Python clean code tip - use singledispatch instead of isinstance
Python clean code tip:
Use
singledispatchinstead ofisinstance.👇
from dataclasses import dataclass
from functools import singledispatch


@dataclass
class UserCanceledSubscription:
    username: str


@dataclass
class UserSubscribed:
    username: str


# with if
def process(event):
    if isinstance(event, UserSubscribed):
        print(f"Enable access to user {event.username}")
    elif isinstance(event, UserCanceledSubscription):
        print(f"Disable access to user {event.username}")


# with singledispatch
@singledispatch
def process(event):
    pass


@process.register(UserCanceledSubscription)
def _(event):
    print(f"Disable access to user {event.username}")


@process.register(UserSubscribed)
def _(event):
    print(f"Enable access to user {event.username}")


events = [
    UserSubscribed(username="johndoe"),
    UserCanceledSubscription(username="johndoe"),
]

for event in events:
    process(event)
Python clean code tip - always use paginated queries
Python clean code tip:
Always use paginated queriesl
Use the "last evaluated record" approach to paginate instead of offset. This way you limit database load per single query.
👇
from sqlalchemy.orm import Session, sessionmaker, declarative_base
from sqlalchemy import create_engine, Column, Integer, String


SQLALCHEMY_DATABASE_URL = "sqlite:///./example.db"

engine = create_engine(
    SQLALCHEMY_DATABASE_URL, connect_args={"check_same_thread": False}
)
SessionLocal = sessionmaker(autocommit=False, autoflush=False, bind=engine)

Base = declarative_base()


class User(Base):
    __tablename__ = "users"

    id = Column(Integer, primary_key=True, index=True)
    email = Column(String, unique=True, index=True)

    def __repr__(self):
        return f"User(id={self.id}, email={self.email})"


class SQLiteUserRepository:
    BATCH_SIZE = 1000

    def __init__(self, database_session):
        self._database_session = database_session

    def add(self, user):
        with self._database_session.begin():
            self._database_session.add(user)

    def list_all(self):
        last_fetched_id = -1
        users = []

        while True:
            users_batch = (
                self._database_session.query(User)
                .filter(User.id > last_fetched_id)
                .order_by(User.id)
                .limit(self.BATCH_SIZE)
                .all()
            )
            users.extend(users_batch)
            if not users_batch:
                break
            last_fetched_id = users_batch[-1].id

        return users


Base.metadata.create_all(bind=engine)
database_session = sessionmaker(engine)()

repository = SQLiteUserRepository(database_session)
repository.add(User(email="[email protected]"))
repository.add(User(email="[email protected]"))

print(repository.list_all())
# [User(id=1, [email protected]), User(id=2, [email protected])]
Flask Message Flashing - get_flashed_messages()
Flask Tip
In Flask, the
get_flashed_messages()method is used to retrieve all the flash messages (from the session).👇
<!-- flash messages -->
{% for message in get_flashed_messages() %}
  <p>{{ message }}</p>
{% endfor %}
Flask - Message Flashing
Flask Tip - Message Flashing
Flash messages are used to provide useful information to the user based on their actions with the app. The
flash()method is used to create a flash message to be displayed in the next request.👇
from flask import request, redirect, url_for, render_template, flash

@stocks_blueprint.route('/add_stock', methods=['GET', 'POST'])
def add_stock():
    if request.method == 'POST':
        # ... save the data ...

        flash(f"Added new stock ({stock_data.stock_symbol})!")  # <-- !!
        return redirect(url_for('stocks.list_stocks'))

    return render_template('stocks/add_stock.html')
Flask Redirect
Flask Tip:
In Flask, the
redirect()function is used to redirect a user to a different URL.
redirect()can greatly improve the navigation through a site by automatically redirecting users to their expected pages.👇
@app.route('/add_stock', methods=['GET', 'POST'])
def add_stock():
    if request.method == 'POST':
        # ... save the data ...

        return redirect(url_for('list_stocks'))  # <-- !!

    return render_template('add_stock.html')
Creating Dynamic URLs in Flask with url_for()
Flask Tip:
In Flask, the
url_for()function can be passed an argument to specify the variable part of a URL.👇
# Flask View Function with Variable Routing (Python)
@stocks_blueprint.route('/stocks/<id>')
def stock_details(id):
    stock = Stock.query.filter_by(id=id).first_or_404()
    return render_template('stocks/stock_details.html', stock=stock)


# Jinja Template (HTML)
<ul>
  {% for stock in stocks %}
    <li>
      <a href="{{ url_for('stocks.stock_details', id=stock.id) }}">{{ stock.stock_symbol }}</a>
    </li>
  {% endfor %}
</ul>
Flask URL Building with url_for()
Flask Tip:
In Flask, the
url_for()function builds the URL for a specific function.
url_for()is really useful in templates to easily include URLs.👇
<header class="site-header">
  <a href="{{ url_for('stocks.index') }}">Flask App</a>
  <nav>
    <ul>
      <li><a href="{{ url_for('users.register') }}">Register</a></li>
      <li><a href="{{ url_for('users.login') }}">Login</a></li>
    </ul>
  </nav>
</header>
Server-side Sessions in Flask with Redis
Flask Tip:
Flask-Session works great with a Redis database!
After configuring the interface to Redis, the
sessionobject can be used (but data is stored on the server!).👇
import redis
from flask import Flask, session, render_template_string
from flask_session import Session


# Create the Flask application
app = Flask(__name__)

# Configure Redis for storing the session data on the server-side
app.config['SESSION_TYPE'] = 'redis'
app.config['SESSION_PERMANENT'] = False
app.config['SESSION_USE_SIGNER'] = True
app.config['SESSION_REDIS'] = redis.from_url('redis://localhost:6379')

# Create and initialize the Flask-Session object AFTER `app` has been configured
server_session = Session(app)

@app.route('/get_email')
def get_email():
    return render_template_string("""<h1>Welcome {{ session['email'] }}!</h1>""")
For more, review Server-side Sessions in Flask with Redis.
How to persist sessions after closing the browser in Flask?
By default, the
sessionobject in Flask remains in place until the browser is closed.However, if you want to change the life of the session object, define the PERMANENT_SESSION_LIFETIME configuration variable after creating the Flask app:
import datetime
app.config['PERMANENT_SESSION_LIFETIME'] = timedelta(minutes=1)
When setting the data in the session, specify that the sessions should be permanent (time will be based on
PERMANENT_SESSION_LIFETIME):# Save the form data to the session object session['email'] = request.form['email_address'] session.permanent = TrueFor more, check out Sessions in Flask.
Python - inline if statement for print
Python tip:
You can write an if-else inside the
def is_adult(age):
    print("Adult" if age > 18 else "Child")

is_adult(17)
# -> Child

is_adult(32)
# -> Adult

age = 10
print("Adult" if age > 18)
# -> SyntaxError: expected 'else' after 'if' expression
How to check if all elements in a Python iterable are True
Python tip:
You can use all() to check if all elements in an iterable are
True:def class_completed(exams): if all(exams): print("You've passed all the exams.") else: print("You didn't pass all of the exams.") student_that_passed = [True, True, True, True] student_that_failed = [True, True, False, True] class_completed(student_that_passed) # -> You've passed all the exams. class_completed(student_that_failed) # -> You didn't pass all of the exams.
How to check if any element in a Python iterable is True
Python tip:
You can use any() to check if any element in iterable is
True:def allow_access(role): allow_access_for_roles = [role == "superuser", role == "owner", role == "supervisor"] if any(allow_access_for_roles): print("Access allowed") else: print("Access denied") allow_access("superuser") # -> Access allowed allow_access("member") # -> Access denied
Python - Truthy and Falsy Values
Python tip:
In Python, individual values can evaluate as either True or False. Values that evaluate to
Trueare "Truthy", and values that evaluate toFalseare "Falsy".By default, an object is considered Truthy, unless its
__bool__()method returnsFalseor__len__()returns0.👇
empty_list = []
empty_touple = ()
empty_dict = {}
empty_set = set()
empty_string = ""
empty_range = range(0)

print(bool(empty_list)) # False

print(bool(empty_touple)) # False

print(bool(empty_dict)) # False

print(bool(empty_set)) # False

print(bool(empty_string)) # False

print(bool(empty_range)) # False

print(bool(0)) # False

print(bool(0.0)) # False

print(bool(0j)) # False

print(bool(None)) # False

print((bool(1))) # True

print((bool(" "))) # True
Python - sum of all counts in collections.Counter
Python tip:
You can compute the sum of all the counts from a
Counterwith total():from collections import Counter pencil_stock = Counter({"Red": 17, "Blue": 5, "Green": 9}) print(pencil_stock.total()) # -> 31
Python - find the most common elements in an iterable
Python tip:
To find the most common elements in an iterable, you can use Counter.most_common.
The counter returns a list of tuples, where each tuple contains the element and the element count.
from collections import Counter

most_common_numbers = Counter([1, 5, 6, 5, 3, 1, 2, 5]).most_common(2)
print(most_common_numbers)
# -> [(5, 3), (1, 2)]

most_common_letters = Counter("abcbadfbcb").most_common(3)
print(most_common_letters)
# -> [('b', 4), ('a', 2), ('c', 2)]
Python - Else conditional statement inside a for loop
Python tip:
If your for loop includes a conditional statement, you can use an else statement in your loop. The else clause is executed if the loop is not terminated with a break statement.
def contains_number_bigger_than_1000(numbers_list):
    for number in numbers_list:
        if number > 1000:
            print("list CONTAINS a number bigger than 1000")
            break
    else:
        print("list DOES NOT contain a number bigger than 1000")


contains_number_bigger_than_1000([1, 200, 50])
# -> list DOES NOT contain a number bigger than 1000

contains_number_bigger_than_1000([1, 200, 5000])
# -> list CONTAINS a number bigger than 1000
Sort your Python module imports automatically with isort
Python tip:
Instead of trying to keep your imports in order by hand, you can use the isort library.
# install isort
$ pip install isort

# sort a specific file
$ isort myfile.py

# sort all Python files, recursively
$ isort .

# see the differences without applying them
$ isort myfile.py --diff

# confirm changes before applying them
$ isort . --interactive

# check if the imports are sorted properly
$ isort . --check
Custom Permissions in Django
Django tip:
You can add custom permissions to a Django model (you still have to enforce it in the views) 👇
from django.db import models

class Post(models.Model):
    title = models.CharField(max_length=400)
    body = models.TextField()
    is_published = models.Boolean(default=False)

    class Meta:
        permissions = [
            (
                "set_published_status",
                "Can set the status of the post to either publish or not"
            )
        ]
For more, check out Permissions in Django.
Check permission inside a Django template
Django tip:
A perms variable is available by default in a Django template, so you can render the content based on the permissions:
{% if perms.store.view_inventory %}
    {{ all_inventory_items }}
{% endif %}
For more, check out Permissions in Django.
Permissions in Django - Enforcing Permissions with permission_required()
Django tip:
To enforce permissions in function-based views, you can use the permission_required decorator 👇
from django.contrib.auth.decorators import permission_required

@permission_required("blog.view_post")
def post_list_view(request):
    return HttpResponse()
For more, check out Permissions in Django.
Permissions in Django - Enforcing Permissions with PermissionRequiredMixin
Django tip:
To enforce permissions in class-based views, you can use the PermissionRequiredMixin from
django.contrib.auth.mixins👇from django.contrib.auth.mixins import PermissionRequiredMixin from django.views.generic import ListView from blog.models import Post class PostListView(PermissionRequiredMixin, ListView): permission_required = "blog.view_post" template_name = "post.html" model = PostFor more, check out Permissions in Django.
Permissions in Django - groups
Django tip:
Instead of handling permissions for a single user, you can use groups and group-level permissions 👇
from django.contrib.auth.models import Group, User, Permission
from django.contrib.contenttypes.models import ContentType


manager_group, created = Group.objects.get_or_create(name="Library manager")
librarian_group, created = Group.objects.get_or_create(name="Librarian")

content_type = ContentType.objects.get_for_model(Book)
book_permission = Permission.objects.filter(content_type=content_type)

"""
print(post_permission)

<QuerySet [
    <Permission: library | book | Can add book>,
    <Permission: library | book | Can change book>,
    <Permission: library | book | Can delete book>,
    <Permission: library | book | Can view book>
]>
"""

for perm in book_permission:
    if perm.codename == "add_book":
        manager_group.permissions.add(perm)
    else:
        manager_group.permissions.add(perm)
        librarian_group.permissions.add(perm)

user = User.objects.get(username="librarian_jane_doe")
user.groups.add(librarian_group)

"""
print(user.has_perm("store.add_book")) => False
print(user.has_perm("library.delete_book")) => True
print(user.has_perm("library.change_book")) => True
print(user.has_perm("store.view_book")) => True
"""
For more, check out Permissions in Django.
Permissions in Django - has_perm()
Django tip:
You can check if a user has permission with the has_perm method:
user = User.objects.create_user(
    username="test",
    password="test",
    email="[email protected]"
)
print(user.has_perm("blog.view_post"))
# => False

superuser = User.objects.create_superuser(
    username="super",
    password="test",
   email="[email protected]"
)
print(superuser.has_perm("blog.view_post"))
# => True
For more, check out Permissions in Django.
Permissions in Django
Django tip:
With django.contrib.auth, Django automatically creates add, change, delete, and view permissions for each Django model. Each permission is named like this:
{app}.{action}_{model_name}You can also see (and set) those permissions in the Django admin.
For more, check out Permissions in Django.
Python - enforcing type hints with mypy
Python tip:
To enforce type hints, you can use mypy, a static type checker for Python.
For example, if we use the
List[float]type hint for the function parameter and then provide a dictionary in a function call:def all_miles_runned(runs: List[float]) -> float: return sum(runs) print(all_miles_runned({1653476791: 5, 1653908791: 7.2, 1654081591: 8.3})) """ with mypy $ pip install mypy $ python -m mypy miles_runned.py miles_runned.py:11: error: Argument 1 to "all_miles_runned" has incompatible type "Dict[int, float]"; expected "List[float]" """
Generate a UUID in Python
Python tip:
With Python's uuid module, you can generate a Universally Unique Identifier. While the module provides four different UUID versions (1, 3, 4, and 5), you'll probably want to use version 4,
uuid4, since it produces a random UUID:import uuid print(uuid.uuid4()) # -> 4388b8ef-caa8-43b5-b7e6-4ef9ab89fe51
Open a web browser with Python's webbrowser module
Python tip:
Python's standard library includes a webbrowser module that allows you to open a web-based document in a browser.
👇
import webbrowser
import tempfile

html_page="""
<html>
<head>
<title>Testdriven.io</title>
</head>
<body>
I'm going to open in a browser.
</body>
</html>
"""

with tempfile.NamedTemporaryFile('w', delete=False, suffix='.html') as f:
    url = 'file://' + f.name
    f.write(html_page)

webbrowser.open(url)
Python HTMLCalendar - formatyearpage()
Python tip:
Did you know you can generate a complete HTML page with a yearly calendar using Python?
import calendar
import tempfile
import webbrowser

cal = calendar.HTMLCalendar()
html_calendar = cal.formatyearpage(2022)


with tempfile.NamedTemporaryFile('w', delete=False, suffix='.html') as f:
    url = 'file://' + f.name
    f.write(html_calendar.decode())

webbrowser.open(url)
Python TextCalendar - formatyear() and pryear()
Python tip:
You can output a calendar year as a multi-line string using Python's
calendarmodule.You need to provide the year, and you can impact how it looks with optional parameters.
You can use formatyear to get the string or pryear to directly print the output.
import calendar

cal = calendar.TextCalendar()
year = cal.formatyear(2022, m=4)

print(year)

# or

cal.pryear(2022, m=4)
Python TextCalendar - formatmonth() and prmonth()
Python tip:
Python's
calendarmodule lets you output a calendar month as a multi-line string. The required parameters are the year and the month.You can use formatmonth to generate the string or prmonth to directly print it.
formatmonth:import calendar cal = calendar.TextCalendar() month = cal.formatmonth(2022, 6) print(month) """ Mo Tu We Th Fr Sa Su 1 2 3 4 5 6 7 8 9 10 11 12 13 14 15 16 17 18 19 20 21 22 23 24 25 26 27 28 29 30 """
prmonth:import calendar cal = calendar.TextCalendar() cal.prmonth(2022, 6) """ June 2022 Mo Tu We Th Fr Sa Su 1 2 3 4 5 6 7 8 9 10 11 12 13 14 15 16 17 18 19 20 21 22 23 24 25 26 27 28 29 30 """
Python - yeardatescalendar()
Python tip:
You can get a list of all months, containing all the dates for a year with the yeardatescalendar method.
You need to provide the date and width as arguments.
The return looks like this:
[list of months[month[week[datetime object]]]]import calendar cal = calendar.Calendar() year = cal.yeardatescalendar(2022, 6) for month in year: print(month) """ Results: [ [ [ datetime.date(2021, 12, 27), datetime.date(2021, 12, 28), datetime.date(2021, 12, 29), datetime.date(2021, 12, 30), datetime.date(2021, 12, 31), datetime.date(2022, 1, 1), datetime.date(2022, 1, 2), ], [ datetime.date(2022, 1, 3), datetime.date(2022, 1, 4), datetime.date(2022, 1, 5), datetime.date(2022, 1, 6), datetime.date(2022, 1, 7), datetime.date(2022, 1, 8), datetime.date(2022, 1, 9), ], ... ], ] """
Python - monthdays2calendar()
Python tip:
To get a list of the weeks in a certain month, INCLUDING weekday numbers, you can use the monthdays2calendar method.
You need to provide the date and month as arguments.
A list of lists, each containing seven tuples of day numbers and weekday numbers, is returned.
import calendar

cal = calendar.Calendar()
weeks = cal.monthdays2calendar(2022, 7)

print(weeks)

"""
Results:

[
    [(0, 0), (0, 1), (0, 2), (0, 3), (1, 4), (2, 5), (3, 6)],
    [(4, 0), (5, 1), (6, 2), (7, 3), (8, 4), (9, 5), (10, 6)],
    [(11, 0), (12, 1), (13, 2), (14, 3), (15, 4), (16, 5), (17, 6)],
    [(18, 0), (19, 1), (20, 2), (21, 3), (22, 4), (23, 5), (24, 6)],
    [(25, 0), (26, 1), (27, 2), (28, 3), (29, 4), (30, 5), (31, 6)],
]
"""
Python - monthdatescalendar()
Python tip:
To get a list of weeks in a certain month, you can use the monthdatescalendar method.
You need to provide the date and month as arguments.
A list of lists, each containing 7
datetime.dateobjects is returned.import calendar cal = calendar.Calendar() weeks = cal.monthdatescalendar(2022, 2) print(weeks) """ Results: [ [ datetime.date(2022, 1, 31), datetime.date(2022, 2, 1), datetime.date(2022, 2, 2), datetime.date(2022, 2, 3), datetime.date(2022, 2, 4), datetime.date(2022, 2, 5), datetime.date(2022, 2, 6), ], [ datetime.date(2022, 2, 7), datetime.date(2022, 2, 8), datetime.date(2022, 2, 9), datetime.date(2022, 2, 10), datetime.date(2022, 2, 11), datetime.date(2022, 2, 12), datetime.date(2022, 2, 13), ], [ datetime.date(2022, 2, 14), datetime.date(2022, 2, 15), datetime.date(2022, 2, 16), datetime.date(2022, 2, 17), datetime.date(2022, 2, 18), datetime.date(2022, 2, 19), datetime.date(2022, 2, 20), ], [ datetime.date(2022, 2, 21), datetime.date(2022, 2, 22), datetime.date(2022, 2, 23), datetime.date(2022, 2, 24), datetime.date(2022, 2, 25), datetime.date(2022, 2, 26), datetime.date(2022, 2, 27), ], [ datetime.date(2022, 2, 28), datetime.date(2022, 3, 1), datetime.date(2022, 3, 2), datetime.date(2022, 3, 3), datetime.date(2022, 3, 4), datetime.date(2022, 3, 5), datetime.date(2022, 3, 6), ], ] """
Python - itermonthdays4()
Python tip:
To get complete dates (including a day in a week) for a certain month, you can use the itermonthdays4 method.
Returned days will be tuples, consisting of a year, a month, a day of the month, and a week day number.
import calendar

cal = calendar.Calendar()
days = cal.itermonthdays4(2022, 2)

for day in days:
    print(day)

"""
Results:

(2022, 1, 31, 0)
(2022, 2, 1, 1)
(2022, 2, 2, 2)
(2022, 2, 3, 3)

...

(2022, 3, 4, 4)
(2022, 3, 5, 5)
(2022, 3, 6, 6)
"""
Python - itermonthdays2()
Python tip:
To get a date and a day in a week for a specific month, you can use the itermonthdays2 method.
Returned days will be tuples, consisting of a day of the month number and a week day number.
Day numbers outside this month are zero.
import calendar

cal = calendar.Calendar()
days = cal.itermonthdays2(2022, 7)

for day in days:
    print(day)

"""
Results:

(0, 0)
(0, 1)
(0, 2)
(0, 3)
(1, 4)
(2, 5)
(3, 6)

...

(29, 4)
(30, 5)
(31, 6)
"""
Python - itermonthdates()
Python tip:
You can get an iterator for a certain month by using the itermonthdates method. You need to provide a year and a month as parameters.
The iterator returns all days before the start / after the end of the month that are required to get a full week.
import calendar

cal = calendar.Calendar()

for day in cal.itermonthdates(2022, 7):
    print(day)

"""
Results:

2022-06-27
2022-06-28
2022-06-29
2022-06-30
2022-07-01
2022-07-02

...

2022-07-30
2022-07-31
"""
How do you "clear" only specific Flask session variables?
In Flask, data stored in the
sessionobject can be deleted by popping a specific element from the object.👇
from flask import session

@app.route('/delete_email')
def delete_email():
    # Clear the email stored in the session object
    session.pop('email', default=None)
    return '<h1>Session deleted!</h1>'
For more, review Sessions in Flask.
Accessing Flask Session Variables in Jinja Templates
In Flask, the
sessionobject can be read (in the same manner as a dictionary) to retrieve data unique to the session. It's conveniently available in Jinja templates as well.👇
from flask import render_template_string


@app.route('/get_email')
def get_email():
    return render_template_string("""
        {% if session['email'] %}
            <h1>Welcome {{ session['email'] }}!</h1>
        {% else %}
            <h1>Welcome! Please enter your email <a href="{{ url_for('set_email') }}">here.</a></h1>
        {% endif %}
    """)
For more, review Sessions in Flask.
Working with Sessions in Flask
In Flask, you can store information specific to a user for the duration of a session using the
sessionobject.Saving data for use throughout a session allows the Flask app to keep data persistent over multiple requests.
👇
from flask import request, session


@app.route('/set_email', methods=['GET', 'POST'])
def set_email():
    if request.method == 'POST':
        # Save the form data to the session object
        session['email'] = request.form['email_address']
        return redirect(url_for('get_email'))

    return """
        <form method="post">
            <label for="email">Enter your email address:</label>
            <input type="email" id="email" name="email_address" required />
            <button type="submit">Submit</button
        </form>
        """
For more, review Sessions in Flask.
Client-side Sessions in Flask
Sessions in Flask can be considered "client-side", as sessions are stored client-side in browser cookies.
Pros:
- Validating and creating sessions is fast (no data storage)
- Easy to scale (no need to replicate session data across web servers)
Cons:
- Sensitive data cannot be stored in session data, as it’s stored on the web browser
- Session data is limited by the size of the cookie (usually 4 KB)
- Sessions cannot be immediately revoked by the Flask app
For more, review Sessions in Flask.
How are sessions implemented in Flask?
In order to store data across multiple requests, Flask utilizes cryptographically-signed cookies (stored on the web browser) to store the data for a session. This cookie is sent with each request to the Flask app on the server-side where it’s decoded.
Since session data is stored in cookies that are cryptographically signed (not encrypted!), sessions should NOT be used for storing any sensitive information. You should never include passwords or personal information in session data.
For more, review Sessions in Flask.
Context local objects in Flask with Werkzueg
Werkzueg provides a library for local data storage (context locals) in "werkzeug.local". Context locals expand on thread-local data in Python to work with threads, processes, or coroutines. Each context accesses the data in a context-safe manner.
👇
import random
import threading
import time
from werkzeug.local import LocalStack


# Create a global LocalStack object for storing data about each thread
thread_data_stack = LocalStack()


def long_running_function(thread_index: int):
    """Simulates a long-running function by using time.sleep()."""

    thread_data_stack.push({'index': thread_index, 'thread_id': threading.get_native_id()})
    print(f'Starting thread #{thread_index}... {thread_data_stack}')

    time.sleep(random.randrange(1, 11))

    print(f'LocalStack contains: {thread_data_stack.top}')
    print(f'Finished thread #{thread_index}!')
    thread_data_stack.pop()


if __name__ == "__main__":
    threads = []

    # Create and start 3 threads that each run long_running_function()
    for index in range(3):
        thread = threading.Thread(target=long_running_function, args=(index,))
        threads.append(thread)
        thread.start()

    # Wait until each thread terminates before the script exits by 'join'ing each thread
    for thread in threads:
        thread.join()

    print('Done!')
Hashing Passwords in Flask with Werkzeug Utils
Werkzueg (a key component of Flask) provides a library for hashing passwords.
👇
from werkzeug.security import generate_password_hash, check_password_hash


class User(database.Model):

    ...

    def is_password_correct(self, password_plaintext: str):
        return check_password_hash(self.password_hashed, password_plaintext)

    def set_password(self, password_plaintext: str):
        self.password_hashed = generate_password_hash(password_plaintext)
What is Werkzeug?
Werkzeug (a key component of Flask) provides a set of utilities for creating a Python application that can talk to a WSGI server (e.g., Gunicorn).
Werkzeug provides the following functionality:
- Request processing
- Response handling
- URL routing
- Middleware
- HTTP utilities
- Exception handling
Example:
from werkzeug.wrappers import Request, Response


class HelloWorldApp(object):
    """Implements a WSGI application."""
    def __init__(self):
        pass

    def dispatch_request(self, request):
        """Dispatches the request."""
        return Response('Hello World!')

    def wsgi_app(self, environ, start_response):
        """WSGI application that processes requests and returns responses."""
        request = Request(environ)
        response = self.dispatch_request(request)
        return response(environ, start_response)

    def __call__(self, environ, start_response):
        """The WSGI server calls this method as the WSGI application."""
        return self.wsgi_app(environ, start_response)


def create_app():
    """Application factory function"""
    app = HelloWorldApp()
    return app


if __name__ == '__main__':
    # Run the Werkzeug development server to serve the WSGI application (HelloWorldApp)
    from werkzeug.serving import run_simple
    app = create_app()
    run_simple('127.0.0.1', 5000, app, use_debugger=True, use_reloader=True)
Template Inheritance in Jinja and Flask
Template inheritance is an amazing feature in Jinja (and Flask)! It allows a base template to define a structure and then child templates to define the details. It's similar to classes in object-oriented design.
👇
<!-- base.html -->
<body>
  <main>
    <!-- child template -->
    {% block content %}
    {% endblock %}
  </main>
</body>


<!-- index.html -->
{% extends "base.html" %}

{% block content %}
<h1>Welcome to the Flask App!</h1>
{% endblock %}
Flask - pass variables to templates
Flask Tip - Jinja Templates
You can pass variables as arguments to
render_template()to use those variables in a template file.👇
# app.py
@app.route('/about')
def about():
    return render_template('about.html', organization='TestDriven.io')


# about.html
<h2>Course developed by {{ organization }}.</h2>
Jinja Templates in Flask
The Jinja templating engine is one of the key building blocks of a Flask application.
With them, you can:
- Use static HTML template files to decouple routes from HTML
- Separate HTML structure from content
- Use programming constructs -- variables, conditionals, and for loops to control shown content -- in your templates
A template file (containing variables and logic) is rendered into an output file (typically HTML).
👇
from flask import render_template

@app.route('/')
def index():
    return render_template('index.html')
Parse URL Parameters in Flask
The request object in Flask stores any parsed URL parameters in
request.args.For example:
http://localhost/users/login?next=%2Fprofile👇
from urllib.parse import urlparse
from flask import request, current_app, abort

@users_blueprint.route('/login')
def login():

    ...

    # Redirect the user to the specified URL after login
    if 'next' in request.args:
        next_url = request.args.get('next')

        # Only accept relative URLs
        if urlparse(next_url).scheme != '' or urlparse(next_url).netloc != '':
            current_app.logger.info(f'Invalid next path in login request: {next_url}')
            return abort(400)

        current_app.logger.info(f'Redirecting after valid login to: {next_url}')
        return '<p>User logged in!</p>'
Be careful to avoid URLs when parsing user inputs:
http://localhost/login?next=http://givemeyourcreditcard.com.
Flask File Uploads
The request object in Flask can be used for handling file uploads via
request.files.👇
import os
from flask import request, current_app
from werkzeug.utils import secure_filename

@journal_blueprint.route('/upload_file', methods=['POST'])
def upload_file():
    if 'file' in request.files:
        file = request.files['file']
        filename = secure_filename(file.filename)
        file.save(os.path.join(current_app.config['UPLOAD_FOLDER'], filename))
        return '<p>File uploaded!</p>'
Flask Request Object - check if the request was made from a secure protocol
The Flask request object can be used to check that a request was made using a secure protocol via
request.is_secure:
- HTTPS - HTTP Secure
- WSS - WebSockets over SSL/TLS
👇
from flask import request, current_app


@journal_blueprint.route('/journal', methods=['GET'])
def get_journal():
    # Only support secure protocols (HTTPS or WSS)
    if request.is_secure:
        current_app.logger.info(f'Journal request using protocol: {request.scheme}')
        return '<p>Journal Entries</p>'
How to get form data in Flask?
In Flask, the request object contains any form data submitted, which can then be processed in a view function.
👇
from flask import request

@journal_blueprint.route('/<int:index>', methods=['PUT'])
def update_journal_entry(index):
    if request.method == 'PUT':
        # Update the journal entry in the database
        ...
        entry.update(request.form['entry_title'],
                     request.form['entry_text'])
Flask Request Object - Sender's IP Address
In Flask, the request object can be used to log the IP address of the sender using request.remote_addr.
👇
@users_blueprint.route('/login')
def login():
    if request.method == 'POST':
        # Log in the user
        current_app.logger.info(
            f'New login request from from IP address: {request.remote_addr}'
        )
        return '<p>User logged in!</p>'

    return '<h2>Login Form</h2>'
Flask Request Object - HTTP method used
In Flask, the request object provides information about the request being processed in the view functions.
For example, the request object provides the HTTP method used.
👇
from flask import request

@users_blueprint.route('/register', methods=['GET', 'POST'])
def register():
    if request.method == 'POST':
        # Validate request
        return '<p>New user registered!</p>'

    return '<h2>Registration Form</h2>'
Flask Application Factory Function
The application factory function for a Flask application initializes the Flask application.
The biggest benefit of this approach is being able to create different versions of the Flask application using the same interface (the application factory).
👇
# ----------------------------
# Application Factory Function
# ----------------------------

def create_app():
    # Create the Flask application
    app = Flask(__name__)

    initialize_extensions(app)
    register_blueprints(app)
    configure_logging(app)
    register_app_callbacks(app)
    register_error_pages(app)
    register_cli_commands(app)
    return app
Flask Custom Error Pages
Flask allows custom error pages for specific status codes, which can provide a better user experience by allowing users to easily navigate back through your application
👇
@app.errorhandler(404)
def page_not_found(e):
    return render_template('404.html'), 404
Flask Abort
The
abort()function in Flask raises an HTTP exception for the given status code. It's helpful for exiting a view function when an error is detected👇
@journal_api_blueprint.route('/<int:index>', methods=['GET'])
def get_journal_entry(index):

    ...

    # Check that the journal entry is associated with the current user
    if entry.user_id != user.id:
        abort(403)

    return entry
Flask URL Variables
Flask supports URL variables with the
routedecorator.
Type Description string (Default) Accepts any text without slashes int Accepts positive integers path Similar to string, but also accepts slashes uuid Accepts UUID strings 👇
@users_blueprint.route('/<int:id>')
def get_user(id):
    return f'<h2>Data for user #{id}</h2>'
Flask Blueprint CLI commands
Flask Tip - Custom CLI Commands
Custom CLI commands in Flask can be added to specific blueprints, not just to the Flask application.
👇
import click
from flask import Blueprint

users_blueprint = Blueprint('users', __name__)

@users_blueprint.cli.command('init_db')
@click.argument('email')
def create(email):
    """Create a new user."""
    ...
    click.echo(f'Added new user (email: {email}!')


# in terminal
$ flask users --help

Commands:
  create  Create a new user.
Flask CLI Commands
Flask Tip - CLI Commands
The
flaskcommand is written using Click. Click can be used to create sub-commands for theflaskcommand.For example, you can create a CLI command for initializing the database:
from click import echo

@app.cli.command('init_db')
def initialize_database():
    """Initialize the SQLite database."""
    database.drop_all()
    database.create_all()
    click.echo('Initialized the SQLite database!')


# in terminal
$ flask init_db
Custom CLI commands are automatically included in the help information:
$ flask --help

Commands:
  init_db  Initialize the SQLite database.
  run      Run a development server.
The Flask-Migrate package is a great example of using custom CLI commands.
Serving Static Files with Flask
Flask Tip - Static Files
Flask automatically creates a static endpoint to serve static files (like HTML templates, CSS stylesheets, JS files, and images).
For example, to serve an image, copy the image into the "static" folder of the Flask project. Create a new route and navigate to http://127.0.0.1:5000/logo.
👇
from flask import current_app

@app.route('/logo')
def flask_logo():
    return current_app.send_static_file('flask-logo.png')
Get a list of all routes defined in a Flask app
Flask Tip - Flask Routes Command
To easily see all the routes defined in a Flask application, use the routes command.
👇
$ flask routes

Endpoint  Methods  Rule
--------  -------  -----------------------
index     GET      /
static    GET      /static/<path:filename>
Adding Automatic Imports to the Flask Shell
Flask Tip:
Additional automatic imports can be added to the Flask shell using shell_context_processor().
👇
# ... After creating the Flask application (`app`) ...
@app.shell_context_processor
def shell_context():
    return {'database': database}


# in terminal
$ flask shell
>>> print(database)
Prototyping with the Flask Shell
Flask Tip - Flask Shell
Prototyping with the Python interpreter is really beneficial with a Flask application too!
Start the Python interpreter with the Flask application loaded to prototype with it.
👇
$ flask shell
>>> print(app.url_map)
>>> print(app.blueprints)
Django REST Framework - writeable nested serializers
DRF tip:
ModelSerializer's
.create()method does not support writable nested fields by default.For the nested serializer to be writable, you'll need to create
create()and/orupdate()methods to explicitly specify how the child relationships should be saved.👇
class PostSerializer(serializers.ModelSerializer):
    class Meta:
        model = Post
        fields = ("title", "content")


class TagSerializer(serializers.ModelSerializer):
    posts = PostSerializer(many=True)

    class Meta:
        model = Tag
        fields = ['name', 'posts']

    def create(self, validated_data):
        posts_data = validated_data.pop('posts')
        tag = Tag.objects.create(**validated_data)

        for post in posts_data:
            Post.objects.create(tag=tag, **post)

        return tag
Django REST Framework - Nested Serializers
DRF tip:
To easily join parent and child objects inside a single response body, you can use a nested serializer.
👇
# serializers:
class PostSerializer(serializers.ModelSerializer):
    class Meta:
        model = Post
        fields = ("title", "content")


class TagSerializer(serializers.ModelSerializer):
    posts = PostSerializer(many=True, read_only=True)

    class Meta:
        model = Tag
        fields = ['name', 'posts']

# result:
{
    "name": "Stories",
    "posts": [
        {
            "title": "My first story",
            "content": "She opened the door and..."
        },
        {
            "title": "Story about a dog",
            "content": "I met Chase when I was..."
        }
    ]
}
For more, review Nested Serializers.
Django REST Framework - HyperlinkedIdentityField
DRF tip:
To include a hyperlink that points to the current object in the serializer, you can use HyperlinkedIdentityField.
HyperlinkedIdentityField extends HyperlinkedRelatedField. Additionally, it makes the field read-only and sets the current object as the source.
👇
# serializer:
class TagSerializer(serializers.ModelSerializer):
    tag_detail = serializers.HyperlinkedIdentityField(view_name='tag-detail')

    class Meta:
        model = Tag
        fields = ['name', 'tag_detail']

# result:
{
    "name": "Stories",
    "tag_detail": "http://127.0.0.1:8000/tags/1/"
}
Django REST Framework - HyperlinkedRelatedField
DRF tip:
According to Roy T. Fielding, RESTful APIs should be driven by hypertext.
To represent the target of the relationship with a hyperlink, you can use HyperlinkedRelatedField in the serializer.
👇
# serializer:
class TagSerializer(serializers.ModelSerializer):
    posts = serializers.HyperlinkedRelatedField(
        many=True, read_only=True, view_name='post-detail'
    )

    class Meta:
        model = Tag
        fields = ['name', 'posts']

# result:
{
    "name": "Stories",
    "posts": [
        "http://127.0.0.1:8000/1/",
        "http://127.0.0.1:8000/2/"
    ]
}
Django REST Framework - SlugRelatedField
DRF tip:
To represent the target of the relationship with one of its fields, you can use SlugRelatedField in the serializer.
👇
# serializer:
class TagSerializer(serializers.ModelSerializer):
    posts = serializers.SlugRelatedField(many=True, read_only=True, slug_field='title')

    class Meta:
        model = Tag
        fields = ['name', 'posts']

# result:
{
    "name": "Stories",
    "posts": [
        "My first story",
        "Story about a dog"
    ]
}
Django REST Framework - PrimaryKeyRelatedField
DRF tip:
To represent the target of the relationship with its primary key, you can use PrimaryKeyRelatedField in the serializer.
👇
# serializer:
class TagSerializer(serializers.ModelSerializer):
    posts = serializers.PrimaryKeyRelatedField(many=True, read_only=True)

    class Meta:
        model = Tag
        fields = ['name', 'posts']

# result:
{
    "name": "Stories",
    "posts": [
        1,
        2
    ]
}
Django REST Framework - StringRelatedField
DRF tip:
To represent the target of the relationship with its
__str__method, you can use StringRelatedField in the serializer. 👇# model: class Post(models.Model): # ... def __str__(self): return f"{self.date_published} - {self.title}" # serializer: class TagSerializer(serializers.ModelSerializer): posts = serializers.StringRelatedField(many=True) class Meta: model = Tag fields = ['name', 'posts'] # result: { "name": "Stories", "posts": [ "2022-01-09 - My first story", "2022-04-09 - Story about a dog" ] }
Related Fields in Django REST Framework
DRF tip:
To represent model relationships in a serializer, you can use various related fields that represent the target of the relationship in different ways:
- StringRelatedField
- PrimaryKeyRelatedField
- HyperlinkedRelatedField
- SlugRelatedField
- HyperlinkedIdentityField
Examples:
class TagSerializer(serializers.ModelSerializer):

    posts = serializers.StringRelatedField(many=True)
    # result: "My story" (from __str__ method)


    posts = serializers.PrimaryKeyRelatedField(many=True, read_only=True)
    # result: 1


    posts = serializers.HyperlinkedRelatedField(
        many=True,
        read_only=True,
        view_name='post-detail'
    )
    # result: "http://127.0.0.1:8000/1/"


    posts = serializers.SlugRelatedField(
        many=True,
        read_only=True,
        slug_field='title'
     )
    # result: "My story" (from title field)


    tag_detail = serializers.HyperlinkedIdentityField(view_name='tag-detail')
    # result: "http://127.0.0.1:8000/tags/1/"
    # *HyperlinkedIdentityField is used for current object, not related objects
For more, review Serializer relations.
Django REST Framework - how to disable the Browsable API in production
DRF tip:
If you want to use the Browsable API in development but not in production, you can set
DEFAULT_RENDERER_CLASSESin settings conditionally, like so:if not DEBUG: REST_FRAMEWORK["DEFAULT_RENDERER_CLASSES"] = ( "rest_framework.renderers.JSONRenderer", )
Django - using Q objects for complex queries
Django tip:
If you need to execute more complex queries, you can use Q objects -- objects used to encapsulate a collection of keyword arguments.
Q objects can be combined using the
&and|operators.For example:
Inventory.objects.filter(
    Q(quantity__lt=10) &
    Q(next_shipping__gt=datetime.datetime.today()+datetime.timedelta(days=10))
)
Django Messages - message levels
Django tip:
By default, the lowest recorded message level, from Django's messages framework, is 20 (INFO).
That means that all message levels but DEBUG (with value 10) are displayed.
You can change the default MESSAGE_LEVEL to a higher or lower level in the settings:
# settings.py
from django.contrib.messages import constants as messages

# all message levels will be displayed:
MESSAGE_LEVEL = messages.DEBUG

# only messages with level WARNING and ERROR will be displayed:
MESSAGE_LEVEL = messages.WARNING
Django Messages - message tags for CSS classes
Django tip:
You can change Django message tags so they correspond to the CSS class you want to use for displaying the flash message.
This makes it easy to combine Django messages with a CSS framework (e.g., Bootstrap).
For example, this is how you can use Bootstrap with Django messages:
# settings.py
from django.contrib.messages import constants as messages

MESSAGE_TAGS = {
        messages.DEBUG: 'alert-secondary',
        messages.INFO: 'alert-info',
        messages.SUCCESS: 'alert-success',
        messages.WARNING: 'alert-warning',
        messages.ERROR: 'alert-danger',
}

# template
{% for message in messages %}
    <div class="alert {{ message.tags }}" role="alert">
        {{ message }}
    </div>
{% endfor %}
Django Messages - message levels
Django tip:
There are five message levels in Django's message framework that correspond to the same tags from Python's logging module (in lowercase):
- DEBUG
- INFO
- SUCCESS
- WARNING
- ERROR
messages.debug(request, "I'm debugging.")
messages.info(request, "I'm informing.")
messages.success(request, "You were successful.")
messages.warning(request, "This is a warning.")
messages.error(request, "This is an error.")
You can set a minimum message level that will be recorded (default is INFO).
Django Messages Example
Django tip:
For displaying a one-time notification message, you can use Django's built-in messages framework.
(The default settings.py file created with
startprojectcontains all the required settings.)For example, your view and template file would look something like this:
# views.py

def contact(request):
    if request.method == "POST":
        form = ContactForm(request.POST)

        if form.is_valid():
            form.save()

            messages.success(request, "Your message was sent.") # message

            return redirect("cart")

    form = ContactForm(request.POST)
    return render(request, "contact.html", {"form": form})


# contact.html

# ...
{% if messages %}
<ul class="messages">
    {% for message in messages %}
        <div {% if message.tags %} class="{{ message.tags }}"{% endif %}>
            {{ message }}
        </div>
    {% endfor %}
</ul>
{% endif %}
# ...
Django Signals - m2m_changed()
Django tip:
To send a Django signal when a
ManyToManyFieldis changed on a model instance, you can use the m2m_changed signal.For example, this signal is sent if an item is added to the cart:
@receiver(m2m_changed, sender=Cart.items.through)
def cart_update_total_when_item_added(sender, instance, action, *args, **kwargs):
    if action == 'post_add':
        total = Decimal(0.00)

        for item in instance.items.all():
            total += item.price

        instance.total = total
        instance.save()
Django Signals - post_delete()
Django tip:
To notify another part of the application after the delete event of an object happens, you can use the post_delete signal.
For example:
from django.db.models.signals import post_delete
from django.dispatch import receiver


@receiver(post_delete, sender=Order)
def add_to_inventory(sender, instance, **kwargs):
    inventory_item = Inventory.objects.get(id=instance.inventory_item.id)
    inventory_item.quantity = inventory_item.quantity + instance.quantity

    inventory_item.save()
Django Signals - pre_delete()
Django tip:
To notify another part of the application before the delete event of an object happens, you can use the pre_delete signal.
For example:
from django.db.models.signals import pre_delete
from django.dispatch import receiver


@receiver(pre_delete, sender=Inventory)
def allow_inventory_delete_if_no_order(sender, instance, **kwargs):
    if Order.objects.filter(inventory_item=instance.id).count() > 0:
        raise Exception("There are orders for this item.")
Django Signals - post_save()
Django tip:
To impact a different part of your application after the object is saved to the database, you can use a post_save signal.
For example:
from django.db.models.signals import post_save
from django.dispatch import receiver


@receiver(post_save, sender=Order)
def remove_from_inventory(sender, instance, **kwargs):
    inventory_item = Inventory.objects.get(id=instance.inventory_item.id)
    inventory_item.quantity = inventory_item.quantity - instance.quantity

    inventory_item.save()
Django Signals - pre_save()
Django tip:
To execute some code dealing with another part of your application before the object gets saved to the database, you have to use a pre_save signal.
That way, the signal is sent at the beginning of a model's
save()method.For example:
from django.db.models.signals import pre_save
from django.dispatch import receiver


@receiver(pre_save, sender=Order)
def valid_order(sender, instance, **kwargs):
    inventory_item = Inventory.objects.get(id=instance.inventory_item.id)

    if instance.quantity > inventory_item.quantity:
        raise Exception("There are not enough items in the inventory.")
Django Signals Example
Django tip:
If you need a decoupled application to get notified when actions occur elsewhere in the framework, you can use a Django signal.
For example:
from django.db.models.signals import post_save
from django.dispatch import receiver


@receiver(post_save, sender=Book)
def last_reading_from_reading_list(sender, instance, **kwargs):
    ReadingList.objects.get(id=instance.reading_list.id).save(
        update_fields=["last_reading_at"]
    )
Django REST Framework Serializers - to_internal_value()
DRF tip:
If your API receives unnecessary data, you can override
to_internal_value()to extract the resource data.For example:
class ResourceSerializer(serializers.ModelSerializer):
    # ...

    def to_internal_value(self, data):
        resource_data = data['resource']

        return super().to_internal_value(resource_data)
For more, review Custom Outputs.
Django REST Framework Serializers - to_representation()
DRF tip:
If you want to change the output of the serializer, you can override the
to_representationfunction of the serializer.For example:
class MovieSerializer(serializers.ModelSerializer):
    class Meta:
        model = Movie
        fields = '__all__'

    def to_representation(self, instance):
        representation = super().to_representation(instance)
        representation['likes'] = instance.liked_by.count()

        return representation
For more, review Custom Outputs.
Django REST Framework Serializers - function validators
DRF tip:
If you need the same validation in multiple serializers, you can create a function validator instead of repeating the code.
For example:
# function validator:
def is_rating(value):
    if value < 1:
        raise serializers.ValidationError('Value cannot be lower than 1.')
    elif value > 10:
        raise serializers.ValidationError('Value cannot be higher than 10')


# function validator used in a serializer
class MovieSerializer(serializers.ModelSerializer):
    rating = IntegerField(validators=[is_rating])
For more, review Custom Data Validation.
Django REST Framework Serializers - object-level validation
DRF tip:
You can use object-level validation to validate fields in comparison to one another.
For example:
class MovieSerializer(serializers.ModelSerializer):
    class Meta:
        model = Movie
        fields = '__all__'

    def validate(self, data):
        if data['us_gross'] > data['worldwide_gross']:
            raise serializers.ValidationError(
                'us_gross cannot be bigger than worldwide_gross'
            )
        return data
For more, review Custom Data Validation.
Django REST Framework Serializers - custom field validation
DRF tip:
You can add custom field validation to your serializer.
The validation method needs to be named like so:
validate_<field_name>.For example:
class PersonSerializer(serializers.ModelSerializer):
    class Meta:
        model = Person
        fields = ['name', 'age']

    def validate_age(self, value):
        if value < 18:
            raise serializers.ValidationError('The person has to be at least 18 years old.')
        return value
For more, review Custom Data Validation.
Django REST Framework - RetrieveUpdateDestroyAPIView
DRF tip:
RetrieveUpdateDestroyAPIView is used for read-update-delete single instance endpoints. It accepts GET, PUT, PATCH, and DELETE requests. It combines RetrieveModelMixin, UpdateModelMixin, and DestroyModelMixin.
class PostDetail(generics.RetrieveUpdateDestroyAPIView):
    serializer_class = PostSerializer
    queryset = Post.objects.all()
For more, review Concrete Views.
Django REST Framework - RetrieveDestroyAPIView
DRF tip:
RetrieveDestroyAPIView is used for read-delete single instance endpoints. It accepts GET and DELETE requests. It combines RetrieveModelMixin and DestroyModelMixin.
class RetrieveDeletePost(generics.RetrieveDestroyAPIView):
    serializer_class = PostSerializer
    queryset = Post.objects.all()
For more, review Concrete Views.
Django REST Framework - RetrieveUpdateAPIView
DRF tip:
RetrieveUpdateAPIView is used for read-update single instance endpoints. It accepts GET, PUT, and PATCH requests. It combines RetrieveModelMixin and UpdateModelMixin.
class RetrieveUpdatePost(generics.RetrieveUpdateAPIView):
    serializer_class = PostSerializer
    queryset = Post.objects.all()
For more, review Concrete Views.
Django REST Framework - ListCreateAPIView
DRF tip:
ListCreateAPIView is used for read-write collection endpoints. It accepts GET and POST requests. It combines CreateModelMixin and ListModelMixin.
class ListAddPost(generics.ListCreateAPIView):
    serializer_class = PostSerializer
    queryset = Post.objects.all()
For more, review Concrete Views.
Django REST Framework - UpdateAPIView
DRF tip:
UpdateAPIView is used for update-only single instance endpoints and accepts PUT and PATCH requests. It extends UpdateModelMixin.
class UpdatePost(generics.UpdateAPIView):
    serializer_class = PostSerializer
    queryset = Post.objects.all()
For more, review Concrete Views.
Django REST Framework - DestroyAPIView
DRF tip:
DestroyAPIView is used for delete-only single instance endpoints and only accepts DELETE requests. It extends DestroyModelMixin.
class DeletePost(generics.DestroyAPIView):
    serializer_class = PostSerializer
    queryset = Post.objects.all()
For more, review Concrete Views.
Django REST Framework - RetrieveAPIView
DRF tip:
RetrieveAPIView is similar to the ListAPIView -- it's used for read-only endpoints and only accepts GET requests, but it returns a single instance instead of a list. It extends RetrieveModelMixin.
class PostDetail(generics.RetrieveAPIView):
    serializer_class = PostSerializer
    queryset = Post.objects.all()
For more, review Concrete Views.
Django REST Framework - ListAPIView
DRF tip:
ListAPIView is used for read-only list endpoints and only accepts GET requests. It extends ListModelMixin.
class ListPost(generics.ListAPIView):
    serializer_class = PostSerializer
    queryset = Post.objects.all()
For more, review Concrete Views.
Django REST Framework - CreateAPIView
DRF tip:
CreateAPIView is used for create-only endpoints and only accepts POST requests. It extends CreateModelMixin.
class CreatePost(generics.CreateAPIView):
    serializer_class = PostSerializer
    queryset = Post.objects.all()
For more, review Concrete Views.
Django REST Framework Views - Generic Views
DRF tip:
All concrete generic views are a combination of the GenericAPIView and one or multiple mixins.
GenericAPIView provides methods like
get_object/get_querysetandget_serializer, whereas mixins provide create/retrieve/update/delete actions.For more, check out Django REST Framework Views - Generic Views.
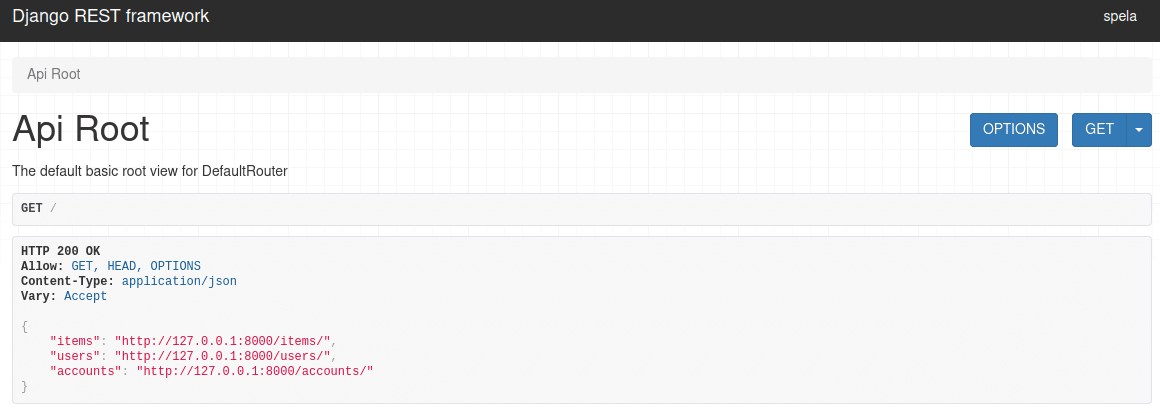
Django REST Framework - DefaultRouter API Root
Django REST Framework tip:
If you're using DefaultRouter, the API root will automatically be included.
The API root is an endpoint that returns a response containing hyperlinks to all the list views.
(Unlike
DefaultRouter,SimpleRouterdoesn't include the API root.)
ViewSet Actions in Django REST Framework
Django REST Framework tip:
If you're using
ModelViewSetand want to create a custom endpoint, you can add it to the ViewSet as a function decorated with the @action decorator.class PostModelViewSet(ModelViewSet): serializer_class = PostSerializer queryset = Post.objects.all() @action(detail=False, methods=['get']) def unpublished_posts(self, request): unpublished = Post.objects.filter(published=False) serializer = PostSerializer(unpublished, many=True) return Response(serializer.data) # available at: http://127.0.0.1:8000/unpublished_posts/