 Patrick Kennedy
This article explores how the Application and Request contexts work in Flask.
This is part two of a two-part series on Flask Contexts:
- Basics: Understanding the Application and Request Contexts in Flask
- Advanced: Deep Dive into Flask's Application and Request Contexts (this article!)
While you don't have to start with the first article, it's recommended to at least review it to provide a bit of context for this article.
Contents
Objectives
By the end of this article, you should be able to explain:
- What a context is
- Which data is stored in both the Application and Request contexts
- The steps required for processing the Application and Request contexts when a request is handled in Flask
- How proxies to the Application and Request context are used
- How to utilize the
current_appandrequestproxies in view functions - What a context-local is
What is a Context?
In order to execute the code that you write, it needs data to process. This data could be configuration data, input data, data from the database, and so on.
Contexts are used to keep track of the data that your code needs to execute.
In Flask, contexts are used to provide the necessary data to process requests and command-line interface (CLI) commands.
While this article focuses on processing requests, the concepts presented also apply to CLI commands.
Request Processing
Let's start with how a request is processed from a high-level:
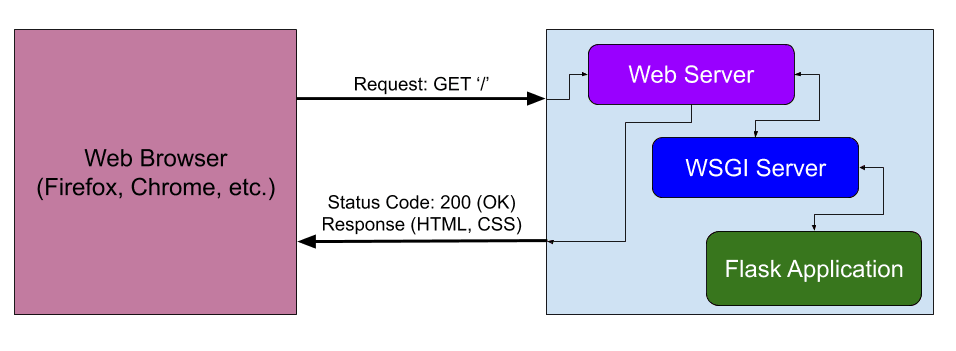
So, a request is sent from the browser to the web server (like Nginx or Apache) to request a specific URL ('/' URL in the above diagram). The web server then routes this request to a WSGI server for processing.
WSGI, which stands for Web Server Gateway Interface, is an interface between a web server and a Python-based web application. It's required since a web server cannot talk directly to a Python application. For more, review WSGI.
The WSGI server tells the Flask app to process the request.
The Flask app generates a response, which is sent back to the WSGI server and back to the web server and, ultimately, back to the web browser.
These steps describe the request-response cycle, which is a key function of how a request is processed via a web server, WSGI application server, and a web application.
Contexts in Flask
When a request is received, Flask provides two contexts:
| Context | Description | Available Objects |
|---|---|---|
| Application | Keeps track of the application-level data (configuration variables, logger, database connection) | current_app, g |
| Request | Keeps track of the request-level data (URL, HTTP method, headers, request data, session info) | request, session |
It's worth noting that each of the above objects are often referred to as "proxies". This just means that they are proxies to global flavors of the objects. We'll dive more into this shortly.
Flask handles the creation of these contexts when a request is received. They can cause confusion as you don't always have access to a particular object depending on which state your application is in.
Overview Diagram
The following diagram illustrates how contexts are processed when a request is handled:

There's a lot going on in this diagram, so we'll walk through each step in detail.
Step 1 - Web and WSGI Servers
Everything starts when a request is received by the web server:
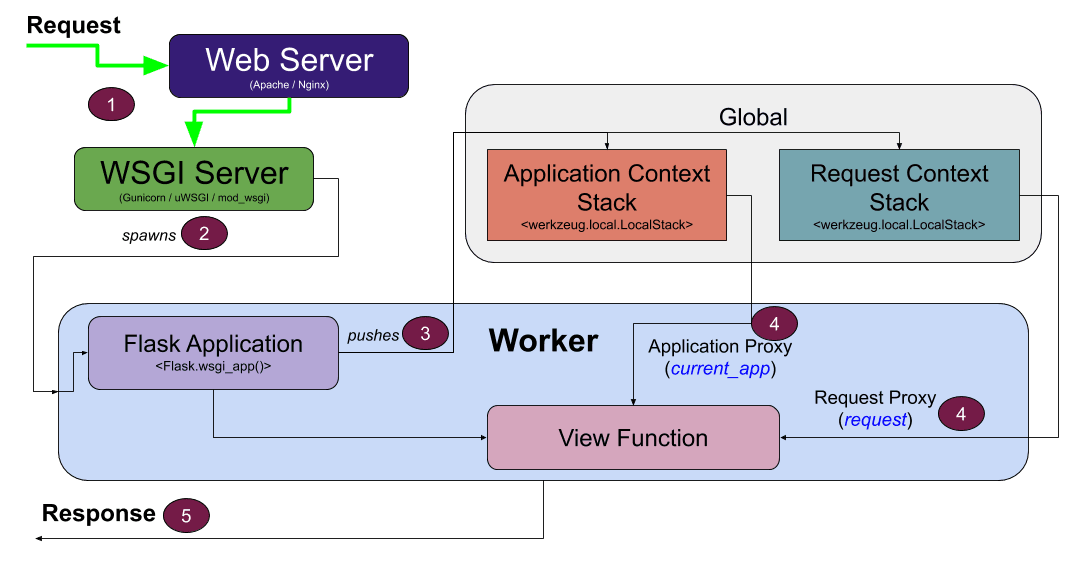
The job of the web server is to route incoming HTTP requests to a WSGI server.
Apache and Nginx are two common web servers while Gunicorn, uWSGI, and mod_wsgi are popular WSGI servers.
It's worth noting that while the Flask Development Server is a WSGI server, it's not meant to be used in production.
Step 2 - Worker
In order to process the request, the WSGI server spawns a worker to handle the request:
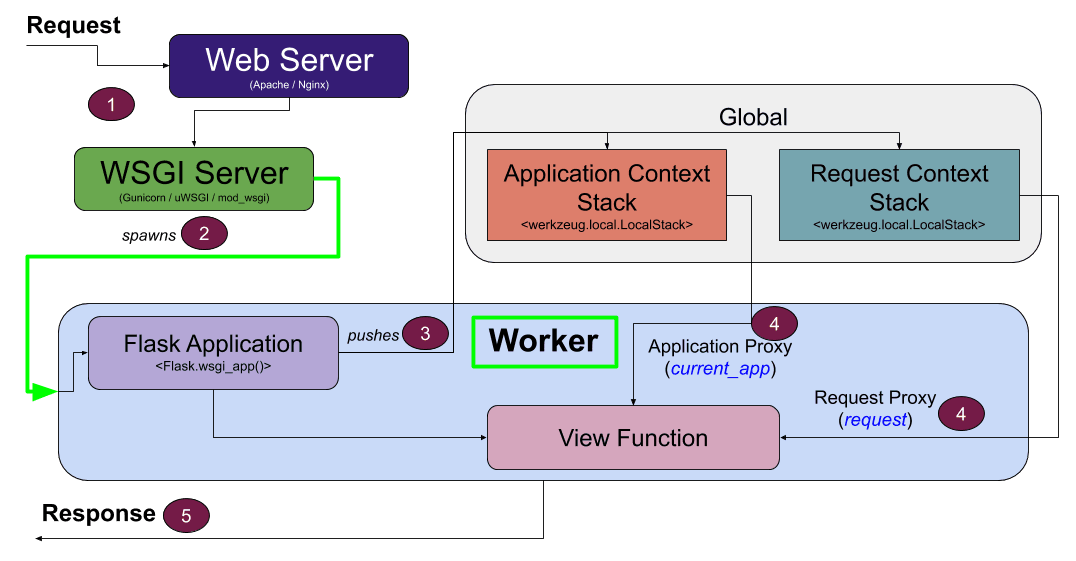
The worker can be a thread, process, or coroutine. For example, the workers would be threads if you're using the Flask Development Server with its default configuration.
If you're interested in learning more about the differences between threads, multiprocessing, and async in Python, check out the Speeding Up Python with Concurrency, Parallelism, and asyncio article and the Concurrency in Python video.
For this explanation, the worker type is not important; the key point about the worker is that it handles one request at a time (hence the need for more than one worker).
Step 3 - Contexts
Once execution switches to the Flask app, Flask creates the Application and Request contexts and pushes them onto their respective stacks:
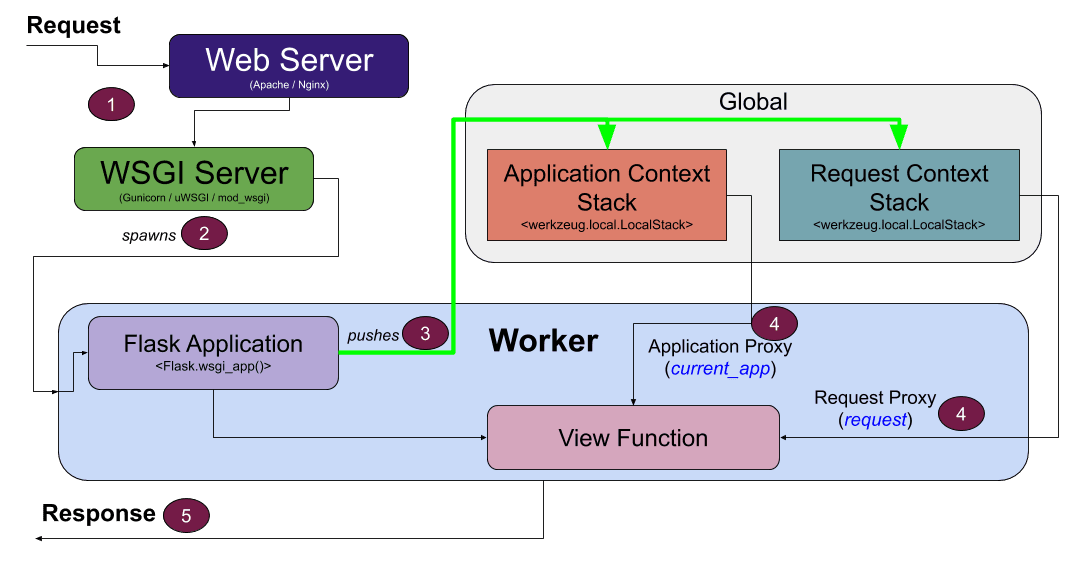
To review, the Application context stores application-level data, such as the configuration variables, database connection, and logger. The Request context, meanwhile, stores the request-specific data that needs to be processed in order to generate a response.
In may be surprising to see, but both stacks are implemented as global objects (this will become clearer in the next section).
Step 4 - Proxies
Now that the Flask app is ready to process the data (in the view function) and the data is ready in the Application and Request context stacks, we need a way to connect these two pieces... proxies to the rescue!
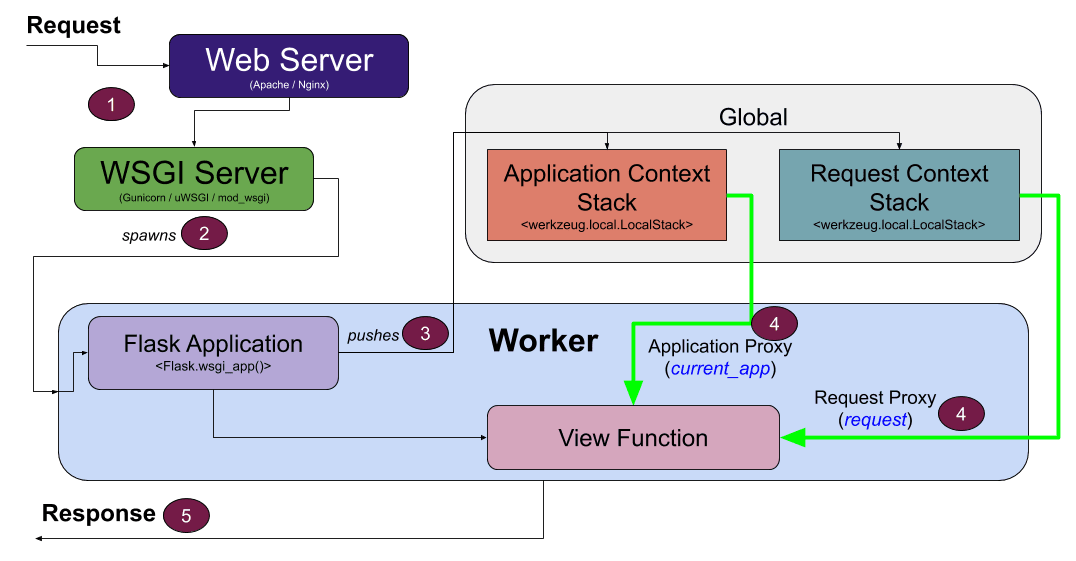
Proxies are used by the view functions to access the Application (stored in the Application context stack) and Request contexts (stored in the Request context stack):
current_app- proxy to the Application context for the workerrequest- proxy to the Request context for the worker
At first glance, this sequence may seem confusing, as the view function appears to be accessing global objects (Application and Request context stacks) via the proxies. If this were the case, this operation would be problematic, as it's not thread-safe. You may also be thinking that these stacks (as global objects) could be accessed by any worker, which would be a security concern.
However, this design is one of the great features of Flask... the stacks are implemented as context-local objects.
For more on Proxies, review Notes On Proxies from the Flask docs and the Proxy pattern article.
Context Locals
Python has a concept of thread-local data for storing data that is specific to a thread, which is both "thread-safe and thread-unique". In other words, each thread will be able to access the data in a thread-safe manner and the data is always unique to the specific thread.
Flask implements a similar behavior (context-locals), but in a more generic way to allow for workers to be threads, processes, or coroutines.
Context-locals are actually implemented in Werkzeug, which is one of the key packages that comprises Flask. For simplicity, we'll be referencing Flask when discussing context-locals.
When data is stored in a context-local object, the data is stored in a way that only one worker can retrieve back. Therefore, if two separate workers access a context-local object, they'll each get back their own specific data that's unique to each worker.
An example using a context-local object will be presented in the next section.
To summarize, the current_app and request proxies are available in each view function and they are used to access the contexts from their respective stacks, which are stored as context-local objects.
The use of 'stack' in the context of the Application and Request context stacks makes this concept even more confusing than it already is. These 'stacks' are typically not storing more than a single context.
The data structure used is a stack as there are very advanced scenarios (for example, internal redirects) that require greater than one element.
Benefit of Proxies in Flask
If you were to create your own web framework from scratch, you might consider passing in the Application and Request contexts into each view function like so:
@app.route('/add_item', methods=['GET', 'POST'])
def add_item(application_context, request_context):  # contexts passed in!
   if request_context.method == 'POST':
       # Save the form data to the database
       ...
       application_context.logger.info(f"Added new item ({ request_context.form['item_name'] })!")
       ...
In fact, a number of web frameworks work like this (including Django).
However, Flask provides the current_app and request proxies which end up looking like global variables to a view function:
from flask import current_app, request

@app.route('/add_item', methods=['GET', 'POST'])
def add_item():
   if request.method == 'POST':
       # Save the form data to the database
       ...
       current_app.logger.info(f"Added new item ({ request.form['item_name'] })!")
       ...
By using this approach, the view function does not need the contexts passed in as arguments; this approach makes for a simplified view function definition. It can cause confusion though as you don't always have access to the current_app and request proxies, depending on which state your application is in.
REMINDER: The
current_appandrequestproxies are not actually global variables; they point to global objects that are implemented as context-locals, so the proxies are always unique to each worker.
Step 5 - Clean Up
After the response is generated, the Request and Application contexts are popped from their respective stacks:
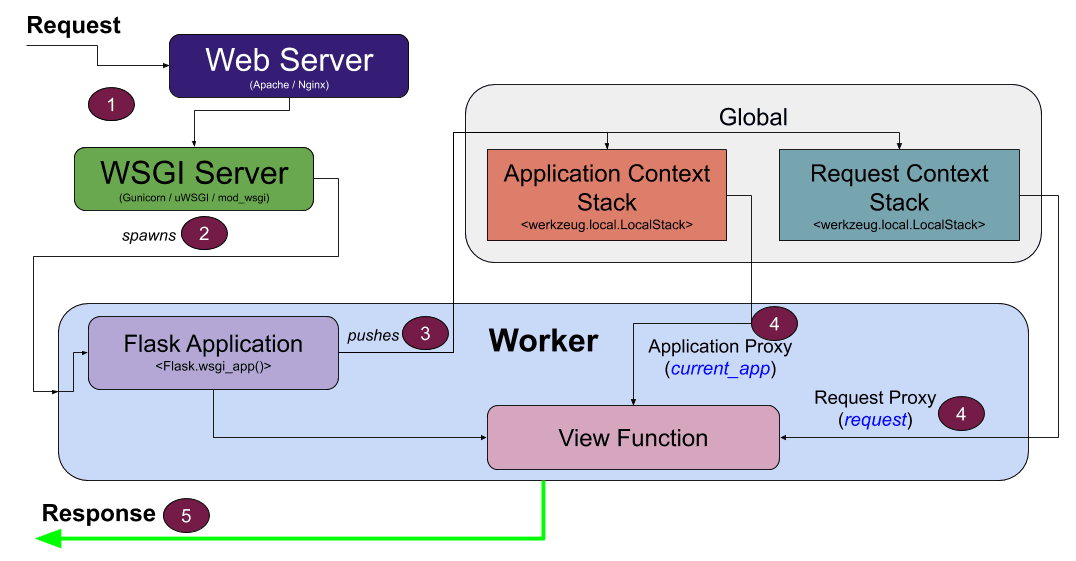
This step cleans up the stacks.
The response is then sent back to the web browser, which completes the handling of this request.
Context-Locals
Context-local objects are implemented using Local objects, which can be created like so:
$ python

>>> from werkzeug.local import Local
>>> data = Local()
>>> data.user = '[email protected]'
Each context (i.e., the 'workers' discussed in the previous section) can access a Local object for context-unique data storage. The data accessed is unique to the context and can only be accessed by that context.
LocalStack objects are similar to Local objects, but keep a stack of objects to allow push() and pop() operations.
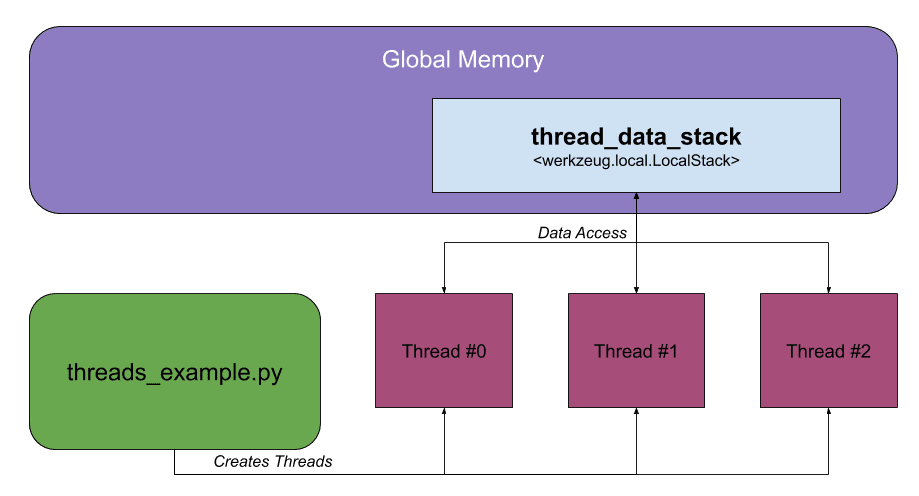
In the previous section, we learned how the Application Context Stack and Request Context Stack are utilized when a request is processed in Flask. These stacks are implemented as LocalStack objects in global memory in Flask.
To help solidify how context-locals work, let's walk through an example by creating a LocalStack object in global memory and then having three separate threads access it:
Here's the full script for this example:
"""
Example script to illustrate how a global `LocalStack` object can be used
when working with multiple threads.
"""
import random
import threading
import time

from werkzeug.local import LocalStack

# Create a global LocalStack object for storing data about each thread
thread_data_stack = LocalStack()


def long_running_function(thread_index: int):
    """Simulates a long-running function by using time.sleep()."""

    thread_data_stack.push({'index': thread_index, 'thread_id': threading.get_native_id()})
    print(f'Starting thread #{thread_index}... {thread_data_stack}')

    time.sleep(random.randrange(1, 11))

    print(f'LocalStack contains: {thread_data_stack.top}')
    print(f'Finished thread #{thread_index}!')
    thread_data_stack.pop()


if __name__ == "__main__":
    threads = []

    # Create and start 3 threads that each run long_running_function()
    for index in range(3):
        thread = threading.Thread(target=long_running_function, args=(index,))
        threads.append(thread)
        thread.start()

    # Wait until each thread terminates before the script exits by
    # 'join'ing each thread
    for thread in threads:
        thread.join()

    print('Done!')
This file creates a LocalStack object (thread_data_stack) for storing data from each of the threads that will be created.
thread_data_stackmimics the Application Context Stack or Request Context Stack in Flask.
The long_running_function is run in each of the threads:
def long_running_function(thread_index: int):
    """Simulates a long-running function by using time.sleep()."""

    thread_data_stack.push({'index': thread_index, 'thread_id': threading.get_native_id()})
    print(f'Starting thread #{thread_index}... {thread_data_stack}')

    time.sleep(random.randrange(1, 11))

    print(f'LocalStack contains: {thread_data_stack.top}')
    print(f'Finished thread #{thread_index}!')
    thread_data_stack.pop()
This function pushes data about the thread to the thread_data_stack object in global memory:
thread_data_stack.push({'index': thread_index, 'thread_id': threading.get_native_id()})
This operation mimics the Application or Request context being pushed to their respective stack.
After the time.sleep() function completes, the data from the thread_data_stack is accessed:
print(f'LocalStack contains: {thread_data_stack.top}')
This operation mimics using the
app_contextandrequestproxies, as these proxies access the data on the top of their respective stack.
At the end of the function, the data is popped from the thread_data_stack:
thread_data_stack.pop()
This operation mimics popping the Application or Request context from their respective stack.
When the script is run, it will start 3 threads:
# Create and start 3 threads that each run long_running_function()
for index in range(3):
    thread = threading.Thread(target=long_running_function, args=(index,))
    threads.append(thread)
    thread.start()
And join each thread so the script waits until each thread completes executing:
# Wait until each thread terminates before the script exits by
# 'join'ing each thread
for thread in threads:
    thread.join()
Let's run this script to see what happens:
$ python app.py

Starting thread #0... <werkzeug.local.LocalStack object at 0x109cebc40>
Starting thread #1... <werkzeug.local.LocalStack object at 0x109cebc40>
Starting thread #2... <werkzeug.local.LocalStack object at 0x109cebc40>
LocalStack contains: {'index': 0, 'thread_id': 320270}
Finished thread #0!
LocalStack contains: {'index': 1, 'thread_id': 320271}
Finished thread #1!
LocalStack contains: {'index': 2, 'thread_id': 320272}
Finished thread #2!
Done!
What's really interesting about each thread is that they all point to the same LocalStack object in memory:
Starting thread #0... <werkzeug.local.LocalStack object at 0x109cebc40>
Starting thread #1... <werkzeug.local.LocalStack object at 0x109cebc40>
Starting thread #2... <werkzeug.local.LocalStack object at 0x109cebc40>
When each thread accesses thread_data_stack, the access is unique to that thread! That's the magic of LocalStack (and Local) -- they allow context-unique access:
LocalStack contains: {'index': 0, 'thread_id': 320270}
LocalStack contains: {'index': 1, 'thread_id': 320271}
LocalStack contains: {'index': 2, 'thread_id': 320272}
The access to
thread_data_stackis also thread-safe, unlike typical global memory access.
Conclusion
One of the powerful (yet confusing) aspects of Flask is how the Application and Request contexts are handled. Hopefully this article provided some clarity on this topic!
The Application and Request contexts provide the necessary data when processing requests or CLI commands. Make sure to use the current_app and request proxies to access the Application context and Request context.
Want to learn more? Check out the following video from FlaskCon 2020:
- Demystifying Flask's Application and Request Contexts with pytest video from FlaskCon 2020
If you're interested in learning more about Flask, check out my course on how to build, test, and deploy a Flask application: