 Patrick Kennedy
This article looks at how server-side sessions can be utilized in Flask with Flask-Session and Redis.
This article is part of a two-part series on how sessions can be used in Flask:
- Client-side: Sessions in Flask
- Server-side: Server-side Sessions in Flask with Redis (this article!)
This article assumes that you have prior experience with Flask. If you're interested in learning more about Flask, check out my course on how to build, test, and deploy a Flask application:
Contents
Sessions
Since HTTP is a stateless protocol, each request has no knowledge of any requests previously executed:
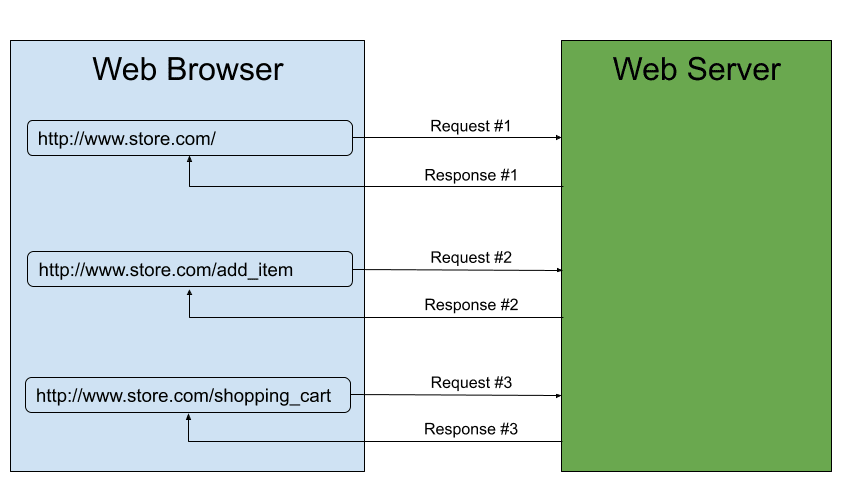
While this greatly simplifies client/server communication, web apps typically need a way to store data between each request as a user interacts with the app itself.
For example, on an e-commerce website, you'd typically store items that a user has added to their shopping cart to a database so that once they're done shopping they can view their cart to purchase the items. This workflow, of storing items in the database, only works for authenticated users, though. So, you need a way to store user-specific data for non-authenticated users between requests.
That's where sessions come into play.
A session is used to store information related to a user, across different requests, as they interact with a web app. So, in the above example, the shopping cart items would be added to a user's session.
The data stored for a session should be considered temporary data, as the session will eventually expire. In order to permanently store data, you need to utilize a database.
Computer storage is a nice analogy here: Temporary items on a computer are stored in RAM (Random Access Memory), much like sessions, while permanent items are stored on the hard drive, much like databases.
Examples of data to store in a session:
- Items in a user's shopping cart
- Whether the user is logged in or not
- Preferences (language, currency, dark vs. light mode)
Examples of data to store in a database:
- User credentials (email, username, hashed password, email confirmed boolean)
- Data entered by the user (stock data, recipes, blog posts)
In Flask, you can store information specific to a user for the duration of a session. Saving data for use throughout a session allows the web app to keep data persistent over multiple requests -- i.e., as a user accesses different pages within a web app.
Sessions in Flask
There are two types of sessions commonly used in web development:
- Client-side - sessions are stored client-side in browser cookies
- Server-side - sessions are stored server-side (typically a session identifier is then created and stored client-side in browser cookies)
Flask uses the client-side approach as the built-in solution to sessions.
Curious about client-side sessions? Review the Sessions in Flask article.
Server-side Sessions
Server-side sessions store the data associated with the session on the server in a particular data storage solution. A cryptographically-signed cookie is included in each response from Flask for specifying a session identifier. This cookie is returned in the next request to the Flask app, which is then used to load the session data from the server-side storage.
Pros:
- Sensitive data is stored on the server, not in the web browser
- You can store as much session data as you want without worrying about the cookie size
- Sessions can easily be terminated by the Flask app
Cons:
- Difficult to set up and scale
- Increased complexity since session state must be managed
Flask-Session
Flask-Session is an extension for Flask that enables server-side sessions. It supports a variety of solutions for storing the session data on the server-side:
- Redis
- Memcached
- SQLAlchemy
- MongoDB
In this article, we'll use Redis, an in-memory data structure store, due to its fast read/write speed and ease of setup.
Refer to the Configuration section of the Flask-Session documentation for how to configure other data storage solutions.
Flask-Session uses Flask's Session Interface, which provides a simple way to replace Flask's built-in session implementation, so you can continue to use the session object as you normally would with the built-in client-side session implementation.
Server-side Session Example
The following app.py file illustrates how to use server-side sessions in Flask with Flask-Session:
import os
from datetime import timedelta

import redis
from flask import Flask, render_template_string, request, session, redirect, url_for
from flask_session import Session


# Create the Flask application
app = Flask(__name__)

# Details on the Secret Key: https://flask.palletsprojects.com/en/3.0.x/config/#SECRET_KEY
# NOTE: The secret key is used to cryptographically-sign the cookies used for storing
#       the session identifier.
app.secret_key = os.getenv('SECRET_KEY', default='BAD_SECRET_KEY')

# Configure Redis for storing the session data on the server-side
app.config['SESSION_TYPE'] = 'redis'
app.config['SESSION_PERMANENT'] = False
app.config['SESSION_USE_SIGNER'] = True
app.config['SESSION_REDIS'] = redis.from_url('redis://127.0.0.1:6379')

# Create and initialize the Flask-Session object AFTER `app` has been configured
server_session = Session(app)


@app.route('/set_email', methods=['GET', 'POST'])
def set_email():
    if request.method == 'POST':
        # Save the form data to the session object
        session['email'] = request.form['email_address']
        return redirect(url_for('get_email'))

    return """
        <form method="post">
            <label for="email">Enter your email address:</label>
            <input type="email" id="email" name="email_address" required />
            <button type="submit">Submit</button
        </form>
        """


@app.route('/get_email')
def get_email():
    return render_template_string("""
            {% if session['email'] %}
                <h1>Welcome {{ session['email'] }}!</h1>
            {% else %}
                <h1>Welcome! Please enter your email <a href="{{ url_for('set_email') }}">here.</a></h1>
            {% endif %}
        """)


@app.route('/delete_email')
def delete_email():
    # Clear the email stored in the session object
    session.pop('email', default=None)
    return '<h1>Session deleted!</h1>'


if __name__ == '__main__':
    app.run()
To run this example, start by creating and activating a new virtual environment:
$ mkdir flask-server-side-sessions
$ cd flask-server-side-sessions
$ python3 -m venv venv
$ source venv/bin/activate
Install and run Redis.
The quickest way to get Redis up and running is with Docker:
$ docker run --name some-redis -d -p 6379:6379 redisIf you're not a Docker user, check out these resources:
Install Flask, Flask-Session, and redis-py:
(venv)$ pip install Werkzeug==2.3.8
(venv)$ pip install Flask==2.3.3
(venv)$ pip install Flask-Session==0.5.0
(venv)$ pip install redis
Since we're using Redis as the session data store, redis-py is required.
IMPORTANT As of December 2023, there are compatibility issues between Flask 3.0.x (specifically, Werkzeug 3.x) and Flask-Session 0.5. So, make sure you're using the following dependency versions if you're building out the example code:
Flask==2.3.3
Flask-Session==0.5.0
redis==5.0.1
Werkzeug==2.3.8
Save the above code to an app.py file. Then, start the Flask development server:
(venv)$ flask --app app --debug run
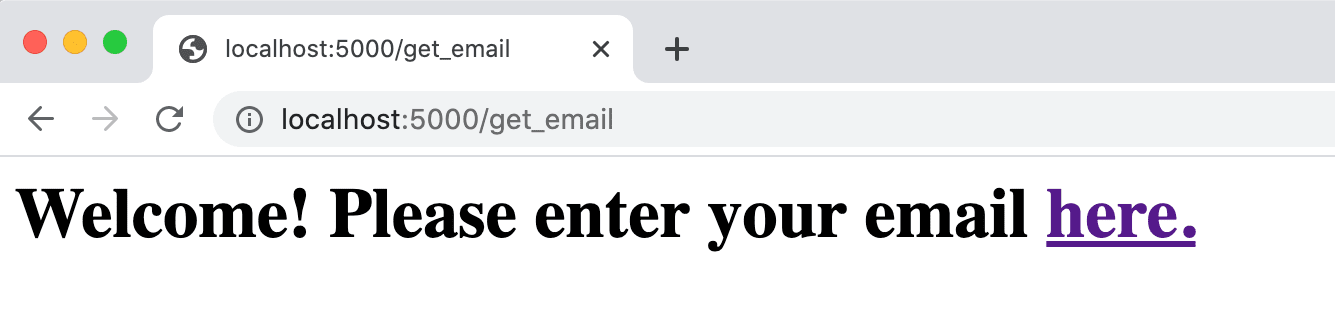
Now navigate to http://127.0.0.1:5000/get_email using your favorite web browser:
Configuration
After the Flask application (app) is created, the secret key needs to be specified:
# Details on the Secret Key: https://flask.palletsprojects.com/en/3.0.x/config/#SECRET_KEY
# NOTE: The secret key is used to cryptographically-sign the cookies used for storing
#       the session identifier.
app.secret_key = os.getenv('SECRET_KEY', default='BAD_SECRET_KEY')
The secret key is used to cryptographically-sign the cookies that store the session identifier. Create and set it as an environment variable like so:
(venv)$ python -c 'import secrets; print(secrets.token_hex())'
(venv)$ export SECRET_KEY=<TOKEN_FROM_ABOVE>
NOTE: If working on Windows, use
setinstead ofexport.
Next, the configuration of Redis as the storage solution for the server-side session data needs to be defined:
# Configure Redis for storing the session data on the server-side
app.config['SESSION_TYPE'] = 'redis'
app.config['SESSION_PERMANENT'] = False
app.config['SESSION_USE_SIGNER'] = True
app.config['SESSION_REDIS'] = redis.from_url('redis://127.0.0.1:6379')

# Create and initialize the Flask-Session object AFTER `app` has been configured
server_session = Session(app)
Configuration variables:
SESSION_TYPE- specifies which type of session interface to useSESSION_PERMANENT- indicates whether to use permanent sessions (defaults toTrue)SESSION_USE_SIGNER- indicates whether to sign the session cookie identifier (defaults toFalse)SESSION_REDIS- specifies the Redis instance (default connection is to127.0.0.1:6379)
Refer to the Configuration section of the Flask-Session documentation for details on all available configuration variables.
Setting Session Data
In this example, the set_email view function processes the email when the form is submitted:
@app.route('/set_email', methods=['GET', 'POST'])
def set_email():
    if request.method == 'POST':
        # Save the form data to the session object
        session['email'] = request.form['email_address']
        return redirect(url_for('get_email'))

    return """
        <form method="post">
            <label for="email">Enter your email address:</label>
            <input type="email" id="email" name="email_address" required />
            <button type="submit">Submit</button
        </form>
        """
This view function supports the GET and POST HTTP methods. When the GET method is used, an HTML form is returned for you to enter your email address:
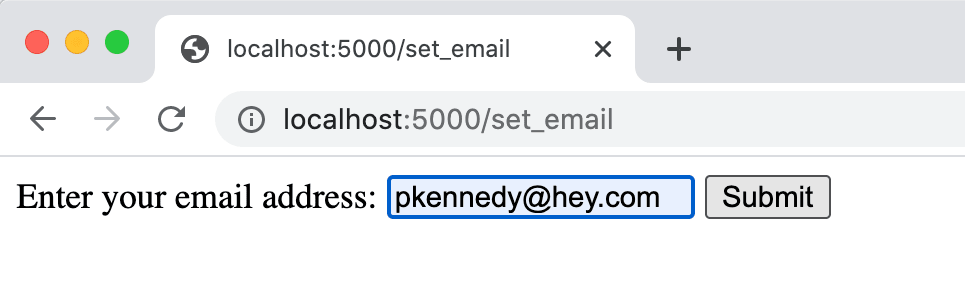
When you submit the form with your email address (via the POST method), the email is saved in the session object:
# Save the form data to the session object
session['email'] = request.form['email_address']
Go ahead and enter your email at http://127.0.0.1:5000/set_email, and submit the form.
Accessing the Session Data
The get_email view function utilizes the Jinja templating engine to display either the email address stored in the session object or a link to the set_email() view function when an email is not stored in the session:
@app.route('/get_email')
def get_email():
    return render_template_string("""
            {% if session['email'] %}
                <h1>Welcome {{ session['email'] }}!</h1>
            {% else %}
                <h1>Welcome! Please enter your email <a href="{{ url_for('set_email') }}">here.</a></h1>
            {% endif %}
        """)
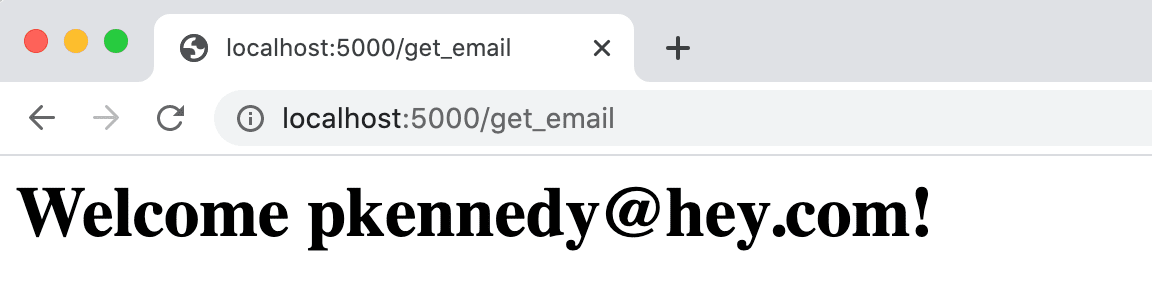
The session object is available for use within the template files!
When you navigate to the http://127.0.0.1:5000/get_email URL after entering your email address, your email will be displayed:
Deleting the Session Data
The email address stored in the session object can be deleted via the delete_email view function:
@app.route('/delete_email')
def delete_email():
    # Clear the email stored in the session object
    session.pop('email', default=None)
    return '<h1>Session deleted!</h1>'
This view function pops the email element from the session object. The pop method will return the value popped, so it's a good practice to provide a default value in case the element is not defined in the session object.
When you navigate to the 'http://127.0.0.1:5000/delete_email URL, you will see:
With the email address no longer stored in the session object, you'll once again be asked to enter your email address when you navigate to the http://127.0.0.1:5000/get_email URL:
Session Uniqueness
To demonstrate how session data is unique to each user, enter your email address again at http://127.0.0.1:5000/set_email. Then, within a different browser (or a private/incognito window in your current browser) navigate to http://127.0.0.1:5000/set_email and enter a different email address. What do you expect to see after you're redirected to http://127.0.0.1:5000/get_email?
Since a different web browser is being used, this is considered a different user to the Flask app. Therefore, there will be a unique session utilized for that user.
To see this in greater detail, you can examine what's stored in the Redis database after accessing the Flask app from two different web browsers on your computer:
$ redis-cli

127.0.0.1:6379> KEYS *
1) "session:8a77d85b-7ed9-4961-958a-510240bcbac4"
2) "session:5ce4b8e2-a2b5-43e4-a0f9-7fa465b7bb0c"

127.0.0.1:6379> exit
$
There are two different sessions stored in Redis, which correspond to the two different web browsers used to access the Flask app:
8a77d85b-7ed9-4961-958a-510240bcbac4is from Firefoxsession:5ce4b8e2-a2b5-43e4-a0f9-7fa465b7bb0cis from Chrome
Conclusion
This article showed how server-side sessions can be implemented in Flask with Flask-Session and Redis.
If you'd like to learn more about about sessions in Flask, be sure to check out my course -- Developing Web Applications with Python and Flask.