Custom Permissions in Django
Django tip:
You can add custom permissions to a Django model (you still have to enforce it in the views) 👇
from django.db import models

class Post(models.Model):
    title = models.CharField(max_length=400)
    body = models.TextField()
    is_published = models.Boolean(default=False)

    class Meta:
        permissions = [
            (
                "set_published_status",
                "Can set the status of the post to either publish or not"
            )
        ]
For more, check out Permissions in Django.
Check permission inside a Django template
Django tip:
A perms variable is available by default in a Django template, so you can render the content based on the permissions:
{% if perms.store.view_inventory %}
    {{ all_inventory_items }}
{% endif %}
For more, check out Permissions in Django.
Permissions in Django - Enforcing Permissions with permission_required()
Django tip:
To enforce permissions in function-based views, you can use the permission_required decorator 👇
from django.contrib.auth.decorators import permission_required

@permission_required("blog.view_post")
def post_list_view(request):
    return HttpResponse()
For more, check out Permissions in Django.
Permissions in Django - Enforcing Permissions with PermissionRequiredMixin
Django tip:
To enforce permissions in class-based views, you can use the PermissionRequiredMixin from
django.contrib.auth.mixins👇from django.contrib.auth.mixins import PermissionRequiredMixin from django.views.generic import ListView from blog.models import Post class PostListView(PermissionRequiredMixin, ListView): permission_required = "blog.view_post" template_name = "post.html" model = PostFor more, check out Permissions in Django.
Permissions in Django - groups
Django tip:
Instead of handling permissions for a single user, you can use groups and group-level permissions 👇
from django.contrib.auth.models import Group, User, Permission
from django.contrib.contenttypes.models import ContentType


manager_group, created = Group.objects.get_or_create(name="Library manager")
librarian_group, created = Group.objects.get_or_create(name="Librarian")

content_type = ContentType.objects.get_for_model(Book)
book_permission = Permission.objects.filter(content_type=content_type)

"""
print(post_permission)

<QuerySet [
    <Permission: library | book | Can add book>,
    <Permission: library | book | Can change book>,
    <Permission: library | book | Can delete book>,
    <Permission: library | book | Can view book>
]>
"""

for perm in book_permission:
    if perm.codename == "add_book":
        manager_group.permissions.add(perm)
    else:
        manager_group.permissions.add(perm)
        librarian_group.permissions.add(perm)

user = User.objects.get(username="librarian_jane_doe")
user.groups.add(librarian_group)

"""
print(user.has_perm("store.add_book")) => False
print(user.has_perm("library.delete_book")) => True
print(user.has_perm("library.change_book")) => True
print(user.has_perm("store.view_book")) => True
"""
For more, check out Permissions in Django.
Permissions in Django - has_perm()
Django tip:
You can check if a user has permission with the has_perm method:
user = User.objects.create_user(
    username="test",
    password="test",
    email="[email protected]"
)
print(user.has_perm("blog.view_post"))
# => False

superuser = User.objects.create_superuser(
    username="super",
    password="test",
   email="[email protected]"
)
print(superuser.has_perm("blog.view_post"))
# => True
For more, check out Permissions in Django.
Permissions in Django
Django tip:
With django.contrib.auth, Django automatically creates add, change, delete, and view permissions for each Django model. Each permission is named like this:
{app}.{action}_{model_name}You can also see (and set) those permissions in the Django admin.
For more, check out Permissions in Django.
Django REST Framework - writeable nested serializers
DRF tip:
ModelSerializer's
.create()method does not support writable nested fields by default.For the nested serializer to be writable, you'll need to create
create()and/orupdate()methods to explicitly specify how the child relationships should be saved.👇
class PostSerializer(serializers.ModelSerializer):
    class Meta:
        model = Post
        fields = ("title", "content")


class TagSerializer(serializers.ModelSerializer):
    posts = PostSerializer(many=True)

    class Meta:
        model = Tag
        fields = ['name', 'posts']

    def create(self, validated_data):
        posts_data = validated_data.pop('posts')
        tag = Tag.objects.create(**validated_data)

        for post in posts_data:
            Post.objects.create(tag=tag, **post)

        return tag
Django REST Framework - Nested Serializers
DRF tip:
To easily join parent and child objects inside a single response body, you can use a nested serializer.
👇
# serializers:
class PostSerializer(serializers.ModelSerializer):
    class Meta:
        model = Post
        fields = ("title", "content")


class TagSerializer(serializers.ModelSerializer):
    posts = PostSerializer(many=True, read_only=True)

    class Meta:
        model = Tag
        fields = ['name', 'posts']

# result:
{
    "name": "Stories",
    "posts": [
        {
            "title": "My first story",
            "content": "She opened the door and..."
        },
        {
            "title": "Story about a dog",
            "content": "I met Chase when I was..."
        }
    ]
}
For more, review Nested Serializers.
Django REST Framework - HyperlinkedIdentityField
DRF tip:
To include a hyperlink that points to the current object in the serializer, you can use HyperlinkedIdentityField.
HyperlinkedIdentityField extends HyperlinkedRelatedField. Additionally, it makes the field read-only and sets the current object as the source.
👇
# serializer:
class TagSerializer(serializers.ModelSerializer):
    tag_detail = serializers.HyperlinkedIdentityField(view_name='tag-detail')

    class Meta:
        model = Tag
        fields = ['name', 'tag_detail']

# result:
{
    "name": "Stories",
    "tag_detail": "http://127.0.0.1:8000/tags/1/"
}
Django REST Framework - HyperlinkedRelatedField
DRF tip:
According to Roy T. Fielding, RESTful APIs should be driven by hypertext.
To represent the target of the relationship with a hyperlink, you can use HyperlinkedRelatedField in the serializer.
👇
# serializer:
class TagSerializer(serializers.ModelSerializer):
    posts = serializers.HyperlinkedRelatedField(
        many=True, read_only=True, view_name='post-detail'
    )

    class Meta:
        model = Tag
        fields = ['name', 'posts']

# result:
{
    "name": "Stories",
    "posts": [
        "http://127.0.0.1:8000/1/",
        "http://127.0.0.1:8000/2/"
    ]
}
Django REST Framework - SlugRelatedField
DRF tip:
To represent the target of the relationship with one of its fields, you can use SlugRelatedField in the serializer.
👇
# serializer:
class TagSerializer(serializers.ModelSerializer):
    posts = serializers.SlugRelatedField(many=True, read_only=True, slug_field='title')

    class Meta:
        model = Tag
        fields = ['name', 'posts']

# result:
{
    "name": "Stories",
    "posts": [
        "My first story",
        "Story about a dog"
    ]
}
Django REST Framework - PrimaryKeyRelatedField
DRF tip:
To represent the target of the relationship with its primary key, you can use PrimaryKeyRelatedField in the serializer.
👇
# serializer:
class TagSerializer(serializers.ModelSerializer):
    posts = serializers.PrimaryKeyRelatedField(many=True, read_only=True)

    class Meta:
        model = Tag
        fields = ['name', 'posts']

# result:
{
    "name": "Stories",
    "posts": [
        1,
        2
    ]
}
Django REST Framework - StringRelatedField
DRF tip:
To represent the target of the relationship with its
__str__method, you can use StringRelatedField in the serializer. 👇# model: class Post(models.Model): # ... def __str__(self): return f"{self.date_published} - {self.title}" # serializer: class TagSerializer(serializers.ModelSerializer): posts = serializers.StringRelatedField(many=True) class Meta: model = Tag fields = ['name', 'posts'] # result: { "name": "Stories", "posts": [ "2022-01-09 - My first story", "2022-04-09 - Story about a dog" ] }
Related Fields in Django REST Framework
DRF tip:
To represent model relationships in a serializer, you can use various related fields that represent the target of the relationship in different ways:
- StringRelatedField
- PrimaryKeyRelatedField
- HyperlinkedRelatedField
- SlugRelatedField
- HyperlinkedIdentityField
Examples:
class TagSerializer(serializers.ModelSerializer):

    posts = serializers.StringRelatedField(many=True)
    # result: "My story" (from __str__ method)


    posts = serializers.PrimaryKeyRelatedField(many=True, read_only=True)
    # result: 1


    posts = serializers.HyperlinkedRelatedField(
        many=True,
        read_only=True,
        view_name='post-detail'
    )
    # result: "http://127.0.0.1:8000/1/"


    posts = serializers.SlugRelatedField(
        many=True,
        read_only=True,
        slug_field='title'
     )
    # result: "My story" (from title field)


    tag_detail = serializers.HyperlinkedIdentityField(view_name='tag-detail')
    # result: "http://127.0.0.1:8000/tags/1/"
    # *HyperlinkedIdentityField is used for current object, not related objects
For more, review Serializer relations.
Django REST Framework - how to disable the Browsable API in production
DRF tip:
If you want to use the Browsable API in development but not in production, you can set
DEFAULT_RENDERER_CLASSESin settings conditionally, like so:if not DEBUG: REST_FRAMEWORK["DEFAULT_RENDERER_CLASSES"] = ( "rest_framework.renderers.JSONRenderer", )
Django - using Q objects for complex queries
Django tip:
If you need to execute more complex queries, you can use Q objects -- objects used to encapsulate a collection of keyword arguments.
Q objects can be combined using the
&and|operators.For example:
Inventory.objects.filter(
    Q(quantity__lt=10) &
    Q(next_shipping__gt=datetime.datetime.today()+datetime.timedelta(days=10))
)
Django Messages - message levels
Django tip:
By default, the lowest recorded message level, from Django's messages framework, is 20 (INFO).
That means that all message levels but DEBUG (with value 10) are displayed.
You can change the default MESSAGE_LEVEL to a higher or lower level in the settings:
# settings.py
from django.contrib.messages import constants as messages

# all message levels will be displayed:
MESSAGE_LEVEL = messages.DEBUG

# only messages with level WARNING and ERROR will be displayed:
MESSAGE_LEVEL = messages.WARNING
Django Messages - message tags for CSS classes
Django tip:
You can change Django message tags so they correspond to the CSS class you want to use for displaying the flash message.
This makes it easy to combine Django messages with a CSS framework (e.g., Bootstrap).
For example, this is how you can use Bootstrap with Django messages:
# settings.py
from django.contrib.messages import constants as messages

MESSAGE_TAGS = {
        messages.DEBUG: 'alert-secondary',
        messages.INFO: 'alert-info',
        messages.SUCCESS: 'alert-success',
        messages.WARNING: 'alert-warning',
        messages.ERROR: 'alert-danger',
}

# template
{% for message in messages %}
    <div class="alert {{ message.tags }}" role="alert">
        {{ message }}
    </div>
{% endfor %}
Django Messages - message levels
Django tip:
There are five message levels in Django's message framework that correspond to the same tags from Python's logging module (in lowercase):
- DEBUG
- INFO
- SUCCESS
- WARNING
- ERROR
messages.debug(request, "I'm debugging.")
messages.info(request, "I'm informing.")
messages.success(request, "You were successful.")
messages.warning(request, "This is a warning.")
messages.error(request, "This is an error.")
You can set a minimum message level that will be recorded (default is INFO).
Django Messages Example
Django tip:
For displaying a one-time notification message, you can use Django's built-in messages framework.
(The default settings.py file created with
startprojectcontains all the required settings.)For example, your view and template file would look something like this:
# views.py

def contact(request):
    if request.method == "POST":
        form = ContactForm(request.POST)

        if form.is_valid():
            form.save()

            messages.success(request, "Your message was sent.") # message

            return redirect("cart")

    form = ContactForm(request.POST)
    return render(request, "contact.html", {"form": form})


# contact.html

# ...
{% if messages %}
<ul class="messages">
    {% for message in messages %}
        <div {% if message.tags %} class="{{ message.tags }}"{% endif %}>
            {{ message }}
        </div>
    {% endfor %}
</ul>
{% endif %}
# ...
Django Signals - m2m_changed()
Django tip:
To send a Django signal when a
ManyToManyFieldis changed on a model instance, you can use the m2m_changed signal.For example, this signal is sent if an item is added to the cart:
@receiver(m2m_changed, sender=Cart.items.through)
def cart_update_total_when_item_added(sender, instance, action, *args, **kwargs):
    if action == 'post_add':
        total = Decimal(0.00)

        for item in instance.items.all():
            total += item.price

        instance.total = total
        instance.save()
Django Signals - post_delete()
Django tip:
To notify another part of the application after the delete event of an object happens, you can use the post_delete signal.
For example:
from django.db.models.signals import post_delete
from django.dispatch import receiver


@receiver(post_delete, sender=Order)
def add_to_inventory(sender, instance, **kwargs):
    inventory_item = Inventory.objects.get(id=instance.inventory_item.id)
    inventory_item.quantity = inventory_item.quantity + instance.quantity

    inventory_item.save()
Django Signals - pre_delete()
Django tip:
To notify another part of the application before the delete event of an object happens, you can use the pre_delete signal.
For example:
from django.db.models.signals import pre_delete
from django.dispatch import receiver


@receiver(pre_delete, sender=Inventory)
def allow_inventory_delete_if_no_order(sender, instance, **kwargs):
    if Order.objects.filter(inventory_item=instance.id).count() > 0:
        raise Exception("There are orders for this item.")
Django Signals - post_save()
Django tip:
To impact a different part of your application after the object is saved to the database, you can use a post_save signal.
For example:
from django.db.models.signals import post_save
from django.dispatch import receiver


@receiver(post_save, sender=Order)
def remove_from_inventory(sender, instance, **kwargs):
    inventory_item = Inventory.objects.get(id=instance.inventory_item.id)
    inventory_item.quantity = inventory_item.quantity - instance.quantity

    inventory_item.save()
Django Signals - pre_save()
Django tip:
To execute some code dealing with another part of your application before the object gets saved to the database, you have to use a pre_save signal.
That way, the signal is sent at the beginning of a model's
save()method.For example:
from django.db.models.signals import pre_save
from django.dispatch import receiver


@receiver(pre_save, sender=Order)
def valid_order(sender, instance, **kwargs):
    inventory_item = Inventory.objects.get(id=instance.inventory_item.id)

    if instance.quantity > inventory_item.quantity:
        raise Exception("There are not enough items in the inventory.")
Django Signals Example
Django tip:
If you need a decoupled application to get notified when actions occur elsewhere in the framework, you can use a Django signal.
For example:
from django.db.models.signals import post_save
from django.dispatch import receiver


@receiver(post_save, sender=Book)
def last_reading_from_reading_list(sender, instance, **kwargs):
    ReadingList.objects.get(id=instance.reading_list.id).save(
        update_fields=["last_reading_at"]
    )
Django REST Framework Serializers - to_internal_value()
DRF tip:
If your API receives unnecessary data, you can override
to_internal_value()to extract the resource data.For example:
class ResourceSerializer(serializers.ModelSerializer):
    # ...

    def to_internal_value(self, data):
        resource_data = data['resource']

        return super().to_internal_value(resource_data)
For more, review Custom Outputs.
Django REST Framework Serializers - to_representation()
DRF tip:
If you want to change the output of the serializer, you can override the
to_representationfunction of the serializer.For example:
class MovieSerializer(serializers.ModelSerializer):
    class Meta:
        model = Movie
        fields = '__all__'

    def to_representation(self, instance):
        representation = super().to_representation(instance)
        representation['likes'] = instance.liked_by.count()

        return representation
For more, review Custom Outputs.
Django REST Framework Serializers - function validators
DRF tip:
If you need the same validation in multiple serializers, you can create a function validator instead of repeating the code.
For example:
# function validator:
def is_rating(value):
    if value < 1:
        raise serializers.ValidationError('Value cannot be lower than 1.')
    elif value > 10:
        raise serializers.ValidationError('Value cannot be higher than 10')


# function validator used in a serializer
class MovieSerializer(serializers.ModelSerializer):
    rating = IntegerField(validators=[is_rating])
For more, review Custom Data Validation.
Django REST Framework Serializers - object-level validation
DRF tip:
You can use object-level validation to validate fields in comparison to one another.
For example:
class MovieSerializer(serializers.ModelSerializer):
    class Meta:
        model = Movie
        fields = '__all__'

    def validate(self, data):
        if data['us_gross'] > data['worldwide_gross']:
            raise serializers.ValidationError(
                'us_gross cannot be bigger than worldwide_gross'
            )
        return data
For more, review Custom Data Validation.
Django REST Framework Serializers - custom field validation
DRF tip:
You can add custom field validation to your serializer.
The validation method needs to be named like so:
validate_<field_name>.For example:
class PersonSerializer(serializers.ModelSerializer):
    class Meta:
        model = Person
        fields = ['name', 'age']

    def validate_age(self, value):
        if value < 18:
            raise serializers.ValidationError('The person has to be at least 18 years old.')
        return value
For more, review Custom Data Validation.
Django REST Framework - RetrieveUpdateDestroyAPIView
DRF tip:
RetrieveUpdateDestroyAPIView is used for read-update-delete single instance endpoints. It accepts GET, PUT, PATCH, and DELETE requests. It combines RetrieveModelMixin, UpdateModelMixin, and DestroyModelMixin.
class PostDetail(generics.RetrieveUpdateDestroyAPIView):
    serializer_class = PostSerializer
    queryset = Post.objects.all()
For more, review Concrete Views.
Django REST Framework - RetrieveDestroyAPIView
DRF tip:
RetrieveDestroyAPIView is used for read-delete single instance endpoints. It accepts GET and DELETE requests. It combines RetrieveModelMixin and DestroyModelMixin.
class RetrieveDeletePost(generics.RetrieveDestroyAPIView):
    serializer_class = PostSerializer
    queryset = Post.objects.all()
For more, review Concrete Views.
Django REST Framework - RetrieveUpdateAPIView
DRF tip:
RetrieveUpdateAPIView is used for read-update single instance endpoints. It accepts GET, PUT, and PATCH requests. It combines RetrieveModelMixin and UpdateModelMixin.
class RetrieveUpdatePost(generics.RetrieveUpdateAPIView):
    serializer_class = PostSerializer
    queryset = Post.objects.all()
For more, review Concrete Views.
Django REST Framework - ListCreateAPIView
DRF tip:
ListCreateAPIView is used for read-write collection endpoints. It accepts GET and POST requests. It combines CreateModelMixin and ListModelMixin.
class ListAddPost(generics.ListCreateAPIView):
    serializer_class = PostSerializer
    queryset = Post.objects.all()
For more, review Concrete Views.
Django REST Framework - UpdateAPIView
DRF tip:
UpdateAPIView is used for update-only single instance endpoints and accepts PUT and PATCH requests. It extends UpdateModelMixin.
class UpdatePost(generics.UpdateAPIView):
    serializer_class = PostSerializer
    queryset = Post.objects.all()
For more, review Concrete Views.
Django REST Framework - DestroyAPIView
DRF tip:
DestroyAPIView is used for delete-only single instance endpoints and only accepts DELETE requests. It extends DestroyModelMixin.
class DeletePost(generics.DestroyAPIView):
    serializer_class = PostSerializer
    queryset = Post.objects.all()
For more, review Concrete Views.
Django REST Framework - RetrieveAPIView
DRF tip:
RetrieveAPIView is similar to the ListAPIView -- it's used for read-only endpoints and only accepts GET requests, but it returns a single instance instead of a list. It extends RetrieveModelMixin.
class PostDetail(generics.RetrieveAPIView):
    serializer_class = PostSerializer
    queryset = Post.objects.all()
For more, review Concrete Views.
Django REST Framework - ListAPIView
DRF tip:
ListAPIView is used for read-only list endpoints and only accepts GET requests. It extends ListModelMixin.
class ListPost(generics.ListAPIView):
    serializer_class = PostSerializer
    queryset = Post.objects.all()
For more, review Concrete Views.
Django REST Framework - CreateAPIView
DRF tip:
CreateAPIView is used for create-only endpoints and only accepts POST requests. It extends CreateModelMixin.
class CreatePost(generics.CreateAPIView):
    serializer_class = PostSerializer
    queryset = Post.objects.all()
For more, review Concrete Views.
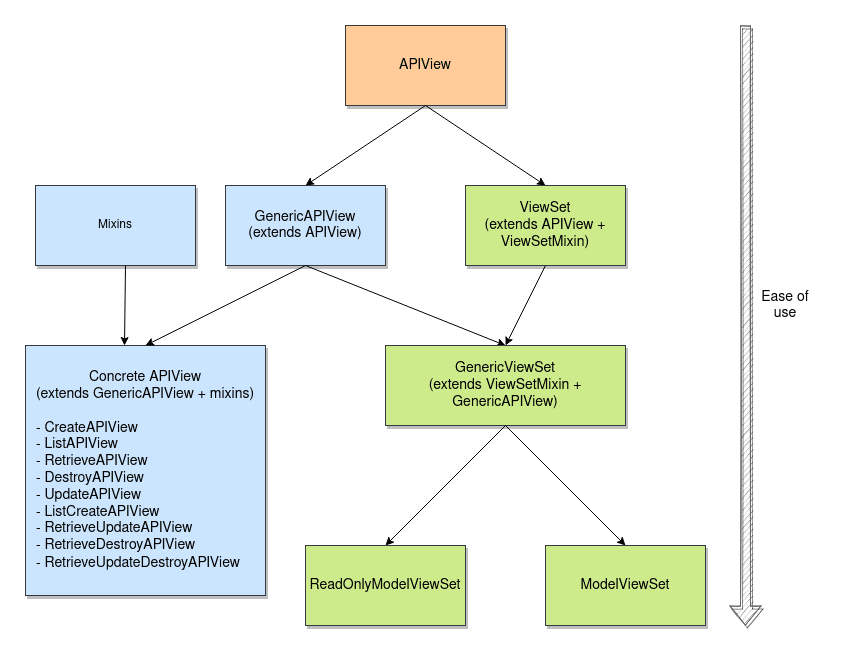
Django REST Framework Views - Generic Views
DRF tip:
All concrete generic views are a combination of the GenericAPIView and one or multiple mixins.
GenericAPIView provides methods like
get_object/get_querysetandget_serializer, whereas mixins provide create/retrieve/update/delete actions.For more, check out Django REST Framework Views - Generic Views.
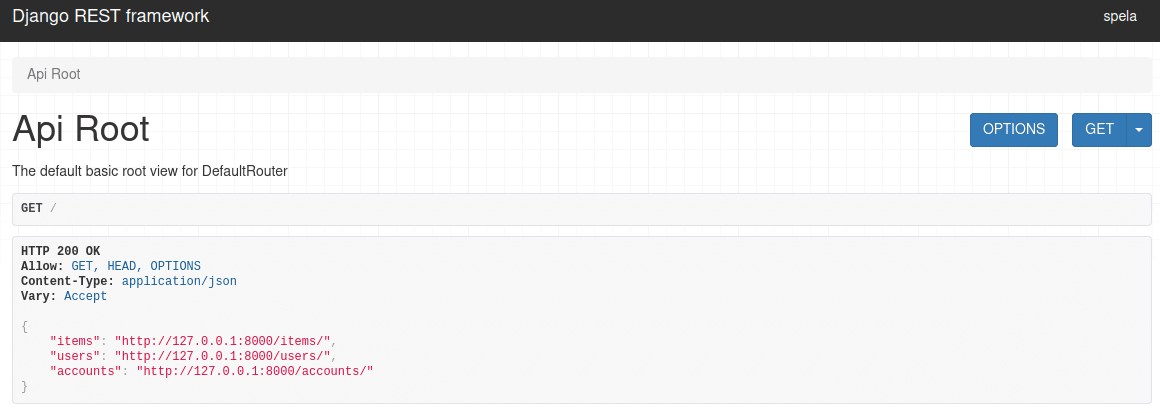
Django REST Framework - DefaultRouter API Root
Django REST Framework tip:
If you're using DefaultRouter, the API root will automatically be included.
The API root is an endpoint that returns a response containing hyperlinks to all the list views.
(Unlike
DefaultRouter,SimpleRouterdoesn't include the API root.)
ViewSet Actions in Django REST Framework
Django REST Framework tip:
If you're using
ModelViewSetand want to create a custom endpoint, you can add it to the ViewSet as a function decorated with the @action decorator.class PostModelViewSet(ModelViewSet): serializer_class = PostSerializer queryset = Post.objects.all() @action(detail=False, methods=['get']) def unpublished_posts(self, request): unpublished = Post.objects.filter(published=False) serializer = PostSerializer(unpublished, many=True) return Response(serializer.data) # available at: http://127.0.0.1:8000/unpublished_posts/
Django REST Framework's ModelViewSet
Django REST Framework tip:
If your API endpoints map close to your models, you can save yourself quite a few lines of code by using ModelViewSet in combination with a router.
# viewsets.py
class PostModelViewSet(ModelViewSet):
    serializer_class = PostSerializer
    queryset = Post.objects.all()


# urls.py
router = routers.DefaultRouter()
router.register(r'', PostModelViewSet)

urlpatterns = [
    path('', include(router.urls)),
]


# yields:
http://127.0.0.1:8000/      # for list of posts
http://127.0.0.1:8000/1/  # for post detail
(ViewSets should be stored in a file named viewsets.py rather than views.py.)
How to create views in Django REST Framework
Django REST Framework tip:
There are three core ways to create views:
- extending APIView class
- Extending one of the seven concrete API views (e.g.,
ListCreateAPIView)- ViewSet (e.g., ModelViewSet)
There are also some sub-possibilities:
Django's length template filter
Django tip:
If you want to show the length of a string or list, you can use the length template filter.
{{ friends|length }}
Django's pluralize template filter
Django tip:
Sometimes you need to use the single or plural form based on the number you're displaying. You can handle this by using the pluralize filter.
{{ number_of_friends }} friend{{ number_of_friends|pluralize }}

# 1 friend
# 2 friends
An "s" is automatically used as the suffix, but you can also provide your own suffix (for both singular and plural versions).
{{ number_of_mice }} {{ number_of_mice|pluralize:"mouse,mice" }}

# 1 mouse
# 2 mice
Selecting a random element from a list in a Django template
Django tip:
You can use the random Django template filter to return a random item from the given list.
{{ inspirational_quote|random }}
Slicing a list in a Django template
Django tip:
You can return only part of the list in a Django template by using the slice filter.
The syntax for slicing is the same as for Python’s list slicing.
{{ friends|slice:":3" }}
Django Date Template Filter
Django tip:
You can use the date filter to format a given date/time.
Example:
{{ post.datetime|date:"jS F Y" }} # => 1st January 2022After the colon, you can provide the desired format inside the string. If the format is not provided, the filter will use the default one, which can be specified in the settings.
Convert letter case in a Django template
Django tip:
There are four template filters you can use to change letter case:
{{ item.name|title }}
{{ item.name|capfirst }}
{{ item.name|lower }}
{{ item.name|upper }}
Check if a For Loop Variable Is Empty in a Django Template
Django tip:
When looping through a list in a Django template, you can use the empty tag to cover cases when the list is empty:
{% for item in list %}
    {{ item }}
{% empty %}
    <p>There are no items yet.</p>
{% endfor %}
Create Custom Django Admin Actions
Django tip:
You can create custom bulk actions for the Django admin.
Example:
@admin.action(description='Mark selected items purchased')
def make_purchased(modeladmin, request, queryset):
    queryset.update(purchased=True)


@admin.register(ShoppingItem)
class ShoppingItemAdmin(admin.ModelAdmin):
    actions = [make_purchased]
How to exclude Django Modelform fields
Django tip:
You can use either
excludeorfieldsto impact which fields will be available in the Django admin model forms.For example:
# models.py

class Child(models.Model):
     name = models.CharField(max_length=200)
     last_name = models.CharField(max_length=200)
     grade = models.CharField(max_length=200)


# admin.py

@admin.register(Child)
class ChildAdmin(admin.ModelAdmin):
    exclude = ('grade',)

# yields the same result as

@admin.register(Child)
class ChildAdmin(admin.ModelAdmin):
    fields = ('name', 'last_name')
How to check for first or last iteration of a for loop in a Django template
Django tip:
You can use
forloop.firstorforloop.lastto check if the current iteration is the first or the last time through a for loop in your Django templates like so:{% for item in item_list %} {{ forloop.first }} # True if this is the first time through the loop {{ forloop.last }} # True if this is the last time through the loop {% endfor %}
Current iteration from the end of a for loop in a Django template - forloop.revcounter
Django tip:
You can use
revcounterto get the number of iterations from the end of a for loop in your Django templates like so:{% for item in item_list %} {{ forloop.revcounter }} # starting index 1 {{ forloop.revcounter0 }} # starting index 0 {% endfor %}
Current iteration of a for loop in a Django template - forloop.counter
Django tip:
You can use
counterto get the current iteration of a for loop in your Django templates like so:{% for item in item_list %} {{ forloop.counter }} # starting index 1 {{ forloop.counter0 }} # starting index 0 {% endfor %}
Django - Custom verbose plural name for admin model class
Django tip:
Django automatically creates a plural verbose name from your object by adding and "s" to the end.
child -> childs
To change the plural verbose name, you can define the verbose_name_plural property of the Meta class like so:
class Child(models.Model):

    ...

    class Meta:
        verbose_name_plural = "children"
Django - Custom Database Constraints
Django tip:
You can add custom database constraints to your Django models like so:
class Child(models.Model):

    ....

    class Meta:
        constraints = [
            models.CheckConstraint(check=models.Q(age__lt=18))
        ]
Custom Django Management Commands
Django tip:
You can create your own custom Django management commands that you can run with manage.py. For example:
python manage.py your_commandSimply add a Python module to a "management/commands" folder in a Django app.
Example:
your_app/
    __init__.py
    models.py
    management/
        __init__.py
        commands/
            __init__.py
            your_command.py
    tests.py
    views.py
(Django will ignore any module that begins with an underscore.)
Example command:
from django.core.management.base import BaseCommand

class Command(BaseCommand):

    def handle(self, *args, **options):
        self.stdout.write('pong!')
Django Admin - custom filters with list_filter
Django tip:
With list_filter you can add custom filters to the right sidebar of the Django admin list page.
For example:
@admin.register(Child)
class ItemAdmin(admin.ModelAdmin):
    list_filter = ("grade", )
Django - reference method in the list_display tuple for the admin
Django tip:
Besides model fields, the
list_displaytuple can reference methods fromModelAdmin:@admin.register(ShoppingList) class ShoppingListAdmin(admin.ModelAdmin): list_display = ("title", "number_of_items") def number_of_items(self, obj): result = ShoppingItem.objects.filter(shopping_list=obj.id).count() return result
Customize the Django admin with list_display
Django tip:
You can make your admin list page friendlier to the user by specifying which fields should be displayed:
@admin.register(Child)
class ChildAdmin(admin.ModelAdmin):
    list_display = ("last_name", "first_name")
Custom field for search in the Django admin
Django tip:
search_fields sets which model fields will be searched when a search is performed in the Django admin.
You can also perform a related lookup on a ForeignKey or ManyToManyField with the lookup API "follow" notation (double underscore syntax):
@admin.register(Child)
class ChildAdmin(admin.ModelAdmin):
    search_fields = ['parent__name']
Registering models with the Django Admin
Django tip:
Instead of using
admin.site.registerfor registering models with the Django admin, you can use a decorator.https://docs.djangoproject.com/en/4.0/ref/contrib/admin/#the-register-decorator
👇
## option 1 ##

class AuthorAdmin(admin.ModelAdmin):
    fields = ('name', 'title')

admin.site.register(Author, AuthorAdmin)


## option 2 ##

# you can use a decorator instead
@admin.register(Author)
class AuthorAdmin(admin.ModelAdmin):
    fields = ('name', 'title')
Django templates - lorem ipsum
Django tip:
You can generate lorem ipsum inside a Django template with the
loremtag.https://docs.djangoproject.com/en/3.2/ref/templates/builtins/#lorem
You can provide any (or none) of the following arguments:
count- number of paragraphs or wordsmethod- words/HTML paragraphs/plain-text paragraphsrandom- doesn't use the common paragraph ("Lorem ipsum dolor sit amet...")Example:
{% lorem 6 p random &}

# generates 6 paragraphs of text that doesn't
# start with "Lorem ips um dolor sit amet"
Django - update_or_create
Django's
update_or_create()method either-
- updates an existing object with the given kwargs along with a
defaultsdictionary of pairs for updating the object- creates a new object if it doesn't exist
It returns a tuple containing an object and a boolean specifying whether a new object was created.
Visitor.objects.create(name="Harry", surname="Potter", age=16)

visitor, created = Visitor.objects.update_or_create(
    name="Harry", surname="Potter", defaults={"age": 21}
)

print(visitor.age)
# => '21'

print(created)
# => False
Django - get_or_create
Django's
get_or_create()method either-
- gets an existing object with the given kwargs
- creates a new object if it doesn't exist
It returns a tuple containing an object and a boolean specifying whether a new object was created.
Visitor.objects.create(name="Harry", surname="Potter", age=16)

visitor, created = Visitor.objects.get_or_create(
    name="Harry", surname="Potter", age=16
)
print(created)
# => False

visitor, created = Visitor.objects.get_or_create(
    name="Hermione", surname="Granger", age=16
)
print(created)
# => True
Django QuerySet - only() vs defer() vs exclude()
If you have some fields in your Django model that contain a lot of data and you don't need those fields for a particular query, you can tell Django not to retrieve them with
defer():Event.objects.defer("description")While
defer()works at the attribute level,exclude()works on the row level.In other words,
exclude()arguments are used after theWHEREclause -- i.e.,SELECT * FROM users WHERE name = 'jan'-- whiledefer()changes*to the provided fields -- i.e.,SELECT name, email FROM users.Opposite to
defer()isonly(). If you have fewer fields that you want to retrieve than those you don't, you can useonly()to retrieve only the fields provided as arguments:Event.objects.only("title")
Using Django's get_object_or_404 shortcut
Django tip:
You can use
get_object_or_404to raise theHttp404exception when the object doesn't exist instead of handlingDoesNotExistand raisingHttp404by yourself.👇
from django.http import Http404
from django.shortcuts import get_object_or_404


def my_view(request):
    obj = get_object_or_404(MyModel, pk=1)


# the above is equivalent to
def my_view(request):
    try:
        obj = MyModel.objects.get(pk=1)
    except MyModel.DoesNotExist:
        raise Http404("No MyModel matches the given query.")
Find the union of two Django querysets
Django tip:
You can use
|to create a union of multiple queries.👇
by_username = User.objects.filter(username="John")
by_name = User.objects.filter(full_name="John")
users = by_username | by_name
Django REST Framework - Combining and Excluding Permission Classes
Did you know?
You can combine permissions in Django REST Framework using
&,|, and~.👇
class MyModelViewSet(viewsets.ModelViewSet):
    permission_classes = IsAuthenticated & (IsAdminUser | IsFaculty | ReadOnly)


class MyModelViewSet(viewsets.ModelViewSet):
    permission_classes = ~IsStudent & IsAuthenticated
For more, check out the Combining and Excluding Permission Classes section from Custom Permission Classes in Django REST Framework.
Custom field validators in Django
Did you know?
In Django, you can add custom validators to your model fields
For example, you can validate that price is always greater than 0👇
from django.core.exceptions import ValidationError
from django.db import models
from django.utils.translation import gettext_lazy as _


def validate_greater_than_zero(value):
    if value <= 0:
        raise ValidationError(
            _("%(value)s is not greater than zero."),
            params={"value": value},
        )


class Book(models.Model):
    title = models.CharField(max_length=120)
    price = models.DecimalField(validators=[validate_greater_than_zero])
Change a model field name in Django REST Framework
Django tip:
You can rename the model field inside the serializer by using the source for the selected field.
For example, the
is_activefield from the model can be returned asactive👇# models. py from django.contrib.auth.models import User from django.db import models class UserProfile(models.Model): user = models.OneToOneField(to=User, on_delete=models.CASCADE) bio = models.TextField() birth_date = models.DateField() def __str__(self): return f"{self.user.username} profile" # serializers.py from rest_framework import serializers class UserSerializer(serializers.ModelSerializer): active = serializers.BooleanField(source="is_active") class Meta: model = User fields = ["id", "username", "email", "is_staff", "active"]
Django deployment checklist
Django tip:
Check your production settings.py file for security vulnerabilities with the
checkcommand:$ ./manage.py check --deployhttps://docs.djangoproject.com/en/3.2/ref/django-admin/#check
Example:
$ ./manage.py check --deploy
System check identified some issues:

WARNINGS:
have not set CSRF COOKIE SECURE to True. Using a secure-only CSRF cookie
makes it more difficult for network traffic sniffers to steal the CSRF token.
? (security.W018) You should not have DEBUG set to True in deployment.
? (security.W022) You have not set the SECURE_REFERRER_POLICY setting.
Without this, your site will not send a Referrer-Policy header.
You should consider enabling this header to protect user privacy.
Django - custom user model
Django Tip:
Use a custom user model when starting a project
When starting a new project, set up a custom user model. This model behaves just like the default user model, but you'll be able to customize it in the future.
That should be done before creating or running any migrations.
https://testdriven.io/blog/django-custom-user-model/
# users/models.py

from django.contrib.auth.models import AbstractUser


class CustomUser(AbstractUser):
    pass


# users/adming.py

from django.contrib import admin
from django.contrib.auth.admin import UserAdmin

from .models import CustomUser

admin.site.register(CustomUser, UserAdmin)


# settings.py

AUTH_USER_MODEL = "users.CustomUser"