 Amal Shaji
Python is one of the most popular programming languages. From scripting to API development to machine learning -- Python has a footprint. Its popularity is fueled by it's focus on the developer experience and the tools it offers. Flask, a web framework, is one such tool, which is popular amongst the machine learning community. It's also widely used for API development. But there's a new framework on the rise: FastAPI. Unlike Flask, FastAPI is an ASGI (Asynchronous Server Gateway Interface) framework. On par with Go and NodeJS, FastAPI is one of the fastest Python-based web frameworks.
This article, which is aimed for those interested in moving from Flask to FastAPI, compares and contrasts common patterns in both Flask and FastAPI.
Contents
FastAPI vs Flask
FastAPI was built with these three main concerns in mind:
- Speed
- Developer experience
- Open standards
You can think of FastAPI as the glue that brings together Starlette, Pydantic, OpenAPI, and JSON Schema.
- Under the hood, FastAPI uses Pydantic for data validation and Starlette for tooling, making it blazing fast compared to Flask, giving comparable performance to high-speed web APIs in Node or Go.
- Starlette + Uvicorn offers async request capability, something that Flask lacks.
- With Pydantic along with type hints, you get a nice editor experience with autocompletion. You also get data validation, serialization and deserialization (for building an API), and automatic documentation (via JSON Schema and OpenAPI).
That said, Flask is much more widely used, so it's battle-tested and has a much larger community supporting it. Since both frameworks are meant to be extended, Flask is the clear winner here due to it's vast plugin ecosystem.
Recommendations:
- Use FastAPI if you resonate with the above three concerns, are tired of the plethora of choices when it comes to Flask extensions, wish to leverage async requests, or are just wanting to stand up a RESTful API.
- Use Flask if you aren't comfortable with the maturity-level of FastAPI, need to build a full-stack app with server-side templating, or can't live without some of the community-maintained Flask extensions.
Getting Started
Installation
Like any other Python package, installation is fairly straightforward.
Flask
pip install flask

# or
poetry add flask
pipenv install flask
conda install flask
FastAPI
pip install fastapi uvicorn

# or
poetry add fastapi uvicorn
pipenv install fastapi uvicorn
conda install fastapi uvicorn -c conda-forge
Unlike Flask, FastAPI does not have a built-in development server, so an ASGI server like Uvicorn or Daphne is required.
"Hello World" App
Flask
# flask_code.py

from flask import Flask

app = Flask(__name__)

@app.route("/")
def home():
    return {"Hello": "World"}

if __name__ == "__main__":
    app.run()
FastAPI
# fastapi_code.py

import uvicorn
from fastapi import FastAPI

app = FastAPI()

@app.get("/")
def home():
    return {"Hello": "World"}

if __name__ == "__main__":
    uvicorn.run("fastapi_code:app")
Parameters like reload=True can be passed into uvicorn.run() to enable hot-reloading for development.
Alternatively, you can start the server directly form the terminal:
uvicorn run fastapi_code:app
For hot-reloading:
uvicorn run fastapi_code:app --reload
Configuration
Both Flask and FastAPI provide a number of options for dealing with different configurations for different environments. Both support the following patterns:
- Environment Variables
- Config File
- Instance Folder
- Classes and inheritance
For more, refer to their respective documentation:
- Flask - Configuration Handling
- FastAPI - Settings and Environment Variables
Flask
import os
from flask import Flask

class Config(object):
    MESSAGE = os.environ.get("MESSAGE")

app = Flask(__name__)
app.config.from_object(Config)

@app.route("/settings")
def get_settings():
    return { "message": app.config["MESSAGE"] }

if __name__ == "__main__":
    app.run()
Now, before you run the server, set the appropriate environment variable:
export MESSAGE="hello, world"
FastAPI
import uvicorn
from fastapi import FastAPI
from pydantic import BaseSettings

class Settings(BaseSettings):
    message: str

settings = Settings()
app = FastAPI()

@app.get("/settings")
def get_settings():
    return { "message": settings.message }

if __name__ == "__main__":
    uvicorn.run("fastapi_code:app")
Again, before running the server, set the appropriate environment variable:
export MESSAGE="hello, world"
Routes, Templates, and Views
HTTP Methods
Flask
from flask import request

@app.route("/", methods=["GET", "POST"])
def home():
    # handle POST
    if request.method == "POST":
        return {"Hello": "POST"}
    # handle GET
    return {"Hello": "GET"}
FastAPI
@app.get("/")
def home():
    return {"Hello": "GET"}

@app.post("/")
def home_post():
    return {"Hello": "POST"}
FastAPI provides separate decorators for each method:
@app.get("/")
@app.post("/")
@app.delete("/")
@app.patch("/")
URL Parameters
To pass in info through the URL (like /employee/1) for managing state:
Flask
@app.route("/employee/<int:id>")
def home():
    return {"id": id}
FastAPI
@app.get("/employee/{id}")
def home(id: int):
    return {"id": id}
The URL parameter is specified similar to an f-string expression. Also, you can make use of type hints. Here, we tell Pydantic at runtime that id is of type int. In development, this can lead to better code-completion as well.
Query Parameters
Like URL parameters, query parameters (like /employee?department=sales) can also be used for managing state (usually for filtering or sorting):
Flask
from flask import request

@app.route("/employee")
def home():
    department = request.args.get("department")
    return {"department": department}
FastAPI
@app.get("/employee")
def home(department: str):
    return {"department": department}
Templates
Flask
from flask import render_template

@app.route("/")
def home():
    return render_template("index.html")
By default, Flask looks for templates in a "templates" folder.
FastAPI
You need to install Jinja:
pip install jinja2
Implementation:
from fastapi import Request
from fastapi.templating import Jinja2Templates
from fastapi.responses import HTMLResponse

app = FastAPI()

templates = Jinja2Templates(directory="templates")

@app.get("/", response_class=HTMLResponse)
def home(request: Request):
    return templates.TemplateResponse("index.html", {"request": request})
For FastAPI, you need to explicitly define the "templates" folder. Then for each response, the request context needs to be provided.
Static Files
Flask
By default, Flask serves up static files from the "static" folder.
FastAPI
In FastAPI, you need to mount a folder for static files:
from fastapi.staticfiles import StaticFiles

app = FastAPI()

app.mount("/static", StaticFiles(directory="static"), name="static")
Asynchronous Tasks
Flask
Starting with Flask 2.0, you can create asynchronous route handlers using async/await:
@app.route("/")
async def home():
    result = await some_async_task()
    return result
For more on asynchronous views in Flask, check out the Async in Flask 2.0 article.
Async in flask can also be achieved by using threads (concurrency) or multiprocessing (parallelism) or from tools like Celery or RQ:
FastAPI
FastAPI greatly simplifies asynchronous tasks due to it's native support for asyncio. To use, simply add the async keyword to the view function:
@app.get("/")
async def home():
    result = await some_async_task()
    return result
FastAPI also has a background tasks feature, which you can use to define background tasks to be run after returning a response. This is useful for operations that don't need to complete before the response is sent back.
from fastapi import BackgroundTasks

def process_file(filename: str):
    # process file :: takes minimum 3 secs (just an example)
    pass

@app.post("/upload/{filename}")
async def upload_and_process(filename: str, background_tasks: BackgroundTasks):
    background_tasks.add_task(process_file, filename)
    return {"message": "processing file"}
Here, the response will be sent instantly without making the user wait for the file processing to complete.
You may want to use Celery instead of BackgroundTasks when you need to perform heavy background computations or if you require a task queue to manage the tasks and workers. For more, refer to Asynchronous Tasks with FastAPI and Celery.
Dependency Injection
Flask
Although you can implement your own Dependency Injection solution, Flask does not have true first-class support for it by default. Instead, you'll want to use an external package like flask-injector.
FastAPI
FastAPI, on the other hand, has a powerful solution for handling Dependency Injection.
For example:
from databases import Database
from fastapi import Depends
from starlette.requests import Request

from db_helpers import get_all_data
def get_db(request: Request):
    return request.app.state._db

@app.get("/data")
def get_data(db: Database = Depends(get_db)):
    return get_all_data(db)
So, get_db will grab a reference to the database connection create in the app's startup event handler. Depends is then used to indicate to FastAPI that the route "depends" on get_db. So, it should be executed before the code in the route handler and the result should be "injected" into the route itself.
Data Validation
Flask
Flask does not have any inhouse data validation support. You can use the powerful Pydantic package for data validation through Flask-Pydantic.
FastAPI
One of the things that makes FastAPI so powerful is it's support for Pydantic.
from pydantic import BaseModel

app = FastAPI()

class Request(BaseModel):
    username: str
    password: str

@app.post("/login")
async def login(req: Request):
    if req.username == "testdriven.io" and req.password == "testdriven.io":
        return {"message": "success"}
    return {"message": "Authentication Failed"}
Here, we take in an input of model Request. The payload must contain a username and password.
# correct payload format
✗ curl -X POST 'localhost:8000/login' \
    --header 'Content-Type: application/json' \
    --data-raw '{\"username\": \"testdriven.io\",\"password\":\"testdriven.io\"}'

{"message":"success"}

# incorrect payload format
✗ curl -X POST 'localhost:8000/login' \
    --header 'Content-Type: application/json' \
    --data-raw '{\"username\": \"testdriven.io\",\"passwords\":\"testdriven.io\"}'

{"detail":[{"loc":["body","password"],"msg":"field required","type":"value_error.missing"}]}
Take note of the request. We passed in passwords as a key instead of password. The Pydantic model automatically tells the user that the password field is missing.
Serialization and Deserialization
Flask
The easiest way to serialize is to use jsonify:
from flask import jsonify
from data import get_data_as_dict

@app.route("/")
def send_data():
    return jsonify(get_data_as_dict)
For complex objects, Flask developers often use Flask-Marshmallow.
FastAPI
FastAPI automatically serializes any returned dict. For more complex and structured data, Pydantic is used:
from pydantic import BaseModel

app = FastAPI()

class Request(BaseModel):
    username: str
    email: str
    password: str

class Response(BaseModel):
    username: str
    email: str

@app.post("/login", response_model=Response)
async def login(req: Request):
    if req.username == "testdriven.io" and req.password == "testdriven.io":
        return req
    return {"message": "Authentication Failed"}
Here, we added a Request model with three inputs: username, email, and password. We also defined a Response model with just the username and email. The input Request model handles deserialization while the output Response model handles object serialization. The response model is then passed in to the decorator via the response_model parameter.
Now if we return the request itself as the response, Pydantic will omit the password, because our defined response model does not contain a password field.
Example:
# output
✗ curl -X POST 'localhost:8000/login' \
    --header 'Content-Type: application/json' \
    --data-raw '{\"username\":\"testdriven.io\",\"email\":\"[email protected]\",\"password\":\"testdriven.io\"}'

{"username":"testdriven.io","email":"[email protected]"}
Middleware
Middleware is used to apply logic with every request before it's processed by the view function.
Flask
class middleware:
    def __init__(self, app) -> None:
        self.app = app

    def __call__(self, environ, start_response):
        start = time.time()
        response = self.app(environ, start_response)
        end = time.time() - start
        print(f"request processed in {end} s")
        return response

app = Flask(__name__)
app.wsgi_app = middleware(app.wsgi_app)
FastAPI
from fastapi import Request

@app.middleware("http")
async def add_process_time_header(request: Request, call_next):
    start_time = time.time()
    response = await call_next(request)
    process_time = time.time() - start_time
    print(f"request processed in {process_time} s")
    return response
The @app.middleware("http") decorator is a must for creating middleware in FastAPI. The above middleware calculates the time taken for processing a request. After the request is processed by the view function, the total processing time is calculated and sent back as a response header.
# flask output(logs)
request processed in 0.0010077953338623047 s
127.0.0.1 - - [22/Sep/2020 18:56:21] "GET / HTTP/1.1" 200 -

# fastapi output(logs)
request processed in 0.0009925365447998047 s
INFO:     127.0.0.1:51123 - "GET / HTTP/1.1" 200 OK
Modularity
As an app grows, at some point you'll want to group similar views, templates, static files, and models together to help decompose the app into smaller components.
Flask
In Flask, Blueprints are used for modularity:
# blueprints/product/views.py
from flask import Blueprint

product = Blueprint("product", __name__)

@product.route("/product1")
    ...
# main.py

from blueprints.product.views import product

app.register_blueprint(product)
FastAPI
With FastAPI, meanwhile, modularity is achieved via an APIRouter:
# routers/product/views.py
from fastapi import APIRouter

product = APIRouter()

@product.get("/product1")
    ...
# main.py

from routers.product.views import product

app.include_router(product)
Additional Features
Automatic Documentation
Flask
Flask does not automatically create API documentation out-of-the-box. However, there are several extensions that handle this like flask-swagger and Flask RESTX but they require additional setup.
FastAPI
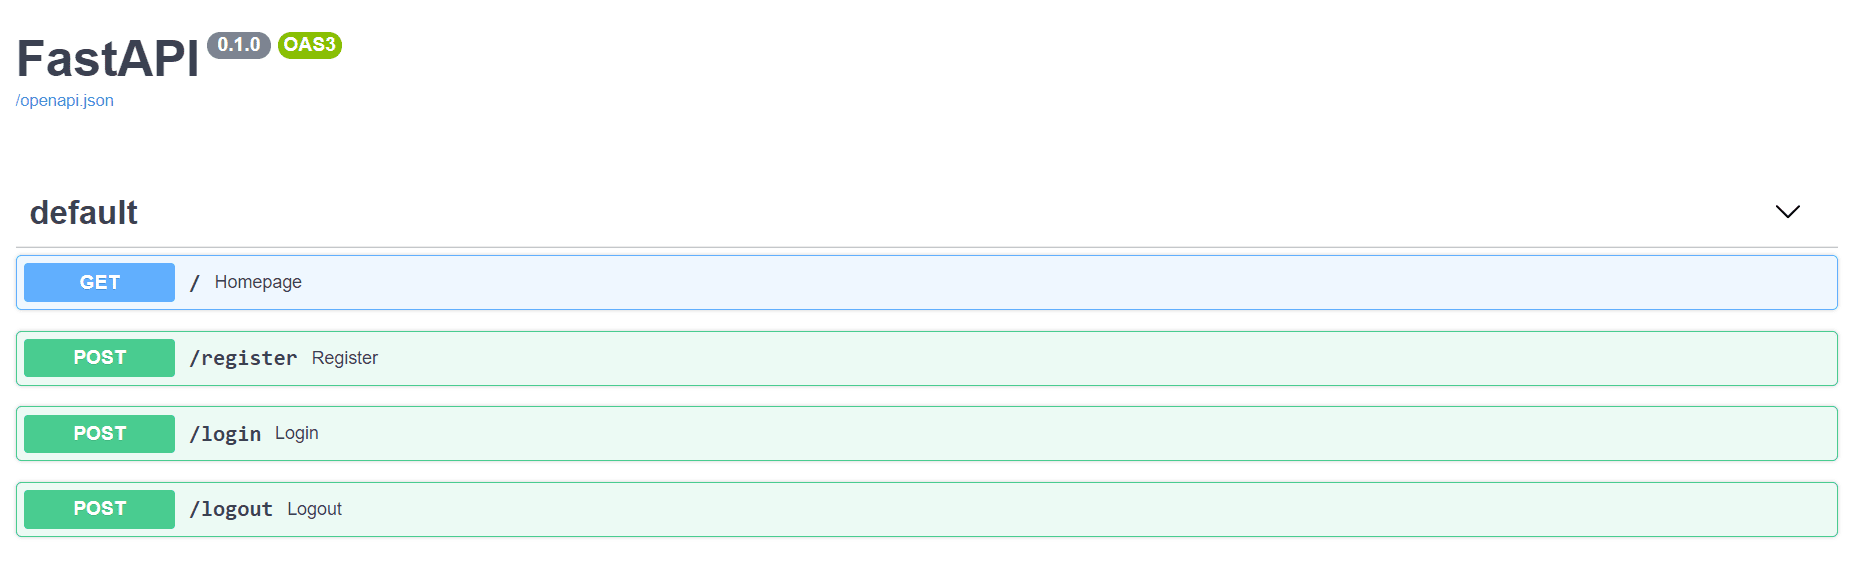
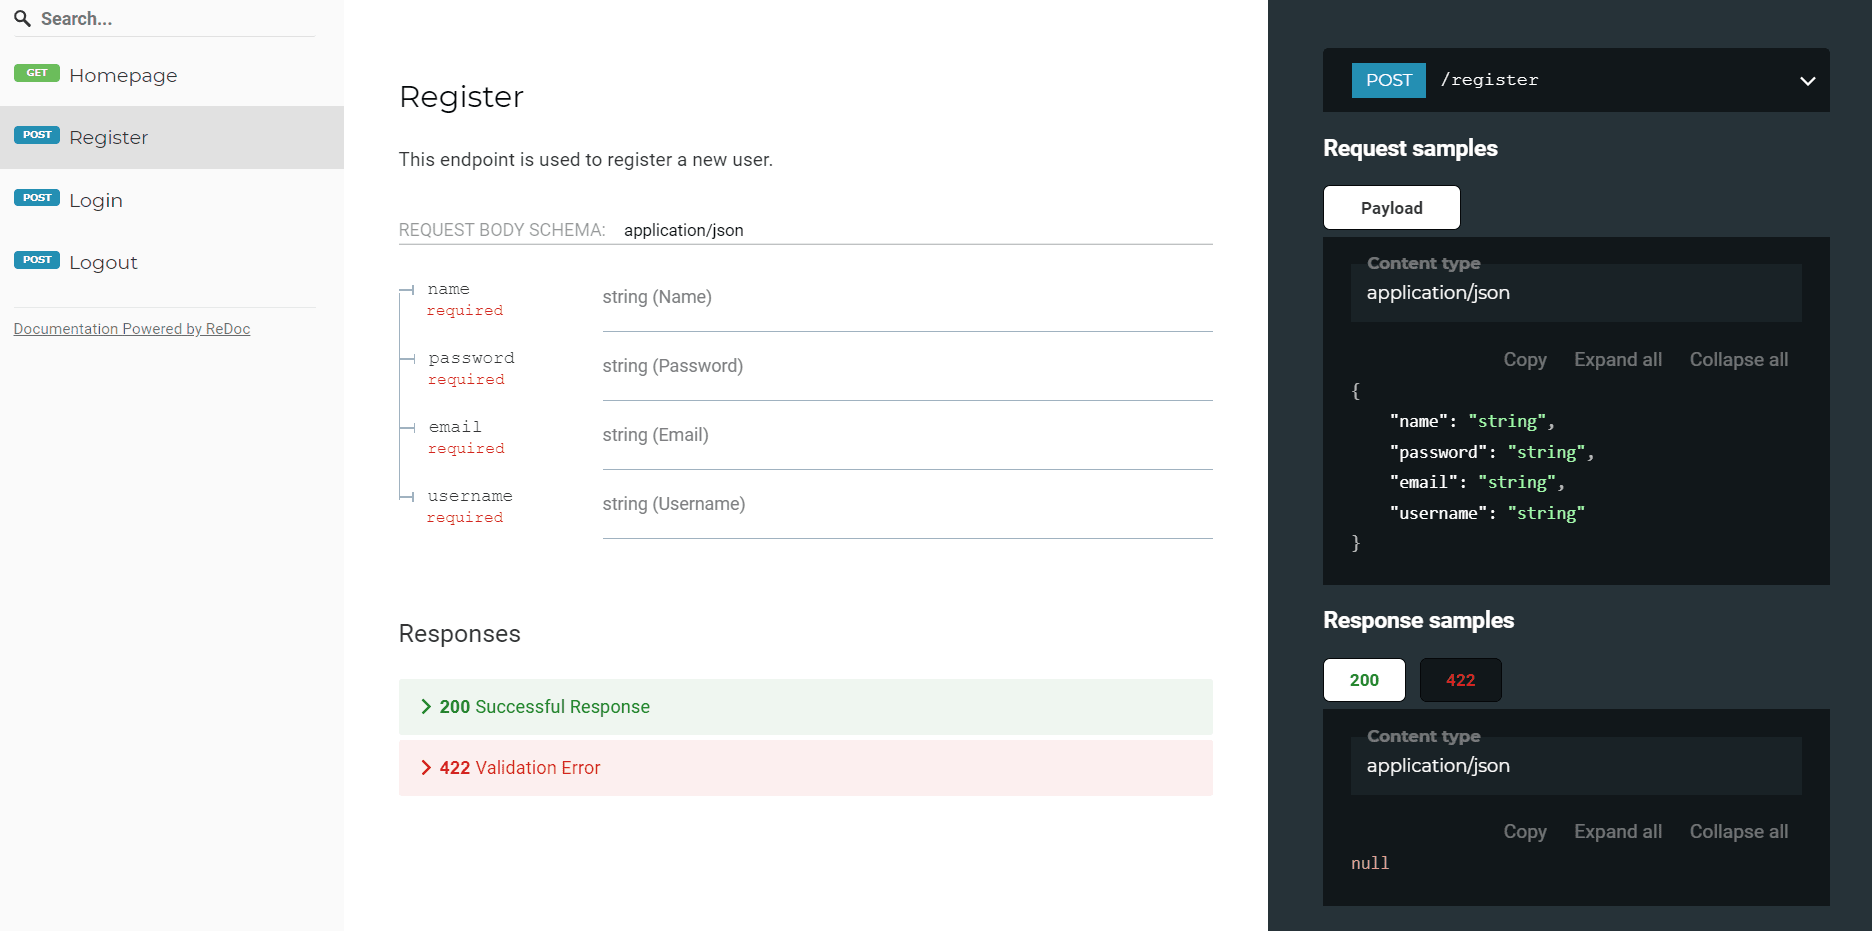
FastAPI supports OpenAPI along with Swagger UI and ReDoc by default. This means that every endpoint is automatically documented from the metadata associated with the endpoint.

Admin app
Flask
Flask has a widely used third party admin package called Flask-Admin, which is used to quickly perform CRUD operations against your models.
FastAPI
As of writing, there are two popular FastAPI extensions for this:
- FastAPI Admin - Functional admin panel that provides a user interface for performing CRUD operations on your data.
- SQLAlchemy Admin - Admin Panel for FastAPI/Starlette that works with SQLAlchemy models.
Authentication
Flask
While Flask doesn't have a native solution, several third-party extensions are available.
FastAPI
FastAPI natively supports a number of security and authentication tools via the fastapi.security package. With a few lines of code, you can add basic HTTP authentication to your application:
import secrets

from fastapi import Depends, FastAPI, HTTPException, status
from fastapi.security import HTTPBasic, HTTPBasicCredentials

app = FastAPI()

security = HTTPBasic()


def get_current_username(credentials: HTTPBasicCredentials = Depends(security)):
    correct_username = secrets.compare_digest(credentials.username, "stanleyjobson")
    correct_password = secrets.compare_digest(credentials.password, "swordfish")
    if not (correct_username and correct_password):
        raise HTTPException(status_code=status.HTTP_401_UNAUTHORIZED)
    return credentials.username


@app.get("/whoami")
def who_ami_i(username: str = Depends(get_current_username)):
    return {"username": username}
FastAPI implements OAuth2 and OpenID Connect via the OpenAPI standards.
Review the following resources from the official documentation for more:
Additional Resources
- Web Authentication Methods Compared
- Adding Social Authentication to Flask
- Session-based Auth with Flask for Single Page Apps
- Securing FastAPI with JWT Token-based Authentication
CORS
CORS (Cross-Origin Resource Sharing) middleware checks whether or not that requests are coming from allowed origins. If yes, the request is passed along to the next middleware or to the view function. If not, it rejects the request, which sends an error response back to the caller.
Flask
Flask requires an external package called Flask-CORS for CORS support:
pip install flask-cors
Basic implementation:
from flask_cors import CORS

app = Flask(__name__)

CORS(app)
FastAPI
FastAPI natively supports CORS:
from fastapi.middleware.cors import CORSMiddleware

app = FastAPI()

origins = ["*"]

app.add_middleware(CORSMiddleware, allow_origins=origins)
Testing
Flask
import pytest
from flask import Flask

app = Flask(__name__)

@app.route("/")
def home():
    return {"message": "OK"}

def test_hello():
    res = app.test_client().get("/")

    assert res.status_code == 200
    assert res.data == b'{"message":"OK"}\n'
FastAPI
from fastapi import FastAPI
from fastapi.testclient import TestClient

app = FastAPI()

@app.get("/")
async def home():
    return {"message": "OK"}

client = TestClient(app)

def test_home():
    res = client.get("/")

    assert res.status_code == 200
    assert res.json() == {"message": "OK"}
FastAPI provides a TestClient. With it, you can run pytest directly with FastAPI. For more information, review the Testing guide from the official documentation.
Deployment
Production Server
Flask
Flask by default runs a development WSGI (Web Server Gateway Interface) application server. For production, you'll need to use a production-grade WSGI app server like Gunicorn, uWSGI, or mod_wsgi
Install Gunicorn:
pip install gunicorn
Start server:
# main.py
# app = Flask(__name__)

gunicorn main:app
FastAPI
Since FastAPI doesn't have a development server, you'll use Uvicorn (or Daphne) for both development and production.
Install Uvicorn:
pip install uvicorn
Start server:
# main.py
# app = FastAPI()

uvicorn main:app
You may want to use Gunicorn to manage Uvicorn in order to take advantage of both concurrency (via Uvicorn) and parallelism (via Gunicorn workers):
# main.py
# app = FastAPI()

gunicorn -w 3 -k uvicorn.workers.UvicornWorker main:app
Docker
Flask
FROM python3.10-slim

WORKDIR /app

COPY requirements.txt .

RUN pip install -r requirements.txt

COPY . .

EXPOSE 5000

CMD ["gunicorn", "main:app"]
This is one of the simplest Dockerfiles for Flask. To see how to fully configure it for production, review the Dockerizing Flask with Postgres, Gunicorn, and Nginx tutorial.
FastAPI
FROM python3.10-slim

WORKDIR /app

COPY requirements.txt .

RUN pip install -r requirements.txt

COPY . .

EXPOSE 8000

CMD ["uvicorn", "main:app"]
Again, this is a very simple configuration. The FastAPI author has provided several production-ready Dockerfiles. For more, review the official FastAPI documentation as well as the Dockerizing FastAPI with Postgres, Uvicorn, and Traefik tutorial.
Conclusion
Taking a step back, Django and Flask are the two most popular Python-based web frameworks (FastAPI is the third most popular). They (Django and Flask) have very different philosophies, though. The advantage of Flask over Django is that Flask is a micro-framework. The program structure is left to the programmers' discretion and not enforced. Developers can add third-party extensions to improve their code as they see fit. That said, typically, as the code base grows, there's a need for a number of common features that almost all web apps need. Tight integration of these features with the framework results in much less code that end developers need to create and maintain on their own.
The code examples throughout this article convey the same thing. In other words, FastAPI includes many of the required features. It also follows strict standards, making your code production-ready and easier to maintain. FastAPI is also very well-documented.
While FastAPI may not be as battle-tested as Flask, more and more developers are turning to it for serving up a machine learning model or developing a RESTful API. Switching to FastAPI is a solid choice.