In this article, we'll look at the most commonly used methods for handling web authentication from the perspective of a Python web developer.
While the code samples and resources are meant for Python developers, the actual descriptions of each authentication method are applicable to all web developers.
Contents
Authentication vs Authorization
Authentication is the process of verifying the credentials of a user or device attempting to access a restricted system. Authorization, meanwhile, is the process of verifying whether the user or device is allowed to perform certain tasks on the given system.
Put simply:
- Authentication: Who are you?
- Authorization: What can you do?
Authentication comes before authorization. That is, a user must be valid before they are granted access to resources based on their authorization level. The most common way of authenticating a user is via username and password. Once authenticated, different roles such as admin, moderator, etc. are assigned to them which grants them special privileges to the system.
With that, let's look at the different methods used to authenticate a user.
HTTP Basic Authentication
Basic authentication, which is built into the HTTP protocol, is the most basic form of authentication. With it, login credentials are sent in the request headers with each request:
"Authorization: Basic dXNlcm5hbWU6cGFzc3dvcmQ=" your-website.com
Usernames and passwords are not encrypted. Instead, the username and password are concatenated together using a : symbol to form a single string: username:password. This string is then encoded using base64.
>>> import base64
>>>
>>> auth = "username:password"
>>> auth_bytes = auth.encode('ascii') # convert to bytes
>>> auth_bytes
b'username:password'
>>>
>>> encoded = base64.b64encode(auth_bytes) # base64 encode
>>> encoded
b'dXNlcm5hbWU6cGFzc3dvcmQ='
>>> base64.b64decode(encoded) # base64 decode
b'username:password'
This method is stateless, so the client must supply the credentials with each and every request. It's suitable for API calls along with simple auth workflows that do not require persistent sessions.
Flow
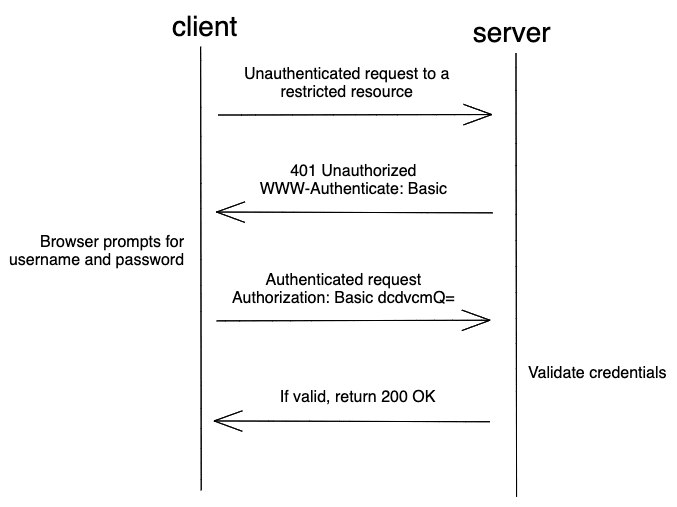
- Unauthenticated client requests a restricted resource
- HTTP 401 Unauthorized is returned with a header
WWW-Authenticatethat has a value ofBasic. - The
WWW-Authenticate: Basicheader causes the browser to display the username and password promot - After entering your credentials, they are sent in the header with each request:
Authorization: Basic dcdvcmQ=

Pros
- Since there aren't many operations going on, authentication can be faster with this method.
- Easy to implement.
- Supported by all major browsers.
Cons
- Base64 is not the same as encryption. It's just another way to represent data. The base64 encoded string can easily be decoded since it's sent in plain text. This poor security feature calls for many types of attacks. Because of this, HTTPS/SSL is absolutely essential.
- Credentials must be sent with every request.
- Users can only be logged out by rewriting the credentials with an invalid one.
Packages
Code
Basic HTTP Authentication can be easily done in Flask using the Flask-HTTP package.
from flask import Flask
from flask_httpauth import HTTPBasicAuth
from werkzeug.security import generate_password_hash, check_password_hash

app = Flask(__name__)
auth = HTTPBasicAuth()

users = {
    "username": generate_password_hash("password"),
}


@auth.verify_password
def verify_password(username, password):
    if username in users and check_password_hash(users.get("username"), password):
        return username


@app.route("/")
@auth.login_required
def index():
    return f"You have successfully logged in, {auth.current_user()}"


if __name__ == "__main__":
    app.run()
Resources
- IETF: The 'Basic' HTTP Authentication Scheme
- RESTful Authentication with Flask
- DRF Basic Authentication Guide
- FastAPI Basic Authentication Example
HTTP Digest Authentication
HTTP Digest Authentication (or Digest Access Authentication) is a more secure form of HTTP Basic Auth. The main difference is that the password is sent in MD5 hashed form rather than in plain text, so it's more secure than Basic Auth.
Flow
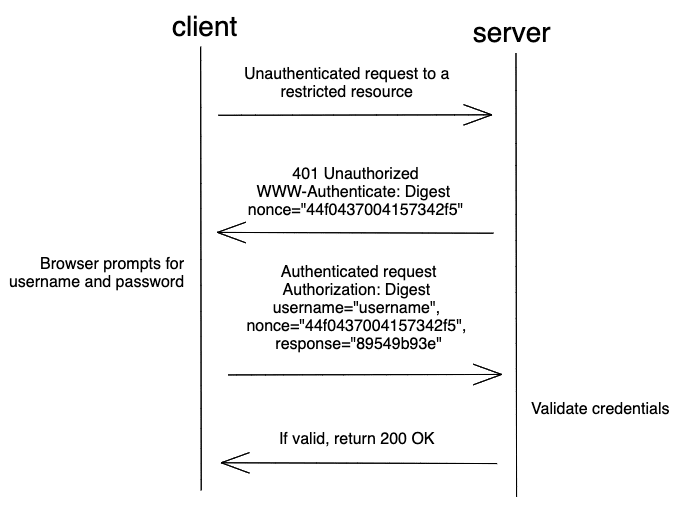
- Unauthenticated client requests a restricted resource
- Server generates a random value called a nonce and sends back an HTTP 401 Unauthorized status with a
WWW-Authenticateheader that has a value ofDigestalong with the nonce:WWW-Authenticate: Digest nonce="44f0437004157342f50f935906ad46fc" - The
WWW-Authenticate: Basicheader causes the browser to display the username and password prompt - After entering your credentials, the password is hashed and then sent in the header along with the nonce with each request:
Authorization: Digest username="username", nonce="16e30069e45a7f47b4e2606aeeb7ab62", response="89549b93e13d438cd0946c6d93321c52" - With the username, the server obtains the password, hashes it along with the nonce, and then verifies that the hashes are the same

Pros
- More secure than Basic auth since the password is not sent in plain text.
- Easy to implement.
- Supported by all major browsers.
Cons
- Credentials must be sent with every request.
- User can only be logged out by rewriting the credentials with an invalid one.
- Compared to Basic auth, passwords are less secure on the server since bcrypt can't be used.
- Vulnerable to man-in-the-middle attacks.
Packages
Code
The Flask-HTTP package supports Digest HTTP Authentication as well.
from flask import Flask
from flask_httpauth import HTTPDigestAuth

app = Flask(__name__)
app.config["SECRET_KEY"] = "change me"
auth = HTTPDigestAuth()

users = {
    "username": "password"
}


@auth.get_password
def get_user(username):
    if username in users:
        return users.get(username)


@app.route("/")
@auth.login_required
def index():
    return f"You have successfully logged in, {auth.current_user()}"


if __name__ == "__main__":
    app.run()
Resources
Session-based Auth
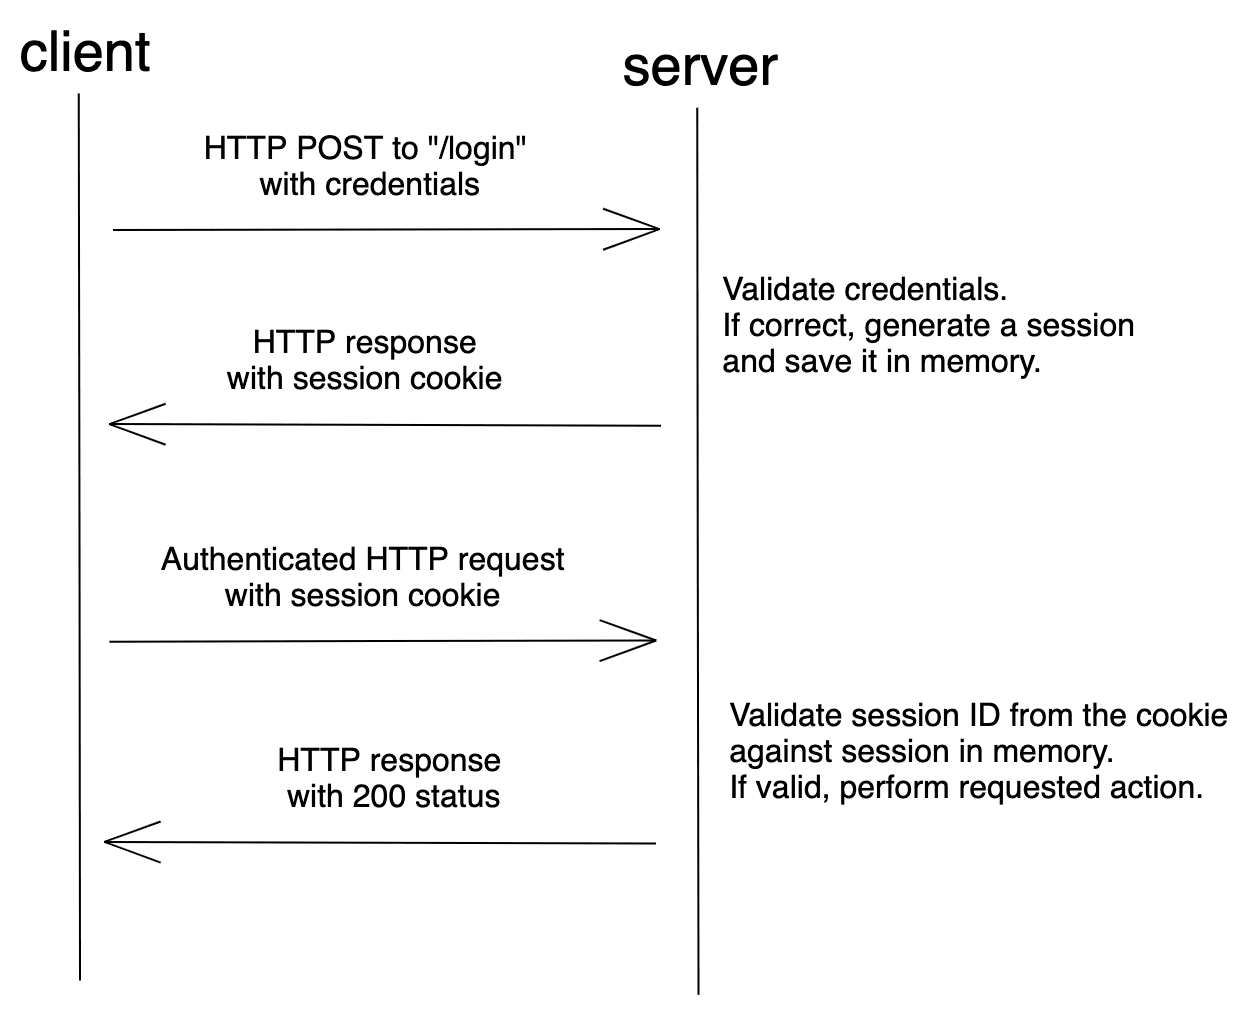
With session-based auth (or session cookie auth or cookie-based auth), the user's state is stored on the server. It does not require the user to provide a username or a password with each request. Instead, after logging in, the server validates the credentials. If valid, it generates a session, stores it in a session store, and then sends the session ID back to the browser. The browser stores the session ID as a cookie, which gets sent anytime a request is made to the server.
Session-based auth is stateful. Each time a client requests the server, the server must locate the session in memory in order to tie the session ID back to the associated user.
Flow

Pros
- Faster subsequent logins, as the credentials are not required.
- Improved user experience.
- Fairly easy to implement. Many frameworks (like Django) provide this feature out-of-the-box.
Cons
- It's stateful. The server keeps track of each session on the server-side. The session store, used for storing user session information, needs to be shared across multiple services to enable authentication. Because of this, it doesn't work well for RESTful services, since REST is a stateless protocol.
- Cookies are sent with every request, even if it does not require authentication.
- Vulnerable to CSRF attacks. Read more about CSRF and how to prevent it in Flask here.
Packages
Code
Flask-Login is perfect for session-based authentication. The package takes care of logging in, logging out, and can remember the user for a period of time.
from flask import Flask, request
from flask_login import (
    LoginManager,
    UserMixin,
    current_user,
    login_required,
    login_user,
)
from werkzeug.security import generate_password_hash, check_password_hash


app = Flask(__name__)
app.config.update(
    SECRET_KEY="change_this_key",
)

login_manager = LoginManager()
login_manager.init_app(app)


users = {
    "username": generate_password_hash("password"),
}


class User(UserMixin):
    ...


@login_manager.user_loader
def user_loader(username: str):
    if username in users:
        user_model = User()
        user_model.id = username
        return user_model
    return None


@app.route("/login", methods=["POST"])
def login_page():
    data = request.get_json()
    username = data.get("username")
    password = data.get("password")

    if username in users:
        if check_password_hash(users.get(username), password):
            user_model = User()
            user_model.id = username
            login_user(user_model)
        else:
            return "Wrong credentials"
    return "logged in"


@app.route("/")
@login_required
def protected():
    return f"Current user: {current_user.id}"


if __name__ == "__main__":
    app.run()
Resources
- IETF: Cookie-based HTTP Authentication
- How To Add Authentication to Your App with Flask-Login
- Session-based Auth with Flask for Single Page Apps
- CSRF Protection in Flask
- Django Login and Logout Tutorial
- Django Session-based Auth for Single Page Apps
- FastAPI-Users: Cookie Auth
Token-Based Authentication
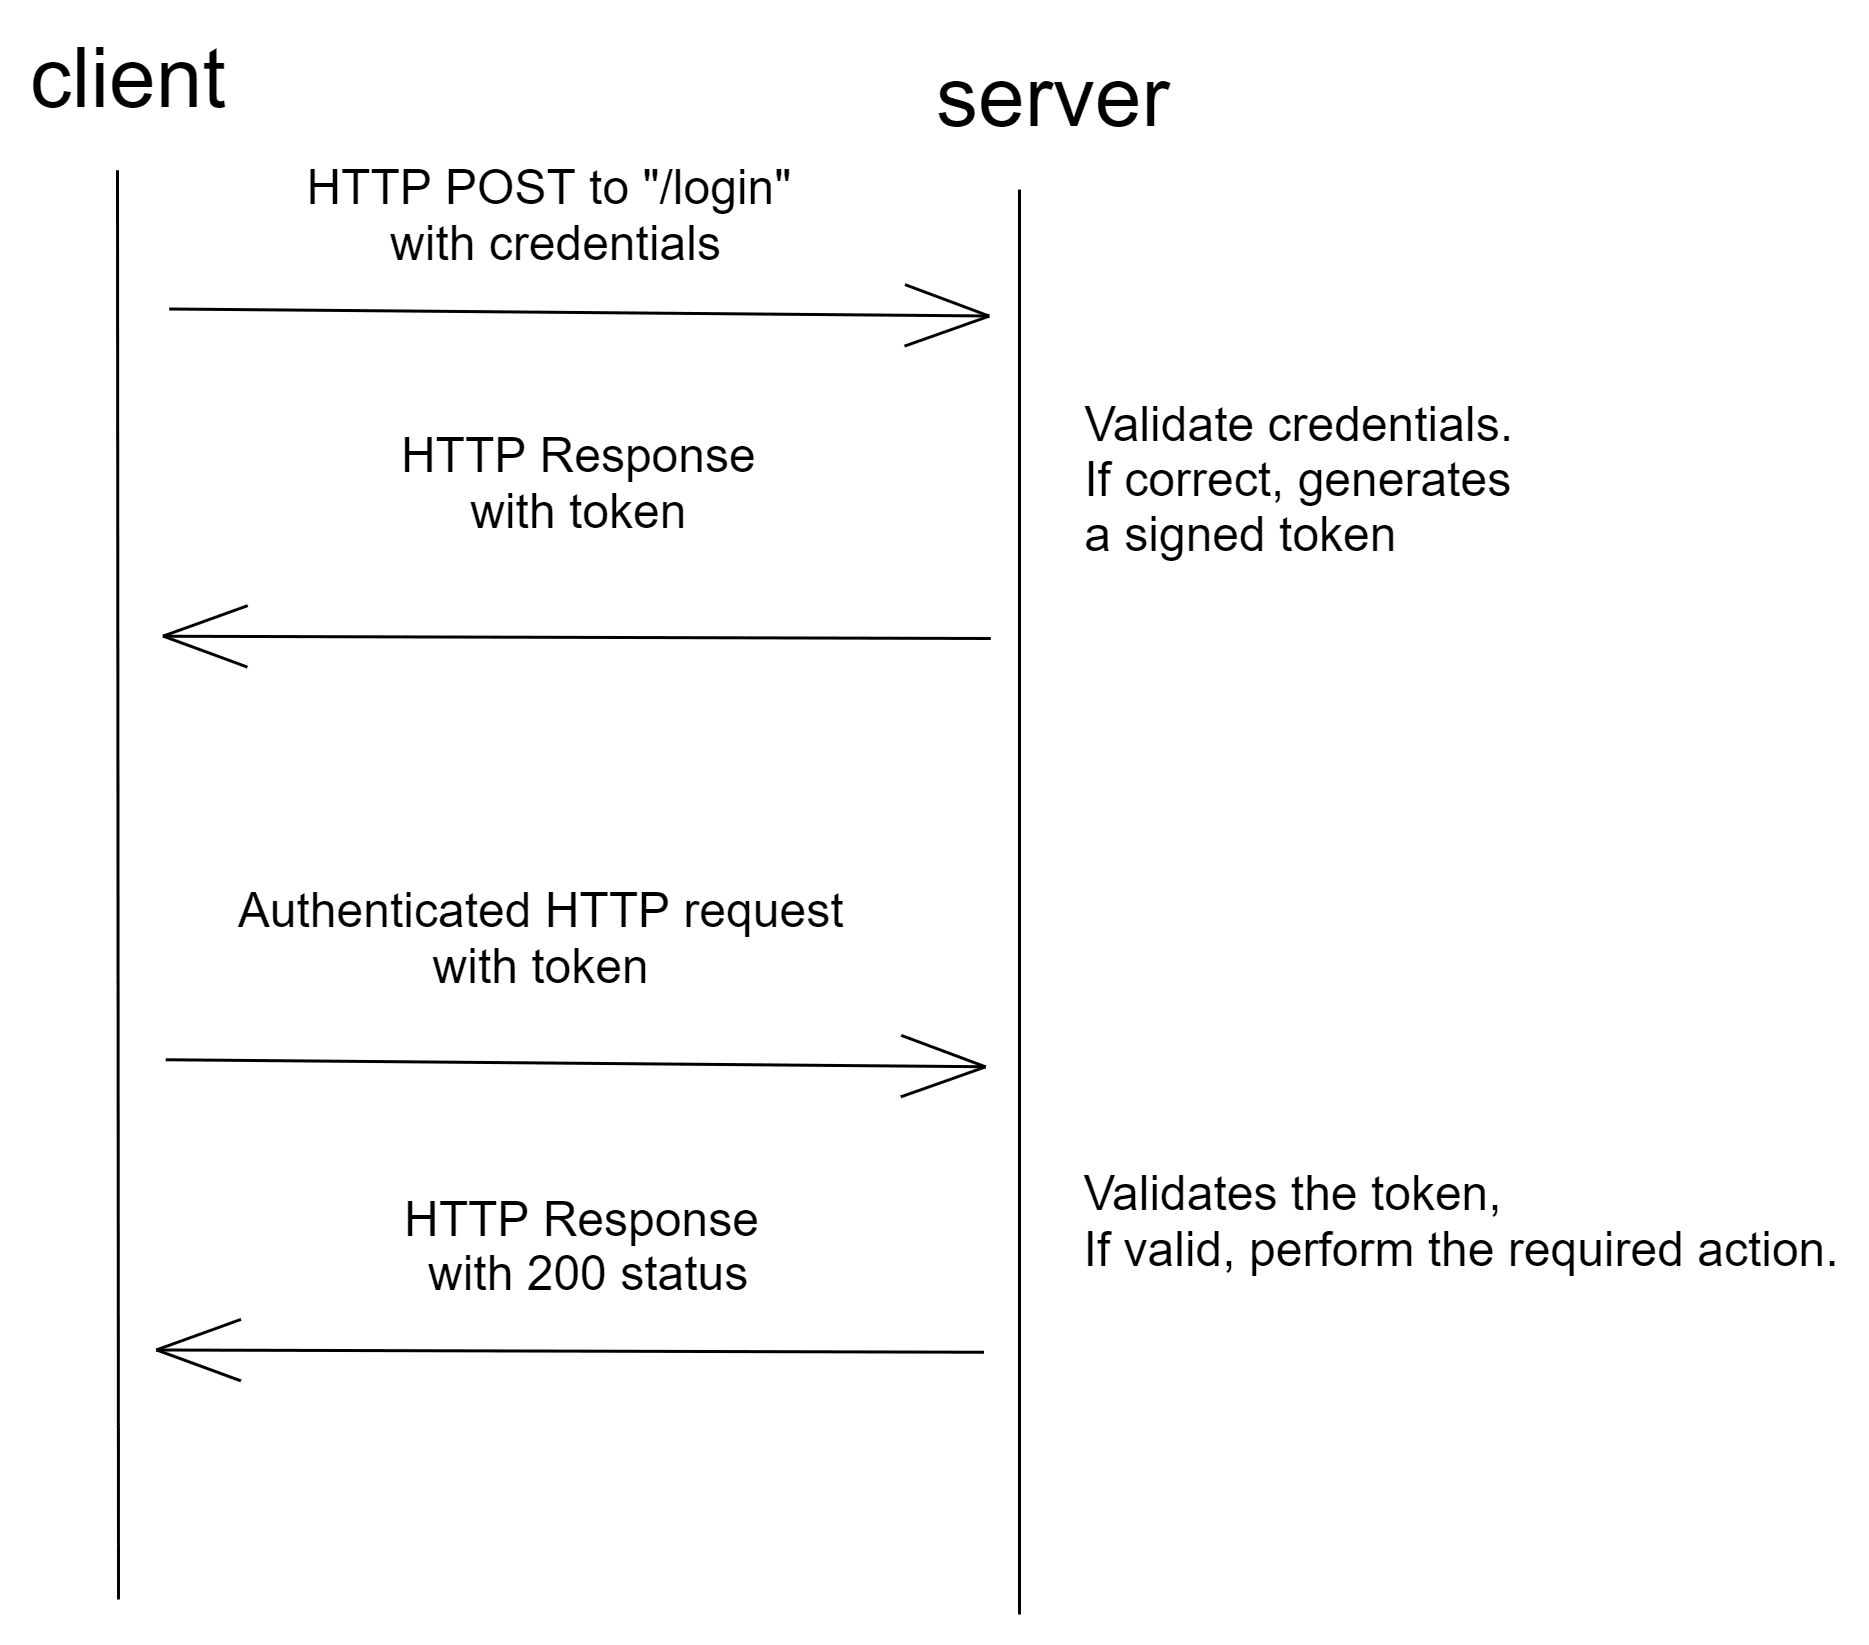
This method uses tokens to authenticate users instead of cookies. The user authenticates using valid credentials and the server returns a signed token. This token can be used for subsequent requests.
The most commonly used token is a JSON Web Token (JWT). A JWT consists of three parts:
- Header (includes the token type and the hashing algorithm used)
- Payload (includes the claims, which are statements about the subject)
- Signature (used to verify that the message wasn't changed along the way)
All three are base64 encoded and concatenated using a . and hashed. Since they are encoded, anyone can decode and read the message. But only authentic users can produce valid signed tokens. The token is authenticated using the Signature, which is signed with a private key.
JSON Web Token (JWT) is a compact, URL-safe means of representing claims to be transferred between two parties. The claims in a JWT are encoded as a JSON object that is used as the payload of a JSON Web Signature (JWS) structure or as the plaintext of a JSON Web Encryption (JWE) structure, enabling the claims to be digitally signed or integrity protected with a Message Authentication Code (MAC) and/or encrypted. - IETF
Tokens don't need not be saved on the server-side. They can just be validated using their signature. In recent times, token adoption has increased due to the rise of RESTful APIs and Single Page Applications (SPAs).
Flow

Pros
- It's stateless. The server doesn't need to store the token as it can be validated using the signature. This makes the request faster as a database lookup is not required.
- Suited for a microservices architecture, where multiple services require authentication. All we need to configure at each end is how to handle the token and the token secret.
Cons
- Depending on how the token is saved on the client, it can lead to XSS (via localStorage) or CSRF (via cookies) attacks.
- Tokens cannot be deleted. They can only expire. This means that if the token gets leaked, an attacker can misuse it until expiry. Thus, it's important to set token expiry to something very small, like 15 minutes.
- Refresh tokens need to be set up to automatically issue tokens at expiry.
- One way to delete tokens is to create a database for blacklisting tokens. This adds extra overhead to the microservice architecture and introduces state.
Packages
Code
The Flask-JWT-Extended package offers a lot of possibilities for handling JWTs.
from flask import Flask, request, jsonify
from flask_jwt_extended import (
    JWTManager,
    jwt_required,
    create_access_token,
    get_jwt_identity,
)
from werkzeug.security import check_password_hash, generate_password_hash

app = Flask(__name__)
app.config.update(
    JWT_SECRET_KEY="please_change_this",
)

jwt = JWTManager(app)

users = {
    "username": generate_password_hash("password"),
}


@app.route("/login", methods=["POST"])
def login_page():
    username = request.json.get("username")
    password = request.json.get("password")

    if username in users:
        if check_password_hash(users.get(username), password):
            access_token = create_access_token(identity=username)
            return jsonify(access_token=access_token), 200

    return "Wrong credentials", 400


@app.route("/")
@jwt_required
def protected():
    return jsonify(logged_in_as=get_jwt_identity()), 200


if __name__ == "__main__":
    app.run()
Resources
- Introduction to JSON Web Tokens
- IETF: JSON Web Token (JWT)
- How to Use JWT Authentication with Django REST Framework
- Securing FastAPI with JWT Token-based Authentication
- JWT Authentication Best Practices
One Time Passwords
One time passwords (OTPs) are commonly used as confirmation for authentication. OTPs are randomly generated codes that can be used to verify if the user is who they claim to be. Its often used after user credentials are verified for apps that leverage two-factor authentication.
To use OTP, a trusted system must be present. This trusted system could be a verified email or mobile number.
Modern OTPs are stateless. They can be verified using multiple methods. While there are a few different types of OTPs, Time-based OTPs (TOTPs) is arguably the most common type. Once generated, they expire after a period of time.
Since you get an added layer of security, OTPs are recommended for apps that involve highly sensitive data, like online banking and other financial services.
Flow
The traditional way of implementing OTPs:
- Client sends username and password
- After credential verification, the server generates a random code, stores it on the server-side, and sends the code to the trusted system
- The user gets the code on the trusted system and enters it back on the web app
- The server verifies the code against the one stored and grants access accordingly
How TOTPs work:
- Client sends username and password
- After credential verification, the server generates a random code using a randomly generated seed, stores the seed on the server-side, and sends the code to the trusted system
- The user gets the code on the trusted system and enters it back on the web app
- The server verifies the code against the stored seed, ensures that it has not expired, and grants access accordingly
How OTP agents like Google Authenticator, Microsoft Authenticator, and FreeOTP work:
- Upon registering for Two Factor Authentication (2FA), the server generates a random seed value and sends the seed to the user in the form of unique QR code
- The user scans the QR code using their 2FA application to validate the trusted device
- Whenever the OTP is required, the user checks for the code on their device and enters it on the web app
- The server verifies the code and grants access accordingly
Pros
- Adds an extra layer of protection.
- No danger that a stolen password can be used for multiple sites or services that also implement OTPs.
Cons
- You need to store the seed used for generating OTPs.
- OTP agents like Google Authenticator are difficult to set up again if you lose the recovery code.
- Problems arise when the trusted device is not available (dead battery, network error, etc.). Because of this, a backup device is typically required which adds an additional attack vector.
Packages
Code
The PyOTP package offers both time-based and counter-based OTPs.
from time import sleep

import pyotp

if __name__ == "__main__":
    otp = pyotp.TOTP(pyotp.random_base32())
    code = otp.now()
    print(f"OTP generated: {code}")
    print(f"Verify OTP: {otp.verify(code)}")
    sleep(30)
    print(f"Verify after 30s: {otp.verify(code)}")
Example:
OTP generated: 474771
Verify OTP: True
Verify after 30s: False
Resources
- IETF: TOTP: Time-Based One-Time Password Algorithm
- IETF: A One-Time Password System
- Implementing 2FA: How Time-Based One-Time Password Actually Works (With Python Examples)
OAuth and OpenID
OAuth/OAuth2 and OpenID are popular forms of authorization and authentication, respectively. They are used to implement social login, which is a form of single sign-on (SSO) using existing information from a social networking service such as Facebook, Twitter, or Google, to sign in to a third-party website instead of creating a new login account specifically for that website.
This type of authentication and authorization can be used when you need to have highly-secure authentication. Some of these providers have more than enough resources to invest in the authentication itself. Leveraging such battle-tested authentication systems can ultimately make your application more secure.
This method is often coupled with session-based auth.
Flow
You visit a website that requires you to log in. You navigate to the login page and see a button called "Sign in with Google". You click the button and it takes you to the Google login page. Once authenticated, you're then redirected back to the website that logs you in automatically. This is an example of using OpenID for authentication. It lets you authenticate using an existing account (via an OpenID provider) without the need to create a new account.
The most famous OpenID providers are Google, Facebook, Twitter, and GitHub.
After logging in, you navigate to the download service within the website that lets you download large files directly to Google Drive. How does the website get access to your Google Drive? This is where OAuth comes into play. You can grant permissions to access resources on another website. In this case, write access to Google Drive.
Pros
- Improved security.
- Easier and faster log in flows since there's no need to create and remember a username or password.
- In case of a security breach, no third-party damage will occur, as the authentication is passwordless.
Cons
- Your application now depends on another app, outside of your control. If the OpenID system is down, users won't be able to log in.
- People often tend to ignore the permissions requested by OAuth applications.
- Users that don't have accounts on the OpenID providers that you have configured won't be able to access your application. The best approach is to implement both -- i.e., username and password and OpenID -- and let the user choose.
Packages
Looking to implement social login?
Looking to run your own OAuth or OpenID service?
- Authlib
- OAuthLib
- Flask-OAuthlib
- Django OAuth Toolkit
- Django OIDC Provider
- FastAPI: Simple OAuth2 with Password and Bearer
- FastAPI: OAuth2 with Password (and hashing), Bearer with JWT tokens
Code
You can implement GitHub social auth with Flask-Dance.
from flask import Flask, url_for, redirect
from flask_dance.contrib.github import make_github_blueprint, github

app = Flask(__name__)
app.secret_key = "change me"
app.config["GITHUB_OAUTH_CLIENT_ID"] = "1aaf1bf583d5e425dc8b"
app.config["GITHUB_OAUTH_CLIENT_SECRET"] = "dee0c5bc7e0acfb71791b21ca459c008be992d7c"

github_blueprint = make_github_blueprint()
app.register_blueprint(github_blueprint, url_prefix="/login")


@app.route("/")
def index():
    if not github.authorized:
        return redirect(url_for("github.login"))
    resp = github.get("/user")
    assert resp.ok
    return f"You have successfully logged in, {resp.json()['login']}"


if __name__ == "__main__":
    app.run()
Resources
- An Illustrated Guide to OAuth and OpenID Connect
- Introduction to OAuth 2.0 and OpenID Connect
- Create a Flask Application With Google Login
- Django-allauth Tutorial
- FastAPI — Google as an external authentication provider
Conclusion
In this article, we looked at a number of different web authentication methods, all of which have their own pros and cons.
When should you use each? It depends. Basic rules of thumb:
- For web applications that leverage server-side templating, session-based auth via username and password is often the most appropriate. You can add OAuth and OpenID as well.
- For RESTful APIs, token-based authentication is the recommended approach since it's stateless.
- If you have to deal with highly sensitive data, you may want to add OTPs to your auth flow.
Finally, keep in mind that the examples shown just touch the surface. Further configuration is required for production use.
 Amal Shaji