If a long-running process is part of your application's workflow, rather than blocking the response, you should handle it in the background, outside the normal request/response flow.
Perhaps your web application requires users to submit a thumbnail (which will probably need to be re-sized) and confirm their email when they register. If your application processed the image and sent a confirmation email directly in the request handler, then the end user would have to wait unnecessarily for them both to finish processing before the page loads or updates. Instead, you'll want to pass these processes off to a task queue and let a separate worker process deal with it, so you can immediately send a response back to the client. The end user can then do other things on the client-side while the processing takes place. Your application is also free to respond to requests from other users and clients.
To achieve this, we'll walk you through the process of setting up and configuring Celery and Redis for handling long-running processes in a Flask app. We'll also use Docker and Docker Compose to tie everything together. Finally, we'll look at how to test the Celery tasks with unit and integration tests.
Redis Queue is a viable solution as well. Check out Asynchronous Tasks with Flask and Redis Queue for more.
Contents
Objectives
By the end of this tutorial, you will be able to:
- Integrate Celery into a Flask app and create tasks.
- Containerize Flask, Celery, and Redis with Docker.
- Run processes in the background with a separate worker process.
- Save Celery logs to a file.
- Set up Flower to monitor and administer Celery jobs and workers.
- Test a Celery task with both unit and integration tests.
Background Tasks
Again, to improve user experience, long-running processes should be run outside the normal HTTP request/response flow, in a background process.
Examples:
- Running machine learning models
- Sending confirmation emails
- Web scraping and crawling
- Analyzing data
- Processing images
- Generating reports
As you're building out an app, try to distinguish tasks that should run during the request/response lifecycle, like CRUD operations, from those that should run in the background.
Workflow
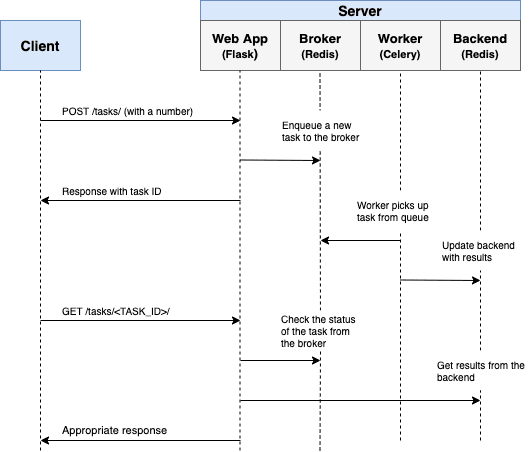
Our goal is to develop a Flask application that works in conjunction with Celery to handle long-running processes outside the normal request/response cycle.
- The end user kicks off a new task via a POST request to the server-side.
- Within the route handler, a task is added to the queue and the task ID is sent back to the client-side.
- Using AJAX, the client continues to poll the server to check the status of the task while the task itself is running in the background.

Project Setup
Clone down the base project from the flask-celery repo, and then check out the v1 tag to the master branch:
$ git clone https://github.com/testdrivenio/flask-celery --branch v1 --single-branch
$ cd flask-celery
$ git checkout v1 -b master
Since we'll need to manage three processes in total (Flask, Redis, Celery worker), we'll use Docker to simplify our workflow by wiring them up so that they can all be run from one terminal window with a single command.
From the project root, create the images and spin up the Docker containers:
$ docker-compose up -d --build
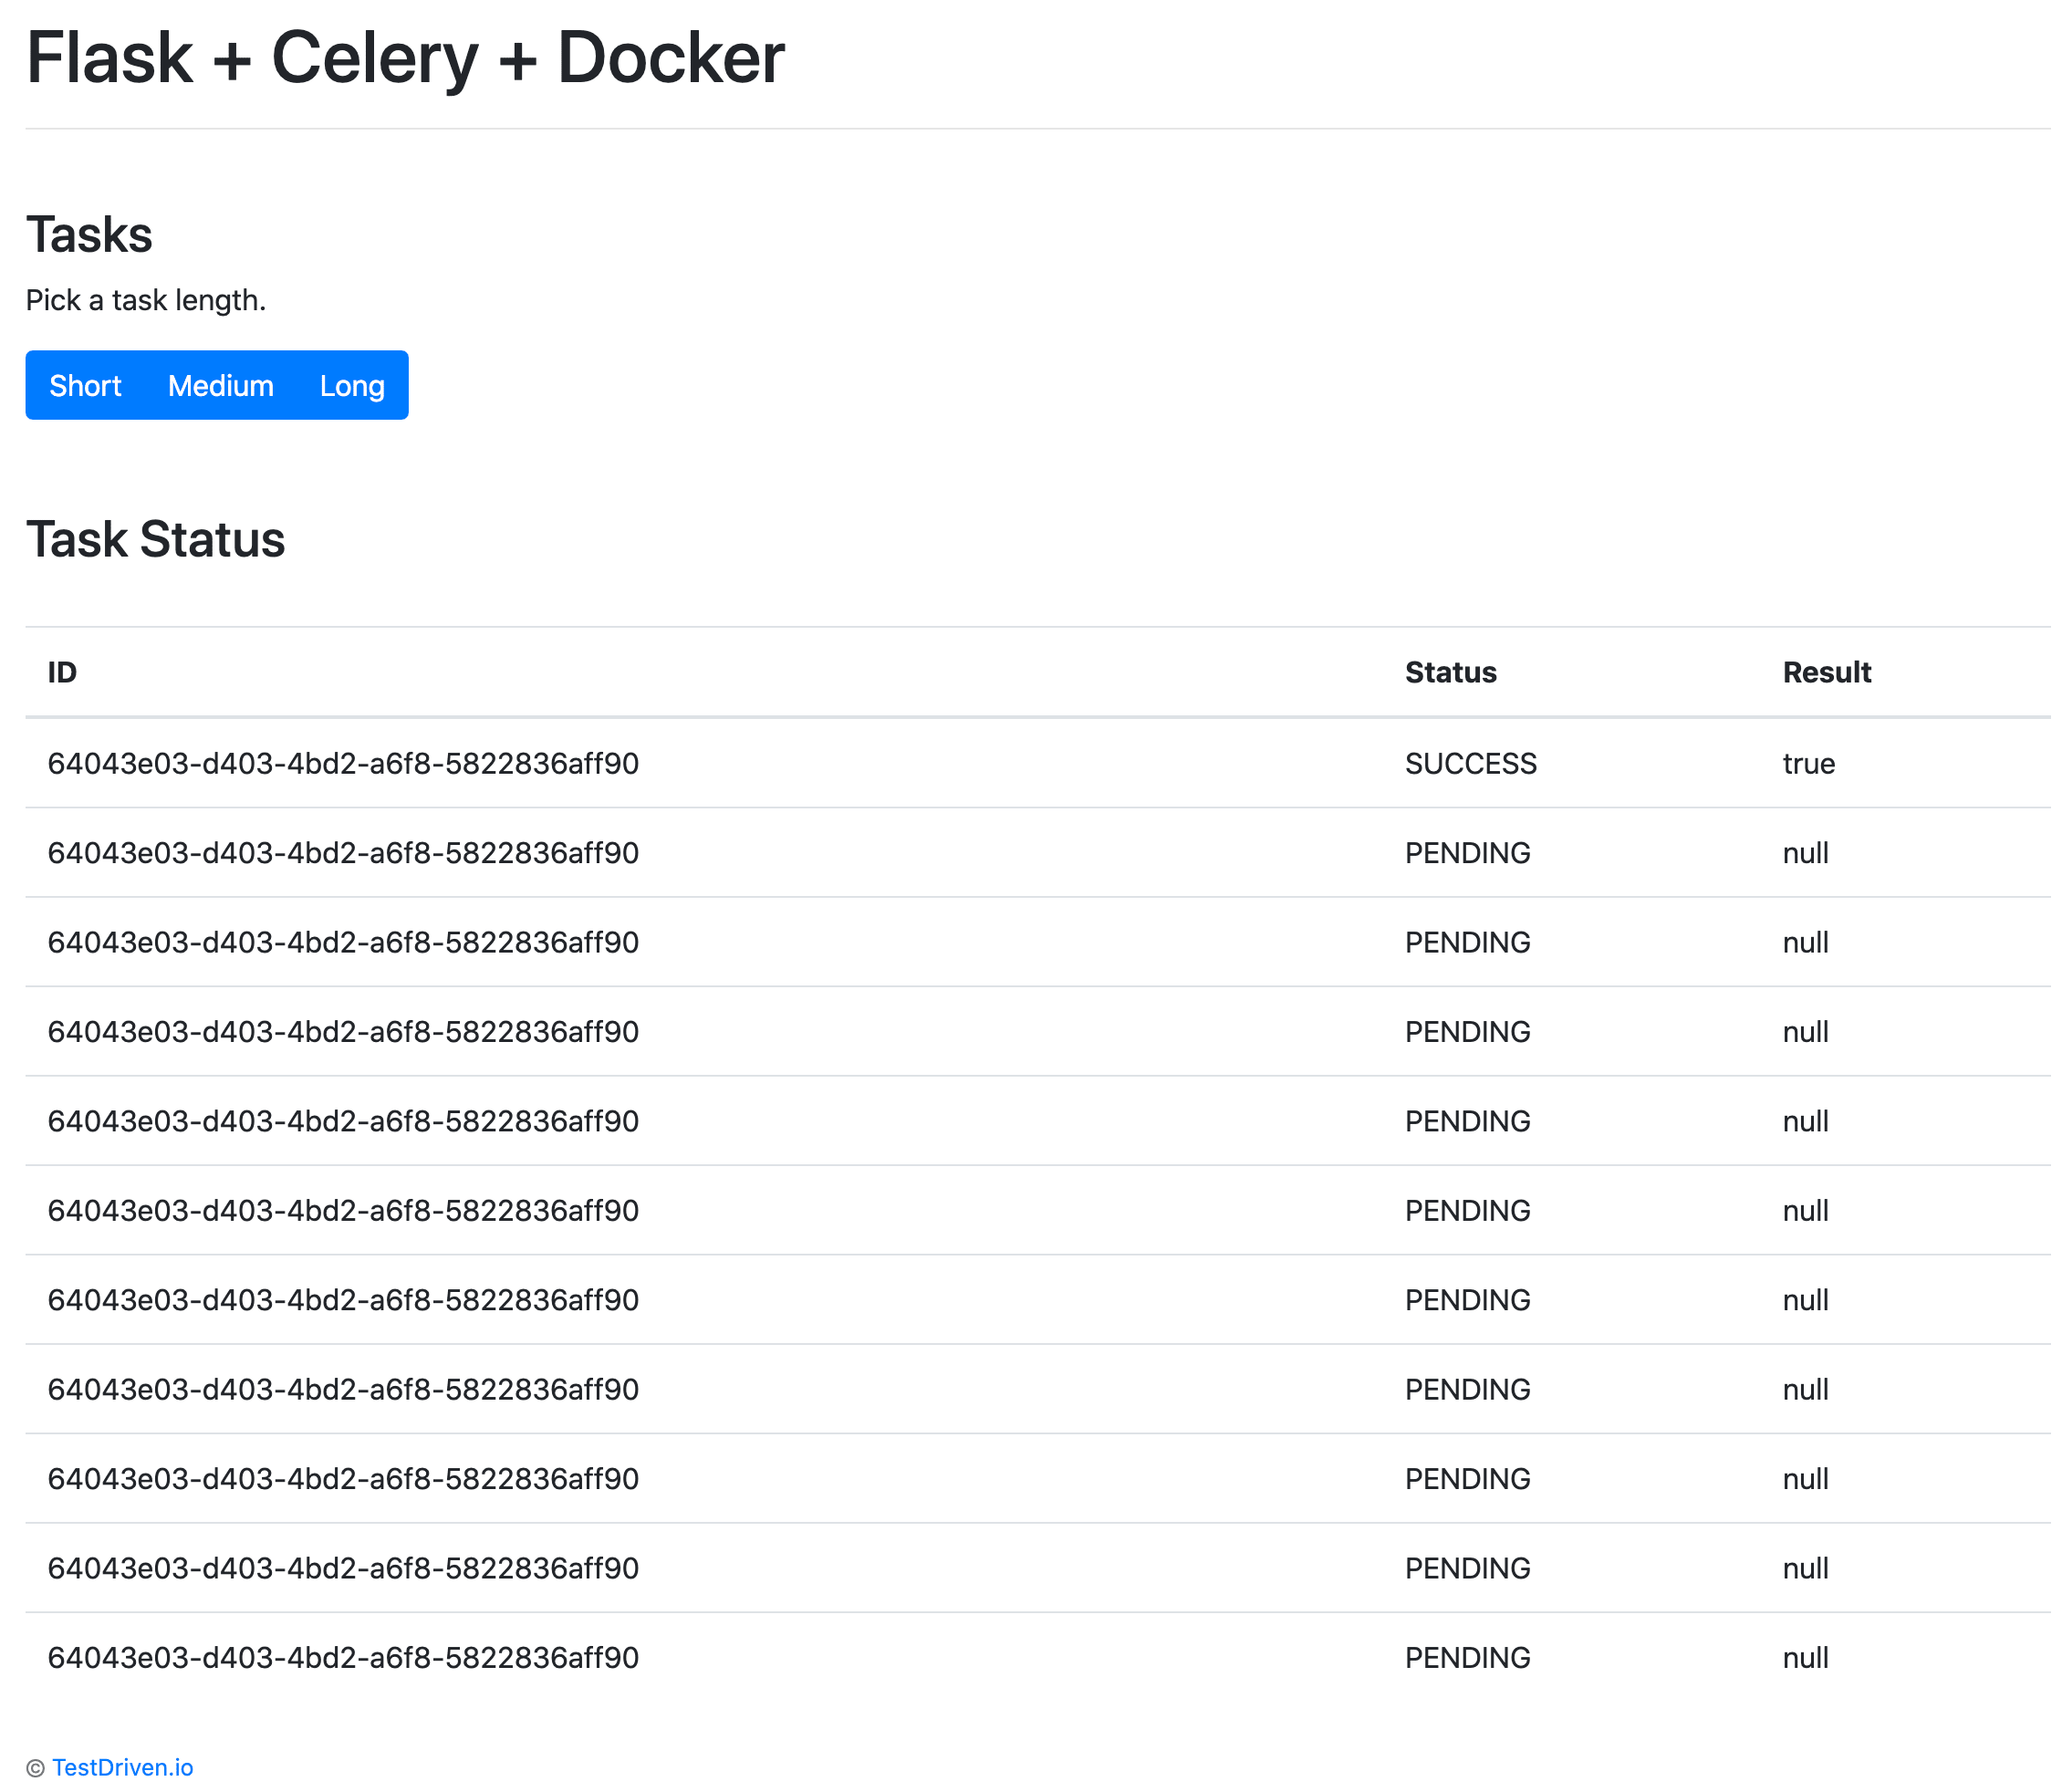
Once the build is complete, navigate to http://localhost:5004:

Make sure the tests pass as well:
$ docker-compose exec web python -m pytest

================================== test session starts ===================================
platform linux -- Python 3.10.2, pytest-7.0.1, pluggy-1.0.0
rootdir: /usr/src/app
collected 1 item

project/tests/test_tasks.py .                                                       [100%]

=================================== 1 passed in 0.34s ====================================
Take a quick look at the project structure before moving on:
├── .gitignore
├── Dockerfile
├── LICENSE
├── README.md
├── docker-compose.yml
├── manage.py
├── project
│   ├── __init__.py
│   ├── client
│   │   ├── static
│   │   │   ├── main.css
│   │   │   └── main.js
│   │   └── templates
│   │       ├── _base.html
│   │       ├── footer.html
│   │       └── main
│   │           └── home.html
│   ├── server
│   │   ├── __init__.py
│   │   ├── config.py
│   │   └── main
│   │       ├── __init__.py
│   │       └── views.py
│   └── tests
│       ├── __init__.py
│       ├── conftest.py
│       └── test_tasks.py
└── requirements.txt
Want to learn how to build this project? Check out the Dockerizing Flask with Postgres, Gunicorn, and Nginx article.
Trigger a Task
An onclick event handler in project/client/templates/main/home.html is set up that listens for a button click:
<div class="btn-group" role="group" aria-label="Basic example">
  <button type="button" class="btn btn-primary" onclick="handleClick(1)">Short</button>
  <button type="button" class="btn btn-primary" onclick="handleClick(2)">Medium</button>
  <button type="button" class="btn btn-primary" onclick="handleClick(3)">Long</button>
</div>
onclick calls handleClick found in project/client/static/main.js, which sends an AJAX POST request to the server with the appropriate task type: 1, 2, or 3.
function handleClick(type) {
  fetch('/tasks', {
    method: 'POST',
    headers: {
      'Content-Type': 'application/json'
    },
    body: JSON.stringify({ type: type }),
  })
  .then(response => response.json())
  .then(data => getStatus(data.task_id));
}
On the server-side, a route is already configured to handle the request in project/server/main/views.py:
@main_blueprint.route("/tasks", methods=["POST"])
def run_task():
    content = request.json
    task_type = content["type"]
    return jsonify(task_type), 202
Now comes the fun part -- wiring up Celery!
Celery Setup
Start by adding both Celery and Redis to the requirements.txt file:
celery==5.2.3
Flask==2.0.3
Flask-WTF==1.0.0
pytest==7.0.1
redis==4.1.4
Celery uses a message broker -- RabbitMQ, Redis, or AWS Simple Queue Service (SQS) -- to facilitate communication between the Celery worker and the web application. Messages are added to the broker, which are then processed by the worker(s). Once done, the results are added to the backend.
Redis will be used as both the broker and backend. Add both Redis and a Celery worker to the docker-compose.yml file like so:
version: '3.8'

services:

  web:
    build: .
    image: web
    container_name: web
    ports:
      - 5004:5000
    command: python manage.py run -h 0.0.0.0
    volumes:
      - .:/usr/src/app
    environment:
      - FLASK_DEBUG=1
      - APP_SETTINGS=project.server.config.DevelopmentConfig
      - CELERY_BROKER_URL=redis://redis:6379/0
      - CELERY_RESULT_BACKEND=redis://redis:6379/0
    depends_on:
      - redis

  worker:
    build: .
    command: celery --app project.server.tasks.celery worker --loglevel=info
    volumes:
      - .:/usr/src/app
    environment:
      - FLASK_DEBUG=1
      - APP_SETTINGS=project.server.config.DevelopmentConfig
      - CELERY_BROKER_URL=redis://redis:6379/0
      - CELERY_RESULT_BACKEND=redis://redis:6379/0
    depends_on:
      - web
      - redis

  redis:
    image: redis:6-alpine
Take note of celery --app project.server.tasks.celery worker --loglevel=info:
celery workeris used to start a Celery worker--app=project.server.tasks.celeryruns the Celery Application (which we'll define shortly)--loglevel=infosets the logging level to info
Next, create a new file called tasks.py in "project/server":
import os
import time

from celery import Celery


celery = Celery(__name__)
celery.conf.broker_url = os.environ.get("CELERY_BROKER_URL", "redis://localhost:6379")
celery.conf.result_backend = os.environ.get("CELERY_RESULT_BACKEND", "redis://localhost:6379")


@celery.task(name="create_task")
def create_task(task_type):
    time.sleep(int(task_type) * 10)
    return True
Here, we created a new Celery instance, and using the task decorator, we defined a new Celery task function called create_task.
Keep in mind that the task itself will be executed by the Celery worker.
Trigger a Task
Update the route handler to kick off the task and respond with the task ID:
@main_blueprint.route("/tasks", methods=["POST"])
def run_task():
    content = request.json
    task_type = content["type"]
    task = create_task.delay(int(task_type))
    return jsonify({"task_id": task.id}), 202
Don't forget to import the task:
from project.server.tasks import create_task
Build the images and spin up the new containers:
$ docker-compose up -d --build
To trigger a new task, run:
$ curl http://localhost:5004/tasks -H "Content-Type: application/json" --data '{"type": 0}'
You should see something like:
{
  "task_id": "14049663-6257-4a1f-81e5-563c714e90af"
}
Task Status
Turn back to the handleClick function on the client-side:
function handleClick(type) {
  fetch('/tasks', {
    method: 'POST',
    headers: {
      'Content-Type': 'application/json'
    },
    body: JSON.stringify({ type: type }),
  })
  .then(response => response.json())
  .then(data => getStatus(data.task_id));
}
When the response comes back from the original AJAX request, we then continue to call getStatus() with the task ID every second:
function getStatus(taskID) {
  fetch(`/tasks/${taskID}`, {
    method: 'GET',
    headers: {
      'Content-Type': 'application/json'
    },
  })
  .then(response => response.json())
  .then(res => {
    const html = `
      <tr>
        <td>${taskID}</td>
        <td>${res.task_status}</td>
        <td>${res.task_result}</td>
      </tr>`;
    const newRow = document.getElementById('tasks').insertRow(0);
    newRow.innerHTML = html;

    const taskStatus = res.task_status;
    if (taskStatus === 'SUCCESS' || taskStatus === 'FAILURE') return false;
    setTimeout(function() {
      getStatus(res.task_id);
    }, 1000);
  })
  .catch(err => console.log(err));
}
If the response is successful, a new row is added to the table on the DOM.
Update the get_status route handler to return the status:
@main_blueprint.route("/tasks/<task_id>", methods=["GET"])
def get_status(task_id):
    task_result = AsyncResult(task_id)
    result = {
        "task_id": task_id,
        "task_status": task_result.status,
        "task_result": task_result.result
    }
    return jsonify(result), 200
Import AsyncResult:
from celery.result import AsyncResult
Update the containers:
$ docker-compose up -d --build
Trigger a new task:
$ curl http://localhost:5004/tasks -H "Content-Type: application/json" --data '{"type": 1}'
Then, grab the task_id from the response and call the updated endpoint to view the status:
$ curl http://localhost:5004/tasks/f3ae36f1-58b8-4c2b-bf5b-739c80e9d7ff

{
  "task_id": "455234e0-f0ea-4a39-bbe9-e3947e248503",
  "task_result": true,
  "task_status": "SUCCESS"
}
Test it out in the browser as well:

Celery Logs
Update the worker service, in docker-compose.yml, so that Celery logs are dumped to a log file:
worker:
  build: .
  command: celery --app project.server.tasks.celery worker --loglevel=info --logfile=project/logs/celery.log
  volumes:
    - .:/usr/src/app
  environment:
    - FLASK_DEBUG=1
    - APP_SETTINGS=project.server.config.DevelopmentConfig
    - CELERY_BROKER_URL=redis://redis:6379/0
    - CELERY_RESULT_BACKEND=redis://redis:6379/0
  depends_on:
    - web
    - redis
Add a new directory to "project" called "logs. Then, add a new file called celery.log to that newly created directory.
Update:
$ docker-compose up -d --build
You should see the log file fill up locally since we set up a volume:
[2022-02-16 21:01:09,961: INFO/MainProcess] Connected to redis://redis:6379/0
[2022-02-16 21:01:09,965: INFO/MainProcess] mingle: searching for neighbors
[2022-02-16 21:01:10,977: INFO/MainProcess] mingle: all alone
[2022-02-16 21:01:10,994: INFO/MainProcess] celery@f9921f0e0b83 ready.
[2022-02-16 21:01:23,349: INFO/MainProcess]
    Task create_task[ceb6cffc-e426-4970-a5df-5a1fac4478cc] received
[2022-02-16 21:01:33,378: INFO/ForkPoolWorker-7]
    Task create_task[ceb6cffc-e426-4970-a5df-5a1fac4478cc]
    succeeded in 10.025073800003156s: True
Flower Dashboard
Flower is a lightweight, real-time, web-based monitoring tool for Celery. You can monitor currently running tasks, increase or decrease the worker pool, view graphs and a number of statistics, to name a few.
Add it to requirements.txt:
celery==5.2.3
Flask==2.0.3
Flask-WTF==1.0.0
flower==1.0.0
pytest==7.0.1
redis==4.1.4
Then, add a new service to docker-compose.yml:
dashboard:
  build: .
  command: celery --app project.server.tasks.celery flower --port=5555 --broker=redis://redis:6379/0
  ports:
    - 5556:5555
  environment:
    - FLASK_DEBUG=1
    - APP_SETTINGS=project.server.config.DevelopmentConfig
    - CELERY_BROKER_URL=redis://redis:6379/0
    - CELERY_RESULT_BACKEND=redis://redis:6379/0
  depends_on:
    - web
    - redis
    - worker
Test it out:
$ docker-compose up -d --build
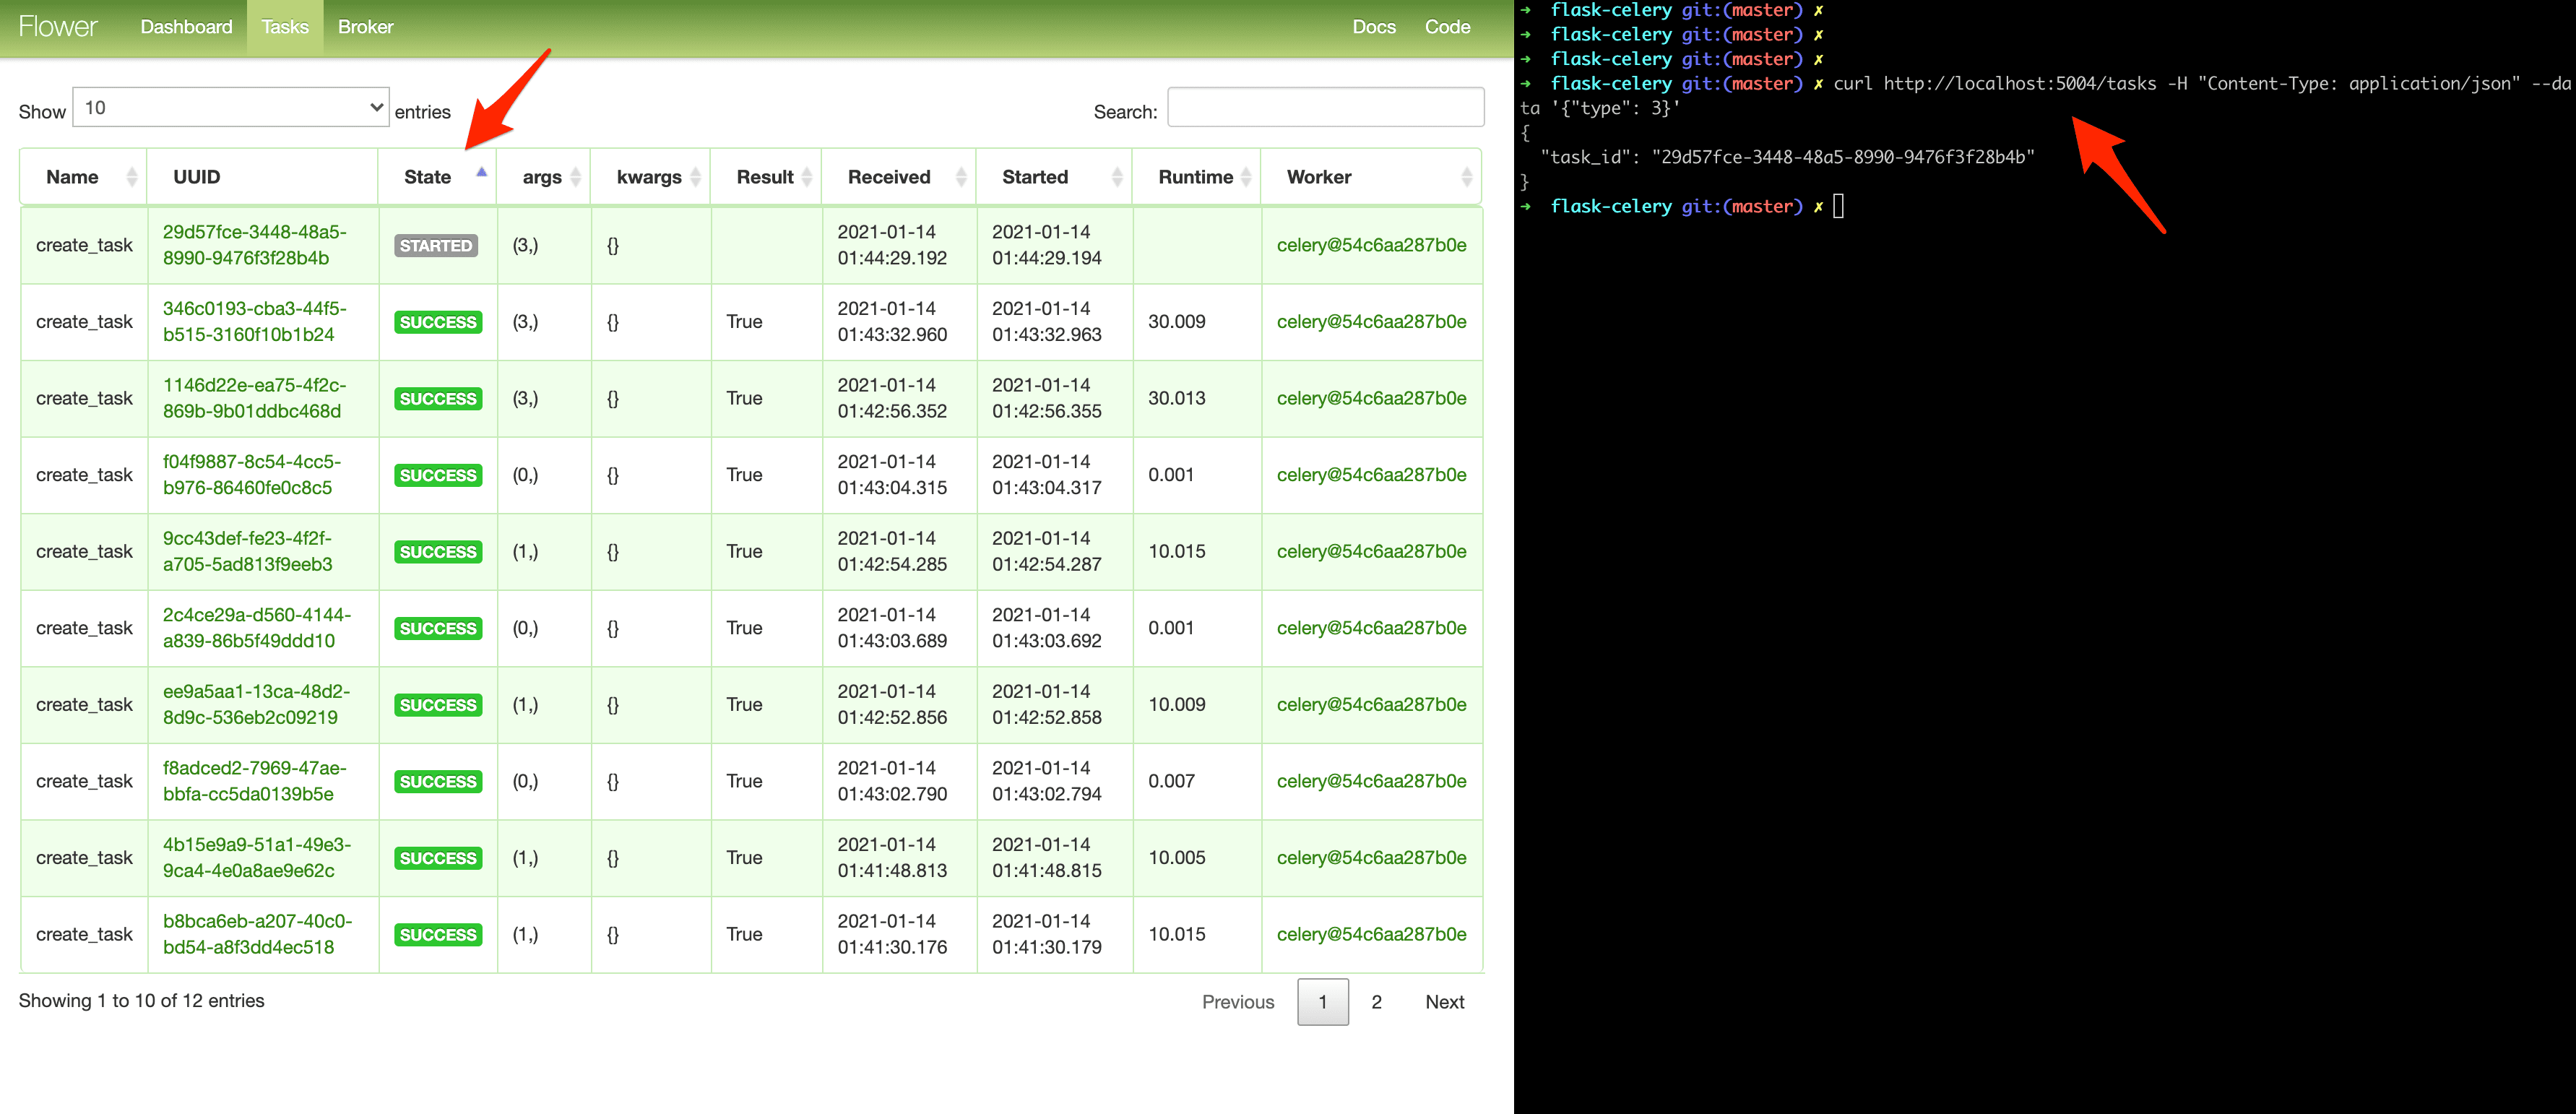
Navigate to http://localhost:5556 to view the dashboard. You should see one worker ready to go:

Kick off a few more tasks to fully test the dashboard:

Try adding a few more workers to see how that affects things:
$ docker-compose up -d --build --scale worker=3
Tests
Let's start with the most basic test:
def test_task():
    assert create_task.run(1)
    assert create_task.run(2)
    assert create_task.run(3)
Add the above test case to project/tests/test_tasks.py, and then add the following import:
from project.server.tasks import create_task
Run that test individually:
$ docker-compose exec web python -m pytest -k "test_task and not test_home"
It should take about one minute to run:
================================== test session starts ===================================
platform linux -- Python 3.10.2, pytest-7.0.1, pluggy-1.0.0
rootdir: /usr/src/app
collected 2 items / 1 deselected / 1 selected

project/tests/test_tasks.py .                                                       [100%]

====================== 1 passed, 1 deselected in 60.28s (0:01:00) ========================
It's worth noting that in the above asserts, we used the .run method (rather than .delay) to run the task directly without a Celery worker.
Want to mock the .run method to speed things up?
@patch("project.server.tasks.create_task.run")
def test_mock_task(mock_run):
    assert create_task.run(1)
    create_task.run.assert_called_once_with(1)

    assert create_task.run(2)
    assert create_task.run.call_count == 2

    assert create_task.run(3)
    assert create_task.run.call_count == 3
Import:
from unittest.mock import patch, call
Test:
$ docker-compose exec web python -m pytest -k "test_mock_task"

================================== test session starts ===================================
platform linux -- Python 3.10.2, pytest-7.0.1, pluggy-1.0.0
rootdir: /usr/src/app
collected 3 items / 2 deselected / 1 selected

project/tests/test_tasks.py .                                                       [100%]

============================ 1 passed, 2 deselected in 0.37s =============================
Much quicker!
How about a full integration test?
def test_task_status(test_app):
    client = test_app.test_client()

    resp = client.post(
        "/tasks",
        data=json.dumps({"type": 0}),
        content_type='application/json'
    )
    content = json.loads(resp.data.decode())
    task_id = content["task_id"]
    assert resp.status_code == 202
    assert task_id

    resp = client.get(f"tasks/{task_id}")
    content = json.loads(resp.data.decode())
    assert content == {"task_id": task_id, "task_status": "PENDING", "task_result": None}
    assert resp.status_code == 200

    while content["task_status"] == "PENDING":
        resp = client.get(f"tasks/{task_id}")
        content = json.loads(resp.data.decode())
    assert content == {"task_id": task_id, "task_status": "SUCCESS", "task_result": True}
Keep in mind that this test uses the same broker and backend used in development. You may want to instantiate a new Celery app for testing.
Add the import:
import json
Ensure the test passes.
Conclusion
This has been a basic guide on how to configure Celery to run long-running tasks in a Flask app. You should let the queue handle any processes that could block or slow down the user-facing code.
Celery can also be used to execute repeatable tasks and break up complex, resource-intensive tasks so that the computational workload can be distributed across a number of machines to reduce (1) the time to completion and (2) the load on the machine handling client requests.
Finally, if you're curious about how to use WebSockets to check the status of a Celery task, instead of using AJAX polling, check out the The Definitive Guide to Celery and Flask course.
Grab the code from the repo.
 Michael Herman