 Jan Giacomelli
In this tutorial, we'll deploy a Django app to AWS EC2 with Docker. The app will run behind an HTTPS Nginx proxy that uses Let's Encrypt SSL certificates. We'll use AWS RDS to serve our Postgres database along with AWS ECR to store and manage our Docker images.
Django on Docker Series:
Contents
Objectives
By the end of this tutorial, you'll be able to:
- Set up a new EC2 instance
- Install Docker on an EC2 instance
- Configure and use an Elastic IP address
- Set up an IAM role
- Utilize Amazon Elastic Container Registry (ECR) image registry to store built images
- Configure AWS RDS for data persistence
- Configure an AWS Security Group
- Deploy Django to AWS EC2 with Docker
- Run the Django app behind an HTTPS Nginx proxy with Let's Encrypt SSL certificates
Prerequisites
This post builds on the Dockerizing Django with Postgres, Gunicorn, and Nginx and Securing a Containerized Django Application with Let's Encrypt posts.
It assumes that you can:
- Containerize a Django app along with Postgres, Nginx, and Gunicorn.
- Secure a containerized Django app running behind an HTTPS Nginx proxy with Let's Encrypt SSL certificates.
- Use SSH to connect to a remote server and SCP to copy files over to the server.
AWS EC2
First, create an AWS account if you don't already have one.
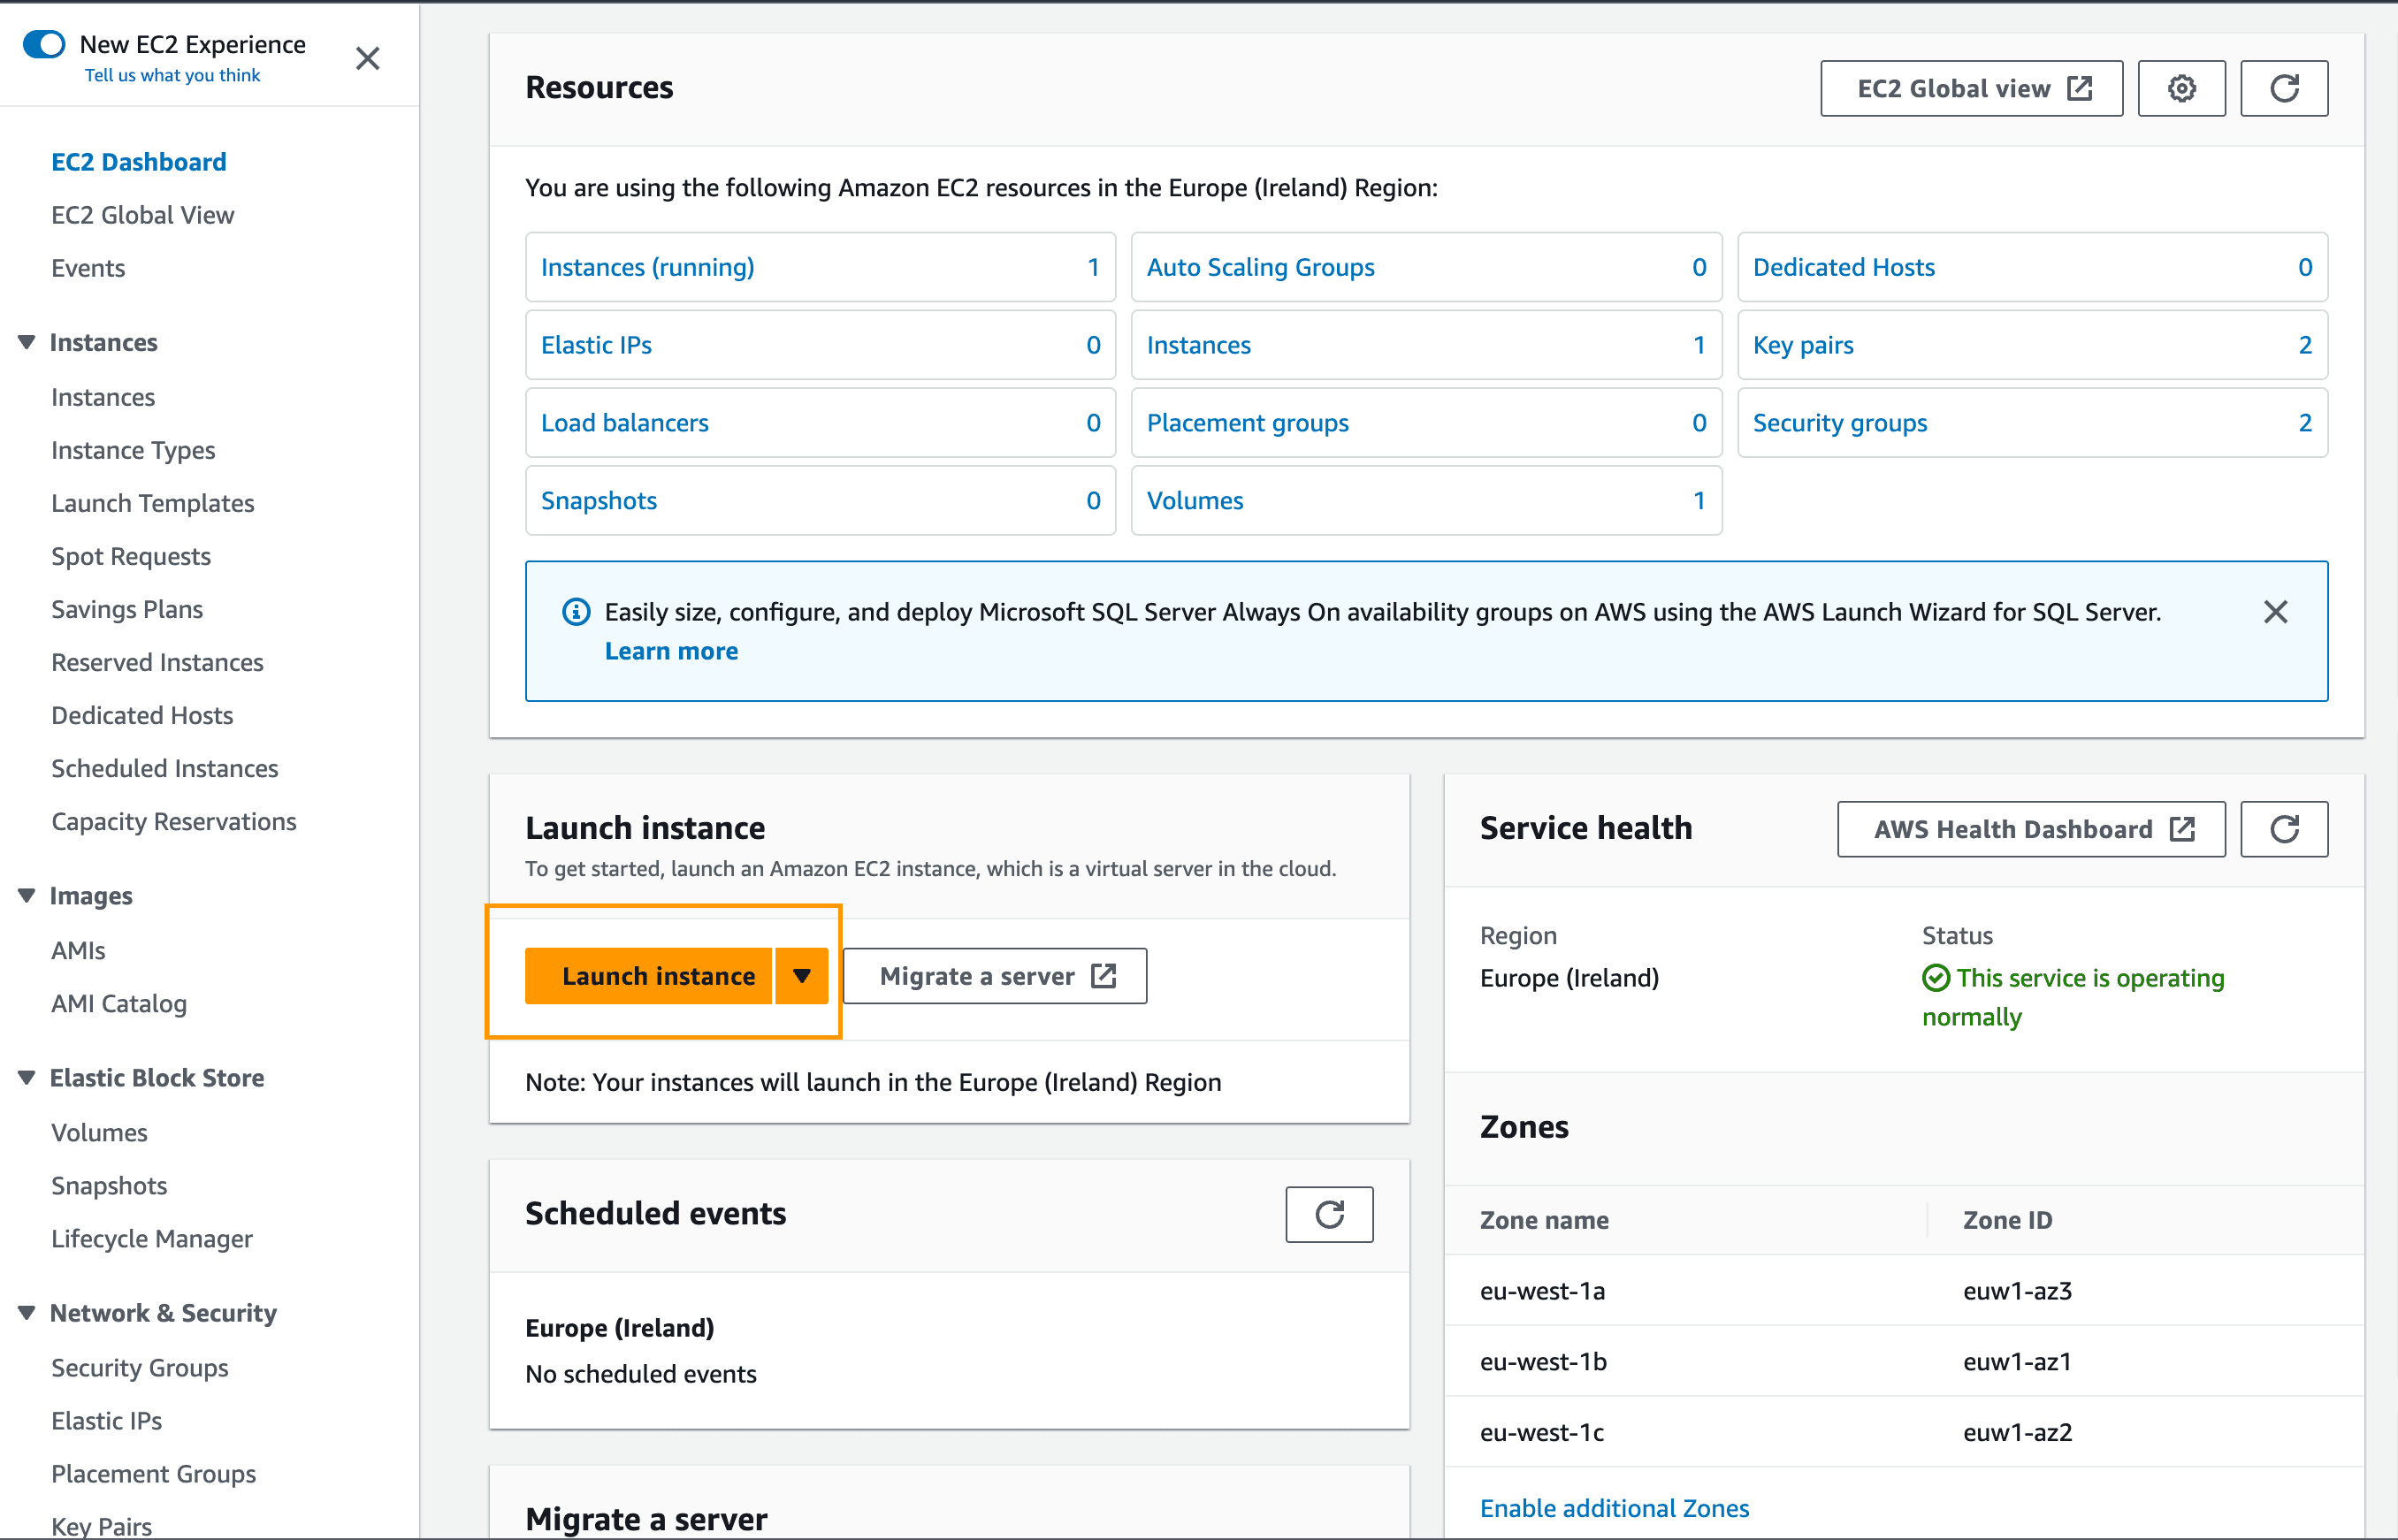
Next, navigate to the EC2 console and click Launch instance:
Enter a name for your instance and select Ubuntu Server 22.04 LTS (HVM) for the server image (AMI):

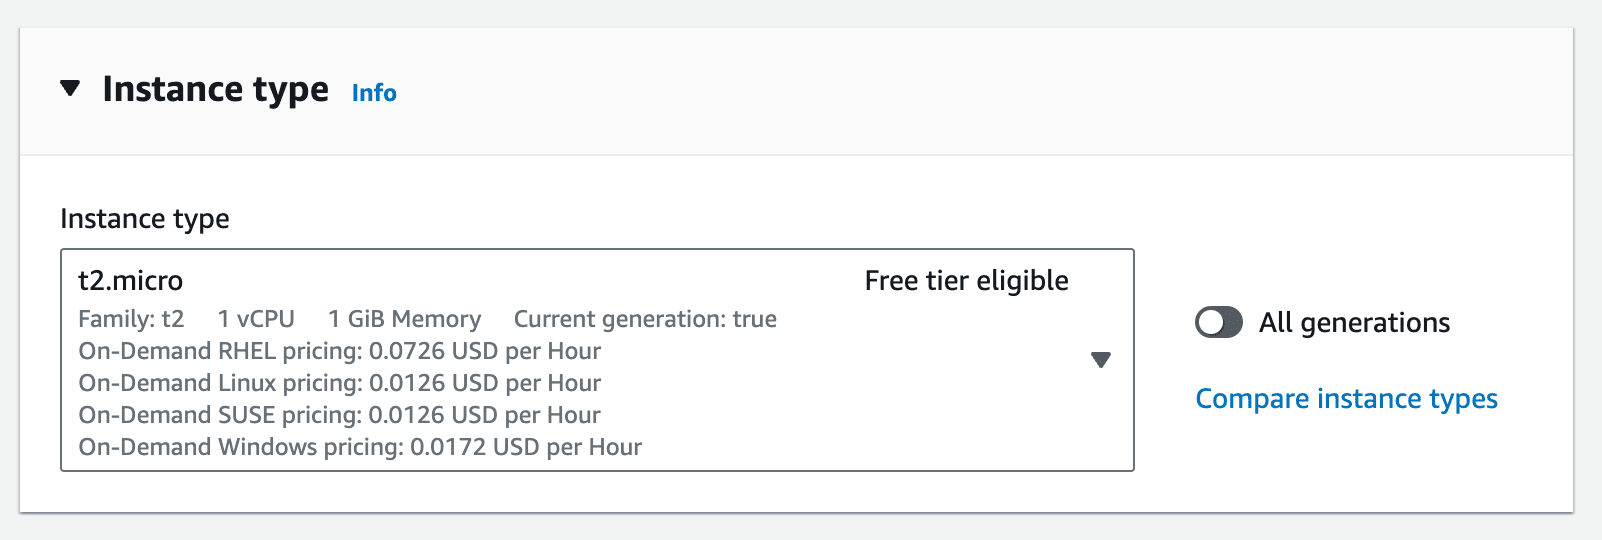
Stick with the t2.micro instance:
Create a new key pair for accessing your instance via SSH by clicking on "Create new key pair". When configuring the security group, stick with the default "Create new security group" and select "Allow HTTPS traffic from the internet" and "Allow HTTP traffic from the internet":
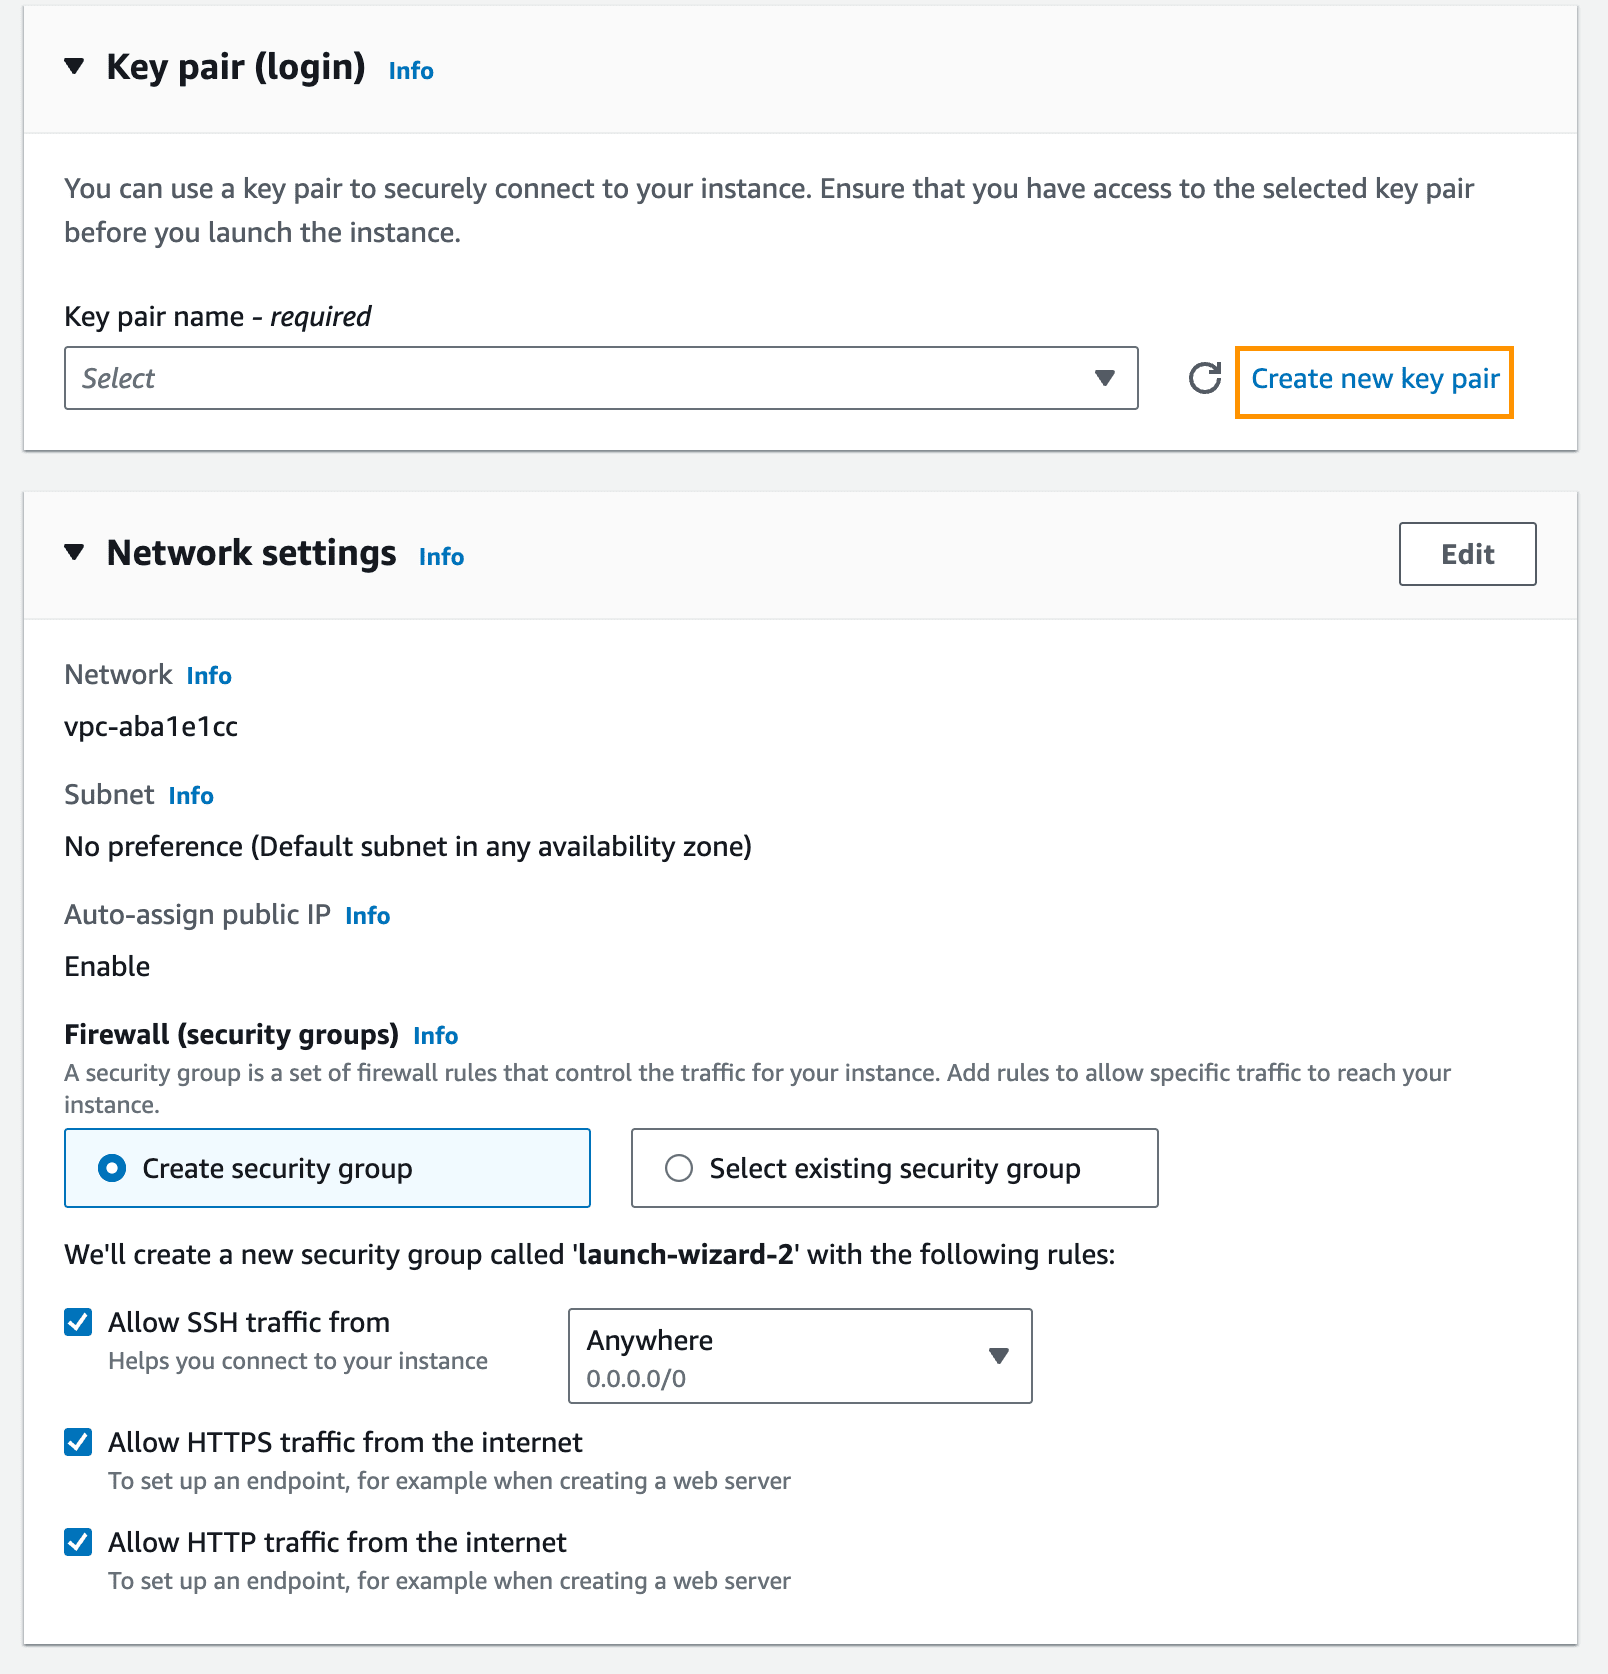
These rules are needed to issue certificates and to access the app.
The key pair will automatically download upon created.
Security group inbound rules are used to limit access to your instance from the internet. Unless you have some additional security requirements, you'll probably want to allow HTTP and HTTPS traffic from anywhere for instances hosting web apps. SSH must be allowed for you to connect to the instance for set up and deployment. In a production setup, limit the IPs from which SSH is allowed.
Click Launch. On the next screen, click View All Instances.
It will take a few minutes for the instance to spin up.
Configure EC2 Instance
In this section, we'll install Docker on the instance, add an Elastic IP, and configure an IAM role.
Install Docker
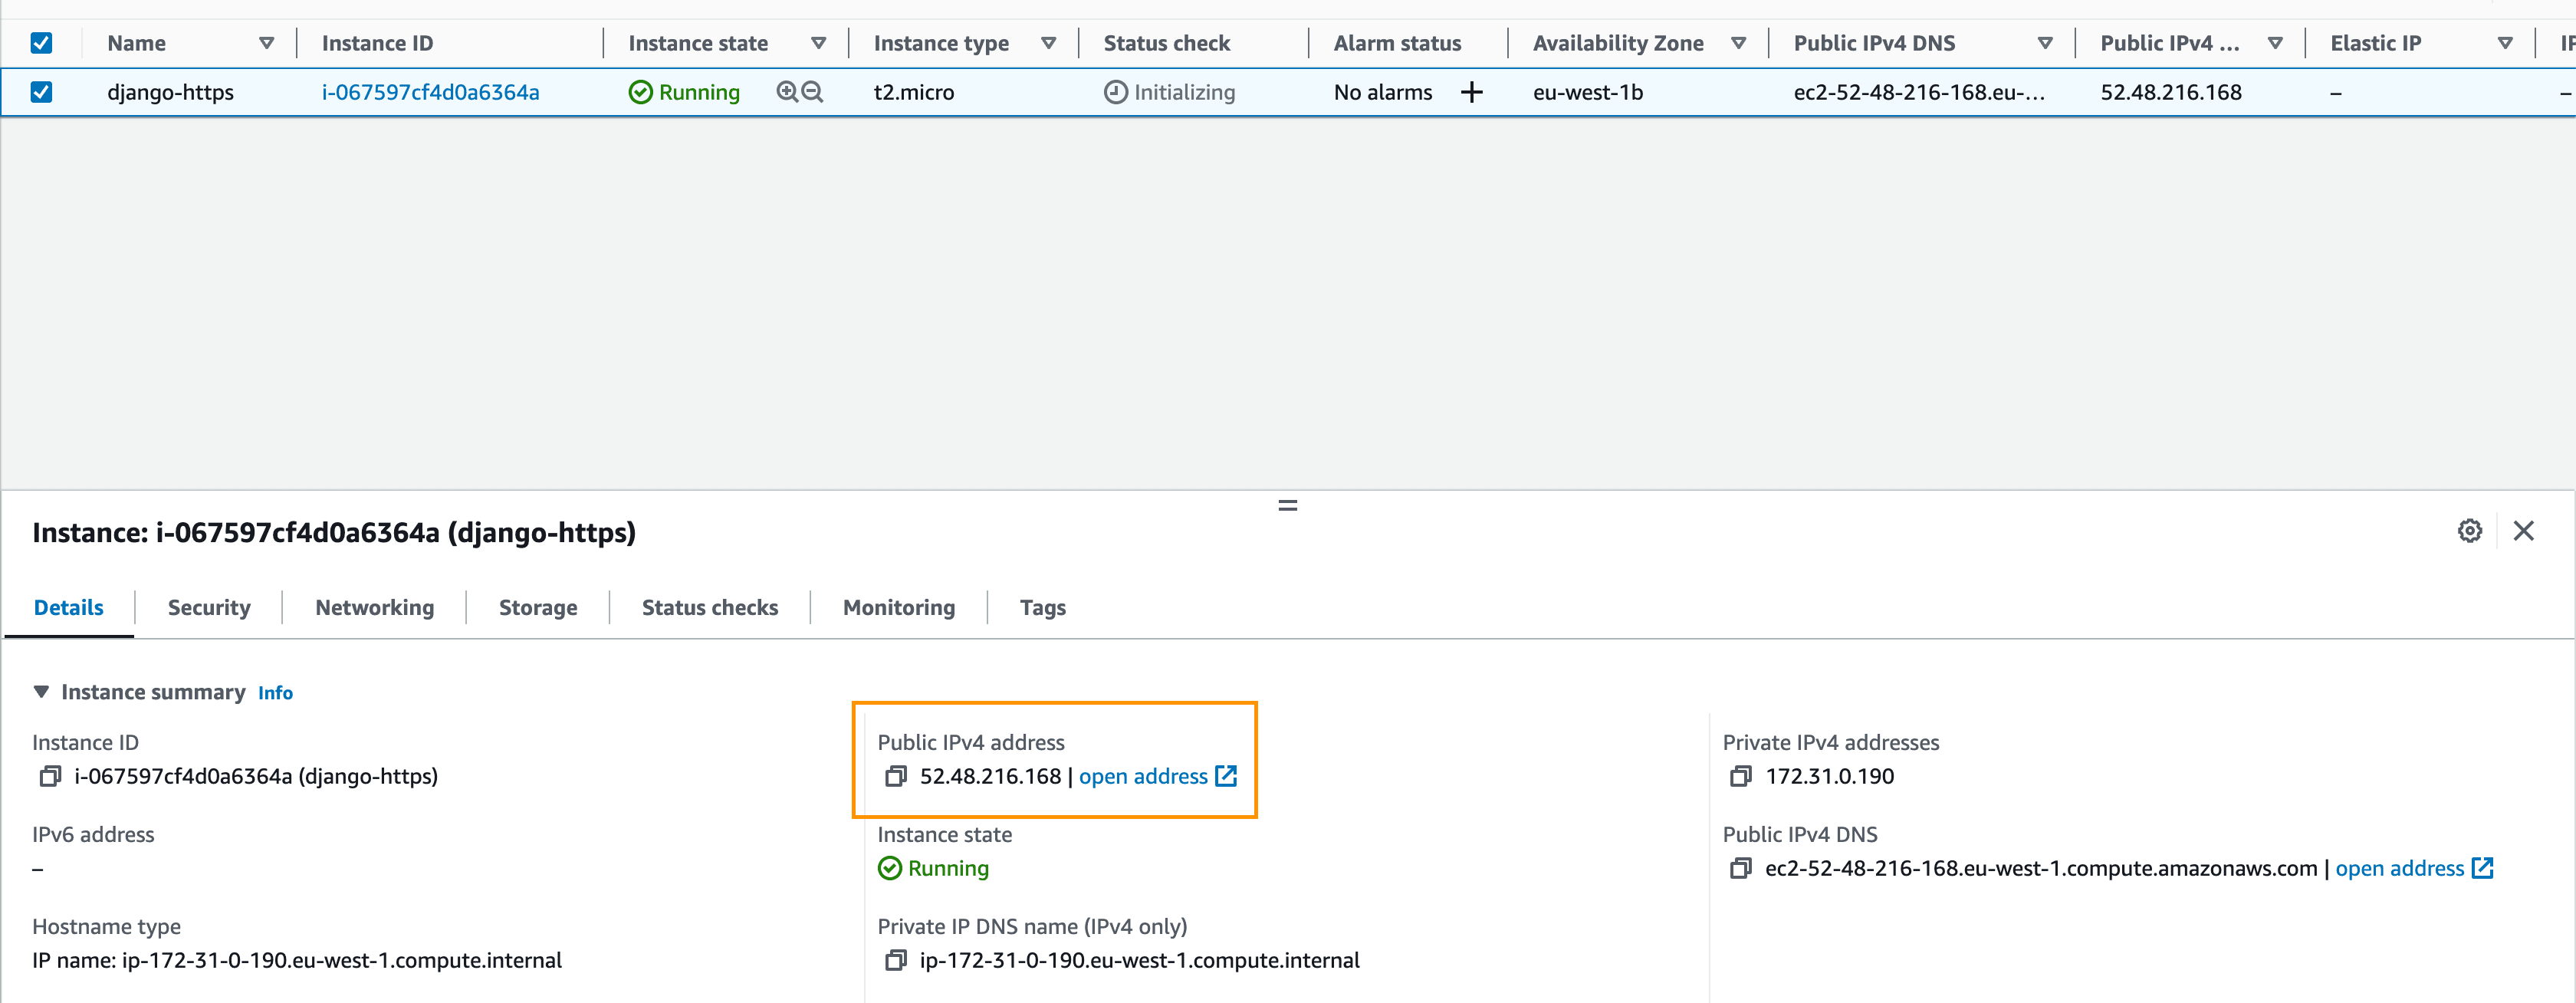
Navigate back to the EC2 console, select the newly created instance, and grab the public IP address:
Connect to your EC2 instance using the .pem key that we downloaded in the "AWS EC2" step.
$ ssh -i /path/to/your/djangoletsencrypt.pem ubuntu@public-ip-or-domain-of-ec2-instance
Your
.pemwas probably downloaded into path like ~/Downloads/your-key-pair-name.pem. If you're not sure where to store it, move it into the "~/.ssh" directory. You may have to also change the permissions -- e.g.,chmod 400 -i /path/to/your/your-key-pair-name.pem.
Start by installing the latest version of Docker and version 1.29.2 of Docker Compose:
$ sudo apt update
$ sudo apt install apt-transport-https ca-certificates curl software-properties-common
$ curl -fsSL https://download.docker.com/linux/ubuntu/gpg | sudo apt-key add -
$ sudo add-apt-repository "deb [arch=amd64] https://download.docker.com/linux/ubuntu bionic stable"
$ sudo apt update
$ sudo apt install docker-ce
$ sudo usermod -aG docker ${USER}
$ sudo curl -L "https://github.com/docker/compose/releases/download/1.29.2/docker-compose-$(uname -s)-$(uname -m)" -o /usr/local/bin/docker-compose
$ sudo chmod +x /usr/local/bin/docker-compose

$ docker -v
Docker version 20.10.8, build 3967b7d

$ docker-compose -v
docker-compose version 1.29.2, build 5becea4c
Install AWS CLI
First, install unzip:
$ sudo apt install unzip
Download AWS CLI ZIP:
$ curl "https://awscli.amazonaws.com/awscli-exe-linux-x86_64.zip" -o "awscliv2.zip"
Unzip its content:
$ unzip awscliv2.zip
Install AWS CLI:
$ sudo ./aws/install
Verify installation:
$ aws --version
Elastic IP
By default, instances receive new public IP address every time they start and re-start.
Elastic IP allows you to allocate static IPs for your EC2 instances, so the IP stays the same all the time and can be re-associated between instances. It's recommended to use one for your production setup.
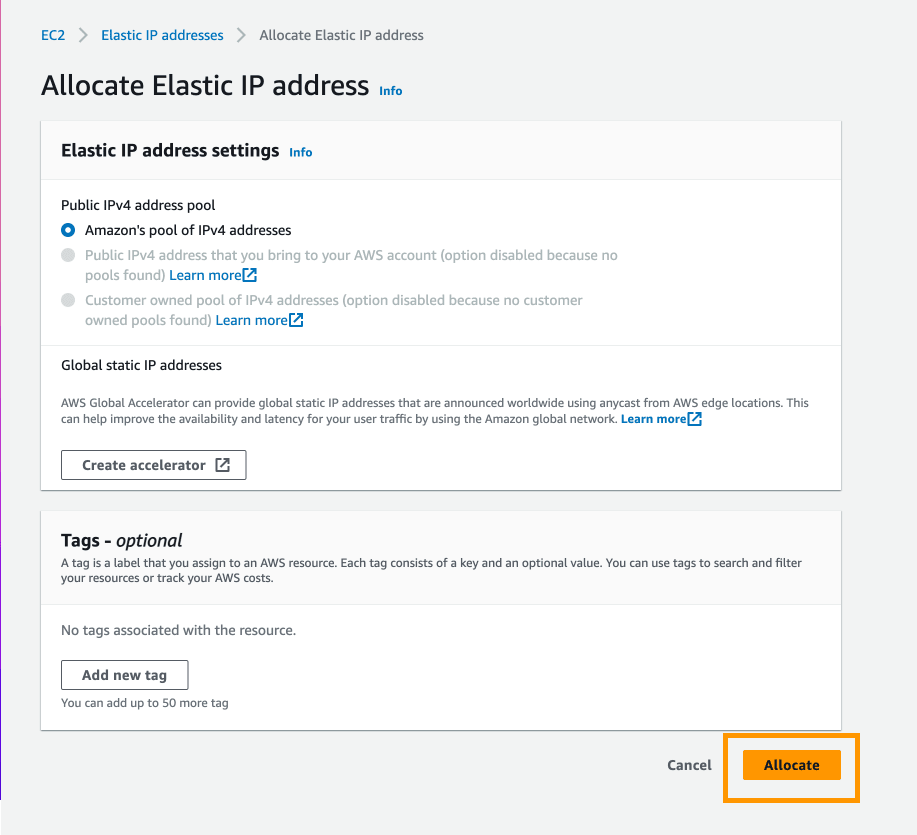
Navigate to Elastic IPs and click Allocate Elastic IP address:
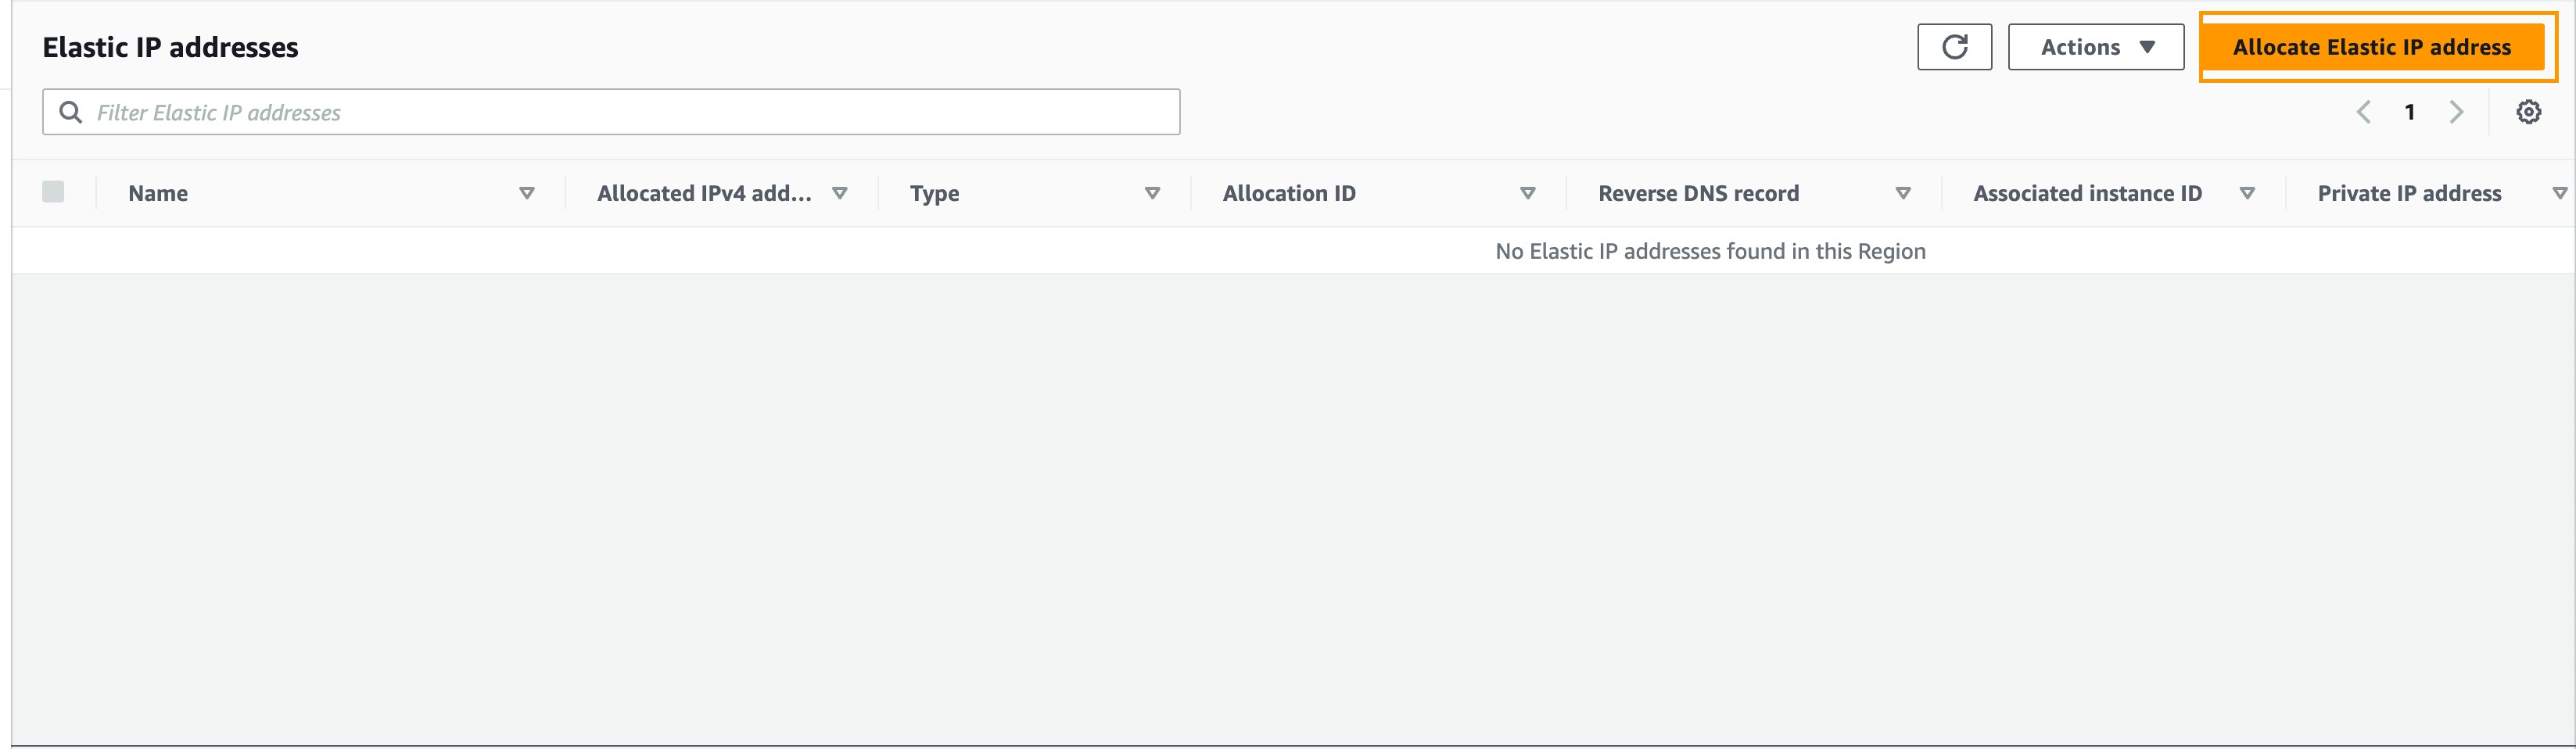
Then, click Allocate:
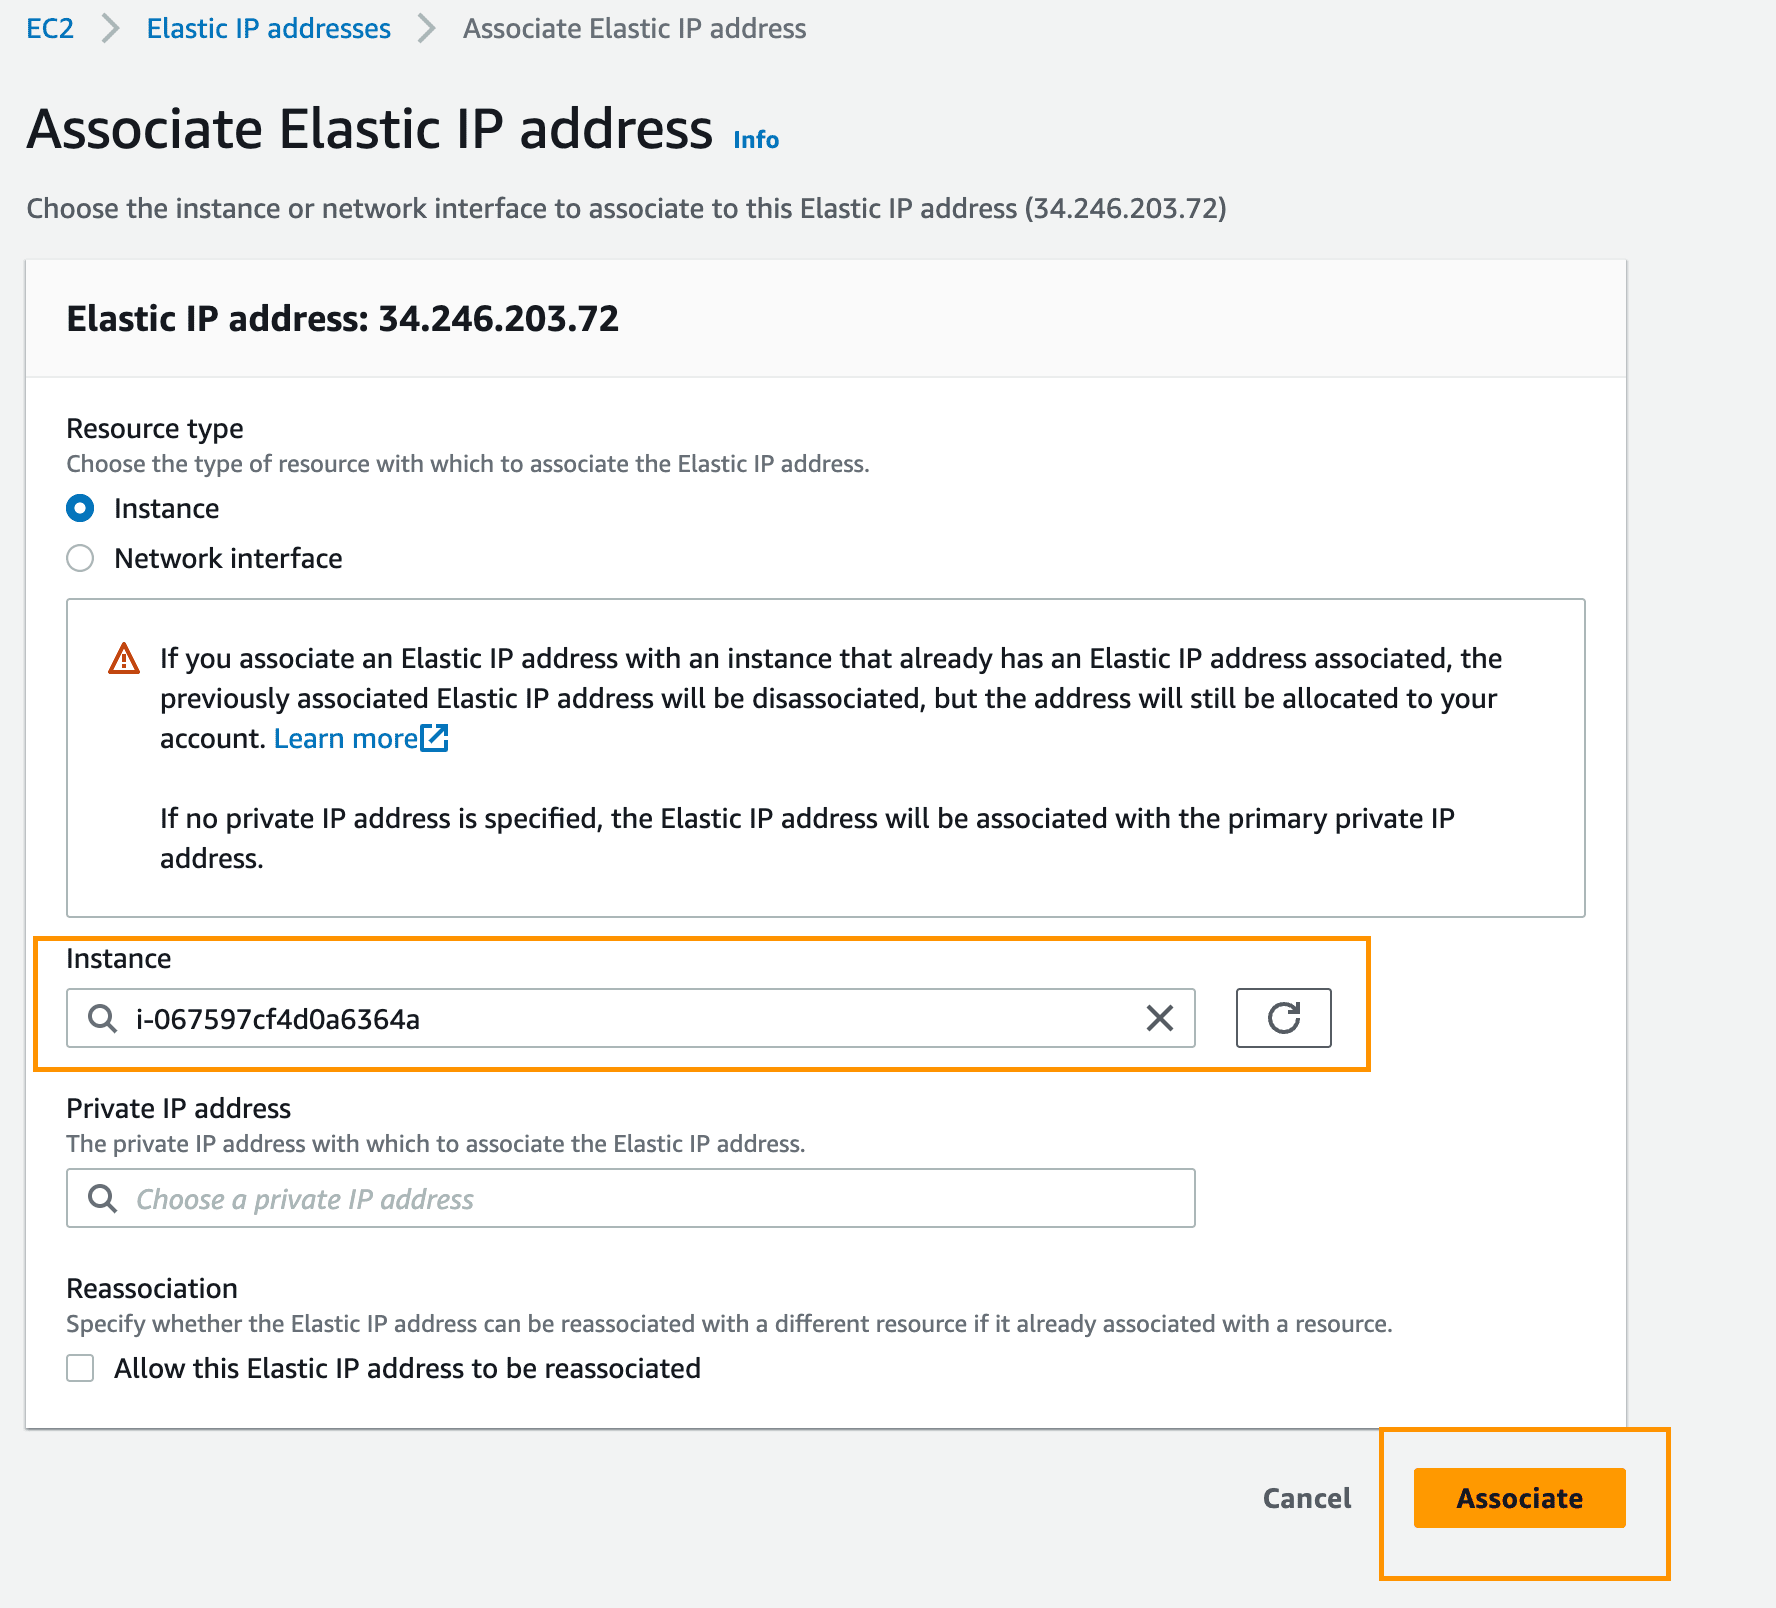
Select the newly created elastic IP address, click the Actions dropdown -> Associate this Elastic IP address:

Select your instance and click Associate:
IAM Role
We'll Docker pull images from AWS ECR to our EC2 instance during deployment. Since we won't be allowing public access to the Docker image on ECR, you'll need to create an IAM role with permissions to pull Docker images from ECR and attach it to your EC2 instance.
Navigate to the IAM console.
Click Roles in the left sidebar and then Create role:
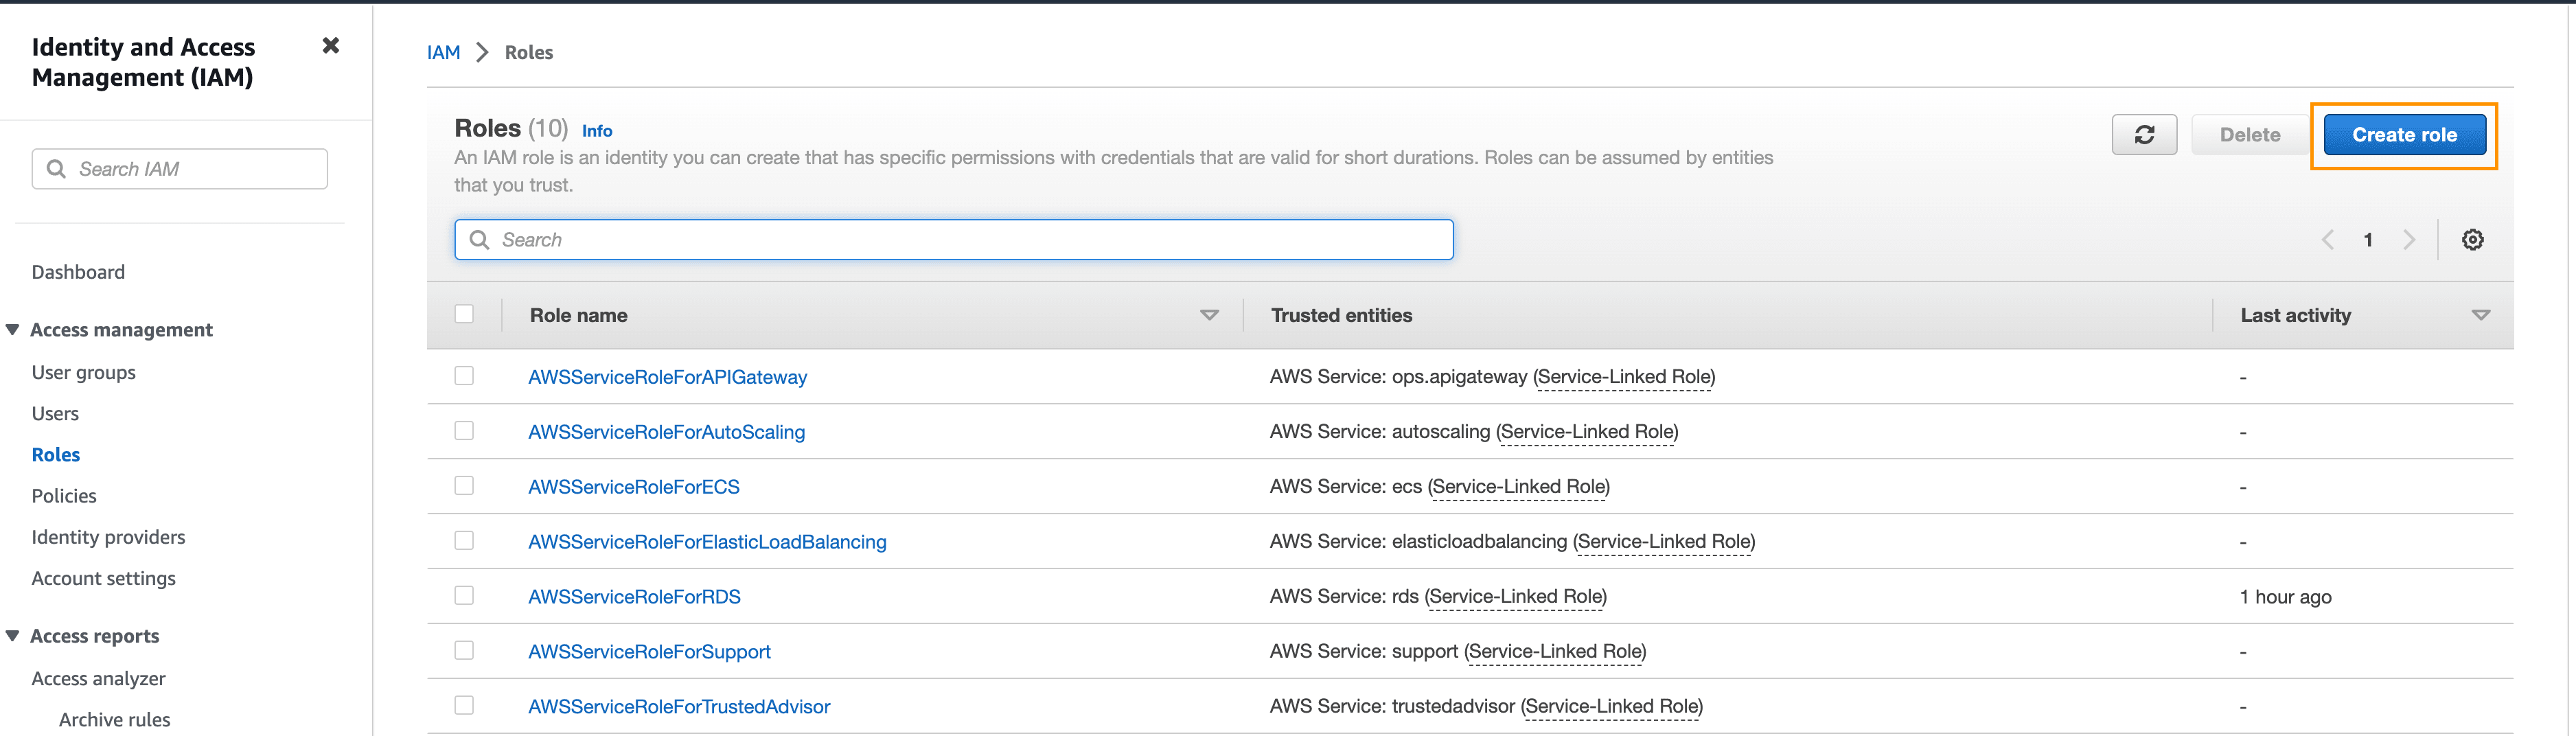
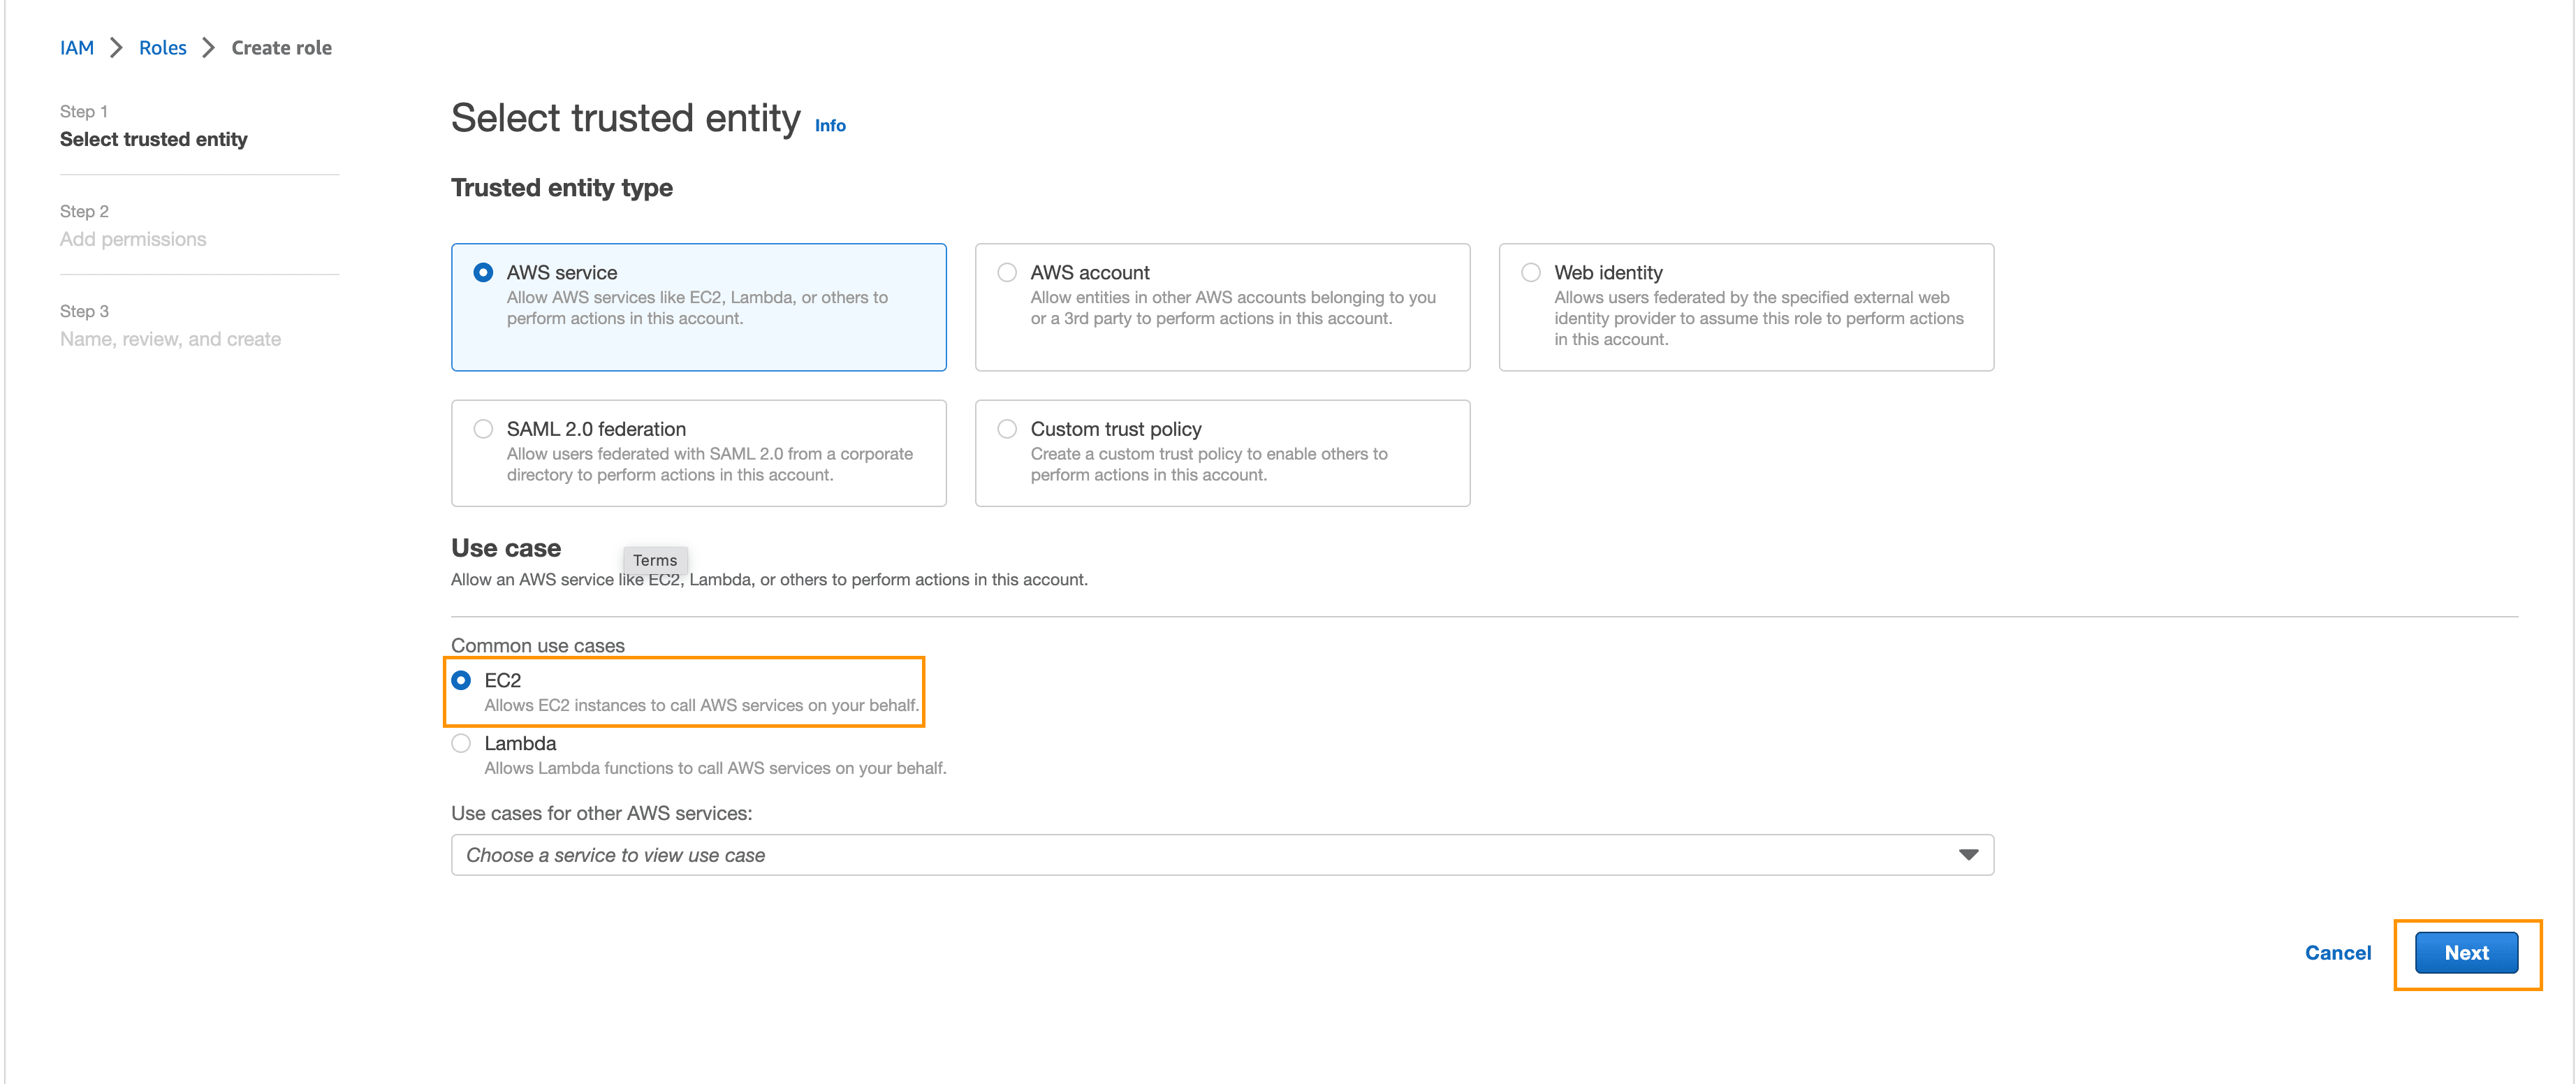
Select AWS Service and EC2, then click on Next:
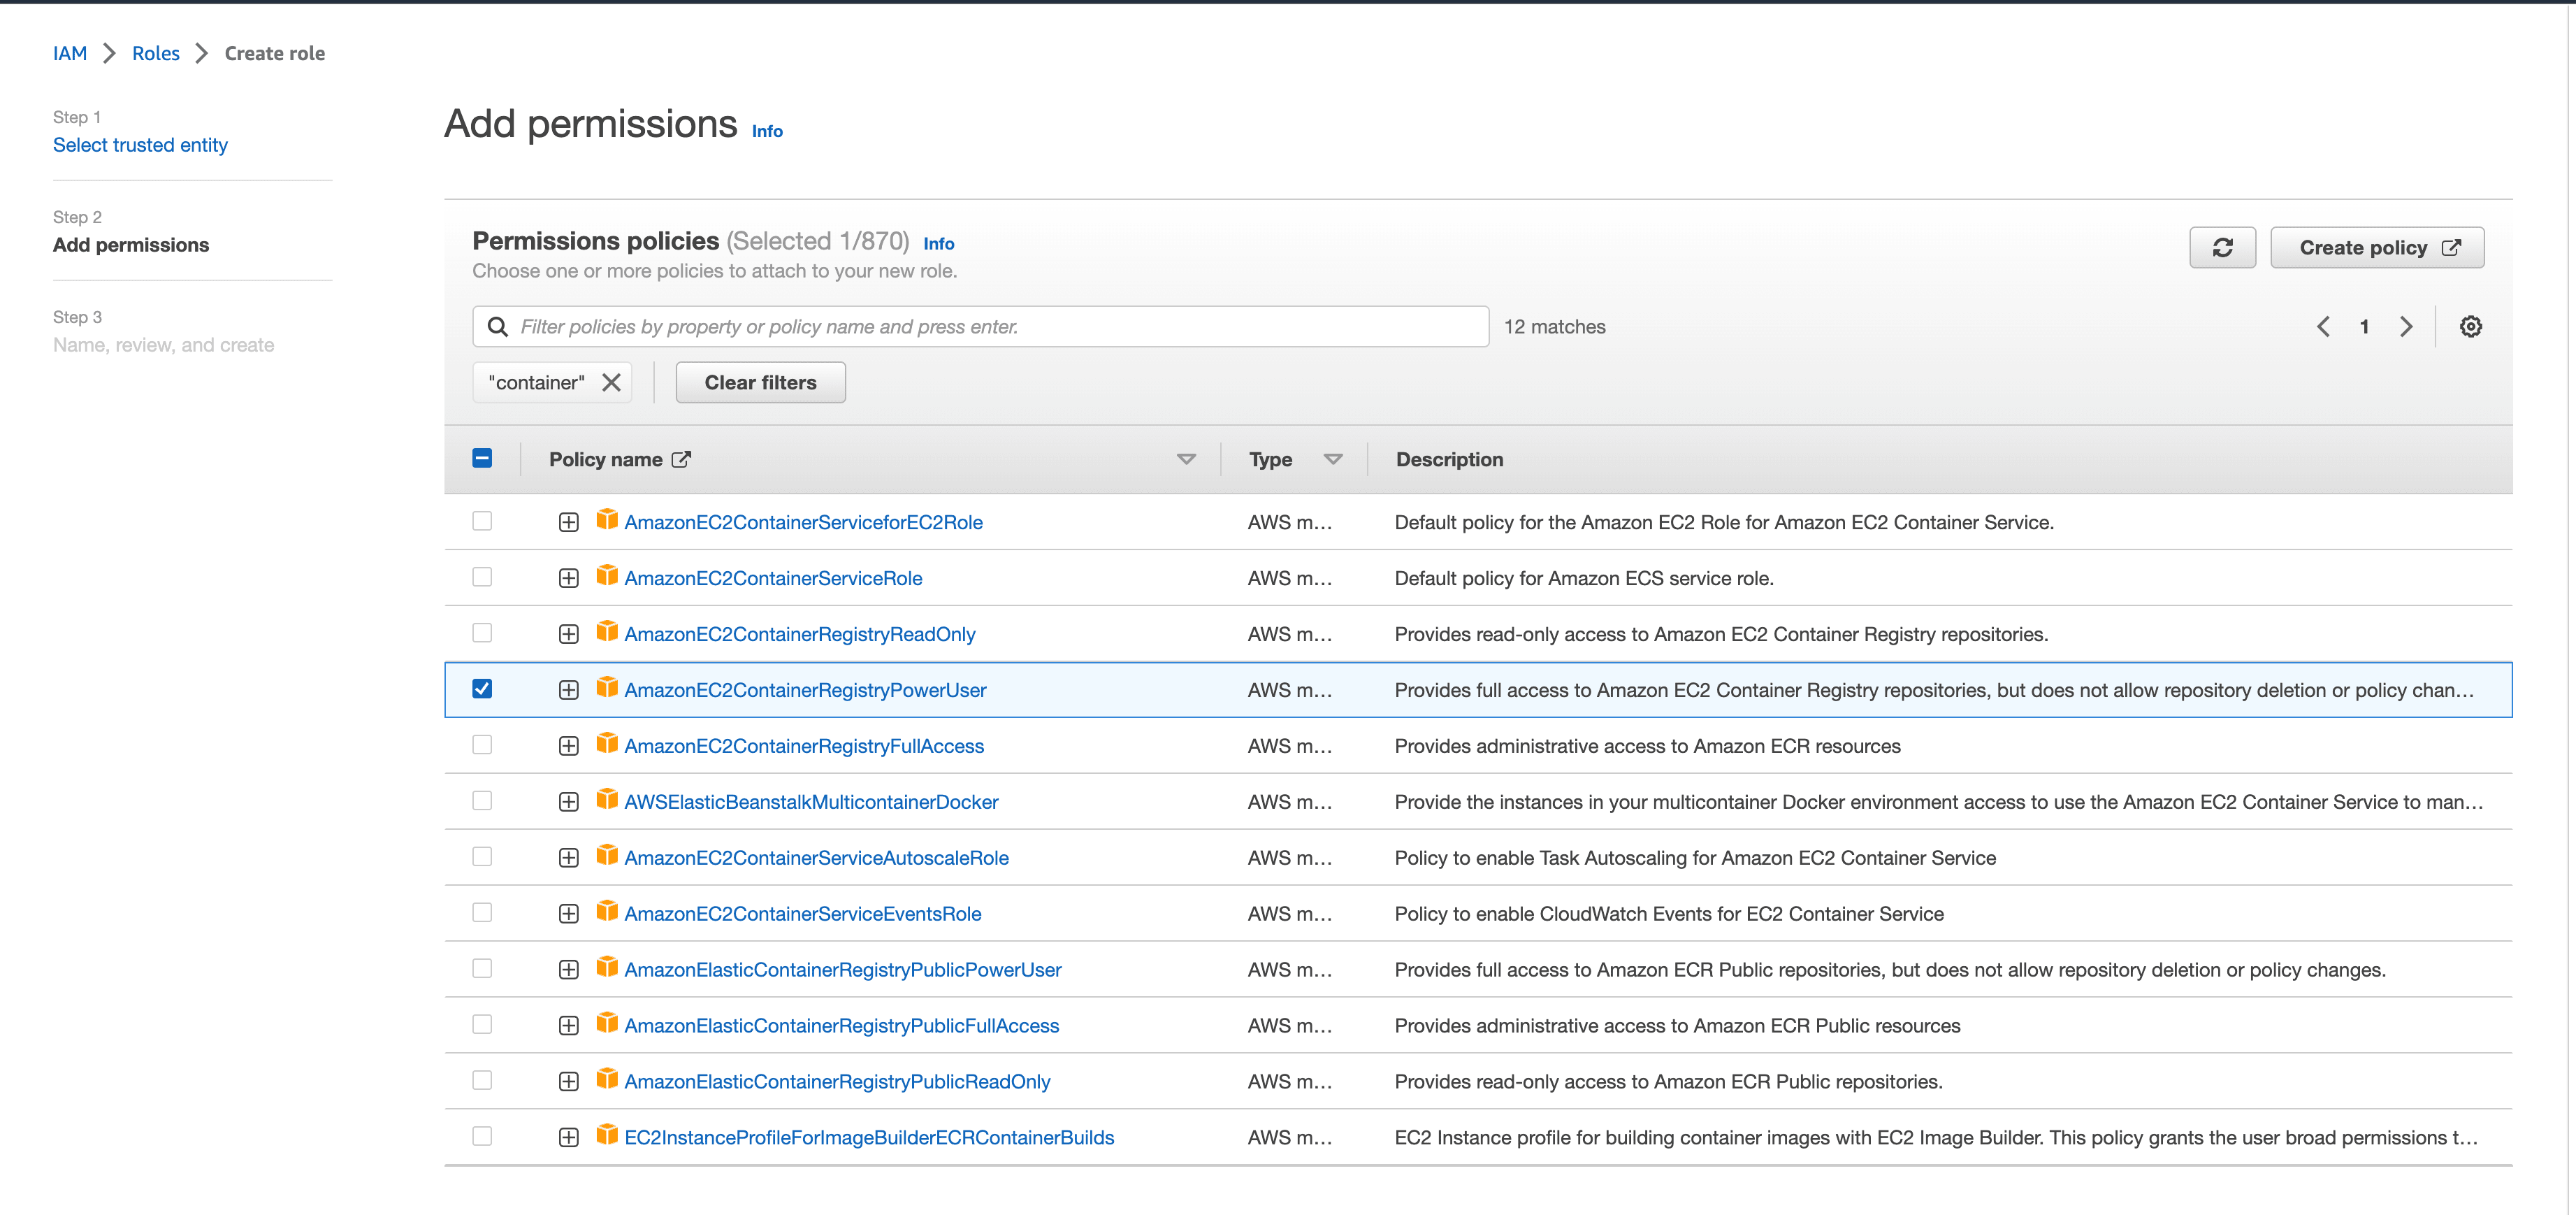
Enter container in the search box, select the AmazonEC2ContainerRegistryPowerUser policy, and click Next:
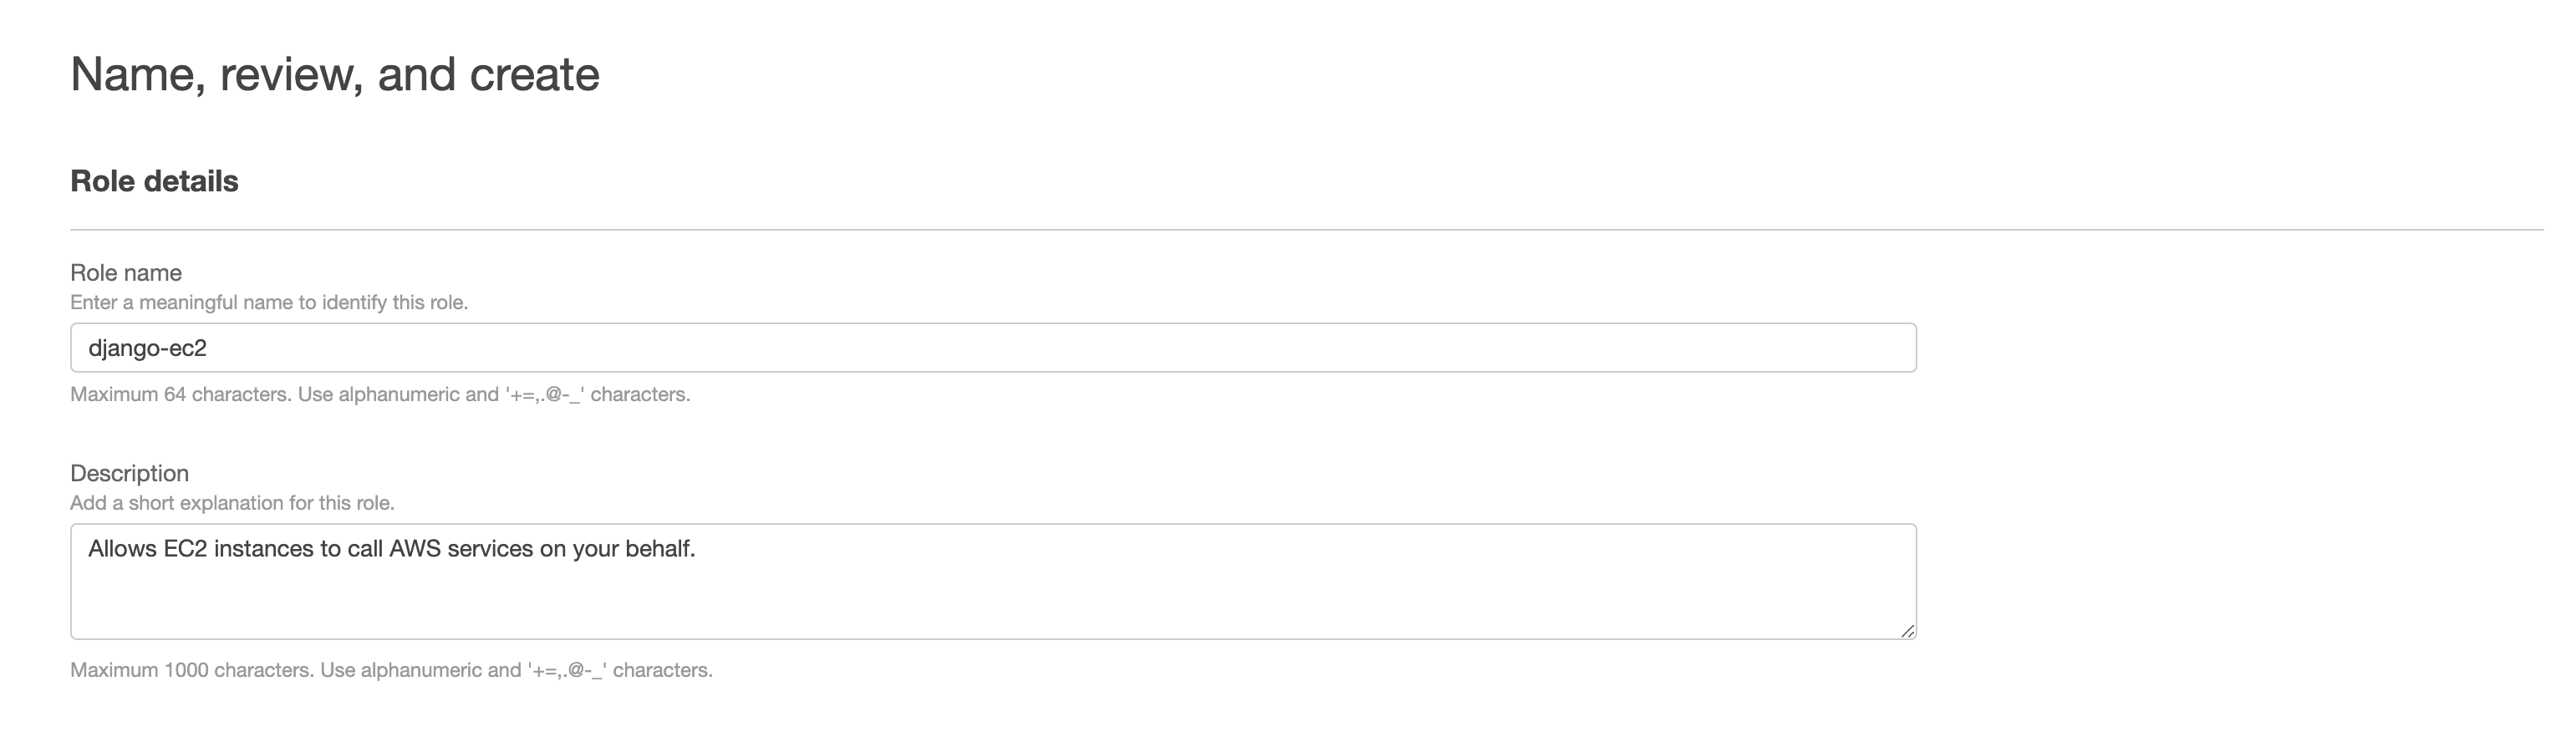
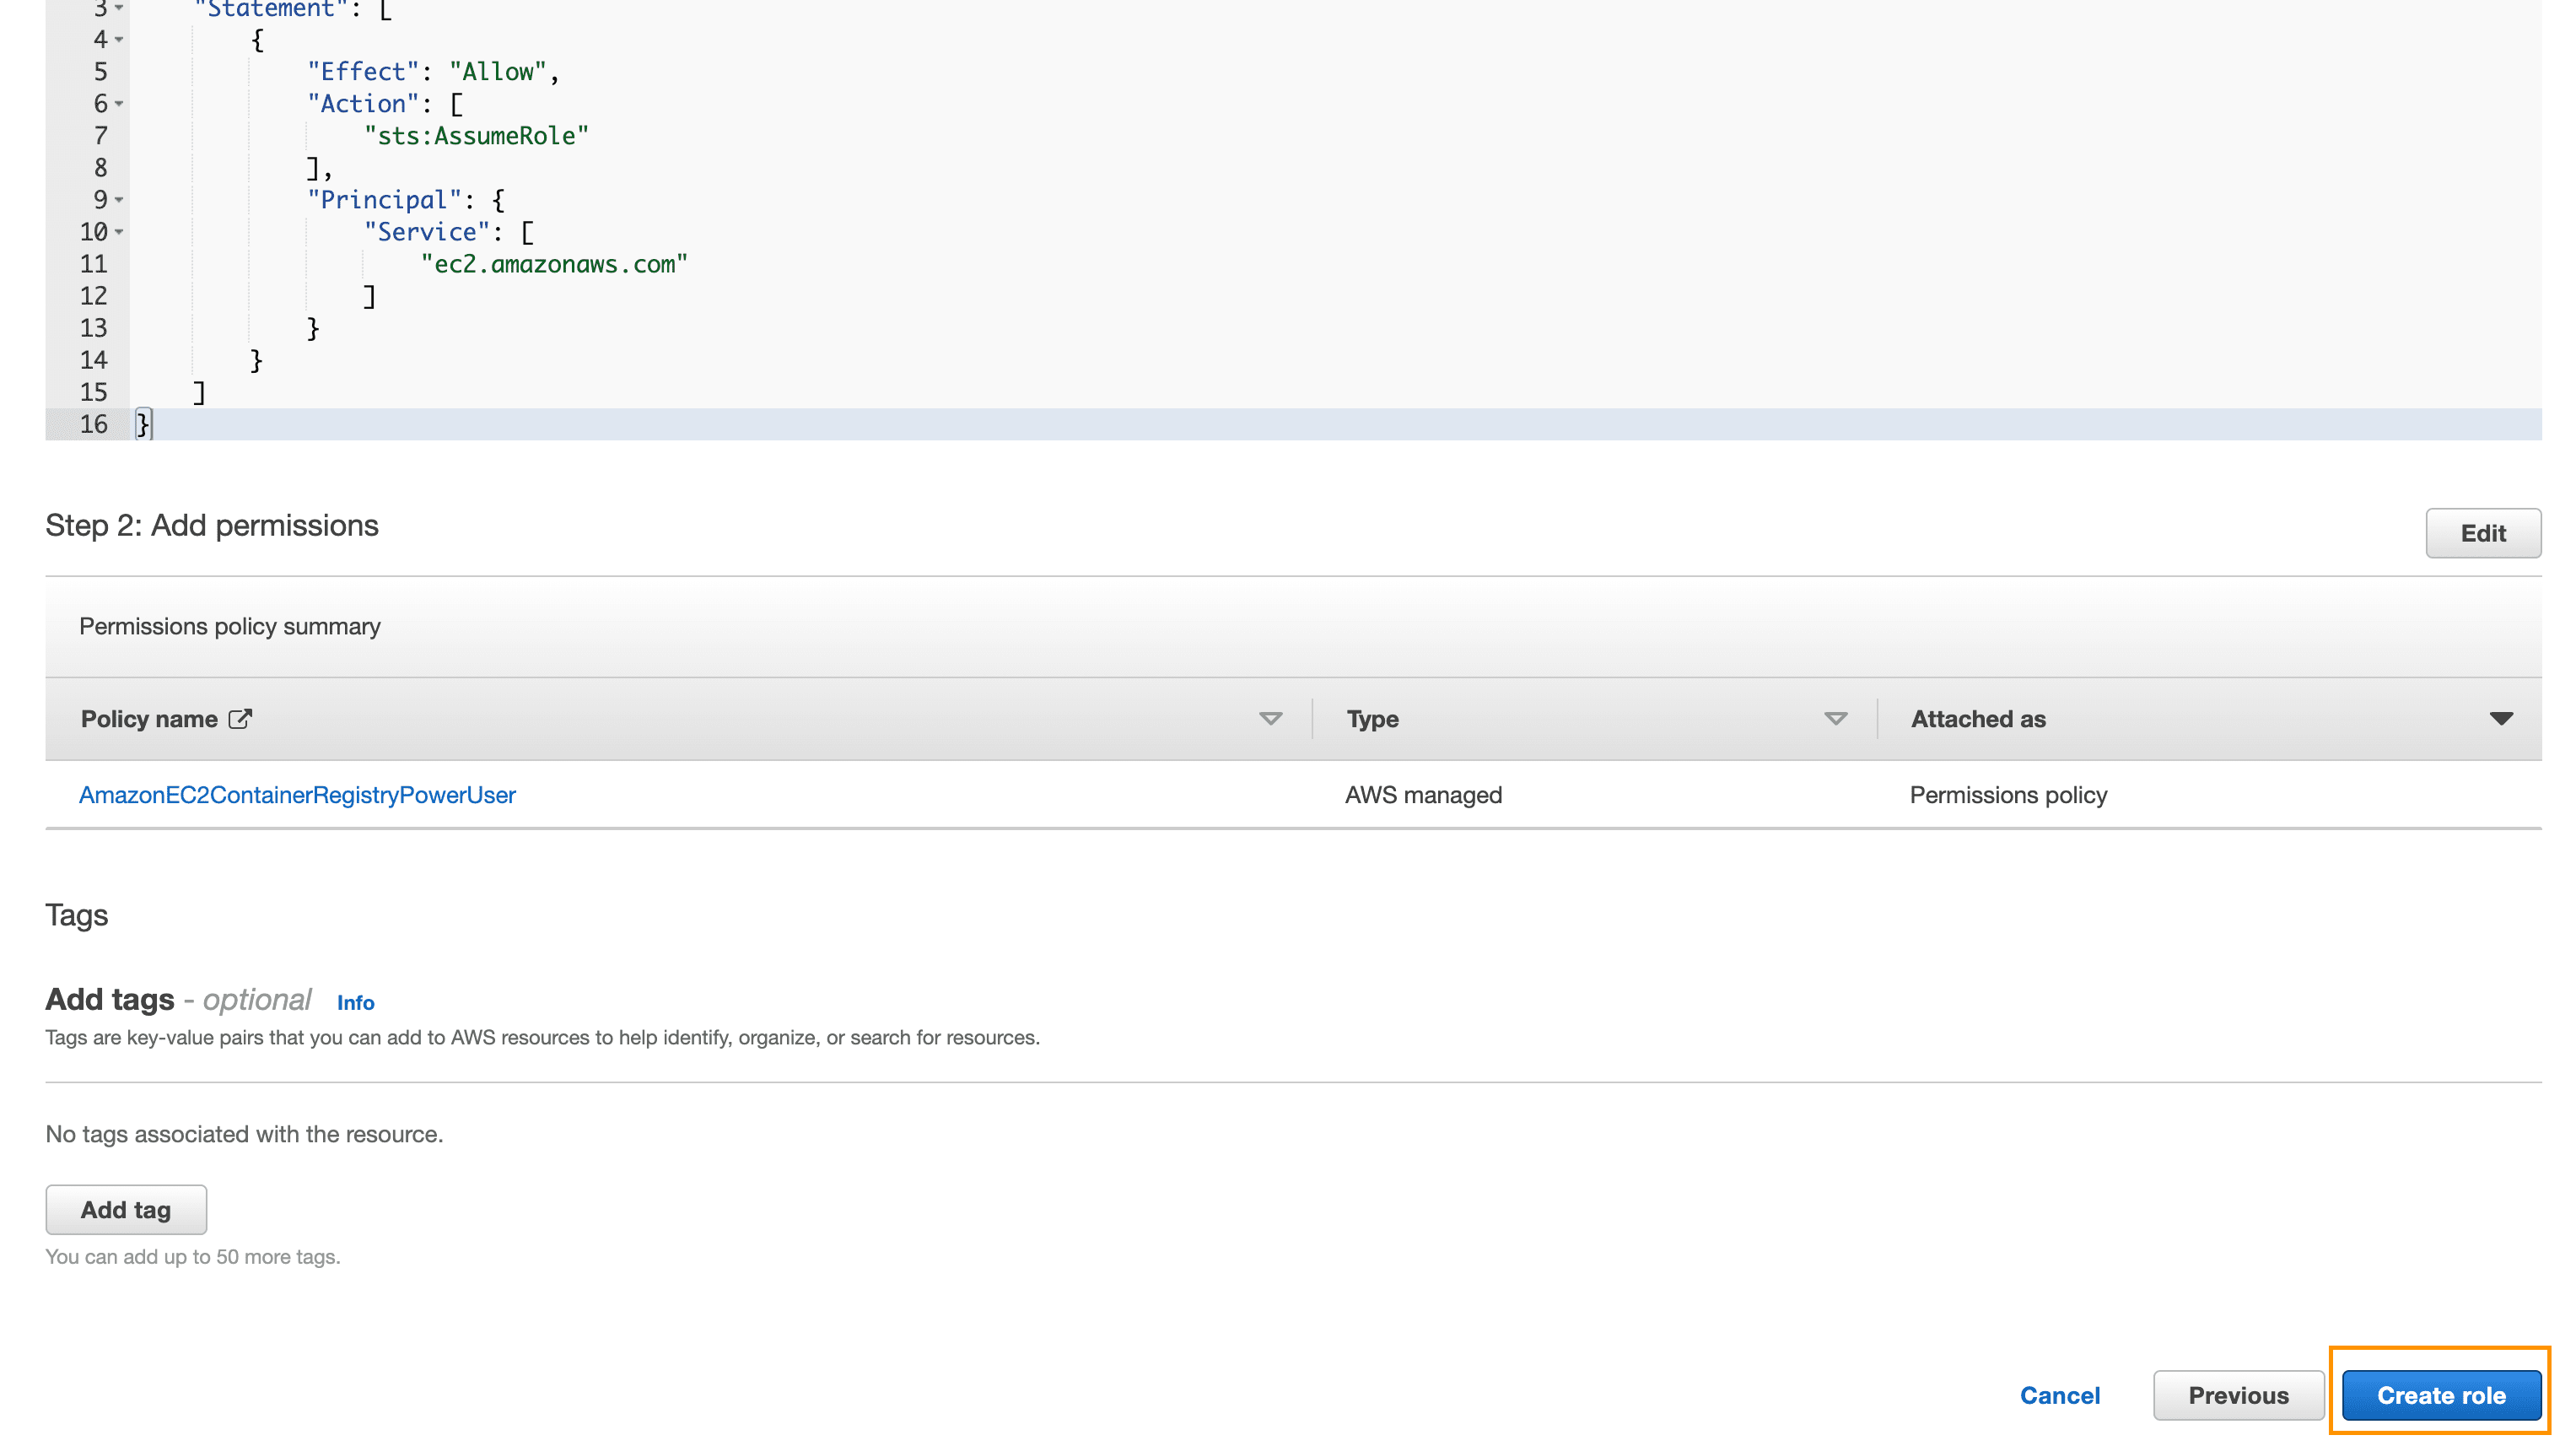
Click Next: Review. Use django-ec2 for the name, and click on Create role:
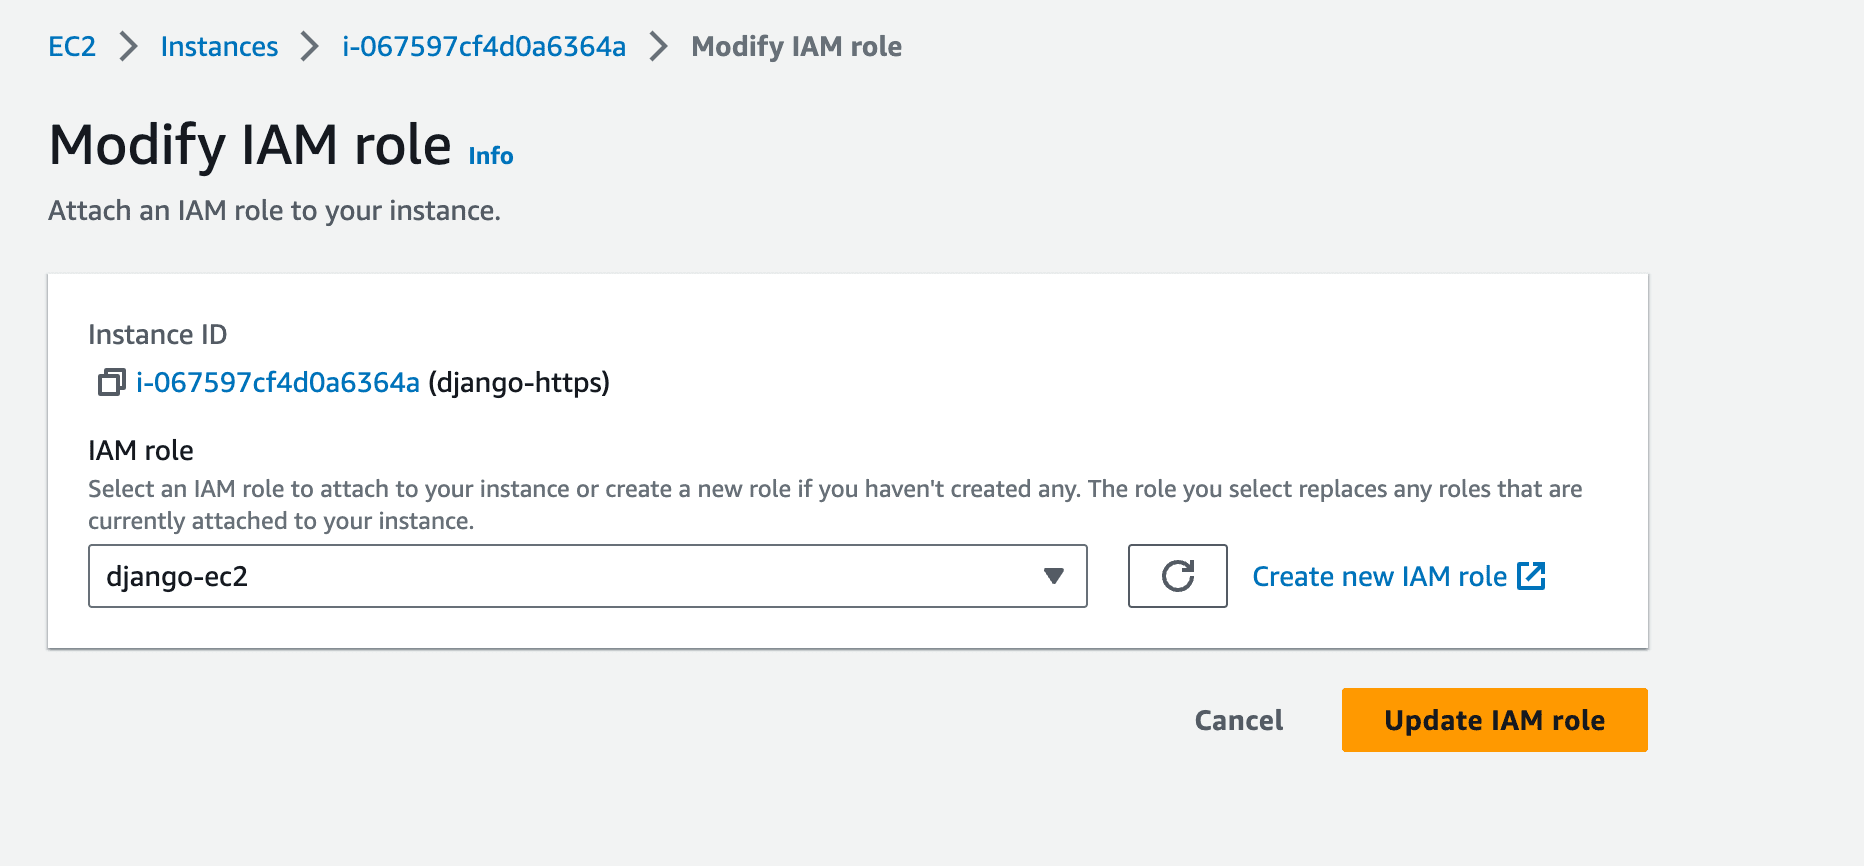
Now you need to attach the new role to your EC2 instance.
Back in the EC2 console, click Instances, and then select your instance. Click the Actions dropdown -> Instance settings -> Attach/Replace IAM Role:
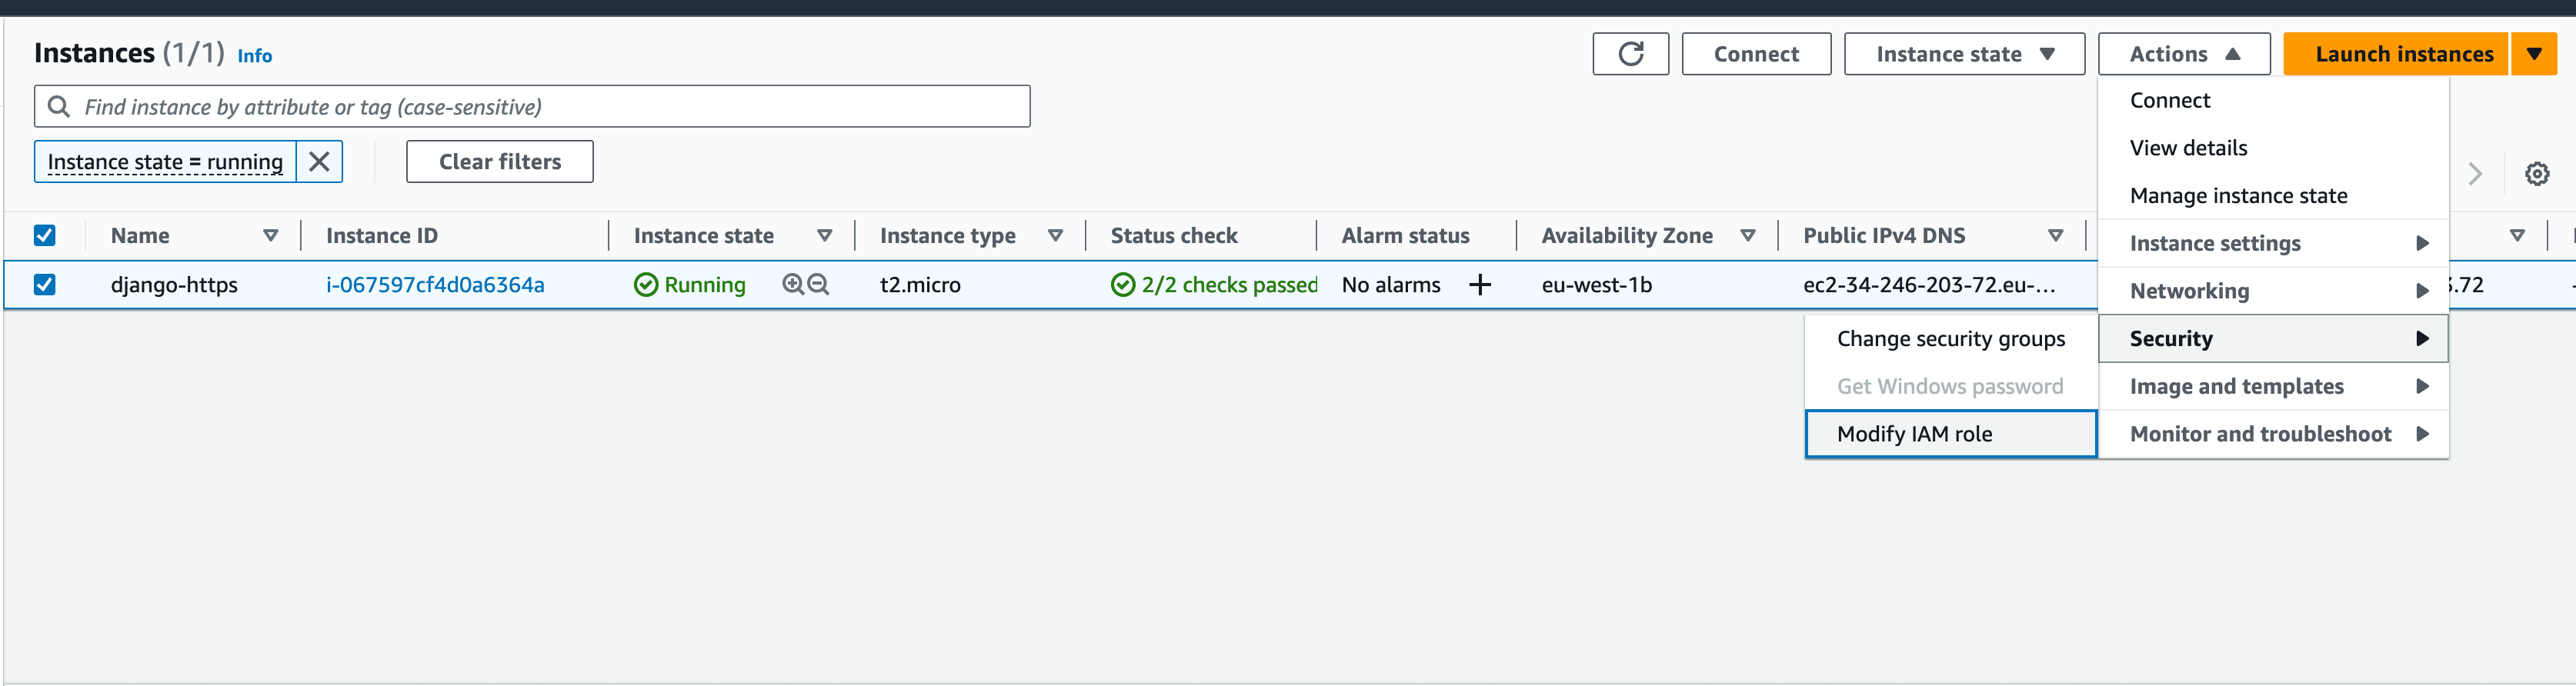
Select the django-ec2 role, and then click Update IAM role.
Add DNS Record
Add an A record to your DNS, for the domain that you are using, to point to your EC2 instance's public IP.
It's the Elastic IP you've associated to your instance.
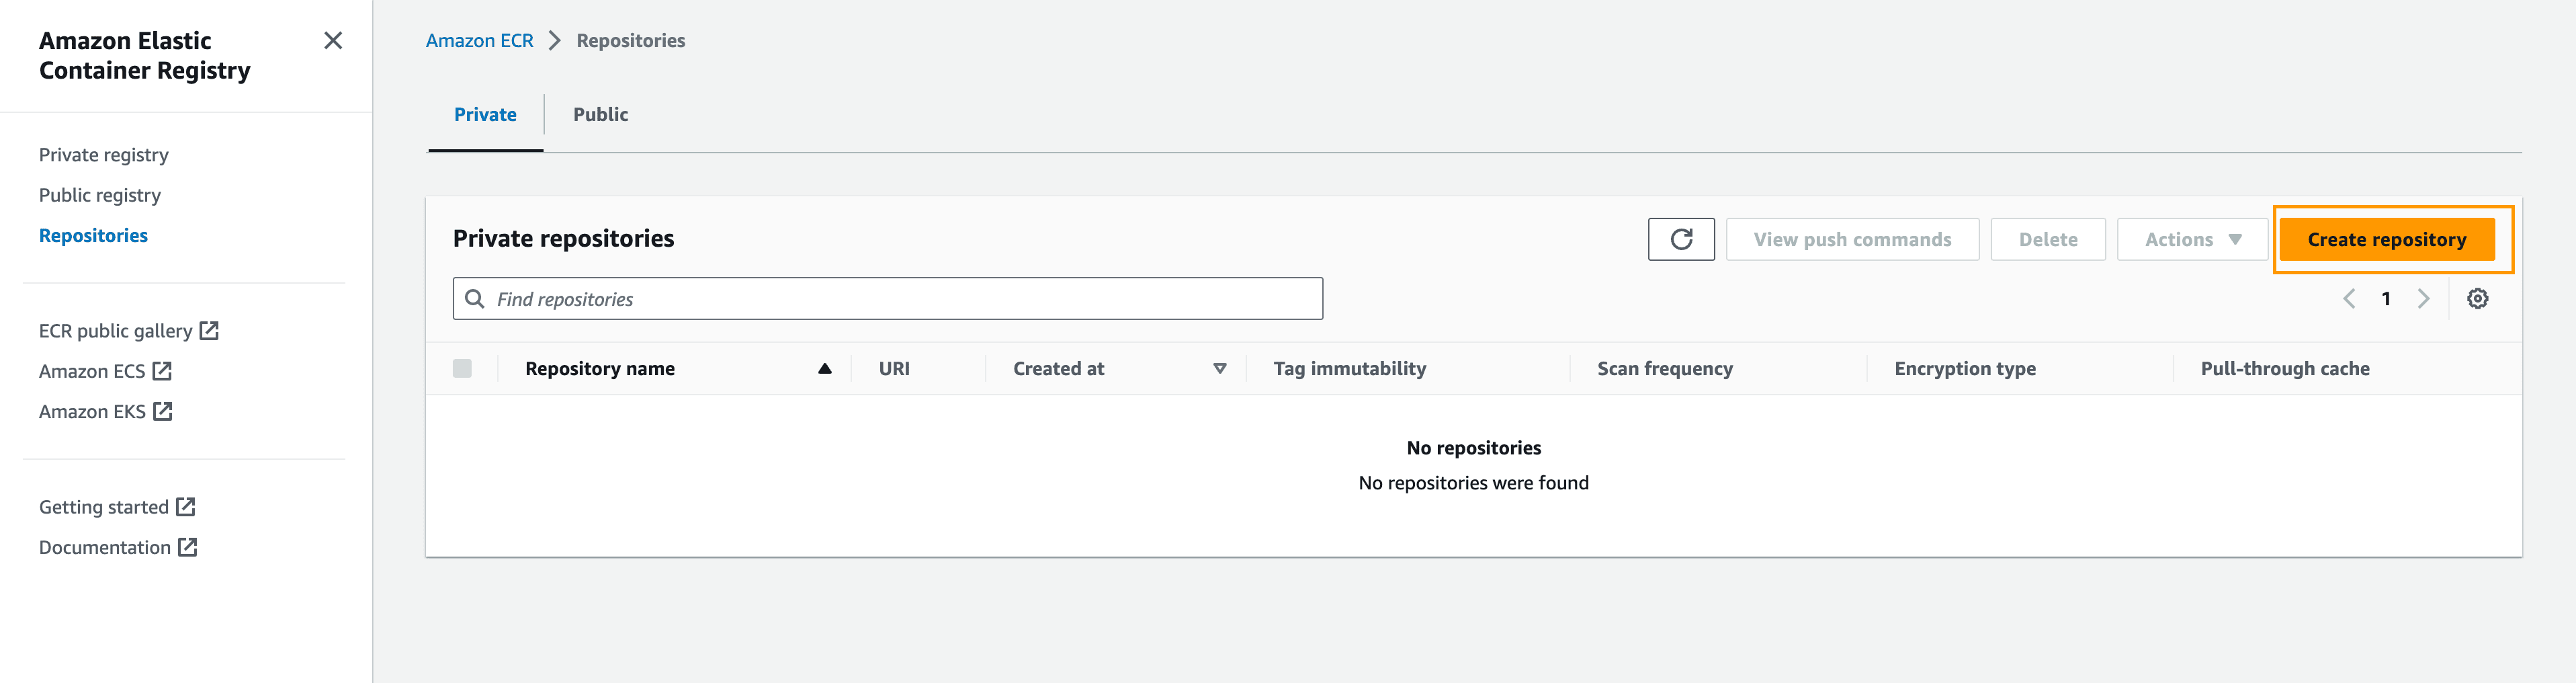
AWS ECR
Amazon Elastic Container Registry (ECR) is a fully-managed Docker image registry that makes it easy for developers to store and manage images. For private images, access is managed via IAM users and roles.
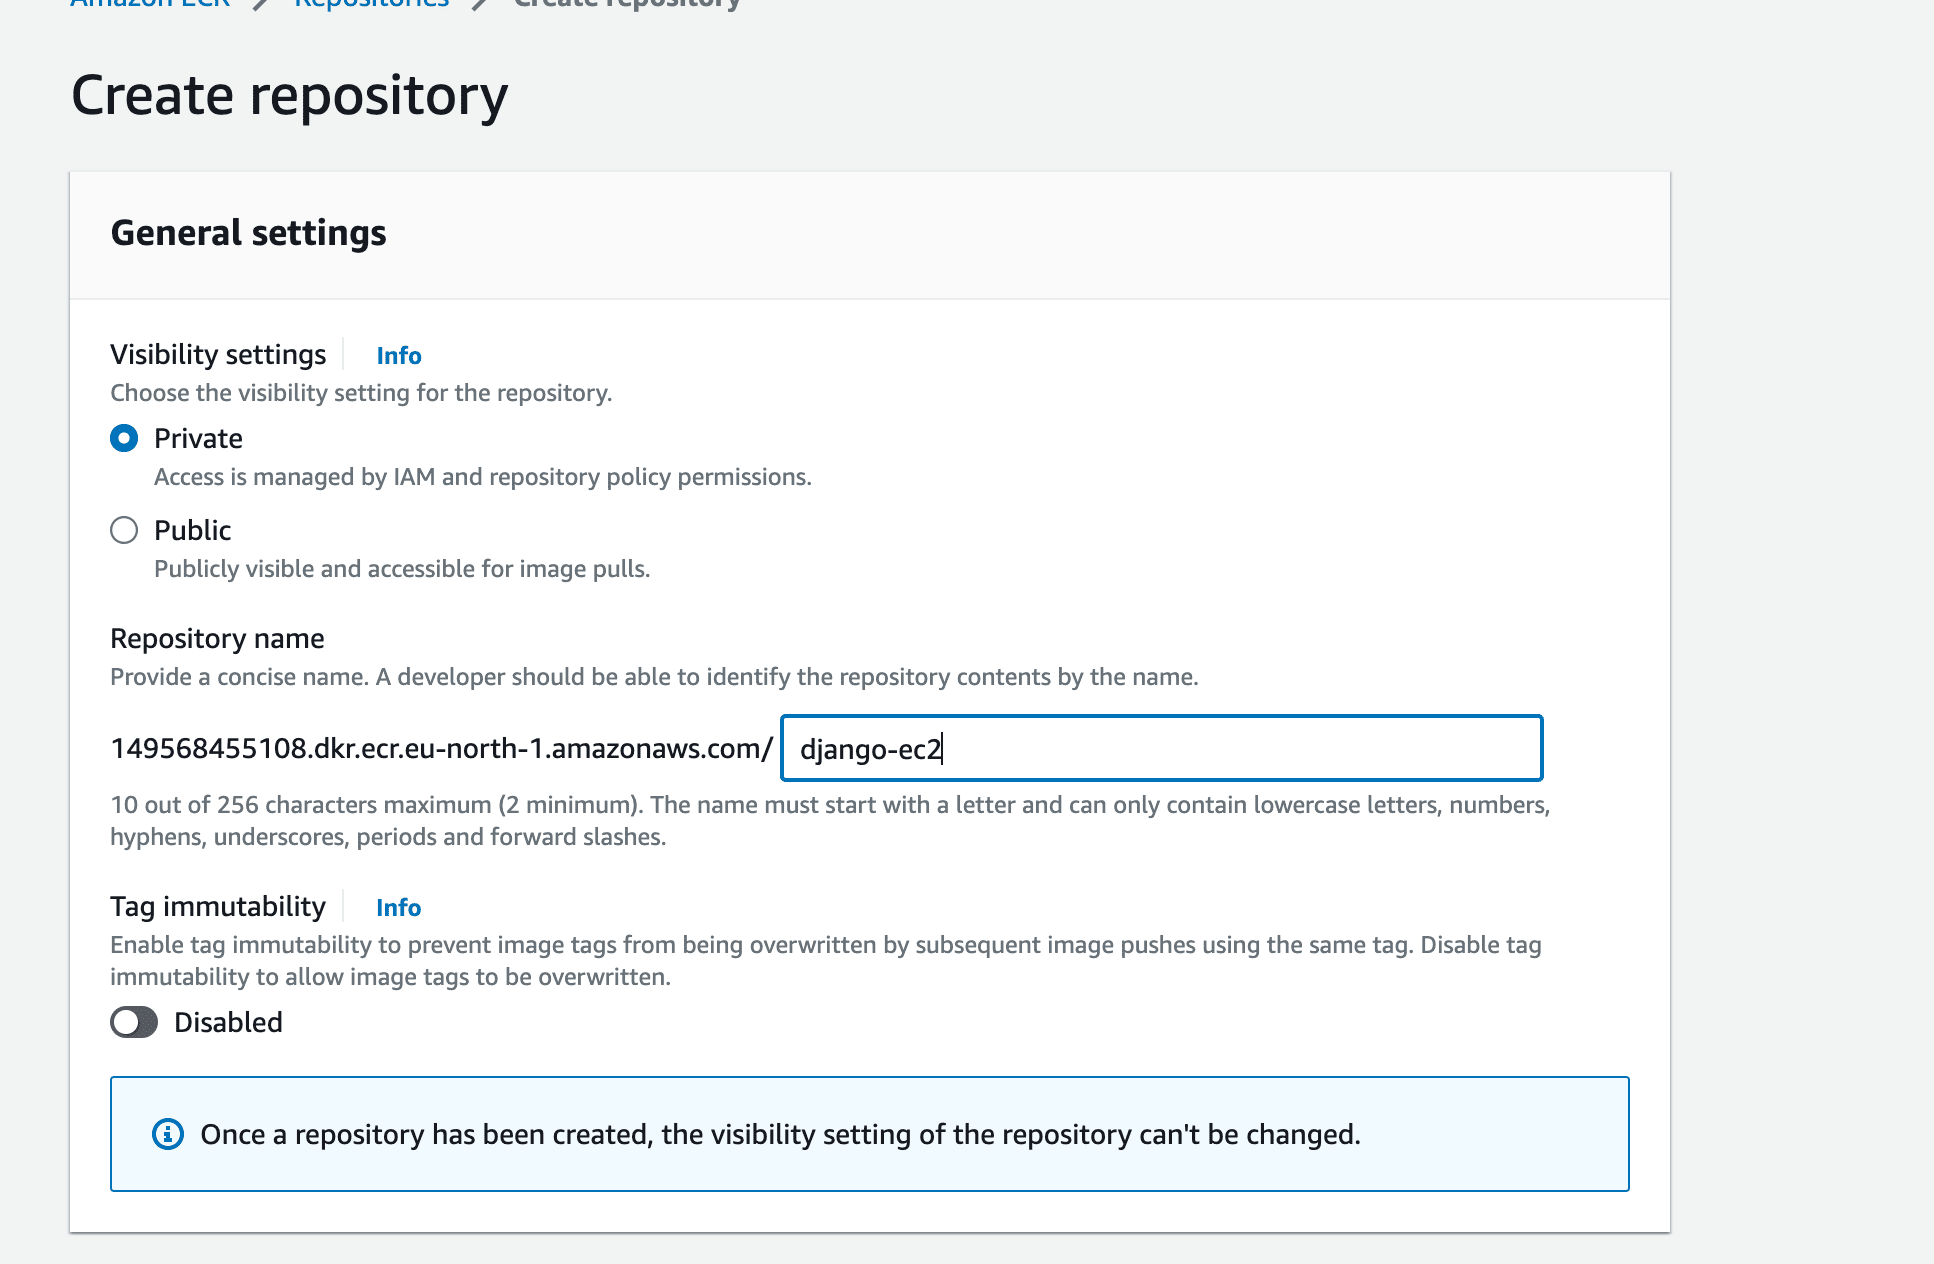
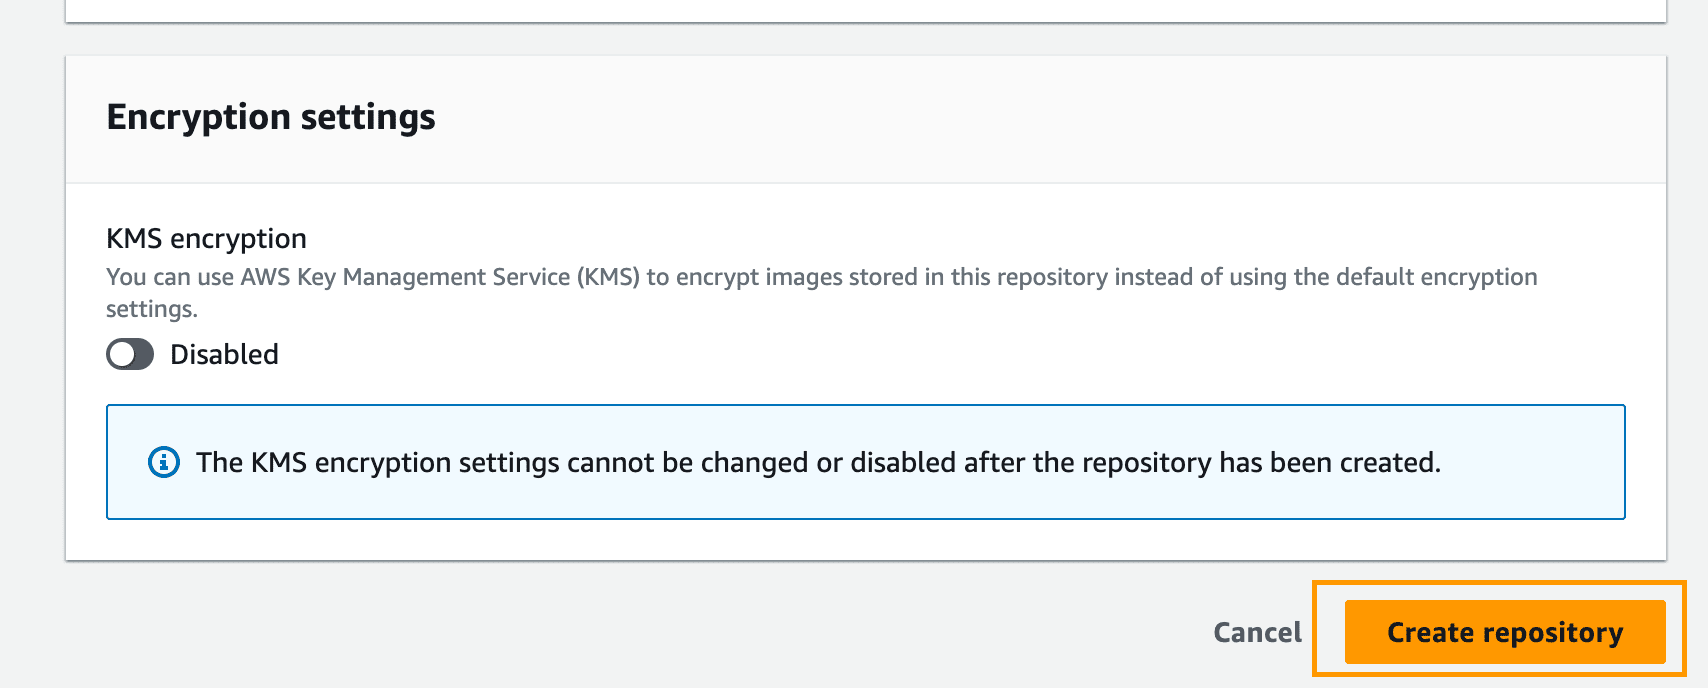
Navigate to the ECR console. Click Repositories in the sidebar and then on Create repository:
Set the name to django-ec2 and click on Create repository:
AWS RDS
Now we can configure an RDS Postgres database.
While you can run your own Postgres database in a container, since databases are critical services, adding additional layers, such us Docker, adds unnecessary risk in production. To simplify tasks such as minor version updates, regular backups, and scaling, it's recommended to use a managed service. So, we'll use RDS.
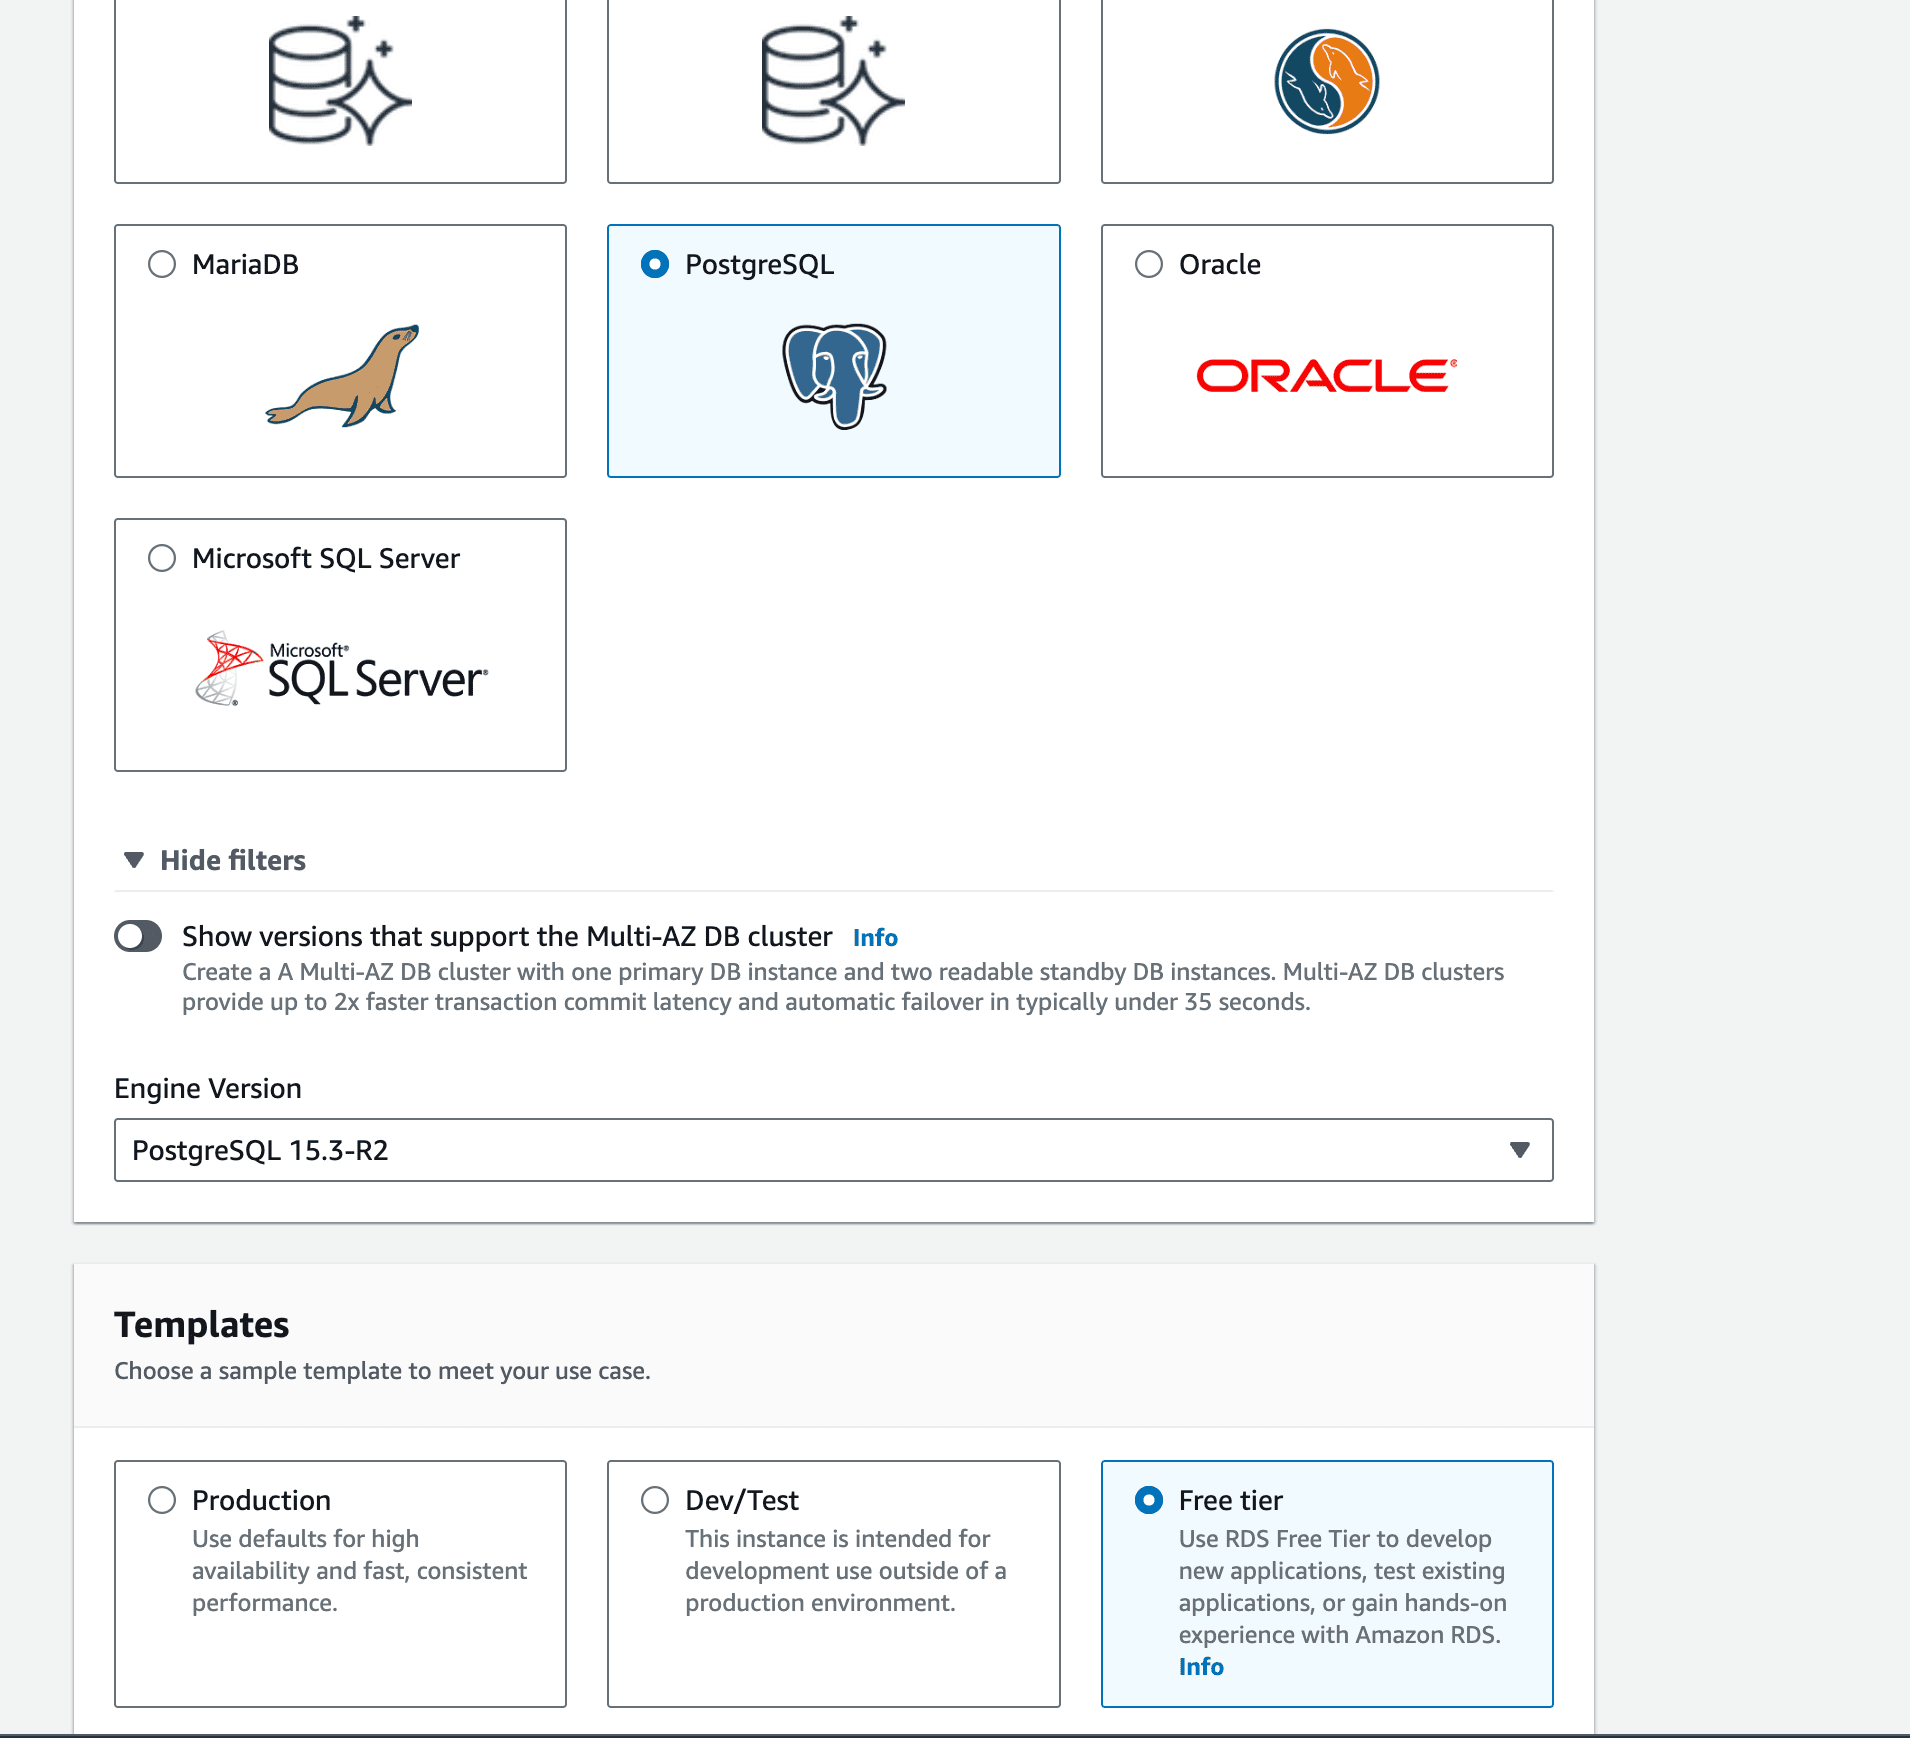
Navigate to the RDS console. Click on Create database:

Select the latest version of Postgres with the Free tier template:
Under Settings, set:
- DB Instance identifier:
djangoec2 - Master username:
webapp - Select Auto generate a password
Stick with default settings for:
- DB instance size
- Storage
- Availability & durability
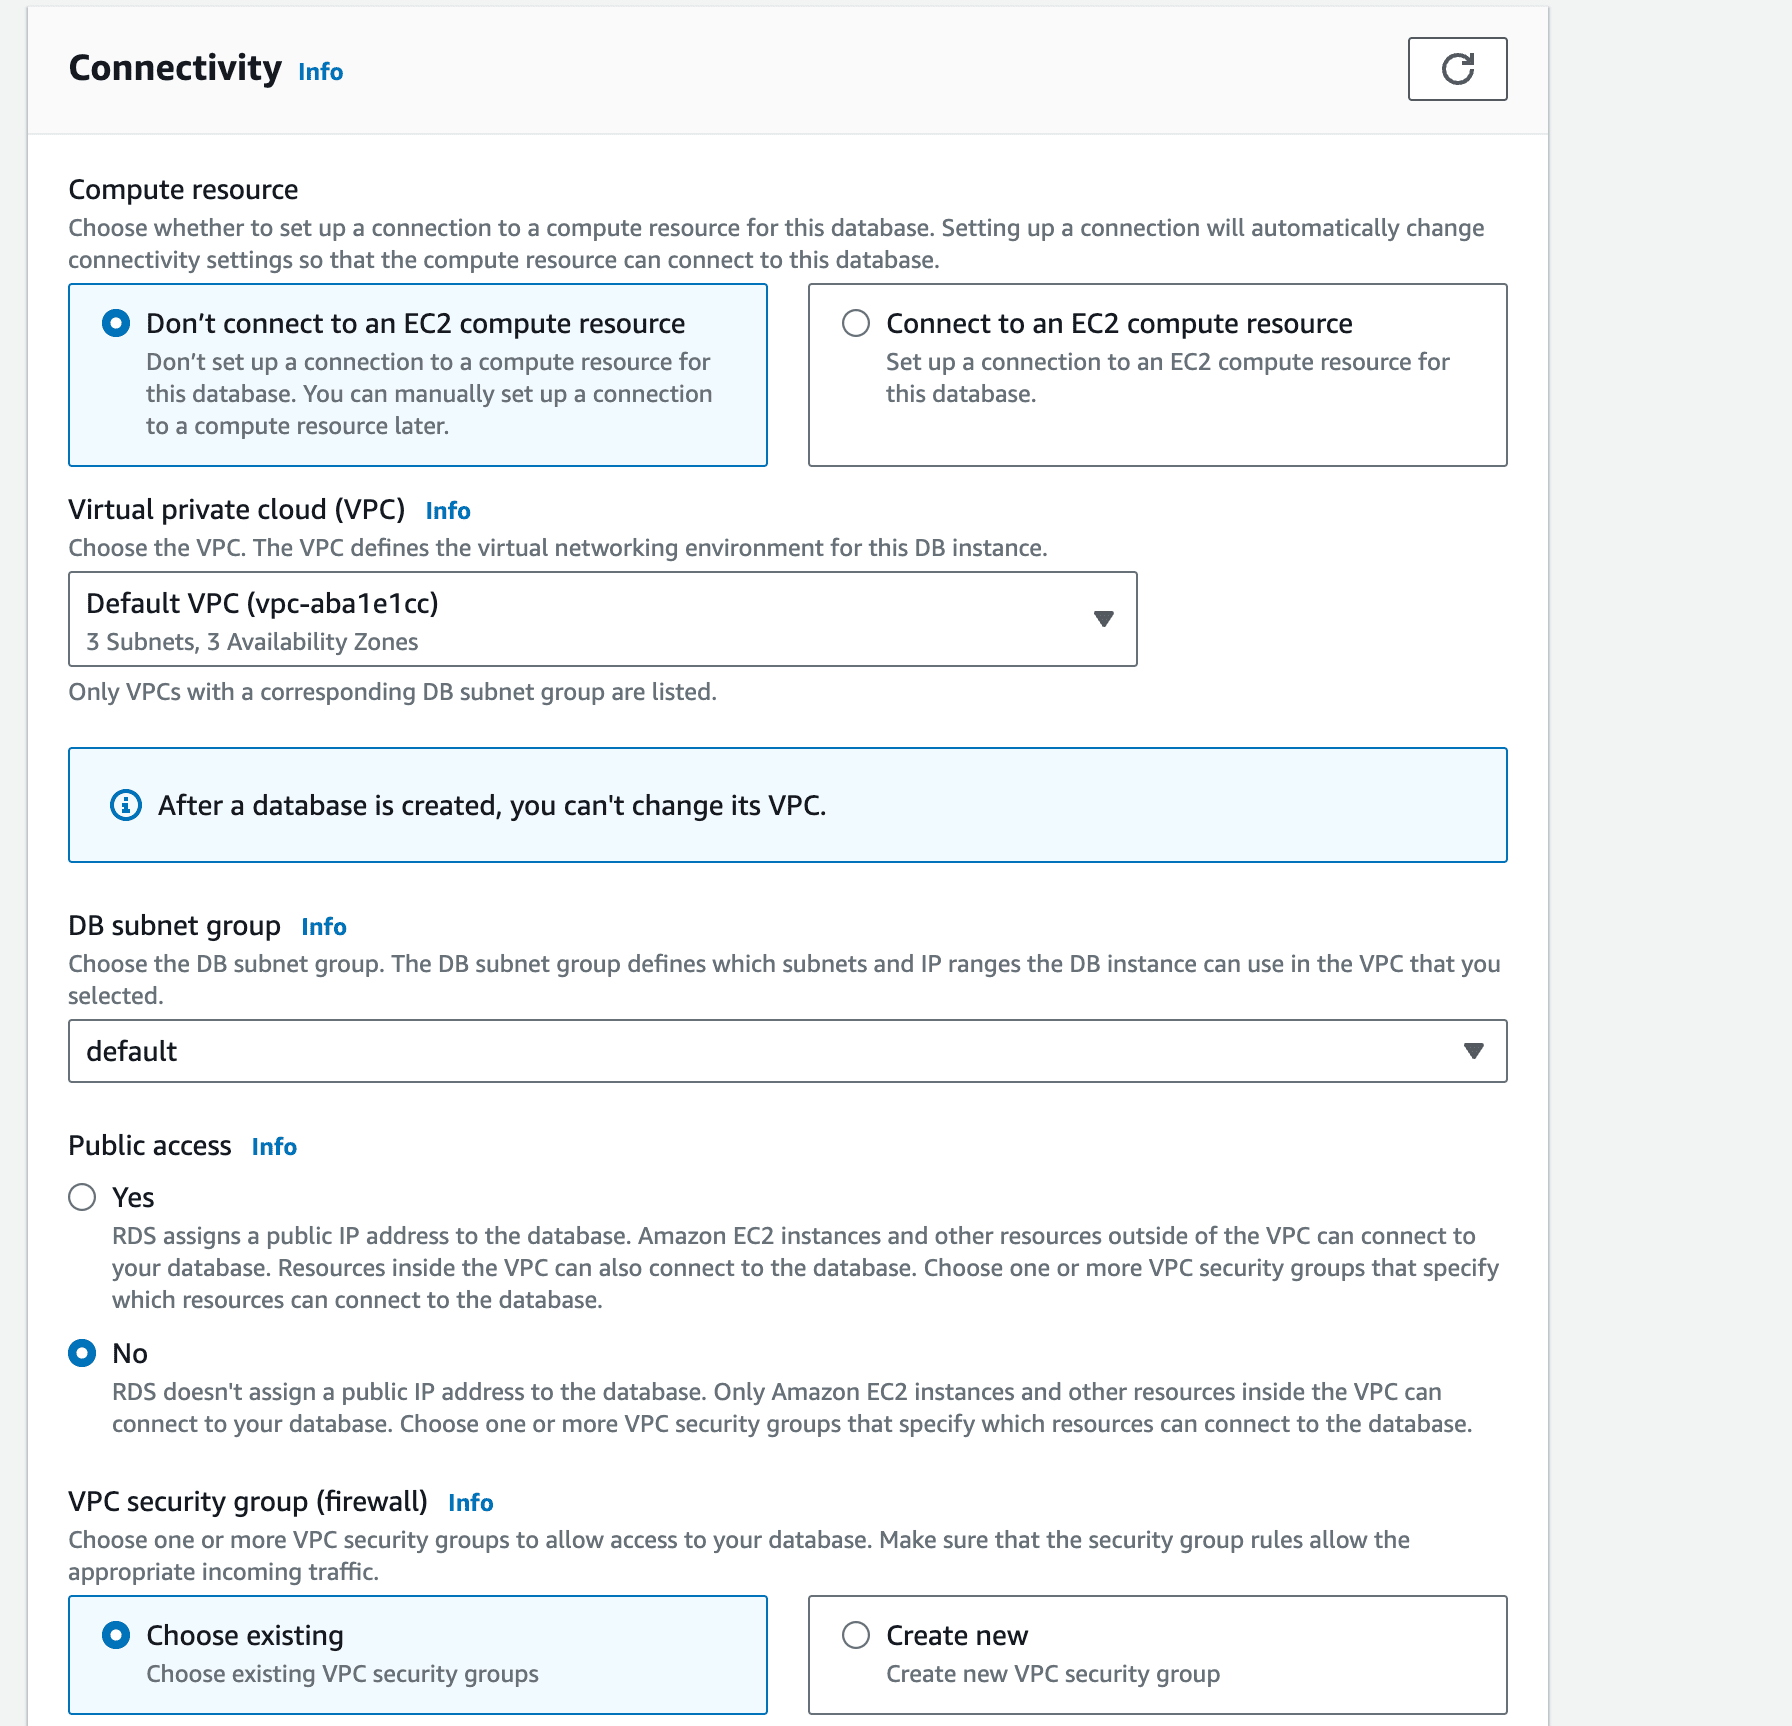
Skip down to the Connectivity section and set the following:
- Virtual private cloud (VPC): Default
- Subnet group: default
- Publicly accessible: No
- VPC security group:
django-ec2 - Database port: 5432
Under Monitoring disable Performance monitoring:
Leave Database authentication as it is.
Open Additional configuration and change Initial database name to djangoec2:
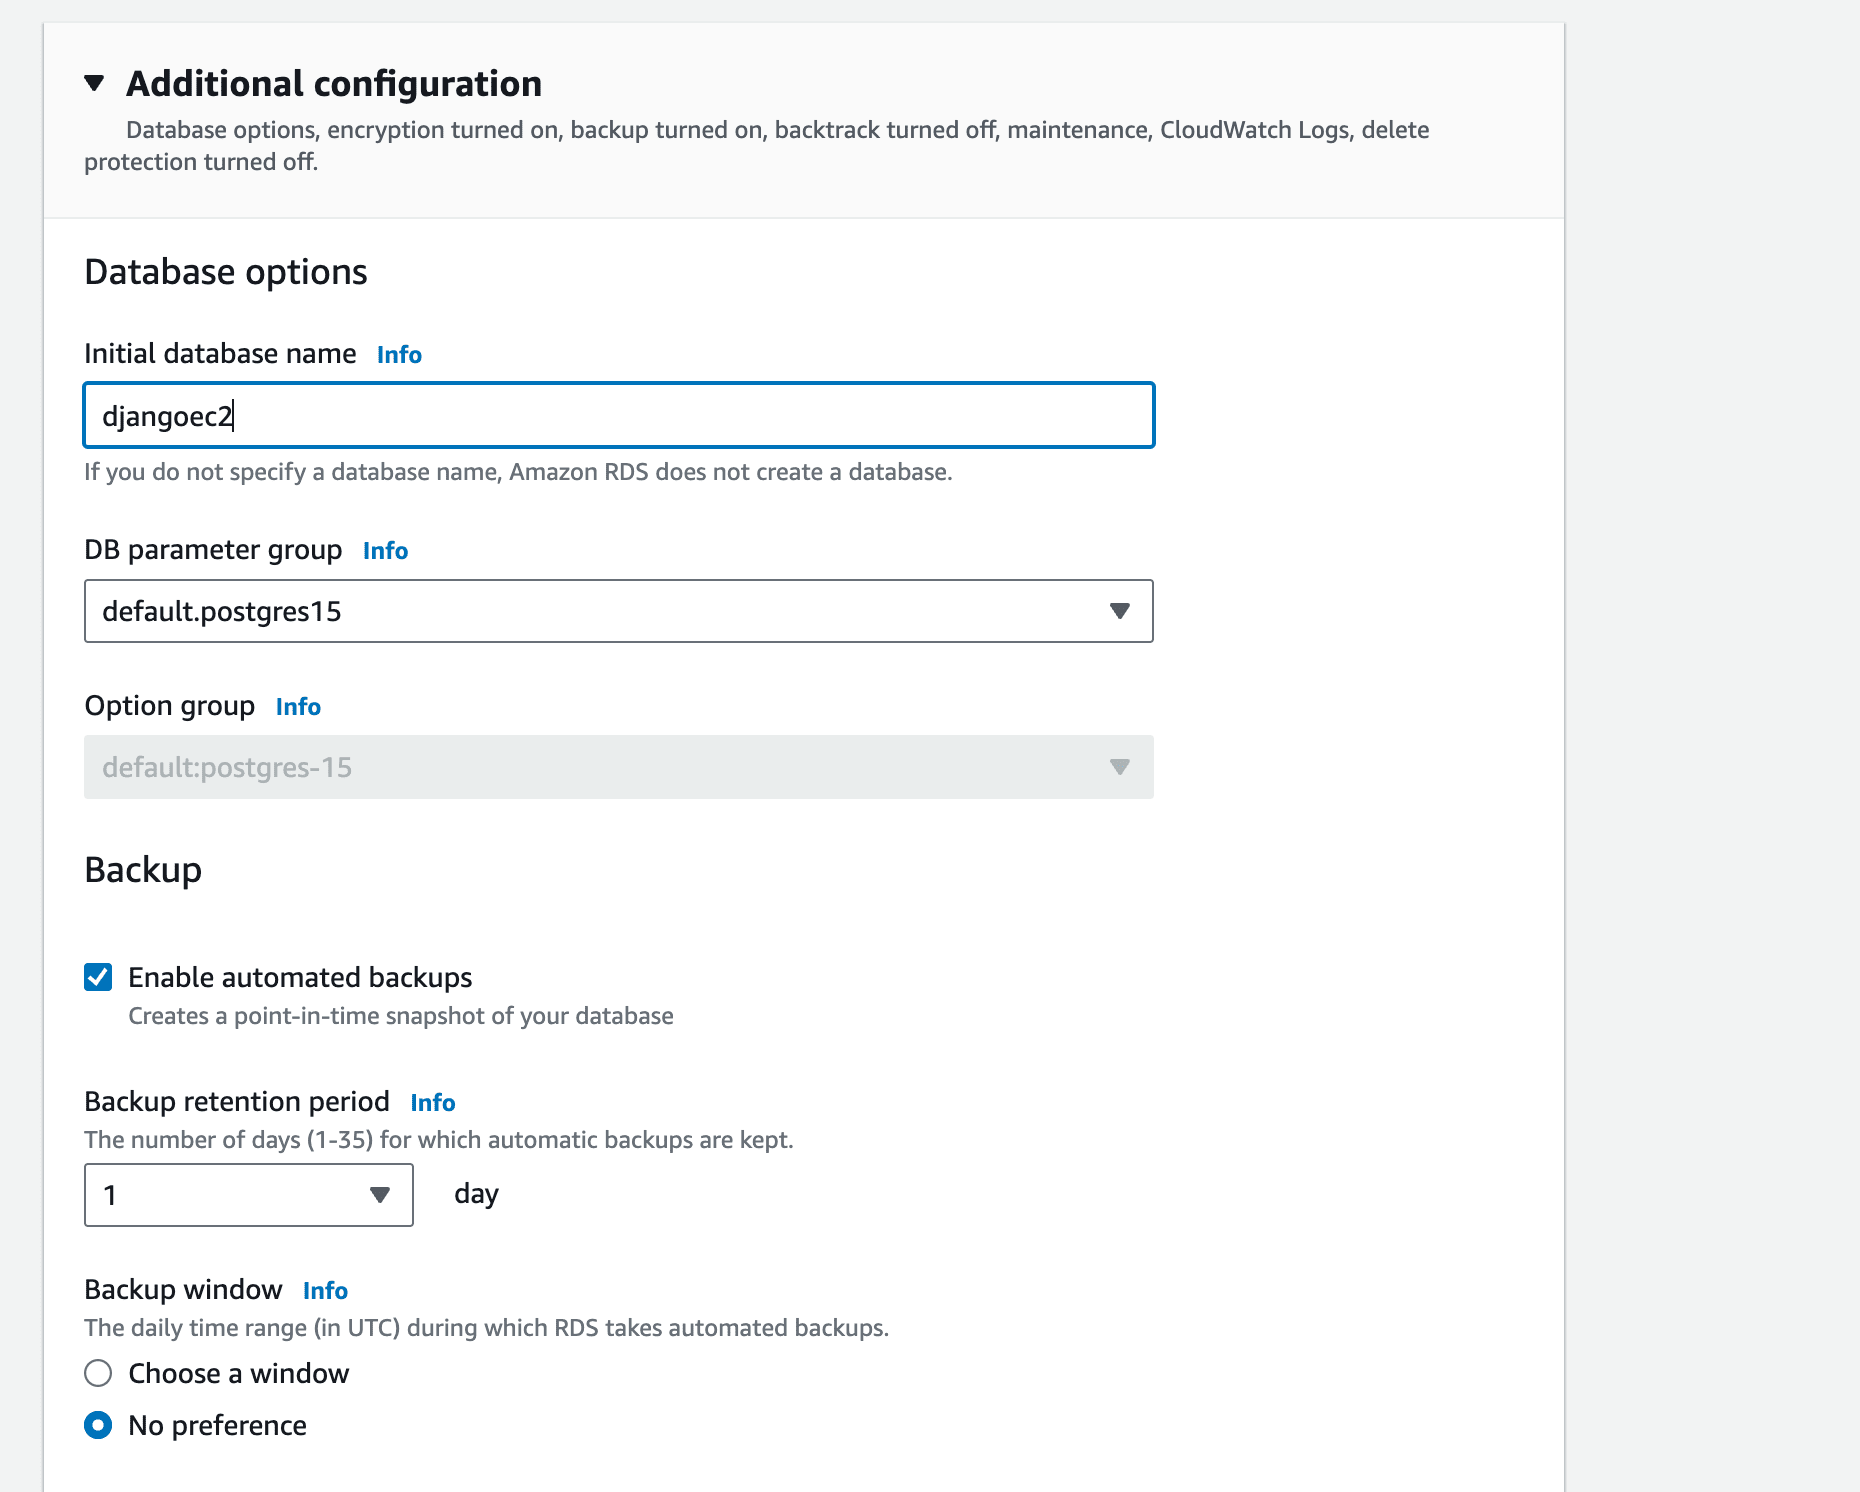
Leave the other settings as they are.
Finally, click Create database.
Click on View credentials details to see the generated password for the webapp user:
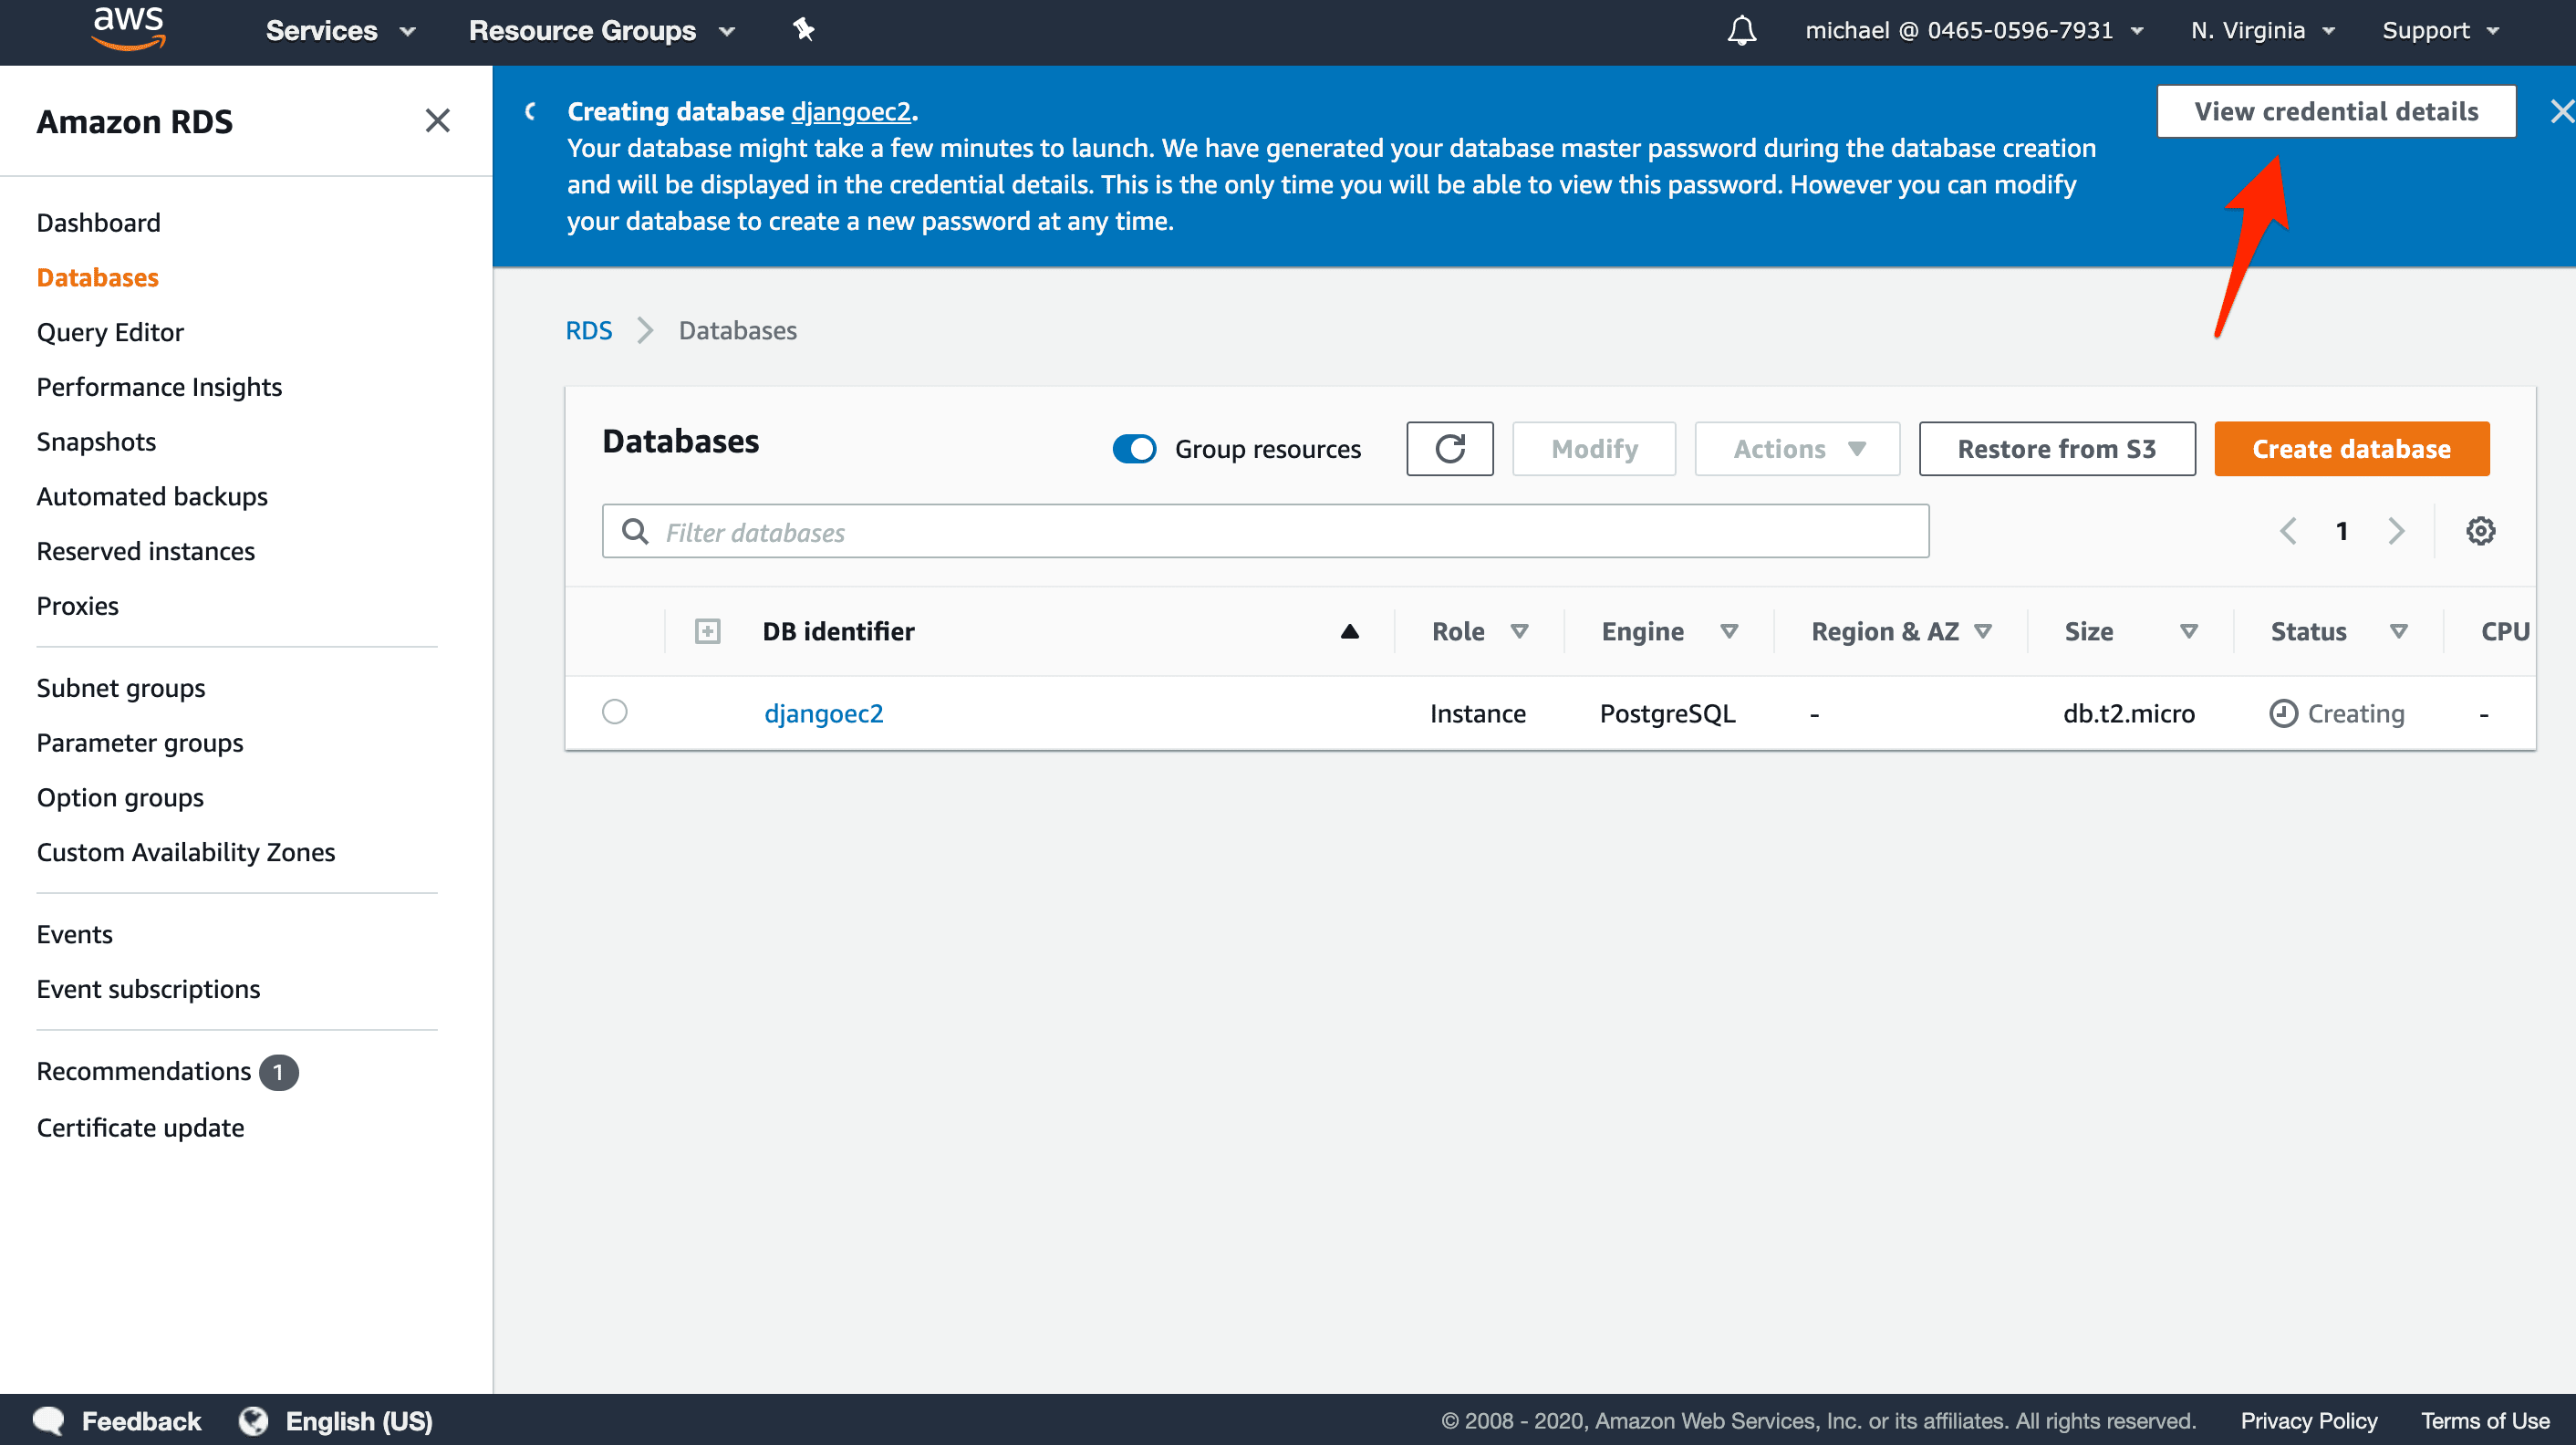
Store this password somewhere safe. You'll need to provide it to the Django application here shortly.
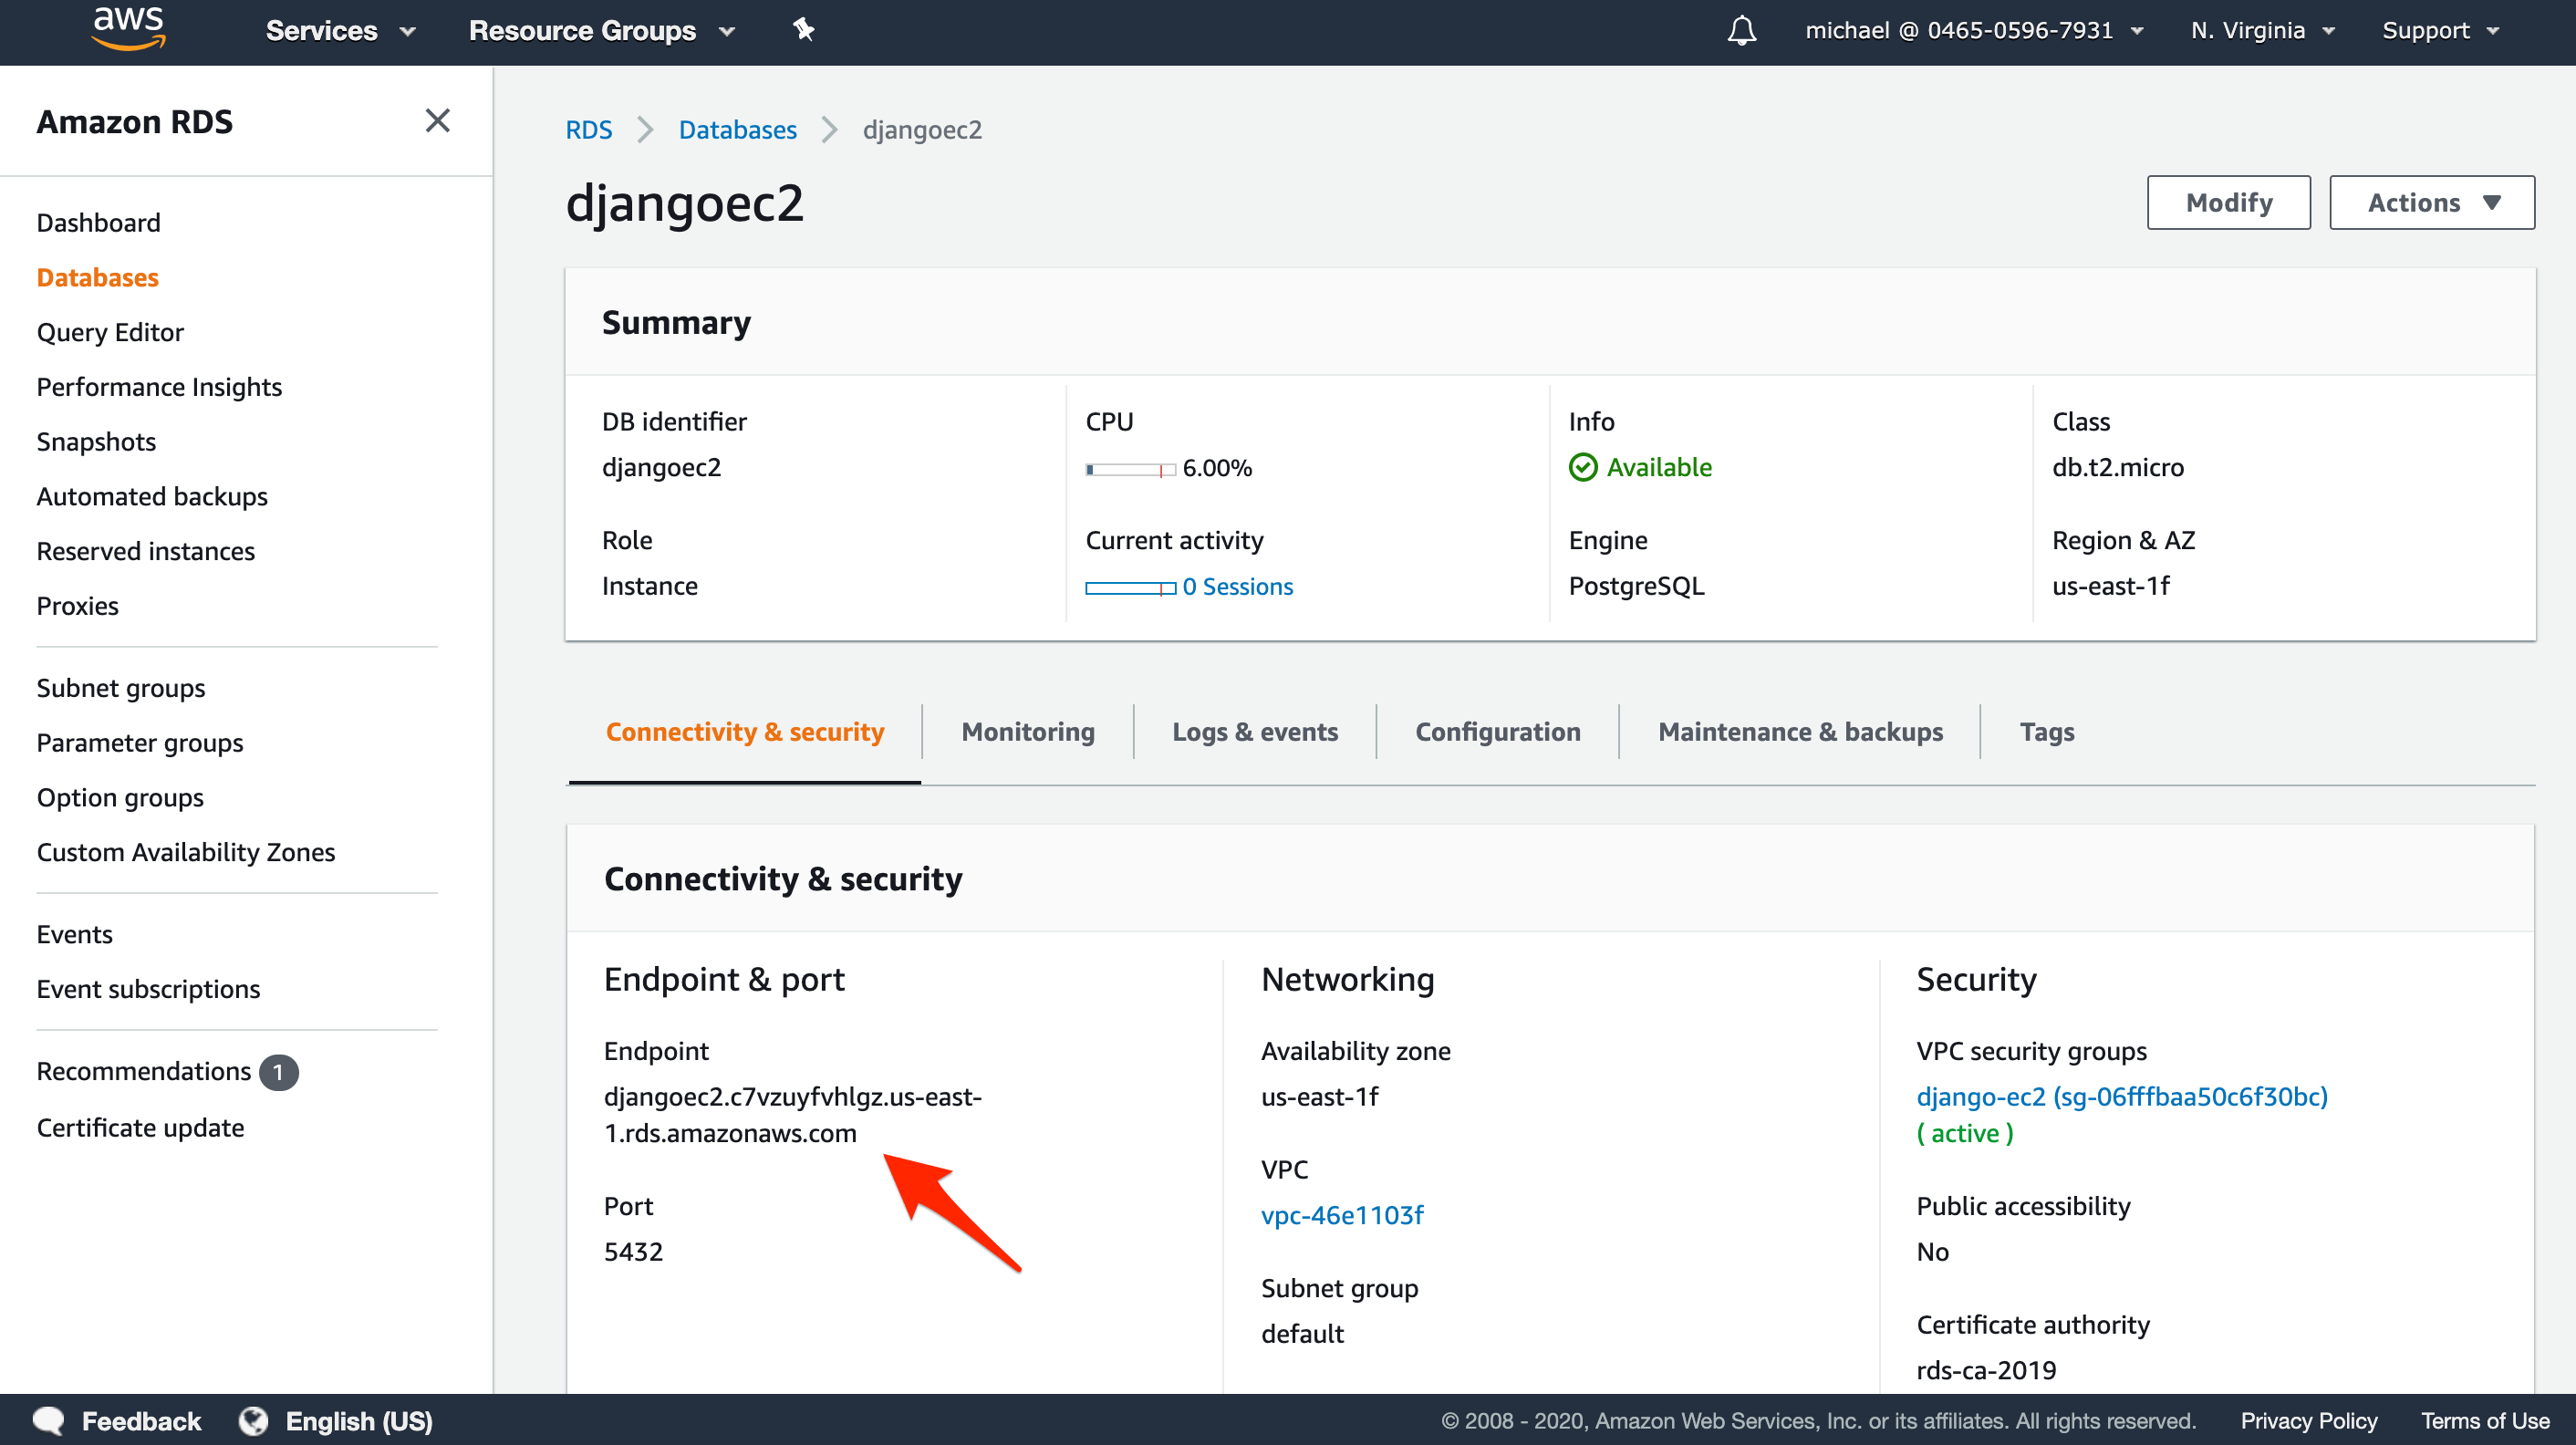
It will take a few of minutes for the instance to spin up. Once up, click on the DB Identifier of the newly created database to see its details. Take note of the database endpoint; you'll need to set it in your Django app.
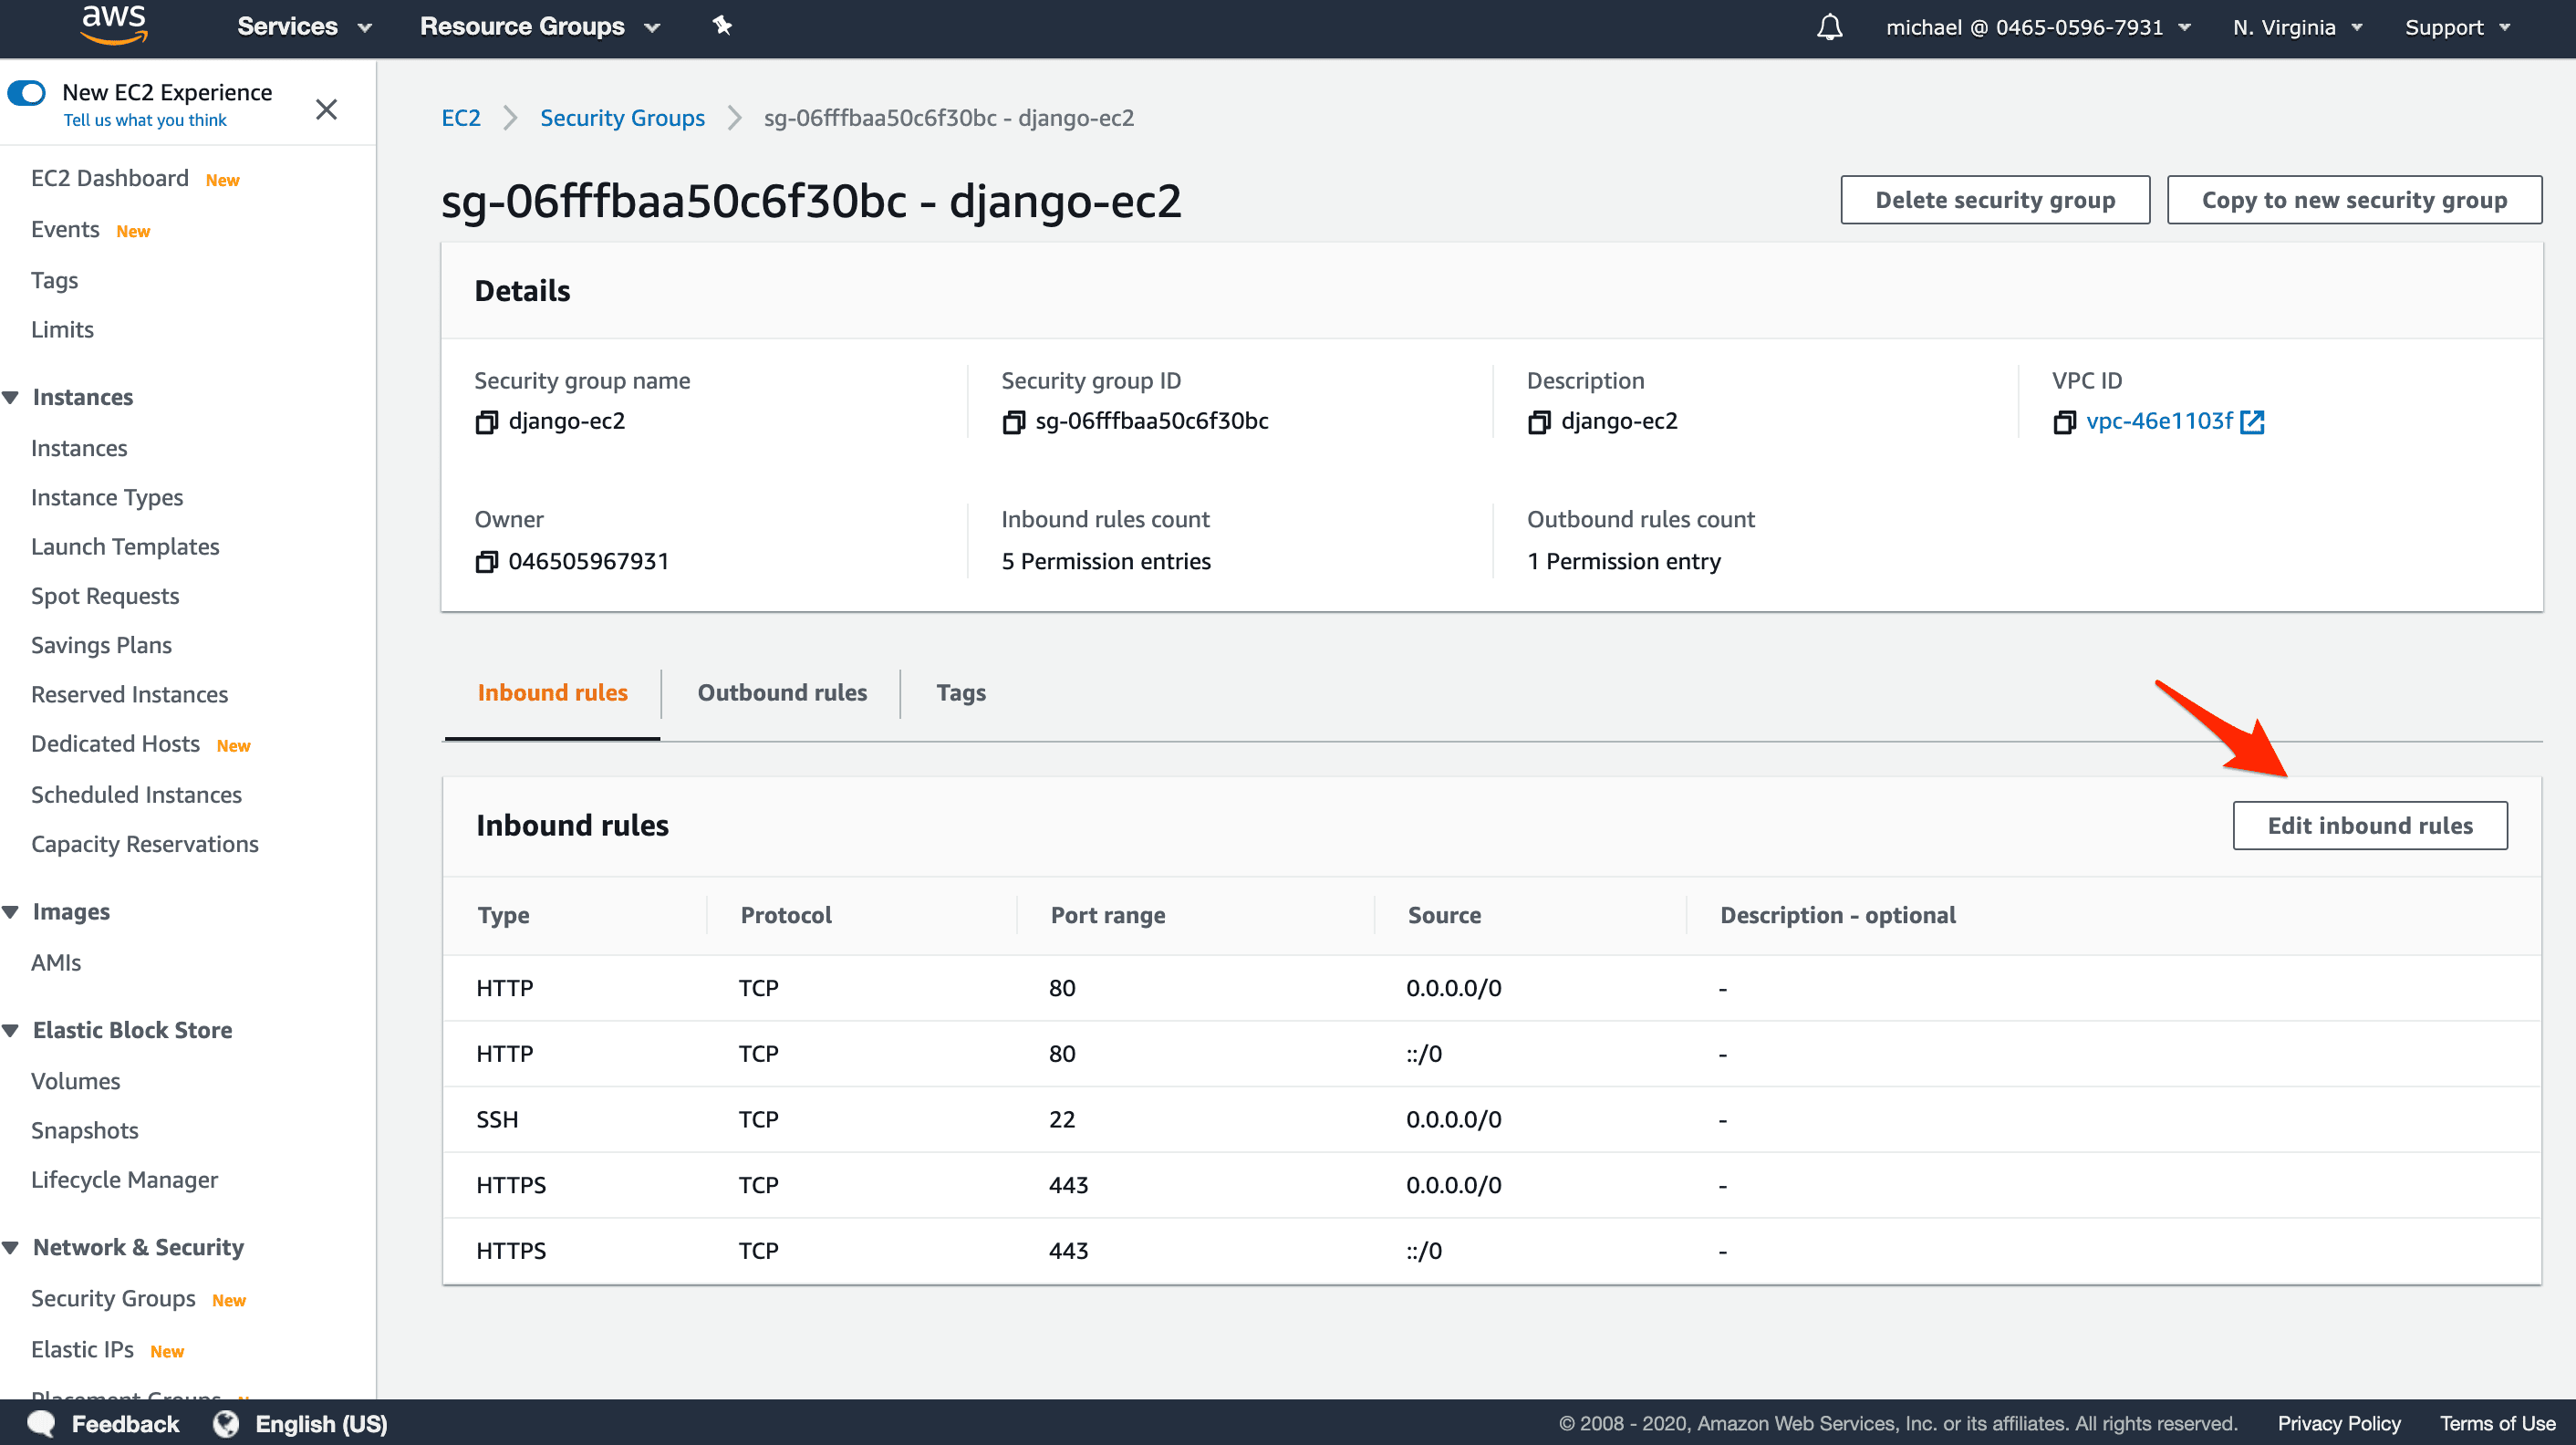
AWS Security Group
Within the EC2 console, click Security Groups in the sidebar. Find and click the ID of the django-ec2 group to edit its details.
Click on Edit inbound rules:
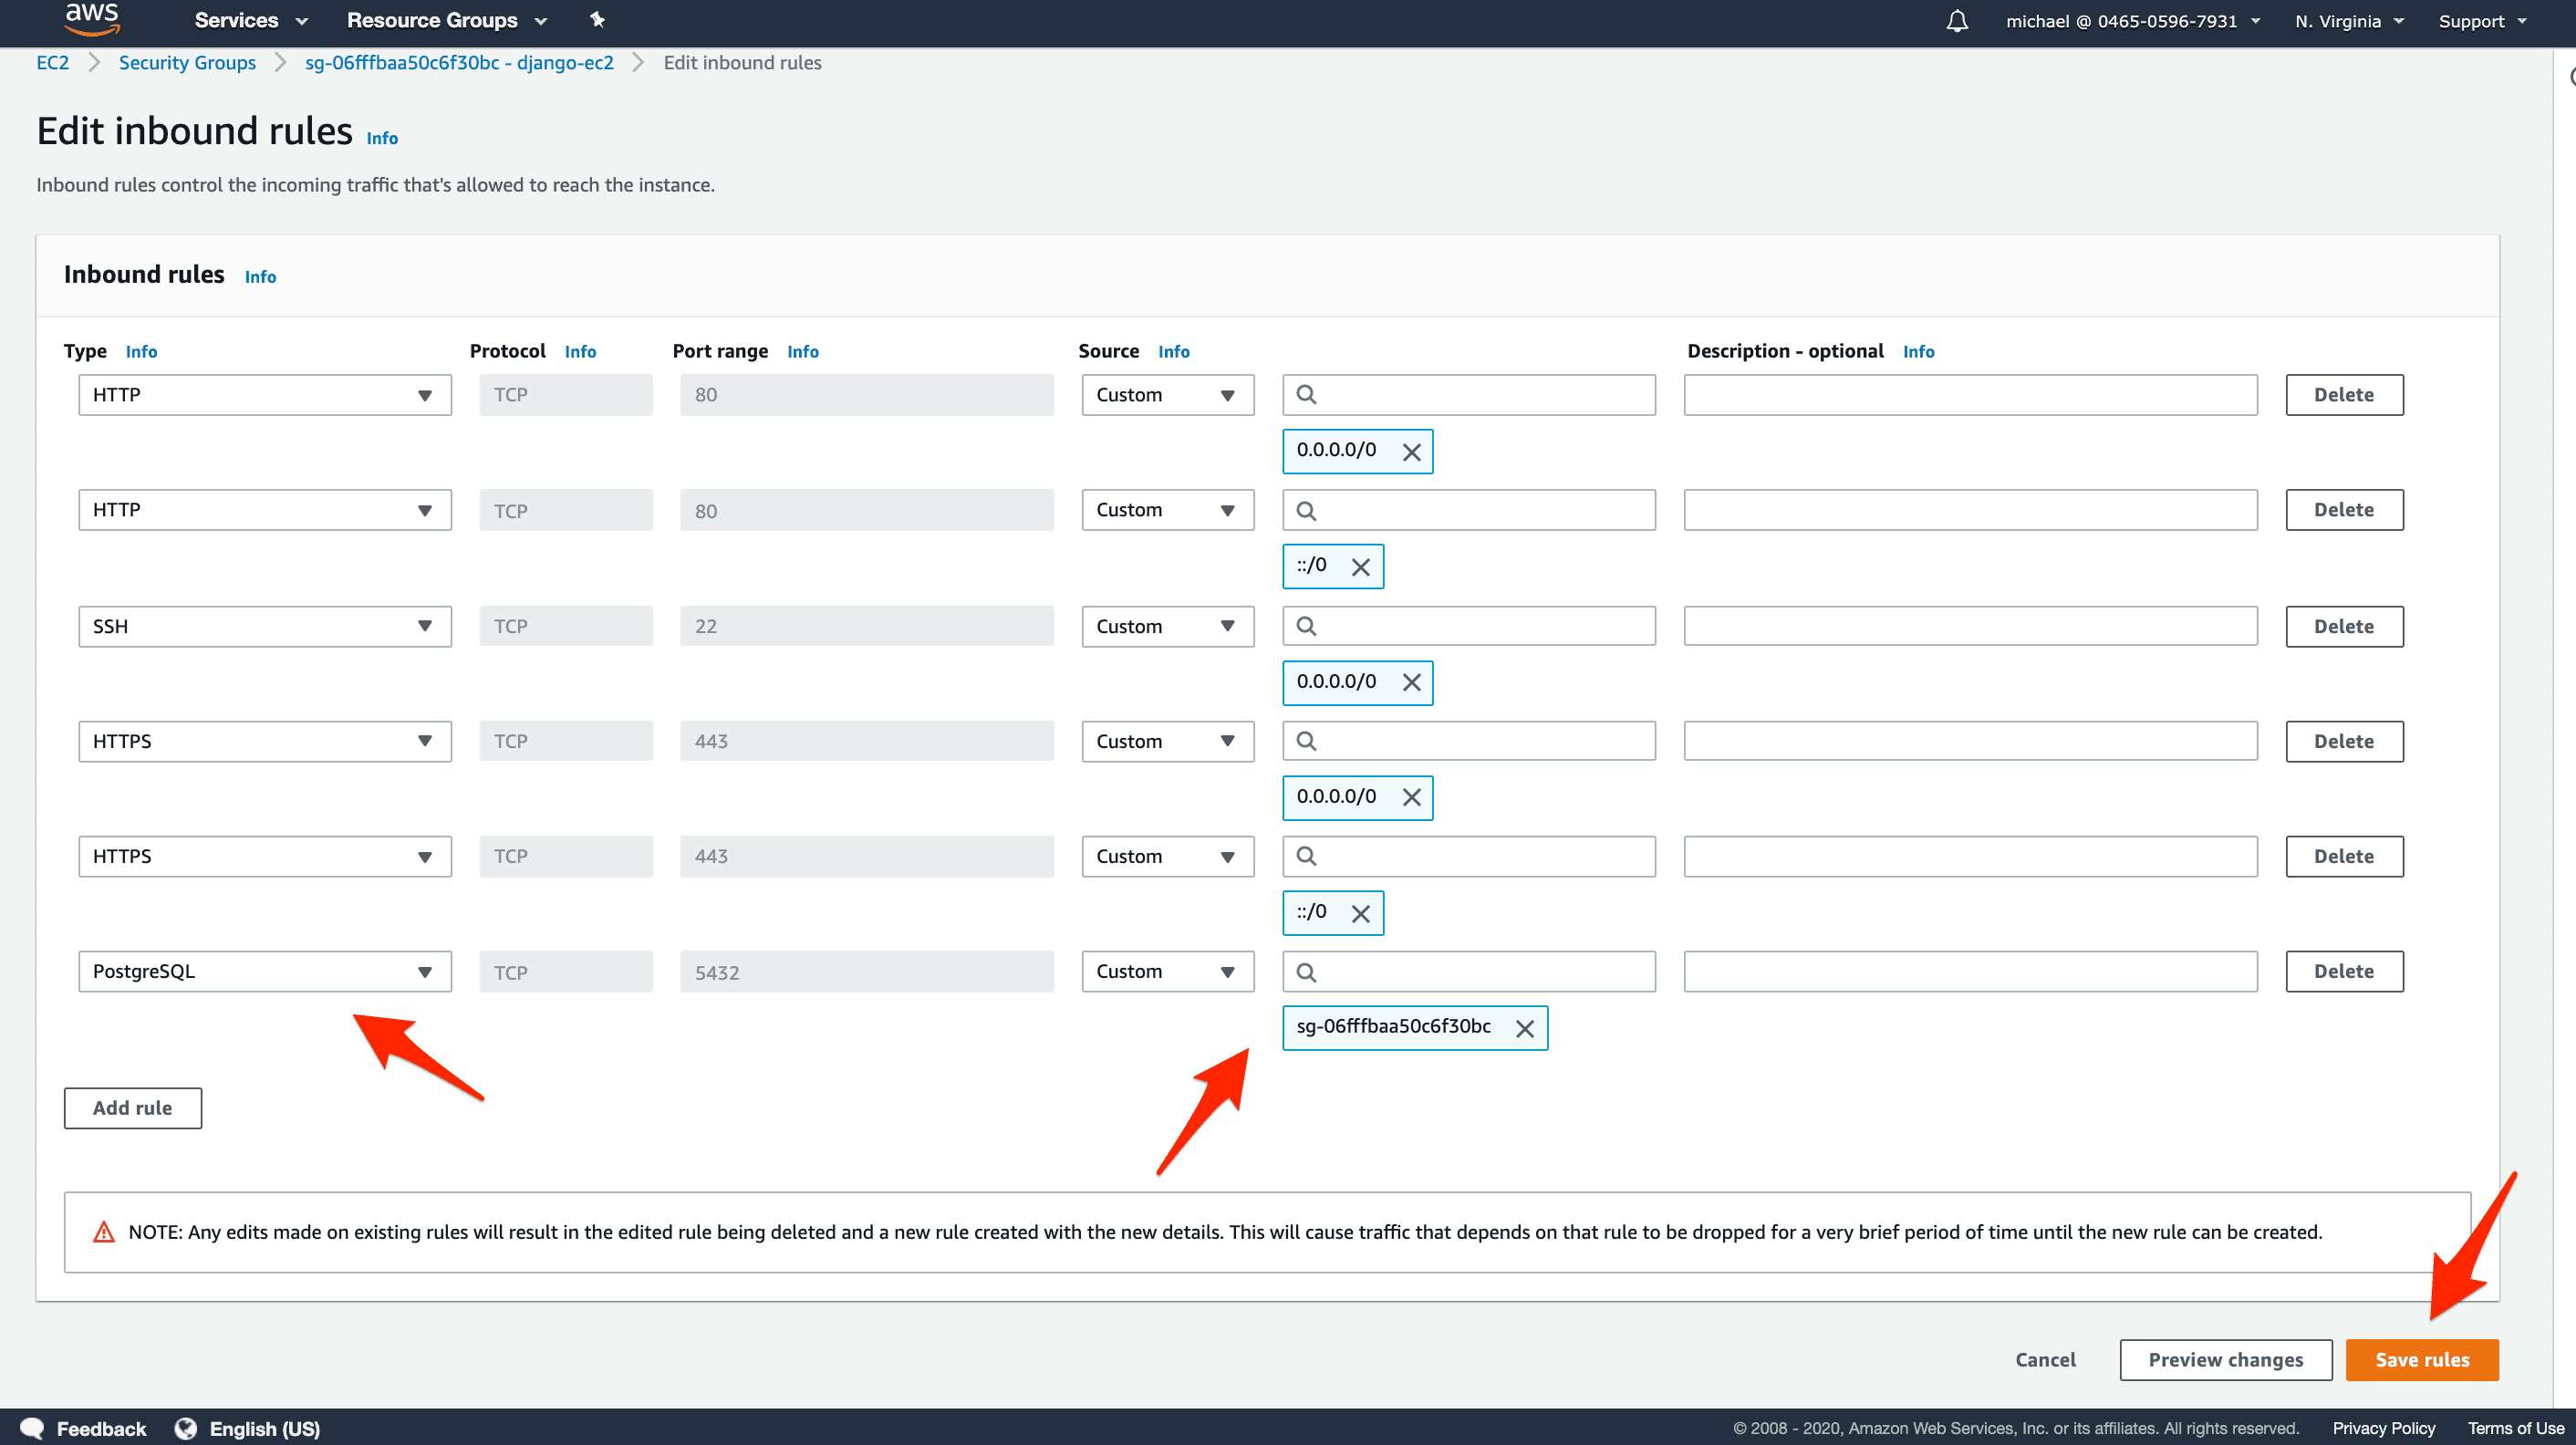
Add an inbound rule that will allow Postgres connections to instances inside that Security Group. To do that:
- click on Add rule
- select PostgreSQL for the rule type
- select Custom for the rule source
- click into the search field and select the django-ec2 Security Group
- click on Save rules
To limit access to your database, only connections from instances inside the same Security Group are allowed. Our application can connect because we set the same Security Group, django-ec2, for both the RDS and EC2 instances. Instances inside other Security Groups are therefore not allowed to connect.
Project Config
With the AWS infrastructure set up, we now need to configure our Django project locally before deploying it.
First, clone down the contents from the GitHub project repo:
$ git clone https://github.com/testdrivenio/django-on-docker-letsencrypt django-on-docker-letsencrypt-aws
$ cd django-on-docker-letsencrypt-aws
This repository contains everything that you need to deploy a Dockerized Django with Let's Encrypt HTTPS certificates.
Docker Compose
When the app is deployed for the first time, you should follow these two steps to avoid issues with certificates:
- Start by issuing the certificates from Let's Encrypt's staging environment
- Then, when all is running as expected, switch to Let's Encrypt's production environment
You can read more about Let's Encrypt's limitations on production environments in the Let's Encrypt section from the previous post, Securing a Containerized Django Application with Let's Encrypt.
For testing, update the docker-compose.staging.yml. file like so:
version: '3.8'

services:
  web:
    build:
      context: ./app
      dockerfile: Dockerfile.prod
    image: <aws-account-id>.dkr.ecr.<aws-region>.amazonaws.com/django-ec2:web
    command: gunicorn hello_django.wsgi:application --bind 0.0.0.0:8000
    volumes:
      - static_volume:/home/app/web/staticfiles
      - media_volume:/home/app/web/mediafiles
    expose:
      - 8000
    env_file:
      - ./.env.staging
  nginx-proxy:
    container_name: nginx-proxy
    build: nginx
    image: <aws-account-id>.dkr.ecr.<aws-region>.amazonaws.com/django-ec2:nginx-proxy
    restart: always
    ports:
      - 443:443
      - 80:80
    volumes:
      - static_volume:/home/app/web/staticfiles
      - media_volume:/home/app/web/mediafiles
      - certs:/etc/nginx/certs
      - html:/usr/share/nginx/html
      - vhost:/etc/nginx/vhost.d
      - /var/run/docker.sock:/tmp/docker.sock:ro
    depends_on:
      - web
  acme-companion:
    image: nginxproxy/acme-companion
    env_file:
      - ./.env.staging.proxy-companion
    volumes:
      - /var/run/docker.sock:/var/run/docker.sock:ro
      - certs:/etc/nginx/certs
      - html:/usr/share/nginx/html
      - vhost:/etc/nginx/vhost.d
      - acme:/etc/acme.sh
    depends_on:
      - nginx-proxy

volumes:
  static_volume:
  media_volume:
  certs:
  html:
  vhost:
  acme:
For the web and nginx-proxy services, update the image properties to use images from ECR (which we'll add shortly).
Examples:
image: 123456789.dkr.ecr.us-east-1.amazonaws.com/django-ec2:web

image: 123456789.dkr.ecr.us-east-1.amazonaws.com/django-ec2:nginx-proxy
The values consist of the repository URL (123456789.dkr.ecr.us-east-1.amazonaws.com) along with the image name (django-ec2) and tags (web and nginx-proxy).
To keep things simple we're using a single registry to store both images. We used the
webandnginx-proxyto differentiate between the two. Ideally, you should use two registries: one forweband one fornginx-proxy. Update this on your own if you'd like it.
Other than the image properties, we also removed the db service (and related volume) since we're using RDS rather than managing Postgres in a container.
Environments
It's time to set up the environment files for the web and acme-companion containers.
First, add an .env.staging file for the web container:
DEBUG=0
SECRET_KEY=change_me
DJANGO_ALLOWED_HOSTS=<YOUR_DOMAIN.COM>
SQL_ENGINE=django.db.backends.postgresql
SQL_DATABASE=djangoec2
SQL_USER=webapp
SQL_PASSWORD=<PASSWORD-FROM-AWS-RDS>
SQL_HOST=<DATABASE-ENDPOINT-FROM-AWS-RDS>
SQL_PORT=5432
DATABASE=postgres
VIRTUAL_HOST=<YOUR_DOMAIN.COM>
VIRTUAL_PORT=8000
LETSENCRYPT_HOST=<YOUR_DOMAIN.COM>
CSRF_TRUSTED_ORIGINS=https://<YOUR_DOMAIN.COM>
Notes:
- Change
<YOUR_DOMAIN.COM>to your actual domain. - Change
SQL_PASSWORDandSQL_HOSTto match those created in the RDS section. - Change
SECRET_KEYto some long random string. - The
VIRTUAL_HOSTandVIRTUAL_PORTare needed bynginx-proxycontainer to auto create the reverse proxy configuration. LETSENCRYPT_HOSTis there so thenginx-proxy-companioncan issue Let's Encrypt certificate for your domain.
For testing/debugging purposes you may want to use a
*forDJANGO_ALLOWED_HOSTSthe first time you deploy to simplify things. Just don't forget to limit the allowed hosts once testing is complete.
Second, add an .env.staging.proxy-companion file, making sure to update the DEFAULT_EMAIL value:
DEFAULT_EMAIL=youremail@yourdomain.com
ACME_CA_URI=https://acme-staging-v02.api.letsencrypt.org/directory
NGINX_PROXY_CONTAINER=nginx-proxy
Review the ACME companion service section from the Securing a Containerized Django Application with Let's Encrypt post to learn more about the above mentioned environment variables.
Build and Push Docker Images
Now we're ready to build the Docker images:
$ docker-compose -f docker-compose.staging.yml build
It may take a few minutes to build. Once done, we're ready to push the images up to ECR.
First, assuming that you have the awscli installed and that you've set your AWS credentials, log in to the ECR Docker repository:
$ aws ecr get-login-password --region <aws-region> | docker login --username AWS --password-stdin <aws-account-id>.dkr.ecr.<aws-region>.amazonaws.com
# aws ecr get-login-password --region us-east-1 | docker login --username AWS --password-stdin 123456789.dkr.ecr.us-east-1.amazonaws.com
You should see:
Login Succeeded
Then push the images to ECR:
$ docker-compose -f docker-compose.staging.yml push
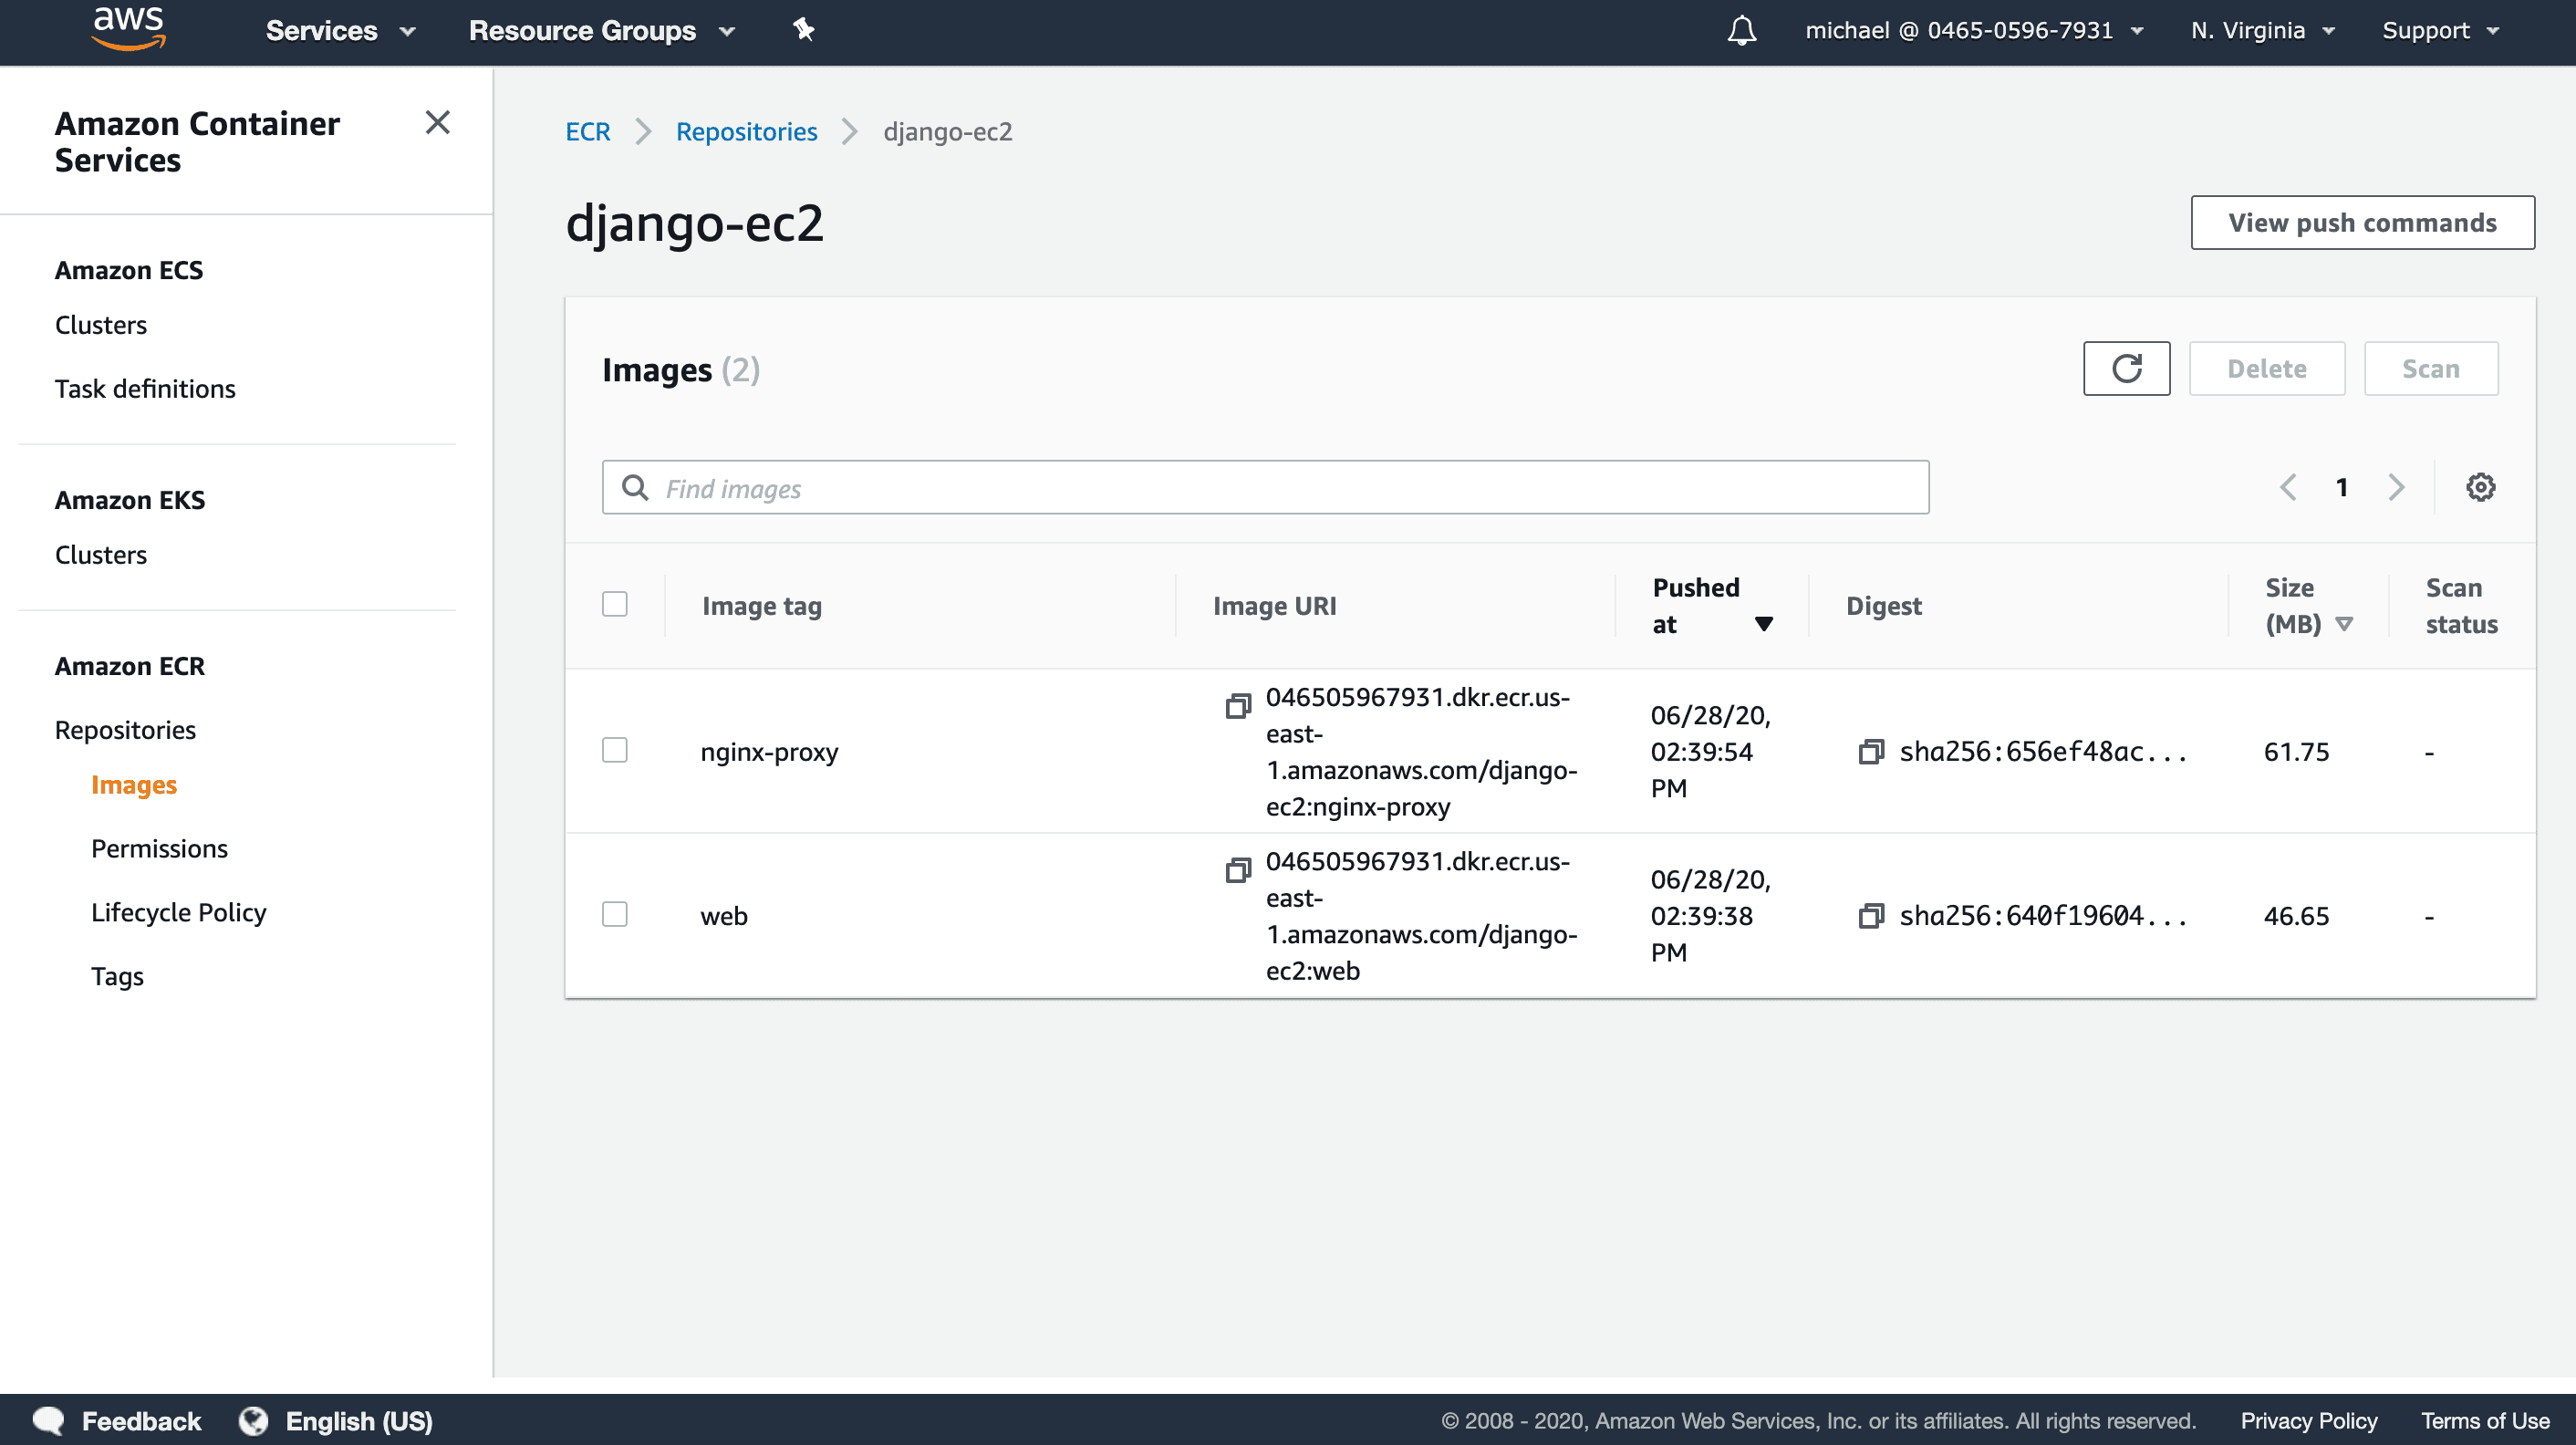
Open your django-ec2 ECR repository to see the pushed images:
Running the Containers
Everything is set up for deployment.
It's time to move to your EC2 instance.
Assuming you have a project directory created on your instance, like /home/ubuntu/django-on-docker, copy the files and folders over with SCP:
$ scp -i /path/to/your/djangoletsencrypt.pem \
      -r $(pwd)/{app,nginx,.env.staging,.env.staging.proxy-companion,docker-compose.staging.yml} \
      ubuntu@public-ip-or-domain-of-ec2-instance:/path/to/django-on-docker
Next, connect to your instance via SSH and move to the project directory:
$ ssh -i /path/to/your/djangoletsencrypt.pem ubuntu@public-ip-or-domain-of-ec2-instance
$ cd /path/to/django-on-docker
Login to ECR Docker repository.
$ aws ecr get-login-password --region <aws-region> | docker login --username AWS --password-stdin <aws-account-id>.dkr.ecr.<aws-region>.amazonaws.com
Pull the images:
$ docker pull <aws-account-id>.dkr.ecr.<aws-region>.amazonaws.com/django-ec2:web
$ docker pull <aws-account-id>.dkr.ecr.<aws-region>.amazonaws.com/django-ec2:nginx-proxy
With that, you're ready to spin up the containers:
$ docker-compose -f docker-compose.staging.yml up -d
Once the containers are up and running, navigate to your domain in your browser. You should see something like:
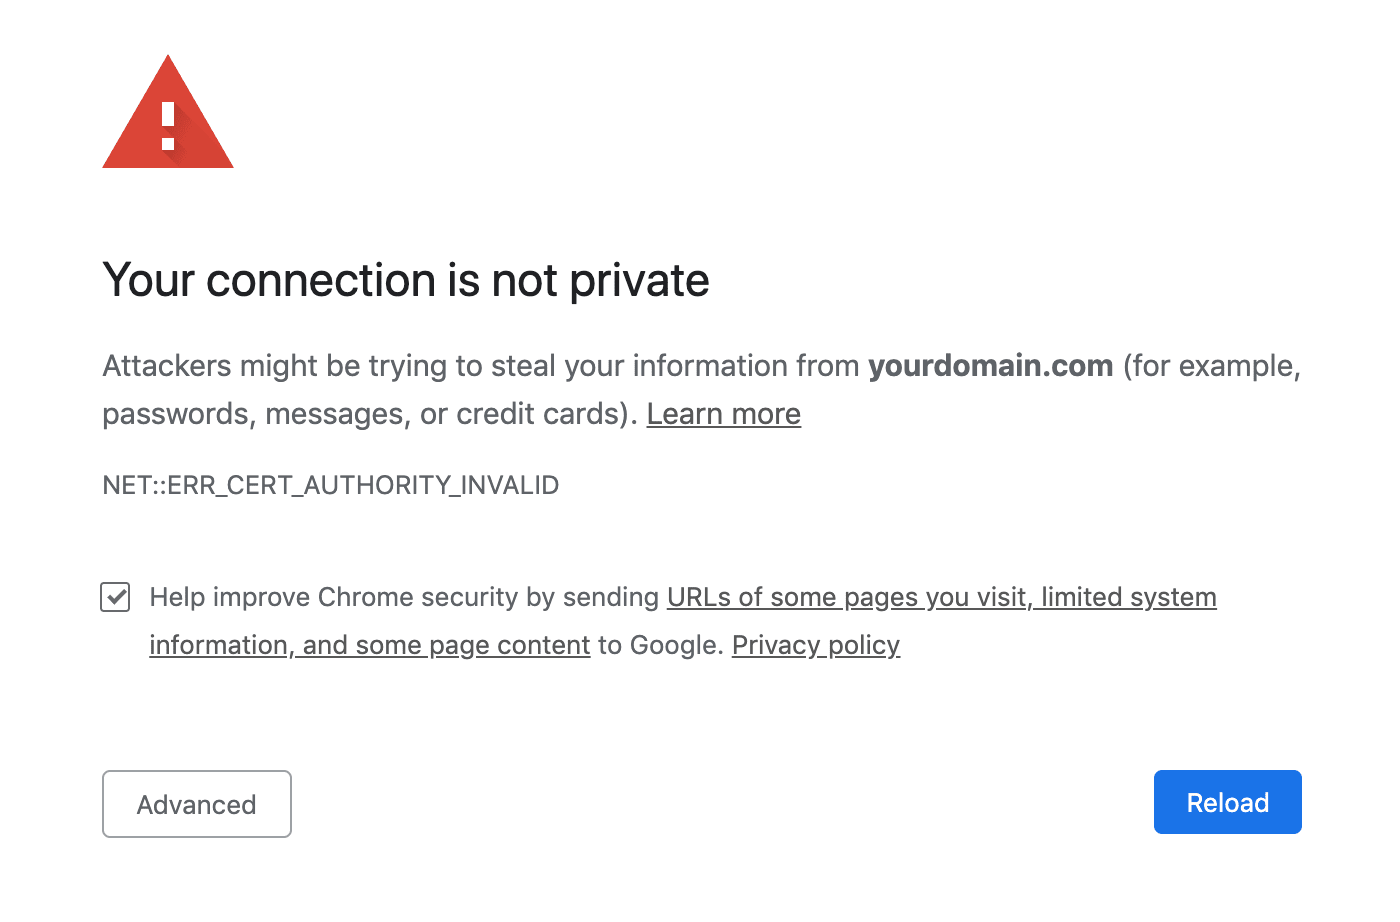
This is expected. This screen is shown because the certificate was issued from a staging environment.
How do you know if everything works?
Click on "Advanced" and then on "Proceed". You should now see your app. Upload an image, and then make sure you can view the image at https://yourdomain.com/media/IMAGE_FILE_NAME.
Issue the Production Certificate
Now, that everything works as expected, we can switch over to Let's Encrypt's production environment.
Bring down the existing containers and exit your instance:
$ docker-compose -f docker-compose.staging.yml down -v
$ exit
Back on your local machine, open docker-compose.prod.yml and make the same changes that you did for the staging version:
- Update the
ìmageproperties to match your AWS ECR URLs for theẁebandnginx-proxyservices - Remove the
dbservice along with the related volume
version: '3.8'

services:
  web:
    build:
      context: ./app
      dockerfile: Dockerfile.prod
    image: 046505967931.dkr.ecr.us-east-1.amazonaws.com/django-ec2:web
    command: gunicorn hello_django.wsgi:application --bind 0.0.0.0:8000
    volumes:
      - static_volume:/home/app/web/staticfiles
      - media_volume:/home/app/web/mediafiles
    expose:
      - 8000
    env_file:
      - ./.env.prod
  nginx-proxy:
    container_name: nginx-proxy
    build: nginx
    image: 046505967931.dkr.ecr.us-east-1.amazonaws.com/django-ec2:nginx-proxy
    restart: always
    ports:
      - 443:443
      - 80:80
    volumes:
      - static_volume:/home/app/web/staticfiles
      - media_volume:/home/app/web/mediafiles
      - certs:/etc/nginx/certs
      - html:/usr/share/nginx/html
      - vhost:/etc/nginx/vhost.d
      - /var/run/docker.sock:/tmp/docker.sock:ro
    depends_on:
      - web
  acme-companion:
    image: nginxproxy/acme-companion
    env_file:
      - ./.env.prod.proxy-companion
    volumes:
      - /var/run/docker.sock:/var/run/docker.sock:ro
      - certs:/etc/nginx/certs
      - html:/usr/share/nginx/html
      - vhost:/etc/nginx/vhost.d
      - acme:/etc/acme.sh
    depends_on:
      - nginx-proxy

volumes:
  static_volume:
  media_volume:
  certs:
  html:
  vhost:
  acme:
Next create an .env.prod file by duplicating the .env.staging file. You don't need to make any changes to it.
Finally, add an .env.prod.proxy-companion file:
DEFAULT_EMAIL=youremail@yourdomain.com
NGINX_PROXY_CONTAINER=nginx-proxy
Build and push images again:
$ docker-compose -f docker-compose.prod.yml build
$ aws ecr get-login-password --region <aws-region> | docker login --username AWS --password-stdin <aws-account-id>.dkr.ecr.<aws-region>.amazonaws.com
$ docker-compose -f docker-compose.prod.yml push
Copy the new files and folders to your instance with SCP:
$ scp -i /path/to/your/djangoletsencrypt.pem \
      $(pwd)/{.env.prod,.env.prod.proxy-companion,docker-compose.prod.yml} \
      ubuntu@public-ip-or-domain-of-ec2-instance:/path/to/django-on-docker
Like before, connect to your instance via SSH and move to the project directory:
$ ssh -i /path/to/your/djangoletsencrypt.pem ubuntu@public-ip-or-domain-of-ec2-instance
$ cd /path/to/django-on-docker
Log in to your ECR Docker repository again:
$ aws ecr get-login-password --region <aws-region> | docker login --username AWS --password-stdin <aws-account-id>.dkr.ecr.<aws-region>.amazonaws.com
Pull the images:
$ docker pull <aws-account-id>.dkr.ecr.<aws-region>.amazonaws.com/django-ec2:web
$ docker pull <aws-account-id>.dkr.ecr.<aws-region>.amazonaws.com/django-ec2:nginx-proxy
And finally spin up the containers:
$ docker-compose -f docker-compose.prod.yml up -d
Navigate to your domain again. You should no longer see a warning.
Congrats! You're now using a production Let's Encrypt certificate for your Django application running on AWS EC2.
Want to see the certificate creation process in action, check out the logs:
$ docker-compose -f docker-compose.prod.yml logs acme-companion
Conclusion
In this tutorial you deployed a containerized Django application to EC2. The app is running behind an HTTPS Nginx proxy with Let's Encrypt SSL certificates. You also used an RDS Postgres instance, and stored Docker images on ECR.
What's next?
- Set up S3 and configure Django to store static and media files in a bucket, outside of the Docker volume
- Set up a CI/CD pipeline on GitLab
- Configure a containerized Django app running on an EC2 instance to send logs to Amazon CloudWatch
Happy deploying!
Django on Docker Series: