 Jan Giacomelli
How do I set up an SSL Certificate for a Django application?
In this tutorial, we'll look at how to secure a containerized Django app running behind an HTTPS Nginx proxy with Let's Encrypt SSL certificates.
This tutorial builds on Dockerizing Django with Postgres, Gunicorn, and Nginx. It assumes you understand how to containerize a Django app along with Postgres, Nginx, and Gunicorn.
Nowadays you simply can't go to production with your application running over HTTP. Without HTTPS, your site is less secure and trustworthy. With Let's Encrypt, which simplifies the process of obtaining and installing SSL certificates, there's simply no excuse anymore not to have HTTPS.
Django on Docker Series:
Contents
Prerequisites
To follow this tutorial you will need:
- a domain name
- a running Linux virtual machine with Docker and Docker Compose installed where your app will be deployed (AWS EC2, Google Compute Engine, DigitalOcean, Linode are all viable options)
Need a cheap domain to practice with? Several domain registrars have specials on '.xyz' domains. Alternatively, you can create a free domain at Freenom.
Approach
There are a number of different ways to secure a containerized Django app with HTTPS. Arguably, the most popular approach is to add a new service to your Docker Compose file that utilizes Certbot for issuing and renewing SSL certificates. While this is perfectly valid, we'll take a slightly different approach and use the following projects:
- nginx-proxy - used to automatically build your Nginx proxy configuration for running containers where each container is treated as a single virtual host
- acme-companion - used to issue and renew Let's Encrypt SSL certificates for each of the containers proxied by nginx-proxy
Together, these projects simplify the management of your Nginx configuration and SSL certificates.
Another option is to use Traefik instead of Nginx. In short, Traefik works with Let's Encrypt to issue and renew certificates. For more, check out Dockerizing Django with Postgres, Gunicorn, and Traefik.
Let's Encrypt
When the app is deployed for the first time, you should follow these two steps to avoid issues with certificates:
- Start by issuing the certificates from Let's Encrypt's staging environment
- Then, when all is running as expected, switch to Let's Encrypt's production environment
Why?
To protect their servers, Let's Encrypt enforces rate limitations on their production validation system:
- 5 validation failures per account, per hostname, per hour
- 50 certificates may be created per domain per week
If you make a typo in your domain name or in a DNS entry or anything similar, your request will fail, which will count against your rate limit, and you'll have to attempt to issue a new certificate.
To avoid being rate limited, during development and testing, you should use Let's Encrypt's staging environment for testing their validation system. The rate limits are much higher on the staging environment, which is better for testing. Just be aware that the issued certificates in staging are not trusted publicly, so once everything is working, you should switch over to their production environment.
Project Setup
First, clone down the contents from the GitHub project repo:
$ git clone https://github.com/testdrivenio/django-on-docker django-on-docker-letsencrypt
$ cd django-on-docker-letsencrypt
This repository contains everything that you need to deploy a Dockerized Django app minus the SSL certificates, which we'll be adding in this tutorial.
Django Configuration
First, to run the Django app behind an HTTPS proxy you'll need to add the SECURE_PROXY_SSL_HEADER setting to settings.py:
SECURE_PROXY_SSL_HEADER = ("HTTP_X_FORWARDED_PROTO", "https")
In this tuple, when X-Forwarded-Proto is set to https the request is secure.
You'll also need to update CSRF_TRUSTED_ORIGINS inside settings.py:
CSRF_TRUSTED_ORIGINS = os.environ.get("CSRF_TRUSTED_ORIGINS").split(" ")
Docker Compose
It's time to configure Docker Compose.
Let's add a new Docker Compose file for testing purposes called docker-compose.staging.yml:
version: '3.8'

services:
  web:
    build:
      context: ./app
      dockerfile: Dockerfile.prod
    command: gunicorn hello_django.wsgi:application --bind 0.0.0.0:8000
    volumes:
      - static_volume:/home/app/web/staticfiles
      - media_volume:/home/app/web/mediafiles
    expose:
      - 8000
    env_file:
      - ./.env.staging
    depends_on:
      - db
  db:
    image: postgres:13.0-alpine
    volumes:
      - postgres_data:/var/lib/postgresql/data/
    env_file:
      - ./.env.staging.db
  nginx-proxy:
    container_name: nginx-proxy
    build: nginx
    restart: always
    ports:
      - 443:443
      - 80:80
    volumes:
      - static_volume:/home/app/web/staticfiles
      - media_volume:/home/app/web/mediafiles
      - certs:/etc/nginx/certs
      - html:/usr/share/nginx/html
      - vhost:/etc/nginx/vhost.d
      - /var/run/docker.sock:/tmp/docker.sock:ro
    depends_on:
      - web
  acme-companion:
    image: nginxproxy/acme-companion
    env_file:
      - ./.env.staging.proxy-companion
    volumes:
      - /var/run/docker.sock:/var/run/docker.sock:ro
      - certs:/etc/nginx/certs
      - html:/usr/share/nginx/html
      - vhost:/etc/nginx/vhost.d
      - acme:/etc/acme.sh
    depends_on:
      - nginx-proxy

volumes:
  postgres_data:
  static_volume:
  media_volume:
  certs:
  html:
  vhost:
  acme:
Add a .env.staging.db file for the db container:
POSTGRES_USER=hello_django
POSTGRES_PASSWORD=hello_django
POSTGRES_DB=hello_django_prod
Change the values of
POSTGRES_USERandPOSTGRES_PASSWORDto match your user and password.
We already looked at the web and db services in the previous tutorial, so let's dive into the nginx-proxy and acme-companion services.
Databases are critical services. Adding additional layers, such us Docker, adds unnecessary risk in production. To simplify tasks such as minor version updates, regular backups, and scaling, it's recommended to use a managed service like AWS RDS, Google Cloud SQL, or DigitalOcean's Managed Database.
Nginx Proxy Service
For this service, the nginx-proxy project is used for generating a reverse proxy configuration for the web container using virtual hosts for routing.
Be sure to review the README on the nginx-proxy repo.
Once up, the container associated with nginx-proxy automatically detects containers (in the same network) that have the VIRTUAL_HOST environment variable set and dynamically updates its virtual hosts configuration.
Go ahead and add a .env.staging file for the web container:
DEBUG=0
SECRET_KEY=change_me
DJANGO_ALLOWED_HOSTS=<YOUR_DOMAIN.COM>
SQL_ENGINE=django.db.backends.postgresql
SQL_DATABASE=hello_django_prod
SQL_USER=hello_django
SQL_PASSWORD=hello_django
SQL_HOST=db
SQL_PORT=5432
DATABASE=postgres
VIRTUAL_HOST=<YOUR_DOMAIN.COM>
VIRTUAL_PORT=8000
LETSENCRYPT_HOST=<YOUR_DOMAIN.COM>
CSRF_TRUSTED_ORIGINS=https://<YOUR_DOMAIN.COM>
Notes:
- Change
<YOUR_DOMAIN.COM>to your actual domain, and change the default values ofSQL_USERandSQL_PASSWORDto matchPOSTGRES_USERandPOSTGRES_PASSWORD(from .env.staging.db). - As mentioned,
VIRTUAL_HOST(andVIRTUAL_PORT) are needed bynginx-proxyto auto create the reverse proxy configuration. LETSENCRYPT_HOSTis there so thenginx-proxy-companioncan issue Let's Encrypt certificate for your domain.- Since the Django app will be listening on port 8000, we also set the
VIRTUAL_PORTenvironment variable. - The
/var/run/docker.sock:/tmp/docker.sock:rovolume in docker-compose.staging.yml is used to listen for newly registered/de-registered containers.
For testing/debugging purposes you may want to use a
*forDJANGO_ALLOWED_HOSTSthe first time you deploy to simplify things. Just don't forget to limit the allowed hosts once testing is complete.
So, requests made to the specified domain will be proxied to the container that has the domain set as the VIRTUAL_HOST environment variable.
Next, let's update the Nginx configuration in the "nginx" folder.
First, add directory called "vhost.d". Then, add a file called default inside that directory to serve static and media files:
location /static/ {
  alias /home/app/web/staticfiles/;
  add_header Access-Control-Allow-Origin *;
}

location /media/ {
  alias /home/app/web/mediafiles/;
  add_header Access-Control-Allow-Origin *;
}
Requests that match any of these patterns will be served from static or media folders. They won't be proxied to other containers. The web and nginx-proxy containers share the volumes in which the static and media files are located:
static_volume:/home/app/web/staticfiles
media_volume:/home/app/web/mediafiles
Add a custom.conf file to the "nginx" folder to hold custom proxy-wide configuration:
client_max_body_size 10M;
Update nginx/Dockerfile:
FROM nginxproxy/nginx-proxy
COPY vhost.d/default /etc/nginx/vhost.d/default
COPY custom.conf /etc/nginx/conf.d/custom.conf
Remove nginx.conf.
Your "nginx" directory should now look like this:
└── nginx
    ├── Dockerfile
    ├── custom.conf
    └── vhost.d
        └── default
ACME Companion Service
While the nginx-proxy service handles routing, acme-companion (via acme-companion) handles the creation, renewal, and use of Let's Encrypt certificates for proxied Docker containers.
To issue and renew certificates for proxied containers, the LETSENCRYPT_HOST environment variable needs to be added to each of them (which we've already done). It must also have the same value as VIRTUAL_HOST.
This container must share the following volumes with nginx-proxy:
certs:/etc/nginx/certsstores certificates, private keys, and ACME account keyshtml:/usr/share/nginx/htmlwrites http-01 challenge filesvhost:/etc/nginx/vhost.dchanges the configuration of vhosts
For more, review the official documentation.
Add a .env.staging.proxy-companion file:
DEFAULT_EMAIL=youremail@yourdomain.com
ACME_CA_URI=https://acme-staging-v02.api.letsencrypt.org/directory
NGINX_PROXY_CONTAINER=nginx-proxy
Notes:
DEFAULT_EMAILis the email that Let's Encrypt will use to send you notifications about your certificates (including renewals).ACME_CA_URIis the URL used to issue certificates. Again, use staging until you're 100% sure that everything works.NGINX_PROXY_CONTAINERis the name ofnginx-proxycontainer.
Running the Containers
Everything is ready to go for deployment.
It's time to move to your Linux instance.
Assuming you have a project directory created on your instance, like /home/myuser/django-on-docker, copy the files and folders over with SCP:
$ scp -r $(pwd)/{app,nginx,.env.staging,.env.staging.db,.env.staging.proxy-companion,docker-compose.staging.yml} user@your-ip-or-domain:/path/to/django-on-docker
Connect to your instance via SSH and move to the project directory:
$ ssh user@your-ip-or-domain
$ cd /path/to/django-on-docker
When that, you're ready to build the images and spin up the containers:
$ docker-compose -f docker-compose.staging.yml up -d --build
Once the containers are up and running, navigate to your domain in your browser. You should see something like:
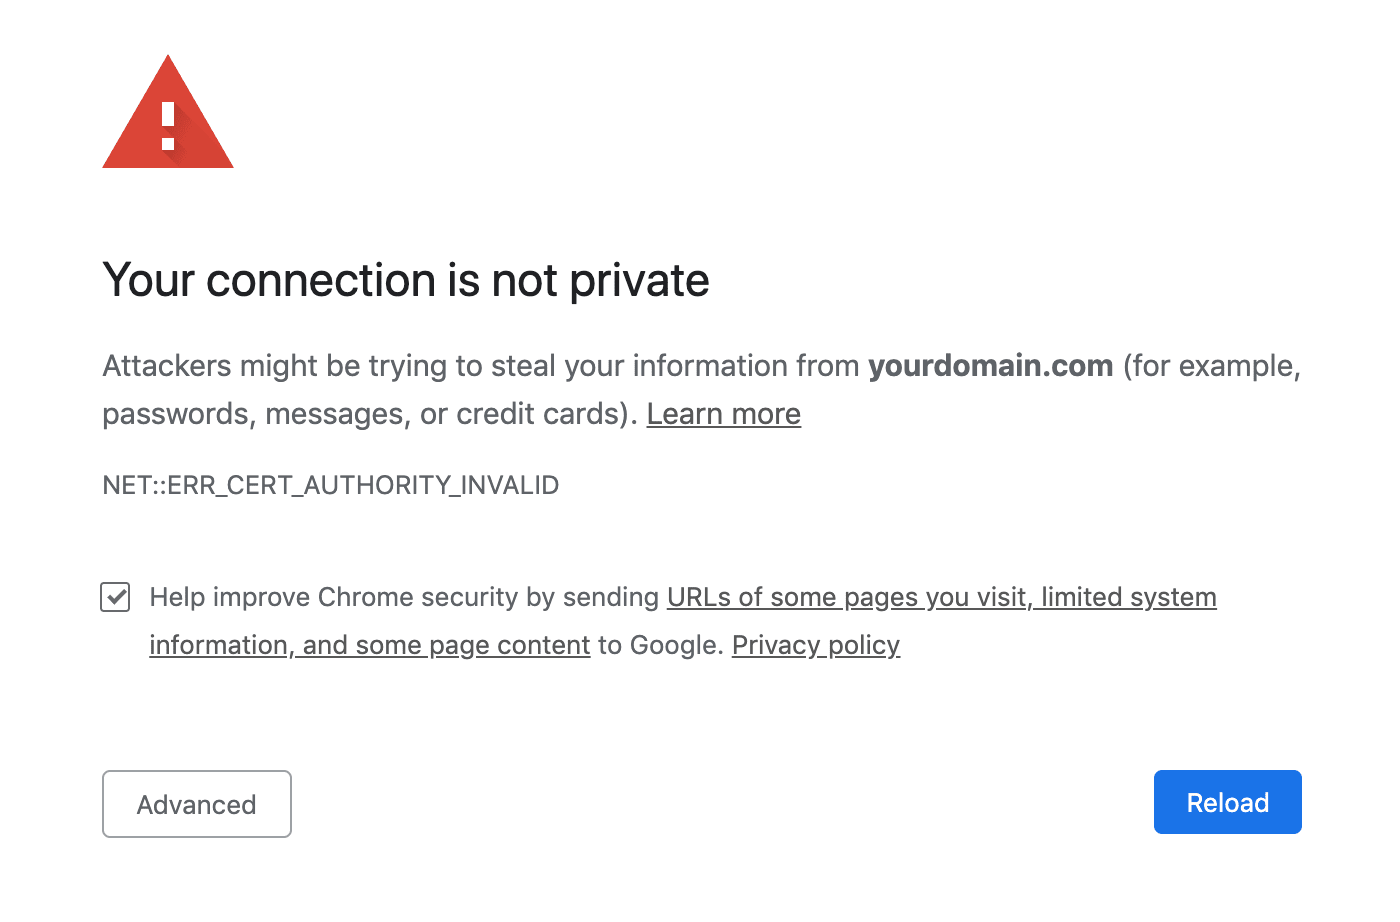
This is expected. This screen is shown because the certificate was issued from a staging environment, which, again, doesn't have the same rate limits as a production environment. It's similar to a self-signed HTTPS certificate. Always use a staging environment until you're sure that everything is working as expected.
How do you know if everything works?
Click on "Advanced" and then on "Proceed". You should now see your app. Upload an image, and then make sure you can view the image at https://yourdomain.com/mediafiles/IMAGE_FILE_NAME.
Issue the Production Certificate
Now, that everything works as expected, we can switch over to Let's Encrypt's production environment.
Bring down the existing containers and exit your instance:
$ docker-compose -f docker-compose.staging.yml down -v
$ exit
Back on your local machine, update docker-compose.prod.yml:
version: '3.8'

services:
  web:
    build:
      context: ./app
      dockerfile: Dockerfile.prod
    command: gunicorn hello_django.wsgi:application --bind 0.0.0.0:8000
    volumes:
      - static_volume:/home/app/web/staticfiles
      - media_volume:/home/app/web/mediafiles
    expose:
      - 8000
    env_file:
      - ./.env.prod
    depends_on:
      - db
  db:
    image: postgres:13.0-alpine
    volumes:
      - postgres_data:/var/lib/postgresql/data/
    env_file:
      - ./.env.prod.db
  nginx-proxy:
    container_name: nginx-proxy
    build: nginx
    restart: always
    ports:
      - 443:443
      - 80:80
    volumes:
      - static_volume:/home/app/web/staticfiles
      - media_volume:/home/app/web/mediafiles
      - certs:/etc/nginx/certs
      - html:/usr/share/nginx/html
      - vhost:/etc/nginx/vhost.d
      - /var/run/docker.sock:/tmp/docker.sock:ro
    depends_on:
      - web
  acme-companion:
    image: nginxproxy/acme-companion
    env_file:
      - ./.env.prod.proxy-companion
    volumes:
      - /var/run/docker.sock:/var/run/docker.sock:ro
      - certs:/etc/nginx/certs
      - html:/usr/share/nginx/html
      - vhost:/etc/nginx/vhost.d
      - acme:/etc/acme.sh
    depends_on:
      - nginx-proxy

volumes:
  postgres_data:
  static_volume:
  media_volume:
  certs:
  html:
  vhost:
  acme:
The only difference here, compared to docker-compose.staging.yml, is that we used different environment files.
.env.prod:
DEBUG=0
SECRET_KEY=change_me
DJANGO_ALLOWED_HOSTS=<YOUR_DOMAIN.COM>
SQL_ENGINE=django.db.backends.postgresql
SQL_DATABASE=hello_django_prod
SQL_USER=hello_django
SQL_PASSWORD=hello_django
SQL_HOST=db
SQL_PORT=5432
DATABASE=postgres
VIRTUAL_HOST=<YOUR_DOMAIN.COM>
VIRTUAL_PORT=8000
LETSENCRYPT_HOST=<YOUR_DOMAIN.COM>
CSRF_TRUSTED_ORIGINS=https://<YOUR_DOMAIN.COM>
.env.prod.db:
POSTGRES_USER=hello_django
POSTGRES_PASSWORD=hello_django
POSTGRES_DB=hello_django_prod
.env.prod.proxy-companion:
DEFAULT_EMAIL=youremail@yourdomain.co
NGINX_PROXY_CONTAINER=nginx-proxy
Update them appropriately.
Did you spot the difference, from the staging versions? The ACME_CA_URI environment variable is not set since the acme-companion image uses Let's Encrypt's production environment by default.
Copy the new files and folders to your instance with SCP:
$ scp $(pwd)/{.env.prod,.env.prod.db,.env.prod.proxy-companion,docker-compose.prod.yml} user@your-ip-or-domain:/path/to/django-on-docker
Like before, connect to your instance via SSH and move to the project directory:
$ ssh user@your-ip-or-domain
$ cd /path/to/django-on-docker
Build the images and spin up the containers:
$ docker-compose -f docker-compose.prod.yml up -d --build
Navigate to your domain again. You should no longer see a warning.
Congrats! You're now using a production Let's Encrypt certificate.
Want to see the certificate creation process in action, check out the logs:
$ docker-compose -f docker-compose.prod.yml logs acme-companion
Conclusion
In conclusion, once you have Docker Compose configured to run Django, to set up HTTPS, you need to add (and configure) the nginx-proxy and acme-companion services in your Docker Compose file. You can now add more containers by configuring the VIRTUAL_HOST (routing) and LETSENCRYPT_HOST (certificate) environment variables. As always, be sure to test with Let's Encrypt's staging environment first.
You can find the code in the django-on-docker-letsencrypt repo.
Django on Docker Series: