 Michael Herman
In this tutorial, we'll look at how to configure GitLab CI to continuously deploy a Django and Docker application to Amazon Web Services (AWS) EC2.
Dependencies:
- Django v4.2.2
- Docker v20.10.23
- Python v3.11.4
Contents
Objectives
By the end of this tutorial, you will be able to:
- Set up a new EC2 instance
- Configure an AWS Security Group
- Install Docker on an EC2 instance
- Set up Passwordless SSH Login
- Configure AWS RDS for data persistence
- Deploy Django to AWS EC2 with Docker
- Configure GitLab CI to continuously deploy Django to EC2
Project Setup
Along with Django and Docker, the demo project that we'll be using includes Postgres, Nginx, and Gunicorn.
Curious about how this project was developed? Check out the Dockerizing Django with Postgres, Gunicorn, and Nginx blog post.
Start by cloning down the base project:
$ git clone https://gitlab.com/testdriven/django-gitlab-ec2.git --branch base --single-branch
$ cd django-gitlab-ec2
To test locally, build the images and spin up the containers:
$ docker-compose up -d --build
Navigate to http://localhost:8000/. You should see:
{
  "hello": "world"
}
AWS Setup
Let's start by setting up an EC2 instance to deploy our application to along with configuring RDS.
First, you'll need to sign up for an AWS account (if you don't already have one).
Setting up your first AWS account?
It's a good idea to create a non-root IAM user, with "Administrator Access" and "Billing" policies, and a Billing Alert via CloudWatch to alert you if your AWS usage costs exceed a certain amount. For more info, review Security best practices in IAM and Tracking your AWS Free Tier usage, respectively.
EC2
Log in to the AWS Console, navigate to the EC2 Console and click "Instances" on the left sidebar. Then, click the "Launch instances" button:

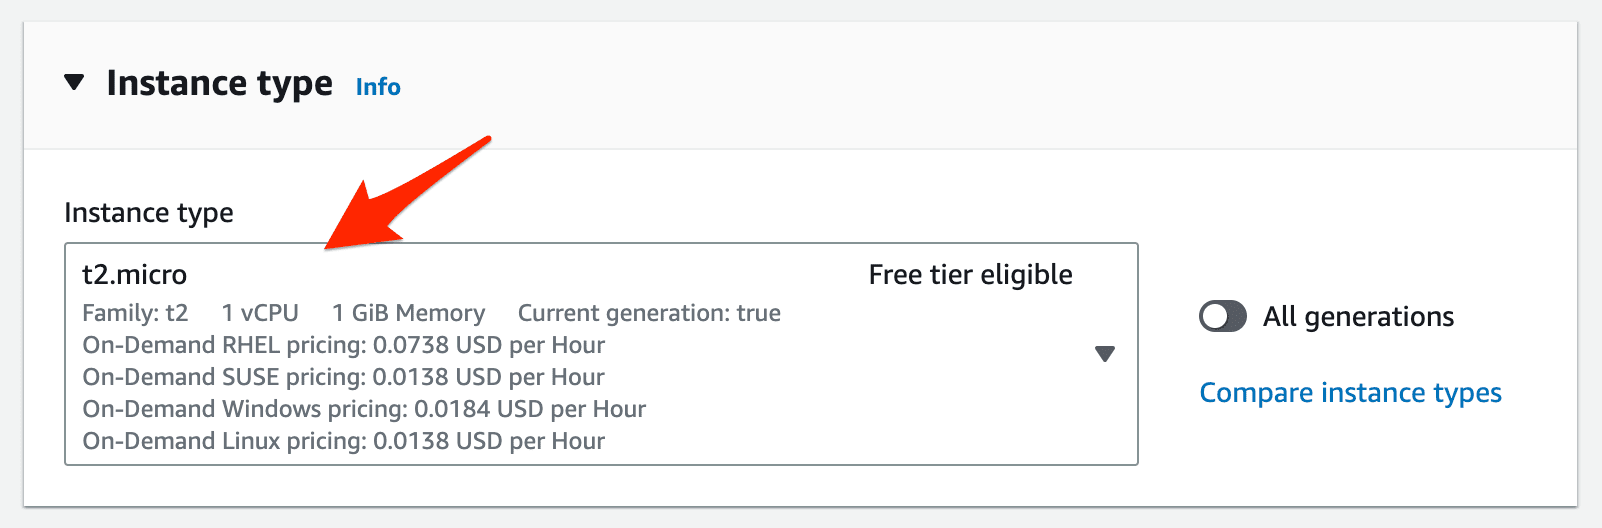
Next, stick with the basic Amazon Linux 2023 with the t2.micro Instance Type:

Next, create a new Key Pair so you can connect to the instance over SSH. Save this .pem file somewhere safe.

On a Mac or a Linux box? It's recommended to save the .pem file to the "/Users/$USER/.ssh" directory. Be sure to set the proper permissions as well -- e.g.,
chmod 400 ~/.ssh/django.pem.
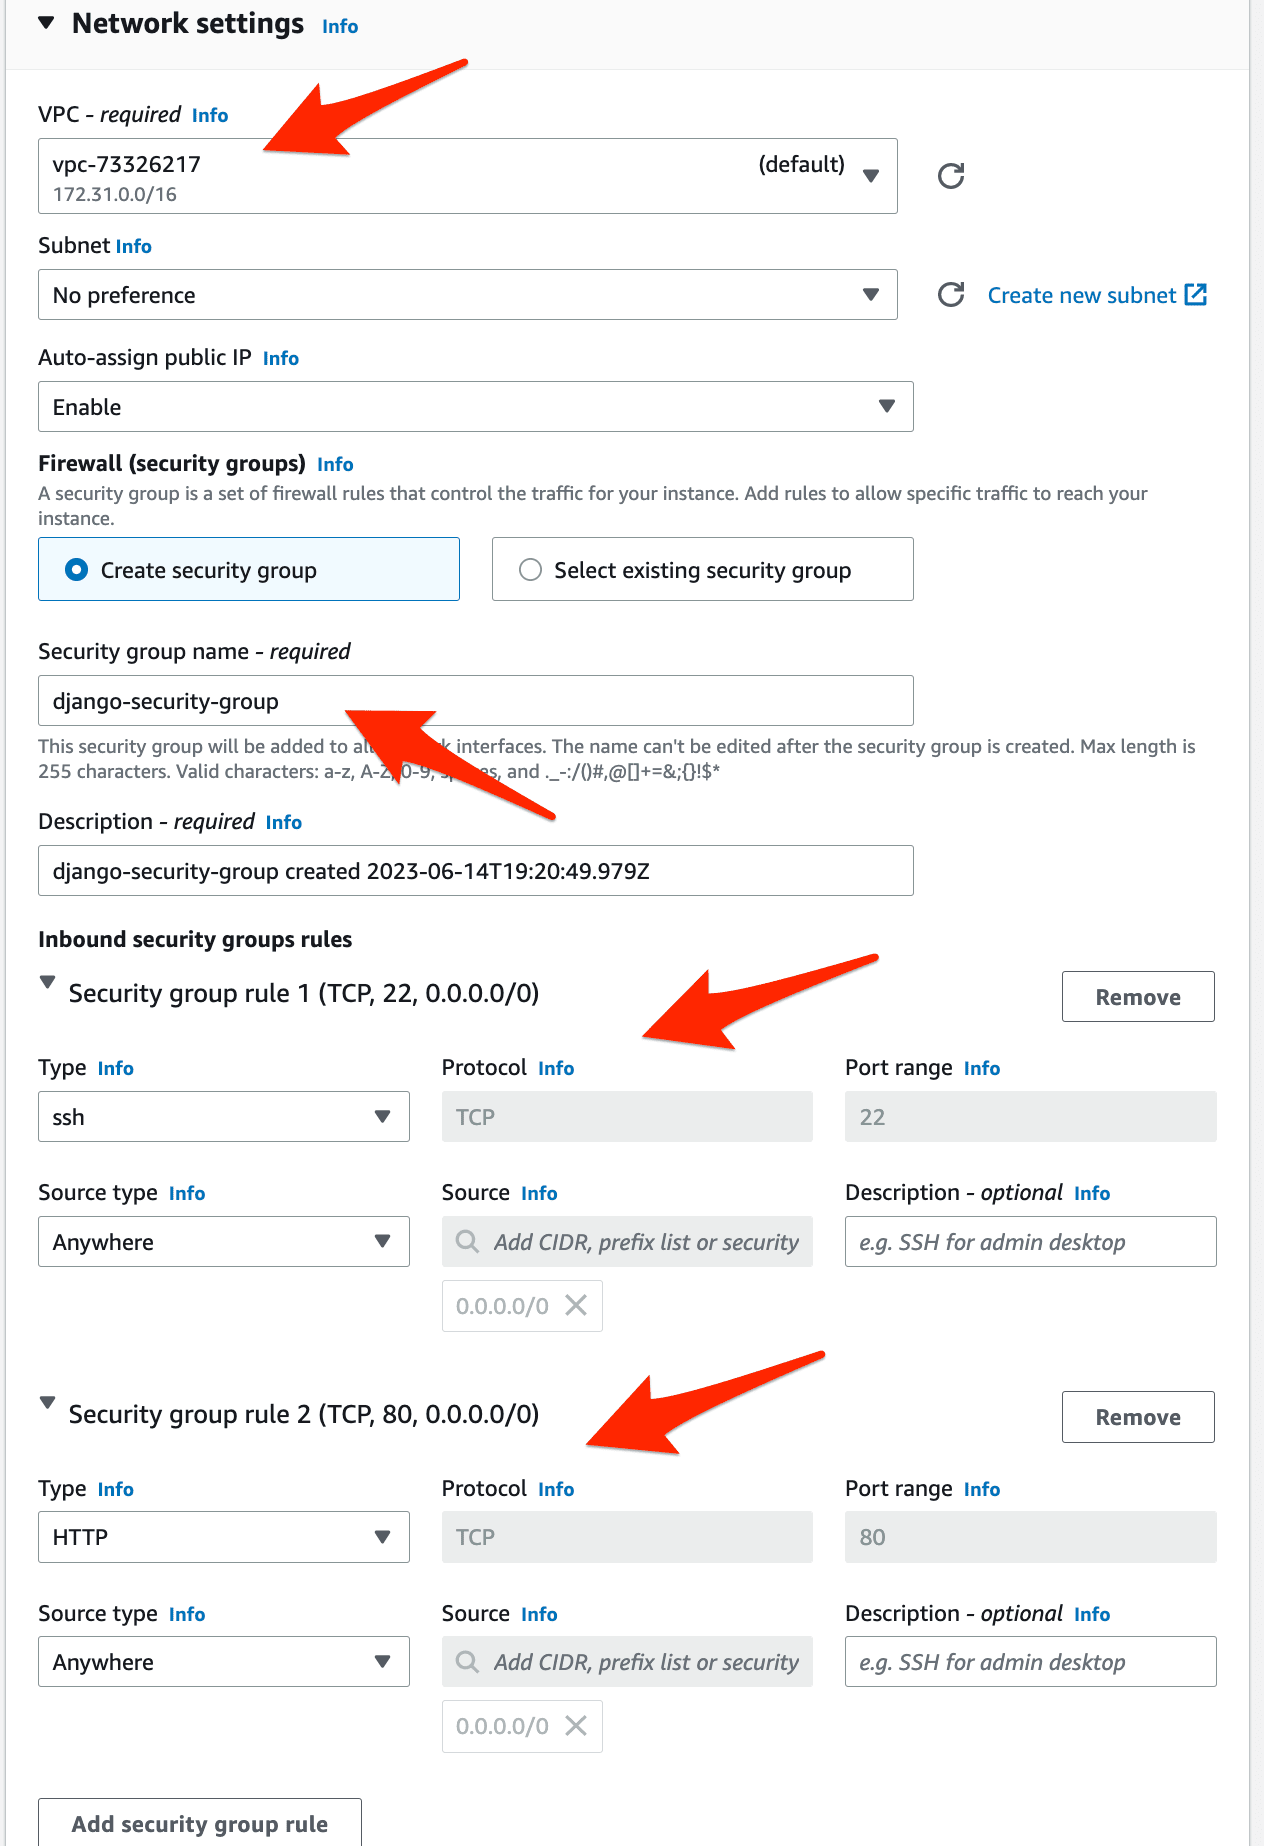
Under "Network settings", stick with the default VPC to keep things simple for this tutorial, but feel free to update this. Then, create a new Security Group (akin to a firewall) called django-security-group, making sure at least HTTP 80 and SSH 22 are open.
Click "Launch instance".
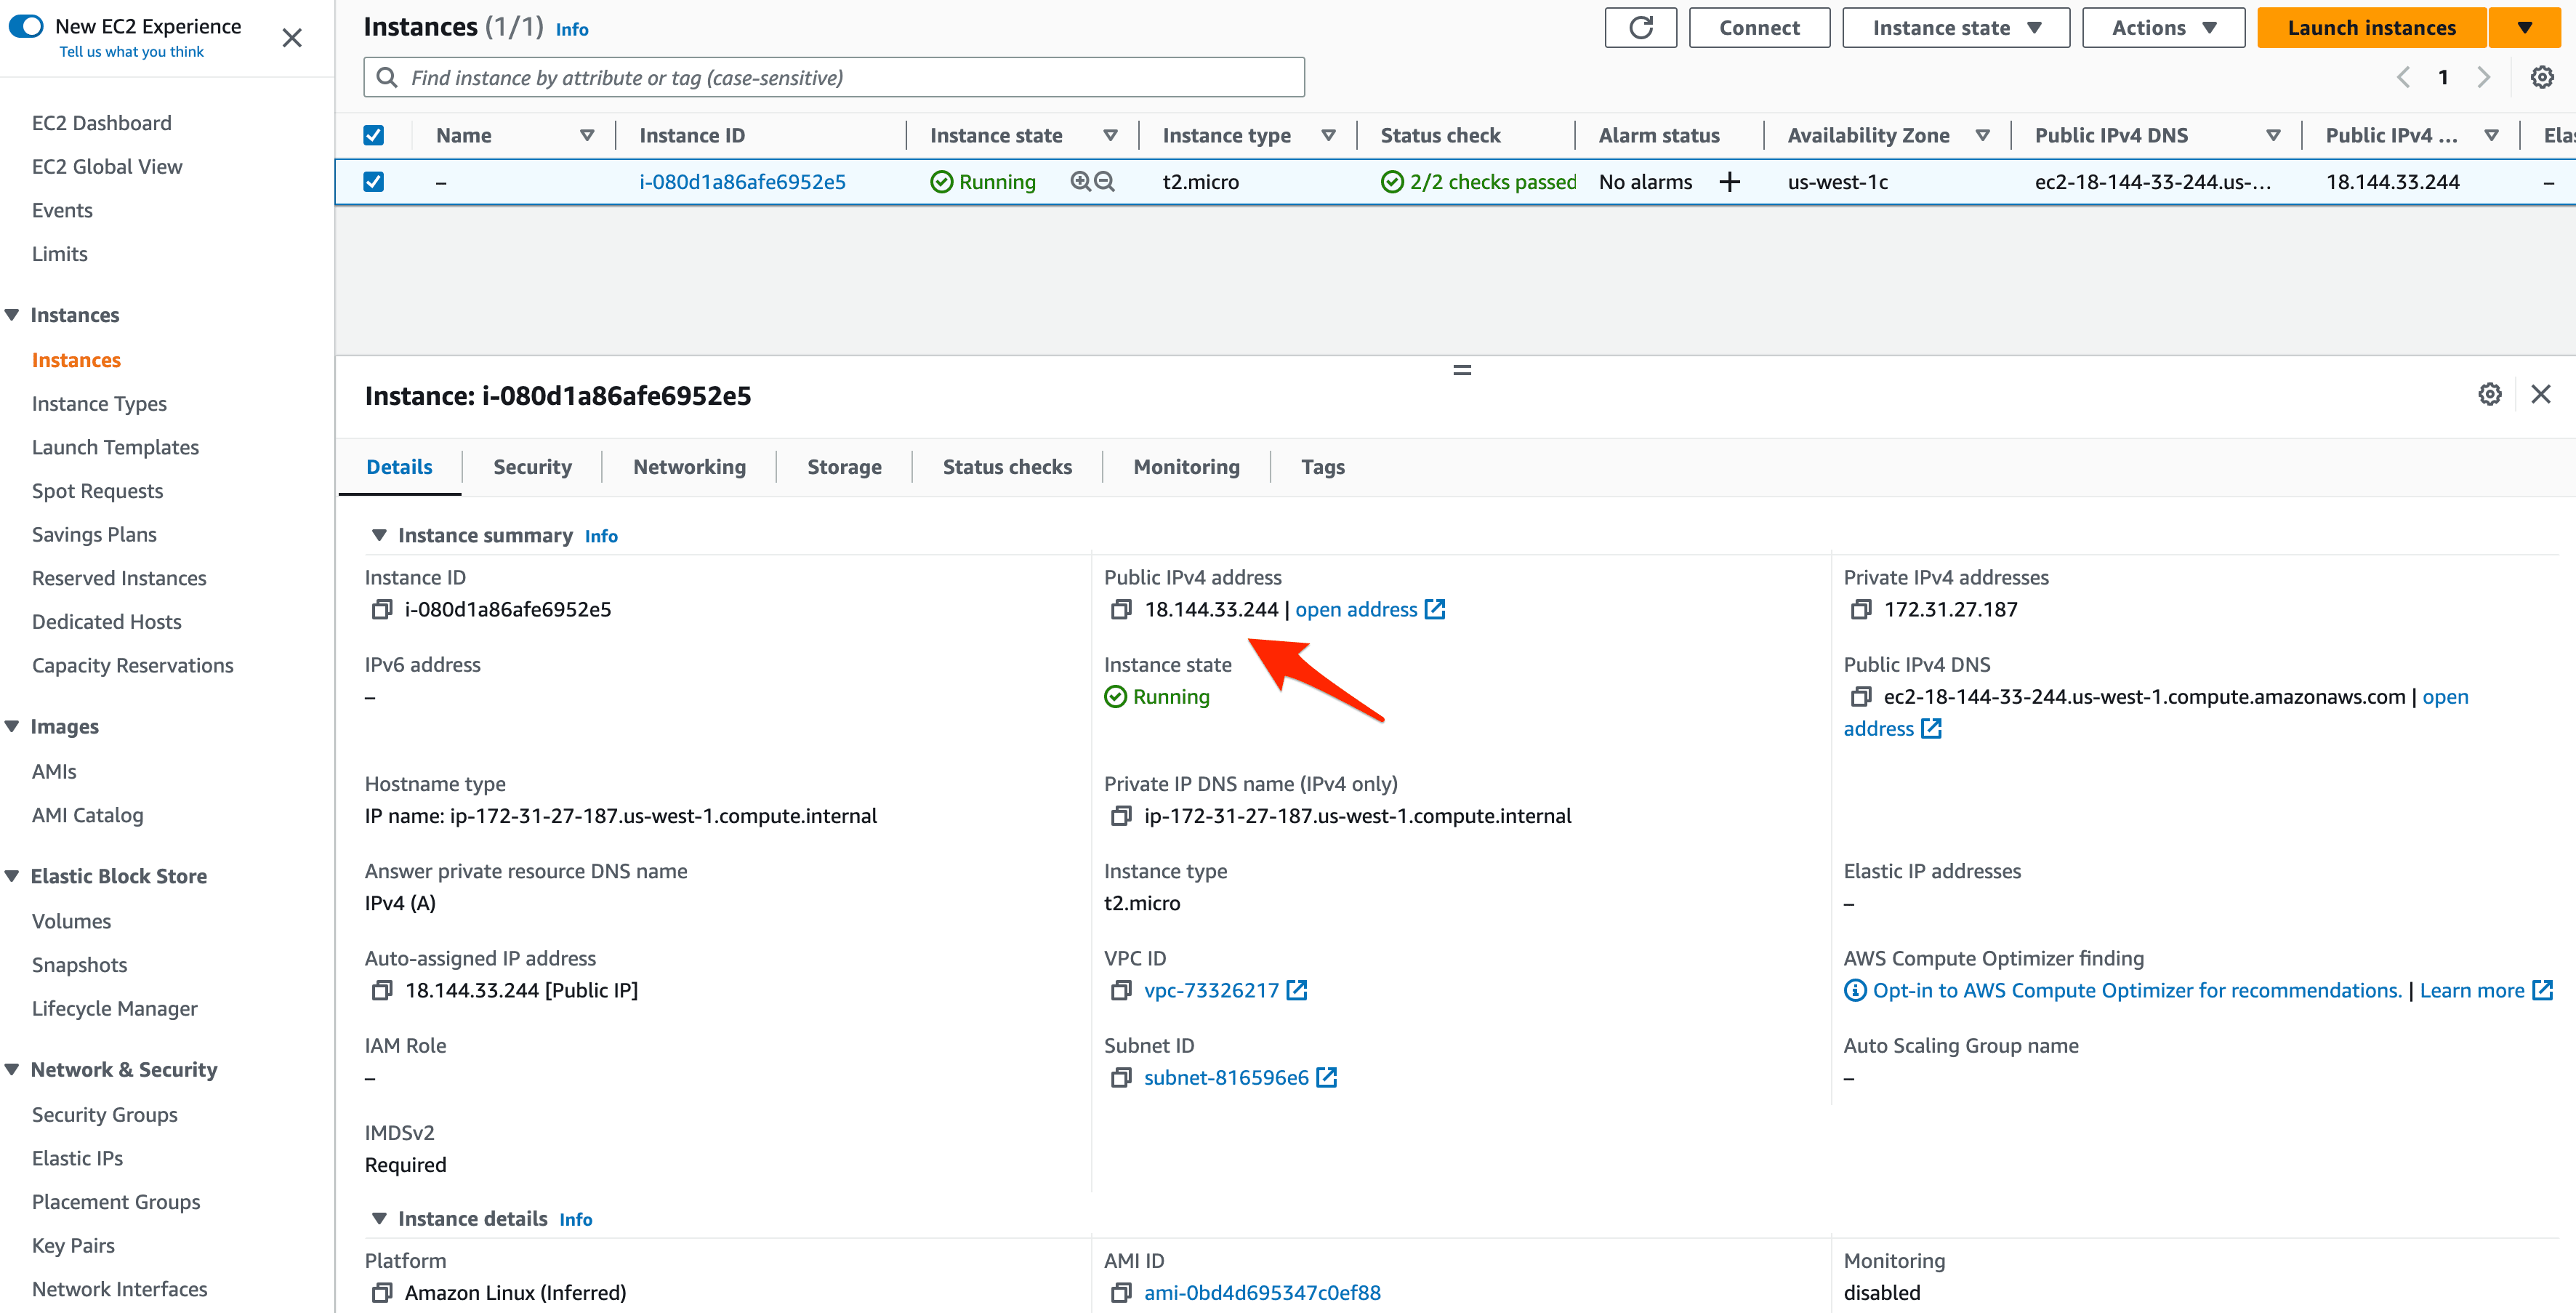
Back on the main instances page, grab the public IP of your newly created instance:
Docker
With the instance up and running, we can now install Docker on it.
SSH into the instance using your Key Pair like so:
$ ssh -i your-key-pair.pem ec2-user@<PUBLIC-IP-ADDRESS>

# example:
# ssh -i ~/.ssh/django.pem [email protected]
Start by installing and starting the latest version of Docker and version 2.18.1 of Docker Compose:
[ec2-user]$ sudo yum update -y
[ec2-user]$ sudo yum install -y docker
[ec2-user]$ sudo service docker start

[ec2-user]$ sudo curl -L "https://github.com/docker/compose/releases/download/v2.18.1/docker-compose-$(uname -s)-$(uname -m)" \
    -o /usr/local/bin/docker-compose
[ec2-user]$ sudo chmod +x /usr/local/bin/docker-compose

[ec2-user]$ docker --version
Docker version 20.10.23, build 7155243

[ec2-user]$ docker-compose --version
Docker Compose version v2.18.1
Add the ec2-user to the docker group so you can execute Docker commands without having to use sudo:
[ec2-user]$ sudo usermod -a -G docker ec2-user
Next, generate a new SSH key:
[ec2-user]$ ssh-keygen -t rsa
Save the key to /home/ec2-user/.ssh/id_rsa and don't set a password. This will generate a public and private key -- id_rsa and id_rsa.pub, respectively. To set up passwordless SSH login, copy the public key over to the authorized_keys file and set the proper permissions:
[ec2-user]$ cat ~/.ssh/id_rsa.pub
[ec2-user]$ vi ~/.ssh/authorized_keys
[ec2-user]$ chmod 600 ~/.ssh/authorized_keys
[ec2-user]$ chmod 600 ~/.ssh/id_rsa
Copy the contents of the private key:
[ec2-user]$ cat ~/.ssh/id_rsa
Exit the remote SSH session. Set the key as an environment variable on your local machine:
$ export PRIVATE_KEY='-----BEGIN RSA PRIVATE KEY-----
MIIEpAIBAAKCAQEA04up8hoqzS1+APIB0RhjXyObwHQnOzhAk5Bd7mhkSbPkyhP1
...
iWlX9HNavcydATJc1f0DpzF0u4zY8PY24RVoW8vk+bJANPp1o2IAkeajCaF3w9nf
q/SyqAWVmvwYuIhDiHDaV2A==
-----END RSA PRIVATE KEY-----'
Add the key to the ssh-agent:
$ ssh-add - <<< "${PRIVATE_KEY}"
To test, run:
$ ssh -o StrictHostKeyChecking=no ec2-user@<YOUR_INSTANCE_IP> whoami

ec2-user

# example:
# ssh -o StrictHostKeyChecking=no [email protected] whoami
Then, create a new directory for the app:
$ ssh -o StrictHostKeyChecking=no root@<YOUR_INSTANCE_IP> mkdir /home/ec2-user/app

# example:
# ssh -o StrictHostKeyChecking=no [email protected] mkdir /home/ec2-user/app
RDS
Moving along, let's spin up a production Postgres database via AWS Relational Database Service (RDS).
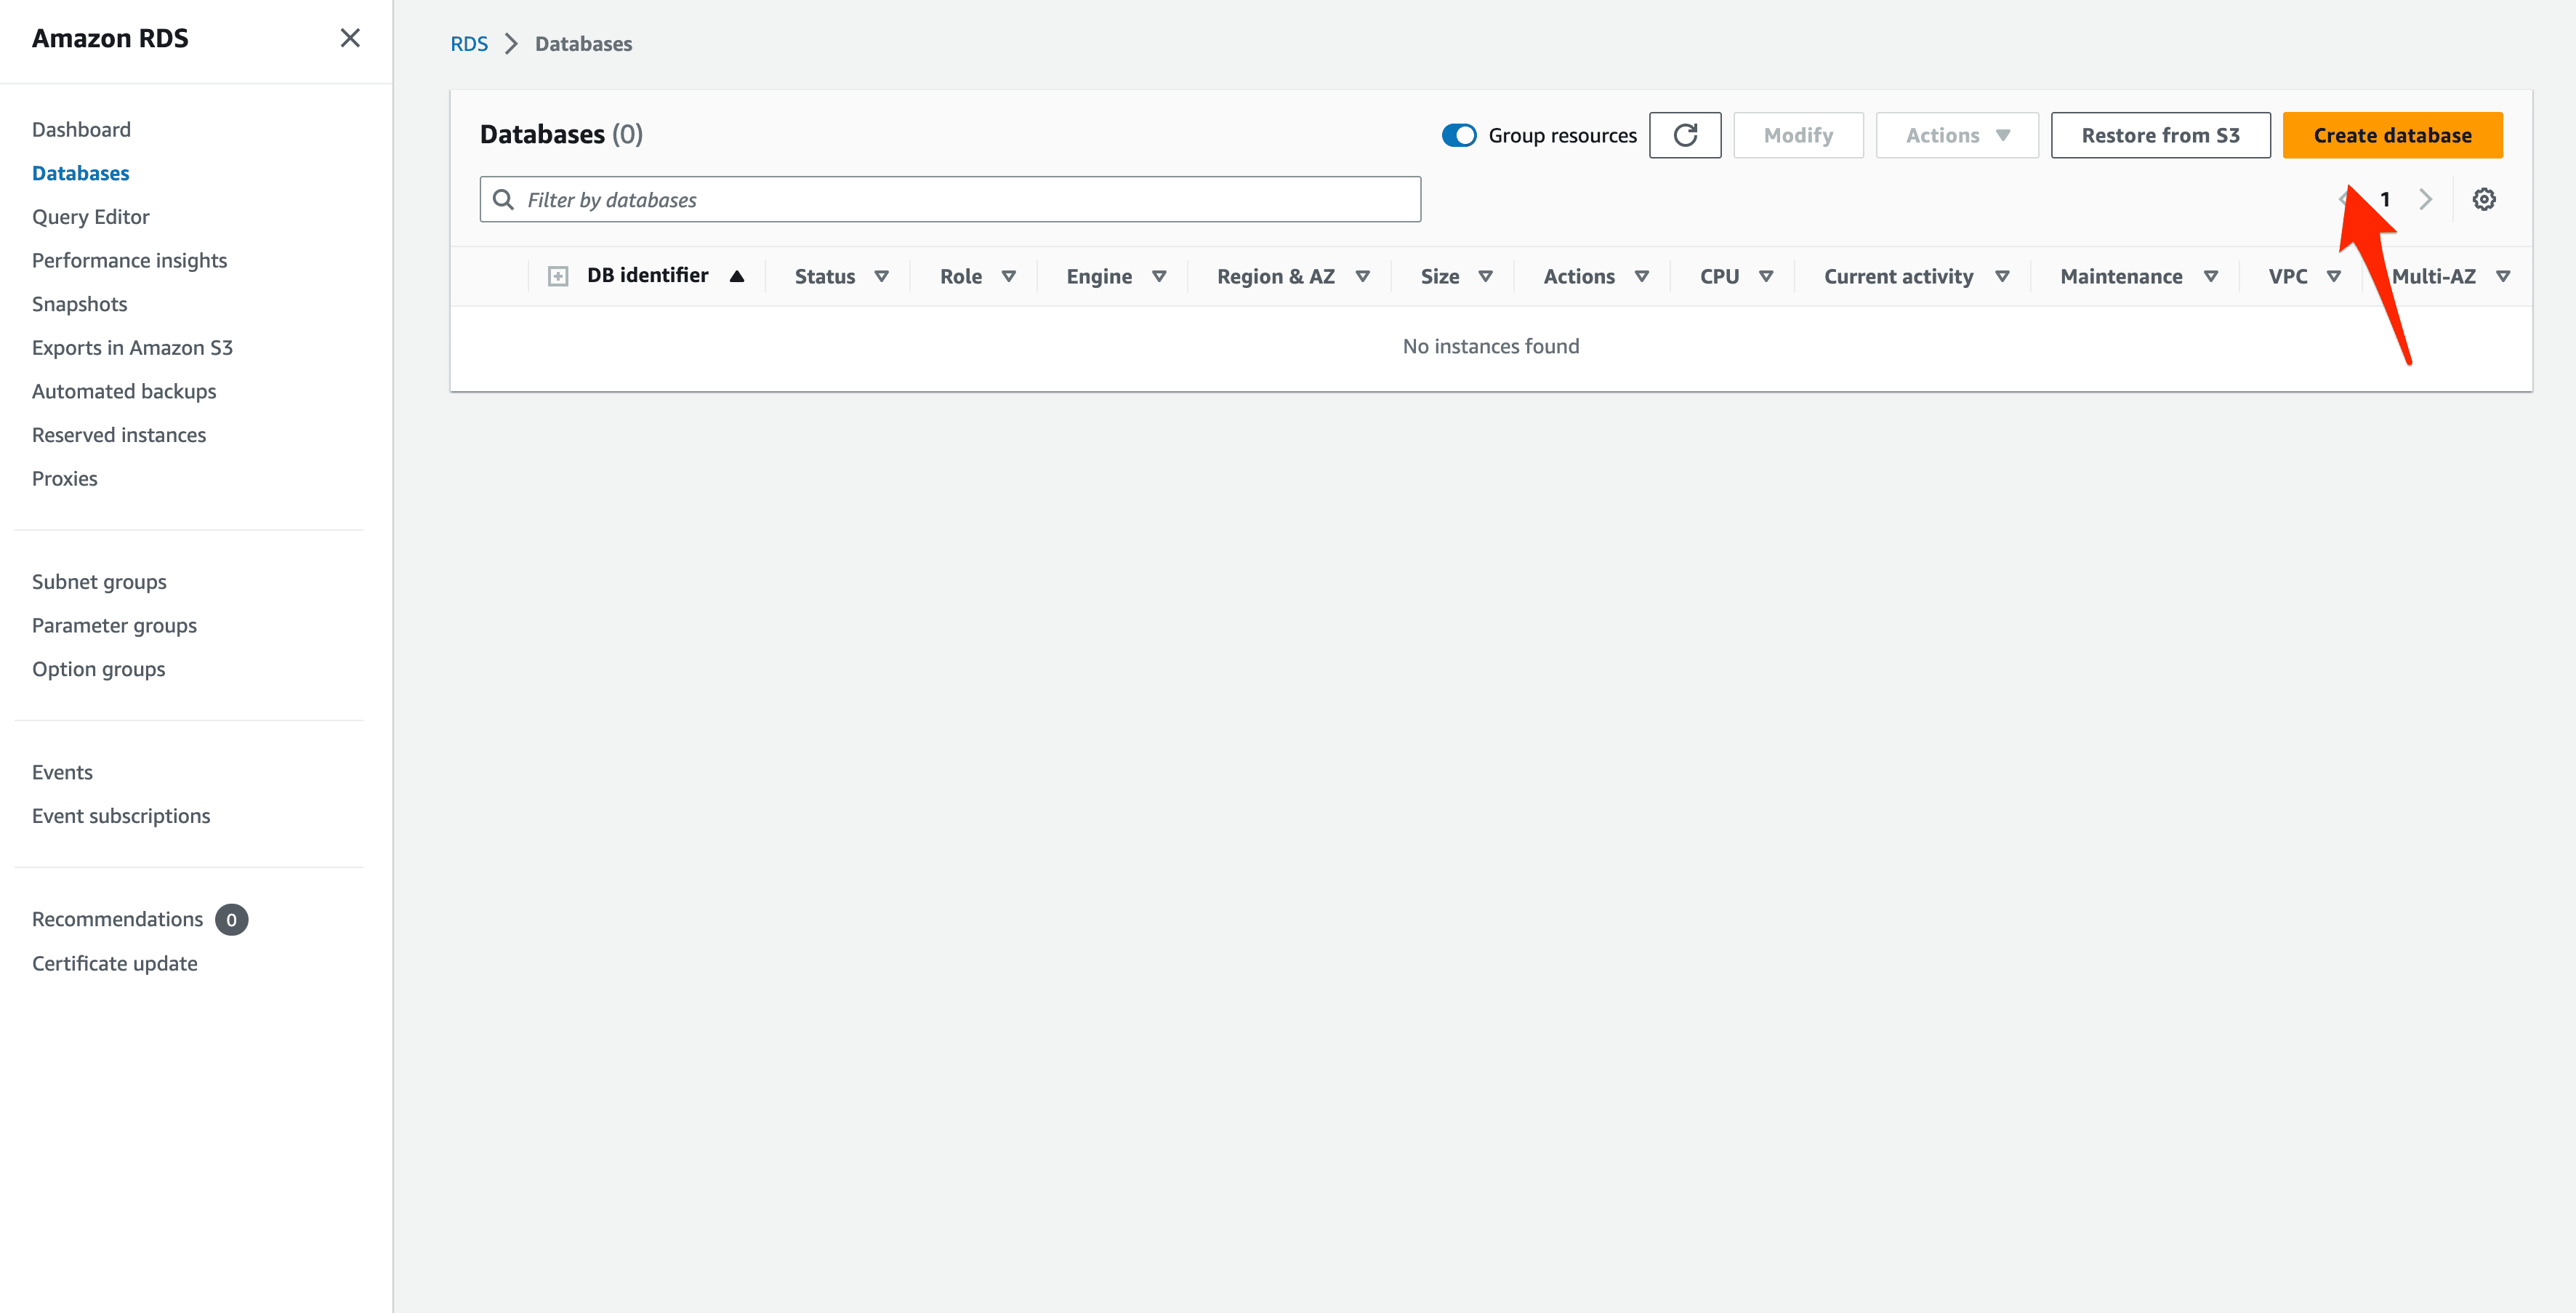
Navigate to Amazon RDS, click "Databases" on the sidebar, and then click the "Create database" button.
For the "Engine options", Select the "PostgreSQL" engine and the PostgreSQL 14.7-R1 version.
Use the "Free Tier" template.
For more on the free tier, review the AWS Free Tier guide.

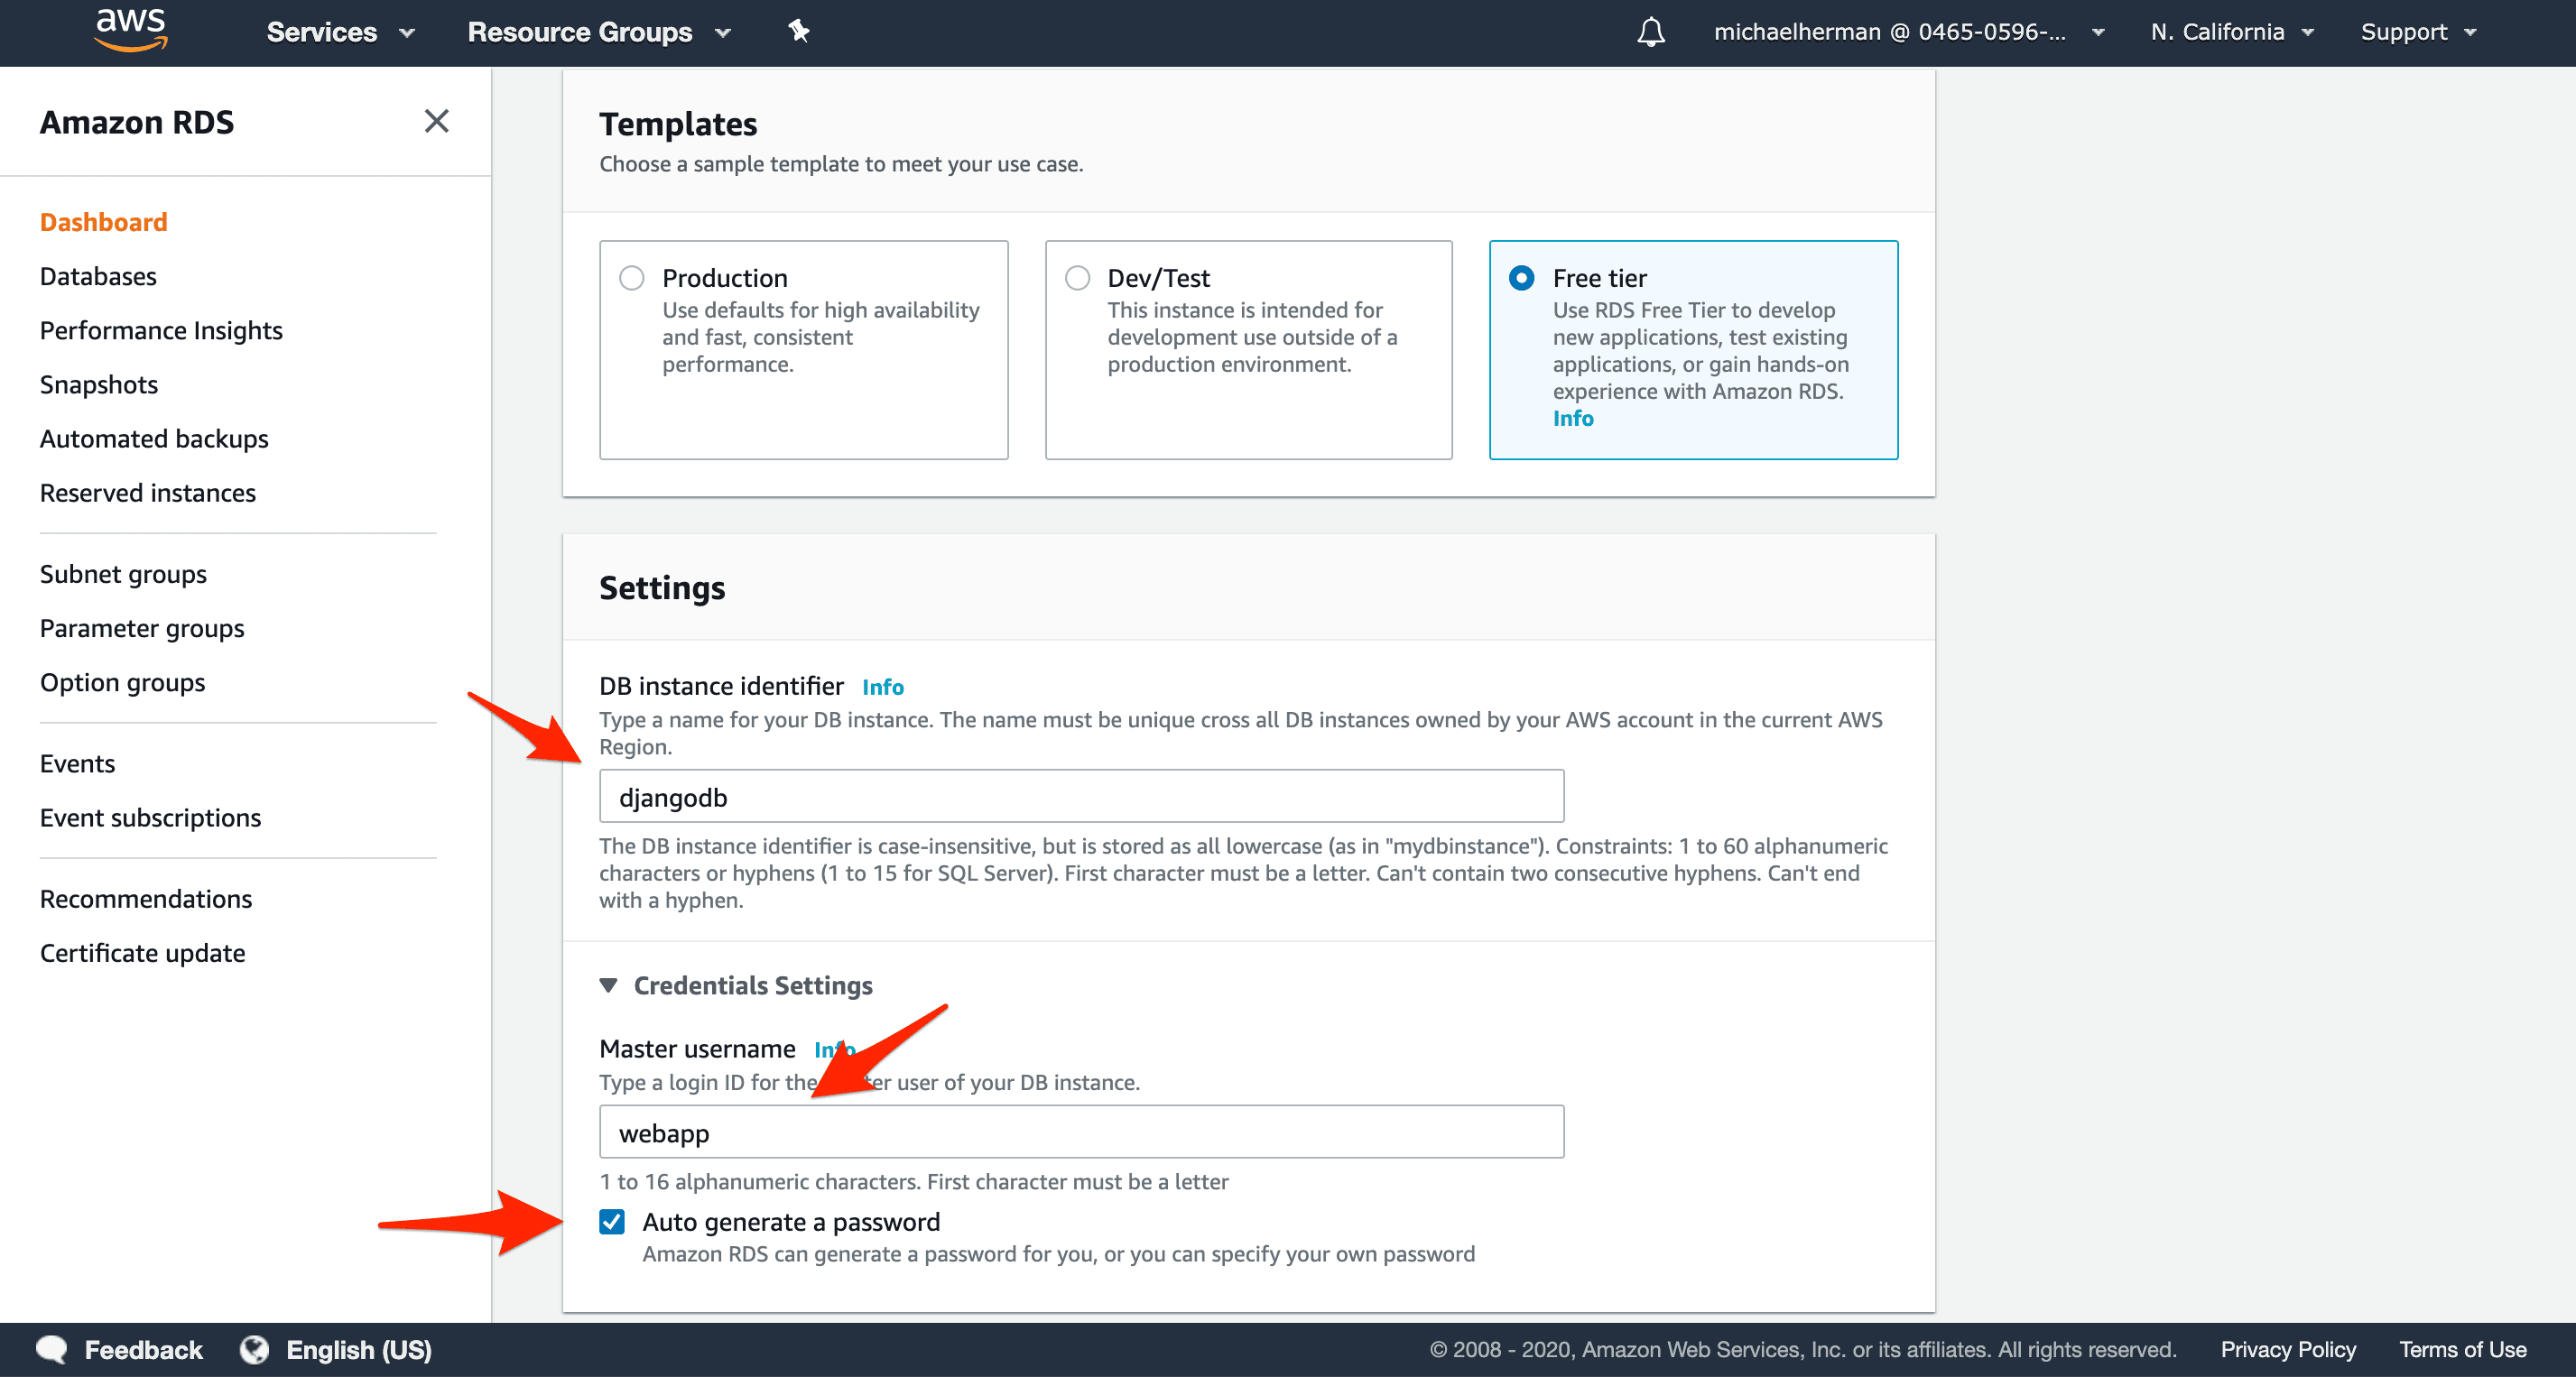
Under "Settings":
- "DB instance identifier":
djangodb - "Master username":
webapp - "Master password": Check "Auto generate a password"
Scroll down to the "Connectivity" section. Stick with the default "VPC" and select the django-security-group Security group. Turn off "Public accessibility".

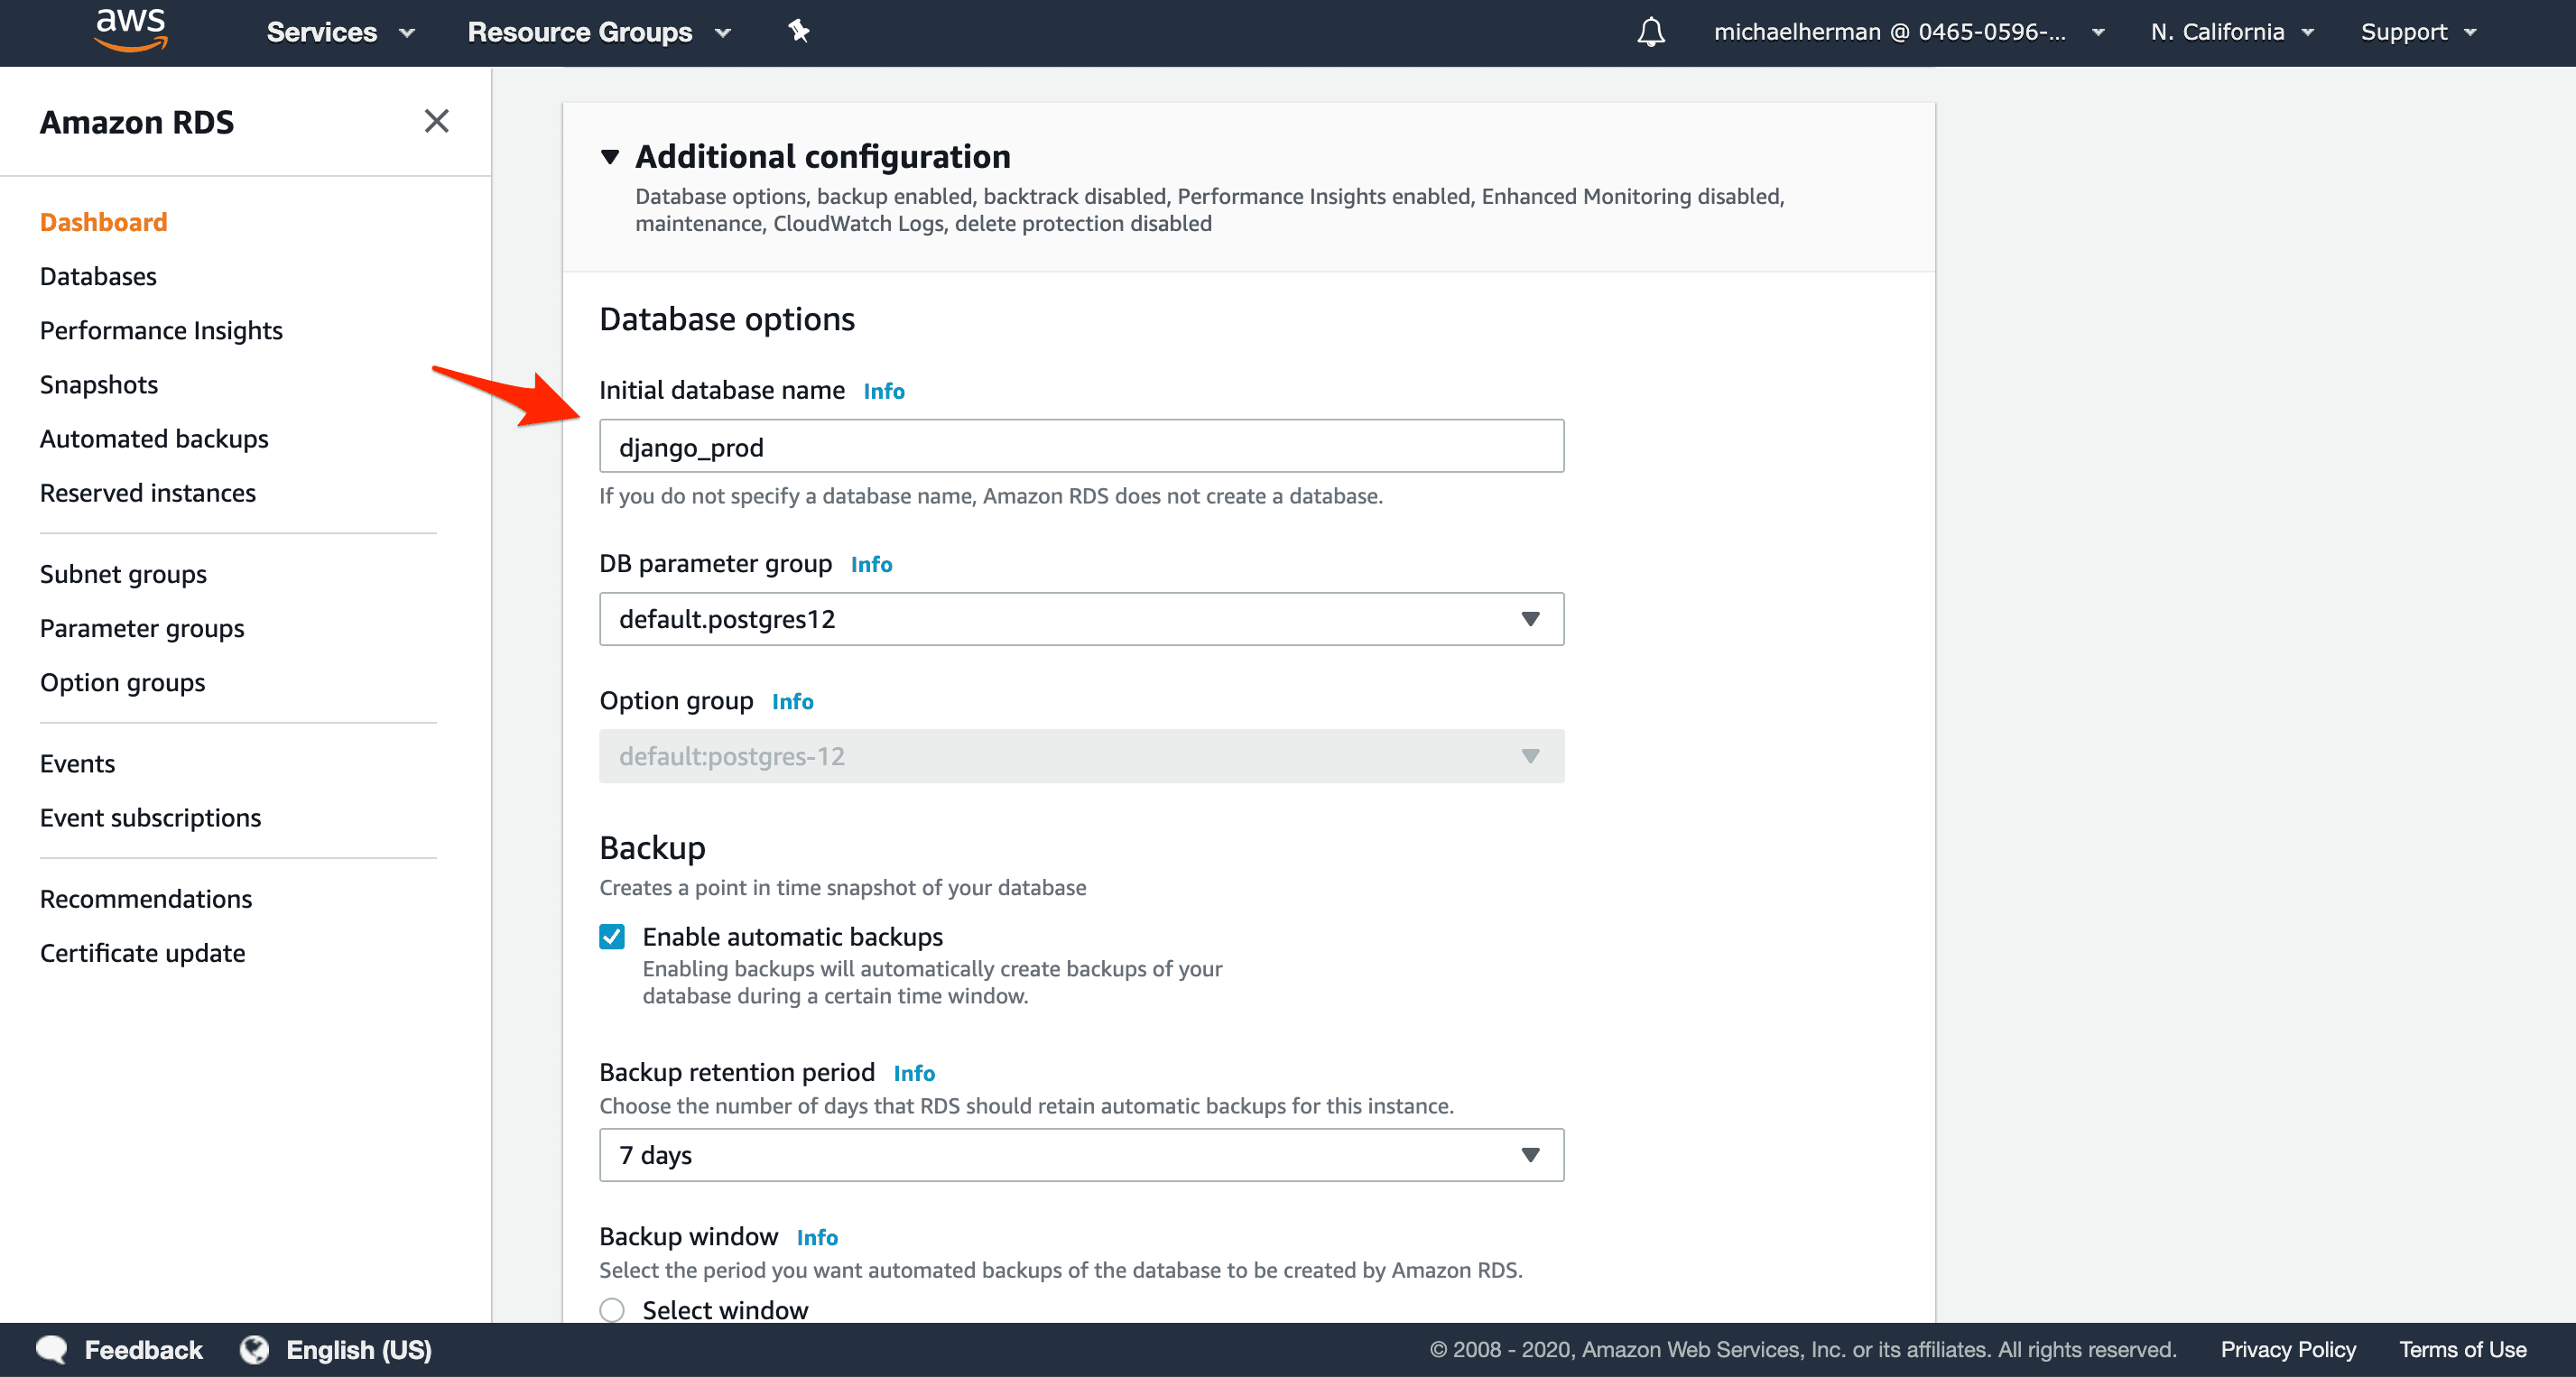
Under "Additional configuration", change the "Initial database name" to django_prod and then create the new database.
Click the "View credential details" button to view the generated password. Take note of it.
It will take a few minutes for the RDS instance to spin up. Once it's available, take note of the endpoint. For example:
djangodb.c7kxiqfnzo9e.us-west-1.rds.amazonaws.com
The full URL will look something like this:
postgres://webapp:YOUR_PASSWORD@djangodb.c7kxiqfnzo9e.us-west-1.rds.amazonaws.com:5432/django_prod
Keep in mind that you cannot access the database outside the VPC. So, if you want to connect to it directly, you'll need to use SSH tunneling via SSHing into the EC2 instance and connecting to the database from there. We'll look at how to do this shortly.
GitLab CI
Sign up for a GitLab account (if necessary), and then create a new project (again, if necessary).
Build Stage
Next, add a GitLab CI/CD config file called .gitlab-ci.yml to the project root:
image:
  name: docker:20.10-dind
  entrypoint: [""]

services:
  - name: docker:20.10-dind
    alias: docker

stages:
  - build

variables:
  DOCKER_HOST: tcp://docker:2375
  DOCKER_DRIVER: overlay2

build:
  stage: build
  before_script:
    - export IMAGE=$CI_REGISTRY/$CI_PROJECT_NAMESPACE/$CI_PROJECT_NAME
    - export WEB_IMAGE=$IMAGE:web
    - export NGINX_IMAGE=$IMAGE:nginx
  script:
    - apk add --no-cache bash
    - chmod +x ./setup_env.sh
    - bash ./setup_env.sh
    - docker login -u $CI_REGISTRY_USER -p $CI_JOB_TOKEN $CI_REGISTRY
    - docker pull $IMAGE:web || true
    - docker pull $IMAGE:nginx || true
    - docker-compose -f docker-compose.ci.yml build
    - docker push $IMAGE:web
    - docker push $IMAGE:nginx
Here, we defined a single build stage where we:
- Set the
IMAGE,WEB_IMAGE, andNGINX_IMAGEenvironment variables - Install bash
- Set the appropriate permissions for setup_env.sh
- Run setup_env.sh
- Log in to the GitLab Container Registry
- Pull the images if they exist
- Build the images
- Push the images up to the registry
Add the setup_env.sh file to the project root:
#!/bin/sh

echo DEBUG=0 >> .env
echo SQL_ENGINE=django.db.backends.postgresql >> .env
echo DATABASE=postgres >> .env

echo SECRET_KEY=$SECRET_KEY >> .env
echo SQL_DATABASE=$SQL_DATABASE >> .env
echo SQL_USER=$SQL_USER >> .env
echo SQL_PASSWORD=$SQL_PASSWORD >> .env
echo SQL_HOST=$SQL_HOST >> .env
echo SQL_PORT=$SQL_PORT >> .env
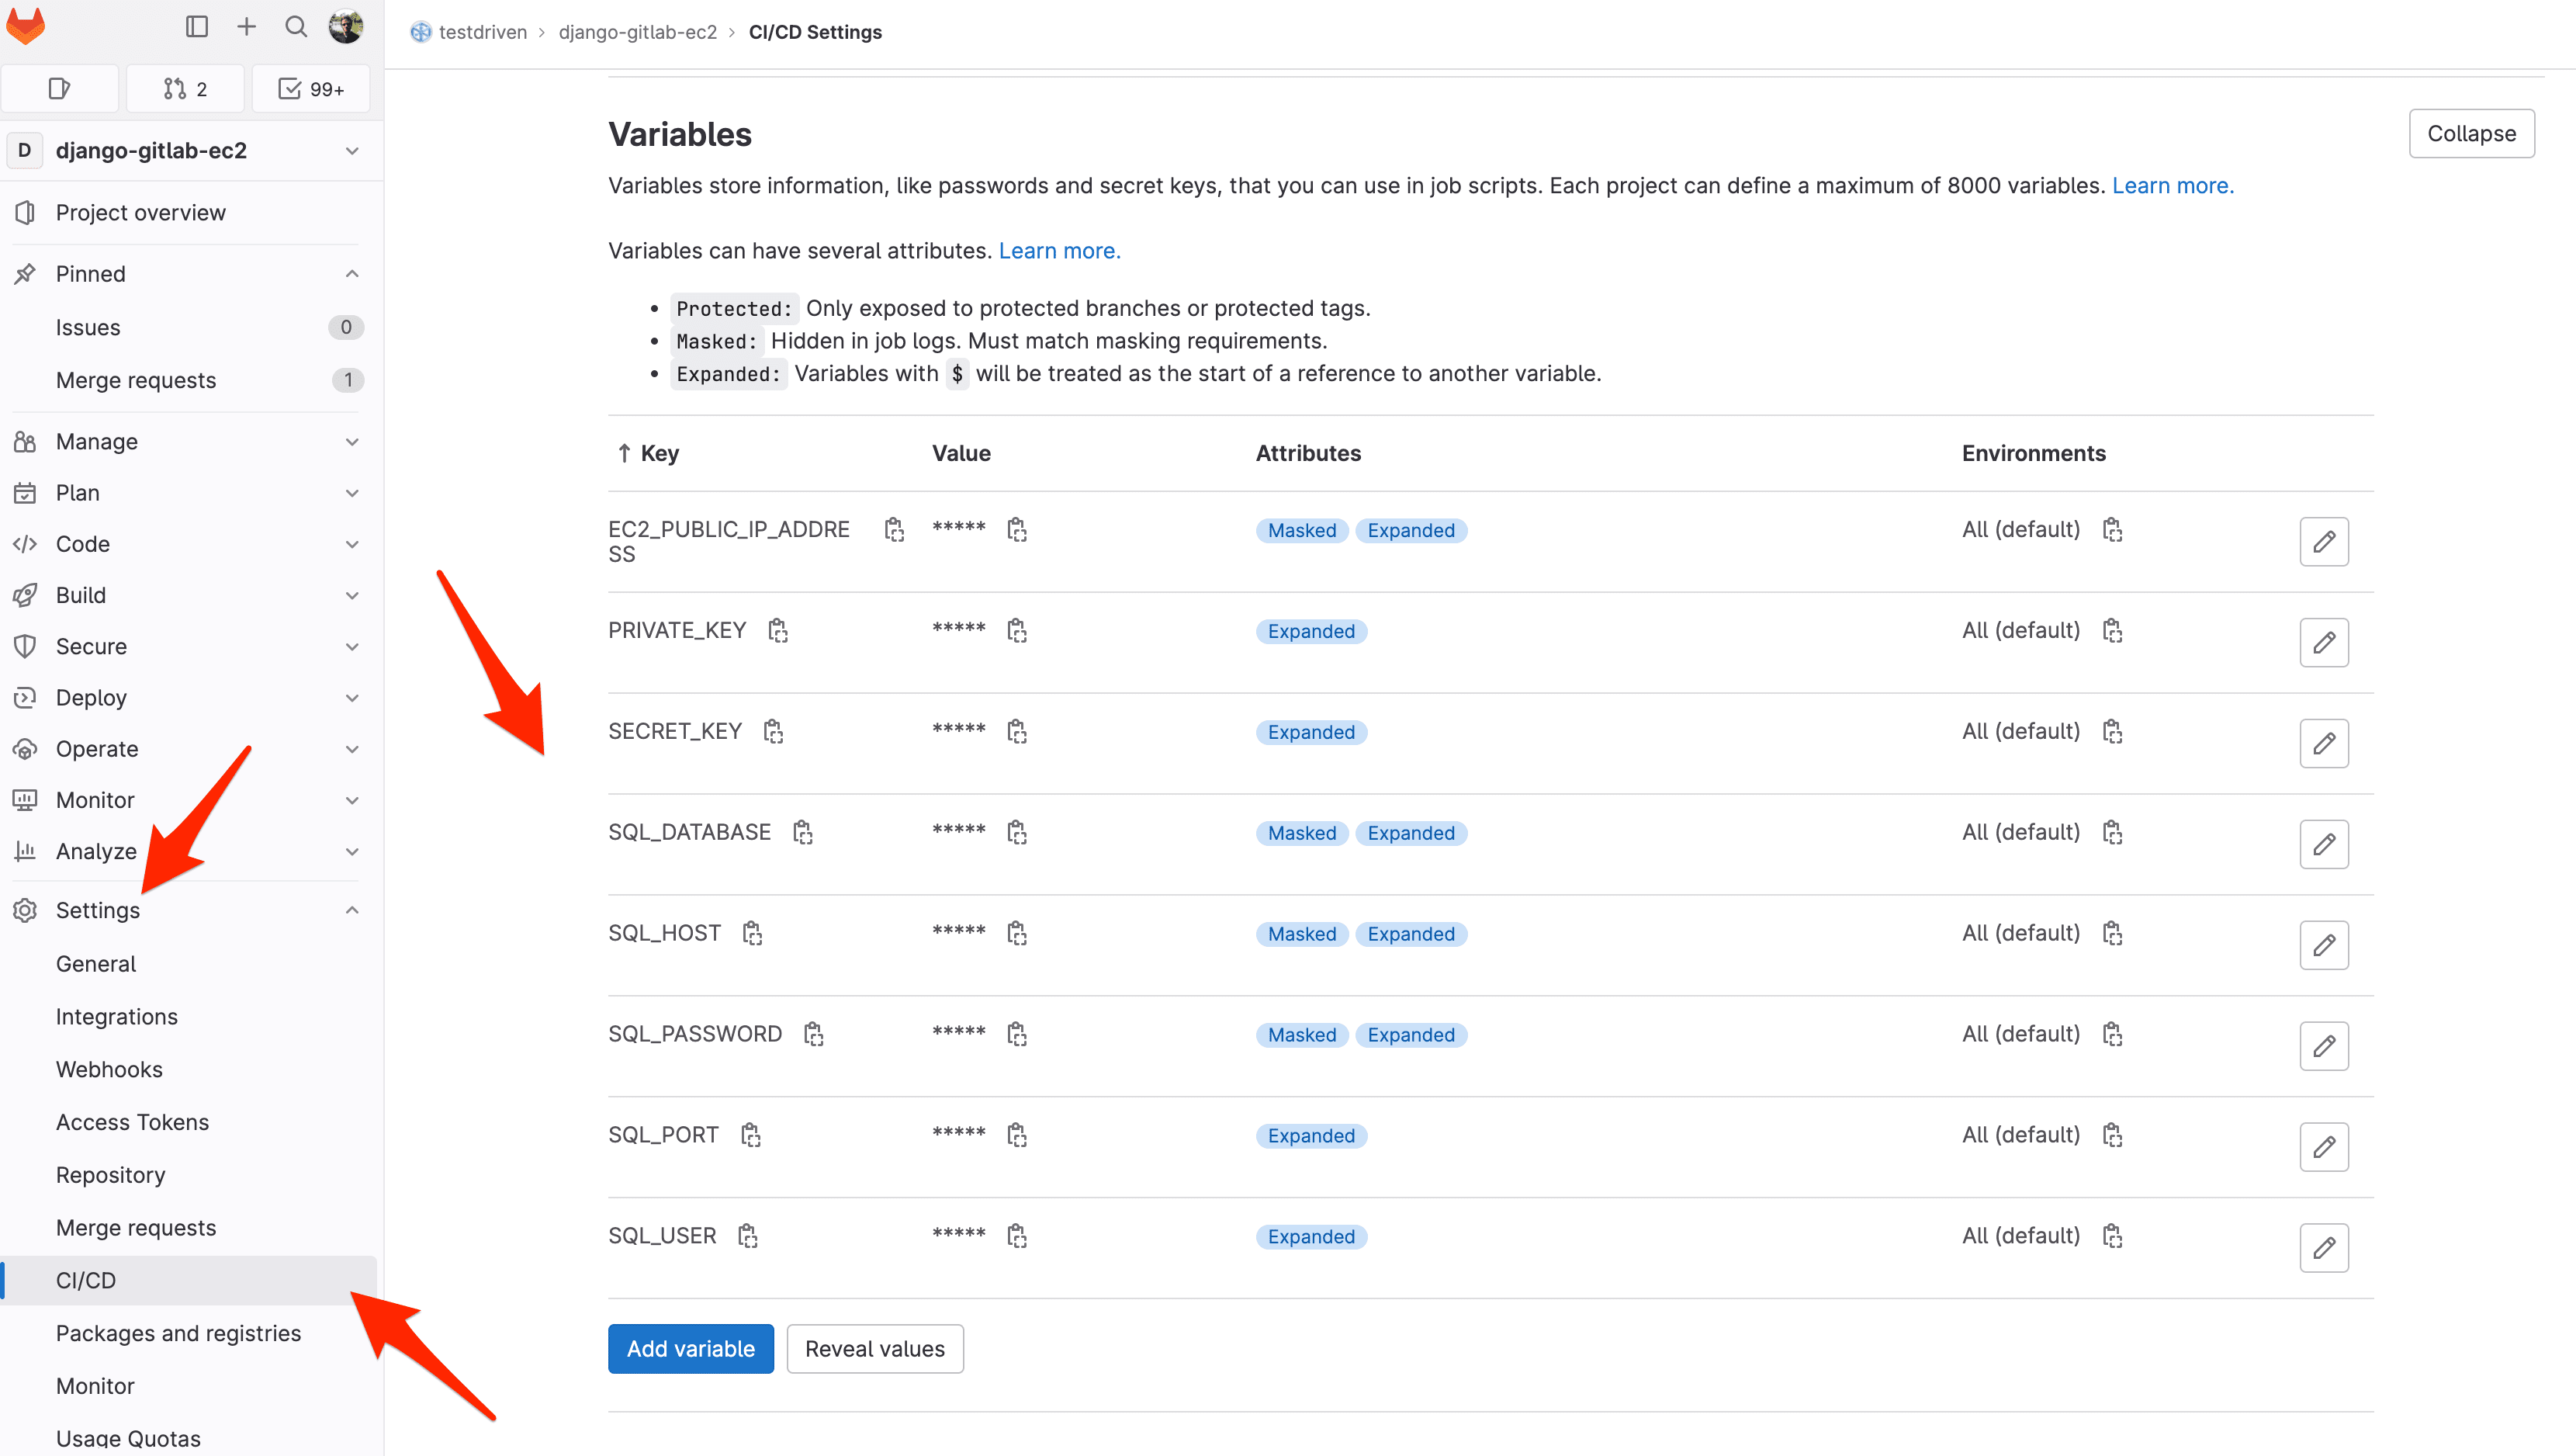
This file will create the required .env file, based on the environment variables found in your GitLab project's CI/CD settings (Settings > CI / CD > Variables). Add the variables based on the RDS connection information from above.
For example:
SECRET_KEY:9zYGEFk2mn3mWB8Bmg9SAhPy6F4s7cCuT8qaYGVEnu7huGRKW9SQL_DATABASE:djangodbSQL_HOST:djangodb.c7kxiqfnzo9e.us-west-1.rds.amazonaws.comSQL_PASSWORD:3ZQtN4vxkZp2kAa0vinVSQL_PORT:5432SQL_USER:webapp
Once done, commit and push your code up to GitLab to trigger a new build. Make sure it passes. You should see the images in the GitLab Container Registry:

AWS Security Group
Next, before adding deployment to the CI process, we need to update the inbound ports for the "Security Group" so that port 5432 can be accessed from the EC2 instance. Why is this necessary? Turn to app/entrypoint.prod.sh:
#!/bin/sh

if [ "$DATABASE" = "postgres" ]
then
    echo "Waiting for postgres..."

    while ! nc -z $SQL_HOST $SQL_PORT; do
      sleep 0.1
    done

    echo "PostgreSQL started"
fi

exec "$@"
Here, we're waiting for the Postgres instance to be healthy, by testing the connection with netcat, before starting Gunciorn. If port 5432 isn't open, the loop will continue forever.
So, navigate to the EC2 Console again and click "Security Groups" on the left sidebar. Select the django-security-group Security Group and click "Edit inbound rules":
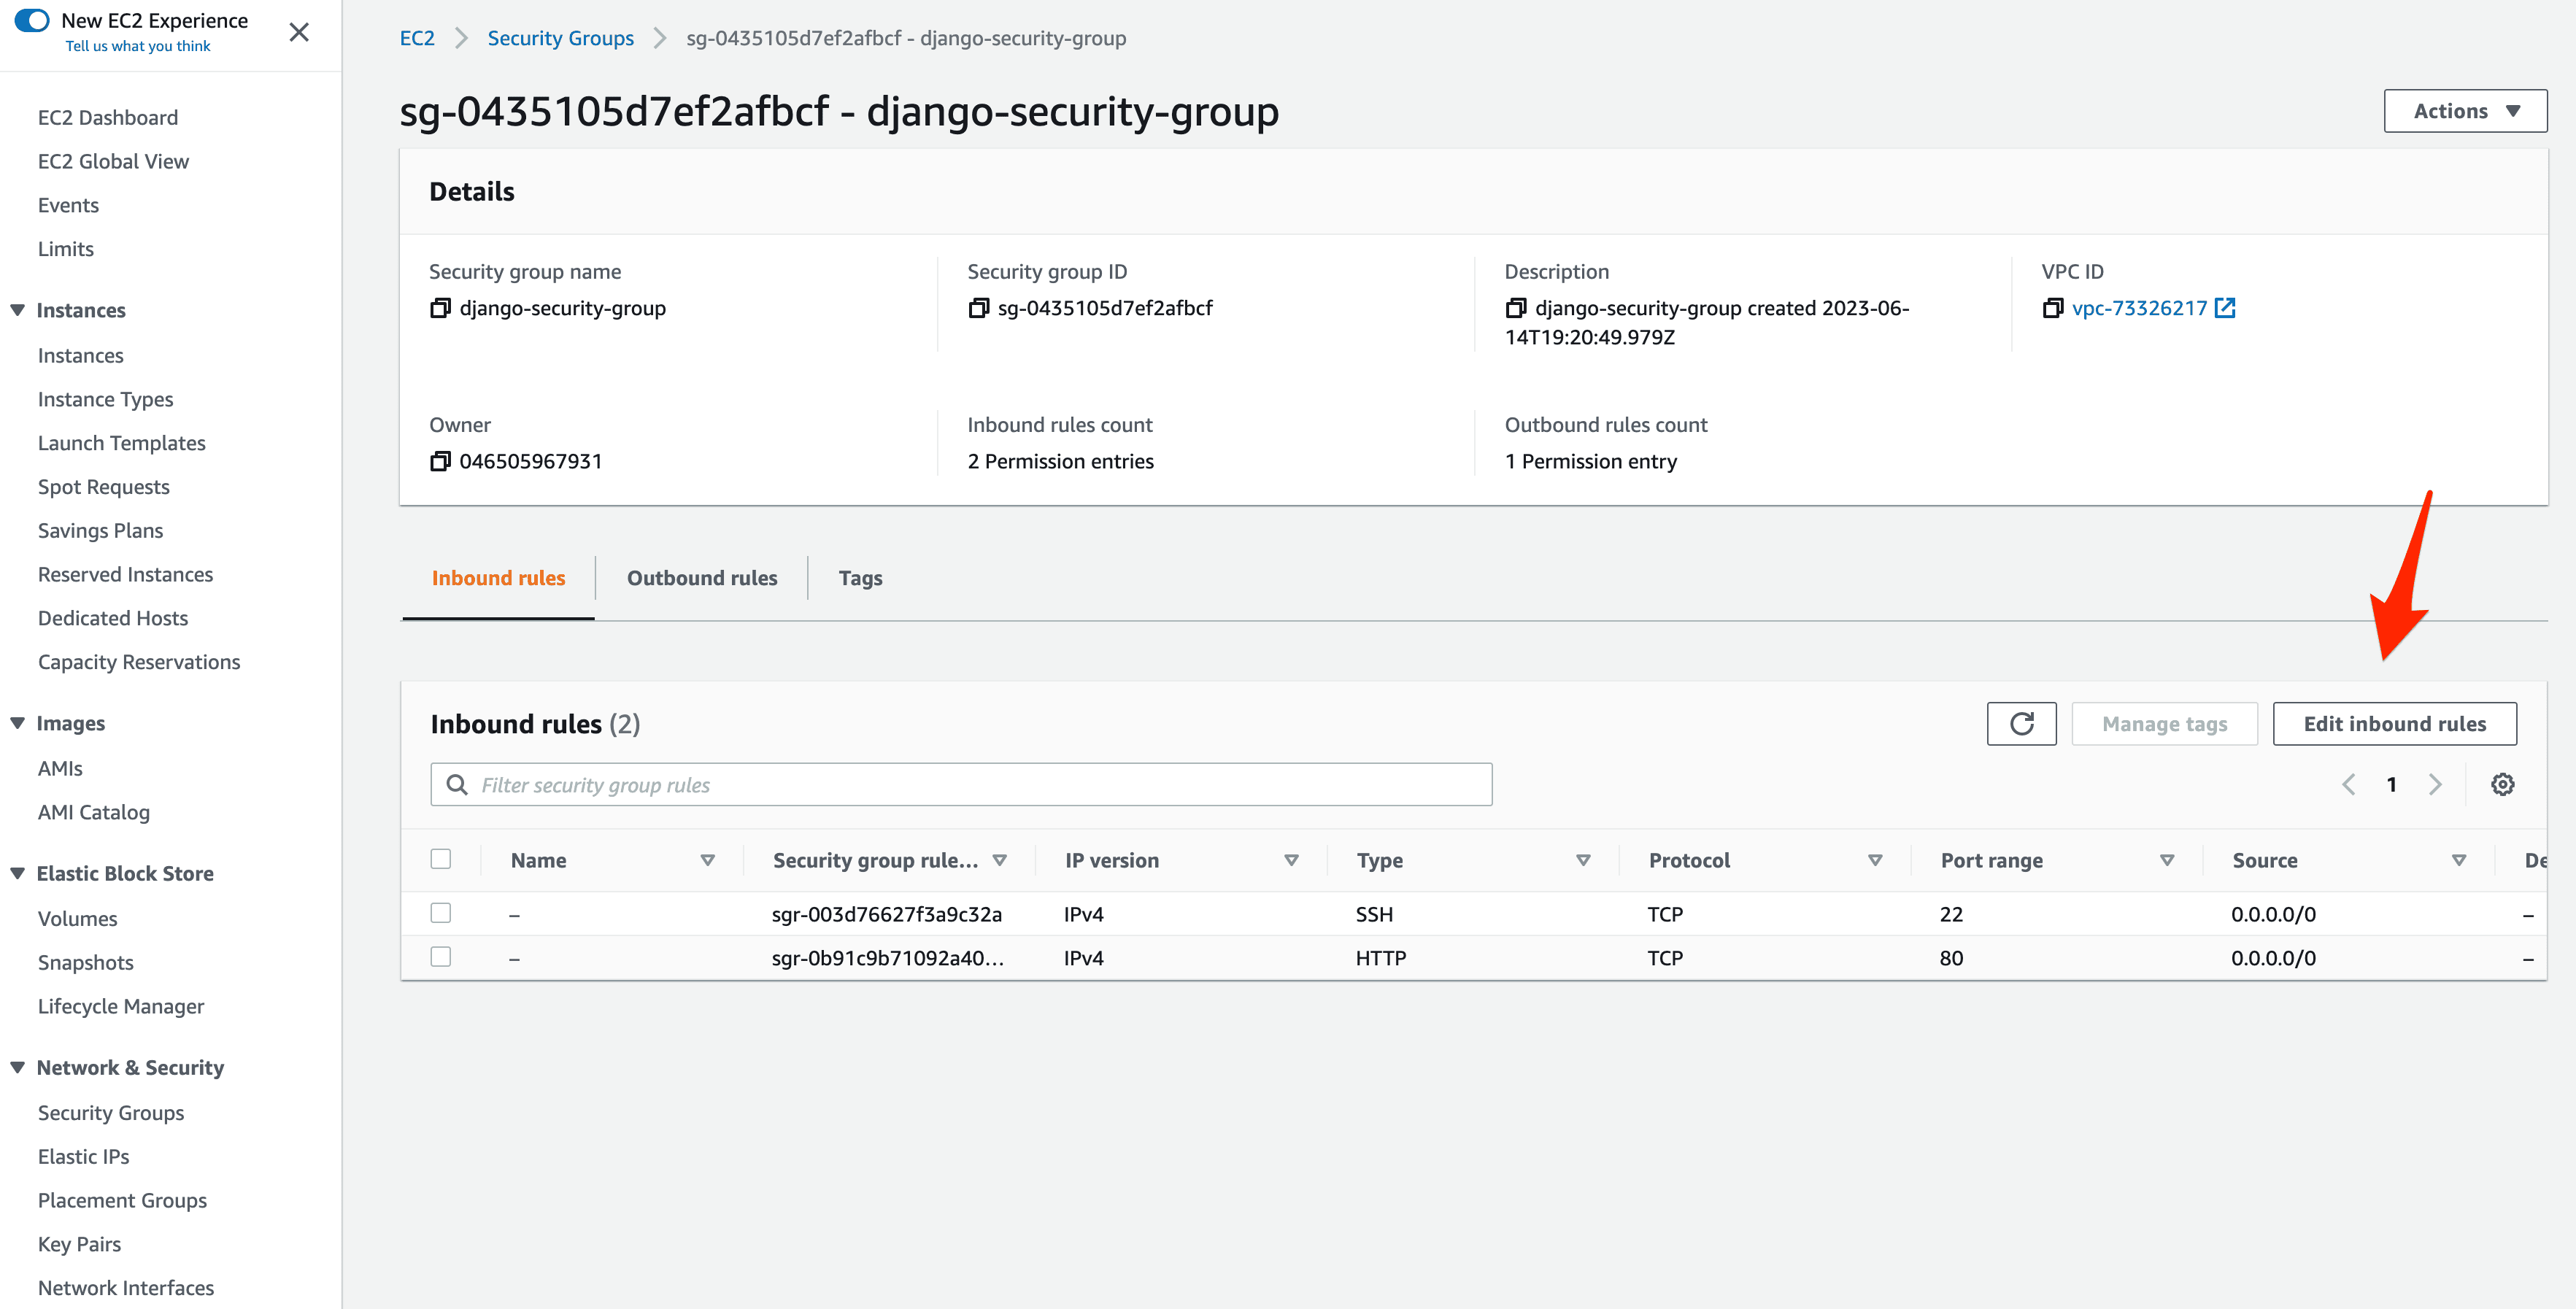
Click "Add rule". Under type, select "PostgreSQL" and under source select the django-security-group Security Group:
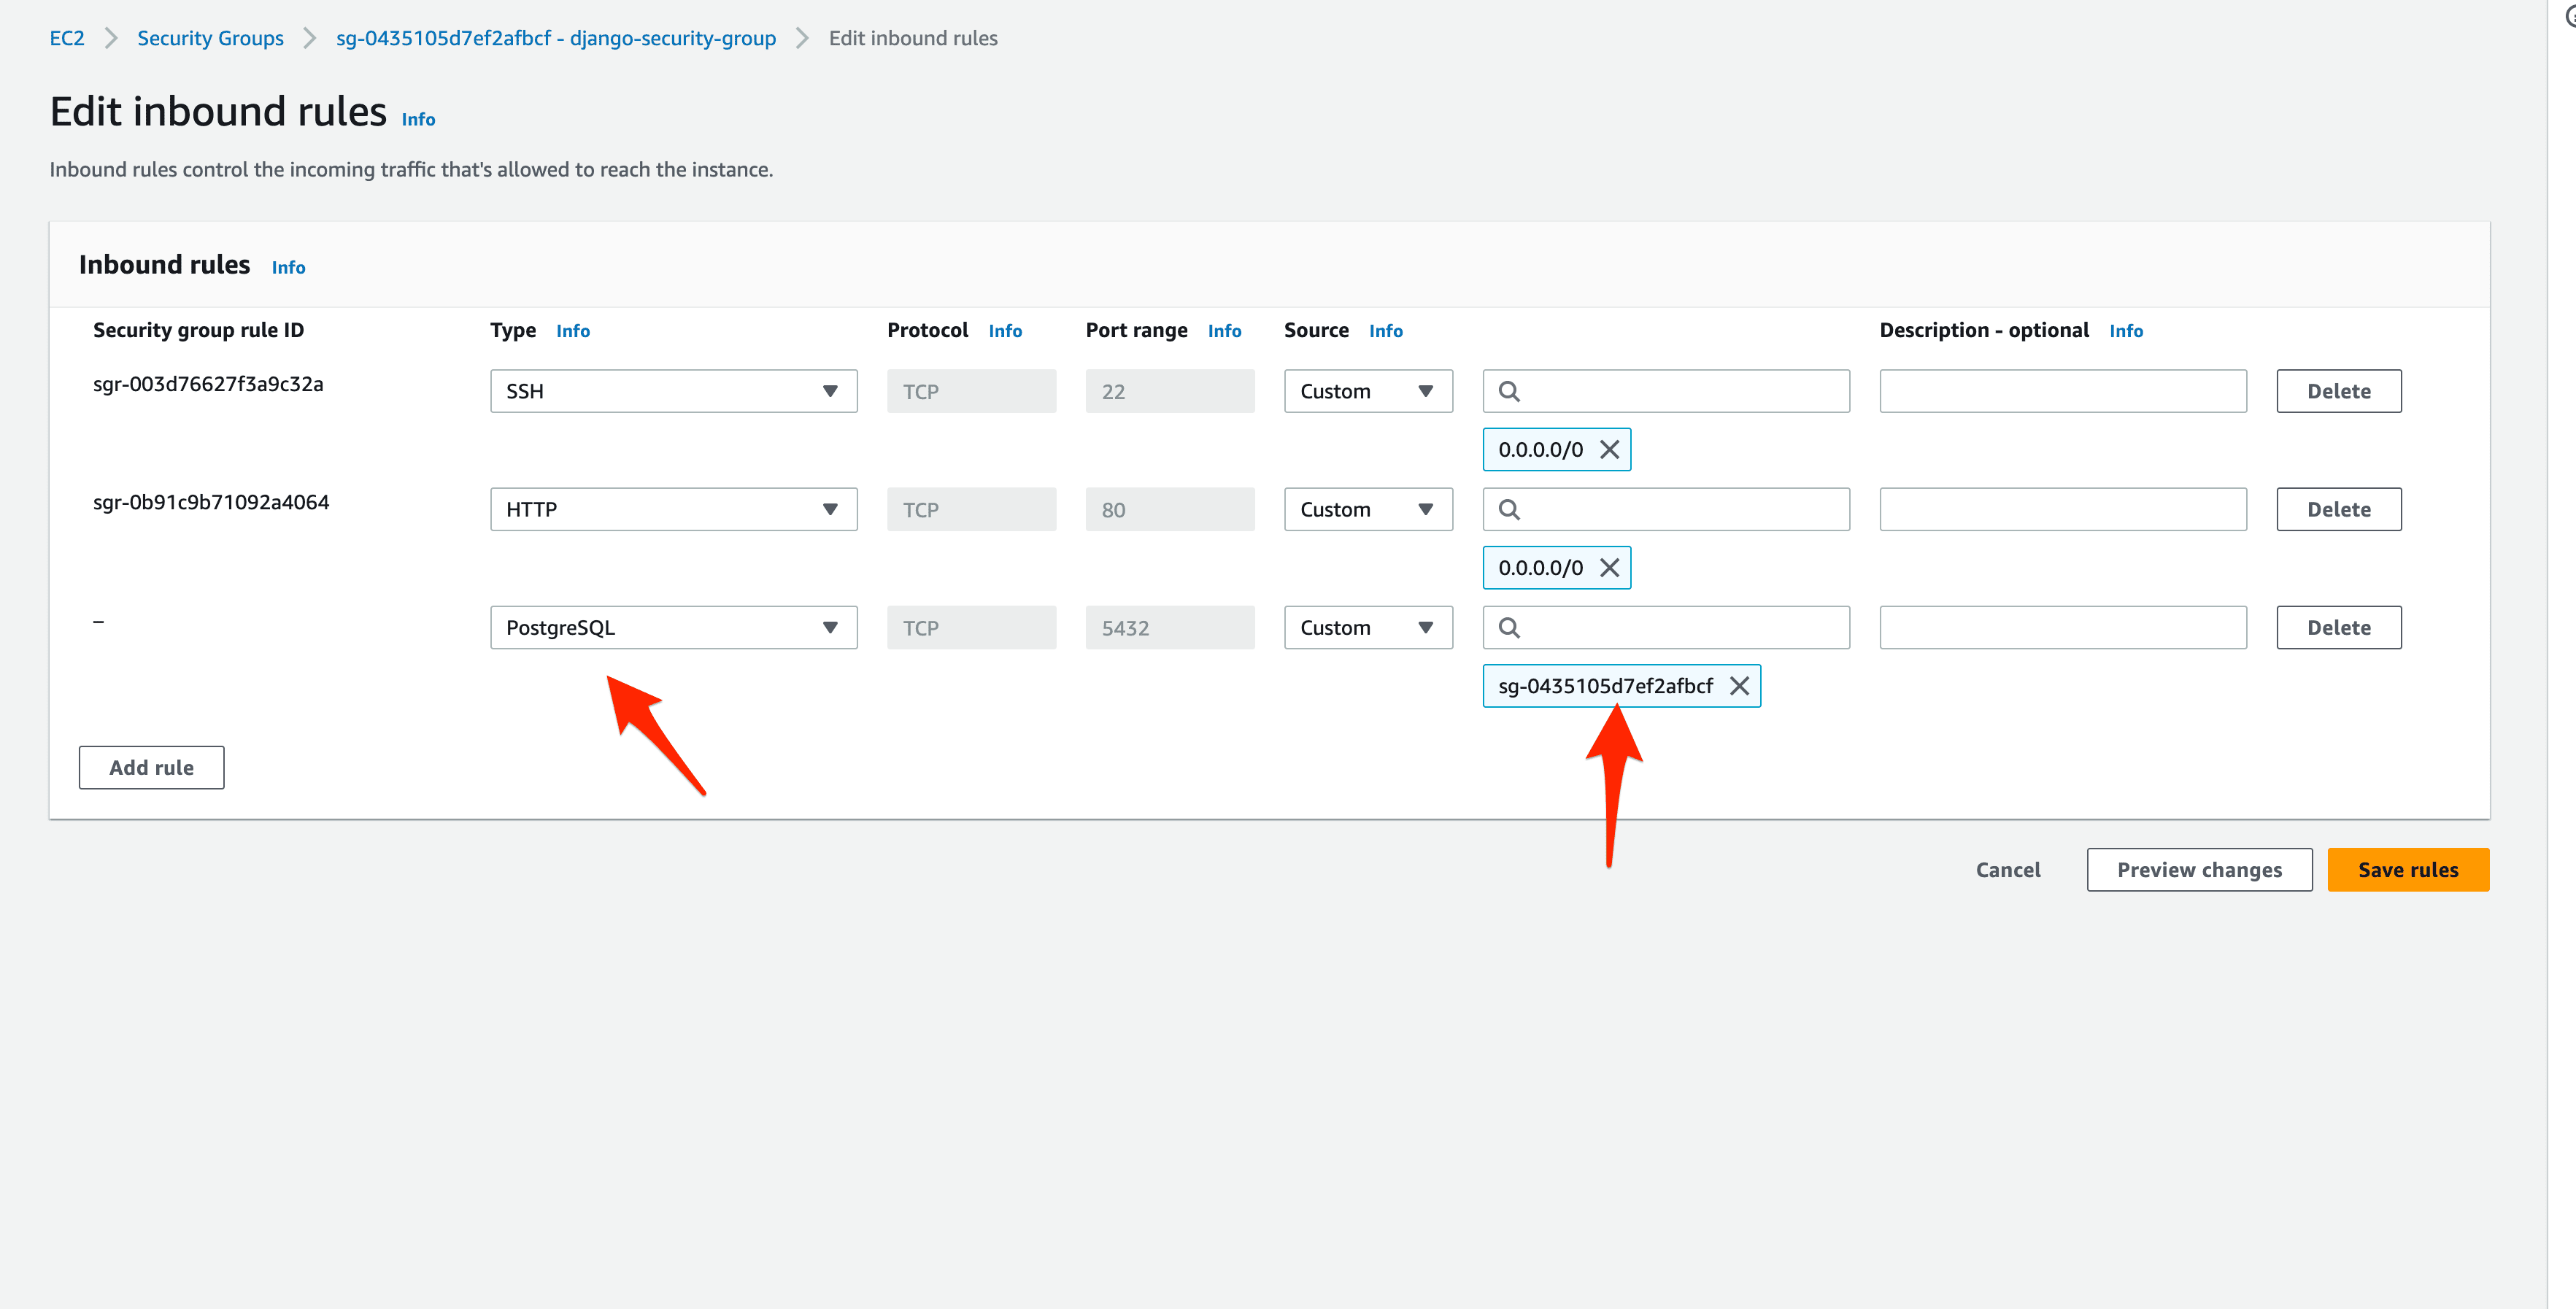
Now, any AWS services associated with that group can access the RDS instance through port 5432. Click "Save rules".
GitLab CI: Deploy Stage
Next, add a deploy stage to .gitlab-ci.yml and create a global before_script that's used for both stages:
image:
  name: docker:20.10-dind
  entrypoint: [""]

services:
  - name: docker:20.10-dind
    alias: docker

stages:
  - build
  - deploy

variables:
  DOCKER_HOST: tcp://docker:2375
  DOCKER_DRIVER: overlay2

before_script:
  - export IMAGE=$CI_REGISTRY/$CI_PROJECT_NAMESPACE/$CI_PROJECT_NAME
  - export WEB_IMAGE=$IMAGE:web
  - export NGINX_IMAGE=$IMAGE:nginx
  - apk add --no-cache openssh-client bash
  - chmod +x ./setup_env.sh
  - bash ./setup_env.sh
  - docker login -u $CI_REGISTRY_USER -p $CI_JOB_TOKEN $CI_REGISTRY

build:
  stage: build
  script:
    - docker pull $IMAGE:web || true
    - docker pull $IMAGE:nginx || true
    - docker-compose -f docker-compose.ci.yml build
    - docker push $IMAGE:web
    - docker push $IMAGE:nginx

deploy:
  stage: deploy
  script:
    - mkdir -p ~/.ssh
    - echo "$PRIVATE_KEY" | tr -d '\r' > ~/.ssh/id_rsa
    - cat ~/.ssh/id_rsa
    - chmod 700 ~/.ssh/id_rsa
    - eval "$(ssh-agent -s)"
    - ssh-add ~/.ssh/id_rsa
    - ssh-keyscan -H 'gitlab.com' >> ~/.ssh/known_hosts
    - chmod +x ./deploy.sh
    - scp  -o StrictHostKeyChecking=no -r ./.env ./docker-compose.prod.yml ec2-user@$EC2_PUBLIC_IP_ADDRESS:/home/ec2-user/app
    - bash ./deploy.sh
So, in the deploy stage we:
- Add the private SSH key to the ssh-agent
- Copy over the .env and docker-compose.prod.yml files to the remote server
- Set the appropriate permissions for deploy.sh
- Run deploy.sh
Add deploy.sh to the project root:
#!/bin/sh

ssh -o StrictHostKeyChecking=no ec2-user@$EC2_PUBLIC_IP_ADDRESS << 'ENDSSH'
  cd /home/ec2-user/app
  export $(cat .env | xargs)
  docker login -u $CI_REGISTRY_USER -p $CI_JOB_TOKEN $CI_REGISTRY
  docker pull $IMAGE:web
  docker pull $IMAGE:nginx
  docker-compose -f docker-compose.prod.yml up -d
ENDSSH
So, after SSHing into the server, we
- Navigate to the deployment directory
- Add the environment variables
- Log in to the GitLab Container Registry
- Pull the images
- Spin up the containers
Add the EC2_PUBLIC_IP_ADDRESS and PRIVATE_KEY environment variables to GitLab.
Update the setup_env.sh file:
#!/bin/sh

echo DEBUG=0 >> .env
echo SQL_ENGINE=django.db.backends.postgresql >> .env
echo DATABASE=postgres >> .env

echo SECRET_KEY=$SECRET_KEY >> .env
echo SQL_DATABASE=$SQL_DATABASE >> .env
echo SQL_USER=$SQL_USER >> .env
echo SQL_PASSWORD=$SQL_PASSWORD >> .env
echo SQL_HOST=$SQL_HOST >> .env
echo SQL_PORT=$SQL_PORT >> .env
echo WEB_IMAGE=$IMAGE:web  >> .env
echo NGINX_IMAGE=$IMAGE:nginx  >> .env
echo CI_REGISTRY_USER=$CI_REGISTRY_USER   >> .env
echo CI_JOB_TOKEN=$CI_JOB_TOKEN  >> .env
echo CI_REGISTRY=$CI_REGISTRY  >> .env
echo IMAGE=$CI_REGISTRY/$CI_PROJECT_NAMESPACE/$CI_PROJECT_NAME >> .env
Next, add the server's IP to the ALLOWED_HOSTS list in the Django settings.
Commit and push your code to trigger a new build. Once the build passes, navigate to the IP of your instance. You should see:
{
  "hello": "world"
}
PostgreSQL via SSH Tunnel
Need to access the database?
SSH into the box:
$ ssh -o StrictHostKeyChecking=no ec2-user@<YOUR_INSTANCE_IP>

# example:
# ssh -o StrictHostKeyChecking=no [email protected]
Install Postgres:
[ec2-user]$ sudo dnf install postgresql15
[ec2-user]$ sudo yum install postgresql15 -y
Then, run psql, like so:
[ec2-user]$ psql -h <YOUR_RDS_ENDPOINT> -U webapp -d django_prod

# example:
# psql -h djangodb.c7kxiqfnzo9e.us-west-1.rds.amazonaws.com -U webapp -d django_prod
Enter the password.
psql (15.3)
SSL connection (protocol: TLSv1.2, cipher: ECDHE-RSA-AES256-GCM-SHA384, bits: 256, compression: off)
Type "help" for help.

django_prod=> \l
                                   List of databases
    Name     |  Owner   | Encoding |   Collate   |    Ctype    |   Access privileges
-------------+----------+----------+-------------+-------------+-----------------------
 django_prod | webapp   | UTF8     | en_US.UTF-8 | en_US.UTF-8 |
 postgres    | webapp   | UTF8     | en_US.UTF-8 | en_US.UTF-8 |
 rdsadmin    | rdsadmin | UTF8     | en_US.UTF-8 | en_US.UTF-8 | rdsadmin=CTc/rdsadmin
 template0   | rdsadmin | UTF8     | en_US.UTF-8 | en_US.UTF-8 | =c/rdsadmin          +
             |          |          |             |             | rdsadmin=CTc/rdsadmin
 template1   | webapp   | UTF8     | en_US.UTF-8 | en_US.UTF-8 | =c/webapp            +
             |          |          |             |             | webapp=CTc/webapp
(5 rows)

django_prod=> \q
Exit the SSH session once done.
Update GitLab CI
Finally, update the deploy stage so that it only runs when changes are made to the master branch:
deploy:
  stage: deploy
  script:
    - mkdir -p ~/.ssh
    - echo "$PRIVATE_KEY" | tr -d '\r' > ~/.ssh/id_rsa
    - cat ~/.ssh/id_rsa
    - chmod 700 ~/.ssh/id_rsa
    - eval "$(ssh-agent -s)"
    - ssh-add ~/.ssh/id_rsa
    - ssh-keyscan -H 'gitlab.com' >> ~/.ssh/known_hosts
    - chmod +x ./deploy.sh
    - scp  -o StrictHostKeyChecking=no -r ./.env ./docker-compose.prod.yml ec2-user@$EC2_PUBLIC_IP_ADDRESS:/home/ec2-user/app
    - bash ./deploy.sh
  only:
    - master
To test, create a new develop branch. Add an exclamation point after world in urls.py:
def home(request):
    return JsonResponse({'hello': 'world!'})
Commit and push your changes to GitLab. Ensure only the build stage runs. Once the build passes open a PR against the master branch and merge the changes. This will trigger a new pipeline with both stages -- build and deploy. Ensure the deploy works as expected:
{
  "hello": "world!"
}
Next Steps
This tutorial looked at how to configure GitLab CI to continuously deploy a Django and Docker application to AWS EC2.
At this point, you'll probably want to use a domain name rather than an IP address. To do so, you'll need to:
- Set up a static IP address and associate it to your EC2 instance
- Create an SSL certificate through Amazon Certificate Manager
- Set up a new Elastic Load Balancer and install the certificate on it
Looking for a challenge? To automate this entire process, so you don't need to manually provision a new instance and install Docker on it each time, set up Elastic Container Service. For more on this, review the Deploying a Flask and React Microservice to AWS ECS course and the Deploying Django to AWS ECS with Terraform tutorial.
You can find the final code in the django-gitlab-ec2 repo.