 Michael Herman
In this tutorial, we'll look at how to deploy a Django app to AWS ECS (via Fargate) with Terraform.
Dependencies:
- Django v4.2.7
- Docker v24.0.6
- Python v3.12.0
- Terraform v1.5.7
Contents
Objectives
By the end of this tutorial, you will be able to:
- Explain what Terraform is and how you can use it to write infrastructure as code
- Utilize the ECR Docker image registry to store images
- Create the required Terraform configuration for spinning up an ECS cluster with the Fargate launch type
- Spin up AWS infrastructure via Terraform
- Deploy a Django app to AWS Fargate managed tasks
- Use Boto3 to update an ECS Service
- Configure AWS RDS for data persistence
- Create an HTTPS listener for an AWS load balancer
Terraform
Terraform is an infrastructure as code (IaC) tool used for building, changing, and versioning infrastructure through code. It uses a high-level declarative configuration language that lets you describe the desired state of your cloud or on-prem infrastructure for running an application. Think of it as the single source of truth for your infrastructure, which makes it easy to create, update, and delete resources safely and efficiently. After describing the end state of your infrastructure, Terraform generates a plan and then executes it -- i.e., provision and spin up the necessary infrastructure.
If you're new to Terraform, review the What is Terraform? article and go through the Getting Started guide.
Make sure you have Terraform installed before moving on:
$ terraform -v

Terraform v1.5.7
on darwin_amd64
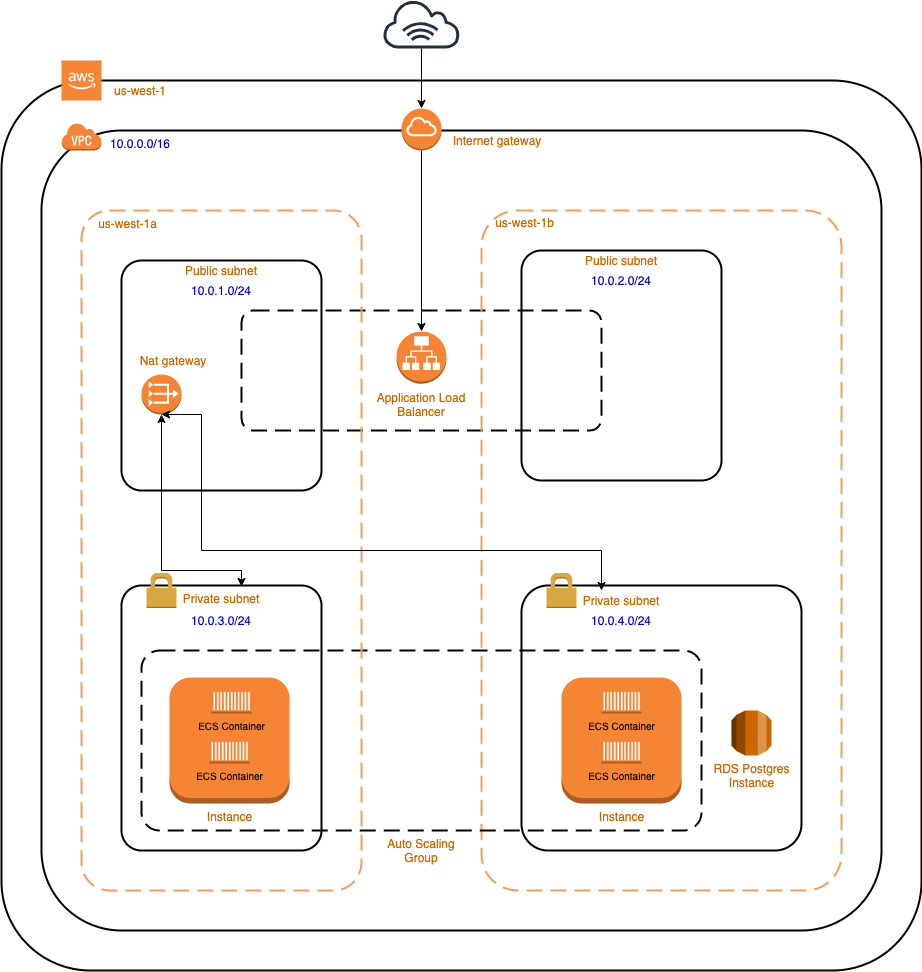
In this tutorial, using Terraform, we'll develop the high-level configuration files required to deploy a Django application to ECS. Once configured, we'll run a single command to set up the following AWS infrastructure:
- Networking:
- VPC
- Public and private subnets
- Routing tables
- Internet Gateway
- Security Groups
- Load Balancers, Listeners, and Target Groups
- IAM Roles and Policies
- ECS:
- Task Definition (with multiple containers)
- Cluster
- Service
- Auto scaling config
- RDS
- Health Checks and Logs
Amazon's Elastic Container Service (ECS) is a fully managed container orchestration platform that's used to manage and run containerized applications on clusters of EC2 instances.
If you're new to ECS, it's recommended to experiment with it in the web console first. Rather than configuring all the underlying network resources, IAM roles and policies, and logs manually, let ECS create these for you. You'll just need to set up ECS, a Load Balancer, Listener, Target Group, and RDS. Once you feel comfortable then move on to an infrastructure as code tool like Terraform.
Architecture diagram:
Project Setup
Let's start by setting up a quick Django project.
Create a new project directory along with a new Django project:
$ mkdir django-ecs-terraform && cd django-ecs-terraform
$ mkdir app && cd app
$ python3.12 -m venv env
$ source env/bin/activate

(env)$ pip install django==4.2.7
(env)$ django-admin startproject hello_django .
(env)$ python manage.py migrate
(env)$ python manage.py runserver
Navigate to http://localhost:8000/ to view the Django welcome screen. Kill the server once done, and then exit from the virtual environment. Go ahead and remove it as well. We now have a simple Django project to work with.
Add a requirements.txt file:
Django==4.2.7
gunicorn==21.2.0
Add a Dockerfile as well:
# pull official base image
FROM python:3.12.0-slim-bookworm

# set work directory
WORKDIR /usr/src/app

# set environment variables
ENV PYTHONDONTWRITEBYTECODE 1
ENV PYTHONUNBUFFERED 1

# install dependencies
RUN pip install --upgrade pip
COPY ./requirements.txt .
RUN pip install -r requirements.txt

# Create a user with UID 1000 and GID 1000
RUN groupadd -g 1000 appgroup && \
    useradd -r -u 1000 -g appgroup appuser
# Switch to this user
USER 1000:1000

# copy project
COPY . .
For testing purposes, set DEBUG to True and allow all hosts in the settings.py file:
DEBUG = True

ALLOWED_HOSTS = ['*']
Next, build and tag the image and spin up a new container:
$ docker build -t django-ecs .

$ docker run \
    -p 8007:8000 \
    --name django-test \
    django-ecs \
    gunicorn hello_django.wsgi:application --bind 0.0.0.0:8000
Ensure you can view the welcome screen again at http://localhost:8007/.
Stop and remove the container once done:
$ docker stop django-test
$ docker rm django-test
Add a .gitignore file to the project root:
__pycache__
.DS_Store
*.sqlite3
Your project structure should now look like this:
├── .gitignore
└── app
    ├── Dockerfile
    ├── hello_django
    │   ├── __init__.py
    │   ├── asgi.py
    │   ├── settings.py
    │   ├── urls.py
    │   └── wsgi.py
    ├── manage.py
    └── requirements.txt
For a more detailed look at how to containerize a Django app, review Dockerizing Django with Postgres, Gunicorn, and Nginx.
ECR
Before jumping into Terraform, let's push the Docker image to Elastic Container Registry (ECR), a private Docker image registry.
Navigate to the ECR console, and add a new repository called "django-app". Keep the tags mutable. For more on this, review the Image Tag Mutability guide.
Back in your terminal, build and tag the image again:
$ docker build -t <AWS_ACCOUNT_ID>.dkr.ecr.us-west-1.amazonaws.com/django-app:latest .
Be sure to replace
<AWS_ACCOUNT_ID>with your AWS account ID.We'll be using the
us-west-1region throughout this tutorial. Feel free to change this if you'd like.
Authenticate the Docker CLI to use the ECR registry:
$ aws ecr get-login-password --region us-west-1 | docker login \
    --username AWS --password-stdin \
    <AWS_ACCOUNT_ID>.dkr.ecr.us-west-1.amazonaws.com
This command retrieves the authentication token and directly logs into the ECR repository.
Push the image:
$ docker push <AWS_ACCOUNT_ID>.dkr.ecr.us-west-1.amazonaws.com/django-app:latest
Terraform Setup
Add a "terraform" folder to your project's root. We'll add each of our Terraform configuration files to this folder.
Next, add a new file to "terraform" called 01_provider.tf:
provider "aws" {
  region = var.region
}
Here, we defined the AWS provider. You'll need to provide your AWS credentials in order to authenticate. Define them as environment variables:
$ export AWS_ACCESS_KEY_ID="YOUR_AWS_ACCESS_KEY_ID"
$ export AWS_SECRET_ACCESS_KEY="YOUR_AWS_SECRET_ACCESS_KEY"
We used a string interpolated value for region, which will be read in from a variables.tf file. Go ahead and add this file to the "terraform" folder and add the following variable to it:
# core

variable "region" {
  description = "The AWS region to create resources in."
  default     = "us-west-1"
}
Feel free to update the variables as you go through this tutorial based on your specific requirements.
Run terraform init to create a new Terraform working directory and download the AWS provider.
With that we can start defining each piece of the AWS infrastructure.
AWS Resources
Next, let's configure the following AWS resources:
- Networking:
- VPC
- Public and private subnets
- Routing tables
- Internet Gateway
- Security Groups
- Load Balancers, Listeners, and Target Groups
- IAM Roles and Policies
- ECS:
- Task Definition (with multiple containers)
- Cluster
- Service
- Health Checks and Logs
You can find each of the Terraform configuration files in the django-ecs-terraform repo on GitHub.
Network Resources
Let's define our network resources in a new file called 02_network.tf:
# Production VPC
resource "aws_vpc" "production-vpc" {
  cidr_block           = "10.0.0.0/16"
  enable_dns_support   = true
  enable_dns_hostnames = true
}

# Public subnets
resource "aws_subnet" "public-subnet-1" {
  cidr_block        = var.public_subnet_1_cidr
  vpc_id            = aws_vpc.production-vpc.id
  availability_zone = var.availability_zones[0]
}
resource "aws_subnet" "public-subnet-2" {
  cidr_block        = var.public_subnet_2_cidr
  vpc_id            = aws_vpc.production-vpc.id
  availability_zone = var.availability_zones[1]
}

# Private subnets
resource "aws_subnet" "private-subnet-1" {
  cidr_block        = var.private_subnet_1_cidr
  vpc_id            = aws_vpc.production-vpc.id
  availability_zone = var.availability_zones[0]
}
resource "aws_subnet" "private-subnet-2" {
  cidr_block        = var.private_subnet_2_cidr
  vpc_id            = aws_vpc.production-vpc.id
  availability_zone = var.availability_zones[1]
}

# Route tables for the subnets
resource "aws_route_table" "public-route-table" {
  vpc_id = aws_vpc.production-vpc.id
}
resource "aws_route_table" "private-route-table" {
  vpc_id = aws_vpc.production-vpc.id
}

# Associate the newly created route tables to the subnets
resource "aws_route_table_association" "public-route-1-association" {
  route_table_id = aws_route_table.public-route-table.id
  subnet_id      = aws_subnet.public-subnet-1.id
}
resource "aws_route_table_association" "public-route-2-association" {
  route_table_id = aws_route_table.public-route-table.id
  subnet_id      = aws_subnet.public-subnet-2.id
}
resource "aws_route_table_association" "private-route-1-association" {
  route_table_id = aws_route_table.private-route-table.id
  subnet_id      = aws_subnet.private-subnet-1.id
}
resource "aws_route_table_association" "private-route-2-association" {
  route_table_id = aws_route_table.private-route-table.id
  subnet_id      = aws_subnet.private-subnet-2.id
}

# Elastic IP
resource "aws_eip" "elastic-ip-for-nat-gw" {
  domain                       = "vpc"
  associate_with_private_ip = "10.0.0.5"
  depends_on                = [aws_internet_gateway.production-igw]
}

# NAT gateway
resource "aws_nat_gateway" "nat-gw" {
  allocation_id = aws_eip.elastic-ip-for-nat-gw.id
  subnet_id     = aws_subnet.public-subnet-1.id
  depends_on    = [aws_eip.elastic-ip-for-nat-gw]
}
resource "aws_route" "nat-gw-route" {
  route_table_id         = aws_route_table.private-route-table.id
  nat_gateway_id         = aws_nat_gateway.nat-gw.id
  destination_cidr_block = "0.0.0.0/0"
}

# Internet Gateway for the public subnet
resource "aws_internet_gateway" "production-igw" {
  vpc_id = aws_vpc.production-vpc.id
}

# Route the public subnet traffic through the Internet Gateway
resource "aws_route" "public-internet-igw-route" {
  route_table_id         = aws_route_table.public-route-table.id
  gateway_id             = aws_internet_gateway.production-igw.id
  destination_cidr_block = "0.0.0.0/0"
}
Here, we defined the following resources:
Add the following variables as well:
# networking

variable "public_subnet_1_cidr" {
  description = "CIDR Block for Public Subnet 1"
  default     = "10.0.1.0/24"
}
variable "public_subnet_2_cidr" {
  description = "CIDR Block for Public Subnet 2"
  default     = "10.0.2.0/24"
}
variable "private_subnet_1_cidr" {
  description = "CIDR Block for Private Subnet 1"
  default     = "10.0.3.0/24"
}
variable "private_subnet_2_cidr" {
  description = "CIDR Block for Private Subnet 2"
  default     = "10.0.4.0/24"
}
variable "availability_zones" {
  description = "Availability zones"
  type        = list(string)
  default     = ["us-west-1b", "us-west-1c"]
}
Run terraform plan to generate and show the execution plan based on the defined configuration.
Security Groups
Moving on, to protect the Django app and ECS cluster, let's configure Security Groups in a new file called 03_securitygroups.tf:
# ALB Security Group (Traffic Internet -> ALB)
resource "aws_security_group" "load-balancer" {
  name        = "load_balancer_security_group"
  description = "Controls access to the ALB"
  vpc_id      = aws_vpc.production-vpc.id

  ingress {
    from_port   = 80
    to_port     = 80
    protocol    = "tcp"
    cidr_blocks = ["0.0.0.0/0"]
  }

  ingress {
    from_port   = 443
    to_port     = 443
    protocol    = "tcp"
    cidr_blocks = ["0.0.0.0/0"]
  }

  egress {
    from_port   = 0
    to_port     = 0
    protocol    = "-1"
    cidr_blocks = ["0.0.0.0/0"]
  }
}

# ECS Fargate Security group (traffic ALB -> ECS Fargate Tasks)
resource "aws_security_group" "ecs-fargate" {
  name        = "ecs_fargate_security_group"
  description = "Allows inbound access from the ALB only"
  vpc_id      = aws_vpc.production-vpc.id

  ingress {
    from_port       = 0
    to_port         = 0
    protocol        = "-1"
    security_groups = [aws_security_group.load-balancer.id]
  }

  # No SSH ingress rule since Fargate tasks are abstracted and not directly accessible via SSH

  egress {
    from_port   = 0
    to_port     = 0
    protocol    = "-1"
    cidr_blocks = ["0.0.0.0/0"]
  }
}
Load Balancer
Next, let's configure an Application Load Balancer (ALB) along with the appropriate Target Group and Listener.
04_loadbalancer.tf:
# Production Load Balancer
resource "aws_lb" "production" {
  name               = "${var.ecs_cluster_name}-alb"
  load_balancer_type = "application"
  internal           = false
  security_groups    = [aws_security_group.load-balancer.id]
  subnets            = [aws_subnet.public-subnet-1.id, aws_subnet.public-subnet-2.id]
}

# Target group for ECS Fargate
resource "aws_alb_target_group" "default-target-group" {
  name     = "${var.ecs_cluster_name}-tg"
  port     = 80
  protocol = "HTTP"
  vpc_id   = aws_vpc.production-vpc.id
  target_type = "ip"

  health_check {
    path                = var.health_check_path
    port                = "traffic-port"
    healthy_threshold   = 5
    unhealthy_threshold = 2
    timeout             = 2
    interval            = 5
    matcher             = "200"
  }
}

# Listener (redirects traffic from the load balancer to the target group)
resource "aws_alb_listener" "ecs-alb-http-listener" {
  load_balancer_arn = aws_lb.production.id
  port              = "80"
  protocol          = "HTTP"
  depends_on        = [aws_alb_target_group.default-target-group]

  default_action {
    type             = "forward"
    target_group_arn = aws_alb_target_group.default-target-group.arn
  }
}
Add the required variables:
# load balancer

variable "health_check_path" {
  description = "Health check path for the default target group"
  default     = "/ping/"
}

# ecs

variable "ecs_cluster_name" {
  description = "Name of the ECS cluster"
  default     = "production"
}
So, we configured our load balancer and listener to listen for HTTP requests on port 80. This is temporary. After we verify that our infrastructure and application are set up correctly, we'll update the load balancer to listen for HTTPS requests on port 443.
Take note of the path URL for the health check: /ping/. It's pivotal that your application responds appropriately to this endpoint to ensure service health checks are accurate.
IAM Roles
05_iam.tf:
resource "aws_iam_role" "ecs-task-execution-role" {
  name               = "ecs_task_execution_role_prod"
  assume_role_policy = file("policies/ecs-role.json")
}

resource "aws_iam_role_policy" "ecs-task-execution-role-policy" {
  name   = "ecs_task_execution_role_policy"
  policy = file("policies/ecs-task-execution-policy.json")
  role   = aws_iam_role.ecs-task-execution-role.id
}

resource "aws_iam_role" "ecs-service-role" {
  name               = "ecs_service_role_prod"
  assume_role_policy = file("policies/ecs-role.json")
}

resource "aws_iam_role_policy" "ecs-service-role-policy" {
  name   = "ecs_service_role_policy"
  policy = file("policies/ecs-service-role-policy.json")
  role   = aws_iam_role.ecs-service-role.id
}
Add a new folder in "terraform" called "policies". Then, add the following role and policy definitions:
ecs-role.json:
{
  "Version": "2008-10-17",
  "Statement": [
    {
      "Action": "sts:AssumeRole",
      "Principal": {
        "Service": [
          "ecs-tasks.amazonaws.com"
        ]
      },
      "Effect": "Allow"
    }
  ]
}
ecs-service-role-policy.json:
{
  "Version": "2012-10-17",
  "Statement": [
    {
      "Effect": "Allow",
      "Action": [
        "elasticloadbalancing:Describe*",
        "elasticloadbalancing:DeregisterInstancesFromLoadBalancer",
        "elasticloadbalancing:RegisterInstancesWithLoadBalancer",
        "ec2:Describe*",
        "ec2:AuthorizeSecurityGroupIngress",
        "elasticloadbalancing:RegisterTargets",
        "elasticloadbalancing:DeregisterTargets",
        "elasticfilesystem:ClientMount",
        "elasticfilesystem:ClientWrite",
        "elasticfilesystem:ClientRootAccess",
        "elasticfilesystem:DescribeFileSystems"
      ],
      "Resource": [
        "*"
      ]
    }
  ]
}
ecs-task-execution-policy.json:
{
  "Version": "2012-10-17",
  "Statement": [
    {
      "Effect": "Allow",
      "Action": [
        "ecs:StartTask",
        "ecs:StopTask",
        "ecs:DescribeTasks",
        "ecr:GetAuthorizationToken",
        "ecr:BatchCheckLayerAvailability",
        "ecr:GetDownloadUrlForLayer",
        "ecr:BatchGetImage",
        "logs:CreateLogStream",
        "logs:PutLogEvents",
        "elasticfilesystem:ClientMount",
        "elasticfilesystem:ClientWrite",
        "elasticfilesystem:ClientRootAccess",
        "elasticfilesystem:DescribeFileSystems"
      ],
      "Resource": "*"
    }
  ]
}
Logs
06_logs.tf:
resource "aws_cloudwatch_log_group" "django-log-group" {
  name              = "/ecs/django-app"
  retention_in_days = var.log_retention_in_days
}
Add the variable:
# logs

variable "log_retention_in_days" {
  default = 30
}
ECS
Now, we can configure our ECS cluster.
07_ecs.tf:
resource "aws_ecs_cluster" "production" {
  name = "${var.ecs_cluster_name}-cluster"
}

data "template_file" "app" {
  template = file("templates/django_app.json.tpl")

  vars = {
    docker_image_url_django = var.docker_image_url_django
    region                  = var.region
  }
}

resource "aws_ecs_task_definition" "app" {
  family                   = "django-app"
  network_mode             = "awsvpc" # Required for Fargate
  requires_compatibilities = ["FARGATE"]
  cpu                      = "${var.fargate_cpu}"
  memory                   = "${var.fargate_memory}"
  execution_role_arn       = aws_iam_role.ecs-task-execution-role.arn
  task_role_arn            = aws_iam_role.ecs-task-execution-role.arn
  container_definitions    = data.template_file.app.rendered
}


resource "aws_ecs_service" "production" {
  name            = "${var.ecs_cluster_name}-service"
  cluster         = aws_ecs_cluster.production.id
  task_definition = aws_ecs_task_definition.app.arn
  launch_type     = "FARGATE"
  desired_count   = var.app_count
  network_configuration {
    subnets          = [aws_subnet.public-subnet-1.id, aws_subnet.public-subnet-2.id]
    security_groups  = [aws_security_group.ecs-fargate.id]
    assign_public_ip = true
  }

  load_balancer {
    target_group_arn = aws_alb_target_group.default-target-group.arn
    container_name   = "django-app"
    container_port   = 8000
  }
}
Add a "templates" folder to the "terraform" folder, and then add a new template file called django_app.json.tpl:
[
  {
    "name": "django-app",
    "image": "${docker_image_url_django}",
    "essential": true,
    "cpu": 10,
    "memory": 512,
    "portMappings": [
      {
        "containerPort": 8000,
        "protocol": "tcp"
      }
    ],
    "command": ["gunicorn", "-w", "3", "-b", ":8000", "hello_django.wsgi:application"],
    "environment": [],
    "logConfiguration": {
      "logDriver": "awslogs",
      "options": {
        "awslogs-group": "/ecs/django-app",
        "awslogs-region": "${region}",
        "awslogs-stream-prefix": "django-app-log-stream"
      }
    }
  }
]
Here, we defined our container definition associated with the Django app.
Add the following variables as well:
# ecs

variable "ecs_cluster_name" {
  description = "Name of the ECS cluster"
  default     = "production"
}

variable "docker_image_url_django" {
  description = "Docker image to run in the ECS cluster"
  default     = "<AWS_ACCOUNT_ID>.dkr.ecr.us-west-1.amazonaws.com/django-app:latest"
}

variable "app_count" {
  description = "Number of Docker containers to run"
  default     = 2
}

variable "fargate_cpu" {
  description = "Amount of CPU for Fargate task. E.g., '256' (.25 vCPU)"
  default     = "256"
}

variable "fargate_memory" {
  description = "Amount of memory for Fargate task. E.g., '512' (0.5GB)"
  default     = "512"
}
Remember to replace
<AWS_ACCOUNT_ID>with your actual AWS account ID.
Since we added the Template provider, run terraform init again to download the new provider.
Auto Scaling
08_auto_scaling.tf:
resource "aws_appautoscaling_target" "ecs_target" {
  max_capacity       = var.autoscale_max
  min_capacity       = var.autoscale_min
  resource_id        = "service/${aws_ecs_cluster.production.name}/${aws_ecs_service.production.name}"
  scalable_dimension = "ecs:service:DesiredCount"
  service_namespace  = "ecs"
}

resource "aws_appautoscaling_policy" "ecs_policy" {
  name               = "ecs-auto-scaling-policy"
  policy_type        = "TargetTrackingScaling"
  resource_id        = aws_appautoscaling_target.ecs_target.resource_id
  scalable_dimension = aws_appautoscaling_target.ecs_target.scalable_dimension
  service_namespace  = aws_appautoscaling_target.ecs_target.service_namespace

  target_tracking_scaling_policy_configuration {
    predefined_metric_specification {
      predefined_metric_type = "ECSServiceAverageCPUUtilization"
    }

    target_value       = 75
    scale_in_cooldown  = 300
    scale_out_cooldown = 300
  }
}
With this configuration, the ECS tasks will scale based on their average CPU utilization. When it reaches 75%, more tasks will be started.
New variables:
# ECS service auto scaling

variable "autoscale_min" {
  description = "Minimum autoscale (number of tasks)"
  default     = "1"
}

variable "autoscale_max" {
  description = "Maximum autoscale (number of tasks)"
  default     = "10"
}

variable "autoscale_desired" {
  description = "Desired number of tasks to run initially"
  default     = "4"
}
Test
outputs.tf:
output "alb_hostname" {
  value = aws_lb.production.dns_name
}

output "ecs_task_execution_role_arn" {
    value = aws_iam_role.ecs-task-execution-role.arn
    description = "ARN for the ECS Task Execution Role"
}

output "subnets" {
  value = [aws_subnet.public-subnet-1.id, aws_subnet.public-subnet-2.id]
}

output "security_group" {
  value = aws_security_group.ecs-fargate.id
}
Here, we configured an outputs.tf file along with several output values.
Ready?!? View then execute the plan:
$ terraform plan

$ terraform apply
You should see the health check failing with a 404:
service production-service port 8000 is unhealthy in target-group production-tg
due to (reason Health checks failed with these codes: [404]).
This is expected since we haven't set up a /ping/ handler in the app yet.
Django Health Check
Add the following middleware to app/hello_django/middleware.py:
from django.http import HttpResponse
from django.utils.deprecation import MiddlewareMixin


class HealthCheckMiddleware(MiddlewareMixin):
    def process_request(self, request):
        if request.META['PATH_INFO'] == '/ping/':
            return HttpResponse('pong!')
Add the class to the middleware config in settings.py:
MIDDLEWARE = [
    'hello_django.middleware.HealthCheckMiddleware',  # new
    'django.middleware.security.SecurityMiddleware',
    'django.contrib.sessions.middleware.SessionMiddleware',
    'django.middleware.common.CommonMiddleware',
    'django.middleware.csrf.CsrfViewMiddleware',
    'django.contrib.auth.middleware.AuthenticationMiddleware',
    'django.contrib.messages.middleware.MessageMiddleware',
    'django.middleware.clickjacking.XFrameOptionsMiddleware',
]
This middleware is used to handle requests to the /ping/ URL before ALLOWED_HOSTS is checked. Why is this necessary? Since we don't know the private IP of where the health check request originates from beforehand, this will ensure that the /ping/ route always returns a successful response even after we restrict ALLOWED_HOSTS.
It's worth noting that you could toss Nginx in front of Gunicorn and handle the health check in the Nginx config like so:
location /ping/ {
    access_log off;
    return 200;
}
To test locally, build the new image and then spin up the container:
$ docker build -t django-ecs .

$ docker run \
    -p 8007:8000 \
    --name django-test \
    django-ecs \
    gunicorn hello_django.wsgi:application --bind 0.0.0.0:8000
Make sure http://localhost:8007/ping/ works as expected:
pong!
Once tested, clean up your local environment:
$ docker stop django-test
$ docker rm django-test
Next, update ECR:
$ docker build -t <AWS_ACCOUNT_ID>.dkr.ecr.us-west-1.amazonaws.com/django-app:latest .
$ docker push <AWS_ACCOUNT_ID>.dkr.ecr.us-west-1.amazonaws.com/django-app:latest
To update the Fargate service with the latest image, we'll use a script that automates the process.
Create a "deploy" folder in the project root. Then, add an update-ecs.py file to that newly created folder:
import boto3
import click


def get_current_task_definition(client, cluster, service):
    response = client.describe_services(cluster=cluster, services=[service])
    current_task_arn = response["services"][0]["taskDefinition"]
    return client.describe_task_definition(taskDefinition=current_task_arn)


@click.command()
@click.option("--cluster", help="Name of the ECS cluster", required=True)
@click.option("--service", help="Name of the ECS service", required=True)
@click.option("--image", help="Docker image URL for the updated application", required=True)
def deploy(cluster, service, image):
    client = boto3.client("ecs")

    # Fetch the current task definition
    print("Fetching current task definition...")
    response = get_current_task_definition(client, cluster, service)
    container_definition = response["taskDefinition"]["containerDefinitions"][0].copy()

    # Update the container definition with the new image
    container_definition["image"] = image
    print(f"Updated image to: {image}")

    # Register a new task definition
    print("Registering new task definition...")
    response = client.register_task_definition(
        family=response["taskDefinition"]["family"],
        volumes=response["taskDefinition"]["volumes"],
        containerDefinitions=[container_definition],
        cpu="256",  # Modify based on your needs
        memory="512",  # Modify based on your needs
        networkMode="awsvpc",
        requiresCompatibilities=["FARGATE"],
        executionRoleArn="ecs_task_execution_role_prod",
        taskRoleArn="ecs_task_execution_role_prod"
    )
    new_task_arn = response["taskDefinition"]["taskDefinitionArn"]
    print(f"New task definition ARN: {new_task_arn}")

    # Update the service with the new task definition
    print("Updating ECS service with new task definition...")
    client.update_service(
        cluster=cluster, service=service, taskDefinition=new_task_arn,
    )
    print("Service updated!")


if __name__ == "__main__":
    deploy()
This script will fetch the current Task Definition, create a new revision, and update the ECS service to use this new revision.
Create and activate a new virtual environment. Then, install Boto3 and Click:
$ pip install boto3 click
Add your AWS credentials along with the default region:
$ export AWS_ACCESS_KEY_ID="YOUR_AWS_ACCESS_KEY_ID"
$ export AWS_SECRET_ACCESS_KEY="YOUR_AWS_SECRET_ACCESS_KEY"
$ export AWS_DEFAULT_REGION="us-west-1"
Run the script like so, making sure to replace <AWS_ACCOUNT_ID> with your AWS account ID:
(env)$ python update-ecs.py \
  --cluster=production-cluster \
  --service=production-service \
  --image="<AWS_ACCOUNT_ID>.dkr.ecr.us-west-1.amazonaws.com/django-app:latest"
The Service should start two new Tasks based on the revised Task Definition and register them with the associated Target Group. This time the health checks should pass. You should now be able to view your application using the DNS hostname that was outputted to your terminal:
Outputs:

alb_hostname = production-alb-1008464563.us-west-1.elb.amazonaws.com
RDS
Next, let's configure RDS so we can use Postgres for our production database.
Add a new Security Group to 03_securitygroups.tf to ensure that only traffic from your Fargate service can talk to the database:
# RDS Security Group (traffic Fargate -> RDS)
resource "aws_security_group" "rds" {
  name        = "rds-security-group"
  description = "Allows inbound access from Fargate only"
  vpc_id      = aws_vpc.production-vpc.id

  ingress {
    protocol        = "tcp"
    from_port       = "5432"
    to_port         = "5432"
    security_groups = [aws_security_group.ecs-fargate.id]
  }

  egress {
    protocol    = "-1"
    from_port   = 0
    to_port     = 0
    cidr_blocks = ["0.0.0.0/0"]
  }
}
Next, add a new file called 09_rds.tf for setting up the database itself:
resource "aws_db_subnet_group" "production" {
  name       = "main"
  subnet_ids = [aws_subnet.private-subnet-1.id, aws_subnet.private-subnet-2.id]
}

resource "aws_db_instance" "production" {
  identifier              = "production"
  db_name                 = var.rds_db_name
  username                = var.rds_username
  password                = var.rds_password
  port                    = "5432"
  engine                  = "postgres"
  engine_version          = "15.4"
  instance_class          = var.rds_instance_class
  allocated_storage       = "20"
  storage_encrypted       = false
  vpc_security_group_ids  = [aws_security_group.rds.id]
  db_subnet_group_name    = aws_db_subnet_group.production.name
  multi_az                = false
  storage_type            = "gp2"
  publicly_accessible     = false
  backup_retention_period = 7
  skip_final_snapshot     = true
}
Variables:
# rds

variable "rds_db_name" {
  description = "RDS database name"
  default     = "mydb"
}
variable "rds_username" {
  description = "RDS database username"
  default     = "foo"
}
variable "rds_password" {
  description = "RDS database password"
}
variable "rds_instance_class" {
  description = "RDS instance type"
  default     = "db.t3.micro"
}
Note that we left off the default value for the password. More on this in a bit.
Since we'll need to know the address for the instance in our Django app, add a depends_on argument to the aws_ecs_task_definition in 07_ecs.tf:
resource "aws_ecs_task_definition" "app" {
  family                   = "django-app"
  network_mode             = "awsvpc" # Required for Fargate
  requires_compatibilities = ["FARGATE"]
  cpu                      = "${var.fargate_cpu}"
  memory                   = "${var.fargate_memory}"
  execution_role_arn       = aws_iam_role.ecs-task-execution-role.arn
  task_role_arn            = aws_iam_role.ecs-task-execution-role.arn
  container_definitions    = data.template_file.app.rendered
  depends_on               = [aws_db_instance.production]
}
Next, we need to update the DATABASES config in settings.py:
if 'RDS_DB_NAME' in os.environ:
    DATABASES = {
        'default': {
            'ENGINE': 'django.db.backends.postgresql_psycopg2',
            'NAME': os.environ['RDS_DB_NAME'],
            'USER': os.environ['RDS_USERNAME'],
            'PASSWORD': os.environ['RDS_PASSWORD'],
            'HOST': os.environ['RDS_HOSTNAME'],
            'PORT': os.environ['RDS_PORT'],
        }
    }
else:
    DATABASES = {
        'default': {
            'ENGINE': 'django.db.backends.sqlite3',
            'NAME': os.path.join(BASE_DIR, 'db.sqlite3'),
        }
    }
Add the import:
import os
Update the environment section in the django_app.json.tpl template:
"environment": [
  {
    "name": "RDS_DB_NAME",
    "value": "${rds_db_name}"
  },
  {
    "name": "RDS_USERNAME",
    "value": "${rds_username}"
  },
  {
    "name": "RDS_PASSWORD",
    "value": "${rds_password}"
  },
  {
    "name": "RDS_HOSTNAME",
    "value": "${rds_hostname}"
  },
  {
    "name": "RDS_PORT",
    "value": "5432"
  }
],
Update the vars passed to the template in 07_ecs.tf:
data "template_file" "app" {
  template = file("templates/django_app.json.tpl")

  vars = {
    docker_image_url_django = var.docker_image_url_django
    region                  = var.region
    rds_db_name             = var.rds_db_name
    rds_username            = var.rds_username
    rds_password            = var.rds_password
    rds_hostname            = aws_db_instance.production.address
  }
}
Add Psycopg2 to the requirements file:
Django==4.2.7
gunicorn==21.2.0
psycopg2-binary==2.9.9
Update the Dockerfile to install the appropriate packages required for Psycopg2:
# pull official base image
FROM python:3.12.0-slim-bookworm

# set work directory
WORKDIR /usr/src/app

# set environment variables
ENV PYTHONDONTWRITEBYTECODE 1
ENV PYTHONUNBUFFERED 1

# install psycopg2 dependencies
RUN apt-get update \
  && apt-get -y install gcc postgresql \
  && apt-get clean

# install dependencies
RUN pip install --upgrade pip
COPY ./requirements.txt .
RUN pip install -r requirements.txt

# Create a user with UID 1000 and GID 1000
RUN groupadd -g 1000 appgroup && \
    useradd -r -u 1000 -g appgroup appuser
# Switch to this user
USER 1000:1000

# copy project
COPY . .
Alright. Build the Docker image and push it up to ECR. Then, to update the ECS Task Definition, create the RDS resources, and update the Service, run:
$ terraform apply
Since we didn't set a default for the password, you'll be prompted to enter one:
var.rds_password
  RDS database password

  Enter a value:
Rather than having to pass a value in each time, you could set an environment variable like so:
$ export TF_VAR_rds_password=foobarbaz

$ terraform apply
Keep in mind that this approach, of using environment variables, keeps sensitive variables out of the .tf files, but they are still stored in the terraform.tfstate file in plain text. So, be sure to keep this file out of version control. Since keeping it out of version control doesn't work if other people on your team need access to it, look to either encrypting the secrets or using a secret store like Vault or AWS Secrets Manager.
Next, we'll need to apply the database migrations. With AWS Fargate, you cannot directly SSH into your containers like you might with EC2. So, to run migrations (or other one-off commands), we can set up a separate ECS Task Definition that runs the migration command. The Task can then be invoked using the AWS Management Console, AWS CLI, or SDK. For example, the task definition's command parameter can be set to ["python", "manage.py", "migrate"].
Let's add the following to 07_ecs.tf:
resource "aws_ecs_task_definition" "django_migration" {
  family                = "django-migration-task"
  network_mode          = "awsvpc"
  requires_compatibilities = ["FARGATE"]
  cpu                   = var.fargate_cpu
  memory                = var.fargate_memory
  execution_role_arn    = aws_iam_role.ecs-task-execution-role.arn

  container_definitions = jsonencode([
    {
      name  = "django-migration-container"
      image = var.docker_image_url_django
      environment: [
        {
            "name": "RDS_DB_NAME",
            "value": var.rds_db_name
        },
        {
            "name": "RDS_USERNAME",
            "value": var.rds_username
        },
        {
            "name": "RDS_PASSWORD",
            "value": var.rds_password
        },
        {
            "name": "RDS_HOSTNAME",
            "value": aws_db_instance.production.address
        },
        {
            "name": "RDS_PORT",
            "value": "5432"
        }
      ],
      # Run migrations as the command
      command = ["python", "manage.py", "migrate"]

      # Add log configuration for CloudWatch
      logConfiguration = {
        logDriver = "awslogs"
        options = {
          awslogs-group         = "/ecs/django-app"
          awslogs-region        = var.region
          awslogs-stream-prefix = "ecs"
        }
      }

      # Other required configurations go here...
      portMappings = [
        {
          containerPort = 8000
        }
      ]
    }
  ])
}
After that, run terraform apply to create the Task Definition. Then, to apply the migrations, run:
$ aws ecs run-task \
  --cluster production-cluster \
  --task-definition django-migration-task \
  --launch-type FARGATE \
  --network-configuration "awsvpcConfiguration={subnets=[YOUR_SUBNET_1, YOUR_SUBNET_2],securityGroups=[YOUR_SECURITY_GROUP],assignPublicIp=ENABLED}"
Make sure to replace
YOUR_SUBNET_1,YOUR_SUBNET_2, andYOUR_SECURITY_GROUPwith the values that were outputted to your terminal.
After running this command, the Task runs in the cluster and when it's done it stops automatically. You can go to Cloudwatch and check the logs for the /ecs/django-app log group to see the results.
Domain and SSL Certificate
Assuming you've generated and validated a new SSL certificate from AWS Certificate Manager, add the certificate's ARN to your variables:
# domain

variable "certificate_arn" {
  description = "AWS Certificate Manager ARN for validated domain"
  default     = "ADD YOUR ARN HERE"
}
Update the default listener associated with the load balancer in 04_loadbalancer.tf so that it listens for HTTPS requests on port 443 (as opposed to HTTP on port 80):
# Listener (redirects traffic from the load balancer to the target group)
resource "aws_alb_listener" "ecs-alb-http-listener" {
  load_balancer_arn = aws_lb.production.id
  port              = "443"
  protocol          = "HTTPS"
  ssl_policy        = "ELBSecurityPolicy-2016-08"
  certificate_arn   = var.certificate_arn
  depends_on        = [aws_alb_target_group.default-target-group]

  default_action {
    type             = "forward"
    target_group_arn = aws_alb_target_group.default-target-group.arn
  }
}
Apply the changes:
$ terraform apply
Make sure to point your domain at the load balancer using a CNAME record. Make sure you can view your application.
Nginx
Next, let's add Nginx into the mix to handle requests for static files appropriately.
In the project root, create the following files and folders:
└── nginx
    ├── Dockerfile
    └── nginx.conf
Dockerfile:
FROM nginx:1.25.3-alpine

RUN rm /etc/nginx/conf.d/default.conf
COPY nginx.conf /etc/nginx/conf.d
EXPOSE 80
nginx.conf:
upstream hello_django {
    server localhost:8000;
}

server {

    listen 80;

    location / {
        proxy_pass http://hello_django;
        proxy_set_header X-Forwarded-For $proxy_add_x_forwarded_for;
        proxy_set_header Host $host;
        proxy_redirect off;
    }

}
Here, we set up a single location block, routing all traffic to the Django app. We'll set up a new location block for static files in the next section.
Create a new repo in ECR called "nginx", and then build and push the new image:
$ docker build -t <AWS_ACCOUNT_ID>.dkr.ecr.us-west-1.amazonaws.com/nginx:latest .
$ docker push <AWS_ACCOUNT_ID>.dkr.ecr.us-west-1.amazonaws.com/nginx:latest
Add the following variable to the ECS section of the variables file:
# nginx

variable "docker_image_url_nginx" {
  description = "Docker image to run in the ECS cluster"
  default     = "<AWS_ACCOUNT_ID>.dkr.ecr.us-west-1.amazonaws.com/nginx:latest"
}
Add the new container definition to the django_app.json.tpl template:
[
  {
    "name": "django-app",
    "image": "${docker_image_url_django}",
    "essential": true,
    "cpu": 10,
    "memory": 512,
    "portMappings": [
      {
        "containerPort": 8000,
        "protocol": "tcp"
      }
    ],
    "command": ["gunicorn", "-w", "3", "-b", ":8000", "hello_django.wsgi:application"],
    "environment": [
      {
        "name": "RDS_DB_NAME",
        "value": "${rds_db_name}"
      },
      {
        "name": "RDS_USERNAME",
        "value": "${rds_username}"
      },
      {
        "name": "RDS_PASSWORD",
        "value": "${rds_password}"
      },
      {
        "name": "RDS_HOSTNAME",
        "value": "${rds_hostname}"
      },
      {
        "name": "RDS_PORT",
        "value": "5432"
      }
    ],
    "logConfiguration": {
      "logDriver": "awslogs",
      "options": {
        "awslogs-group": "/ecs/django-app",
        "awslogs-region": "${region}",
        "awslogs-stream-prefix": "django-app-log-stream"
      }
    }
  },
  {
    "name": "nginx",
    "image": "${docker_image_url_nginx}",
    "essential": true,
    "cpu": 10,
    "memory": 128,
    "portMappings": [
      {
        "containerPort": 80,
        "protocol": "tcp"
      }
    ],
    "logConfiguration": {
      "logDriver": "awslogs",
      "options": {
        "awslogs-group": "/ecs/nginx",
        "awslogs-region": "${region}",
        "awslogs-stream-prefix": "nginx-log-stream"
      }
    }
  }
]
Pass the variable to the template in 07_ecs.tf:
data "template_file" "app" {
  template = file("templates/django_app.json.tpl")

  vars = {
    docker_image_url_django = var.docker_image_url_django
    docker_image_url_nginx  = var.docker_image_url_nginx
    region                  = var.region
    rds_db_name             = var.rds_db_name
    rds_username            = var.rds_username
    rds_password            = var.rds_password
    rds_hostname            = aws_db_instance.production.address
  }
}
Add the new logs to 06_logs.tf:
resource "aws_cloudwatch_log_group" "nginx-log-group" {
  name              = "/ecs/nginx"
  retention_in_days = var.log_retention_in_days
}

resource "aws_cloudwatch_log_stream" "nginx-log-stream" {
  name           = "nginx-log-stream"
  log_group_name = aws_cloudwatch_log_group.nginx-log-group.name
}
Update the Service so it points to the nginx container instead of django-app:
resource "aws_ecs_service" "production" {
  name            = "${var.ecs_cluster_name}-service"
  cluster         = aws_ecs_cluster.production.id
  task_definition = aws_ecs_task_definition.app.arn
  launch_type     = "FARGATE"
  desired_count   = var.app_count
  network_configuration {
    subnets          = [aws_subnet.public-subnet-1.id, aws_subnet.public-subnet-2.id]
    security_groups  = [aws_security_group.ecs-fargate.id]
    assign_public_ip = true
  }

  load_balancer {
    target_group_arn = aws_alb_target_group.default-target-group.arn
    container_name   = "nginx"
    container_port   = 80
  }
}
Apply the changes:
$ terraform apply
Make sure the app can still be accessed from the browser.
Since we have multiple containers in our task definition now -- i.e., nginx and django-app -- we need to ensure that we're updating the correct container image for both of these containers. So, we need to modify the update-ecs.py script to handle multiple container definitions:
- Iterate over the container definitions.
- Update the image for the container name that matches the specified container name.
Changes:
import boto3
import click


def get_current_task_definition(client, cluster, service):
    response = client.describe_services(cluster=cluster, services=[service])
    current_task_arn = response["services"][0]["taskDefinition"]
    return client.describe_task_definition(taskDefinition=current_task_arn)


@click.command()
@click.option("--cluster", help="Name of the ECS cluster", required=True)
@click.option("--service", help="Name of the ECS service", required=True)
@click.option("--image", help="Docker image URL for the updated application", required=True)
@click.option("--container-name", help="Name of the container to update", required=True)
def deploy(cluster, service, image, container_name):
    client = boto3.client("ecs")

    # Fetch the current task definition
    print("Fetching current task definition...")
    response = get_current_task_definition(client, cluster, service)

    # Iterate over container definitions and update the image for the matching container
    container_definitions = response["taskDefinition"]["containerDefinitions"]
    for container in container_definitions:
        if container["name"] == container_name:
            container["image"] = image
            print(f"Updated {container_name} image to: {image}")

    # Register a new task definition
    print("Registering new task definition...")
    response = client.register_task_definition(
        family=response["taskDefinition"]["family"],
        volumes=response["taskDefinition"]["volumes"],
        containerDefinitions=container_definitions,
        cpu="256",  # Modify based on your needs
        memory="512",  # Modify based on your needs
        networkMode="awsvpc",
        requiresCompatibilities=["FARGATE"],
        executionRoleArn="ecs_task_execution_role_prod",
        taskRoleArn="ecs_task_execution_role_prod"
    )
    new_task_arn = response["taskDefinition"]["taskDefinitionArn"]
    print(f"New task definition ARN: {new_task_arn}")

    # Update the service with the new task definition
    print("Updating ECS service with new task definition...")
    client.update_service(
        cluster=cluster, service=service, taskDefinition=new_task_arn,
    )
    print("Service updated!")


if __name__ == "__main__":
    deploy()
For example, to update django-app we can run:
(env)$ python update-ecs.py \
  --cluster=production-cluster \
  --service=production-service \
  --image="<AWS_ACCOUNT_ID>.dkr.ecr.us-west-1.amazonaws.com/django-app:latest" \
  --container-name django-app
Static Files
Set the STATIC_ROOT in your settings.py file:
STATIC_URL = '/staticfiles/'
STATIC_ROOT = '/efs/staticfiles/'
Also, turn off debug mode:
DEBUG = False
Since we set DEBUG to False, let's add a simple view for the index page, so we can show something instead of page not found. Create a new file in "app/hello_django" called views.py:
from django.http import HttpResponse


def home(request):
    return HttpResponse('Welcome to Hello Django!')
Now, update app/hello_django/urls.py like so:
from django.contrib import admin
from django.urls import path

from . import views # new line


urlpatterns = [
    path('', views.home, name='home'), # new line
    path('admin/', admin.site.urls),
]
Next, let's add a shared volume to the Task Definition and update the Nginx conf file.
Add the new location block to nginx.conf:
upstream hello_django {
    server localhost:8000;
}

server {

    listen 80;

    location /staticfiles/ {
        alias /efs/staticfiles/;  # Path to static files on EFS
    }

    location / {
        proxy_pass http://hello_django;
        proxy_set_header X-Forwarded-For $proxy_add_x_forwarded_for;
        proxy_set_header Host $host;
        proxy_redirect off;
    }

}
Then, within 07_ecs.tf, create an Elastic File System resounce, an Elastic File System access point, and an Elastic File System mount target:
resource "aws_efs_file_system" "efs" {
  lifecycle_policy {
    transition_to_ia = "AFTER_30_DAYS"
  }
}

resource "aws_efs_access_point" "app_access_point" {
  file_system_id = aws_efs_file_system.efs.id
  posix_user {
    uid = 1000
    gid = 1000
  }
  root_directory {
    path = "/efs"
    creation_info {
      owner_uid   = 1000
      owner_gid   = 1000
      permissions = "755"
    }
  }
}

resource "aws_efs_mount_target" "efs_mount" {
  count           = length([aws_subnet.public-subnet-1.id, aws_subnet.public-subnet-2.id])
  file_system_id  = aws_efs_file_system.efs.id
  subnet_id       = [aws_subnet.public-subnet-1.id, aws_subnet.public-subnet-2.id][count.index]
  security_groups = [aws_security_group.efs_sg.id]
}
In our Terraform setup, we're using Elastic File System (EFS) as a scalable storage solution. EFS offers persistent storage for our static files, accessible via an EFS Access Point that sets permissions and user access controls. The EFS Mount Targets make this file system available across different subnets, ensuring high availability and redundancy. This integration allows our Django and Nginx containers in ECS to efficiently handle and serve static files, enhancing the scalability and reliability of your application architecture.
Overall, this architecture enhances our application's scalability and flexibility. EFS provides a central, scalable location for files, which is crucial for a containerized environment where multiple containers need consistent access to persistent data. The access point ensures secure and consistent access, while the mount targets integrate this storage solution with our AWS network infrastructure.
Our EFS setup has the following main components
aws_efs_file_system"efs": Creates an EFS file system with a lifecycle policy to automatically transition files to a lower-cost storage class (Infrequent Access) after 30 days of inactivity.aws_efs_access_point"app_access_point": Establishes an access point within the EFS, setting specific user and group IDs (1000) for consistent file permissions, and designates "/efs" as the root directory with specified ownership and permissions, 755.aws_efs_mount_target"efs_mount": Defines mount targets for the EFS in two public subnets, enabling network access to the file system within these subnets and linking them with a specified security group for access control.
Now let's add the volume to aws_ecs_task_definition to make it accessible to our container:
resource "aws_ecs_task_definition" "app" {
  family                   = "django-app"
  depends_on               = [aws_db_instance.production]
  network_mode             = "awsvpc" # Required for Fargate
  requires_compatibilities = ["FARGATE"]
  cpu                      = "${var.fargate_cpu}"
  memory                   = "${var.fargate_memory}"
  execution_role_arn       = aws_iam_role.ecs-task-execution-role.arn
  task_role_arn            = aws_iam_role.ecs-task-execution-role.arn
  container_definitions    = data.template_file.app.rendered
  volume {
    name = "efs-volume"
    efs_volume_configuration {
      file_system_id          = aws_efs_file_system.efs.id
      root_directory          = "/"
      transit_encryption      = "ENABLED"
      transit_encryption_port = 2049
      authorization_config {
        access_point_id = aws_efs_access_point.app_access_point.id
        iam             = "ENABLED"
      }
    }
  }
}
To make sure that your ECS Tasks can communicate with the EFS File System, add the following Security Group to 03_securitygroups.tf:
resource "aws_security_group" "efs_sg" {
  name        = "EFS Security Group"
  description = "Allow ECS to EFS communication"
  vpc_id      = aws_vpc.production-vpc.id

  ingress {
    from_port   = 2049  # NFS port
    to_port     = 2049
    protocol    = "tcp"
    cidr_blocks = ["0.0.0.0/0"] # Modify this based on your security requirements
  }
}
Add the volume to the container definitions in the django_app.json.tpl template so the containers can access our EFS:
[
  {
    "name": "django-app",
    "image": "${docker_image_url_django}",
    "essential": true,
    "cpu": 10,
    "memory": 512,
    "portMappings": [
      {
        "containerPort": 8000,
        "protocol": "tcp"
      }
    ],
    "command": ["gunicorn", "-w", "3", "-b", ":8000", "hello_django.wsgi:application"],
    "environment": [
      {
        "name": "RDS_DB_NAME",
        "value": "${rds_db_name}"
      },
      {
        "name": "RDS_USERNAME",
        "value": "${rds_username}"
      },
      {
        "name": "RDS_PASSWORD",
        "value": "${rds_password}"
      },
      {
        "name": "RDS_HOSTNAME",
        "value": "${rds_hostname}"
      },
      {
        "name": "RDS_PORT",
        "value": "5432"
      }
    ],
    "mountPoints": [
      {
        "containerPath": "/efs/staticfiles/",
        "sourceVolume": "efs-volume",
        "readOnly": false

      }
    ],
    "logConfiguration": {
      "logDriver": "awslogs",
      "options": {
        "awslogs-group": "/ecs/django-app",
        "awslogs-region": "${region}",
        "awslogs-stream-prefix": "django-app-log-stream"
      }
    }
  },
  {
    "name": "nginx",
    "image": "${docker_image_url_nginx}",
    "essential": true,
    "cpu": 10,
    "memory": 128,
    "portMappings": [
      {
        "containerPort": 80,
        "protocol": "tcp"
      }
    ],
    "mountPoints": [
      {
        "containerPath": "/efs/staticfiles/",
        "sourceVolume": "efs-volume",
        "readOnly": false

      }
    ],
    "logConfiguration": {
      "logDriver": "awslogs",
      "options": {
        "awslogs-group": "/ecs/nginx",
        "awslogs-region": "${region}",
        "awslogs-stream-prefix": "nginx-log-stream"
      }
    }
  }
]
Now, each container will share a directory named "staticfiles".
Add a new Task Definition for collecting static files to 07_ecs.tf:
resource "aws_ecs_task_definition" "django_collectstatic" {
  family                = "django-collectstatic-task"
  network_mode          = "awsvpc"
  requires_compatibilities = ["FARGATE"]
  cpu                   = var.fargate_cpu
  memory                = var.fargate_memory
  execution_role_arn    = aws_iam_role.ecs-task-execution-role.arn
  task_role_arn         = aws_iam_role.ecs-task-execution-role.arn
  volume {
    name = "efs-volume"
    efs_volume_configuration {
      file_system_id          = aws_efs_file_system.efs.id
      root_directory          = "/"
      transit_encryption      = "ENABLED"
      transit_encryption_port = 2049
      authorization_config {
        access_point_id = aws_efs_access_point.app_access_point.id
        iam             = "ENABLED"
      }
    }
  }
  container_definitions = jsonencode([
    {
      name  = "django-collectstatic-container"
      image = var.docker_image_url_django
      linuxParameters = {
        user = "1000:1000"
      },
      # Run collectstatic as the command
      command = ["python", "manage.py", "collectstatic", "--no-input", "-v", "3"]

      mountPoints = [
        {
          sourceVolume = "efs-volume",
          containerPath = "/efs/staticfiles/",
          readOnly = false
        }
      ]

      # Add log configuration for CloudWatch
      logConfiguration = {
        logDriver = "awslogs"
        options = {
          awslogs-group         = "/ecs/django-app"
          awslogs-region        = var.region
          awslogs-stream-prefix = "ecs"
        }
      }

      # Other required configurations go here...
      portMappings = [
        {
          containerPort = 8000
        }
      ]
    }
  ])
}
Here, we mounted "/efs/staticfiles/" so the Task will have access to the EFS directory and copy the static files there to be accessible to the Nginx and Django containers.
Update update-ecs.py like so to run the collectstatic commands in Fargate:
import subprocess

import boto3
import click


def get_terraform_output(output_name):
    try:
        return subprocess.check_output(
            ["terraform", "output", "-state=../terraform/terraform.tfstate", output_name],
            text=True
        ).strip()
    except Exception as e:
        print(f"Error fetching Terraform output {output_name}: {e}")
        return None

def get_current_task_definition(client, cluster, service):
    response = client.describe_services(cluster=cluster, services=[service])
    current_task_arn = response["services"][0]["taskDefinition"]
    return client.describe_task_definition(taskDefinition=current_task_arn)

def run_collectstatic_task(client, cluster, task_definition_name):
    print("Running collectstatic task...")

    response = client.run_task(
        cluster=cluster,
        taskDefinition=task_definition_name,
        launchType="FARGATE",
        networkConfiguration=network_configuration,  # Add the network configuration here
    )

    if response.get("tasks"):
        print(f"collectstatic task started with task ARN: {response['tasks'][0]['taskArn']}")
    else:
        print("Failed to start collectstatic task.")
        if response.get("failures"):
            for failure in response["failures"]:
                print(f"Reason: {failure['reason']}")

subnets = [s.strip(' "\n[]') for s in get_terraform_output("subnets").split(",") if "subnet" in s]
security_group = get_terraform_output("security_group").strip(' "\n')
network_configuration = {
    "awsvpcConfiguration": {
        "subnets": subnets,
        "securityGroups": [security_group],
        "assignPublicIp": "ENABLED"
    }
}

@click.command()
@click.option("--cluster", help="Name of the ECS cluster", required=True)
@click.option("--service", help="Name of the ECS service", required=True)
@click.option("--image", help="Docker image URL for the updated application", required=True)
@click.option("--container-name", help="Name of the container to update", required=True)
@click.option("--collectstatic-task", help="Name of the collectstatic task definition", default="django-collectstatic-task")
def deploy(cluster, service, image, container_name, collectstatic_task):
    client = boto3.client("ecs")

    # Run the collectstatic task
    run_collectstatic_task(client, cluster, collectstatic_task)

    # Fetch the current task definition
    print("Fetching current task definition...")
    response = get_current_task_definition(client, cluster, service)

    # Iterate over container definitions and update the image for the matching container
    container_definitions = response["taskDefinition"]["containerDefinitions"]
    for container in container_definitions:
        if container["name"] == container_name:
            container["image"] = image
            print(f"Updated {container_name} image to: {image}")

    # Register a new task definition
    print("Registering new task definition...")
    response = client.register_task_definition(
        family=response["taskDefinition"]["family"],
        volumes=response["taskDefinition"]["volumes"],
        containerDefinitions=container_definitions,
        cpu="256",  # Modify based on your needs
        memory="512",  # Modify based on your needs
        networkMode="awsvpc",
        requiresCompatibilities=["FARGATE"],
        executionRoleArn="ecs_task_execution_role_prod",
        taskRoleArn="ecs_task_execution_role_prod"
    )
    new_task_arn = response["taskDefinition"]["taskDefinitionArn"]
    print(f"New task definition ARN: {new_task_arn}")

    # Update the service with the new task definition
    print("Updating ECS service with new task definition...")
    client.update_service(
        cluster=cluster, service=service, taskDefinition=new_task_arn,
    )
    print("Service updated!")


if __name__ == "__main__":
    deploy()
What's new?
- We defined a new function called
get_terraform_outputto read the Terraform output to use in our script. - We also added another new function,
run_collectstatic_task, that runs the new Task for collecting static files with the Task Defintion that we just added to 07_ecs.tf. - Finally, we added an
--collectstatic-taskoption in case you defined a different name for the Task for collecting static files.
Build the new images and push them up to ECR:
$ docker build -t <AWS_ACCOUNT_ID>.dkr.ecr.us-west-1.amazonaws.com/django-app:latest .
$ docker push <AWS_ACCOUNT_ID>.dkr.ecr.us-west-1.amazonaws.com/django-app:latest

$ docker build -t <AWS_ACCOUNT_ID>.dkr.ecr.us-west-1.amazonaws.com/nginx:latest .
$ docker push <AWS_ACCOUNT_ID>.dkr.ecr.us-west-1.amazonaws.com/nginx:latest
Apply the changes:
$ terraform apply
Once the deployment is done, your app should now display:
Welcome to Hello Django!
Navigate to the Django admin. The static files shouldn't work yet.
To collect the static files, run:
(env)$ python update-ecs.py \
  --cluster=production-cluster \
  --service=production-service \
  --image="<AWS_ACCOUNT_ID>.dkr.ecr.us-west-1.amazonaws.com/django-app:latest" \
  --container-name django-app
Static files should now load correctly.
Allowed Hosts
Finally, let's lock down our application for production:
ALLOWED_HOSTS = os.getenv('ALLOWED_HOSTS', '').split()
Add the ALLOWED_HOSTS environment variable to the container definition:
"environment": [
  {
    "name": "RDS_DB_NAME",
    "value": "${rds_db_name}"
  },
  {
    "name": "RDS_USERNAME",
    "value": "${rds_username}"
  },
  {
    "name": "RDS_PASSWORD",
    "value": "${rds_password}"
  },
  {
    "name": "RDS_HOSTNAME",
    "value": "${rds_hostname}"
  },
  {
    "name": "RDS_PORT",
    "value": "5432"
  },
  {
    "name": "ALLOWED_HOSTS",
    "value": "${allowed_hosts}"
  }
],
Pass the variable to the template in 07_ecs.tf:
data "template_file" "app" {
  template = file("templates/django_app.json.tpl")

  vars = {
    docker_image_url_django = var.docker_image_url_django
    docker_image_url_nginx  = var.docker_image_url_nginx
    region                  = var.region
    rds_db_name             = var.rds_db_name
    rds_username            = var.rds_username
    rds_password            = var.rds_password
    rds_hostname            = aws_db_instance.production.address
    allowed_hosts           = var.allowed_hosts
  }
}
Add the variable to the ECS section of the variables file, making sure to add your domain name:
variable "allowed_hosts" {
  description = "Domain name for allowed hosts"
  default     = "YOUR DOMAIN NAME"
}
Build the new image and push it up to ECR:
$ docker build -t <AWS_ACCOUNT_ID>.dkr.ecr.us-west-1.amazonaws.com/django-app:latest .
$ docker push <AWS_ACCOUNT_ID>.dkr.ecr.us-west-1.amazonaws.com/django-app:latest
Apply:
$ terraform apply
Test it out one last time.
Bring the infrastructure down once done:
$ terraform destroy
Conclusion
This tutorial looked at how to use Terraform to spin up the required AWS infrastructure for running a Django app on ECS.
While the initial configuration is complex, large teams with complicated infrastructure requirements, will benefit from Terraform. It provides a readable, central source of truth for your infrastructure, which should result in quicker feedback cycles.
Next steps:
- Configure CloudWatch alarms for scaling containers out and in.
- Store user-uploaded files on Amazon S3
- Set up multi-stage Docker builds and use a non-root user in the Docker container
- Rather than routing traffic on port 80 to Nginx, add a listener for port 443.
- Run through the entire Django deployment checklist.
- If you're planing to host multiple applications, you may want to move any "common" resources shared across the applications to a separate Terraform stack so that if you're regularly making modifications, your core AWS services will not be not affected.
You can find the final code in the django-ecs-terraform repo.