Setting Up a Flask Project
Part 1, Chapter 3
In this chapter, we'll cover how to set up a Flask project and get it running with a simple "Hello World" application.
Key software tools that we'll be using in this chapter:
Source Code
All of the code for this course is stored on GitLab in the following repository:
flask-stock-portfolio-code on GitLab
Part I (Flask Fundamentals) of this course has a corresponding branch (part1_flask_fundamentals) in the repository.
Structure
The easiest way to create a Flask app is to start with a single file. This is my preferred approach for starting a new Flask project as it will provide quick feedback that tells us whether or not the basic environment is configured correctly.
Start by creating a new directory and changing into that directory:
$ mkdir flask-stock-portfolio-code
$ cd flask-stock-portfolio-code
At this point, you'll probably have at least two versions of python available on your system:
$ python --version
Python 2.7.18
$ python3 --version
Python 3.12.1
I strongly recommend using Python 3.12 for all new Python projects. At the very least, you must use a version greater than 3.6 since support for Python 2 ended in January 2020 and support for Python 3.6 ended in December 2021.
Virtual Environments
For even the simplest of projects, you should start with a virtual environment. Virtual environments create isolated environments for each of your Python projects, so that each project can have its own unique dependencies (imported Python packages) and utilize a specific version of the Python interpreter.
Since this project is using Python 3, there's a built-in module called venv that can be used for creating virtual environments.
Run the following command to create a new virtual environment:
$ python3 -m venv venv
Make sure to use
python3instead ofpythonto guarantee that Python 3 will be used in the virtual environment.
This command creates a new directory called "venv", which contains the following items:
- Python interpreter (Python 3.12.1 in this case)
- Scripts for activating and deactivating the virtual environment
It will also store the Python packages that we install for this project throughout this course.
To start using the virtual environment, it needs to be activated:
$ source venv/bin/activate
(venv) $
After activating, the virtual environment (venv) will be displayed on your command prompt, to the left of the prompt.
Since the virtual environment is active, running the python command will run the Python 3 version of the interpreter (which is stored within your virtual environment itself):
(venv) $ python --version
Python 3.12.1
Installing Packages with pip
With the virtual environment created and activated, it's time to start installing the Python packages that you need using pip.
Start by installing Flask:
(venv) $ pip install Flask
This command installs the Flask package plus all of its dependencies (e.g., the other packages needed by Flask):
(venv)$ pip freeze
blinker==1.7.0
click==8.1.7
Flask==3.0.1
itsdangerous==2.1.2
Jinja2==3.1.3
MarkupSafe==2.1.4
Werkzeug==3.0.1
The first time running
pipwithin a virtual environment will result in a warning about a new version of pip being available. It's a good idea to upgrade pip using the specified command, which will upgrade pip within your virtual environment.
It's a good idea to save the installed packages (including version numbers) to a file called requirements.txt.
A common approach for saving the package listing to requirements.txt is to run
pip freeze > requirements.txt. While this is a valid approach, it results in a long list of package dependencies which can make upgrading packages in the future cumbersome and it clutters the true list of package dependencies.
Here's a command that I like to run (works with MacOS and Linux) to save the package information:
(venv)$ pip freeze | grep "Flask==" >> requirements.txt
Regardless of how you add the packages to requirements.txt, the file should now look like:
(venv)$ cat requirements.txt
Flask==3.0.1
Saving the full list of the packages (including version numbers) that need to be installed for the project can be really beneficial if you (future self) or someone else starts with this project and wants to quickly install all these packages with pip install -r requirements.txt.
Writing Python Code
Now it's time to actually write some Python code!
In the top-level directory that was created, create a new file called app.py. Then, in your text editor of choice, add the following content:
from flask import Flask

app = Flask(__name__)


@app.route('/')
def index():
    return 'Hello World!'
This file creates a new instance of the Flask app and defines a single route that returns the "Hello World!" statement. This is a very basic app, but that's the point: It quickly tells us whether everything has been configured properly or not.
There are a number of great text editors and full IDEs (Integrated Development Environments) available for Python development, but I recommend using PyCharm or VS Code.
Running the Development Server
We can use the Flask development server that comes bundled with Flask in order to check that the code in the app.py file is working correctly.
Run the Flask Development Server to serve your Flask app:
(venv) $ flask --app app --debug run

 * Serving Flask app 'app'
 * Debug mode: on
 WARNING: This is a development server. Do not use it in a production deployment. Use a production WSGI server instead.
 * Running on http://127.0.0.1:5000
 Press CTRL+C to quit
 * Restarting with stat
 * Debugger is active!
 * Debugger PIN: ***-***-***
The --app argument specifies the Python file (without the .py extension) that contains the Flask application (app). The --debug argument specifies that the Flask Development Server run in 'debug' mode.
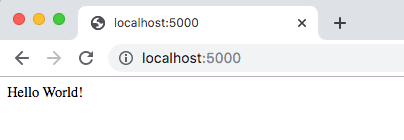
As the comment states, you can now view your app by navigating to http://127.0.0.1:5000/ in your browser of choice.
127.0.0.1is mapped tolocalhoston most systems, so you can alternatively navigate tolocalhost:5000.
What is localhost?
When you access a website via web browser, you're communicating with a server that responds with a website that gets displayed in your web browser.
In this course, we're developing a web application (using Flask) that will eventually be hosted on a web server on Render. In order to test out the web application during the development phase, we want to be able to communicate with the web application through a web browser, just like any other website.
The term "localhost" refers to your computer ("local") "host"-ing a web application. When accessing "localhost" or "127.0.0.1", a loopback occurs to access the web application on your computer (as opposed to access a web server on the internet).
What is a port?
Notice how there are numbers after the localhost or 127.0.0.1 address in
http://127.0.0.1:5000/? The ":5000" refers to a port number.A port number is a way to identify a specific process to send a request to on a web server. For example, a standard HTTP request goes to port 80, while a HTTPS request goes to port 443. Flask uses port 5000 for accessing the development server.
An IP address (such as the "127.0.0.1") is used to access a server while the port number is used to determine where the relevant process -- i.e., the Flask development server -- is running that should handle the request.
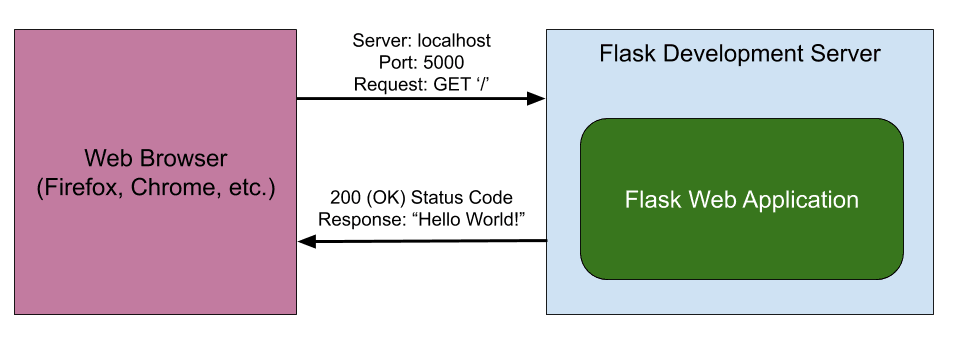
Turn back to you terminal after you view your site in the browser. You should see the following log message:
127.0.0.1 - - [27/Nov/2022 17:08:17] "GET / HTTP/1.1" 200 -
This indicates that a GET request was made to the '/' route and the development server returned a 200 (OK) status code.
What does that mean exactly?
- The browser made a request to the Flask development server (running as '127.0.0.1:5000')
- The server received the request and responded with a status of 200 (OK) along with the HTML to display "Hello World!" in the web browser:
That's it! We created a full web app with a single file. We also confirmed that our environment is configured correctly for development.
Structure
At this point, your project should look like this:
(venv)$ tree -L 2

.
├── app.py
├── requirements.txt
└── venv
    ├── bin
    ├── ...
✓ Mark as Completed