Forms
Part 1, Chapter 6
This chapter looks at how to create forms for acquiring user input data.
Prerequisites
This chapter looks at how forms are implemented and validated in HTML. If you've never worked with HTML or forms before, there are some great resources available from the Mozilla Developer Network (MDN):
Forms
Forms (also referred to as 'web forms' or 'HTML forms') provide a way for the user to interact with a web app. Typically, forms allow the user to enter data, which is sent to the server to be processed.
Some examples of forms:
- User registration
- Contact
- Feedback
In this chapter, we'll implement a form for submitting the following data for a stock:
- stock symbol
- number of shares purchased
- purchase price
Form for Stock Data
To create a form, we'll add:
- The HTML code (in a template) to display the form
- A view function (in Python) to serve and process the form submission
Template (HTML)
Let's start by creating the HTML code for the form by creating a new file called templates/add_stock.html:
{% extends "base.html" %}

{% block content %}
<h1>Add a Stock</h1>
<form method="post">
  <label for="stockSymbol">Stock Symbol:</label>
  <input type="text" id="stockSymbol" name="stock_symbol" />
  <br>
  <label for="numberOfShares">Number of Shares:</label>
  <input type="text" id="numberOfShares" name="number_of_shares" />
  <br>
  <label for="purchasePrice">Purchase Price ($):</label>
  <input type="text" id="purchasePrice" name="purchase_price" />
  <br>
  <input type="submit">
</form>
{% endblock %}
Form Element
The <form> element is used to define a form, which can contain any number of inputs that the user can provide. There are two key attributes often used with the <form> element:
actiondefines the location (URL) where the form should be sent to when submittedmethoddefines which HTTP method (typically, POST) to send the data with
In the above example, we set the method to POST and since we left off the action attribute, the form submission will be sent to the same URL that's used to serve up the form in the browser.
Input Elements
In HTML, the typical approach for defining an input is to create a <label> element to define a description of what to enter and then to have a separate <input> element for collecting the input:
<label for="stockSymbol">Stock Symbol:</label>
<input type="text" id="stockSymbol" name="stock_symbol" />
These two elements are linked together via the stockSymbol identifier. The <label> element provides the description for the <input> element with the matching id of stockSymbol.
Make sure to include the
nameattribute in each<input>element, as this is used by Flask to parse the input data from therequestobject. We'll look at this in detail shortly.
The type of an input element defines the expected type of data:
- button
- checkbox
- date
- file
- number
- password
- radio
- submit
- text (default)
- url
In this form, we defined three <input> elements with type="text".
The final <input> element, from the example, has a type of submit, which will be rendered as an HTML button. When clicked, the form data will be sent to the server-side via a POST request.
Flask Route
To serve up this form, add a new route and view function to app.py:
@app.route('/add_stock')
def add_stock():
    return render_template('add_stock.html')
Now, when the '/add_stock' URL is accessed, the templates/add_stock.html template will be rendered for the user to see:
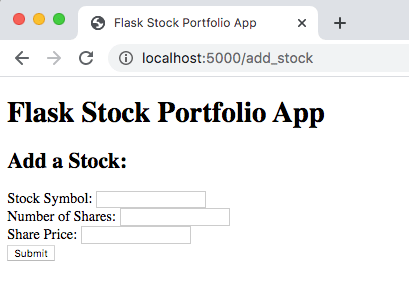
While we're able to see the form, we haven't set up a route to handle the form submission. In fact, if you click the 'Submit' button, you will get a 405 (Method Not Allowed) error:
<h1>Method Not Allowed</h1>
<p>The method is not allowed for the requested URL.</p>
Processing Form Data
Currently, the add_stock() function only handles GET requests:
@app.route('/add_stock')
def add_stock():
    return render_template('add_stock.html')
Do you remember how to allow additional HTTP methods?
@app.route('/add_stock', methods=['GET', 'POST'])
def add_stock():
    return render_template('add_stock.html')
Next, in order to perform a different operation when the HTTP method is a POST, make the following changes:
from flask import Flask, render_template, request

@app.route('/add_stock', methods=['GET', 'POST'])
def add_stock():
    if request.method == 'POST':
        # Print the form data to the console
        for key, value in request.form.items():
            print(f'{key}: {value}')

    return render_template('add_stock.html')
This diagram provides an illustration of what happens when the form is submitted:
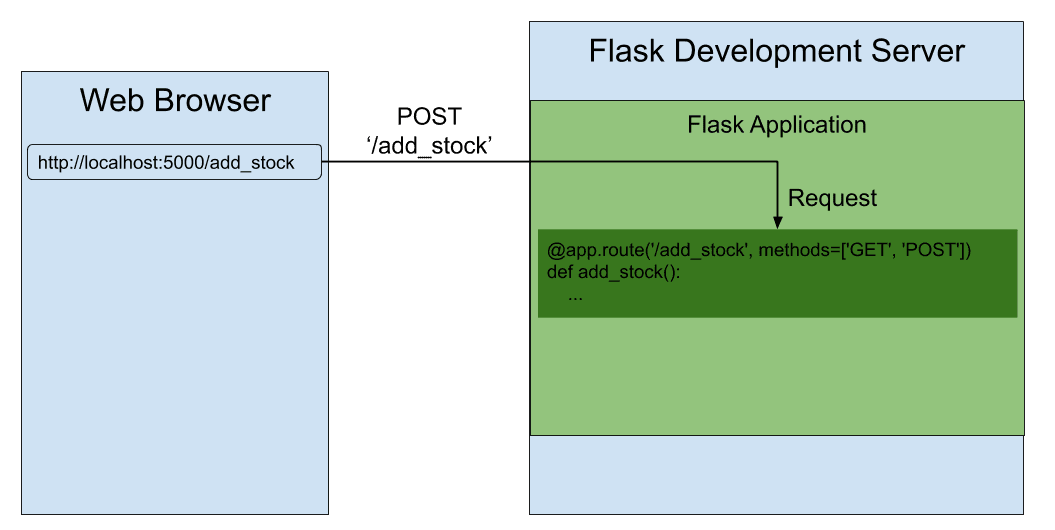
Request
The user provided data is available via the keys on the form property from the Flask request object:
# Print the form data to the console
for key, value in request.form.items():
    print(f'{key}: {value}')
To see this in action, navigate to the '/add_stock' URL and enter the following data:
- Stock Symbol: AAPL
- Number of Shares: 15
- Purchase Price ($): 302.17
You should see the inputs printed in the terminal output from the Flask development server:
127.0.0.1 - - [04/Jan/2022 17:42:58] "GET /add_stock HTTP/1.1" 200 -
stock_symbol: AAPL
number_of_shares: 15
purchase_price: 302.17
127.0.0.1 - - [04/Jan/2022 17:43:16] "POST /add_stock HTTP/1.1" 200 -
The values printed to the console are the key/value pairs from the request.form property. The keys should look familiar, as they are the same as the values assigned to the name attributes from the <input> elements in our form:
<form method="post">
  <label for="stockSymbol">Stock Symbol:</label>
  <input type="text" id="stockSymbol" name="stock_symbol" />  <!-- Flask: request.form['stock_symbol'] -->
  <br>
  <label for="numberOfShares">Number of Shares:</label>
  <input type="text" id="numberOfShares" name="number_of_shares" />  <!-- Flask: request.form['number_of_shares'] -->
  <br>
  <label for="purchasePrice">Purchase Price ($):</label>
  <input type="text" id="purchasePrice" name="purchase_price" />  <!-- Flask: request.form['purchase_price'] -->
  <br>
  <input type="submit">
</form>
Form Validation
Form validation is a set of checks to constrain the data input by the user. The goal of form validation is to ensure that the data is in the correct format.
You've probably seen examples of form validation in practice on different websites:
- "This field is required"
- "Please enter a valid email address"
- "Your password needs to be between 8 and 30 characters long and contain one uppercase letter, one symbol, and two numbers."
User-inputted data can be processed on both the client-side (web browser) or the server-side (Flask application).
Client-Side
Client-side form validation is a great choice for these reasons:
- There's no need to waste time sending data to the server if it's invalid to begin with
- HTML form validation has significantly improved over the past few years
Client-side validation is great for providing (near) instant feedback to the user when they input invalid or unexpected data; this approach provides a nice user experience.
Here are some key validation checks that can be defined in the HTML code for a form:
requiredspecifies that the field needs to be filled inminlengthandmaxlengthspecifies the minimum and maximum length of text input (strings)patternuses a regular expression to define a pattern that data needs to adhere to
Additionally, the different type attributes have their own, built-in data validation.
So, when the form is submitted, the web browser checks that the data is in the correct format based on the specified constraints. If the data passes the validation checks, it will be sent to the server for processing.
Invalid Data Input
To illustrate how valuable form validation can be, let's attempt to send some invalid data. Navigate to the form in your browser and enter the following data:
| Field | Value | Description |
|---|---|---|
| Stock Symbol | 15 | Invalid stock symbol! |
| Number of Shares | Empty field! | |
| Purchase Price ($) | 302.17 | Valid |
Since there are no validation checks on the input fields, this data is passed directly to our view function and the following output is logged to the console:
stock_symbol: 15
number_of_shares:
purchase_price: 302.17
127.0.0.1 - - [02/Jul/2021 13:47:21] "POST /add_stock HTTP/1.1" 200 -
Fortunately, this is a fairly easy fix.
Updated Form
While we will use a number of different form validators in this course, let's start by using the required and pattern validators in templates/add_stock.html:
{% extends "base.html" %}

{% block content %}
<h2>Add a Stock:</h2>
<form method="post">
  <label for="stockSymbol">Stock Symbol <em>(required, 1-5 uppercase letters)</em></label>       <!-- Updated! -->
  <input type="text" id="stockSymbol" name="stock_symbol" required pattern="[A-Z]{1,5}" />       <!-- Updated! -->
  <br>
  <label for="numberOfShares">Number of Shares <em>(required)</em></label>                       <!-- Updated! -->
  <input type="text" id="numberOfShares" name="number_of_shares" required />                     <!-- Updated! -->
  <br>
  <label for="purchasePrice">Purchase Price ($) <em>(required)</em></label>                      <!-- Updated! -->
  <input type="text" id="purchasePrice" name="purchase_price" placeholder="$300.00" required />  <!-- Updated! -->
  <br>
  <input type="submit">
</form>
{% endblock %}
The form no longer allows an empty <input> field due to the required attribute. Additionally, there's a regex pattern used to check the format of the stock symbol. The regex pattern is defined as pattern="[A-Z]{1,5}", which means that there needs to be between 1 and 5 ({1,5}) capital letters ([A-Z]).
Some examples:
- AAPL - valid
- appl - invalid
- Patrick - invalid
- T123 - invalid
- T - valid
Since each input is required, we should inform the user of this so that they are not caught off guard by an error message when they submit the form:
<label for="stockSymbol">Stock Symbol <em>(required, 1-5 uppercase letters)</em></label>
Additionally, the label for the Stock Symbol field includes a description of what input is expected (1-5 uppercase letters) to help the user with filling out the form.
Try submitting the form without filling in the stock symbol field:
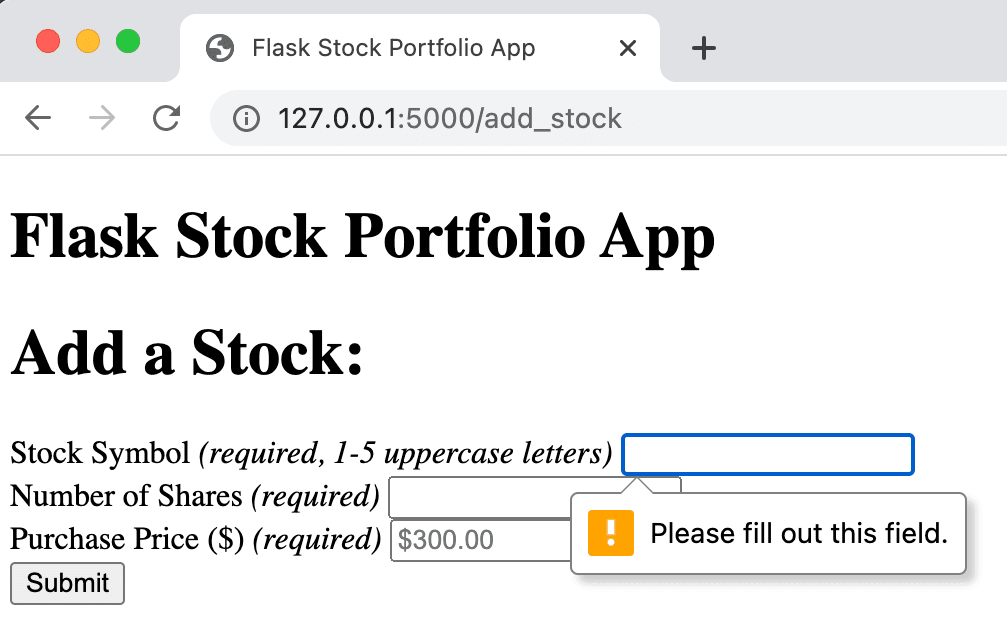
The web browser performs the form validation each time the 'Submit' button is clicked. Since the stock symbol field was not filled in, the web browser reports an error back to us and the HTTP POST request to the server is NOT sent since the form is invalid.
If you don't see the changes made to your HTML (or CSS) files when running the Flask development server, try restarting by exiting the Flask development server (control-C) and running
flask --app app --debug runagain.
Next, try submitting the form with an invalid entry in the stock symbol field:

Since the stock symbol of '12' does not match the regex pattern for the stock symbol, the web browser reports an error back to us.
While there are lots of options available for form validation in HTML, you can expand this even further by using JavaScript to extend the browser's built-in validators to make a more elegant experience for the end user. Refer to the Form Validation guide from the Mozilla Developer Network for more details.
Server-Side
While client-side validation helps to keep a nice user experience, server-side validation is still a best practice (even with client-side validation). Client-side validation could be bypassed and invalid/malicious data could be sent to your server. Check out tMozilla Developer Network's guide on client-side validation for more details.
To get an idea of the limitations of client-side validation, try submitting the form with the following data:
| Field | Value | Description |
|---|---|---|
| Stock Symbol | SBUX | Valid |
| Number of Shares | 100 | Valid |
| Purchase Price ($) | 34,56 | Invalid price! |
Since the (client-side) validation check on the purchase price isn't very strict, this data is passed directly to our view function and the following output is logged to the console:
stock_symbol: SBUX
number_of_shares: 100
purchase_price: 34,56
127.0.0.1 - - [05/Jan/2022 20:54:46] "POST /add_stock HTTP/1.1" 200 -
Saving a purchase price of 34,56 to a database would be a bad idea. Let's use pydantic to perform the server-side validation check.
Start by installing pydantic and saving the package information to requirements.txt:
(venv) $ pip install pydantic
(venv) $ pip freeze | grep "pydantic==" >> requirements.txt
Next, create a helper class (StockModel) at the top of app.py:
from pydantic import BaseModel, field_validator


class StockModel(BaseModel):
    """Class for parsing new stock data from a form."""
    stock_symbol: str
    number_of_shares: int
    purchase_price: float

    @field_validator('stock_symbol')
    def stock_symbol_check(cls, value):
        if not value.isalpha() or len(value) > 5:
            raise ValueError('Stock symbol must be 1-5 characters')
        return value.upper()
The StockModel class contains the three data elements that are submitted in the 'Add Stock' form:
stock_symbol- string (str)number_of_shares- integer (int)purchase_price- floating point (float)
When a new instance of StockModel is created by passing in all three data elements, an attempt will be made to convert each field to the applicable data type. Additionally, there's a custom validator for the stock_symbol field to make sure the value is between 1 and 5 characters.
Here's an example of creating a StockModel object with valid data:
(venv) $ flask shell
>>> from app import StockModel
>>> stock_data = StockModel(
...     stock_symbol='SBUX',
...     number_of_shares='150',
...     purchase_price='56.78'
... )
>>> print(stock_data)
stock_symbol='SBUX' number_of_shares=150 purchase_price=56.78
The Flask shell will be introduced in an upcoming chapter!
However, if invalid data is passed in when creating a StockModel object, then a ValidationError will be raised:
>>> stock_data = StockModel(
...     stock_symbol='SBUX',
...     number_of_shares='150',
...     purchase_price='56,78'
... )
Traceback (most recent call last):
  File "pydantic/main.py", line 331, in pydantic.main.BaseModel.__init__
pydantic.error_wrappers.ValidationError: 1 validation error for StockModel
purchase_price
  value is not a valid float (type=type_error.float)
Let's use this helper class (StockModel) in the add_stock() view function:
from pydantic import BaseModel, field_validator, ValidationError


@app.route('/add_stock', methods=['GET', 'POST'])
def add_stock():
    if request.method == 'POST':
        # Print the form data to the console
        for key, value in request.form.items():
            print(f'{key}: {value}')

        try:
            stock_data = StockModel(
                stock_symbol=request.form['stock_symbol'],
                number_of_shares=request.form['number_of_shares'],
                purchase_price=request.form['purchase_price']
            )
            print(stock_data)
        except ValidationError as e:
            print(e)

    return render_template('add_stock.html')
So, when the 'Add Stock' form is submitted (via a POST call), the data elements from the form will be validated when the StockModel object is created:
- If the data is in the correct format, then the stock data will be printed to the console.
- If the data is not in the correct format, an error message is printed to the console indicating which validation checks failed.
Try adding the same invalid data from earlier (with 34,56 as the purchase price):
stock_symbol: SBUX
number_of_shares: 100
purchase_price: 45,67
1 validation error for StockModel
purchase_price
  value is not a valid float (type=type_error.float)
127.0.0.1 - - [08/Jan/2022 16:54:57] "POST /add_stock HTTP/1.1" 200 -
Try adding valid data in the form:
stock_symbol: SBUX
number_of_shares: 100
purchase_price: 45.67
stock_symbol='SBUX' number_of_shares=100 purchase_price=45.67
127.0.0.1 - - [08/Jan/2022 17:01:57] "POST /add_stock HTTP/1.1" 302 -
Conclusion
In this chapter we looked at how to create and process forms. You should now be able to:
- Explain how forms are processed on a web app
- Define a form in an HTML template
- Change the allowable HTTP methods for a Flask view function
- Parse form data in a view function using the
requestobject - Implement basic form validation in HTML (client-side)
- Implement data validation in Python with pydantic (server-side)
Please note that this chapter does not discuss a common attack known as Cross-Site Request Forgery (CSRF). We'll cover how to prevent this attack in an upcoming chapter using the Flask-WTForms module.
✓ Mark as Completed