 Patrick Kennedy
This article serves as a guide to unit testing Vue components.
We'll first look at why unit testing is important for creating maintainable software and what you should test. Then, we'll detail how to:
- Create and run a unit test for a Vue component
- Test different aspects of a Vue component
- Use mocks to test asynchronous functions
- Check the code coverage of your unit tests
- Structure your unit test files
If you're interested in learning more about Vue, check out my course: Learn Vue by Building and Deploying a CRUD App.
Dependencies:
- Vue 3 with the Composition API - JavaScript framework
- Vite - Tooling for Vue development
- Vitest - Unit test framework
- Vue Test Utils - test utility library for Vue
- Node - JavaScript runtime
The source code (along with detailed installation instructions) for the Vue Weather App project that's used in this article can be found on GitLab: Vue Weather App.
This is part one of a two-part series on testing Vue applications:
- Guide to Unit Testing Vue Components (this article!)
- Testing Pinia Data Stores in Vue
Contents
Objectives
By the end of this article, you should be able to:
- Explain why unit testing is important
- Describe what you should (and should not) unit test
- Develop a unit test suite for a Vue component
- Run the unit tests for a Vue project
- Utilize the
beforeEach()andafterEach()functions within a unit test suite - Write unit tests for testing the implementation details of a Vue component
- Write unit tests for testing the behavioral aspects of a Vue component (click events, etc.)
- Explain how mocking can help simplify unit tests
- Write unit tests for mocking a library and testing asynchronous functions
- Check the code coverage of your unit tests
- Develop a well-structured unit test file for testing a Vue component
Why Unit Test?
In general, testing helps ensure that your app will work as expected for your end users.
Software projects with high test coverage are never perfect, but it's a good initial indicator of the quality of the software. Additionally, testable code is generally a sign of a good software architecture, which is why advanced developers take testing into account throughout the entire development lifecycle.
Tests can be considered at three levels:
- Unit
- Integration
- End-to-end
Unit tests test the functionality of an individual unit of code isolated from its dependencies. They are the first line of defense against errors and inconsistencies in your codebase. Unit testing is a fundamental part of the Test-Driven Development (TDD) process.
Unit testing improves the maintainability of your code.
Maintainability refers to making bug fixes or enhancements to your code or to another developer needing to update your code in the future.
Unit testing should be combined with a Continuous Integration (CI) process to ensure that your unit tests are constantly being executed, ideally on each commit to your repository. A solid suite of unit tests can be critical to catching defects quickly and early in the development process before your end users come across them in production.
What to Test
What should you test? Or, more importantly: What should you not test?
There are three types of testing to consider with unit testing:
- Implementation details: the underlying business logic that a component uses to produce a result based on a given input
- Public interface/design contract: specific inputs (or props, in this case) produce specific results
- Side effects: "if this, then that"; e.g. when a button is clicked something happens
Since you can't test all the things, what should you focus on?
Focus on testing inputs and outputs that the end user will interact with. The experience that the users of your product have is paramount!
- Inputs: data, props, user interaction, lifecycle methods, data store (Pinia/Vuex), route params, query strings
- Outputs: rendered output, events, data results, data store (Pinia/Vuex) updates, dispatches
By focusing on testing the inputs/outputs of a software module (e.g., a Vue component), you are testing the key aspects that the end user will experience.
There may be other internal logic in a software module that is complex and needs to be unit tested, but these types of tests are most likely to need updating during a code refactor.
App Overview
Before discussing how to unit test Vue components, I want to give a short overview of the Vue Weather App that we'll be testing.
After cloning down the repo, install the dependencies, and add the API key.
Review the project's README for more info on creating and adding the API key from Open Weather.
Once done, the Vue Weather App can be run on your local computer by starting the development server:
$ npm run dev
Once the app is built, you will see a success message similar to:
vite v2.9.14 dev server running at:

 > Local: http://localhost:3000/
 > Network: use `--host` to expose

 ready in 543ms.
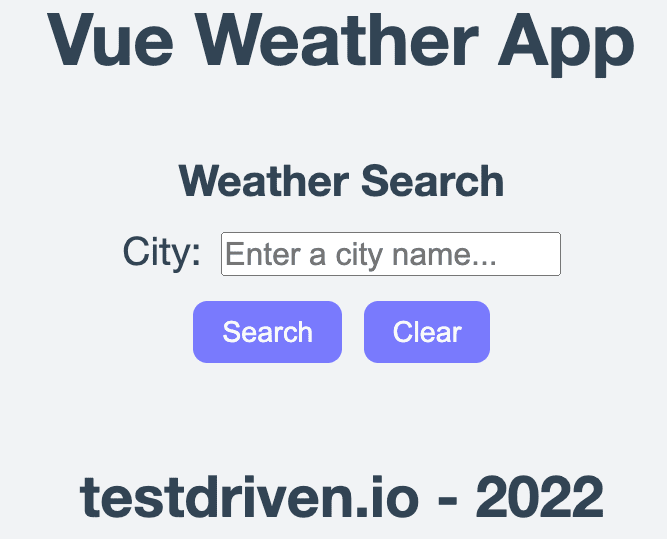
At this point, the development server will be up and running. You can see the Vue app by navigating to http://localhost:3000 in your favorite web browser. When you first load the app, no data is displayed; you'll just see an input field to enter the city that you'd like to get the weather for:
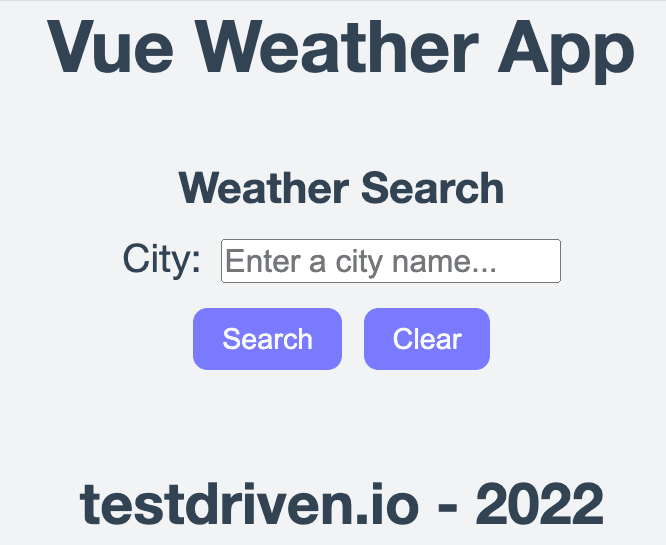
Without any data entered, both the 'Search' and 'Clear' buttons are disabled.
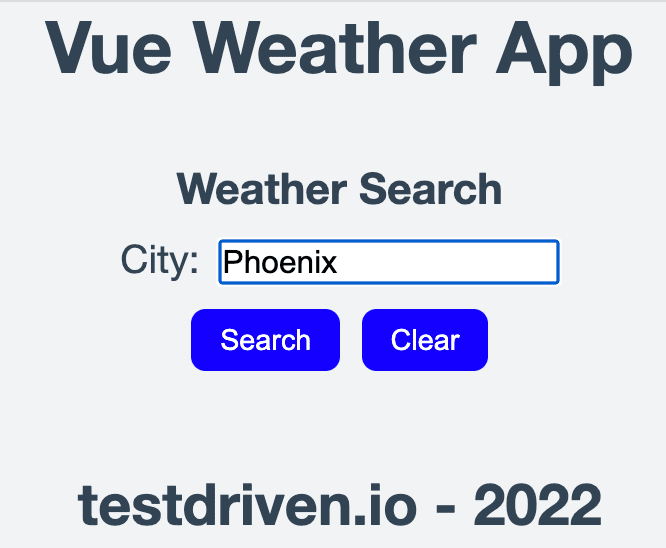
Once you start entering data for a city (as soon as the first character is added), both the 'Search' and 'Clear' buttons will be enabled:
If you click on 'Search' after entering a valid city, the weather data will be displayed for that city:
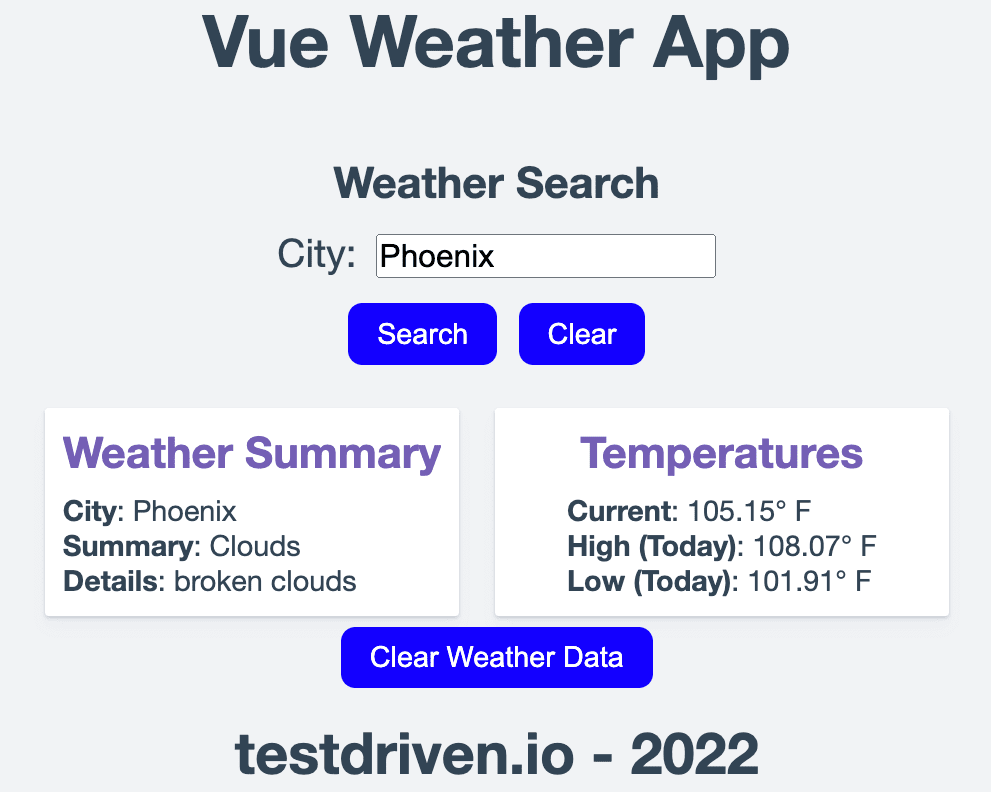
At this point, clicking on the 'Clear Weather Data' button will cause the weather data to be cleared:
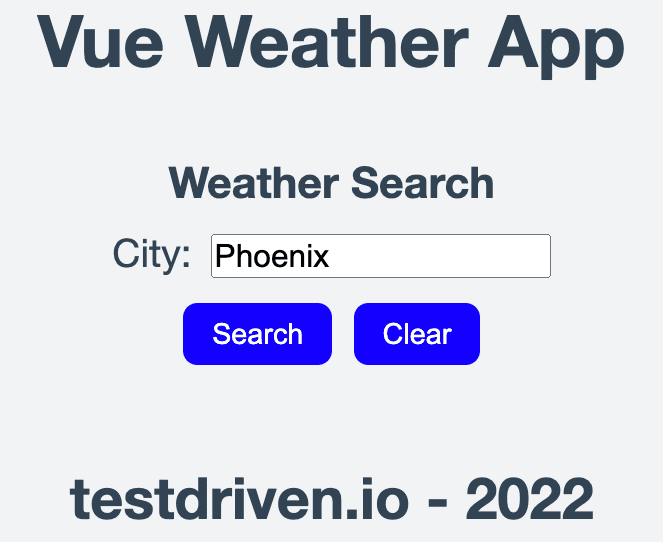
However, the city that was entered will remain in the input field.
If you click on 'Clear' now, the input field will be cleared and the 'Search' and 'Clear' buttons will become disabled once again:
What happens if you enter an invalid city? What if you click 'Clear' before 'Clear Weather Data'? What other states of the app can you find?
Unit Testing in Vue
Since components are the building blocks of Vue (and really any SPA framework, for that matter), they are the most crucial part of your app as a whole. So, spend the majority of your allotted testing time writing unit tests that test your app's components.
Based on my experience with unit testing Vue components, I've found that the testing tools and framework -- Vite and Vitest -- satisfy the key aspects of a good test environment:
- tests are easy and fun to write
- tests can be written quickly
- tests can be executed with a single command
- tests run quickly
Hopefully, you'll find that unit testing your Vue components is an enjoyable experience, as I think that's key to encouraging more testing.
Unit Testing Tools
There are two tools that we're going to use for unit testing the Vue components:
- Vitest - unit test framework
- Vue Test Utils - unit testing utility library for Vue
Vitest is a unit test framework that aims to be framework-agnostic, so it can be used to test Vue, React, Svelte, Lit, and other projects. Vitest is configured to run with Vite, which results in fast test execution.
If you're familiar with Jest, switching to use Vitest is very straightforward as the API for Vitest is compatible with Jest.
When writing unit tests for a Vue component, Vitest and Vue Test Utils provide the following functionality:
Vitest
- Command-line tool to run the tests and check the test coverage
- User interface to visually see test results and coverage results
- Functions for writing unit tests (
it,describe) - Functions for checking against expected values (
expect,toMatch,toContain, etc.) - Mocking (
mockResolvedValue,mockRejectedValue) - Setup (
beforeEach,beforeAll) / Teardown (afterEach,afterAll)
Vue Test Utils
- Mounting components (
mount,shallowMount) - Setting props data (
setProps) - Finding HTML components for testing (
findAll('h2')) - Utility for flushing all Promises (
flushPromises()) - Utility for triggering click events (
trigger) - Utility for checking emitted events (
emitted)
Vitest provides the generic functionality to write unit tests while Vue Test Utils provides the Vue-specific test utilities.
Unit Testing Overview
For starters, let's discuss the naming convention for unit tests in Vue. The unit test file should be of the following format:
<ComponentName>.spec.js
Per the Vue Style Guide, component names should be multiple words (
WeatherHeaderinstead of justHeader) to prevent conflicts with HTML elements.
You should typically have one unit test file for each component in your Vue project. Within each unit test file, there can be a single unit test suite or multiple unit test suites.
The unit test files should be placed in a sub-folder within the Components folder (src/components/__tests__):
$ tree -d -L 2
.
├── node_modules
├── public
├── src
    ├── assets
    └── components
        └── __tests__
Running the Tests
Vitest can be used to run the unit tests like so:
$ npm run test:unit

✓ src/components/__tests__/WeatherFooter.spec.js (1)
✓ src/components/__tests__/WeatherHeader.spec.js (1)
✓ src/components/__tests__/WeatherResult.spec.js (3)
✓ src/components/__tests__/WeatherBanner.spec.js (5)
✓ src/components/__tests__/WeatherSearch.spec.js (5)
✓ src/components/__tests__/App.spec.js (7)

Test Files  6 passed (6)
    Tests  22 passed (22)
     Time  2.38s (in thread 640ms, 371.13%)
All the available commands to run via
npmfor your Vue project are defined in thescriptsfield in package.json.
The default configuration for Vitest is to run the tests in watch mode, which means that the test suite will be re-executed on each save to an applicable file. To change this configuration so that Vitest only runs once (without "watch mode"), update the test:unit configuration in package.json to include the run argument:
"test:unit": "vitest run --environment jsdom",
Examples
Using the Vue Weather App, let's look at some examples for testing Vue components.
Example 1 - Unit Test Introduction
Let's jump right into an example of a unit test file in Vue! The first unit test file is found in src/components/__tests__/WeatherHeader.spec.js and it tests the WeatherHeader component:
import { describe, it, expect } from 'vitest'
import { shallowMount } from '@vue/test-utils'
import WeatherHeader from '../WeatherHeader.vue'


describe('WeatherHeader.vue Test', () => {
  it('renders message when component is created', () => {
    // render the component
    const wrapper = shallowMount(WeatherHeader, {
      propsData: {
        title: 'Vue Project'
      }
    })

    // check that the title is rendered
    expect(wrapper.text()).toMatch('Vue Project')
  })
})
Mounting
The first line in this file imports the test functions from Vitest that are used in this file.
If you want the Vitest API to be available globally (like how Jest works), then add
test: {globals: true}in thedefineConfig()function in vite.config.js. For more details, check out the Vitest documentation.
The second line in this file imports a function called shallowMount from the Vue Test Utils library. The idea of 'mounting' means the loading of an individual component to be able to test it. There are two methods for this in Vue Test Utils:
shallowMount()- creates awrapperfor the Vue component, but with stubbed child componentsmount()- creates awrapperfor the Vue component, including mounting any child components
Since our focus is on testing an individual component (the WeatherHeader component), we'll use shallowMount().
shallowMount()is better for testing an individual component in isolation, as child components are stubbed out. This is the ideal situation for unit testing.Additionally, using
shallowMount()for testing a component with a lot of child components can improve the execution time of the unit test as there's no cost (in terms of time) for rendering the child components.
mount()is useful when you want to include testing the behavior of the child components.
The third line imports the Vue component that is going to be tested, WeatherHeader.vue.
Describe Blocks
After the import statements, there's a describe block that defines a unit test suite.
Within a unit test file, there can be multiple describe blocks that define different unit test suites. Similarly, each describe block can contain multiple unit tests, where each unit test is defined by an it block.
I think about this distinction as:
describeblock - unit test suiteitblock - individual unit test function
What's nice about unit testing with Vitest is that there are several built-in encouragements for adding comments. For example, the first argument for describe should clearly explain which Vue component is being tested:
describe('WeatherHeader.vue Test', () => { ... })
For each it block, the first argument is a description of the test function, which should be a short description of what this specific test is doing. In the example above, the it block tests that the component 'renders message when component is created'.
Expects
As far as the actual unit testing, the first step is to mount the Vue component so that it can be tested:
// render the component
const wrapper = shallowMount(WeatherHeader, {
  propsData: {
    title: 'Vue Project'
  }
})
The shallowMount function returns a wrapper object, which contains the mounted component and the methods to test that component. The wrapper object allows us to test all aspects of the HTML generated by the Vue component and all properties (such as data) of the Vue component.
Additionally, the props, passed into the WeatherHeader component, are passed in as the second argument to shallowMount().
The actual check performed in the unit test is:
// check that the title is rendered
expect(wrapper.text()).toMatch('Vue Project')
This line uses wrapper to check if the title generated by the component is 'Vue Project'. Since this check does a string comparison, it's recommended to use toMatch().
Test Helpers
While the checks in the unit test file for the WeatherHeader component are only checking string values, there are [lots of options available from Vitest to perform checks:
- Booleans:
toBeTruthy()- checks that a variable/statement is truetoBeFalsy()- checks that a variable/statement is false
- Defined:
toBeNull()- checks if a variable matches only nulltoBeUndefined()- checks if a variable is not definedtoBeDefined()- checks if a variable is defined
- Numbers:
toBeGreaterThan()- checks if a number is greater than the value specifiedtoBeGreaterThanOrEqual()- checks if a number is greater than or equal to the value specifiedtoBeLessThan()- checks if a number is less than the value specifiedtoBeLessThanOrEqual()- checks if a number is less than or equal to the value specifiedtoBe()andtoEqual()- checks if a number is the same as the value specified (these functions are equivalent for numbers)toBeCloseTo()- checks if a number is equal to the value specified within a small tolerance (useful for floating-point numbers)
- Strings:
toMatch()- checks if a string is equal to the value specified (Regex can be used as the value specified!)
- Arrays:
toContain()- checks if an array contains the specified value
Additionally, the not qualifier can be used with most of these checks:
expect(wrapper.text()).not.toMatch('Node Project')
For a full list of checks available, check out the Vitest API reference.
Example 2 - Testing Initial Conditions
This example shows how to test the initial conditions (or state) of the WeatherResult component.
Here's an outline of the unit test file (defined in src/components/__tests__/WeatherResult.spec.js):
import { describe, it, expect, beforeEach, afterEach } from 'vitest'
import { shallowMount, flushPromises } from '@vue/test-utils'
import WeatherResult from '@/components/WeatherResult.vue'


describe('WeatherResult.vue Implementation Test', () => {
  let wrapper = null

  // SETUP - run before to each unit test
  beforeEach(() => {
    // render the component
    wrapper = shallowMount(WeatherResult, {
      propsData: {
        city: '',
        weatherSummary: '',
        weatherDescription: '',
        currentTemperature: 0.0,
        lowTemperature: 0.0,
        highTemperature: 0.0
      }
    })
  })

  // TEARDOWN - run after to each unit test
  afterEach(() => {
    wrapper.unmount()
  })

  it('initializes with correct elements', () => { ... })

  it('processes valid props data', async () => { ... })

  it('emits a custom event when the Clear Weather Data button is clicked', () => { ... })
})
The unit test file utilizes the shallowMount() function for rendering the WeatherResult component, as this component is tested as an individual component in isolation.
beforeEach and afterEach Blocks
Within the unit test suite (defined within the describe block), there are two new functions defined:
beforeEach()- called before the execution of each unit test within this unit test suiteafterEach()- called after the execution of each unit test within this unit test suite
The beforeEach() function is used to set a consistent state before running each unit test. This concept is very important to make sure that the order of running the unit tests does not impact the results of the unit tests as a whole.
In this example, the beforeEach() function renders the component with a default set of prop data:
// SETUP - run before to each unit test
beforeEach(() => {
  // render the component
  wrapper = shallowMount(WeatherResult, {
    propsData: {
      city: '',
      weatherSummary: '',
      weatherDescription: '',
      currentTemperature: 0.0,
      lowTemperature: 0.0,
      highTemperature: 0.0
    }
  })
})
The afterEach() function is used to clean up any processing performed during the unit test.
In this example, the afterEach() function un-mounts the wrapper used during the unit test, so that the wrapper can be re-initialized for the next unit test in the beforeEach():
// TEARDOWN - run after to each unit test
afterEach(() => {
  wrapper.unmount()
})
If you want to run code that is executed before or after the overall unit test suite is run, you can use:
beforeAll(() => {
  /* Runs before all tests */
})
afterAll(() => {
  /* Runs after all tests */
})
Expects
The first unit test checks the initial conditions of the WeatherResult component:
it('initializes with correct elements', () => {
  // check that the heading text is rendered
  expect(wrapper.findAll('h2').length).toEqual(2)
  expect(wrapper.findAll('h2').at(0).text()).toMatch('Weather Summary')
  expect(wrapper.findAll('h2').at(1).text()).toMatch('Temperatures')

  // check that 6 fields of data for the temperature are displayed
  expect(wrapper.findAll('p').length).toEqual(6)
  expect(wrapper.findAll('p').at(0).text()).toMatch('City:')
  expect(wrapper.findAll('p').at(1).text()).toMatch('Summary:')
  expect(wrapper.findAll('p').at(2).text()).toMatch('Details:')
  expect(wrapper.findAll('p').at(3).text()).toMatch('Current: 0° F')
  expect(wrapper.findAll('p').at(4).text()).toMatch('High (Today): 0° F')
  expect(wrapper.findAll('p').at(5).text()).toMatch('Low (Today): 0° F')
})
Checks:
- The first section of
expects check that the two headers (defined ash2elements) are as expected. - The second section of
expects check that the six data fields (defined aspelements) are as expected.
Example 3 - Testing Props
The second unit test checks that valid data passed in as prop data is handled correctly by the WeatherResult component:
it('processes valid props data', async () => {
  // Update the props passed in to the WeatherResult component
  wrapper.setProps({
    city: 'Chicago',
    weatherSummary: 'Cloudy',
    weatherDescription: 'Cloudy with a chance of rain',
    currentTemperature: 45.1,
    lowTemperature: 42.0,
    highTemperature: 47.7
  })

  // Wait until the DOM updates
  await flushPromises()

  // check that the prop data is stored as expected within the component
  expect(wrapper.vm.city).toMatch('Chicago')
  expect(wrapper.vm.weatherSummary).toMatch('Cloudy')
  expect(wrapper.vm.weatherDescription).toMatch('Cloudy with a chance of rain')
  expect(wrapper.vm.currentTemperature).toEqual(45.1)
  expect(wrapper.vm.lowTemperature).toBeCloseTo(42.0)
  expect(wrapper.vm.highTemperature).toBe(47.7)

  // check that the heading text is rendered
  expect(wrapper.findAll('h2').length).toEqual(2)
  expect(wrapper.findAll('h2').at(0).text()).toMatch('Weather Summary')
  expect(wrapper.findAll('h2').at(1).text()).toMatch('Temperatures')

  // check that 6 fields of data for the temperature are displayed
  expect(wrapper.findAll('p').length).toEqual(6)
  expect(wrapper.findAll('p').at(0).text()).toMatch('City: Chicago')
  expect(wrapper.findAll('p').at(1).text()).toMatch('Summary: Cloudy')
  expect(wrapper.findAll('p').at(2).text()).toMatch('Details: Cloudy with a chance of rain')
  expect(wrapper.findAll('p').at(3).text()).toMatch('Current: 45.1° F')
  expect(wrapper.findAll('p').at(4).text()).toMatch('High (Today): 47.7° F')
  expect(wrapper.findAll('p').at(5).text()).toMatch('Low (Today): 42° F')
})
Since the beforeEach() function provides a default set of prop data, we need to override the prop data using the setProps() function.
To ensure that the prop data causes the expected updates in the WeatherResult, the test needs to wait for all the DOM updates to take effect:
// Wait until the DOM updates
await flushPromises()
NOTE: The use of
awaitis only possible if the function is defined withasync!
Checks:
- With the props data updated, we can check that the prop data was properly stored within the
WeatherResultcomponent by checking the data elements (usingwrapper.vm). - The second section of
expects check that the two headers (defined ash2elements) are as expected. - The last set of
expects check that the prop data is used to set the six data fields (defined aspelements) as expected.
Example 4 - Testing User Input (Click Event)
The third unit test checks that the clear-weather-data event is emitted by the WeatherResult component when the user clicks on the 'Clear Weather Data' button:
it('emits a custom event when the Clear Weather Data button is clicked', () => {
  // trigger an event when the 'Clear Weather Data' button is clicked
  wrapper.findAll('button').at(0).trigger('click')

  // check that 1 occurrence of the event has been emitted
  expect(wrapper.emitted('clear-weather-data')).toBeTruthy()
  expect(wrapper.emitted('clear-weather-data').length).toBe(1)
})
To trigger a click event, the button element must be found in the wrapper and then the trigger function is called to trigger the click event.
Once the button is clicked, the unit test checks that only one custom event (with the name of clear-weather-data) is emitted.
Mocking Examples
Within the App component, when a user searches for the weather for a city, an HTTP GET call is made to Open Weather to retrieve the data via a third-party library called Axios:
const searchCity = (inputCity) => {
  // GET request for user data
  axios.get('http://api.openweathermap.org/data/2.5/weather?q=' + inputCity + '&units=imperial&APPID=' + openweathermapApiKey.value)
    .then((response) => {
      // handle success
      console.log(response)

      weatherData.value.city = response.data.name
      weatherData.value.weatherSummary = response.data.weather[0].main
      weatherData.value.weatherDescription = response.data.weather[0].description
      weatherData.value.currentTemperature = response.data.main.temp
      weatherData.value.lowTemperature = response.data.main.temp_min
      weatherData.value.highTemperature = response.data.main.temp_max
      validWeatherData.value = true
    })
    .catch((error) => {
      // handle error
      messageType.value = 'Error'
      messageToDisplay.value = 'ERROR! Unable to retrieve weather data for ' + inputCity + '!'
      console.log(error.message)
      resetData()
    })
    .finally((response) => {
      // always executed
      console.log('HTTP GET Finished!')
    })
}
When thinking about how to test making the HTTP GET calls, two scenarios come to mind, each testing the side effect of the actual API call:
- HTTP GET response succeeds (happy path)
- HTTP GET response fails (exception path)
When testing code that utilizes an external API, it's often easier to not make the actual call to begin with by replacing the call with a mock. There are pros and cons to this approach, though.
Pros:
- The tests won't be dependent on a network request
- They won't break if the API goes down
- They will run much faster
Cons:
- You'll need to update the tests whenever the API schema changes
- It's difficult to keep up with API changes in a microservice architecture
- Mocking is a difficult concept to grasp and they can add a lot of clutter to your test suites
At some point you should check the full integration to ensure the shape of the API response hasn't changed.
Since this article is focused on unit testing, we're going to mock the Axios library.
Mocking provides a means to mimic the expected behavior of a software module. Although mocking can be used in production code (very dangerous!), it's typically used during development and testing.
Loading data from an external API takes time. While it typically takes less than one or two seconds to load the data from Open Weather in this app, other external APIs can be more time-consuming. Additionally, we want a way to easily check if the HTTP GET request fails. So, we'll add mocks to specify how the GET request would respond.
Example 5 - Testing Asynchronous Code (Successful Case)
The unit tests for the App component are located in the src/components/__tests__/App.spec.js file.
To get started, we need to import the Axios library:
import { describe, it, expect, beforeEach, afterEach, vi } from 'vitest'
import { shallowMount, mount, flushPromises } from '@vue/test-utils'
import App from '../../App.vue'
import axios from 'axios'
However, we don't want to use the actual Axios library as is done in the source code (App.vue). Instead, we want to create a mock of the Axios library so we don't actually call the external API:
// Mock the axios library
vi.mock("axios", () => {
  return {
    default: {
      get: vi.fn(),
    },
  };
});
This code block tells Vitest that the get() method within the axios library should be mocked.
In the unit test file (src/components/__tests__/App.spec.js), for the App component, we're:
- Simulating a successful HTTP GET request
- Simulating a failed HTTP GET request
To start, let's handle the nominal situation where the HTTP GET request is successful.
describe('Implementation Test for App.vue with Successful HTTP GET', () => {
  let wrapper = null

  beforeEach(() => {
    const responseGet = { data:
      {
        name: 'Chicago',
        weather: [
          {
            main: 'Cloudy',
            description: 'Cloudy with a chance of rain'
          }
        ],
        main: {
          temp: 56.3,
          temp_min: 53.8,
          temp_max: 58.6
        }
      }
    }

    // Set the mock call to GET to return a successful GET response
    axios.get.mockResolvedValue(responseGet)

    // render the component
    wrapper = shallowMount(App)
  })

  afterEach(() => {
    axios.get.mockReset()
    wrapper.unmount()
  })

  ...

})
beforeEach and afterEach Blocks
In the beforeEach() function, we set the response that should occur when axios.get() is called. The response is the pre-canned weather data that looks similar to what we get from Open Weather, if we actually made the request. The key line in this section is:
// Set the mock call to GET to return a successful GET response
axios.get.mockResolvedValue(responseGet)
This line is the key as it lets Vitest know that it should return the responseGet array when axios.get() is called in the App component instead of actually making an HTTP GET call using Axios.
The next section of the unit test suite defines the afterEach() function:
afterEach(() => {
  axios.get.mockReset()
  wrapper.unmount()
})
The afterEach() function, which is called after each unit test executes, clears the mock of axios.get() that was created during the unit test execution. This approach is a good practice to clean up any mocks after running a test, so that any subsequent tests start from a known state.
Expects
Now we can define the unit test:
it('does load the weather data when a successful HTTP GET occurs', async () => {
  wrapper.vm.searchCity('Chicago')

  // Wait until the DOM updates
  await flushPromises()

  expect(axios.get).toHaveBeenCalledTimes(1)
  expect(axios.get).toBeCalledWith(expect.stringMatching(/Chicago/))

  // check that the user data is properly set
  expect(wrapper.vm.weatherData.city).toMatch('Chicago')
  expect(wrapper.vm.weatherData.weatherSummary).toMatch('Cloudy')
  expect(wrapper.vm.weatherData.weatherDescription).toMatch('Cloudy with a chance of rain')
  expect(wrapper.vm.weatherData.currentTemperature).toEqual(56.3)
  expect(wrapper.vm.weatherData.lowTemperature).toEqual(53.8)
  expect(wrapper.vm.weatherData.highTemperature).toEqual(58.6)
  expect(wrapper.vm.validWeatherData).toBe(true)
})
Since we already went through the steps of defining the mock and rendering the component (via shallowMount()), this unit test can focus on performing checks.
The unit test starts by calling the searchCity() function:
wrapper.vm.searchCity('Chicago')
To ensure that the searchCity() function causes the expected updates in the App component, the test needs to wait for all the Promises to be resolved and for the DOM updates to take effect:
// Wait until all Promises are resolved and the DOM updates
await flushPromises()
We check that axios.get() was called only once and that the HTTP GET call included the correct city name:
expect(axios.get).toHaveBeenCalledTimes(1)
expect(axios.get).toBeCalledWith(expect.stringMatching(/Chicago/))
To be very thorough, the weather data also checks for the instance of the App component rendered in this unit test to make sure it matches the pre-canned data returned from the mock of axios.get():
// check that the user data is properly set
expect(wrapper.vm.weatherData.city).toMatch('Chicago')
expect(wrapper.vm.weatherData.weatherSummary).toMatch('Cloudy')
expect(wrapper.vm.weatherData.weatherDescription).toMatch('Cloudy with a chance of rain')
expect(wrapper.vm.weatherData.currentTemperature).toEqual(56.3)
expect(wrapper.vm.weatherData.lowTemperature).toEqual(53.8)
expect(wrapper.vm.weatherData.highTemperature).toEqual(58.6)
expect(wrapper.vm.validWeatherData).toBe(true)
Example 6 - Testing Asynchronous Code (Failure Case)
While it's nice to test when things go as expected, it's also important to check how our software reacts to negative conditions. With that in mind, let's create a second unit test suite for checking a failed HTTP GET request:
describe('Implementation Test for App.vue with Failed HTTP GET', () => { ... })
There's no problem with having multiple unit test suites within a single unit test file (.spec.js).
Since the mocks are created in the
beforeEach()function, there needs to be separate unit test suites with differentbeforeEach()implementations for both successful and failed HTTP GET responses.
beforeEach and afterEach Blocks
The beforeEach() function in this unit test suite is quite different:
beforeEach(() => {
  // Set the mock call to GET to return a failed GET request
  axios.get.mockRejectedValue(new Error('BAD REQUEST'))

  // Render the component
  wrapper = shallowMount(App)
})
Instead of setting a response to return from the axios.get() call, we are now returning a failed Promise object with the response of 'BAD REQUEST'.
The afterEach() function for this unit test suite is identical to the other unit test suite:
afterEach(() => {
  axios.get.mockReset()
  wrapper.unmount()
})
Expects
Here's the unit test function for testing a failed HTTP GET request:
it('does not load the weather data when a failed HTTP GET occurs', async () => {
  wrapper.vm.searchCity('Chicago')

  expect(axios.get).toHaveBeenCalledTimes(1)
  expect(axios.get).toBeCalledWith(expect.stringMatching(/Chicago/))

  // Wait until the DOM updates
  await flushPromises()

  // Check that there is no user data loaded when the GET request fails
  expect(wrapper.vm.weatherData.city).toMatch(/^$/)
  expect(wrapper.vm.weatherData.weatherSummary).toMatch(/^$/)
  expect(wrapper.vm.weatherData.weatherDescription).toMatch(/^$/)
  expect(wrapper.vm.weatherData.currentTemperature).toEqual(0)
  expect(wrapper.vm.weatherData.lowTemperature).toEqual(0)
  expect(wrapper.vm.weatherData.highTemperature).toEqual(0)
  expect(wrapper.vm.validWeatherData).toBe(false)

  // check that the banner message indicates failure
  expect(wrapper.vm.messageToDisplay).toMatch('ERROR! Unable to retrieve weather data for Chicago!')
  expect(wrapper.vm.messageType).toMatch('Error')
})
Just like in the previous unit test suite, we check that only one instance of axios.get() is called and then there's a check that no weather data was loaded into the App component.
Code Coverage
When developing unit tests, it can be nice to get an understanding of how much of the source code is actually tested. This concept is known as code coverage.
I need to be very clear that having a set of unit tests that cover 100% of the source code is by no means an indicator that the code is properly tested.
This metric means that there are a lot of unit tests and a lot of effort has been put into developing the unit tests. The quality of the unit tests still needs to be checked by code inspection.
The other extreme where this is a minimal set (or none!) of unit tests is a very bad indicator.
Vitest provides code coverage by using the --coverage flag.
To easily run Vitest with coverage results, I like to include the following items in the script section of package.json:
{
  "name": "vue-weather-app",
  "version": "1.0.0",
  "scripts": {
    ...
    "test:unit": "vitest run --environment jsdom",
    "test:coverage": "vitest run --environment jsdom --coverage",
    "test:ui": "vitest --environment jsdom --coverage --ui"
  },
  ...
}
When npm run test:unit is run, the unit tests are executed:
$ npm run test:unit
...
 ✓ src/components/__tests__/WeatherBanner.spec.js (5)
 ✓ src/components/__tests__/WeatherSearch.spec.js (5)
 ✓ src/components/__tests__/WeatherFooter.spec.js (1)
 ✓ src/components/__tests__/WeatherHeader.spec.js (1)
 ✓ src/components/__tests__/WeatherResult.spec.js (3)
 ✓ src/components/__tests__/App.spec.js (7)

Test Files  6 passed (6)
     Tests  22 passed (22)
      Time  2.81s (in thread 536ms, 524.89%)
When npm run test:coverage is run, the unit tests are executed and the coverage is reported:
$ npm run test:coverage
...
Test Files  6 passed (6)
     Tests  22 passed (22)
      Time  3.38s (in thread 660ms, 512.10%)

--------------------|---------|----------|---------|---------|-------------------
File                | % Stmts | % Branch | % Funcs | % Lines | Uncovered Line #s
--------------------|---------|----------|---------|---------|-------------------
All files           |   99.15 |    96.55 |     100 |   99.15 |
 src                |   97.31 |    85.71 |     100 |   97.31 |
  App.vue           |   97.31 |    85.71 |     100 |   97.31 | 60-63
 src/components     |     100 |      100 |     100 |     100 |
  WeatherBanner.vue |     100 |      100 |     100 |     100 |
  WeatherFooter.vue |     100 |      100 |     100 |     100 |
  WeatherHeader.vue |     100 |      100 |     100 |     100 |
  WeatherResult.vue |     100 |      100 |     100 |     100 |
  WeatherSearch.vue |     100 |      100 |     100 |     100 |
--------------------|---------|----------|---------|---------|-------------------
The npm run test:ui will load the test and coverage results in your default web browser, which can be convenient for visually seeing where the test coverage is missing.
Unit Test Structure
After going through many different unit test files, I recommend the following structure for the unit test file for a Vue component:
import { describe, it, expect, beforeEach, afterEach, vi } from 'vitest'
import { shallowMount } from '@vue/test-utils'
import App from '@/App.vue'  // Import Vue component to test
import axios from 'axios'    // Import libraries to mock

// Mock the axios library
vi.mock("axios", () => {
  return {
    default: {
      get: vi.fn(),
    },
  };
});


describe('Tests for the ... Component', () => {
  let wrapper = null

  beforeEach(() => {
    // set any initial data and create the mocks of libraries

    // render the component
    wrapper = shallowMount(App)
  })

  afterEach(() => {
    axios.get.mockReset()
    wrapper.unmount()
  })

  it('check successful events', () => { ... })

  it('check failure events', () => { ... })
})
Key items:
- Each unit test suite has a related set of unit tests
- Utilize the
beforeEach()andafterEach()functions to create independent unit test functions - Create mocks of any libraries used within the Vue component that's tested
- Render the components in the
beforeEach()function and update prop data within the unit test functions - Utilize
shallowMount()overmount()to focus on testing individual components
Conclusion
This article provides a guide for unit testing Vue components, focusing on:
- Why you should write unit tests
- What you should (and should not) unit test
- How to write unit tests
Put simply, when considering what to test, focus on testing the inputs and outputs (actual results), not the underlying business logic (how the results are produced). With this in mind, take a minute or two to review the examples again, taking note of the inputs and outputs tested.
Again, if you're interested in learning more about Vue, check out my course: Learn Vue by Building and Deploying a CRUD App.
This is part one of a two-part series on testing Vue applications:
- Guide to Unit Testing Vue Components (this article!)
- Testing Pinia Data Stores in Vue