 Patrick Kennedy
This tutorial describes how to test Pinia data stores in a Vue application.
This is part two of a two-part series on testing Vue applications:
- Guide to Unit Testing Vue Components
- Testing Pinia Data Stores in Vue (this article!)
While you don't have to start with the first article, it's recommended to at least review it to provide a bit of context for this article.
If you're interested in learning more about Vue, check out my course: Learn Vue by Building and Deploying a CRUD App.
Dependencies:
- Vue 3 with the Composition API - JavaScript framework
- Vite - Tooling for Vue development
- Vitest - Unit test framework
- Vue Test Utils - test utility library for Vue
- Node - JavaScript runtime
- Pinia - state management library
- Pinia Testing - Pinia testing utilities
The source code (along with detailed installation instructions) for the Vue Weather App project that's used in this article can be found on GitLab: Vue Weather App.
Contents
Objectives
By the end of this article, you should be able to:
- Explain how state is managed by a Pinia data store
- Explain when to use a Pinia data store in a Vue application
- Write unit tests for testing a Pinia data store
- Write tests for how a Vue component interacts with a Pinia data store
- Run unit tests using Vitest
What is Pinia?
Pinia is a state management library. The term 'state management' refers to the centralized data in your Vue application that's typically utilized by multiple components.
Pinia is both a library that provides the tools to create a reactive data store and a set of design patterns to access (read/write) that data in a controlled manner. Additionally, Pinia is integrated with Vue DevTools to provide a very nice debugging/analysis experience.
The following component diagram illustrates how Pinia fits into the Vue application that will be tested in this tutorial:
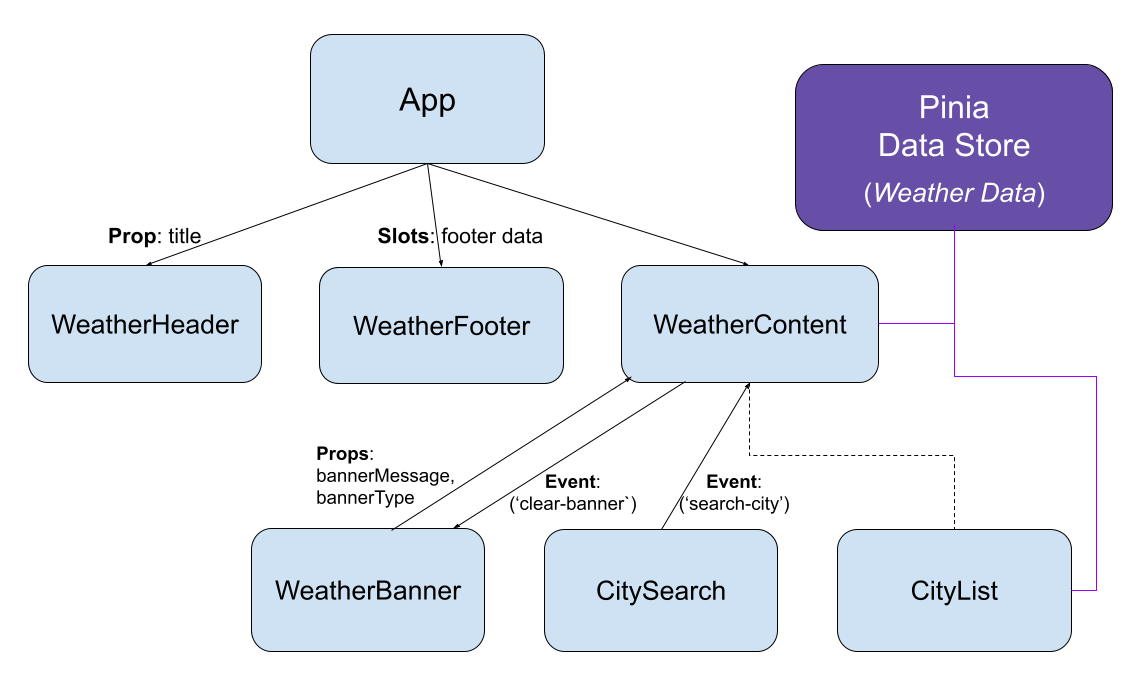
The Pinia data store contains the global data for the Vue application. Both the WeatherContent and CityList components interact with the Pinia data store to add/retrieve weather data.
When to Use Pinia
Once you learn about Pinia, it might be tempting to move all data from each component into a data store. However, I would recommend adding data into a data store that's utilized by >1 component.
Data that's only utilized within a single component is best to remain in that component (to help reduce the scope of that data).
Any data that's shared by >1 component is a good candidate for addition into a data store.
As you start using Pinia, you'll notice that a lot of data that was passed between components using props and custom events becomes better suited for a data store.
Pinia vs. Vuex
Vuex is another popular state management library for Vue projects. While it works well with any version of Vue, there are several simplifications with Pinia that make the development experience simpler and the resulting code easier to read and understand.
Vuex has different versions depending on the version of Vue that is being used: Vuex 4.x works with Vue 3; Vuex 3.x works with Vue 2. In contrast, Pinia works with both Vue 2 and Vue 3.
Finally, Pinia is the recommended state management library for Vue.
Vocabulary
Several terms have unique implications in Pinia, so I want to go over each before we dive into how Pinia works:
- State Management - managing the global data of the Vue application in a controlled manner
- Store - where the global data is stored
- State - the global data in a store
- Getters - methods for retrieving data from a store
- Actions - methods for modifying data in a store
Getting Started with Pinia
Before discussing how to test a Pinia data store, I want to give a short overview of the Vue Weather App that we'll be testing.
To play around with the Vue Weather App, check out the app on Netlify: Vue Weather App - Netlify
If you'd like to run the app on your local machine, you'll need to clone the repository and install the dependencies using NPM:
$ git clone [email protected]:patkennedy79/vue-weather-app.git
$ cd vue-weather-app
$ npm install
Once done, the app can be run by starting the development server:
$ npm run dev
Once the app is built, you'll see a success message similar to:
vite v2.9.14 dev server running at:

 > Local: http://localhost:3000/
 > Network: use `--host` to expose

 ready in 543ms.
At this point, the development server will be up and running. You can see the app by navigating to http://localhost:3000 in your favorite web browser. You can search by city name to see the current weather for a city:

The weather data for the cities searched is retrieved using the OpenWeather API; the cities are listed in the order that they were searched. This list of cities can be cleared by clicking the "Clear Weather Data" button.
For a complete set of prerequisites and installation instructions, check out the README on GitLab.
If you're interested in learning more about Pinia, check out my Vue course which teaches how to use Pinia in a Vue application: Learn Vue by Building and Deploying a CRUD App.
Installation
Pinia should be installed using NPM:
$ npm install pinia
Once the installation is complete, you should see that pinia has been added as a dependency in package.json:
"dependencies": {
  "axios": "^0.27.2",
  "pinia": "^2.0.20",
  "vue": "^3.2.37"
},
Additionally, since we'll be testing the data store created with Pinia, install the Pinia testing package:
$ npm install @pinia/testing --save-dev
Once the installation is complete, you should see that @pinia/testing has been added as a development dependency in package.json:
"devDependencies": {
  "@pinia/testing": "^0.0.14",
}
Project Structure
Within a Vue project, the "src" folder contains the Vue components and the Pinia data store(s):
% tree -L 2 src
src
├── App.vue
├── assets
│   ├── base.css
│   └── main.css
├── components
│   ├── CityList.vue
│   ├── ...
│   ├── WeatherHeader.vue
│   └── __tests__
│       ├── App.spec.js
│       ├── ...
│       └── WeatherHeader.spec.js
├── main.js
└── stores
    ├── __tests__
    │   └── cities.spec.js
    └── cities.js
The Pinia data stores are stored in "src/stores". Each Pinia data store should be a separate file within the "src/stores" folder.
The unit test files for the Pinia data stores are stored in "src/stores/__tests__". There should be a separate unit test file for each Pinia data store.
Data Store
The Pinia data store that will be tested in this tutorial stores the weather data for different cities:
import { defineStore } from 'pinia'

export const useCitiesStore = defineStore('cities', {
  // state is the data being stored in the data store
  state: () => ({
    // List of Objects representing the weather for cities:
    //   - cityName: name of the city
    //   - stateName: name of the state (if applicable)
    //   - countryAbbreviation: abbreviation of the country
    //   - weatherSummary: brief description of the current weather
    //   - currentTemperature: current temperature (in degrees F)
    //   - dailyHigh: high temperature (in degrees F) for today
    //   - dailyLow: low temperature (in degrees F) for today
    weatherData: []
  }),

  // getters return data from the data store
  getters: {
    getNumberOfCities: (state) => { return state.weatherData.length }
  },

  // actions are operations that change the state
  actions: {
    addCity(city, state, country, summary, currentTemp, high, low) {
      // Check if the city is already saved
      if (this.weatherData.find(({ cityName }) => cityName === city) === undefined) {
        this.weatherData.push({
          'cityName': city,
          'stateName': state,
          'countryAbbreviation': country,
          'weatherSummary': summary,
          'currentTemperature': currentTemp,
          'dailyHigh': high,
          'dailyLow': low
        })
      }
    },
    clearAllCities() {
      // Setting the `weatherData` array to a length of zero clears it
      this.weatherData.length = 0
    }
  }
})
The state property defines the data being stored, which is an array of objects representing the weather for different cities.
There's one element in the getters property for retrieving the number of cities stored.
There are two actions for modifying the data being stored:
addCity()- action for adding the weather data for a cityclearAllCities()- action for removing the weather data for all cities
Unit Testing a Pinia Data Store
Unit Test Structure
When unit testing a Pinia data store, the actual store should be utilized by importing it:
import { describe, it, expect, beforeEach } from 'vitest'
import { setActivePinia, createPinia } from 'pinia'
import { useCitiesStore } from '@/stores/cities'  // <-- !!

describe('Data Store Test', () => {
  let store = null

  beforeEach(() => {
    // create a fresh Pinia instance and make it active so it's automatically picked
    // up by any useStore() call without having to pass it to it:
    // `useStore(pinia)`
    setActivePinia(createPinia())

    // create an instance of the data store
    store = useCitiesStore()
  })

  it('initializes with correct values', () => { ... })
  it('test adding a new city', () => { ...})
  it('test adding a duplicate city', () => { ... })
  it('test removing all cities', () => { ... })
})
The Pinia data store is imported for use within the unit test file:
import { useCitiesStore } from '@/stores/cities'
The use of
@in theimportstatement is an alias to the "src" folder within the Vue project.
In the beforeEach() function (which is executed before each unit test function), the pinia instance is created and made active:
beforeEach(() => {
  // create a fresh Pinia instance and make it active so it's automatically picked
  // up by any useStore() call without having to pass it to it:
  // `useStore(pinia)`
  setActivePinia(createPinia())

  // create an instance of the data store
  store = useCitiesStore()
})
Once pinia has been activated, an instance of the Pinia data store -- i.e., the unit under test! -- can be created using useCitiesStore().
Unit Tests
With the structure of the unit test file in place, the unit tests can be written to test the getters and actions.
First, check if the Pinia data store initializes with an empty array:
it('initializes with zero cities', () => {
  expect(store.getNumberOfCities).toEqual(0)
})
Next, test the nominal scenario for using the addCity() action:
it('test adding a new city', () => {
  // Call the 'addCity' action
  store.addCity('Chicago', 'Illinois', 'US', 'cloudy', 75.6, 78.9, 65.2)

  // Check that the city was added
  expect(store.getNumberOfCities).toEqual(1)
  expect(store.weatherData.length).toEqual(1)
  expect(store.weatherData[0]).toEqual({
    'cityName': 'Chicago',
    'stateName': 'Illinois',
    'countryAbbreviation': 'US',
    'weatherSummary': 'cloudy',
    'currentTemperature': 75.6,
    'dailyHigh': 78.9,
    'dailyLow': 65.2
  })
})
Also, it's a good idea to test the off-nominal scenario where the city is already in the weatherData array when using the addCity() action:
it('test adding a duplicate city', () => {
  // Call the 'addCity' action
  store.addCity('New Orleans', 'Louisiana', 'US', 'sunny', 87.6, 78.9, 65.2)

  // Check that the city was added
  expect(store.weatherData.length).toEqual(1)
  expect(store.weatherData[0].cityName).toMatch('New Orleans')

  // Attempt to add the same city
  store.addCity('New Orleans', 'Louisiana', 'US', 'sunny', 87.6, 78.9, 65.2)

  // Check that only 1 instance of the city name is saved
  expect(store.weatherData.length).toEqual(1)
  expect(store.weatherData[0].cityName).toMatch('New Orleans')
})
Finally, test removing all the data from the store with the clearAllCities() action:
it('test removing all cities', () => {
  // Add two cities to the data store
  store.addCity('New Orleans', 'Louisiana', 'US', 'sunny', 87.6, 78.9, 65.2)
  store.addCity('Denver', 'Colorado', 'US', 'windy', 94.5, 95.6, 56.7)

  // Check that the cities were added
  expect(store.weatherData.length).toEqual(2)

  // Remove a city
  store.clearAllCities()

  // Check that zero cities remain in the data store
  expect(store.weatherData.length).toEqual(0)
})
When unit testing a Pinia data store, the tests should focus on how the data store will be used by Vue components. Typically, these unit tests should focus on the actions that modify the state of the data store.
Testing Using a Pinia Data Store
Overview
When testing a Vue component that utilizes a Pinia data store, the createTestingPinia plugin should be used to create a Pinia instance that's designed for testing.
Specifically, all Pinia data stores will be mocked, so you can focus on testing the Vue component. This approach means that the Vue component test should focus on two key interactions with a Pinia data store:
- Initialize the Pinia data store when the component is mounted
- Spy on the actions in the Pinia data store to make sure they are called at the appropriate times
Unit Tests
When unit testing Vue components that use a Pinia data store, you'll need to import createTestingPinia from the Pinia testing module:
import { describe, it, expect, vi, beforeEach, afterEach } from 'vitest'
import { shallowMount } from '@vue/test-utils'
import CityList from '@/components/CityList.vue'
import { createTestingPinia } from '@pinia/testing'  // <-- !!
import { useCitiesStore } from '@/stores/cities'
In addition to createTestingPinia, the useCitiesStore() function from the Pinia data store needs to be imported to test that the correct 'actions' are called on the data store.
There are two unit test suites (of increasing complexity) that will be described in this tutorial.
The first unit test suite tests how the Vue component works when the Pinia data store is empty:
describe('CityList.vue Test with empty data store', () => {
  let wrapper = null

  // SETUP - run prior to each unit test
  beforeEach(() => {
    // render the component
    wrapper = shallowMount(CityList, {
      global: {
        plugins: [
          createTestingPinia({
            createSpy: vi.fn
          })
        ]
      }
    })
  })

  // TEARDOWN - run after each unit test
  afterEach(() => {
    wrapper.unmount()
  })

  it('initializes with zero elements displayed', () => {
    // check that zero city cards are displayed
    expect(wrapper.findAll('h2').length).toEqual(0)

    // check that the 'Clear Weather Data' button is not displayed
    expect(wrapper.findAll('button').length).toEqual(1)
    expect(wrapper.findAll('button')[0].isVisible()).toBeFalsy()
  })
})
When mounting the component (using shallowMount()), utilize createTestingPinia() to create a spy on all the actions:
// render the component
wrapper = shallowMount(CityList, {
  global: {
    plugins: [
      createTestingPinia({
        createSpy: vi.fn
      })
    ]
  }
})
The single unit test in this unit test suite checks that zero cards are displayed and the 'Clear Weather Data' button is not displayed:
it('initializes with zero elements displayed', () => {
  // check that zero city cards are displayed
  expect(wrapper.findAll('h2').length).toEqual(0)

  // check that the 'Clear Weather Data' button is not displayed
  expect(wrapper.findAll('button').length).toEqual(1)
  expect(wrapper.findAll('button')[0].isVisible()).toBeFalsy()
})
The second unit test suite initializes the Pinia data store with weather data for two cities:
describe('CityList.vue Test with filled data store', () => {
  let wrapper = null
  let store = null

  // SETUP - run prior to each unit test
  beforeEach(() => {
    // render the component and initialize the data store
    // to contain weather data for (2) cities
    wrapper = shallowMount(CityList, {
      global: {
        plugins: [
          createTestingPinia({
            createSpy: vi.fn,
            initialState: {
              cities: {
                weatherData: [
                  {
                    'cityName': 'New Orleans',
                    'stateName': 'Louisiana',
                    'countryAbbreviation': 'US',
                    'weatherSummary': 'sunny',
                    'currentTemperature': 77.6,
                    'dailyHigh': 78.9,
                    'dailyLow': 65.2
                  },
                  {
                    'cityName': 'Dublin',
                    'stateName': '',
                    'countryAbbreviation': 'IE',
                    'weatherSummary': 'windy',
                    'currentTemperature': 64.5,
                    'dailyHigh': 65.6,
                    'dailyLow': 46.7
                  }
                ]
              }
            }
          })
        ]
      }
    })

    // create the data store using the testing pinia
    store = useCitiesStore()
  })

  // TEARDOWN - run after each unit test
  afterEach(() => {
    wrapper.unmount()
  })

  it('displays city weather from the data store', () => { ... })
  it('calls the correct action when the weather data is cleared', async () => { ... })
})
When the Vue component is mounted (via shallowMount()), createTestingPinia() is used to create a spy on all the actions. Additionally, the initialState property is defined to initialize the Pinia data store:
// render the component and initialize the data store
// to contain weather data for (2) cities
wrapper = shallowMount(CityList, {
  global: {
    plugins: [
      createTestingPinia({
        createSpy: vi.fn,
        initialState: {
          cities: {
            weatherData: [
              {
                'cityName': 'New Orleans',
                'stateName': 'Louisiana',
                'countryAbbreviation': 'US',
                'weatherSummary': 'sunny',
                'currentTemperature': 77.6,
                'dailyHigh': 78.9,
                'dailyLow': 65.2
              },
              {
                'cityName': 'Dublin',
                'stateName': '',
                'countryAbbreviation': 'IE',
                'weatherSummary': 'windy',
                'currentTemperature': 64.5,
                'dailyHigh': 65.6,
                'dailyLow': 46.7
              }
            ]
          }
        }
      })
    ]
  }
})
When specifying the initialState property, the object specified needs to start with the Pinia data store name (in this case, cities is the name specified when the store is created using defineStore() in src/stores/cities.js). Next, the 'state' (in this case, weatherData) is specified and the initial array of data is specified.
With the initial state of the Pinia data store specified, the first unit test in this test suite checks that the data from the store is displayed properly:
it('displays city weather from the data store', () => {
  // check that two city cards are displayed
  const cityHeadings = wrapper.findAll('h2')
  expect(cityHeadings.length).toEqual(2)
  expect(cityHeadings[0].text()).toMatch('New Orleans, Louisiana')
  expect(cityHeadings[1].text()).toMatch('Dublin')
  const citySubHeadings = wrapper.findAll('h3')
  expect(citySubHeadings.length).toEqual(2)
  expect(citySubHeadings[0].text()).toMatch('US')
  expect(citySubHeadings[1].text()).toMatch('IE')
  const cityWeatherData = wrapper.findAll('p')
  expect(cityWeatherData.length).toEqual(6)
  expect(cityWeatherData[0].text()).toMatch('Weather Summary: sunny')
  expect(cityWeatherData[1].text()).toMatch('Current Temperature: 77.6')
  expect(cityWeatherData[2].text()).toMatch('High: 78.9°F / Low: 65.2°F')
  expect(cityWeatherData[3].text()).toMatch('Weather Summary: windy')
  expect(cityWeatherData[4].text()).toMatch('Current Temperature: 64.5')
  expect(cityWeatherData[5].text()).toMatch('High: 65.6°F / Low: 46.7°F')

  // check that the 'Clear Weather Data' button is displayed
  expect(wrapper.findAll('button').length).toEqual(1)
  expect(wrapper.findAll('button')[0].isVisible()).toBeTruthy()
  expect(wrapper.findAll('button')[0].text()).toMatch('Clear Weather Data (2)')
})
The second unit test checks that the correct 'action' is called when the 'Clear Weather Data' button is clicked:
it('calls the correct action when the weather data is cleared', async () => {
  // create the data store using the testing pinia
  const store = useCitiesStore()

  // trigger an event when the 'Clear Weather Data' button is clicked
  wrapper.findAll('button').at(0).trigger('click')

  // check that the 'clearAllCities' action was called on the data store
  expect(store.clearAllCities).toHaveBeenCalledTimes(1)
})
Notice that the test doesn't check if the data changes in the Pinia data store since we already tested that in the unit test of the Pinia data store. When testing the Vue component, we're concerned with how it interacts with the Pinia data store (i.e., is the correct action called?).
Additional Considerations
If you have a top-level test of your Vue application (that uses mount()), it will also need to create a test version of Pinia since the Vue sub-components that interact with the Pinia data store will be mounted during test.
Here's an example of a top-level test file that checks that the correct components are rendered:
import { describe, it, expect, vi } from 'vitest'
import { mount } from '@vue/test-utils'
import App from '@/App.vue'
import { createTestingPinia } from '@pinia/testing'

describe('App.vue Test', () => {
  it('renders the page', () => {
    // render the component
    const wrapper = mount(App, {
      global: {
        plugins: [
          createTestingPinia({
            createSpy: vi.fn
          })
        ]
      }
    })

    // check that all 3 sub-components are rendered
    expect(wrapper.getComponent({ name: 'WeatherHeader' }).exists()).toBeTruthy()
    expect(wrapper.getComponent({ name: 'WeatherContent' }).exists()).toBeTruthy()
    expect(wrapper.getComponent({ name: 'WeatherFooter' }).exists()).toBeTruthy()
  })
})
Just as in the previous example, the App component needs to be mounted with the createTestingPinia plugin. This allows any sub-components that interact with the Pinia data store to execute with the test version of Pinia.
Running the Tests
Vitest can be used to run the unit tests like so:
$ npm run test:unit
...

 ✓ src/components/__tests__/CitySearch.spec.js (5)
 ✓ src/components/__tests__/WeatherBanner.spec.js (5)
 ✓ src/components/__tests__/WeatherFooter.spec.js (2)
 ✓ src/components/__tests__/CityList.spec.js (3)
 ✓ src/components/__tests__/WeatherHeader.spec.js (1)
 ✓ src/components/__tests__/WeatherContent.spec.js (5)
 ✓ src/components/__tests__/App.spec.js (1)
 ✓ src/stores/__tests__/cities.spec.js (4)

Test Files  8 passed (8)
     Tests  26 passed (26)
      Time  3.44s (in thread 801ms, 429.95%)


 PASS  Waiting for file changes...
       press h to show help, press q to quit
Excellent! We can successfully run our unit tests.
All the available commands to run via
npmfor your Vue project are defined in thescriptsfield in package.json.
The default configuration for Vitest is to run the tests in watch mode, which means that the test suite will be re-executed on each save to an applicable file. To change this configuration so that Vitest only runs once (without "watch mode"), update the test:unit configuration in package.json to include the run argument:
"test:unit": "vitest run --environment jsdom",
Running the same npm run test:unit command will now result in Vitest running once and then completing its execution (no "watch mode").
Conclusion
Pinia data stores are a great way to store global data in a Vue application.
Testing Pinia data stores should be separated into two categories:
- Unit tests of the data store - test that the 'getters' and 'actions' work correctly
- Unit tests of Vue components that use the data store - test retrieving data and calling 'actions' correctly
While there's some complexity in configuring the unit test files to work with Pinia, testing the Pinia data stores provides confidence in a key aspect of your Vue application.
Again, if you're interested in learning more about Vue, check out my course: Learn Vue by Building and Deploying a CRUD App.
This is part two of a two-part series on testing Vue applications:
- Guide to Unit Testing Vue Components
- Testing Pinia Data Stores in Vue (this article!)