 Jan Giacomelli
Why do you need to document your Python code? What should your project documentation include? How do you write and generate documentation?
Documentation is an important part of software development. Without proper documentation, it can be very difficult or impossible for internal and external stakeholders to use and/or maintain your code. It also makes it much harder to onboard new developers. Taking it a step further, without a culture of documenting and learning in general you'll often make the same mistakes over and over again. Unfortunately, many developers treat documentation as an afterthought -- something sprinkled on, like black pepper, without much consideration.
This article looks at why you should document your Python code and how to go about doing it.
The Complete Python Guide:
Contents
Comments vs Documentation
What's the difference between code comments and documentation?
Documentation is a standalone resource that helps others use your API, package, library, or framework without having to read the source code. Comments, on the other hand, are there for developers who read your source code. Documentation is something that should always be present but the same cannot be said for comments. They are nice to have but not required. Documentation should tell others how and when to use something while comments should answer the why questions:
- Why is this done this way?
- Why is this here and not there?
The what questions should then be answered by your clean code:
- What is this?
- What does this method do?
| Type | Answers | Stakeholder |
|---|---|---|
| Documentation | When and How | Users |
| Code Comments | Why | Developers |
| Clean Code | What | Developers |
Docstrings
As specified by PEP-257, a Python documentation string (or docstring) is a special "string literal that occurs as the first statement in a module, function, class, or method definition" to form the __doc__ attribute of the given object. It allows you to embed documentation directly into your source code.
For example, say you have a module called temperature.py with a single function that calculates daily average temperatures. Using docstrings, you can document it like so:
"""
The temperature module: Manipulate your temperature easily

Easily calculate daily average temperature
"""

from typing import List


class HighTemperature:
    """Class representing very high temperatures"""

    def __init__(self, value: float):
        """
        :param value: value of temperature
        """

        self.value = value


def daily_average(temperatures: List[float]) -> float:
    """
    Get average daily temperature

    Calculate average temperature from multiple measurements

    :param temperatures: list of temperatures
    :return: average temperature
    """

    return sum(temperatures)/len(temperatures)
You can see docstrings specified for the daily_average function by accessing its __doc__ attribute:
>>> from temperature import daily_average
>>>
>>> print(daily_average.__doc__)

    Get average daily temperature

    :param temperatures: list of temperatures
    :return: average temperature
You can also view the full module-level docstrings by using the built-in help function:
>>> import temperature
>>>
>>> help(temperature)
It's worth noting that you can use the help function with built-in keywords (int, float, def, and so on), classes, functions, and modules.
Single vs Multi-line
Docstrings can be single-line or multi-line. Either way the first line is always treated as a summary. The summary line may be used by automatic indexing tools so it's important that it fits on one line. When using single line docstrings, everything should be on the same line: opening quotes, summary, and closing quotes.
class HighTemperature:
    """Class representing very high temperatures"""

    # code starts here
When using multi-line docstrings, structure goes like this: opening quotes, summary, blank line, more elaborate description, and closing quotes.
def daily_average(temperatures: List[float]) -> float:
    """
    Get average daily temperature

    Calculate average temperature from multiple measurements

    :param temperatures: list of temperatures
    :return: average temperature
    """

    return sum(temperatures) / len(temperatures)
Besides describing what a particular function, class, method, or module does, you can also specify:
- function arguments
- function returns
- class attributes
- errors raised
- limitations
- code examples
Formats
The four most common formats are:
Pick the one that suits you the most and be consistent about it throughout the entire project.
By using docstrings you can express your intentions explicitly in spoken language to help others (and your future self!) better understand when, where, and how to use certain code.
Linting
You can lint docstrings just as you would your code. Linters ensure that your docstrings are well formatted and that they match the actual implementation, which helps keep your documentation fresh.
Darglint is a popular Python documentation linter.
$ pip install darglint
Let's lint the temperature.py module:
def daily_average(temperatures: List[float]) -> float:
    """
    Get average daily temperature

    Calculate average temperature from multiple measurements

    :param temperatures: list of temperatures
    :return: average temperature
    """

    return sum(temperatures) / len(temperatures)
Lint:
$ darglint --docstring-style sphinx temperature.py
What happens if you change the name of the parameter from temperatures to temperatures_list?
$ darglint --docstring-style sphinx temperature.py

temperature.py:daily_average:27: DAR102: + temperatures
temperature.py:daily_average:27: DAR101: - temperatures_list
Code Examples
You can also add code examples to docstrings, showing example usage of the function, method, or class.
For example:
def daily_average(temperatures: List[float], new_param=None) -> float:
    """
    Get average daily temperature

    Calculate average temperature from multiple measurements

    >>> daily_average([10.0, 12.0, 14.0])
    12.0

    :param temperatures: list of temperatures
    :return: Average temperature
    """

    return sum(temperatures)/len(temperatures)
Code examples can also be executed by pytest like any other test via doctest. Along with linting, this also helps ensure that your documentation stays fresh, in sync with the code.
Check out doctest — Testing Through Documentation for more on
doctest.
So, with the above example, pytest will assert daily_average([10.0, 12.0, 14.0]) equals 12.0. To run this code example as a test you just need to run pytest with the doctest-modules option:
$ python -m pytest --doctest-modules temperature.py

=============================== test session starts ===============================
platform darwin -- Python 3.11.0, pytest-7.2.1, pluggy-1.0.0
rootdir: /Users/michael/repos/testdriven/documenting-python
collected 1 item

temperature.py .                                                            [100%]

================================ 1 passed in 0.01s ================================
What happens if you change the code example to:
>>> daily_average([10.0, 12.0, 14.0])
13.0
$ python -m pytest --doctest-modules temperature.py

=============================== test session starts ===============================
platform darwin -- Python 3.11.0, pytest-7.2.1, pluggy-1.0.0
rootdir: /Users/michael/repos/testdriven/documenting-python
collected 1 item

temperature.py F                                                            [100%]

==================================== FAILURES =====================================
_______________________ [doctest] temperature.daily_average _______________________
022
023     Get average daily temperature
024
025     Calculate average temperature from multiple measurements
026
027     >>> daily_average([10.0, 12.0, 14.0])
Expected:
    13.0
Got:
    12.0

/Users/michael/repos/testdriven/documenting-python/temperature.py:27: DocTestFailure
============================= short test summary info =============================
FAILED temperature.py::temperature.daily_average
================================ 1 failed in 0.01s ================================
For more on pytest, check out the Testing in Python article.
Sphinx
Adding docstrings to your code is great, but you still need to present it to your users.
This is where tools like Sphinx, Epydoc, and MKDocs come into play, which will convert your project's docstrings over to HTML and CSS.
Sphinx is by far the most popular. It's used to generate the documentation for a number of open-source projects like Python and Flask. It's also one of the documentation tools supported by Read the Docs, which is used by thousands of open-source projects like Requests, Flake8, and pytest, to name a few.
Let's see it in action. Start by following the official guide to download and install Sphinx.
$ sphinx-quickstart --version

sphinx-quickstart 6.1.3
Create a new project directory:
$ mkdir sphinx_example
$ cd sphinx_example
Next, add a new file called temperature.py:
"""
The temperature module: Manipulate your temperature easily

Easily calculate daily average temperature
"""

from typing import List


class HighTemperature:
    """Class representing very high temperatures"""

    def __init__(self, value: float):
        """
        :param value: value of temperature
        """

        self.value = value


def daily_average(temperatures: List[float]) -> float:
    """
    Get average daily temperature

    :param temperatures: list of temperatures
    :return: average temperature
    """

    return sum(temperatures)/len(temperatures)
To scaffold out the files and folders for Sphinx to create the documentation for temperature.py, within the project root, run:
$ sphinx-quickstart docs
You'll be promoted with a few questions:
> Separate source and build directories (y/n) [n]: n
> Project name: Temperature
> Author name(s): Your Name
> Project release []: 1.0.0
> Project language [en]: en
Once done, the "docs" directory should contain the following files and folders:
docs
├── Makefile
├── _build
├── _static
├── _templates
├── conf.py
├── index.rst
└── make.bat
Next, let's update the project config. Open docs/conf.py, and add the following to the top:
import os
import sys
sys.path.insert(0, os.path.abspath('..'))
Now, autodoc, which is used to pull in documentation from docstrings, will search for modules in the parent folder of "docs".
Add the following extensions to the extensions list:
extensions = [
    'sphinx.ext.autodoc',
]
Open docs/index.rst and edit it to look like this:
Welcome to Temperature documentation!
=====================================

.. automodule:: temperature
    :members:


Indices and tables
==================

* :ref:`genindex`
* :ref:`modindex`
* :ref:`search`
The contents of index.rst is written in reStructuredText, which is a file format for textual data similar to Markdown but much more powerful since it's designed for writing technical documentation.
Notes:
- Titles are created by underlining (and optionally overlining) the title with an
=character, at least as long as the text: - The automodule directive is used to gather docstrings from Python modules. So,
.. automodule:: temperaturetells Sphinx to gather docstrings from the temperature.py module. - The
genindex,modindex, andsearchdirectives are used to generate a general index, an index of documented modules, and a search page, respectively.
From the "docs" directory, build the documentation:
$ make html
Open docs/_build/html/index.html in your browser. You should see:
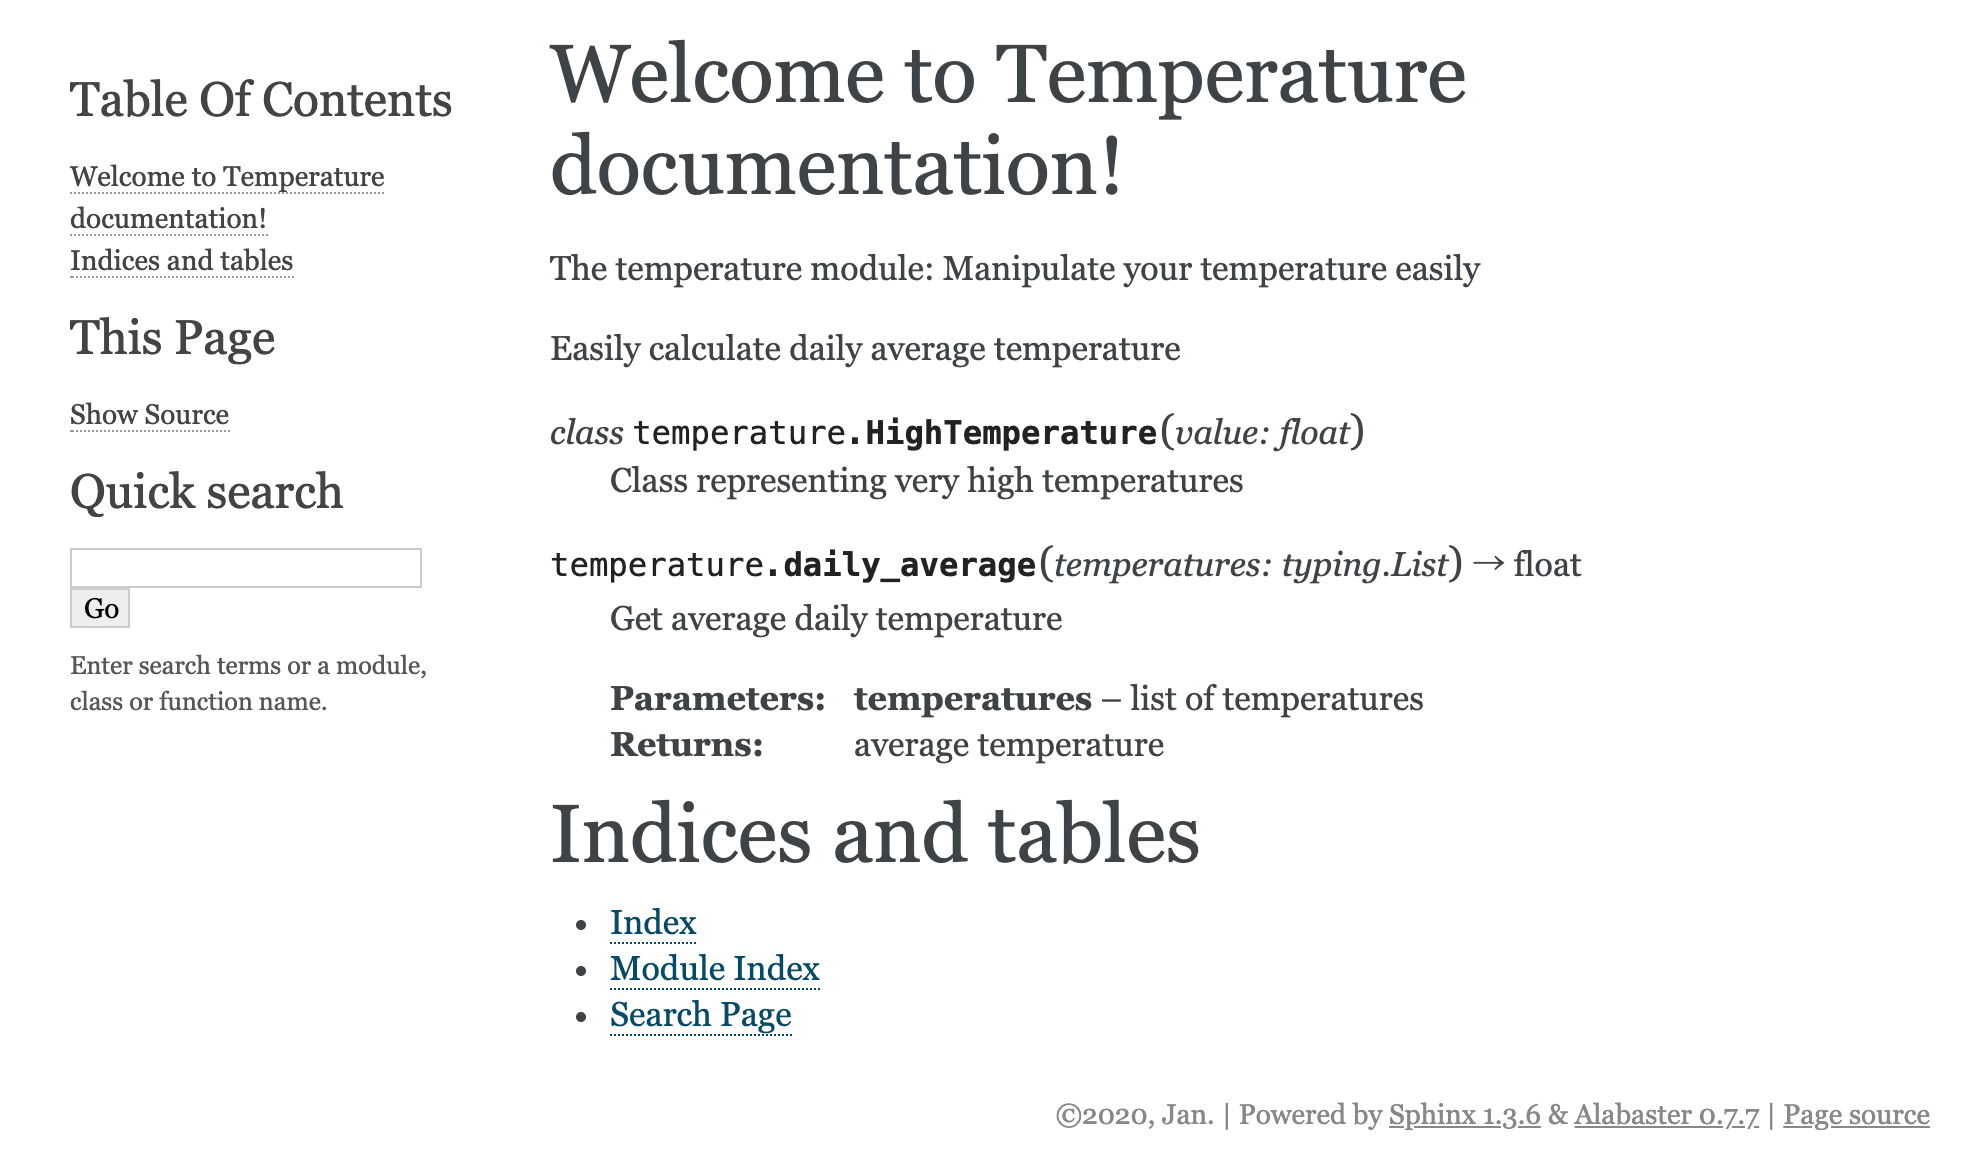
Now you can serve up the docs yourself using a tool like Netlify or via a service like Read the Docs.
API Documentation
When talking about documentation don't forget about documentation for your APIs. You have endpoints with their URLs, URL parameters, query parameters, status codes, request bodies, and response bodies. Even a simple API can have a number of parameters that are difficult to remember.
OpenAPI Specification (formerly Swagger Specification) provides a standard format for describing, producing, consuming, and visualizing RESTful APIs. The spec is used to generate documentation with Swagger UI or ReDoc. It can also be imported into tools like Postman. You can generate sever stubs and client SDKs as well with tools like Swagger Codegen and OpenAPI Generator.
For a full list of editors, linters, parsers, code generators, documentation, testing, and schema/data validation tools for OpenAPI, check out OpenAPI Tools.
The spec itself must be written in either YAML or JSON. For example:
---
openapi: 3.0.2
info:
  title: Swagger Petstore - OpenAPI 3.0
  description: |-
    This is a sample Open API
  version: 1.0.0
servers:
- url: "/api/v3"
paths:
  "/pet":
    post:
      summary: Add a new pet to the store
      description: Add a new pet to the store
      operationId: addPet
      requestBody:
        description: Create a new pet in the store
        content:
          application/json:
            schema:
              "$ref": "#/components/schemas/Pet"
        required: true
      responses:
        '200':
          description: Successful operation
          content:
            application/json:
              schema:
                "$ref": "#/components/schemas/Pet"
        '405':
          description: Invalid input
components:
  schemas:
    Pet:
      required:
      - name
      - photoUrls
      type: object
      properties:
        id:
          type: integer
          format: int64
          example: 10
        name:
          type: string
          example: doggie
        photoUrls:
          type: array
          items:
            type: string
        status:
          type: string
          description: pet status in the store
          enum:
          - available
          - pending
          - sold
  requestBodies:
    Pet:
      description: Pet object that needs to be added to the store
      content:
        application/json:
          schema:
            "$ref": "#/components/schemas/Pet"
Writing such schema by hand is very dull and prone to errors. Fortunately, there are a number of tools that help automate this process:
- Django - drf-yasg, drf-spectacular
- Flask - Flask-RESTX, Connexion, Flask-Rebar
- FastAPI - OpenAPI support is built-in
Tests as Documentation
Thus far, we've talked about documentation for users (project documentation) and developers (code comments). Another type of documentation for developers comes from the tests themselves.
As a developer working on a project you need to know more than just how to use a method. You need to know if it works as expected and how to use it to develop further. While adding code examples to docstrings can help with this, such examples are not meant for anything more than simple examples. You need to add tests to cover more than just a function's happy path.
Tests document three things:
- What the expected output for a given input is
- How exception paths are handled
- How to use a given function, method, or class
As you're writing tests, be sure to use proper naming and clearly specify what it is that you're testing. This will make it much easier for a developer to review the test suite in order to find out how a particular function or method should be used.
What's more, when writing a test, you basically define what should go into your docstrings. The GIVEN, WHEN, THEN structure can be easily converted to function's docstrings.
For example:
- GIVEN a list of temperature measurements ->
:param temperatures: list of temperatures - WHEN 'daily_average' is called ->
>>> daily_average([10.0, 12.0, 14.0]) - THEN average temperature is returned ->
Get average temperature, :return: Average temperature
def daily_average(temperatures: List[float]) -> float:
    """
    Get average temperature

    Calculate average temperature from multiple measurements

    >>> daily_average([10.0, 12.0, 14.0])
    12.0

    :param temperatures: list of temperatures
    :return: Average temperature
    """

    return sum(temperatures)/len(temperatures)
So, you can treat Test-driven Development (TDD) as a form of documentation-driven development by creating your docstrings as code:
- Write a test
- Ensure the test fails
- Write the code
- Ensure the test passes
- Refactor and add docstrings
For more on TDD, check out the Modern Test-Driven Development in Python article.
Documenting a Flask REST API
Thus far, we've just covered theory so let's move on to a real example. We'll create a RESTful API with Flask for temperature measurements. Each measurement will have the following attributes: timestamp, temperature, notes. Flask-RESTX will be used for auto-generating an OpenAPI spec.
So, let's begin. First, create a new folder:
$ mkdir flask_temperature
$ cd flask_temperature
Next, initialize your project with Poetry:
$ poetry init
Package name [flask_temperature]:
Version [0.1.0]:
Description []:
Author [Your name <[email protected]>, n to skip]:
License []:
Compatible Python versions [^3.11]:

Would you like to define your main dependencies interactively? (yes/no) [yes] no
Would you like to define your development dependencies interactively? (yes/no) [yes] no
Do you confirm generation? (yes/no) [yes]
After that, add Flask and Flask-RESTX:
$ poetry add flask flask-restx
Now, let's create our documented API. Add a file for the Flask app called app.py:
import uuid

from flask import Flask, request
from flask_restx import Api, Resource

app = Flask(__name__)
api = Api(app)

measurements = []


@api.route('/measurements')
class Measurement(Resource):
    def get(self):
        return measurements

    def post(self):
        measurement = {
            'id': str(uuid.uuid4()),
            'timestamp': request.json['timestamp'],
            'temperature': request.json['temperature'],
            'notes': request.json.get('notes'),
        }
        measurements.append(measurement)

        return measurement


if __name__ == '__main__':
    app.run()
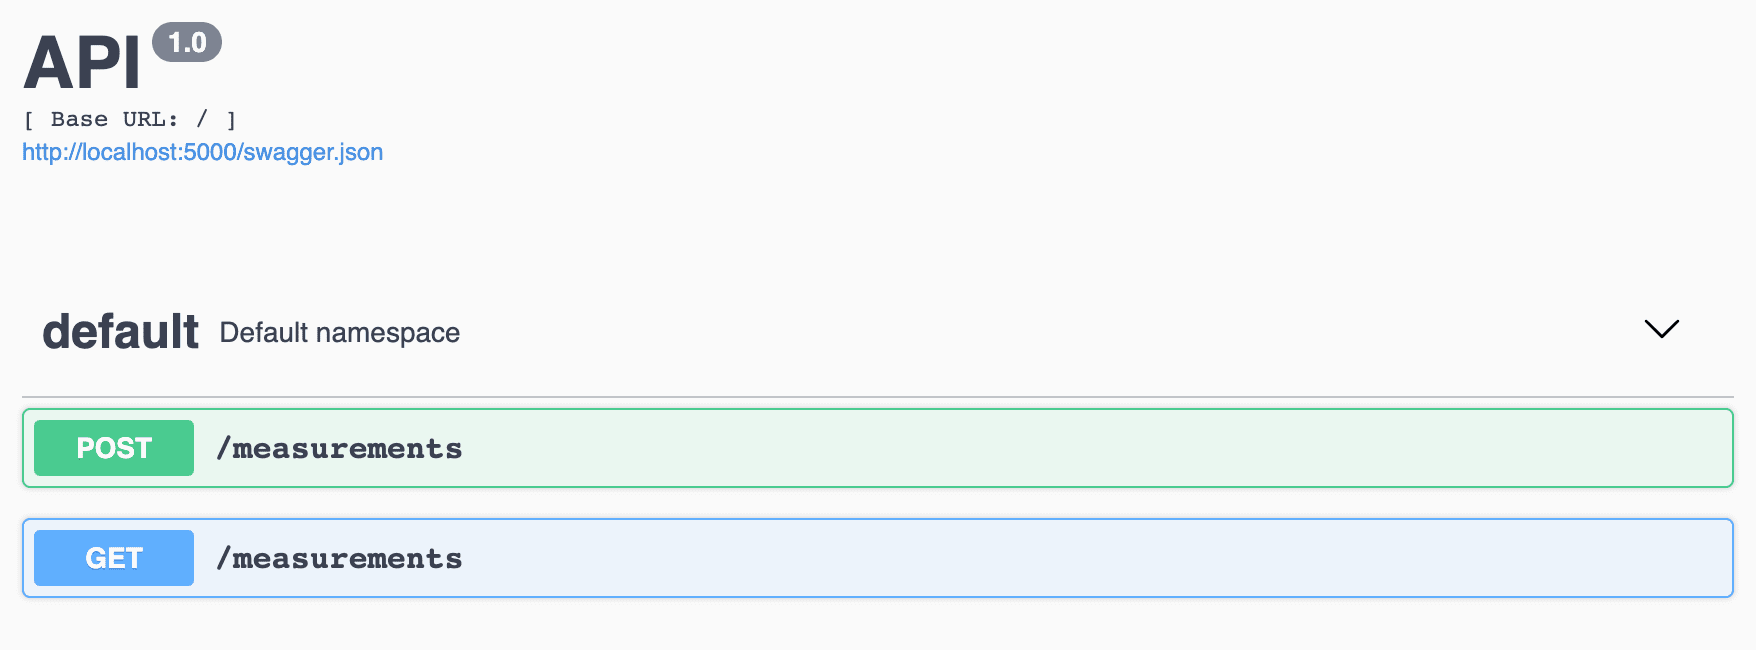
Flask-RESTX uses class-based views to organize resources, routes, and HTTP methods. In the above example, the Measurement class supports HTTP GET and POST methods. Other methods, will return a MethodNotAllowed error. Flask-RESTX will also generate the OpenAPI schema when the app is run.
$ python app.py
You can see the schema at http://localhost:5000/swagger.json. You'll also be able to view the browsable API at http://localhost:5000.
Currently, the schema only contains endpoints. We can define the request and response bodies to tell our users what's expected from them as well as what will be returned.
Update app.py:
import uuid

from flask import Flask, request
from flask_restx import Api, Resource, fields

app = Flask(__name__)
api = Api(app)

measurements = []

add_measurement_request_body = api.model(
    'AddMeasurementRequestBody', {
        'timestamp': fields.Integer(
            description='Timestamp of measurement',
            required=True,
            example=1606509272
        ),
        'temperature': fields.Float(
            description='Measured temperature',
            required=True, example=22.3),
        'notes': fields.String(
            description='Additional notes',
            required=False, example='Strange day'),
    }
)

measurement_model = api.model(
    'Measurement', {
        'id': fields.String(
            description='Unique ID',
            required=False,
            example='354e405c-136f-4e03-b5ce-5f92e3ed3ff8'
        ),
        'timestamp': fields.Integer(
            description='Timestamp of measurement',
            required=True,
            example=1606509272
        ),
        'temperature': fields.Float(
            description='Measured temperature',
            required=True,
            example=22.3
        ),
        'notes': fields.String(
            description='Additional notes',
            required=True,
            example='Strange day'
        ),
    }
)


@api.route('/measurements')
class Measurement(Resource):
    @api.doc(model=[measurement_model])
    def get(self):
        return measurements

    @api.doc(model=[measurement_model], body=add_measurement_request_body)
    def post(self):
        measurement = {
            'id': str(uuid.uuid4()),
            'timestamp': request.json['timestamp'],
            'temperature': request.json['temperature'],
            'notes': request.json.get('notes'),
        }
        measurements.append(measurement)

        return measurement


if __name__ == '__main__':
    app.run()
To define models for our response and request bodies we used api.model. We defined the names and the appropriate fields. For each field, we defined the type, description, example, and if it's required.
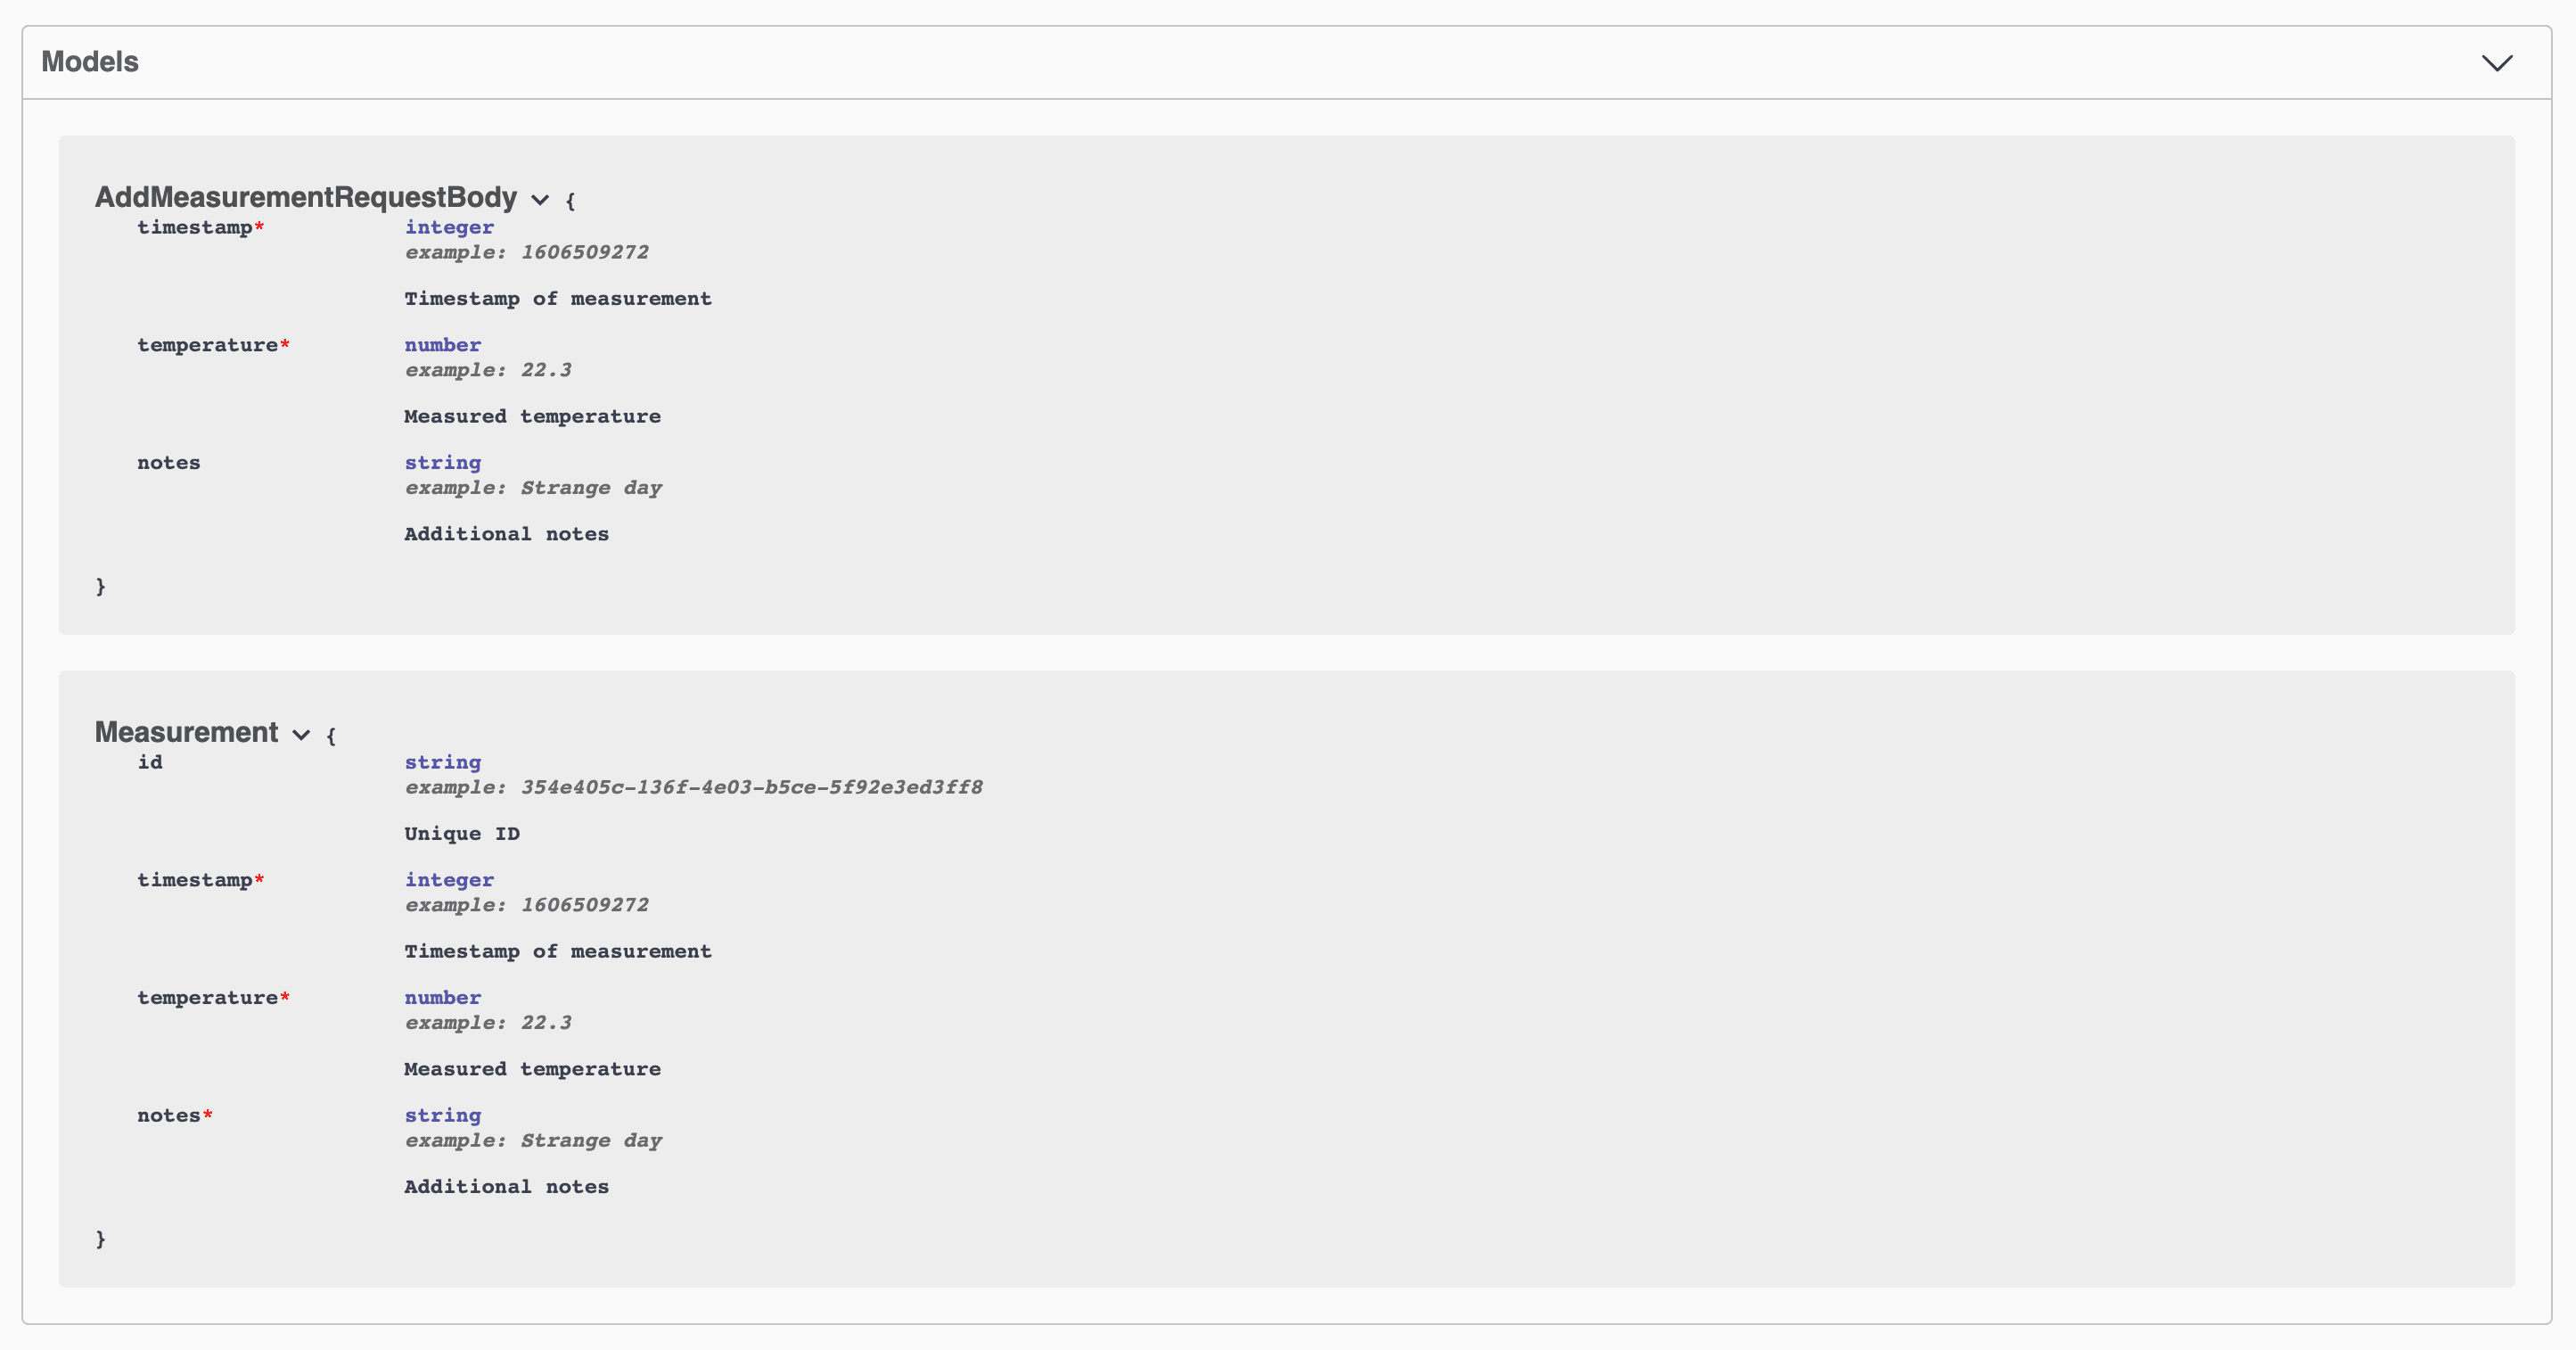
To add the models to endpoints, we used the @api.doc decorator. The body parameter defines the request body while model defines the response body.
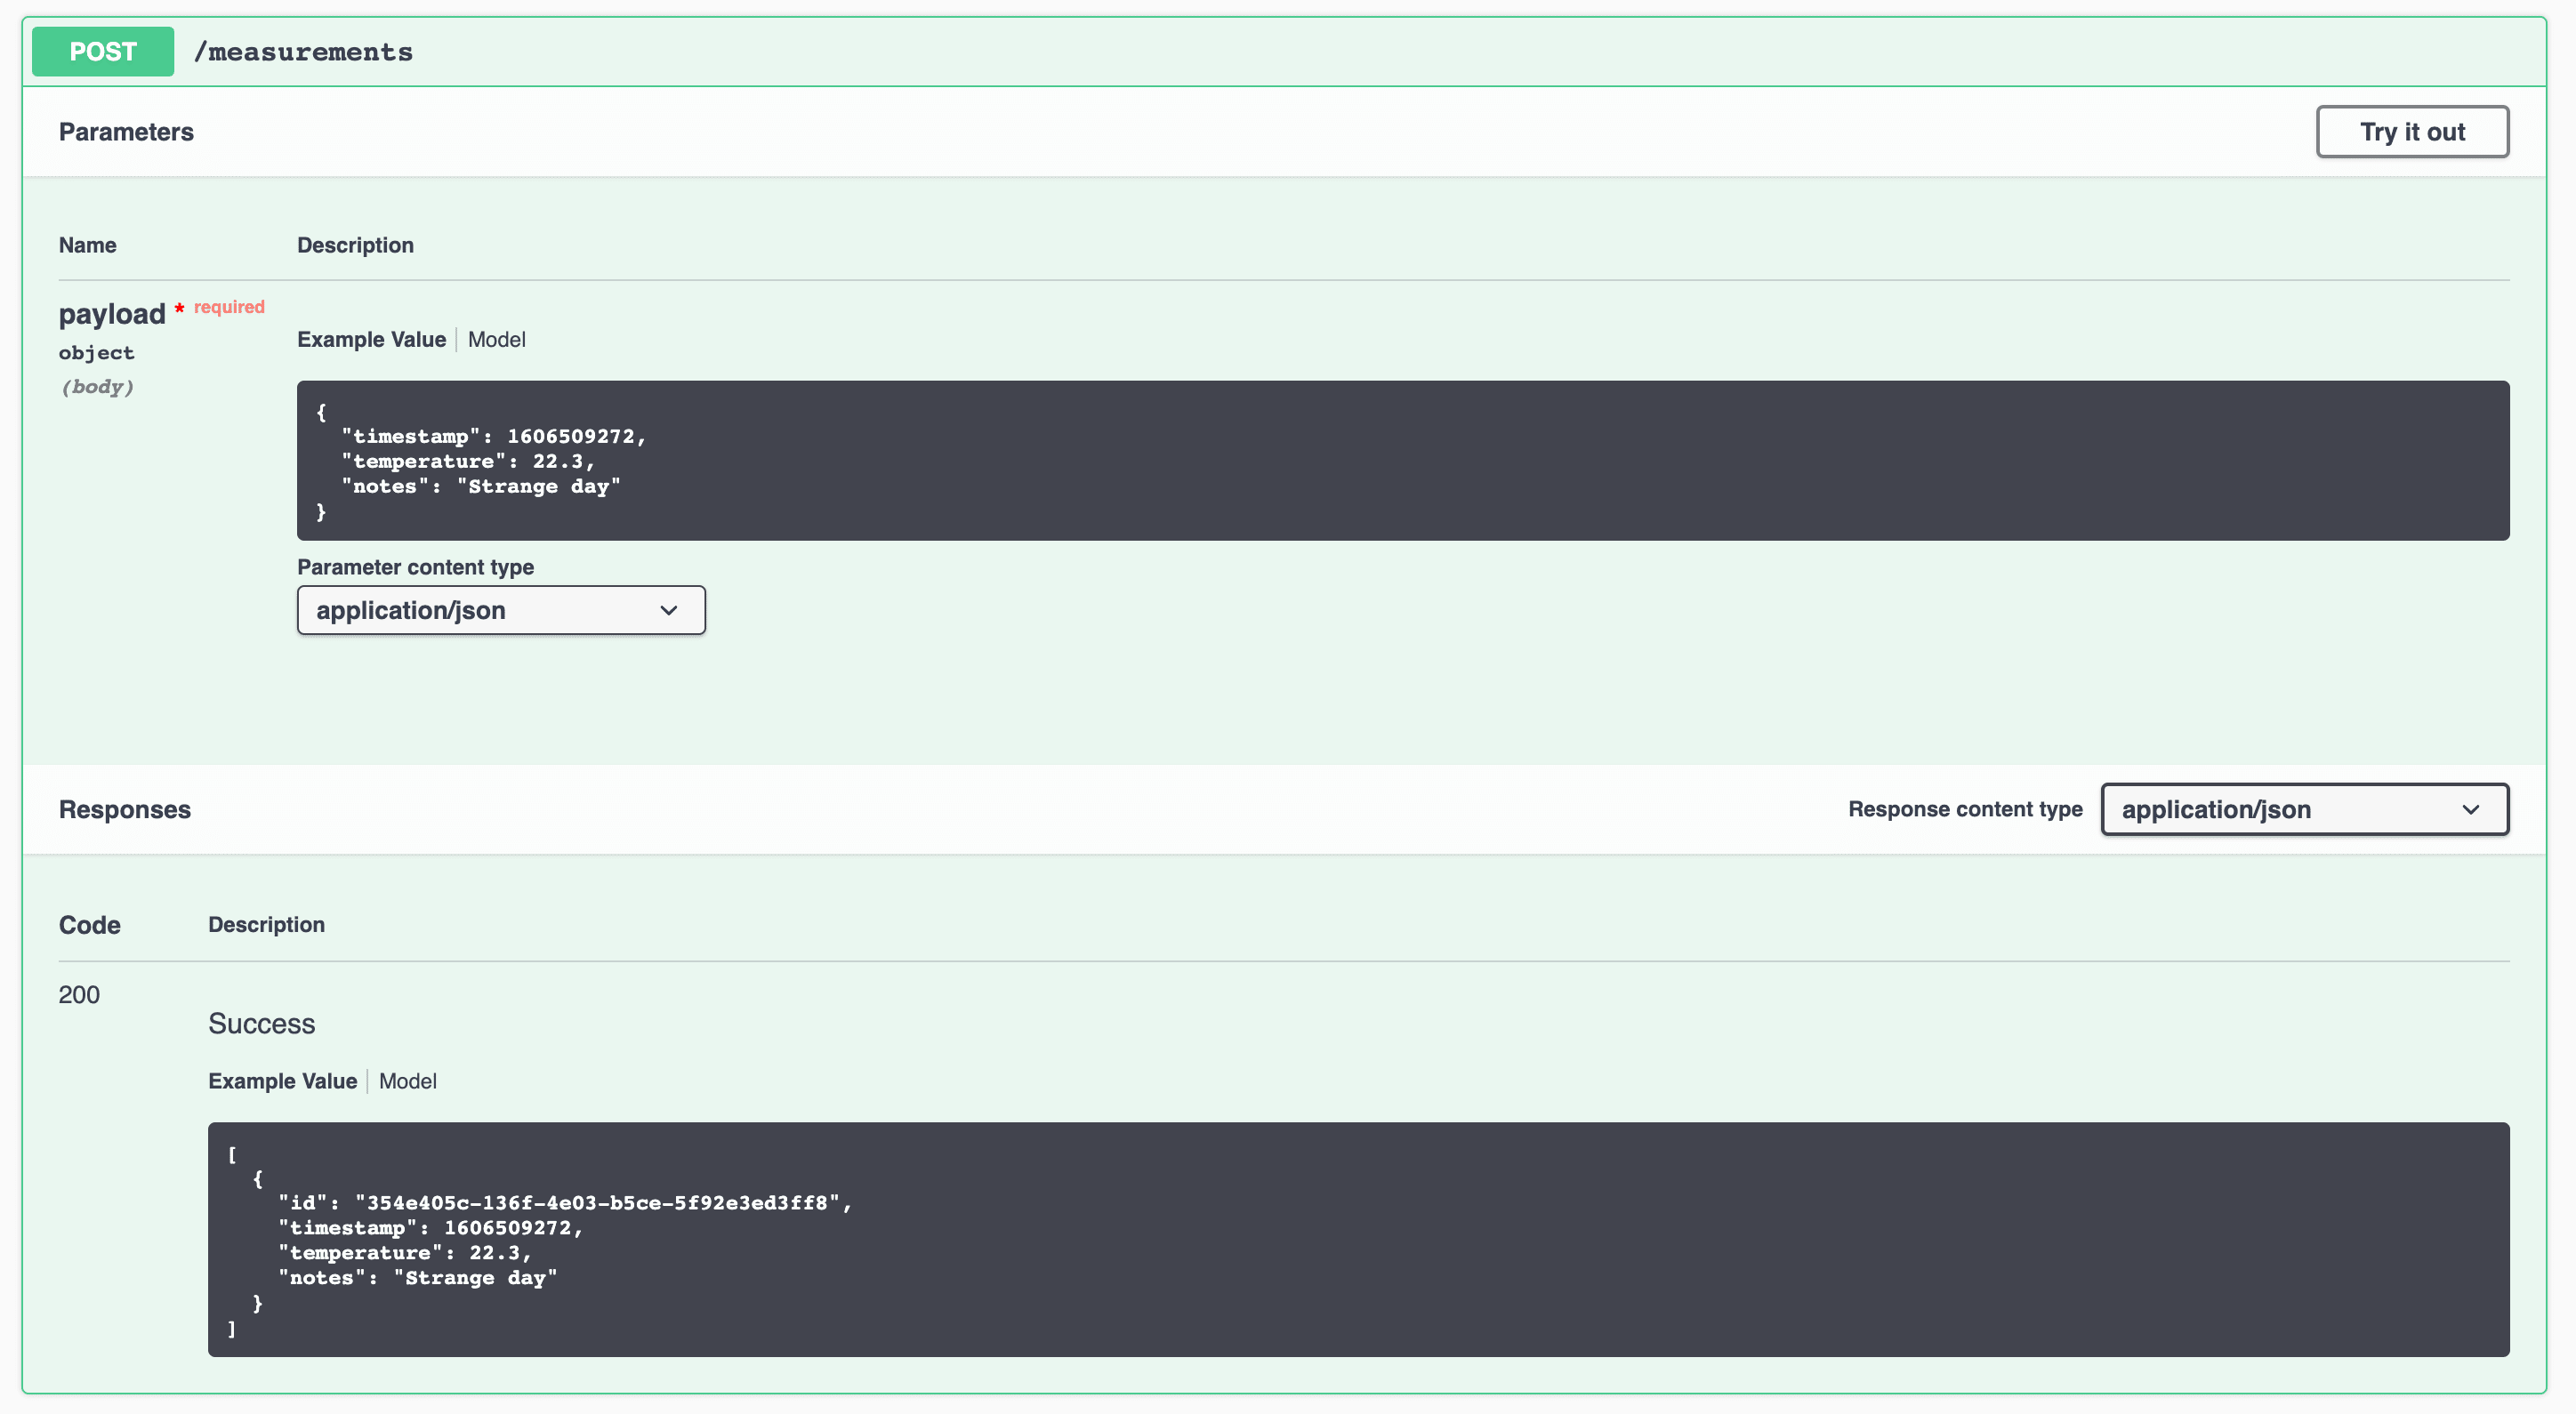
Now you should have the basic idea of how to document your Flask RESTful API with Flask-RestX. This just scratches the surface. Check out the Swagger documentation for details on how to define auth info, URL parameters, status codes, and much more.
Conclusion
Most, if not all, of us can do a better job at writing documentation. Fortunately, there are plenty of tools available for simplifying the process of writing it. When writing packages and libraries use Sphinx to organize and help generate your documentation from docstrings. When working on a RESTful API, use a tool that generates an OpenAPI schema since the schema can be used by a plethora of tools -- everything from data validators to code generators. Looking for inspiration? Stripe, Flask, Cypress, and FastAPI are excellent examples of documentation done well.
The Complete Python Guide: