 Michael Herman
We use Heroku to host the TestDriven.io learning platform so that we can focus on application development rather than configuring web servers, installing Linux packages, setting up load balancers, and everything else that goes along with infrastructure management on a traditional server.
This article aims to simplify the process of deploying, maintaining, and scaling a production-grade Django app on Heroku.
We'll also review some tips and tricks for simplifying the deployment process. At the end, you'll find a production checklist for deploying a new app to production.
Contents
Heroku
Why Heroku? Like Django, Heroku embraces the "batteries included" philosophy. It's an opinionated environment, but it's also an environment that you don't have to manage -- so you can focus on application development rather than the environment supporting it.
If you use your own infrastructure or an Infrastructure as a Service (IaaS) solution -- like DigitalOcean Droplets, Amazon EC2, Google Compute Engine, to name a few -- you must either hire a sys admin/devops engineer or take on that role yourself. The former costs money while the latter slows down your velocity. Heroku will probably end up costing you more in hosting than an IaaS solution, but you will save money since you don't need to hire someone to administer the infrastructure and you can move faster on the application, which is what matters most at the end of the day.
Tips:
- Make sure you're using Heroku with the latest Heroku Stack.
- Use either uWSGI or Gunicorn as your production WSGI server. Either is fine. If you don't know why you'd prefer one WSGI server over another, it doesn't really matter. It's not difficult to switch later on either.
- Run long-running or CPU-intensive processes, like email delivery or PDF report generation, outside of the web application asynchronously with either Celery or RQ along with the Heroku Redis add-on. For reference, we use Django-RQ.
- Run at least two web and background processes for redundancy.
- Use SSL.
- Follow the Twelve-Factor App methodology.
- Add caching.
Database
Tips:
- Use a Heroku standard (or higher) tier Postgres database. Review the disc space, memory, and concurrent connection limits for each tier as well as the Concurrency and Database Connections in Django article.
- Schedule daily backups of the production database via Heroku PGBackups.
- Keep your migrations clean and manageable by squashing or resetting them from time to time.
Continuous Integration and Delivery
The Heroku runtime is both stateless and immutable, which helps enable continuous delivery. On each application deploy, a new virtual machine is constructed, configured, and moved into production.
Because of this, you do not need to worry about:
- Using a process manager to stand up your services as Heroku handles this for you via a Dyno Manager.
- Configuring a deployment mechanism for updating and restarting the app.
Heroku works with a number of Continuous Integration (CI) services, like Circle and GitHub Actions, and they also offer their own CI solution -- Heroku CI.
Tips:
- Set up automatic deployments. Manual deployments are error prone due to human error.
- Run the Django deployment checklist (
manage.py check --deploy) in your production CI build. - At TestDriven.io, we use a form of GitOps where the state of the app is always kept in git and changes to the staging and production environments only happen in CI. Consider using this approach to help speed up development and introduce a stable rollback system.
- Deploy regularly, at a scheduled time when developers are available in case something goes wrong.
- Use release tags so you know exactly which version of the code is running in production -- e.g.,
git tag -a "$ENVIRONMENT/${VERSION}".
Static and Media Files
Tips:
- Use WhiteNoise for static files and then throw a CDN, like Cloudflare or CloudFront, in front of it.
- For user-uploaded media files, use S3 and django-storages.
Environments
Tips:
- For staging, use a different Heroku app. Make sure to turn maintenance mode on when it's not in use so that Google's crawlers don't inadvertently come across it.
Testing
Write tests. Tests are a safeguard, so you don't accidentally change the functionality of your application. It's much better to catch a bug locally from your test suite than by a customer in production.
Tips:
- Ignore the traditional testing pyramid. Spend half your time writing Django unit tests (with both pytest and Hypothesis). Spend the other half writing browser-based integration and end-to-end tests with Cypress. Compared to Selenium, Cypress tests are much easier to write and maintain. We recommend incorporating Cypress into your everyday TDD workflow. Review Modern Front-End Testing with Cypress for more info on this.
Monitoring and Logging
Monitoring and logging are a crucial part of a your app's reliability, making it easier to:
- Discover errors at an early stage.
- Understand how your app works.
- Analyze performance.
- Determine if your app is running correctly.
Your logs should always have a timestamp and a log level. They should also be human readable and easy to parse.
On the monitoring side of things, set up alerts to help reduce and preempt downtimes. Set up notifications so you can fix issues and address bottlenecks before your customers start to complain.
As you have seen, Heroku provides a number of services via the add-on system. This system is one of the powerful tools that you get out of the box from Heroku. You have hundreds of services at your disposable that take minutes to configure, many of which are useful for logging, monitoring, and error tracking.
Tips:
- Heroku retains only the most recent 1500 lines of consolidated logs, which will just be a couple of seconds of logs. So, you'll need to send logs to a remote logging service, like Papertrail, to aggregate all of your logs.
- Use Scout for application performance monitoring in order to track down performance issues.
- Use Sentry for exception monitoring to get notifications when errors occur in your application.
- You can monitor the basics like memory usage and CPU load directly from Heroku's Application Metrics dashboard.
- Use Uptime Robot, which does not have a Heroku add-on, to ensure your site is up.
Security
When it comes to security, people are generally the weakest link. Your development team should be aware of some of the more common security vulnerabilities. Security Training for Engineers and Heroku's Security guide are great places to start along with the following OWASP cheat sheets:
- Cross-Site Request Forgery (CSRF) Prevention
- XSS (Cross Site Scripting) Prevention
- DOM based XSS Prevention
- Content Security Policy
Tips:
- Use Snyk to keep your dependencies up-to-date.
- Introduce a throttling mechanism, like Django Ratelimit, to limit the impact of DDoS attacks.
- Keep your application's configuration separate from your code to prevent sensitive credentials from getting checked into source control.
- Monitor and log suspicious behavior, such as multiple failed login attempts from a particular source and unusual spikes in traffic. Check out the Expedited WAF add-on for real-time security monitoring.
- Check your Python code for common security issues with Bandit.
- Once deployed, run your site through the automated security checkup at Pony Checkup.
- Validate upload file content type and size.
Conclusion
Hopefully this article provided some useful information that will help simplify the process of deploying and maintaining a production Django app on Heroku.
Remember: Web development is complex because of all the moving pieces. You can counter that by:
- Breaking problems up into small, easily-digestible subproblems. Ideally, you can then translate these subproblems to problems that have already been solved.
- Removing pieces altogether by using Django and Heroku -- both of which make it easier to develop and deploy secure, scalable, and maintainable web apps since they embrace stability and a "batteries included" philosophy.
Curious about what the full architecture looks like with Heroku?
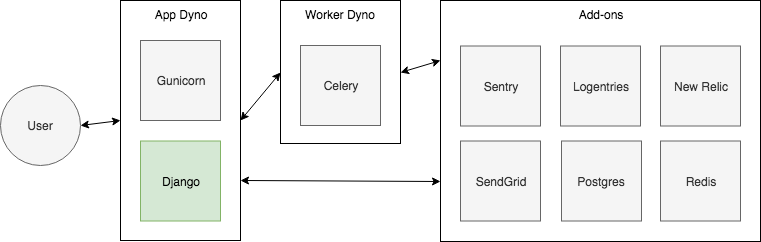
Once you have Celery and Gunicorn configured, you can focus the majority, if not all, of your time on developing your application -- everything else is an add-on.
Recommended resources:
Production Checklist
Deploying a new Django app to Heroku? Review the following checklist for help. Make sure you document the deployment workflow throughout the entire process.
Before deployment
Frontend:
- Spell check Django templates.
- Set favicon.
- Customize the default error views.
- Add a robots.txt file.
- Create a sitemap.xml file.
- Compress and optimize all images.
- Set up Google Analytics.
- Configure SSL.
- Configure a CDN provider, like Cloudflare, for frontend assets.
Django:
- Anonymize the production Django admin URL.
- Optionally add the django-cors-headers app to add Cross-Origin Resource Sharing (CORS) headers to responses.
- Consider using ATOMIC_REQUESTS.
- Configure the following Django settings for production:
- Set ALLOWED_HOSTS only for valid domains.
- Set DEBUG to
False. - Change
SECRET_KEYto a long, unique string of random bytes. - Set CSRF_COOKIE_SECURE, SESSION_COOKIE_SECURE, SECURE_SSL_REDIRECT, and SECURE_CONTENT_TYPE_NOSNIFF to
True. - Check SECURE_PROXY_SSL_HEADER.
- Optionally configure XFrameOptionsMiddleware, to help prevent clickjacking, HTTP Strict Transport Security, and SECURE_BROWSER_XSS_FILTER.
- If you're using subdomain, set SESSION_COOKIE_DOMAIN.
- Ensure DEFAULT_FROM_EMAIL is set to the correct email.
Continuous Integration:
- Set up a CI service.
- Run
python manage.py check --deployagainst the production settings. - Configure any other linters and/or code analysis tools to run.
- Test the CI process.
- Configure automated deployments.
Heroku:
- Ensure the latest Heroku stack and Python version are being used.
- Configure Postgres and Redis add-ons.
- Set up database backups.
- Configure remaining Heroku add-ons -- e.g., Papertrail, Scout, Sentry, and SendGrid.
- Set environment variables.
- Set up at least two web and worker processes for redundancy.
After deployment
Frontend:
- Run the Mozilla Observatory, Google PageSpeed, Google Mobile-Friendly, webhint, and Netsparker Security Headers scans.
- Use the WAVE tool to test if your page meets the accessibility standards.
- Review the Front-End Checklist.
- Run a SSL Server Test.
- Run automated tests if you have them or manually test your app from the browser.
- Verify 301 redirects are configured properly.
- Set up Google Tag Manager.
- Configure Uptime Robot.
Cheers!