 Patrick Kennedy
This article provides an in-depth walkthrough of how requests are processed in a Flask application.
First, we'll look at the key steps that happen before and after a view function is executed. Second, we'll look at the callbacks that are available during different steps of the request processing sequence, as these can be beneficial for powering up your Flask application.
This article assumes that you have prior experience with Flask. If you're interested in learning more about Flask, check out my course on how to build, test, and deploy a Flask application: Developing Web Applications with Python and Flask.
Contents
Request / Response Cycle
When developing a web application with Flask, we're focused on processing requests that come in and providing responses back:
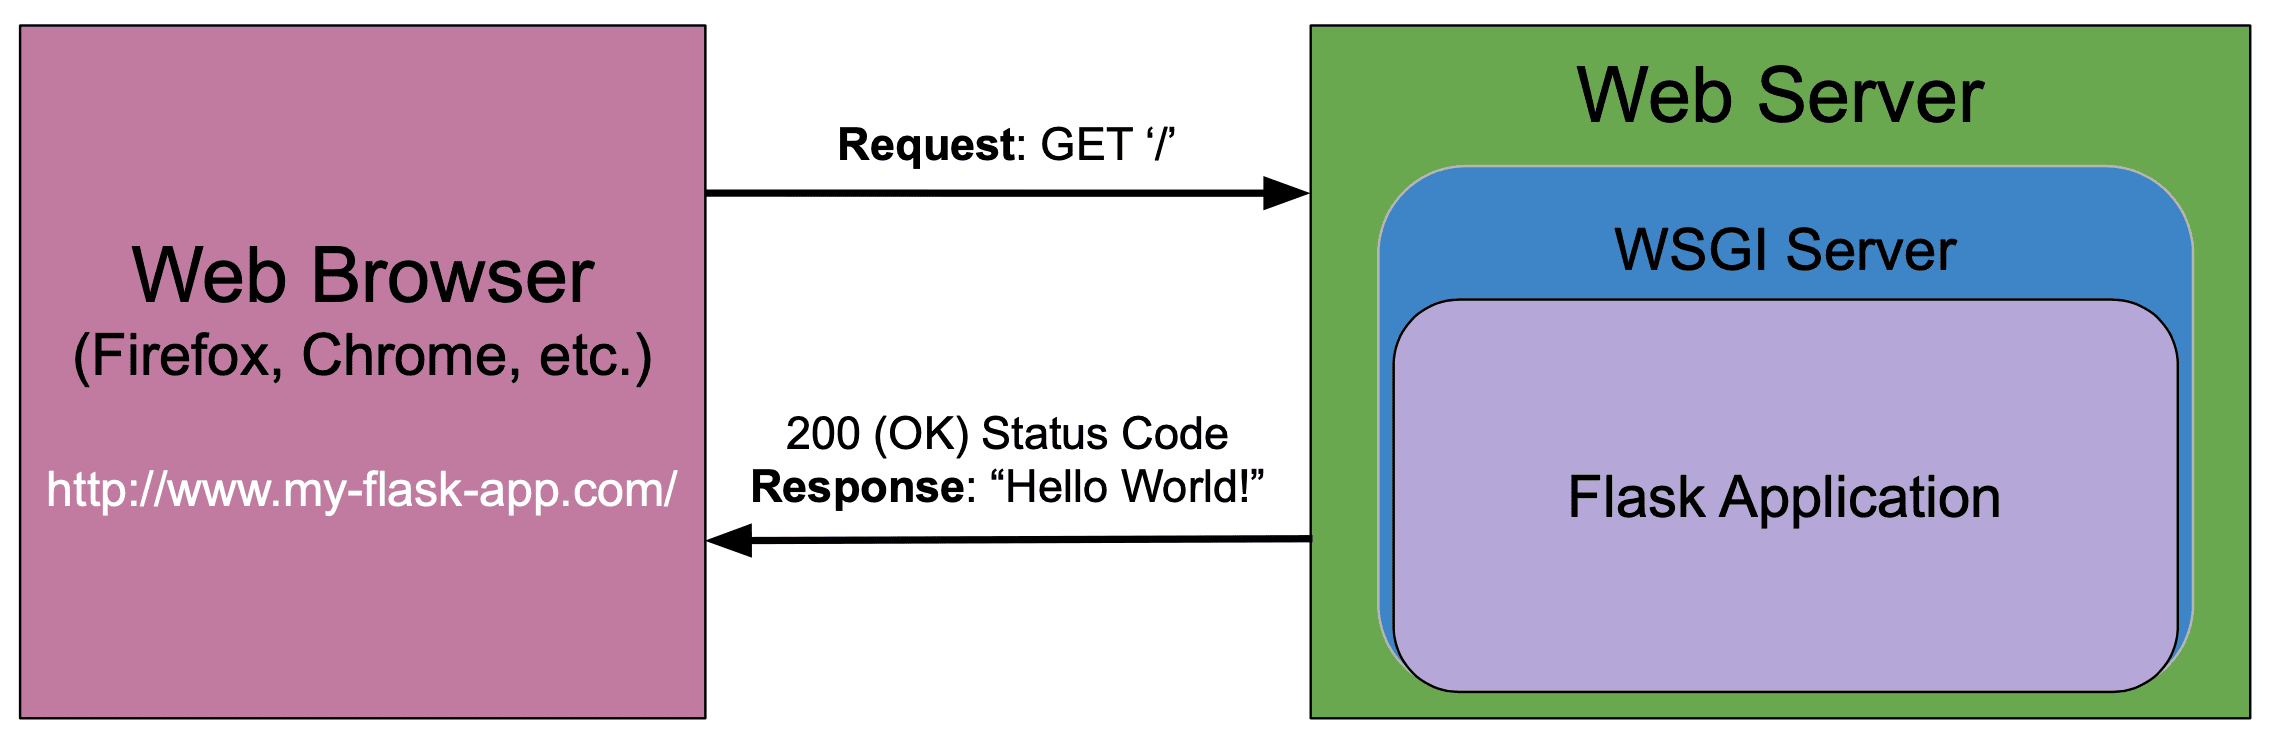
When you enter a URL into your web browser, the request is sent to the web server (like Nginx or Apache), which then passes it on to a WSGI server (like Gunicorn). The WSGI server is the standard interface between a web server and a Python application. In our case here, there's a Flask application running on the Python side of the WSGI interface.
WSGI, which stands for Web Server Gateway Interface, is an interface between a web server and a Python-based web application. It's required since a web server cannot talk directly to a Python application. For more, review WSGI.
The Flask application processes the request and generates a response, which gets sent back to the web browser via the WSGI server and web server.
Expanding the Flask application piece of this diagram, we'll typically have a view function (a function decorated with route(), get(), post(), delete(), etc.) that handles processing the request and generating the response:
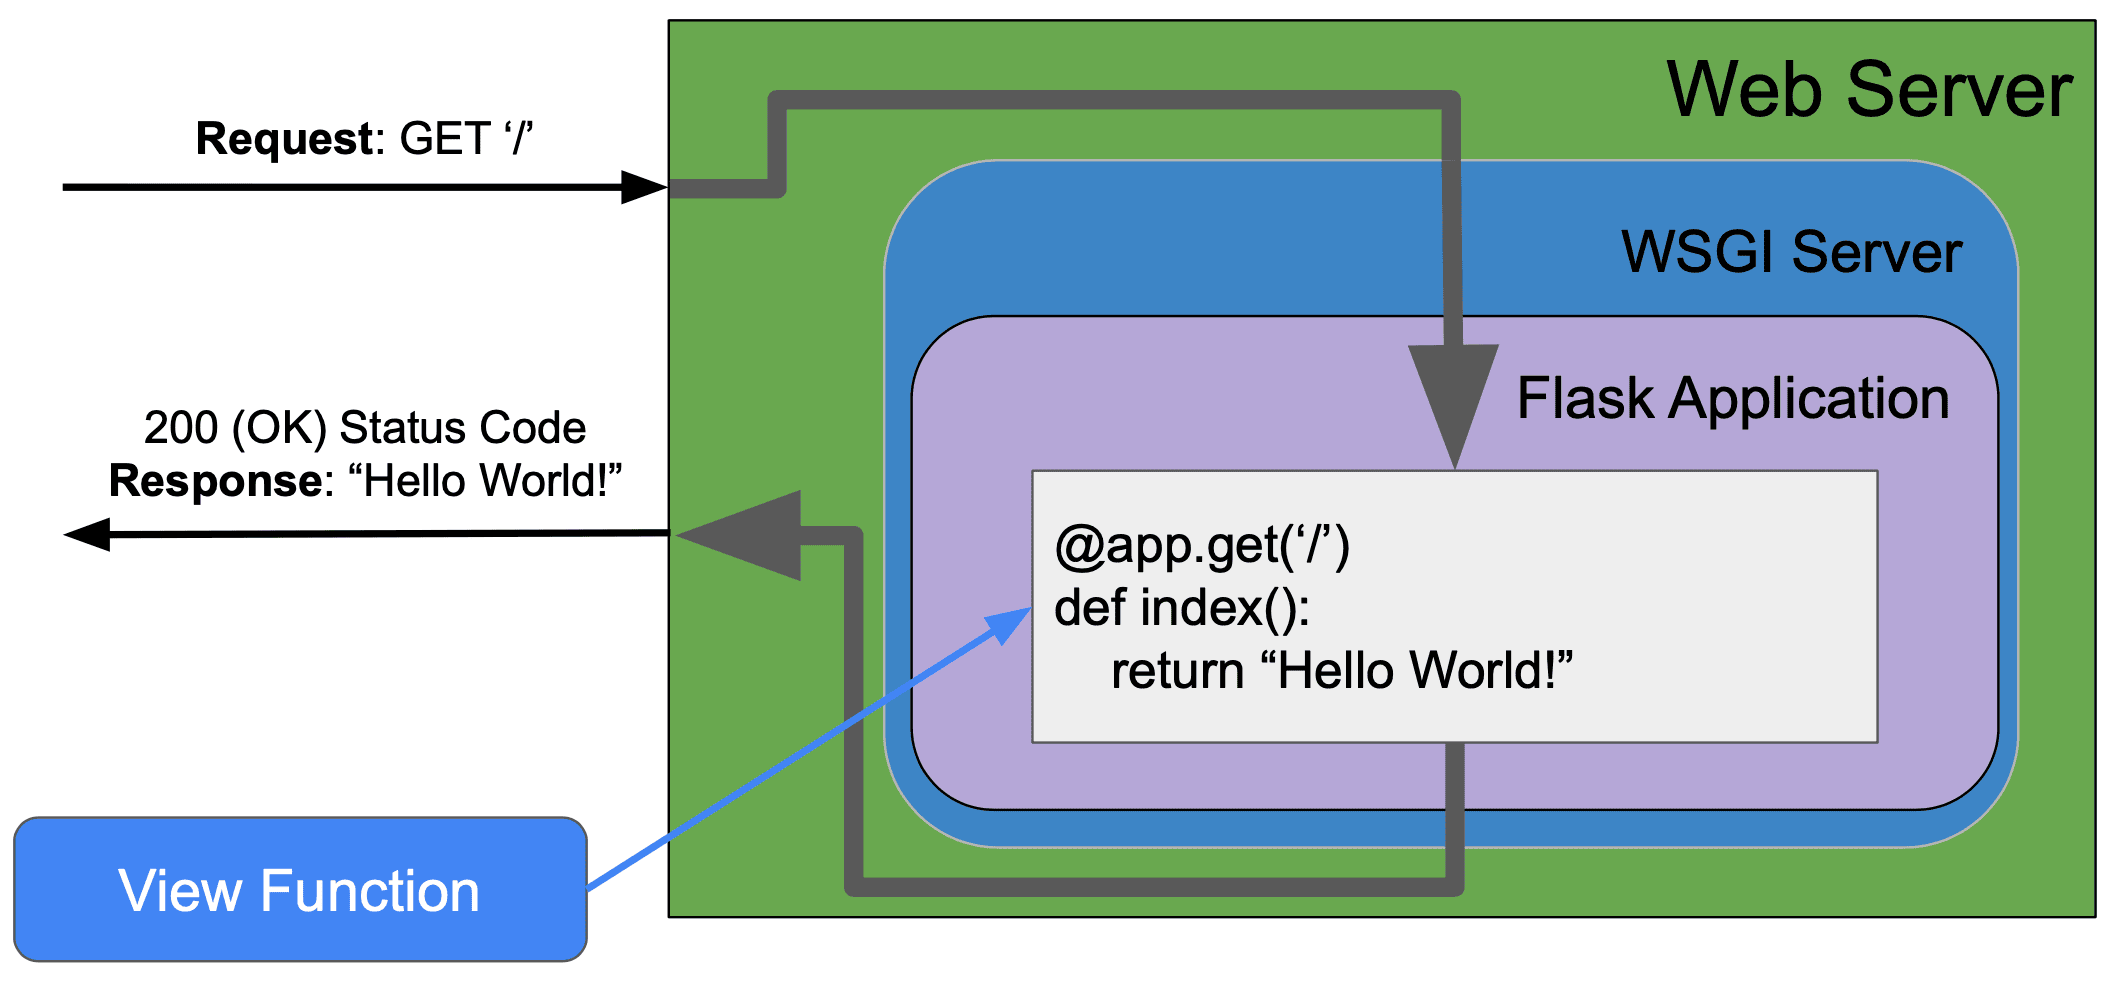
In this case, the view function returns a “Hello World” response. Now let's investigate the key steps that happen before and after a view function is executed...
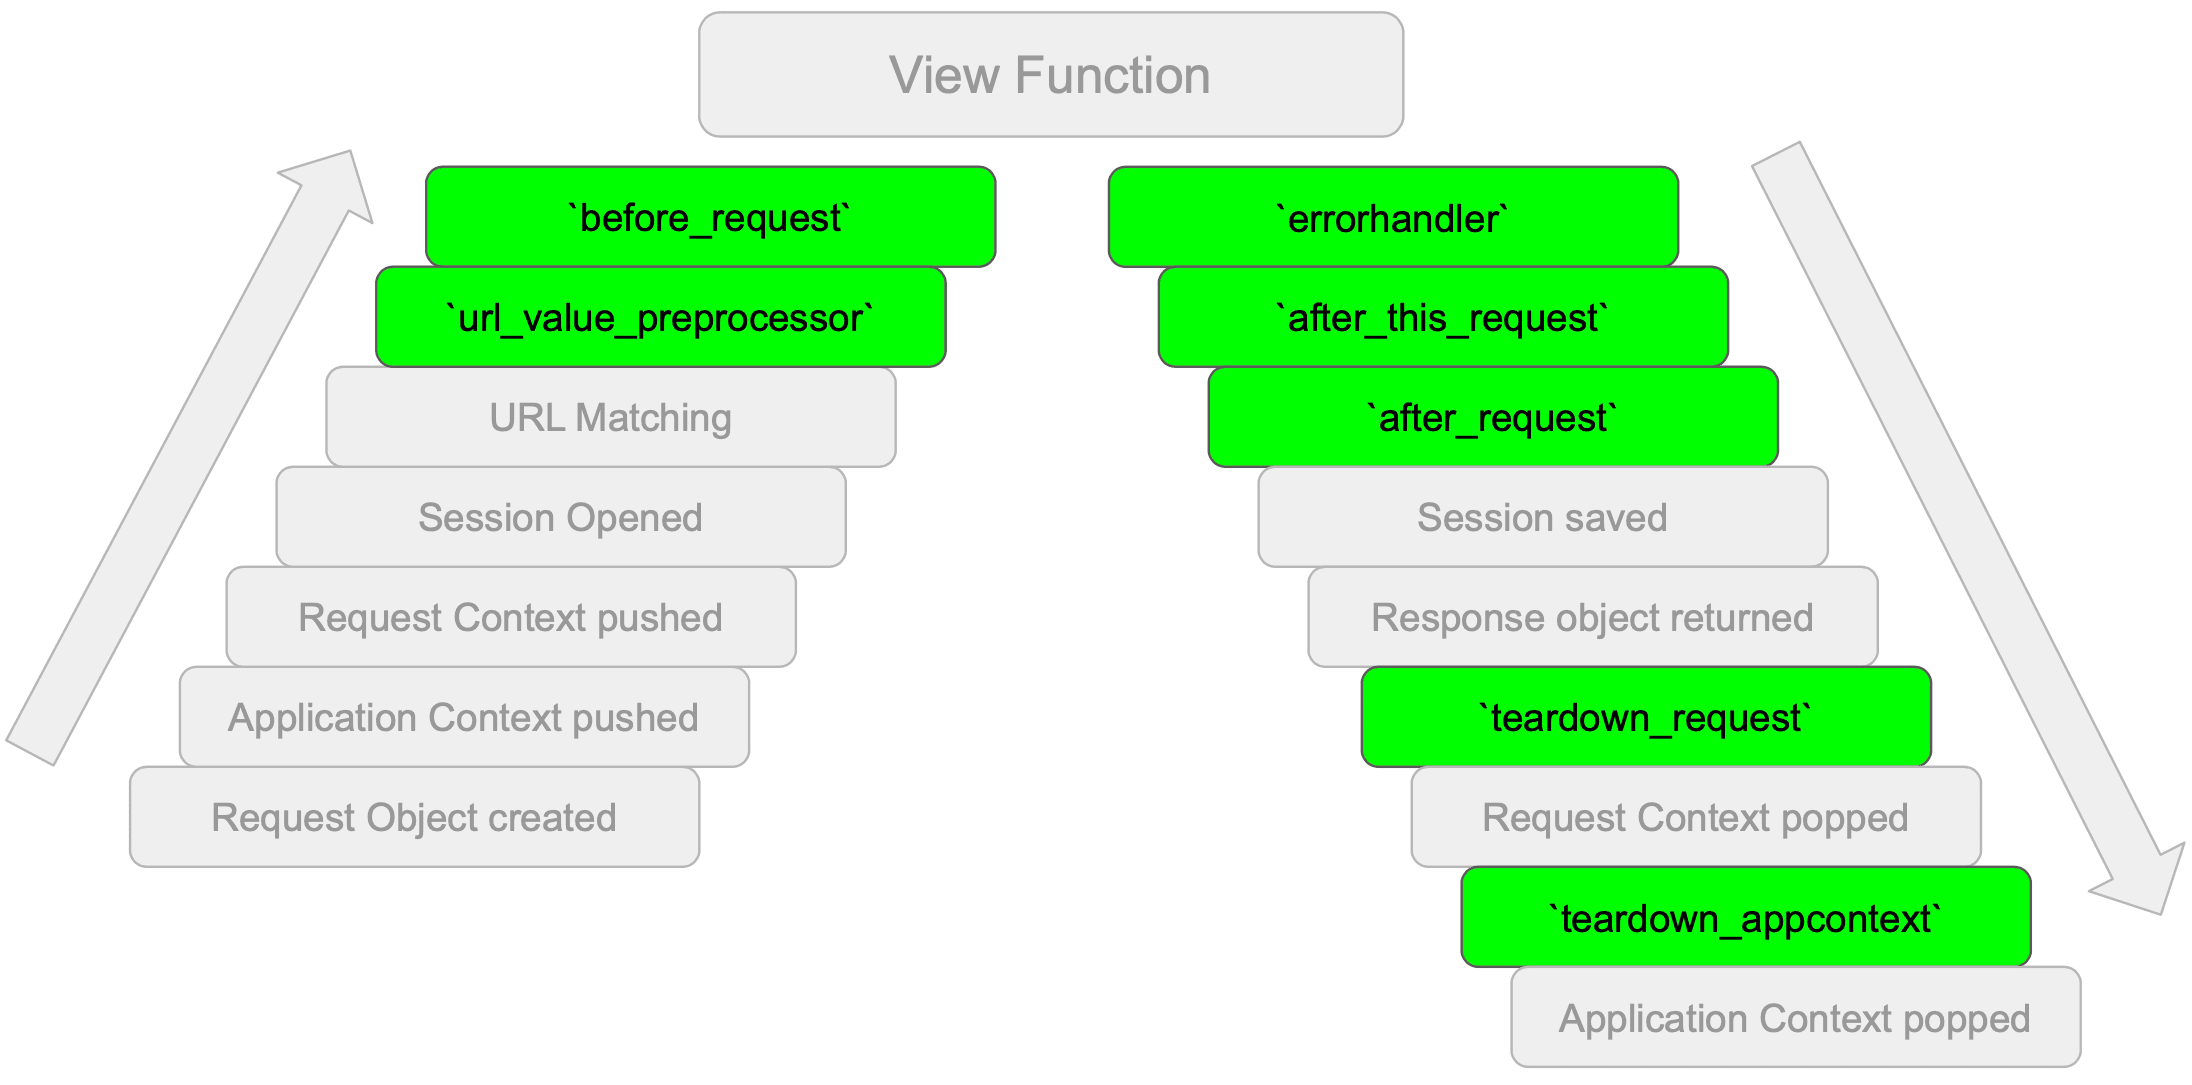
Steps Before and After a View Function
This diagram illustrates the key steps that occur before and after a view function is executed:
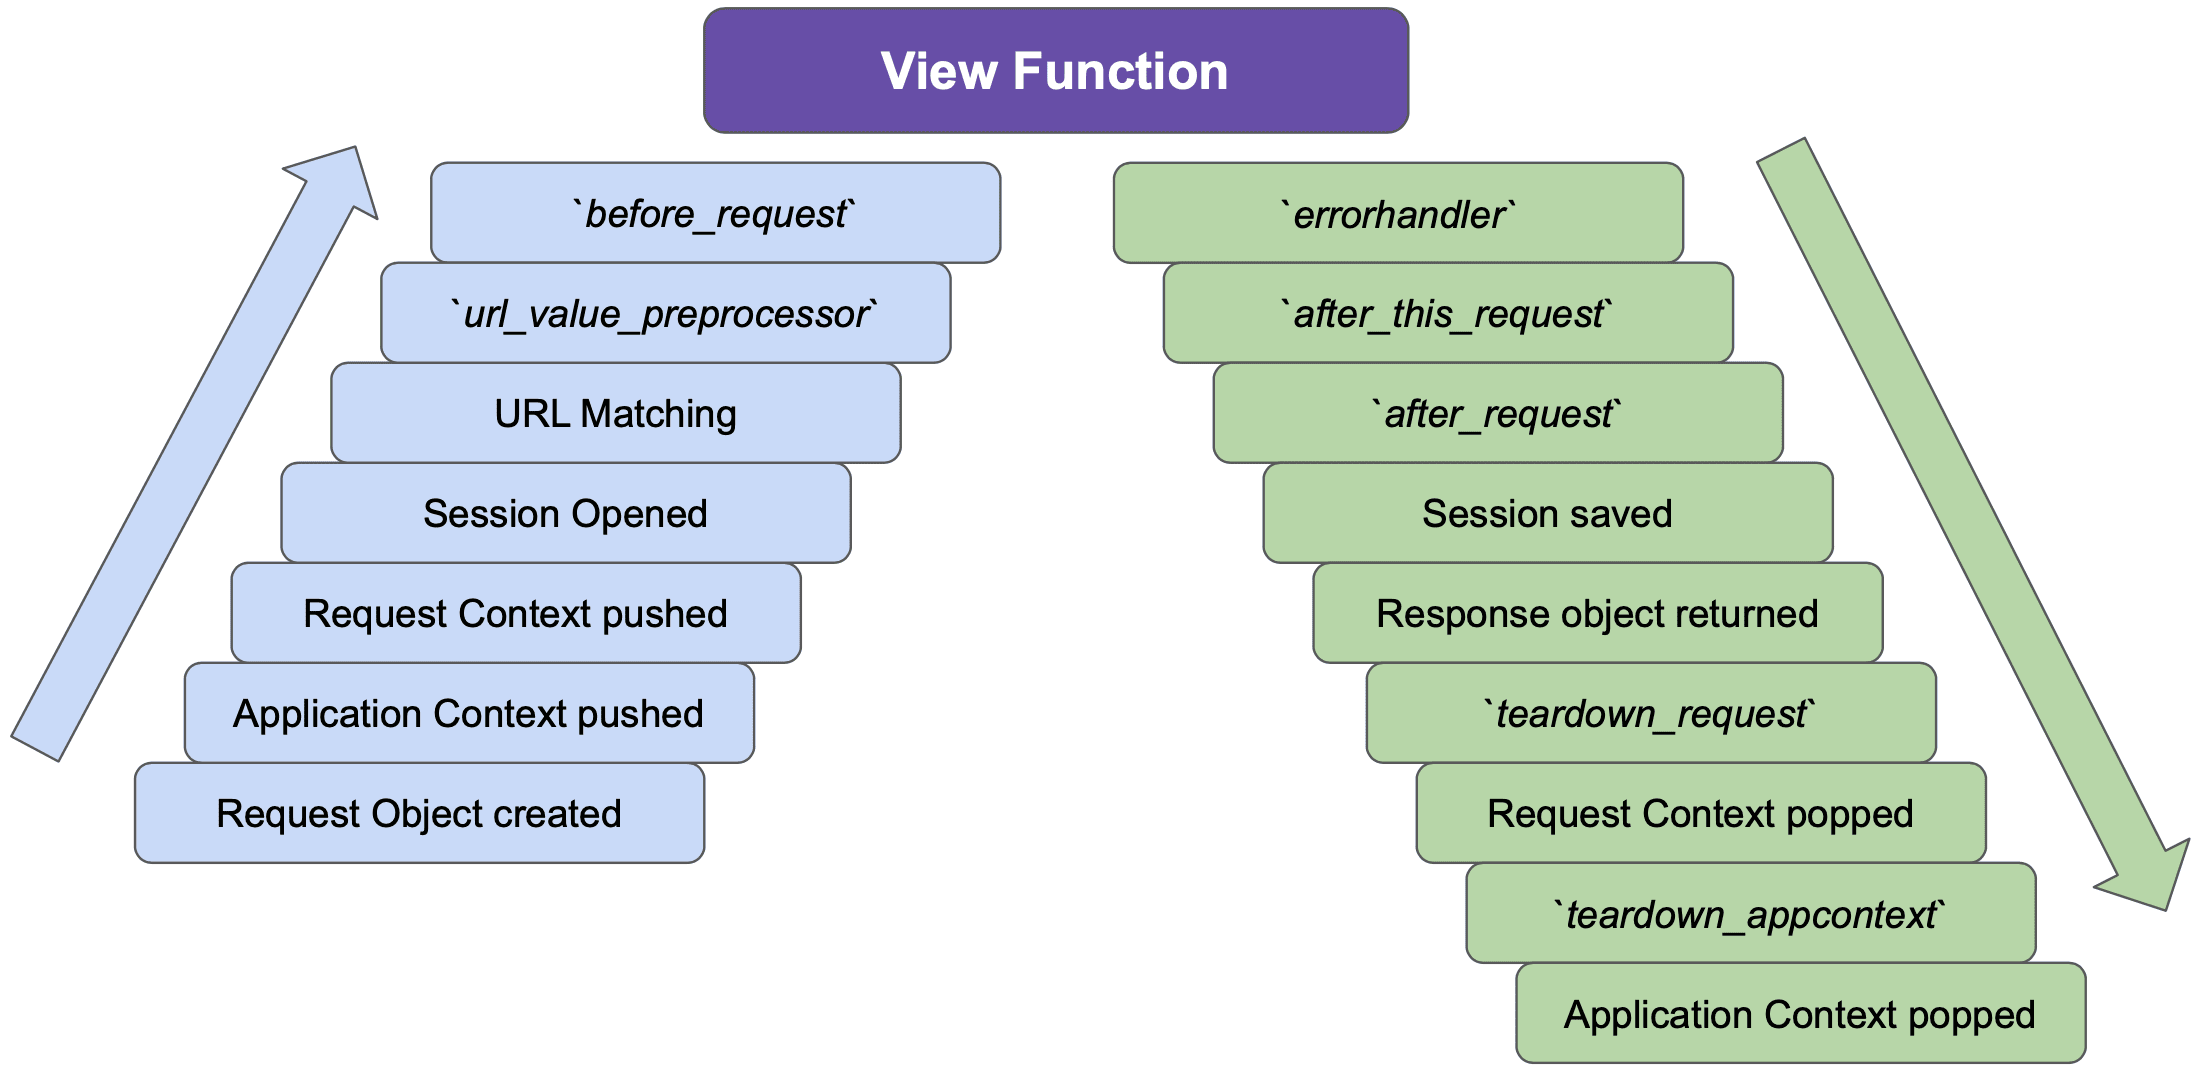
This diagram has a lot of steps, so I'll be walking through this sequence to show what occurs in each step.
This sequence of steps is important to know when developing a Flask application, as it gives you insight into how Flask works to prepare for executing a view function and how the response is generated. Additionally, there are several callbacks available in this sequence that you can attach functions to for executing different operations. These callbacks are a really powerful feature of Flask!
Steps Before a View Function
The steps before a view function prepare the necessary data and contexts to be available for the view function:
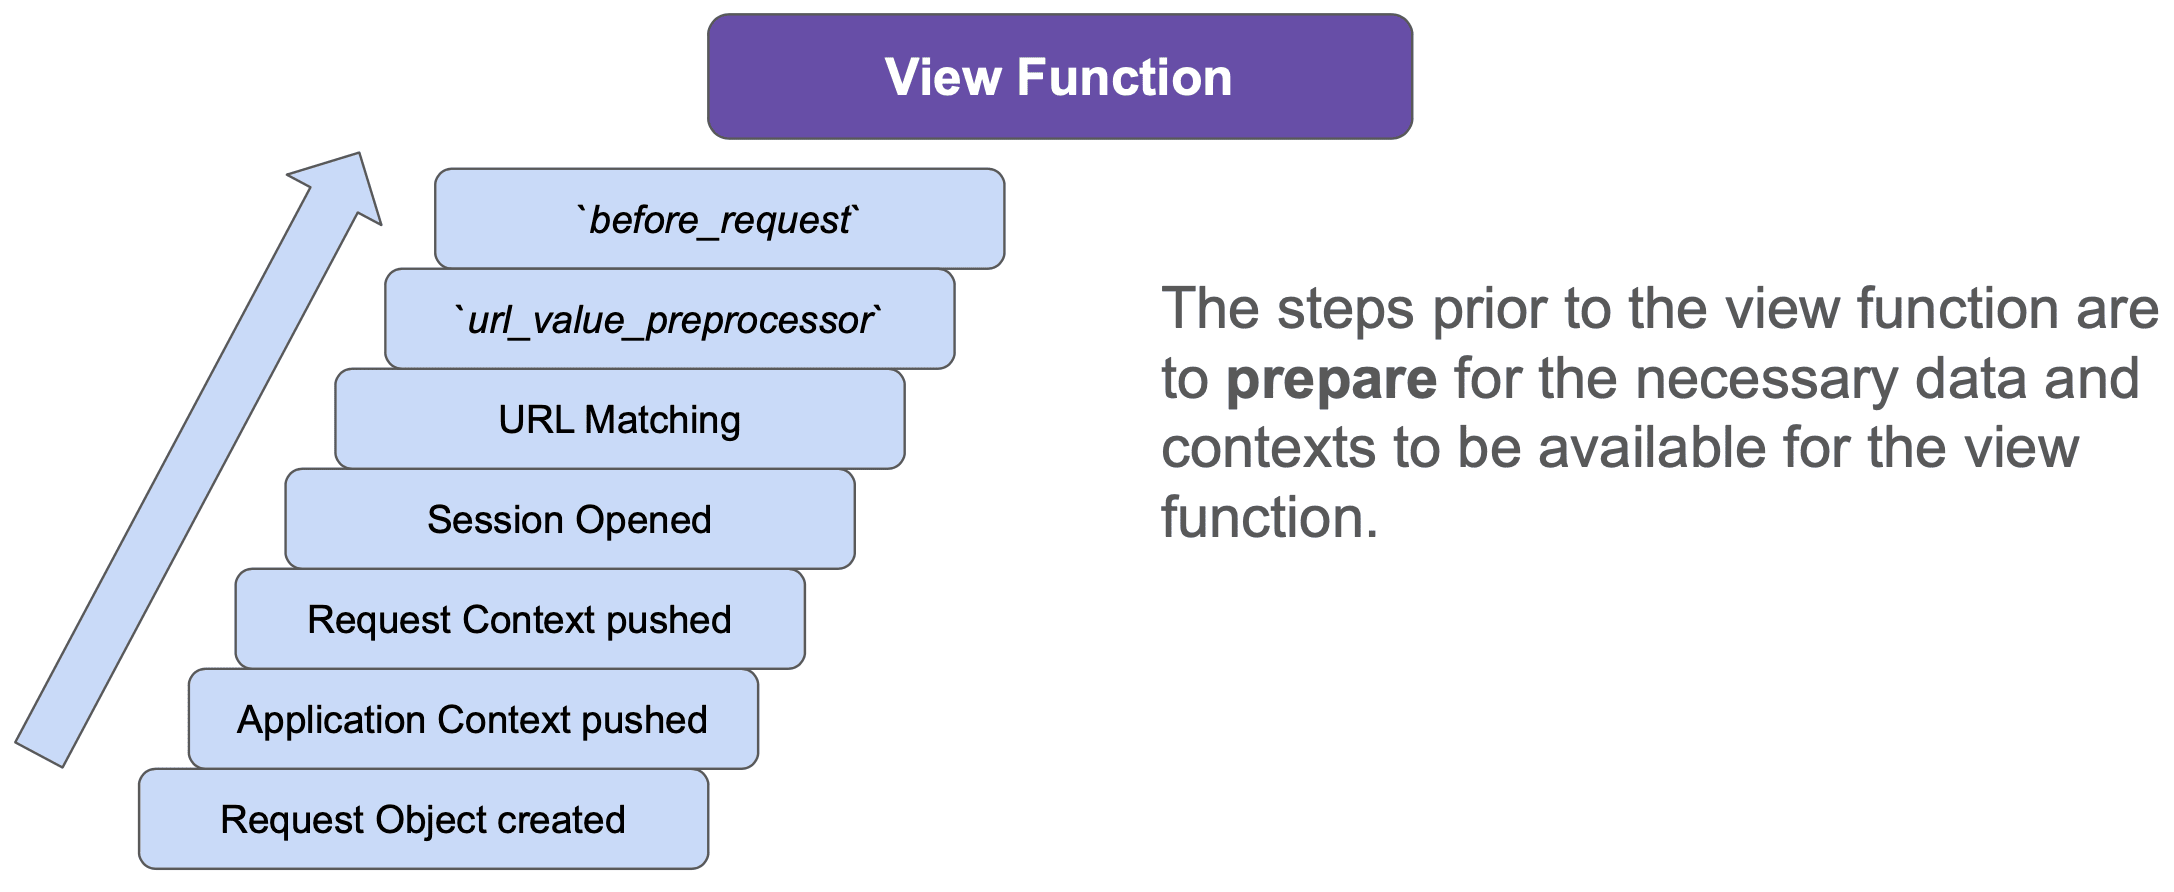
Let's walk through each of these steps...
Step 1 - Request Object Created
When a request is passed from the WSGI server, the environ object is passed in as an argument to the Flask application (via Flask.wsgi_app()). This data is used to create a Request object, which stores the data passed in about the request (from the environ object).
Step 2 - Application Context Pushed
The Application Context is used to store application-level data, such as configuration variables, logger, etc. In this step, the Application Context is pushed onto the stack, which makes the following items available:
current_app- proxy to the application during the application contextg- stores “global” data during the application context
For more details about how the Application and Request Contexts work, check out the following articles:
Step 3 - Request Context Pushed
The Request Context is used to keep track of the request-level data, such as the URL, HTTP method, headers, request data, session, etc. In this step, the Request Context is pushed onto the stack, which makes the following items available:
request- proxy to the request data passed in from the WSGI serversession- data for storing data from one request to another
Step 4 - Session Opened
Session data is loaded via the session_interface that is part of the Flask application. A powerful feature of Flask is that session_interface allows a flexible implementation for sessions:
- Client-side sessions - default for Flask (implemented as
SecureCookieSessionInterface) - Server-side sessions - implemented via Flask extensions (e.g., Flask-Session)
For more details about how the client and server-side sessions work in Flask, check out the following articles:
Step 5 - URL Matching
URL matching involves trying to find the correct view function for the URL being requested. For example, a request for the /profile URL would be matched to a view function decorated with @app.route('/profile').
If there's no match, then an error is stored for processing later (after the url_value_preprocessor and before_request decorated functions are executed).
Step 6 - url_value_preprocessor
Functions decorated with url_value_preprocessor are executed. This step is beneficial for modifying the URL values to be passed to the view function.
Step 7 - before_request
Functions decorated with before_request are executed. This step is beneficial for loading the necessary data needed by the view function, such as creating a database connection or loading user data.
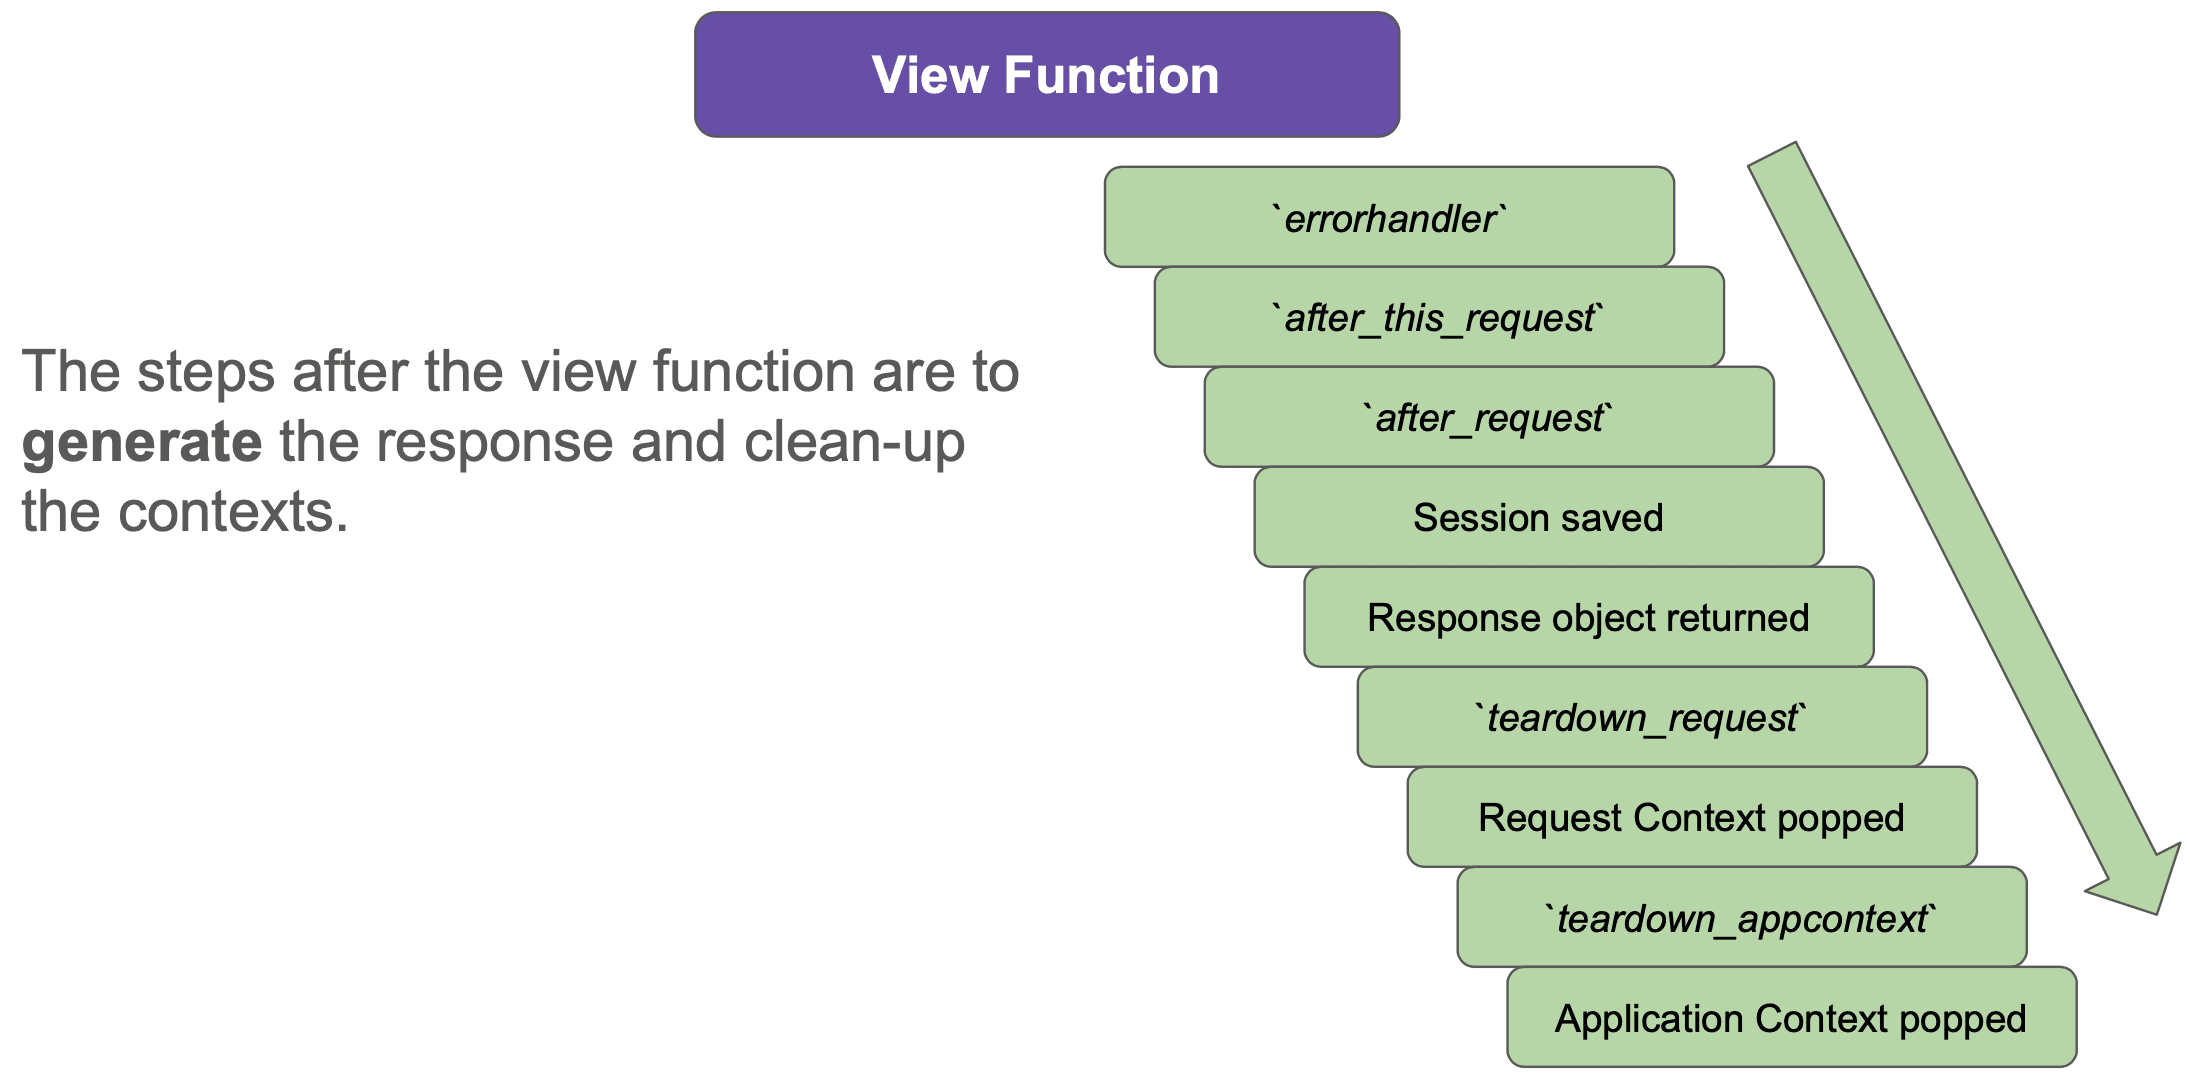
Steps After a View Function
The steps after a view function generate the response to be sent back to the WSGI server (and ultimately to the web browser) and clean up the contexts that were available to the view function:
Let's walk through each of these steps...
Step 1 - errorhandler
If an error has been generated up to this point and there's a matching errorhandler decorated function, then it gets executed during this step. Having errorhandler decorated functions for key HTTP error codes -- such as 403 (Forbidden) and 404 (Page Not Found) -- provide a custom feel for your web application (perhaps with links back to the homepage), instead of a generic error page.
Step 2 - after_this_request
Functions decorated with after_this_request are executed. This step is beneficial for modifying the response, but only in certain situations. Typically, a view function will define an after_this_request decorated function if it needs some custom modifications to the response.
Step 3 - after_request
Functions decorated with after_request are executed. Just like the previous step, this step is beneficial for modifying the response. However, functions decorated with after_request are executed for each request processed.
Step 4 - Session Saved
Session data is saved for use in the next request that gets processed.
Step 5 - Response Object Returned
In this step, the Response object is returned to the WSGI server.
Now that the response has been returned, the subsequent steps will focus on clean-up.
Step 6 - teardown_request
Functions decorated with teardown_request are executed. This step is beneficial for cleaning up resources after a request is done being processed, such as closing database connections.
Step 7 - Request Context Popped
Now the Request Context is popped from the stack, which means that request and session are no longer available.
Step 8 - teardown_appcontext
Functions decorated with teardown_appcontext are executed. Just like with teardown_request, this step is beneficial for cleaning up resources after a request is done being processed, such as closing database connections.
Step 9 - Application Context Popped
Finally, the Application Context is popped from the stack, which means that current_app and g are no longer available.
Callbacks in Flask
Flask has several callbacks that you can utilize at different steps when processing a request:
These callbacks are available as decorators to execute functions at specific steps.
Let's look at how to use these callbacks and what scenarios the callbacks can help you out...
url_value_preprocessor
The purpose of creating a function decorated with url_value_preprocessor is to read or modify the URL information prior to the view function executing.
For example, if you wanted to read the username from the URL (http://www.flask-social.com/patrick123) for a social media application, you could create a function decorated with url_value_preprocessor to pop the username from the URL:
@app.url_value_preprocessor
def get_site(endpoint, values):
    g.user = values.pop('username', None)
Now the view function is simplified to not pass in the username argument (it has already been popped) and the username has been loaded into g for immediate processing:
@app.route('/<username>')
def profile_page():
    # `g` available in templates too!
    return f"<h1>Profile Page - {g.user}</h1>"
For more, check out Using URL Processors from the official Flask docs.
before_request
The purpose of creating a function decorated with before_request is to execute a function before each call to the view functions.
before_request is available at both the application-level (@app.before_request) and Blueprint-level (@user_blueprint.before_request).
A common use of before_request is to create a connection to a database, so the view functions can work with the database:
@app.before_request
def database_connection():
if 'db' not in g:
    g.db = sqlite3.connect(app.config['SQLITE_FILE'])
before_request can also be used to check if the user has the proper authorization. For example, an administrative Blueprint could create a function decorated with before_request to check if the user is authorized to access the view functions:
@admin_blueprint.before_request
def admin_before_request():
    if current_user.user_type != 'Admin':
        abort(403)
If the user is not authorized, then the function calls abort with a 403 (Forbidden) error. This call to abort results in the view function not being executed, as returning a non-None value from a function decorated with before_request causes the view function to not be executed!
The Flask-WTF extension uses a
before_request()callback to check the CSRF token: https://github.com/wtforms/flask-wtf/blob/v1.2.1/src/flask_wtf/csrf.py#L206.
errorhandler
The purpose of functions decorated with errorhandler are to gracefully handle specific HTTP error codes.
For example, 403 (Forbidden) and 404 (Page Not Found) errors can be handled like so:
@app.errorhandler(403)
def page_forbidden(e):
    return render_template('403.html'), 403

@app.errorhandler(404)
def page_not_found(e):
    return render_template('404.html'), 404
By rendering a template for these HTTP error codes, you can create a page that includes links back to the homepage using common headers and footers throughout your web application.
after_this_request
The purpose of functions decorated with after_this_request are to modify the response, but only after specific requests.
For example, a view function can specify a function to set a cookie in the response:
from flask import after_this_request

@app.route('/profile')
def profile():
    @after_this_request
    def remember_theme(response):
        response.set_cookie('theme', theme)
        return response
    return render_template('profile.html')
The usage of after_this_request is different from the other callbacks presented in this section, so make sure to import after_this_request.
after_request
The purpose of functions decorated with after_request are to modify the response after every request.
For example, a function could be specified to modify the header in the response after every request is processed:
@app.after_request
def remember_language(response):
    response.headers['language'] = g.language
    return response
Functions decorated with after_request (and with after_this_request) need to pass in response as an argument and also return the response.
after_request is available at both the application-level (@app.after_request) and Blueprint-level (@user_blueprint.after_request). It can be useful at the Blueprint-level to modify the response for a specific set of view functions.
Flask-Login uses an
after_request()callback to handle the “Remember Me” cookie: https://github.com/maxcountryman/flask-login/blob/main/src/flask_login/login_manager.py#L119.
teardown_request / teardown_appcontext
The purpose of functions decorated with teardown_request or teardown_appcontext are to clean up resources after a request has been processed.
Remember: The response has already been returned to the WSGI server when any function decorated with
teardown_requestorteardown_appcontextis called.
An example usage of these callbacks is for closing the connection to a SQLite database:
@app.teardown_appcontext
def close_database_connection(error):
    database = g.pop('database', None)

    if database is not None:
        database.close()
The teardown_request or teardown_appcontext callbacks are similar, with the key difference being what contexts are available:
| Callback | Contexts Available |
|---|---|
teardown_request |
request, session, current_app, g |
teardown_appcontext |
current_app, g |
Example of Callbacks
The following Flask application prints a message to the console for each of the callbacks specified in this section:
from flask import Flask, g, request, after_this_request, abort

app = Flask(__name__)


# ---------
# Callbacks
# ---------

@app.url_value_preprocessor
def get_site(endpoint, values):
    print(f"In url_value_preprocessor callback... endpoint: {endpoint}, values: {values}")
    g.username = values.pop('username_slug', None)


@app.before_request
def before_request():
    print("In before_request callback...")


@app.after_request
def after_request(response):
    print("In after_request callback...")
    return response


@app.teardown_request
def teardown_request(error):
    print(f'In teardown_request callback...')


@app.teardown_appcontext
def teardown_appcontext(error):
    print(f'In teardown_appcontext callback...')


# ------
# Routes
# ------

@app.get('/')
def index():
    return f"<h1>Homepage</h1>"


@app.route('/<username_slug>')
def profile_page():
    print('In profile_page view function...')
    @after_this_request
    def check_after_this_request(response):
        print("In after_this_request callback...")
        return response

    return f"<h1>Profile Page - {g.username}</h1>"  # `g` available in templates too!


if __name__ == '__main__':
    app.run()
If you start the Flask development server (flask --app app --debug run) and navigate to http://127.0.0.1:5000/, you will see the following printed to the console:
In url_value_preprocessor callback... endpoint: index, values: {}
In before_request callback...
In after_request callback...
In teardown_request callback...
In teardown_appcontext callback...
127.0.0.1 - - [14/Dec/2023 11:26:32] "GET / HTTP/1.1" 200 -
This output shows the expected order of the callbacks presented in this section. Notice that there's no after_this_request message, as this callback was not executed.
If you navigate to http://127.0.0.1:5000/patrick123, the console output will be:
In url_value_preprocessor callback... endpoint: profile_page, values: {'username_slug': 'patrick123'}
In before_request callback...
In profile_page view function...
In after_this_request callback...
In after_request callback...
In teardown_request callback...
In teardown_appcontext callback...
127.0.0.1 - - [14/Dec/2023 11:33:34] "GET /patrick123 HTTP/1.1" 200 -
The callbacks are executed in the expected order and the function decorated with after_this_request was executed as well. Also, notice that the function decorated with url_value_preprocessor was passed in the username_slug so it could be added to g:
@app.url_value_preprocessor
def get_site(endpoint, values):
    print(f"In url_value_preprocessor callback... endpoint: {endpoint}, values: {values}")
    g.username = values.pop('username_slug', None)
Conclusion
This article shows how requests are processed in Flask by detailing the key steps that occur before and after a view function is executed. Additionally, there are callbacks available during this sequence to help you power up your Flask application.
If you're interested in learning more about Flask, check out my course on how to build, test, and deploy a Flask application: Developing Web Applications with Python and Flask.