 Amir Tadrisi
In the first tutorial in this series, we built a Single Page Application using Python and Pyodide to load Pandas, fetch a Netflix Dataset, and perform basic computations on the data. We also looked at how Pyodide can be used to manipulate the DOM directly with Python. In the application that we built, we passed processed Netflix data to a JavaScript component and rendered it directly from Python code.
As mentioned in the conclusion to part one, the application is missing some features and we need to address a number of issues. In this second part, we'll:
- Better analyze and manipulate the data with Pandas
- Use a web worker to speed up the application
--
Python Single Page Application Series:
- Part 1: Learn the basics of Pyodide and create the base application
- Part 2 (this tutorial!): Analyze and manipulate the data with Pandas and use a web worker to speed up the application
- Part 3: Create a Python package, add additional features, and add a persistent data layer
Contents
Objectives
By the end of this tutorial, you should be able to:
- Use more advanced features of Pandas to analyze and manipulate the data
- Improve the user experience and performance with web workers
What We're Building
First, we'll improve the user experience and application performance by using a web worker. We'll also dive deeper into the Pandas library for analyzing and manipulating the Netflix data in order to create recommendations based on the given titles as well as add random movie and show facts.
You can find a live demo of the application here.
Analyzing Netflix Dataset with Pandas
In part one, after loading the Netflix CSV file, we dropped a few unnecessary columns and returned the results as JSON. As you can see, we haven't done much analysis or manipulation of the data yet. We'll look at that now.
If you need the code from part one, you can find it here.
Create Recommendation List
The sanitized DataFrame has the following columns:
- id
- title
- release_year
- genres
- production_countries
- imdb_score
- imdb_votes
- tmdb_score
- tmdb_popularity
Let's create a recommendation list for movies and shows using Pandas. To do so, we'll add a new column to the DataFrame called recommendation_score, with the value being the weighted sum of imdb_votes, imdb_score, tmdb_score, and tmdb_popularity:
recommended_titles["recommendation_score"] = (
    sanitized_titles["imdb_votes"] * 0.3 +
    sanitized_titles["imdb_score"] * 0.3 +
    sanitized_titles["tmdb_score"] * 0.2 +
    sanitized_titles["tmdb_popularity"] * 0.2
)
Open the index.html file in your code editor of choice, and add the following code after titles_list = sanitized_titles.head(10).to_json(orient="records")
# 4. Create recommendation list for Shows and Movies
# 4.1 Copy the sanitized_titles to add new column to it
recommended_titles = sanitized_titles.copy()

# 4.2 Add new column to the sanitized_titles
recommended_titles["recommendation_score"] = (
    sanitized_titles["imdb_votes"] * 0.3 +
    sanitized_titles["imdb_score"] * 0.3 +
    sanitized_titles["tmdb_score"] * 0.2 +
    sanitized_titles["tmdb_popularity"] * 0.2
)
print(recommended_titles.head(5))
Open the file in your browser. Then, within the console in your browser's developer tools, you should see the first five titles. Take note of the recommendation_score column:
      id                            title  ... tmdb_score recommendation_score
 tm84618                      Taxi Driver  ...        8.2          238576.2524
tm127384  Monty Python and the Holy Grail  ...        7.8          159270.7632
 tm70993                    Life of Brian  ...        7.8          117733.1610
tm190788                     The Exorcist  ...        7.7          117605.6374
 ts22164     Monty Python's Flying Circus  ...        8.3           21875.3838
With that, let's create two new DataFrames, one for movies and another for shows, and then sort them by recommendation_score in descending order:
recommended_movies = (
    recommended_titles.loc[recommended_titles["type"] == "MOVIE"]
    .sort_values(by="recommendation_score", ascending=False)
    .head(5)
    .to_json(orient="records")
)

recommended_shows = (
    recommended_titles.loc[recommended_titles["type"] == "SHOW"]
    .sort_values(by="recommendation_score", ascending=False)
    .head(5)
    .to_json(orient="records")
)
Here, we used the loc and sort_values methods to filter the titles by the type column and sort by recommendation_score in descending order, respectively.
Replace print(recommended_titles.head(5)) with these new lists:
# 4. Create recommendation list for Shows and Movies
# 4.1 Copy the sanitized_titles to add new column to it
recommended_titles = sanitized_titles.copy()

# 4.2 Add new column to the sanitized_titles
recommended_titles["recommendation_score"] = (
    sanitized_titles["imdb_votes"] * 0.3 +
    sanitized_titles["imdb_score"] * 0.3 +
    sanitized_titles["tmdb_score"] * 0.2 +
    sanitized_titles["tmdb_popularity"] * 0.2
)
recommended_movies = (
    recommended_titles.loc[recommended_titles["type"] == "MOVIE"]
    .sort_values(by="recommendation_score", ascending=False)
    .head(5)
    .to_json(orient="records")
)
recommended_shows = (
    recommended_titles.loc[recommended_titles["type"] == "SHOW"]
    .sort_values(by="recommendation_score", ascending=False)
    .head(5)
    .to_json(orient="records")
)
To use these lists in our application, first we need to add new keys to the App's state to be able to save and manipulate the data:
state = {
  titles: [],
  recommendedMovies: [],
  recommendedShows: [],
}
Now, to update the state, add the following, right after js.window.appComponent.state.titles = titles_list:
js.window.appComponent.state.recommendedMovies = recommended_movies
js.window.appComponent.state.recommendedShows = recommended_shows
Finally, to display the recommendations to the end user, add the following to view(), just below the <!-- End of Titles --!> line:
<!-- Start of Recommended title --!>
<div class="flex">
  <!-- Start of Recommended title --!>
  <div class="px-4 sm:px-6 lg:px-8 my-8 w-1/2">
    <p class="text-4xl font-semibold text-slate-100">Recommended Movies</p>
    <ul role="list" class="divide-y divide-gray-200">
      ${this.state.recommendedMovies.length > 0 ? JSON.parse(this.state.recommendedMovies).map(function (movie) {
          return `
            <li class="relative bg-white py-5 px-4 hover:bg-gray-50 focus-within:ring-2 focus-within:ring-inset focus-within:ring-indigo-600 rounded-md my-2">
              <div class="flex justify-between space-x-3">
                <div class="min-w-0 flex-1">
                  <p class="text-sm font-semibold text-gray-900 truncate">${movie.title}</p>
                  <p class="text-sm text-gray-500 truncate">${movie.description}</p>
                </div>
                <time datetime="" class="flex-shrink-0 whitespace-nowrap text-sm text-gray-500">${movie.release_year}</time>
              </div>
            </li>
            `
        }).join('') : `
          <li class="relative bg-white py-5 px-4 hover:bg-gray-50 focus-within:ring-2 focus-within:ring-inset focus-within:ring-indigo-600">
            <div class="flex justify-between space-x-3">
              <div class="min-w-0 flex-1">
                <p class="text-sm font-medium text-gray-900 truncate">Loading...</p>
              </div>
            </div>
          </li>
        </ul>
        `
      }
    </div>
    <!-- End of Recommended titles --!>

    <!-- Start of Recommended Shows --!>
    <div class="px-4 sm:px-6 lg:px-8 my-8 w-1/2">
      <p class="text-4xl font-semibold text-slate-100">Recommended Shows</p>
      <ul role="list" class="divide-y divide-gray-200">
        ${this.state.recommendedShows.length > 0 ? JSON.parse(this.state.recommendedShows).map(function (show) {
          return `
            <li class="relative bg-white py-5 px-4 hover:bg-gray-50 focus-within:ring-2 focus-within:ring-inset focus-within:ring-indigo-600 rounded-md my-2">
              <div class="flex justify-between space-x-3">
                <div class="min-w-0 flex-1">
                  <p class="text-sm font-semibold text-gray-900 truncate">${show.title}</p>
                  <p class="text-sm text-gray-500 truncate">${show.description}</p>
                </div>
                <time datetime="" class="flex-shrink-0 whitespace-nowrap text-sm text-gray-500">${show.release_year}</time>
                </div>
              </li>
              `
        }).join('') : `
          <li class="relative bg-white py-5 px-4 hover:bg-gray-50 focus-within:ring-2 focus-within:ring-inset focus-within:ring-indigo-600">
            <div class="flex justify-between space-x-3">
              <div class="min-w-0 flex-1">
                <p class="text-sm font-medium text-gray-900 truncate">Loading...</p>
              </div>
            </div>
          </li>
        </ul>
      `}
    </div>
    <!-- Start of Recommended shows --!>
</div>
<!-- End of Recommended titles --!>
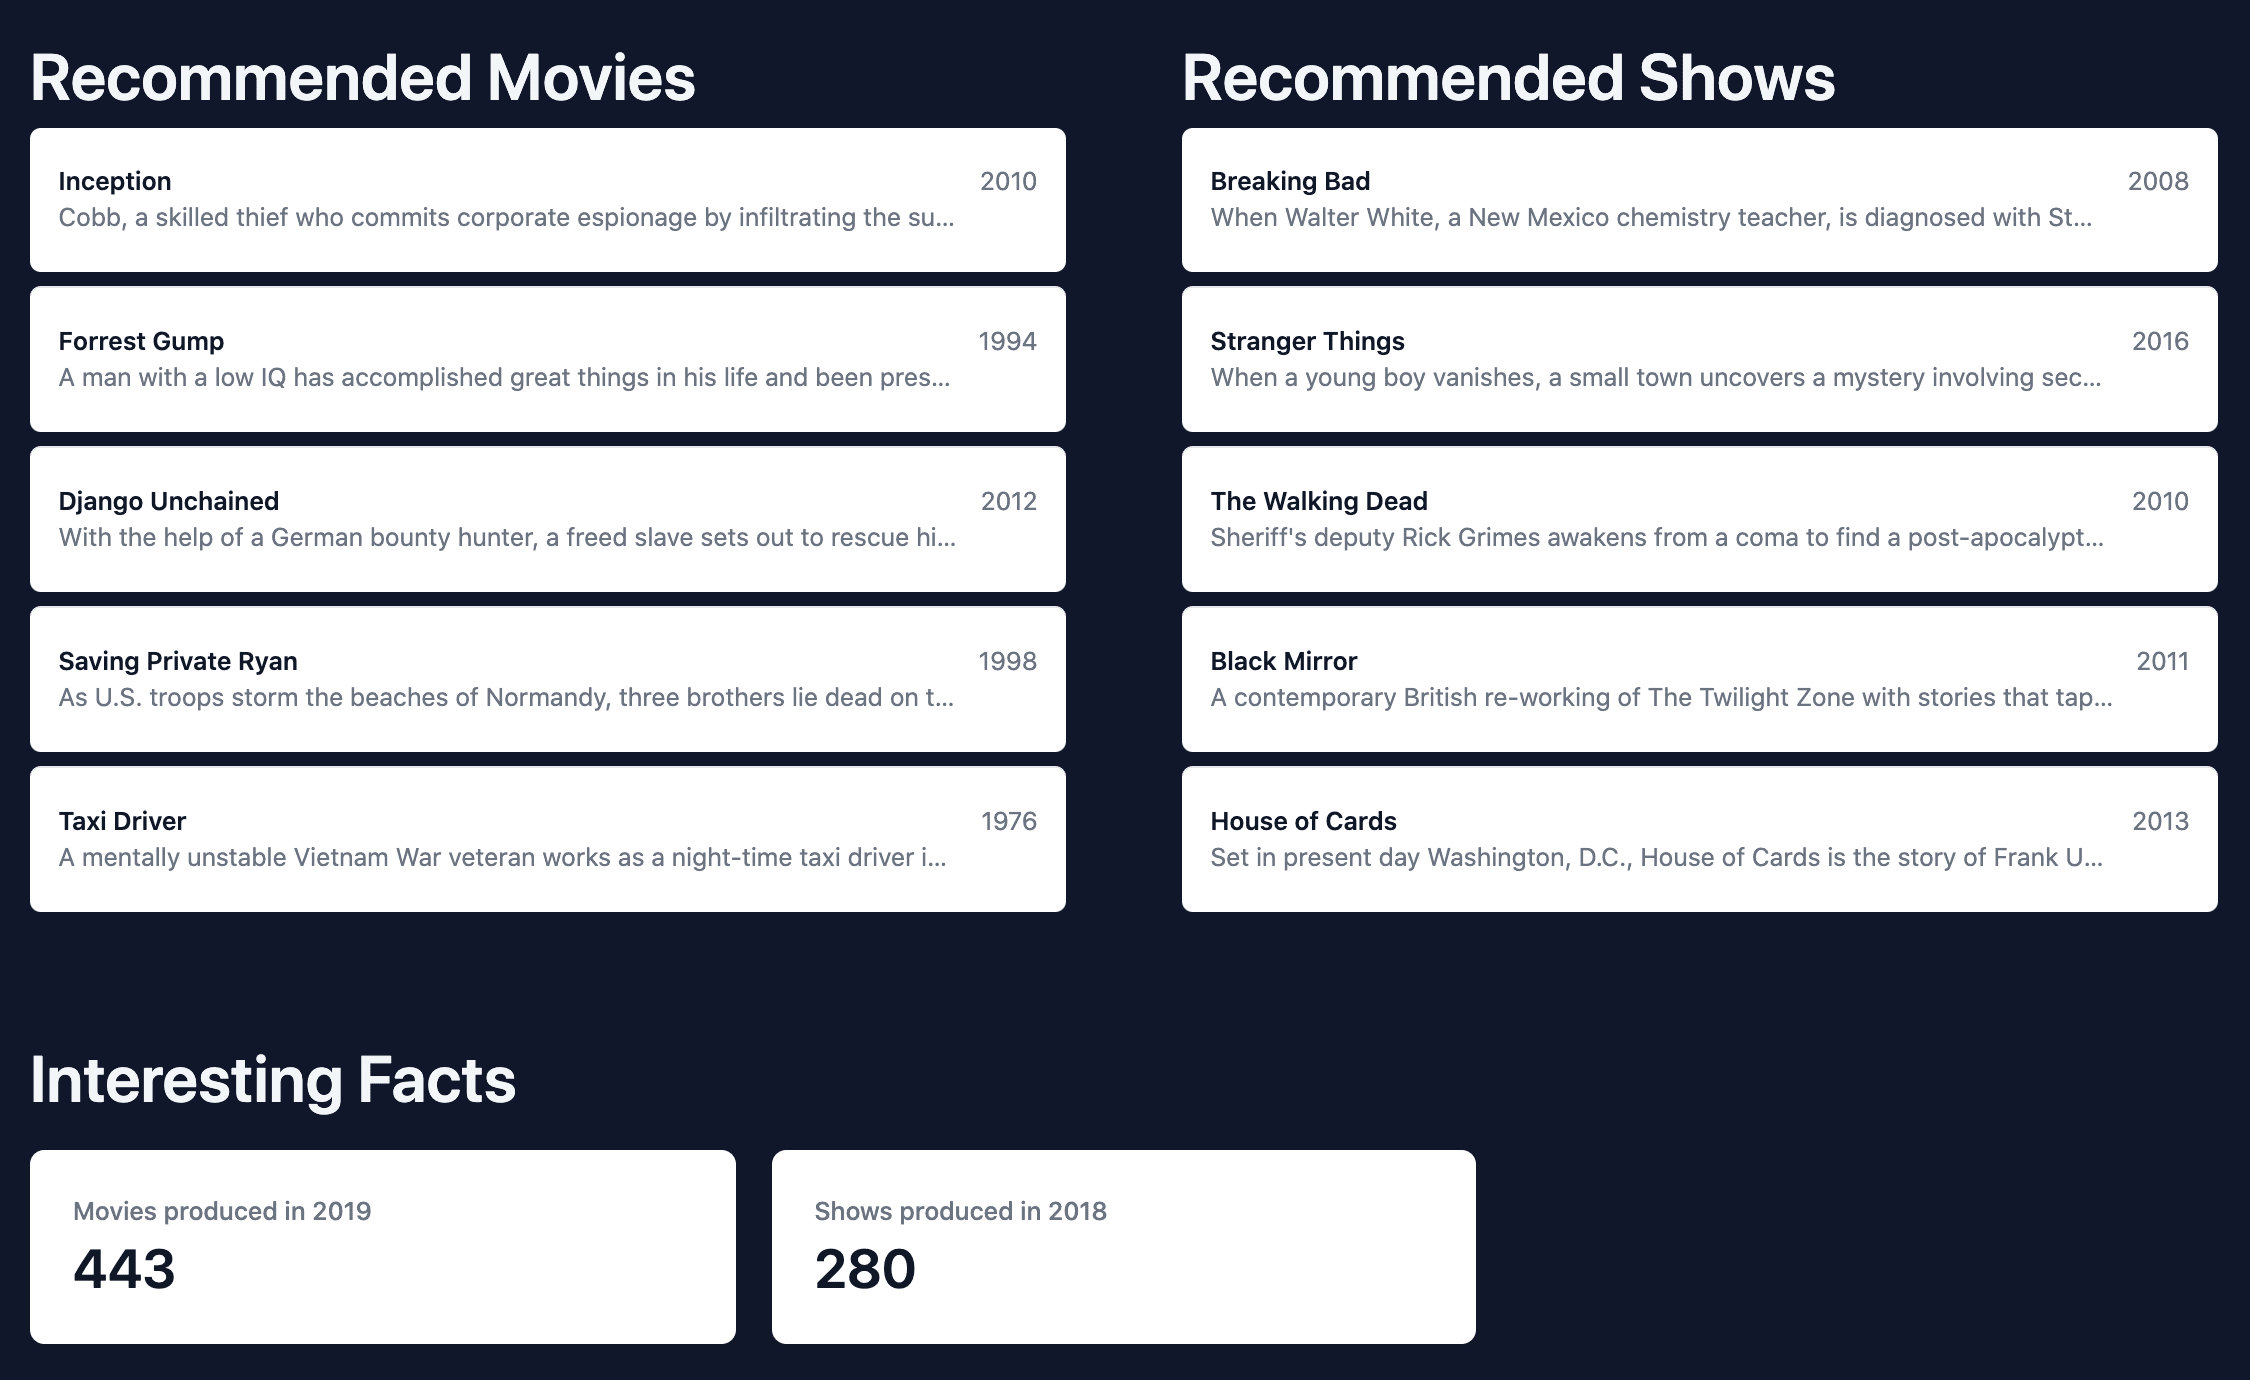
Back in your browser, you should now see the recommended movies and shows.
Movie and Show Facts
In this section, we'll find the year that produced the most movies and shows, starting with the Python code:
# 5. Movie and Show Facts

facts_movies = (
    sanitized_titles.loc[sanitized_titles["type"] == "MOVIE"]
    .groupby("release_year")
    .count()["id"]
    .sort_values(ascending=False)
    .head(1)
    .to_json(orient="table")
)

facts_shows = (
    sanitized_titles.loc[sanitized_titles["type"] == "SHOW"]
    .groupby("release_year")
    .count()["id"]
    .sort_values(ascending=False)
    .head(1)
    .to_json(orient="table")
)
Here, we used the:
- groupby method to group the titles by
release_year. - count to count the number of titles per year.
- sort_values to sort the titles by the number of titles per year in descending order.
Add the above code to the index.html file, just below the recommendation section.
Update the App's state again:
state = {
  titles: [],
  recommendedMovies: [],
  recommendedShows: [],
  factsMovies: [],
  factsShows: [],
}
Update the state:
# 6. set titles to first 10 titles to the state, update remaining state, and render
js.window.appComponent.state.titles = titles_list
js.window.appComponent.state.recommendedMovies = recommended_movies
js.window.appComponent.state.recommendedShows = recommended_shows
js.window.appComponent.state.factsMovies = facts_movies   # NEW
js.window.appComponent.state.factsShows = facts_shows     # NEW
js.window.appComponent.render()
Update view() again by adding the following, just after <!-- End of Recommended Shows --!>:
<!-- Start of Facts --!>
<div class="px-4 sm:px-6 lg:px-8 my-8">
  <div>
    <h3 class="text-4xl font-semibold text-slate-100">Interesting Facts</h3>
    <dl class="mt-5 grid grid-cols-1 gap-5 sm:grid-cols-3">
      <div class="px-4 py-5 bg-white shadow rounded-lg overflow-hidden sm:p-6">
        ${this.state.factsMovies.length > 0 ?
          `
            <dt class="text-sm font-medium text-gray-500 truncate">Movies produced in ${JSON.parse(this.state.factsMovies).data[0].release_year}</dt>
            <dd class="mt-1 text-3xl font-semibold text-gray-900">${JSON.parse(this.state.factsMovies).data[0].id}</dd>
          ` : `
            Loading...
          `}
      </div>
      <div class="px-4 py-5 bg-white shadow rounded-lg overflow-hidden sm:p-6">
        ${this.state.factsShows.length > 0 ?
          `
            <dt class="text-sm font-medium text-gray-500 truncate">Shows produced in ${JSON.parse(this.state.factsShows).data[0].release_year}</dt>
            <dd class="mt-1 text-3xl font-semibold text-gray-900">${JSON.parse(this.state.factsShows).data[0].id}</dd>
          ` : `
            Loading...
          `}
      </div>
    </dl>
  </div>
</div>
<!-- End of Facts --!>
Reload the index.html page in the browser. You should see the interesting facts section with the number of movies and shows produced in the year that produced the most movies and shows.
Improve Performance
One of the issues with the current implementation is that we're putting expensive operations in the main thread of the browser. The consequence of this is that other operations will be blocked until Pyodide finishes loading and executing the code. This can have negative impact on the performance of the application and user experience.
Web Workers
To resolve this issue we can use web workers to offload the heavy operations -- Pyodide and the Python script, in this case -- to a separate thread in the background to let the browser's main thread continue running other operations without getting slowed down or locked up.
The main components of a web worker are:
- Worker() constructor: Creates a new instance of a web worker, which we can pass a script to that will be run in a separate thread
- onmessage() event: Triggered when the worker receives a message from another thread
- postMessage() method: Sends a message to the worker
- terminate() method: Terminates the worker
Let's look at a quick example.
Create a new file called worker.js in the root of your project:
self.onmessage = function(message) {
  console.log(message.data);
}
This file contains the code the worker will run.
Create a new script tag in index.html, just before the closing body tag:
<script>
  const worker = new Worker("./worker.js");
  worker.postMessage("Hello from the main thread!");
</script>
Due to security reasons, the web worker file cannot be imported from your local file system with the file:// protocol. We'll need to run a local web server to run the project. Within your terminal, navigate to your project's root. Then, run Python's http server:
$ python -m http.server
With the server running, navigate to http://localhost:8000/ in your browser. You should see Hello from the main thread! in the developer console.
Move Pyodide to a Web Worker
Our goal in this section is to:
- Load and initialize Pyodide and it's packages in a web worker
- Run our Python script in the web worker and post the result to the main thread in order to render it
First, remove the function definition and call for main() in index.html. Then, replace all of the code in worker.js with:
// load pyodide.js
importScripts("https://cdn.jsdelivr.net/pyodide/v0.20.0/full/pyodide.js");

// Initialize pyodide and load Pandas
async function initialize(){
  self.pyodide = await loadPyodide();
  await self.pyodide.loadPackage("pandas");
}

let initialized = initialize();
Now, add the following code to the worker.js file to run our script when the worker is initialized:
self.onmessage = async function (e) {
  await initialized;
  response = await fetch(
    "https://raw.githubusercontent.com/amirtds/kaggle-netflix-tv-shows-and-movies/main/titles.csv"
  );
  response.ok && response.status === 200
    ? (titles = await response.text())
    : (titles = "");
  // define global variable called titles to make it accessible by Python
  self.pyodide.globals.set("titlesCSV", titles);
  let titlesList = await self.pyodide.runPythonAsync(`
    import pandas as pd
    import io

    # 1. create csv buffer to make it readable by pandas
    csv_buffer = io.StringIO(titlesCSV)
    # 2. load the csv file
    all_titles = pd.read_csv(csv_buffer)

    # 3. sanitize the data
    # drop unnecessary columns
    all_titles = all_titles.drop(
        columns=[
            "age_certification",
            "seasons",
            "imdb_id",
        ]
    )
    # drop rows with null values for important columns
    sanitized_titles = all_titles.dropna(
        subset=[
            "id",
            "title",
            "release_year",
            "genres",
            "production_countries",
            "imdb_score",
            "imdb_votes",
            "tmdb_score",
            "tmdb_popularity",
        ]
    )
    # Convert the DataFrame to a JSON object. ('orient="records"' returns a list of objects)
    titles_list = sanitized_titles.head(10).to_json(orient="records")
    titles_list
  `);

  let recommendations = await self.pyodide.runPythonAsync(`
    # Create recommendation list for Shows and Movies
    # 1. Copy the sanitized_titles to add new column to it
    recommended_titles = sanitized_titles.copy()

    # 2. Add new column to the sanitized_titles
    recommended_titles["recommendation_score"] = (
        sanitized_titles["imdb_votes"] * 0.3 +
        sanitized_titles["imdb_score"] * 0.3 +
        sanitized_titles["tmdb_score"] * 0.2 +
        sanitized_titles["tmdb_popularity"] * 0.2
    )
    # 3. Create Recommended movies list
    recommended_movies = recommended_titles.loc[recommended_titles["type"] == "MOVIE"].sort_values(
        by="recommendation_score", ascending=False
    ).head(5).to_json(orient="records")
    # 4. Create Recommended shows list
    recommended_shows = recommended_titles.loc[recommended_titles["type"] == "SHOW"].sort_values(
        by="recommendation_score", ascending=False
    ).head(5).to_json(orient="records")
    recommendations = {
        "movies": recommended_movies,
        "shows": recommended_shows
    }
    recommendations
  `);

  let facts = await self.pyodide.runPythonAsync(`
    # Create facts list for Movies and Shows
    facts_movies = sanitized_titles.loc[sanitized_titles["type"] == "MOVIE"].groupby("release_year").count()["id"].sort_values(ascending=False).head(1).to_json(orient="table")
    facts_shows = sanitized_titles.loc[sanitized_titles["type"] == "SHOW"].groupby("release_year").count()["id"].sort_values(ascending=False).head(1).to_json(orient="table")
    facts = {
        "movies": facts_movies,
        "shows": facts_shows
    }
    facts
  `);

  self.postMessage({
    titles: titlesList,
    recommendedMovies: recommendations.toJs({
      dict_converter: Object.fromEntries,
    }).movies,
    recommendedShows: recommendations.toJs({
      dict_converter: Object.fromEntries,
    }).shows,
    factsMovies: facts.toJs({ dict_converter: Object.fromEntries }).movies,
    factsShows: facts.toJs({ dict_converter: Object.fromEntries }).shows,
  });
};
Here, after analyzing the Netflix data as we did before, we posted the results to the main thread using postMessage.
Next, in the index.html file after const worker = new Worker("./worker.js");, add the following code:
worker.postMessage("Running Pyodide");
worker.onmessage = function (event) {
  event.data.titles !== undefined ? appComponent.state.titles = event.data.titles : [];
  event.data.recommendedMovies !== undefined ? appComponent.state.recommendedMovies = event.data.recommendedMovies : [];
  event.data.recommendedShows !== undefined ? appComponent.state.recommendedShows = event.data.recommendedShows : [];
  event.data.factsMovies !== undefined ? appComponent.state.factsMovies = event.data.factsMovies : [];
  event.data.factsShows !== undefined ? appComponent.state.factsShows = event.data.factsShows : [];
  appComponent.render()
}
Stop and restart the Python HTTP server. Refresh the browser.
You should see the same results as before, but with execution of Pyodide and the Python code offloaded to a separate thread.
Conclusion
In this tutorial, we covered how to use Pandas to do data manipulation on our Netflix titles CSV data to create recommendation scores and lists for movies and shows. We also did some data analysis to find in which year most of the movies and shows were produced.
We also improved our application performance by moving Pyodide and the Python code execution to a web worker.
You can find the source code for this tutorial here.
In the next tutorial, we'll add more SPA features to our application, like deleting and editing movies and shows. We'll also add a persistence data layer so that remote data only has be fetched once.
--
Python Single Page Application Series: