 Amir Tadrisi
In part two of this series, we improved the user experience by offloading Pyodide and the Python code execution to a Web worker. We also created a list of recommendations and facts with Pandas.
In this final part, we'll look at how to package the Python code to make it more readable and maintainable, add a search bar and a delete button, and add a persistent data layer with PouchDB.
--
Python Single Page Application Series:
- Part 1: Learn the basics of Pyodide and create the base application
- Part 2: Analyze and manipulate the data with Pandas and use a web worker to speed up the application
- Part 3 (this tutorial!): Create a Python package, add additional features, and add a persistent data layer
Contents
Objectives
By the end of this tutorial, you should be able to:
- Package your Python code and import it in Pyodide
- Add a data layer to your application with PouchDB
What We're Building
First, we'll package the Python code into a separate Python module. This will make our code less polluted and more readable. We'll modify the web worker to import the Python file in Pyodide. We'll also add a search bar and a delete button. Our final task will be to add a persistent data layer to store the data in a PouchDB database, which will make our application faster on page reloads.
You can find a live demo of the application here.
Improve Code Maintainability
Up to this point, we've added Python code directly to the runPythonAsync methods. As you can probably already tell, this is fine for small code snippets, but as the code grows, it becomes harder and harder to maintain and scale.
To improve things, we'll-
- Separate the Python code out into a module.
- Fetch the Python module code in worker.js, write the result to the browser's virtual memory, and import the package to use it in Pyodide.
Packaging the Python Code
Create a new file called main.py in the root of the project:
import io

import pandas as pd


def analyze_titles(titlesCSV):
    # 1. create csv buffer to make it readable by pandas
    csv_buffer = io.StringIO(titlesCSV)
    # 2. load the csv file
    all_titles = pd.read_csv(csv_buffer)

    # 3. sanitize the data
    # drop unnecessary columns
    all_titles = all_titles.drop(
        columns=[
            "age_certification",
            "seasons",
            "imdb_id",
        ]
    )
    # drop rows with null values for important columns
    sanitized_titles = all_titles.dropna(
        subset=[
            "id",
            "title",
            "release_year",
            "genres",
            "production_countries",
            "imdb_score",
            "imdb_votes",
            "tmdb_score",
            "tmdb_popularity",
        ]
    )
    # Convert the DataFrame to a JSON object. ('orient="records"' returns a list of objects)
    titles_list = sanitized_titles.head(10).to_json(orient="records")

    # 4. Create recommendation list for Shows and Movies
    # 4.1 Copy the sanitized_titles to add new column to it
    recommended_titles = sanitized_titles.copy()

    # 4.2 Add new column to the sanitized_titles
    recommended_titles["recommendation_score"] = (
        sanitized_titles["imdb_votes"] * 0.3
        + sanitized_titles["imdb_score"] * 0.3
        + sanitized_titles["tmdb_score"] * 0.2
        + sanitized_titles["tmdb_popularity"] * 0.2
    )
    # 4.3 Create Recommended movies list
    recommended_movies = (
        recommended_titles.loc[recommended_titles["type"] == "MOVIE"]
        .sort_values(by="recommendation_score", ascending=False)
        .head(5)
        .to_json(orient="records")
    )
    # 4.4 Create Recommended shows list
    recommended_shows = (
        recommended_titles.loc[recommended_titles["type"] == "SHOW"]
        .sort_values(by="recommendation_score", ascending=False)
        .head(5)
        .to_json(orient="records")
    )
    recommendations = {"movies": recommended_movies, "shows": recommended_shows}

    # 5. Create facts list for Movies and Shows
    facts_movies = (
        sanitized_titles.loc[sanitized_titles["type"] == "MOVIE"]
        .groupby("release_year")
        .count()["id"]
        .sort_values(ascending=False)
        .head(1)
        .to_json(orient="table")
    )
    facts_shows = (
        sanitized_titles.loc[sanitized_titles["type"] == "SHOW"]
        .groupby("release_year")
        .count()["id"]
        .sort_values(ascending=False)
        .head(1)
        .to_json(orient="table")
    )
    facts = {"movies": facts_movies, "shows": facts_shows}

    return titles_list, recommendations, facts
Nothing really new here. Please review on your own.
Pass Python File to Pyodide
Next, we need to make several changes to worker.js:
// load pyodide.js
importScripts("https://cdn.jsdelivr.net/pyodide/v0.20.0/full/pyodide.js");

// Initialize pyodide and load Pandas
async function initialize() {
  self.pyodide = await loadPyodide();
  await self.pyodide.loadPackage("pandas");
}

let initialized = initialize();

self.onmessage = async function (e) {
  await initialized;
  response = await fetch(
    "https://raw.githubusercontent.com/amirtds/kaggle-netflix-tv-shows-and-movies/main/titles.csv"
  );
  response.ok && response.status === 200
    ? (titles = await response.text())
    : (titles = "");

  // fetch main.py, save it in browser memory
  await self.pyodide.runPythonAsync(`
    from pyodide.http import pyfetch
    response = await pyfetch("main.py")
    with open("main.py", "wb") as f:
        f.write(await response.bytes())
  `)

  // Importing fetched py module
  pkg = pyodide.pyimport("main");

  // Run the analyze_titles function from main.py and assign the result to a variable

  let analyzedTitles = pkg.analyze_titles(titles);
  // convert the Proxy object to Javascript object

  analyzedTitles = analyzedTitles.toJs({
    dict_converter: Object.fromEntries,
  });

  // Set variables to corresponding values from the analyzedTitles object
  let titlesList = analyzedTitles[0];
  let recommendedMovies = analyzedTitles[1].movies
  let recommendedShows = analyzedTitles[1].shows
  let factsMovies = analyzedTitles[2].movies
  let factsShows = analyzedTitles[2].shows

  self.postMessage({
    titles: titlesList,
    recommendedMovies: recommendedMovies,
    recommendedShows: recommendedShows,
    factsMovies: factsMovies,
    factsShows: factsShows,
  });
};
Take note of the Python code in the runPythonAsync method. We used pyfetch to fetch the local main.py file and save it in the browser's virtual memory to be used later.
Run Python's http server in your terminal:
$ python -m http.server
Then, navigate to http://localhost:8000/ in your browser.
You should see the same results as before, but the execution of the Python code is now packaged in a separate module, making the code more readable and maintainable. Plus, you can now take advantage of syntax highlighting in your code editor and write automated tests for it.
SPA Features
With the application's performance improved and the code separated out into a module, let's turn our attention back to feature development.
In this section, we'll add a delete button and search functionality to filter the titles based on their names.
Delete Button
To add the ability to delete, we need to:
- Add a button to the DOM next to each title
- Set up an event listener to trigger a deletion on button click
- Create a function to handle the actual deletion
Start by adding a new column to the table head in index.html:
<thead class="bg-gray-50">
  <tr>
    <th scope="col" class="whitespace-nowrap py-3.5 pl-4 pr-3 text-left text-sm font-semibold text-gray-900 sm:pl-6">Title</th>
    <th scope="col" class="whitespace-nowrap px-2 py-3.5 text-left text-sm font-semibold text-gray-900">Type</th>
    <th scope="col" class="whitespace-nowrap px-2 py-3.5 text-left text-sm font-semibold text-gray-900">Release Year</th>
    <th scope="col" class="whitespace-nowrap px-2 py-3.5 text-left text-sm font-semibold text-gray-900">Genre</th>
    <th scope="col" class="whitespace-nowrap px-2 py-3.5 text-left text-sm font-semibold text-gray-900">Production Country</th>
     <!-- NEW -->
    <th scope="col" class="whitespace-nowrap px-2 py-3.5 text-left text-sm font-semibold text-gray-900"></th>
  </tr>
</thead>
Next, make the following changes to the table body:
<tbody class="divide-y divide-gray-200 bg-white">
  ${this.state.titles.length > 0 ? JSON.parse(this.state.titles).map(function (title) {
    return (`
      <tr id=${title.id}>
        <td class="whitespace-nowrap py-2 pl-4 pr-3 text-sm text-gray-500 sm:pl-6">${title.title}</td>
        <td class="whitespace-nowrap px-2 py-2 text-sm font-medium text-gray-900">${title.type}</td>
        <td class="whitespace-nowrap px-2 py-2 text-sm text-gray-500">${title.release_year}</td>
        <td class="whitespace-nowrap px-2 py-2 text-sm text-gray-500">${title.genres}</td>
        <td class="whitespace-nowrap px-2 py-2 text-sm text-gray-500">${title.production_countries}</td>
        <!-- NEW -->
        <td class="whitespace-nowrap px-2 py-2 text-sm text-gray-500">
          <button id=${title.id} class="delete text-red-600 hover:text-red-900">Delete</button>
        </td>
      </tr>
    `)
  }).join('') : (`
    <tr>
      <td class="whitespace-nowrap py-2 pl-4 pr-3 text-sm text-gray-500 sm:pl-6">Titles are loading...</td>
      <td class="whitespace-nowrap px-2 py-2 text-sm font-medium text-gray-900">Titles are loading...</td>
      <td class="whitespace-nowrap px-2 py-2 text-sm text-gray-500">Titles are loading...</td>
      <td class="whitespace-nowrap px-2 py-2 text-sm text-gray-500">Titles are loading...</td>
      <td class="whitespace-nowrap px-2 py-2 text-sm text-gray-500">Titles are loading...</td>
       <!-- NEW -->
      <td class="whitespace-nowrap px-2 py-2 text-sm text-gray-500">Titles are loading...</td>
    </tr>
  `)
  }
</tbody>
Here, we added the delete button along with an additional loading message when the titles are still loading.
Moving right along, add two new methods to the App class in index.html:
setupEvents() {
  let deleteButtons = document.querySelectorAll(".delete")
    .forEach((button) => {
      button.addEventListener("click", () => this.deleteTitle(button.id))
    })
}

deleteTitle(id) {
  this.state.titles = JSON.stringify(JSON.parse(this.state.titles).filter(title => title.id != id));
  this.render()
}
Notes:
setupEventsis used to add the event listeners to the delete buttons so that when a user clicks the button, thedeleteTitlemethod is called.deleteTitleis then used to delete a title from the list.
Finally update render to call setupEvents:
render() {
  app.innerHTML = this.view();
  this.setupEvents();  // NEW
}
Test this out.
Looking for a challenge? Try updating the recommendations and facts after a title is deleted.
Search Box
Next up, let's add a search box to filter the movie and show list by titles.
Add the HTML for the search box just below the opening body tag in index.html:
<!-- Start Search box -->
<div class="absolute top-1 right-0 mr-20 z-50">
  <div class="h-full max-w-7xl mt-16 px-4 sm:px-6 lg:px-8 flex flex-row-reverse">
    <label for="search" class="sr-only">Search</label>
    <div class="relative text-gray-400 focus-within:text-gray-600">
      <div class="pointer-events-none absolute inset-y-0 left-0 pl-3 flex items-center">
        <svg class="h-5 w-5" xmlns="http://www.w3.org/2000/svg" viewBox="0 0 20 20" fill="currentColor" aria-hidden="true">
          <path fill-rule="evenodd" d="M8 4a4 4 0 100 8 4 4 0 000-8zM2 8a6 6 0 1110.89 3.476l4.817 4.817a1 1 0 01-1.414 1.414l-4.816-4.816A6 6 0 012 8z" clip-rule="evenodd" />
        </svg>
      </div>
      <input id="search" class="block w-full bg-white py-2 pl-10 pr-3 border border-transparent rounded-md leading-5 text-gray-900 placeholder-gray-500 focus:outline-none focus:ring-2 focus:ring-offset-2 focus:ring-offset-indigo-600 focus:ring-white focus:border-white sm:text-sm" placeholder="Search" type="search" name="search" autofocus>
    </div>
  </div>
</div>
<!-- End Search box -->
Next, add a new value to the App's state:
state = {
  titles: [],
  recommendedMovies: [],
  recommendedShows: [],
  factsMovies: [],
  factsShows: [],
  filteredTitles: [],  // NEW
}
In the view method, rather than looping over the titles state, we need to loop through the filteredTitles state.
So, change:
${this.state.titles.length > 0 ? JSON.parse(this.state.titles).map(function (title) {
To:
${this.state.filteredTitles.length > 0 ? JSON.parse(this.state.filteredTitles).map(function (title) {
Update the deleteTitle method to use filteredTitles state instead of titles state:
deleteTitle(id) {
  this.state.filteredTitles = JSON.stringify(
    JSON.parse(this.state.filteredTitles).filter(function (title) {
      return title.id !== id;
    })
  );
  this.render();
}
Add a new method called searchTitle to handle the searching logic:
searchTitle(name) {
  this.state.filteredTitles = JSON.stringify(
    JSON.parse(this.state.titles).filter((title) =>
      title.title.toLowerCase().includes(name.toLowerCase())
    )
  );
  this.render();
}
Add a new event listener to setupEvents for the search box to call searchTitle when the user types in the search box:
setupEvents() {
  let deleteButtons = document.querySelectorAll(".delete").forEach((button) => {
    button.addEventListener("click", () => this.deleteTitle(button.id));
  });

  let searchBox = document
    .querySelector("#search")
    .addEventListener("keyup", (e) => {
      this.searchTitle(e.target.value);
    });
}
Finally, set the filteredTitles state to the titles state so it has some initial values to work with in worker.onmessage:
worker.onmessage = function (event) {
  event.data.titles !== undefined ? appComponent.state.titles = event.data.titles : [];
  event.data.recommendedMovies !== undefined ? appComponent.state.recommendedMovies = event.data.recommendedMovies : [];
  event.data.recommendedShows !== undefined ? appComponent.state.recommendedShows = event.data.recommendedShows : [];
  event.data.factsMovies !== undefined ? appComponent.state.factsMovies = event.data.factsMovies : [];
  event.data.factsShows !== undefined ? appComponent.state.factsShows = event.data.factsShows : [];
  // NEW
  event.data.titles !== undefined ? appComponent.state.filteredTitles = event.data.titles : [];
  appComponent.render()
}
Test this out in the browser!
Persistent Data Layer
The final feature that we'll add is a persistent date layer to save the data so we don't have to fetch the CSV file remotely and analyze and manipulate the data each time the page reloads. We'll also save the results when a title is deleted.
For persistence, we'll use PouchDB.
PouchDB
PouchDB an opensource database designed for the browser that allows you to save data locally in the browser. Since all the data is stored in IndexedDB it brings offline support to our application. It's supported by all modern browsers.
Setup
Update the head of the index.html file, just after Tailwind CSS, to install::
<head>
  <script src="https://cdn.jsdelivr.net/pyodide/v0.20.0/full/pyodide.js"></script>
  <script src="https://cdn.tailwindcss.com"></script>
   <!-- NEW -->
  <script src="https://cdn.jsdelivr.net/npm/[email protected]/dist/pouchdb.min.js"></script>
</head>
Now, we can create different databses for titles, recommendations, and facts:
<head>
  <script src="https://cdn.jsdelivr.net/pyodide/v0.20.0/full/pyodide.js"></script>
  <script src="https://cdn.tailwindcss.com"></script>
  <script src="https://cdn.jsdelivr.net/npm/[email protected]/dist/pouchdb.min.js"></script>
  <!-- NEW -->
  <script>
    // Setup PouchDB databases
    var titlesDB = new PouchDB('titles');
    var recommendedMoviesDB = new PouchDB('recommendedMovies');
    var recommendedShowsDB = new PouchDB('recommendedShows');
    var factsMoviesDB = new PouchDB('factsMovies');
    var factsShowsDB = new PouchDB('factsShows');
    var remoteCouch = false;
  </script>
</head>
Persisting Data
To prevent running the heavy operation of fetching and manipulating the data on each page load, we can simply run the worker.js file on the initial page load, save the results to the PouchDB databases, and then fetch data from the databases on subsequent page loads.
Within index.html, update the final script tag like so:
<script>
  titlesDB.info().then(function (info) {
    if (info.doc_count == 0) {
      const worker = new Worker("worker.js");
      worker.postMessage("Running Pyodide");
      worker.onmessage = function (event) {
        event.data.titles !== undefined
          ? (appComponent.state.titles = event.data.titles)
          : [];
        event.data.titles !== undefined
          ? (appComponent.state.filteredTitles = event.data.titles)
          : [];
        event.data.recommendedMovies !== undefined
          ? (appComponent.state.recommendedMovies = event.data.recommendedMovies)
          : [];
        event.data.recommendedShows !== undefined
          ? (appComponent.state.recommendedShows = event.data.recommendedShows)
          : [];
        event.data.factsMovies !== undefined
          ? (appComponent.state.factsMovies = event.data.factsMovies)
          : [];
        event.data.factsShows !== undefined
          ? (appComponent.state.factsShows = event.data.factsShows)
          : [];
        appComponent.render();

        // Add titles to database
        appComponent.state.titles.length > 0
          ? titlesDB
              .bulkDocs(JSON.parse(appComponent.state.titles))
              .then(function (result) {
                // handle result
              })
              .catch(function (err) {
                console.log("titles DB:", err);
              })
          : console.log("No titles to add to database");

        // Add recommended movies to database
        appComponent.state.recommendedMovies.length > 0
          ? recommendedMoviesDB
              .bulkDocs(JSON.parse(appComponent.state.recommendedMovies))
              .then(function (result) {
                // handle result
              })
              .catch(function (err) {
                console.log("recommendedMovies DB:", err);
              })
          : console.log("No recommended movies to add to database");

        // Add recommended shows to database
        appComponent.state.recommendedShows.length > 0
          ? recommendedShowsDB
              .bulkDocs(JSON.parse(appComponent.state.recommendedShows))
              .then(function (result) {
                // handle result
              })
              .catch(function (err) {
                console.log("recommendedShows DB:", err);
              })
          : console.log("No recommended shows to add to database");

        // Add facts movies to database
        appComponent.state.factsMovies.length > 0
          ? factsMoviesDB
              .bulkDocs(JSON.parse(appComponent.state.factsMovies).data)
              .then(function (result) {
                // handle result
              })
              .catch(function (err) {
                console.log("factsMovies DB:", err);
              })
          : console.log("No facts movies to add to database");

        // Add facts shows to database
        appComponent.state.factsShows.length > 0
          ? factsShowsDB
              .bulkDocs(JSON.parse(appComponent.state.factsShows).data)
              .then(function (result) {
                // handle result
              })
              .catch(function (err) {
                console.log("factsShows DB:", err);
              })
          : console.log("No facts shows to add to database");
      };
    } else {
      console.log("Database already populated");
    }
  });
</script>
Here, we checked if the titles database is empty:
- If yes, we fetched and saved the data
- If no, we simply logged a "Database already populated" message to the console
Go ahead and test this in the browser.
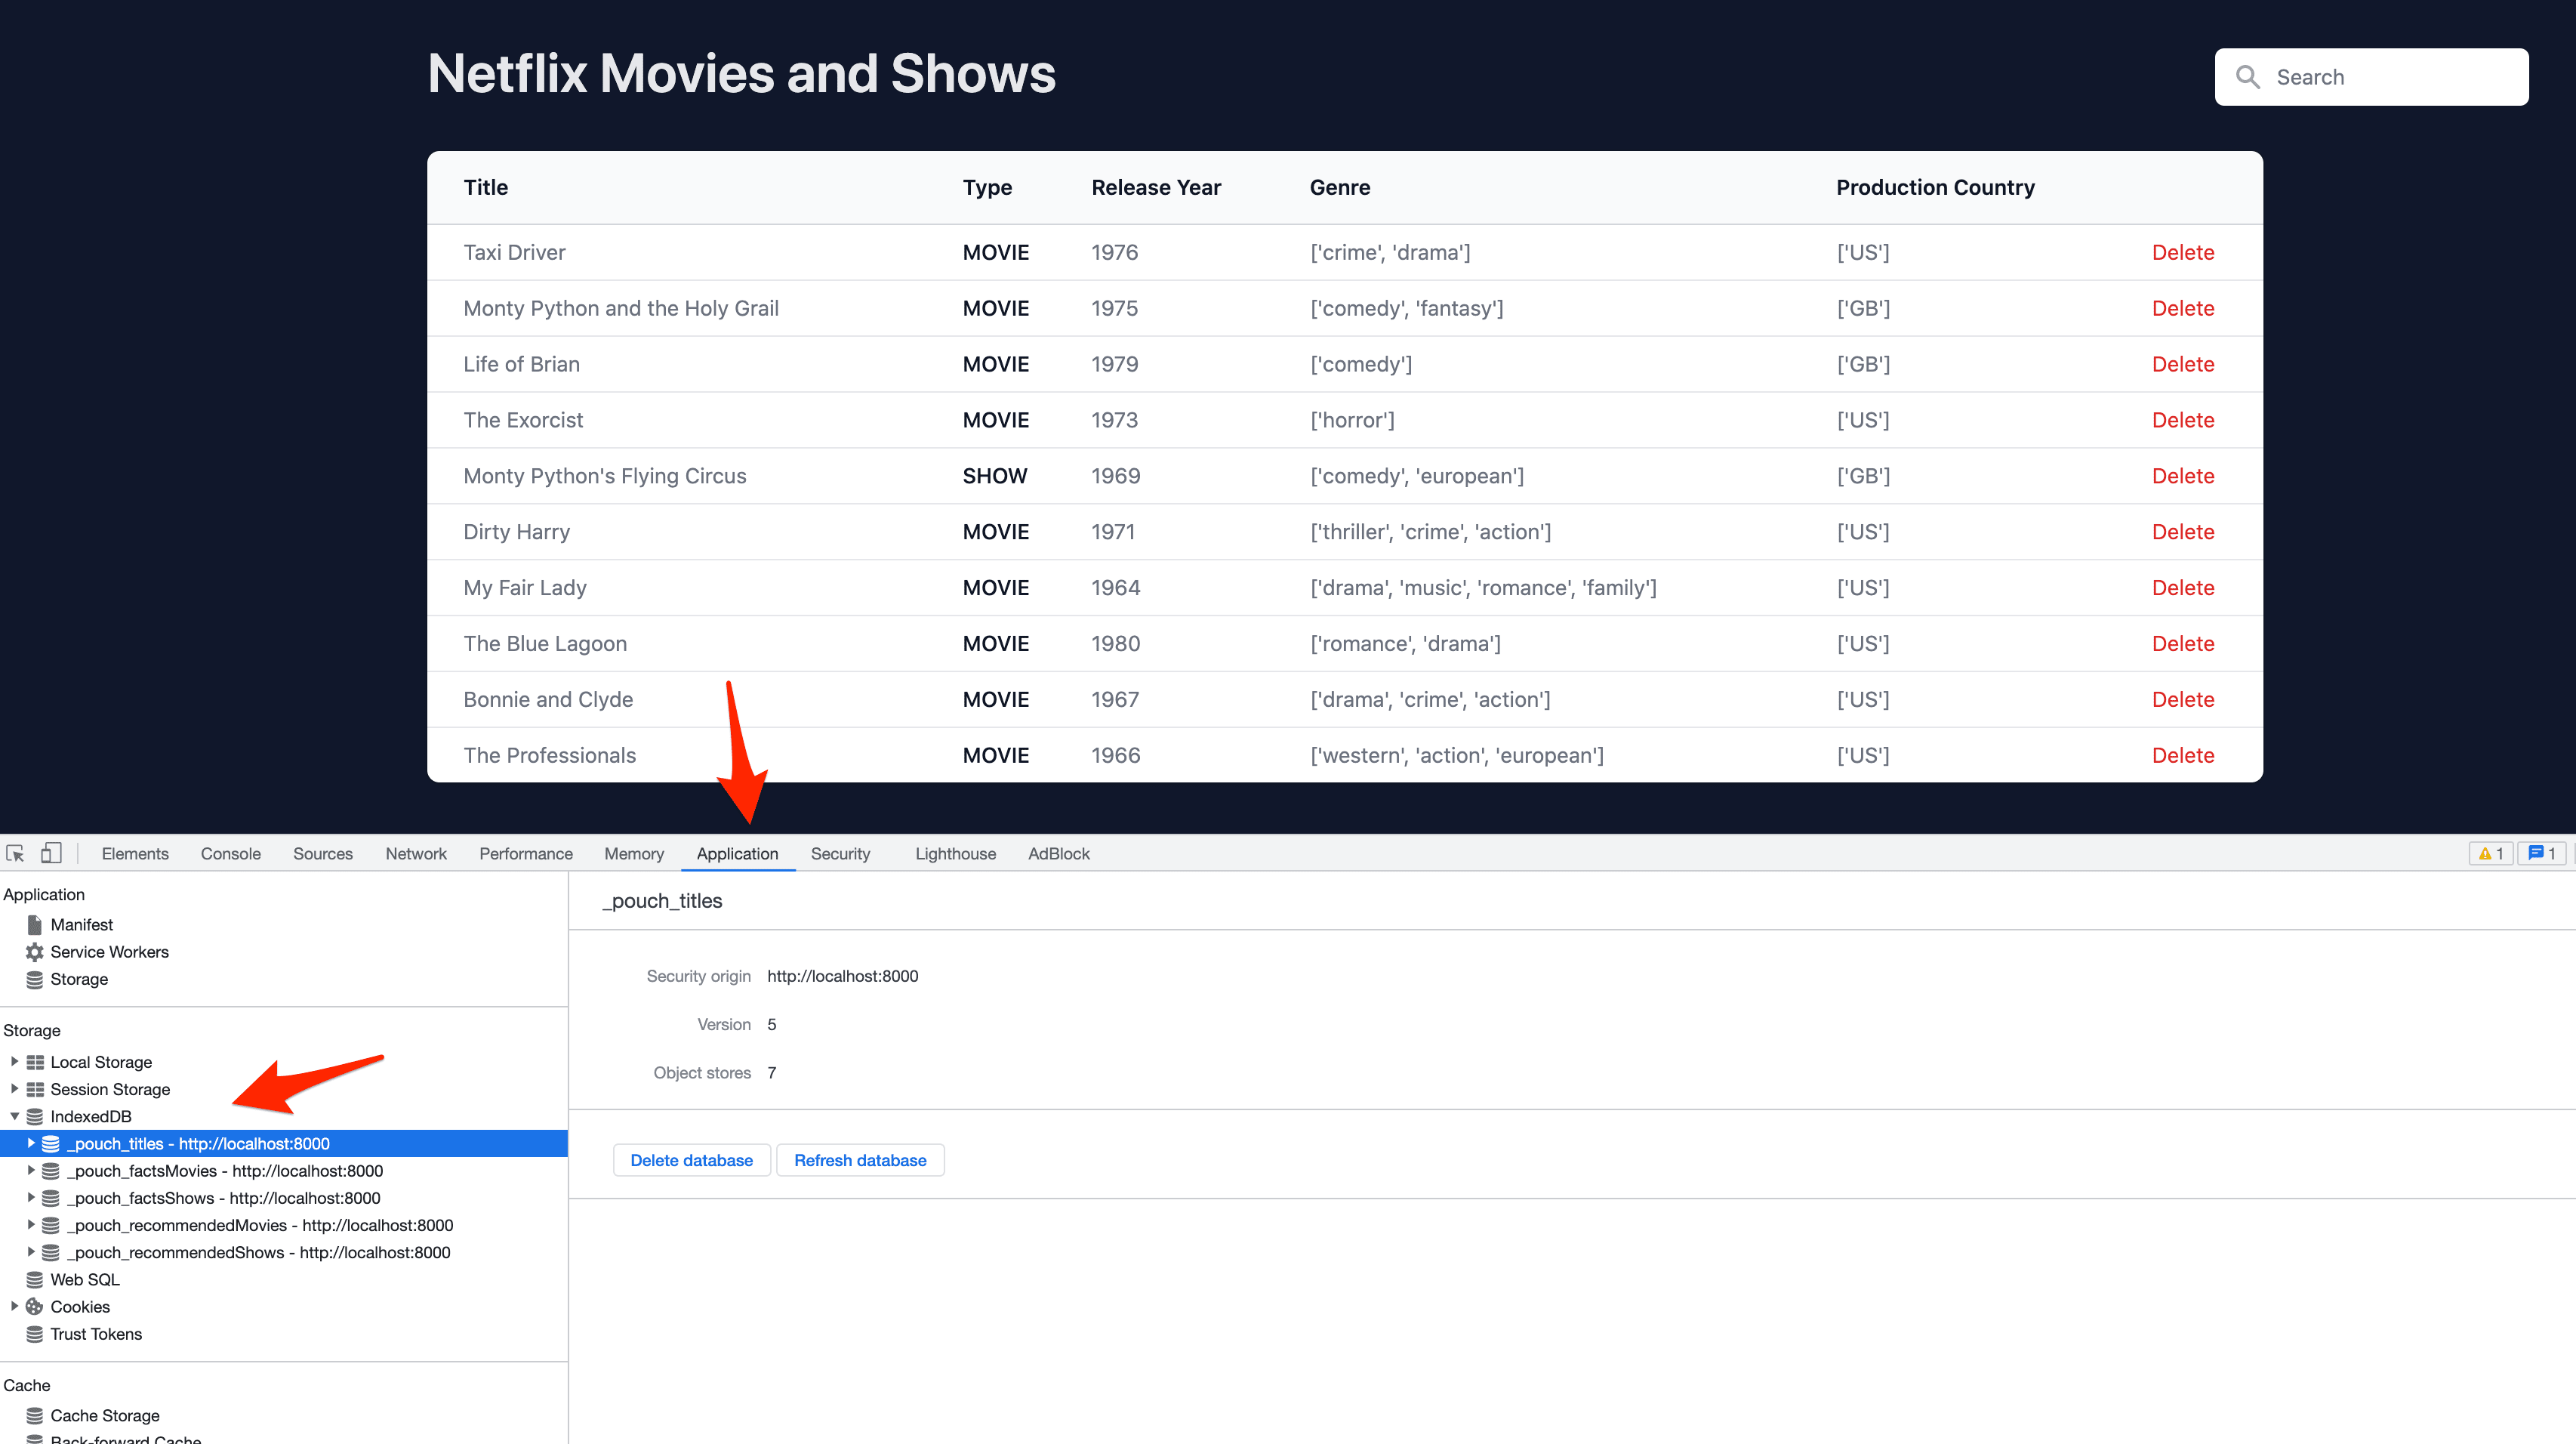
Within your browser's developer tools, under "IndexedDB" in the "Application" tab, you should see the following databases:
_pouch_titles_pouch_factsMovies_pouch_factsShows_pouch_recommendedMovies_pouch_recommendedShows
Reload the page. What happens? Nothing, except for the lone console log, right? We still need to load the data from the local database. To do so, update the else block with:
// use database to populate app state
// setting titles state
titlesDB.allDocs({
  include_docs: true,
  descending: true
}, function(err, doc) {
  const titles = doc.rows.map(function(row) {
    return row.doc
  })
  appComponent.state.titles = JSON.stringify(titles);
  appComponent.state.filteredTitles = JSON.stringify(titles);
  appComponent.render()
});
// setting recommended movies state
recommendedMoviesDB.allDocs({
  include_docs: true,
  descending: true
}, function(err, doc) {
  const recommendedMovies = doc.rows.map(function(row) {
    return row.doc
  })
  appComponent.state.recommendedMovies = JSON.stringify(recommendedMovies);
  appComponent.render()
});
// setting recommended shows state
recommendedShowsDB.allDocs({
  include_docs: true,
  descending: true
}, function(err, doc) {
  const recommendedShows = doc.rows.map(function(row) {
    return row.doc
  })
  appComponent.state.recommendedShows = JSON.stringify(recommendedShows);
  appComponent.render()
});
// setting facts movies state
factsMoviesDB.allDocs({
  include_docs: true,
  descending: true
}, function(err, doc) {
  const factsMovies = doc.rows.map(function(row) {
    return row.doc
  })
  appComponent.state.factsMovies = JSON.stringify({
    data: factsMovies
  });
  appComponent.render()
});
// setting facts shows state
factsShowsDB.allDocs({
  include_docs: true,
  descending: true
}, function(err, doc) {
  const factsShows = doc.rows.map(function(row) {
    return row.doc
  })
  appComponent.state.factsShows = JSON.stringify({
    data: factsShows
  });
  appComponent.render()
});
Back in your browser, let's test things out fresh. Delete all the databases in the "IndexedDB" section of the "Application" tab. Reload the page. It should take a few seconds for the data to populate. Subsequent reloads should just about load instantaneously.
Handling Deletions
To properly remove titles when a user deletes a title, update deleteTitle like so:
deleteTitle(id) {
  const title = JSON.parse(this.state.titles).find((title) => title.id == id);
  titlesDB.remove(title);
  this.state.titles = JSON.stringify(
    JSON.parse(this.state.titles).filter(function (title) {
      return title.id !== id;
    })
  );
  this.state.filteredTitles = JSON.stringify(
    JSON.parse(this.state.filteredTitles).filter(function (title) {
      return title.id !== id;
    })
  );
  this.render();
}
Back in your browser, test a deletion. Ensure it persists by reloading the page.
Conclusion
That's it!
In this tutorial series, you learned how to build a Single Page Application with Python. Executing Python in the browser with Pyodide opens a number of new doors that were impossible before. For example, you:
- Can use powerful libraries like Pandas in the browser
- Have direct access to all the Web APIs with Python
- Can even use Python to manipulate the DOM
Also, you can use Python alongside JavaScript to maximize the benefits that both languages (and their plethora of libraries) have to offer!
We also saw how we can improve the performance of our application by using web workers to run heavy calculations in the background, separated from the main thread. By moving the Python script to a separate module, we made our application less polluted and it's easier to maintain and scale.
We finished this series by adding a data layer to our application using PouchDB. This feature improved the user experience by decreasing page loads and introducing offline capabilities.
You can find the source code for this tutorial here.
I hope you enjoyed this series. If you have any questions or comments feel free to contact me. Cheers!
--
Python Single Page Application Series: