 Michael Herman
For most web applications, after a new user registers, it's important to confirm that the user provided a valid email address that they have access to. This not only helps to prevent spammers from creating fake accounts, but it also provides an additional layer of security for your application.
For example, you never want to send a password reset email without first verifying the email address. Suppose a new user enters their email address incorrectly during the registration flow and that user attempts to send a reset password email. At best, the user simply won't get the email. At worst, that password reset email will go to a valid email address, unowned by that user, and their account could then easily be compromised.
This tutorial looks at how to send confirmation emails to newly registered users with Flask, Redis Queue (RQ), and Amazon SES (SES).
While this tutorial uses RQ and SES, it's important to focus on the concepts and patterns from this tutorial rather than the specific tools and technologies used. Check your understanding by using a different task queue (like Celery) and/or transactional email service (like SendGrid or Mailgun) as you work your way through the tutorial.
Contents
Objectives
After completing this tutorial, you will be able to:
- Discuss the overall client/server email confirmation workflow.
- Describe what email confirmation is and why you would want to use it in your application's registration flow.
- Integrate Redis Queue into a Flask app and create tasks.
- Containerize Flask and Redis with Docker.
- Run long-running tasks in the background with a separate worker process.
- Encode and decode tokens using the itsdangerous module.
- Interact with the AWS API via Boto3.
- Send transactional emails with Amazon Simple Email Service (SES).
Project Setup
To code along with this tutorial, clone down the base project:
$ git clone https://github.com/testdrivenio/flask-ses-rq --branch base --single-branch
$ cd flask-ses-rq
Quickly review the code and overall project structure:
├── Dockerfile
├── docker-compose.yml
├── manage.py
├── project
│   ├── __init__.py
│   ├── client
│   │   ├── static
│   │   │   ├── main.css
│   │   │   └── main.js
│   │   └── templates
│   │       ├── _base.html
│   │       ├── footer.html
│   │       └── home.html
│   ├── db
│   │   ├── Dockerfile
│   │   └── create.sql
│   ├── server
│   │   ├── __init__.py
│   │   ├── config.py
│   │   ├── main
│   │   │   ├── __init__.py
│   │   │   ├── forms.py
│   │   │   └── views.py
│   │   └── models.py
│   └── tests
│       ├── __init__.py
│       ├── base.py
│       ├── helpers.py
│       ├── test__config.py
│       └── test_main.py
└── requirements.txt
Then, spin up the app:
$ docker compose up -d --build
This tutorial uses Docker version 27.0.3.
Create the database tables:
$ docker compose run users python manage.py create_db
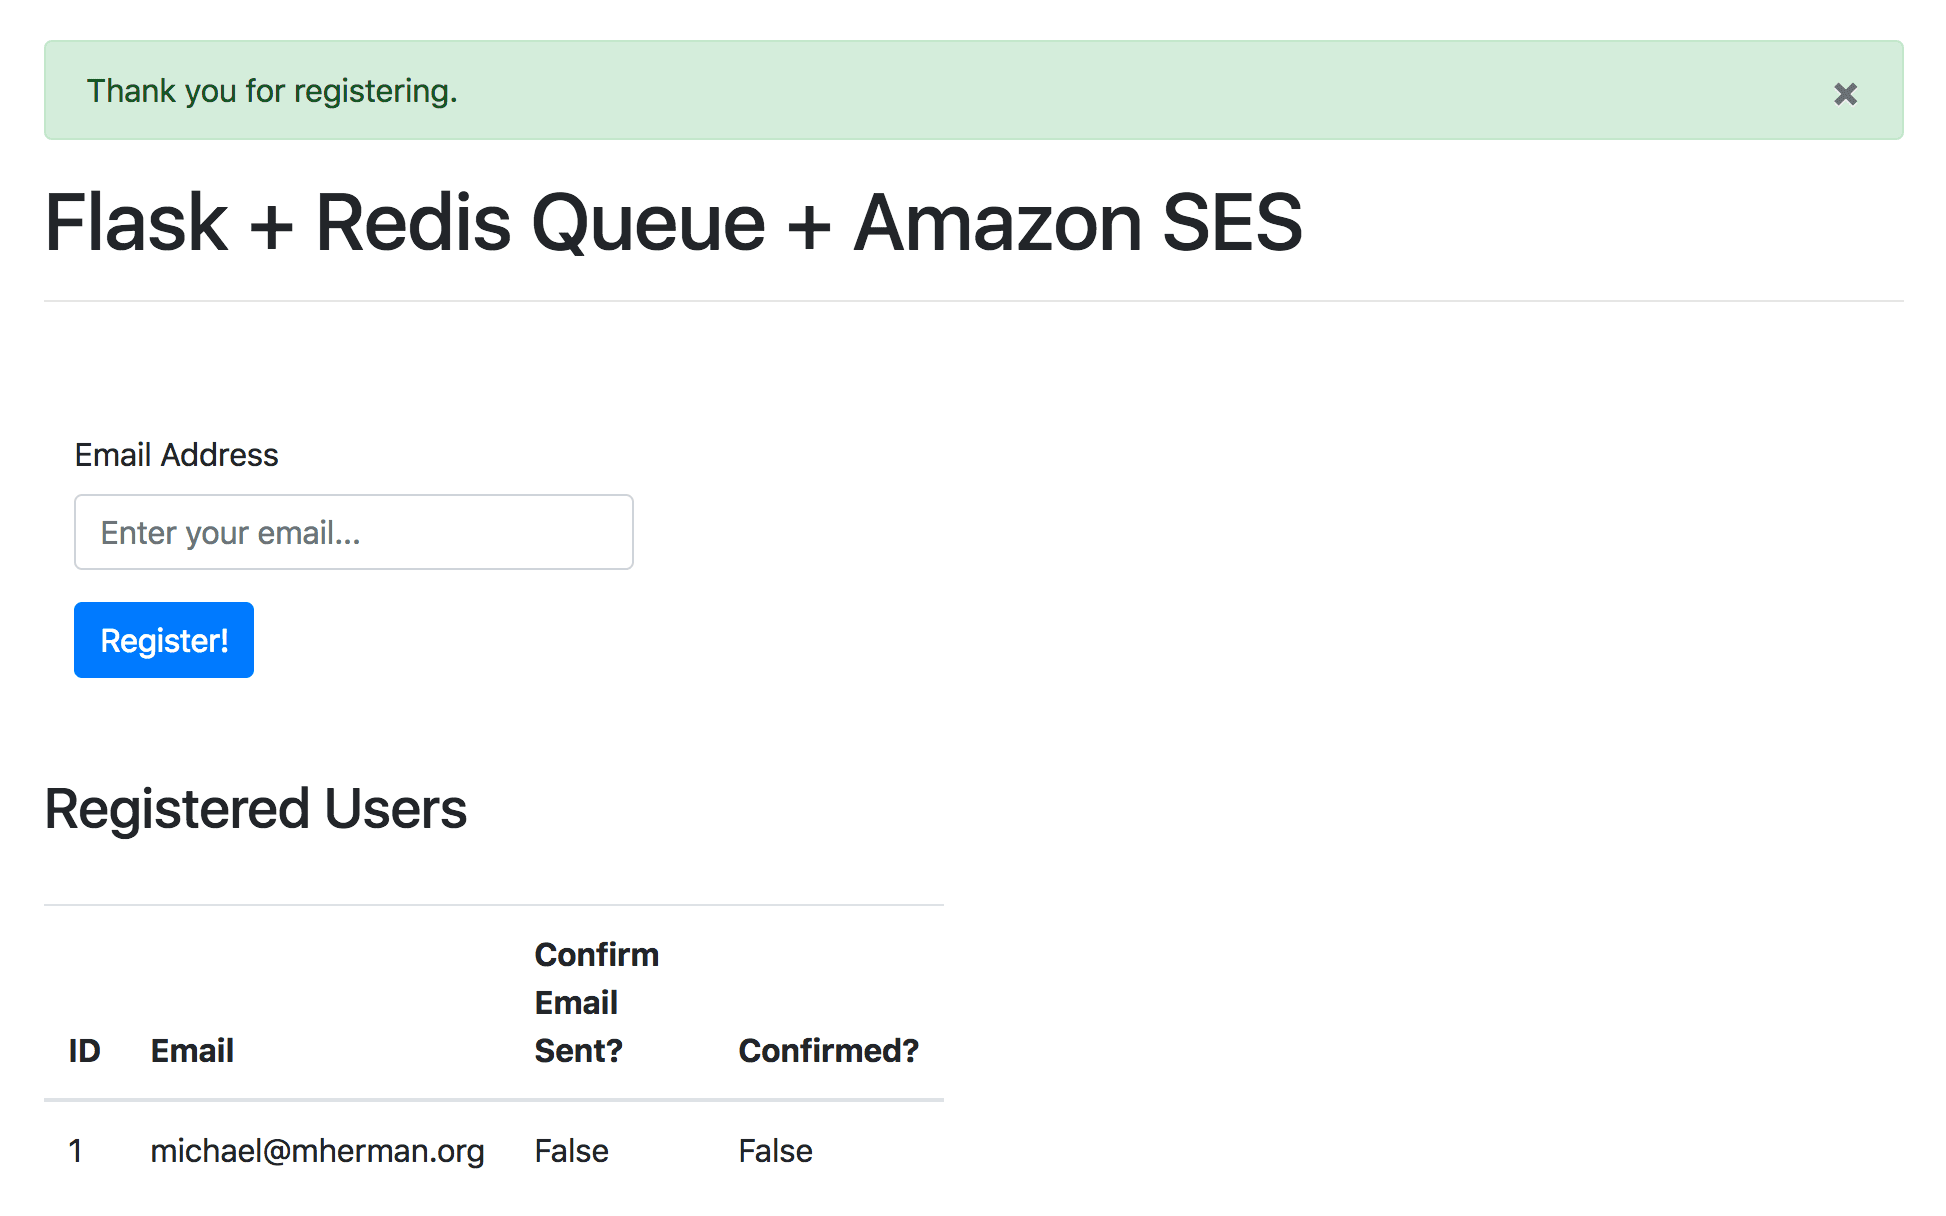
Navigate to http://localhost:5003 in your browser. You should see:

Make sure you can add a new user:

Run the tests:
$ docker compose run users python manage.py test

----------------------------------------------------------------------
Ran 8 tests in 0.225s

OK
Workflow
Here's the workflow we'll be using:
- A new user submits the registration form, which sends a POST request to the server-side.
- Within the Flask view, after a new user is successfully added to the database, a new task is added to the queue and a response is sent back to the end user indicating that they need to confirm their registration via email.
- In the background, a worker process picks up the task, generates a unique link, and sends a request to Amazon SES to send the confirmation email.
- The end user can then confirm the email, from his or her mailbox, by clicking the unique link.
- When the user clicks the link, a GET request is sent to the server-side, which updates the user record in the database.
If you're trying to incorporate email confirmation into an existing application, the above workflow will vary based on your app's flow. Keep this in mind as you're working your way through this tutorial.

Final app in action:
Redis Queue
First, let's wire up the task queue!
Docker
Start by spinning up two new processes: Redis and a worker. Update the docker-compose.yml file like so:
services:

  users:
    build: .
    image: users
    container_name: users
    ports:
      - 5003:5000
    command: python manage.py run -h 0.0.0.0
    volumes:
      - .:/usr/src/app
    environment:
      - FLASK_DEBUG=1
      - APP_SETTINGS=project.server.config.DevelopmentConfig
      - DATABASE_URL=postgresql://postgres:postgres@users-db:5432/users_dev
      - DATABASE_TEST_URL=postgresql://postgres:postgres@users-db:5432/users_test
      - SECRET_KEY=my_precious
    depends_on:
      - users-db
      - redis

  users-db:
    container_name: users-db
    build:
      context: ./project/db
      dockerfile: Dockerfile
    expose:
      - 5432
    environment:
      - POSTGRES_USER=postgres
      - POSTGRES_PASSWORD=postgres

  worker:
    image: users
    command: python manage.py run_worker
    volumes:
      - .:/usr/src/app
    environment:
      - FLASK_DEBUG=1
      - APP_SETTINGS=project.server.config.DevelopmentConfig
      - DATABASE_URL=postgresql://postgres:postgres@users-db:5432/users_dev
      - DATABASE_TEST_URL=postgresql://postgres:postgres@users-db:5432/users_test
      - SECRET_KEY=my_precious
    depends_on:
      - users-db
      - redis

  redis:
    image: redis:7.2.5-alpine
Add the dependencies to requirements.txt:
redis==5.0.7
rq==1.16.2
Task
Add a new task to a file called tasks.py in "project/server/main":
# project/server/main/tasks.py


import time

from project.server import db
from project.server.models import User


def send_email(email):
    time.sleep(10)  # simulate long-running process
    user = User.query.filter_by(email=email).first()
    user.email_sent = True
    db.session.commit()
    return True
Here, we simulated a long-running process and then updated the email_sent field in the User model to True. We'll replace time.sleep(10) with the actual functionality to send an email shortly.
After
email_sentis set toTrue, the user is technically registered but "unconfirmed". At this point, what is that user allowed to do? In other words, does that user have full access to your app, some form of limited or restricted access, or simply no access at all? Think about how you'd handle this in your app.
Update the view to connect to Redis and enqueue a task:
@main_blueprint.route('/', methods=['GET', 'POST'])
def home():
    form = RegisterForm(request.form)
    if request.method == 'POST':
        if form.validate_on_submit():
            try:
                user = User(email=form.email.data)
                db.session.add(user)
                db.session.commit()
                redis_url = current_app.config['REDIS_URL']
                with Connection(redis.from_url(redis_url)):
                    q = Queue()
                    q.enqueue(send_email, user.email)
                flash('Thank you for registering.', 'success')
                return redirect(url_for("main.home"))
            except IntegrityError:
                db.session.rollback()
                flash('Sorry. That email already exists.', 'danger')
    users = User.query.all()
    return render_template('home.html', form=form, users=users)
Update the imports:
import redis
from flask import render_template, Blueprint, url_for, \
    redirect, flash, request, current_app
from rq import Queue, Connection
from sqlalchemy.exc import IntegrityError

from project.server import db
from project.server.models import User
from project.server.main.forms import RegisterForm
from project.server.main.tasks import send_email
Add the config to the BaseConfig in project/server/config.py:
class BaseConfig(object):
    """Base configuration."""
    SECRET_KEY = os.environ.get('SECRET_KEY')
    SQLALCHEMY_TRACK_MODIFICATIONS = False
    WTF_CSRF_ENABLED = False
    REDIS_URL = 'redis://redis:6379/0'
    QUEUES = ['default']
Note that we referenced the redis service in the REDIS_URL, defined in docker-compose.yml, rather than localhost. Review the Docker Compose docs for more info on connecting to other services via the hostname alias.
Worker
Next, let's add a custom CLI command to manage.py to fire the worker process, which is used to process the task we added to the queue:
@cli.command('run_worker')
def run_worker():
    redis_url = app.config['REDIS_URL']
    redis_connection = redis.from_url(redis_url)
    with Connection(redis_connection):
        worker = Worker(app.config['QUEUES'])
        worker.work()
Don't forget the imports:
import redis
from rq import Connection, Worker
Test
Spin up the new containers:
$ docker compose up -d --build
To trigger a new task, register a new user. Confirm Email Sent? should be False:

Then, refresh the page after ten seconds. Confirm Email Sent? should now be True since the task finished and the database was updated.

Email Confirmation
Moving right along, let's add the logic for confirming an email address, starting with the template.
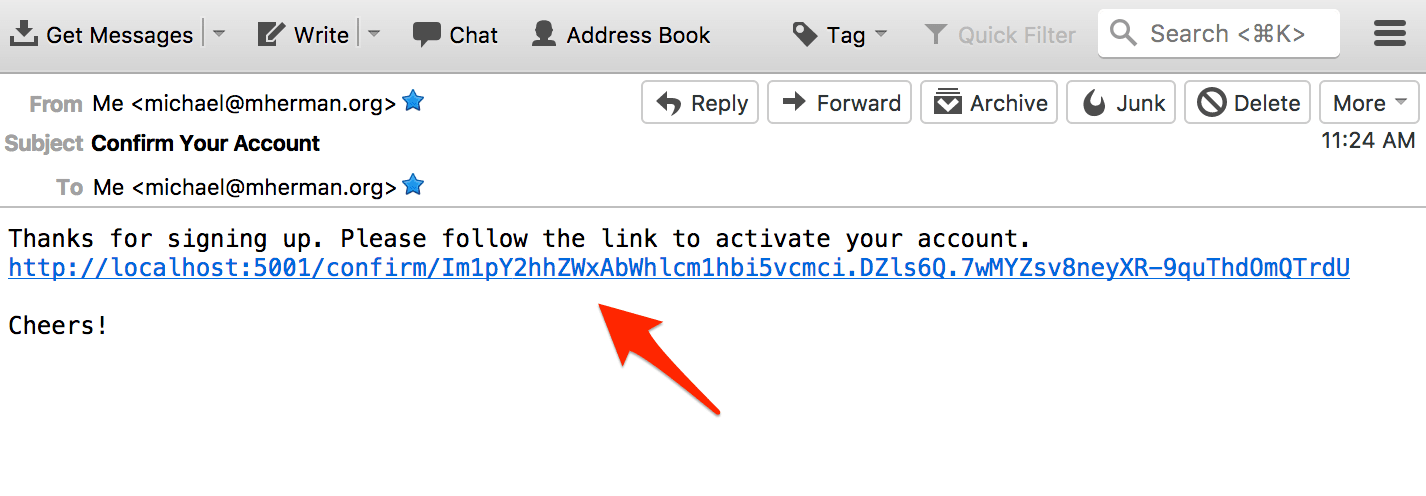
Email template
We can use Jinja to generate the template on the server.
Thanks for signing up. Please follow the link to activate your account.
{{ confirm_url }}

Cheers!
Save the above text to a new file called email.txt in "project/client/templates".
For now, we'll just be sending a plain-text email. Feel free to add HTML (basic and/or rich) on your own.
Unique URL
Next, let's add a few helper functions to encode and decode a token, which will set the base for generating a unique confirmation URL.
Add a new file called utils.py to "project/server/main":
# project/server/main/utils.py


from itsdangerous import URLSafeTimedSerializer
from flask import current_app, url_for


def encode_token(email):
    serializer = URLSafeTimedSerializer(current_app.config['SECRET_KEY'])
    return serializer.dumps(email, salt='email-confirm-salt')


def decode_token(token, expiration=3600):
    serializer = URLSafeTimedSerializer(current_app.config['SECRET_KEY'])
    try:
        email = serializer.loads(
            token,
            salt='email-confirm-salt',
            max_age=expiration
        )
        return email
    except Exception as e:
        return False

def generate_url(endpoint, token):
    return url_for(endpoint, token=token, _external=True)
What's happening here?
encode_tokenutilizes theURLSafeTimedSerializerclass from the itsdangerous package to encode the email address and a timestamp in a token.decode_tokenthen decodes the token and returns the email address as long as the token is not older than 3600 seconds (one hour).generate_urltakes an endpoint and an encoded token and then returns a unique URL. (Yes, this is a single-line function! It makes testing much easier.)
Since, by default,
url_forcreates relative URLs, we set_externaltoTrueto generate an absolute URL. If this were created outside the Flask request context you would need to define aSERVER_NAMEin the app config and provide access to the application context to use an absolute URL. Once aSERVER_NAMEis set, Flask can only serve requests from that domain, though. Review the following issue for more info.
Let's add a few quick tests to ensure the encoding and decoding of the token along with the unique URL generation work as expected.
test_utils.py:
# project/server/tests/test_utils.py


import time
import unittest

from base import BaseTestCase
from project.server.main.utils import encode_token, decode_token, generate_url
from project.server.models import User


class TestUtils(BaseTestCase):

    def test_verify_token(self):
        # Ensure encode and decode behave correctly.
        token = encode_token('[email protected]')
        email = decode_token(token)
        self.assertEqual(email, '[email protected]')

    def test_verify_invalid_token(self):
        # Ensure encode and decode behave correctly when token is invalid.
        token = 'invalid'
        email = decode_token(token)
        self.assertEqual(email, False)

    def test_verify_expired_token(self):
        # Ensure encode and decode behave correctly when token has expired.
        token = encode_token('[email protected]')
        time.sleep(1)
        email = decode_token(token, 0)
        self.assertEqual(email, False)

    def test_token_is_unique(self):
        # Ensure tokens are unique.
        token1 = encode_token('[email protected]')
        token2 = encode_token('[email protected]')
        self.assertNotEqual(token1, token2)

    def test_generate_url(self):
        # Ensure generate_url behaves as expected.
        token = encode_token('[email protected]')
        url = generate_url('main.home', token)
        url_token = url.split('=')[1]
        self.assertEqual(token, url_token)
        email = decode_token(url_token)
        self.assertEqual(email, '[email protected]')


if __name__ == '__main__':
    unittest.main()
Run the tests:
$ docker compose run users python manage.py test

----------------------------------------------------------------------
Ran 13 tests in 1.305s

OK
Are we missing any tests? Add them now. How would you mock the test that uses
sleep(1)? Check out FreezeGun!
Next, make a few updates to the view:
@main_blueprint.route('/', methods=['GET', 'POST'])
def home():
    form = RegisterForm(request.form)
    if request.method == 'POST':
        if form.validate_on_submit():
            try:
                # add user to the db
                user = User(email=form.email.data)
                db.session.add(user)
                db.session.commit()
                # generate token, confirm url, and template
                token = encode_token(user.email)
                confirm_url = generate_url('main.confirm_email', token)
                body = render_template('email.txt', confirm_url=confirm_url)
                # enqueue
                redis_url = current_app.config['REDIS_URL']
                with Connection(redis.from_url(redis_url)):
                    q = Queue()
                    q.enqueue(send_email, user.email, body)
                flash('Thank you for registering.', 'success')
                return redirect(url_for("main.home"))
            except IntegrityError:
                db.session.rollback()
                flash('Sorry. That email already exists.', 'danger')
    users = User.query.all()
    return render_template('home.html', form=form, users=users)
Make sure to import encode_token and generate_url:
from project.server.main.utils import encode_token, generate_url
So, after adding the user to the database, we created a token, a unique URL (which we still need to create the view for), and a template.
Finally, add body as a parameter to send_email:
def send_email(email, body):
    time.sleep(10)  # simulate long-running process
    user = User.query.filter_by(email=email).first()
    user.email_sent = True
    db.session.commit()
    return True
We'll use this shortly.
View
Next, let's add the confirm_email view to process the token and, if appropriate, update the user model:
@main_blueprint.route('/confirm/<token>')
def confirm_email(token):
    email = decode_token(token)
    if not email:
        flash('The confirmation link is invalid or has expired.', 'danger')
        return redirect(url_for('main.home'))
    user = User.query.filter_by(email=email).first()
    if user.confirmed:
        flash('Account already confirmed.', 'success')
        return redirect(url_for('main.home'))
    user.confirmed = True
    db.session.add(user)
    db.session.commit()
    flash('You have confirmed your account. Thanks!', 'success')
    return redirect(url_for('main.home'))
Import decode_token:
from project.server.main.utils import encode_token, generate_url, decode_token
So, if the decode is successful, the confirmed field is updated to True for the database record and the user is redirected back to the homepage with a success message.
Test
To manually test, first bring down the containers and volumes. Then, spin the containers back up, create the database tables, and open the Docker logs for the worker:
$ docker compose down -v
$ docker compose up -d --build
$ docker compose run users python manage.py create_db
$ docker compose logs -f worker
Then, from the browser, add a new email address. You should see the task start and finish successfully:
21:16:49 default: project.server.main.tasks.send_email(
  '[email protected]',
  'Thanks for signing up. Please follow the link to activate your account.\nh...
) (af8974f4-c4b7-4db1-ba15-7e2bc57ee058)
21:16:59 default: Job OK (af8974f4-c4b7-4db1-ba15-7e2bc57ee058)
21:16:59 Result is kept for 500 seconds
Amazon SES
First off, why would you want to use a transactional email service (like Amazon SES, Mailchimp Transactional Email (formerly Mandrill), or Mailgun) over Gmail or your own email server?
- Rate limiting: Email service providers -- e.g., Gmail, Yahoo, Outlook -- have hourly or daily email sending limits. Transactional email service providers have limits as well, but they are much, much higher.
- Deliverability: Most email service providers do not allow messages from unknown IP addresses. Such emails are marked as spam and generally don't reach the inbox. So if you're sending transactional emails from your own email server, on a shared server, those emails will most likely never be seen by your users. Transactional email services set up relationships with internet service providers and email service providers to ensure that emails are delivered smoothly and promptly.
- Analytics: Transactional email services provide detailed statistics and analytics to help you improve email open and click rates.
Amazon SES is a cost-effective email service designed for sending both bulk and transactional emails. Emails can be sent directly from the SES console, via the Simple Mail Transfer Protocol (SMTP) interface, or through the API.
In this tutorial, we'll use Boto3, a Python-based AWS SDK, to make calls to the API.
Setup
Sign up for an AWS account if you don’t already have one.
Before you can send emails with SES, you must first verify that you own the email address that you wish to send from. Navigate to Amazon SES, click "Identities" in the sidebar, and then click the "Create identity" button.

Under "Identity type", select "Email address". Enter the email you'd like to use and click "Create identity".

Then, after clicking the verification link in your email inbox, you should see your email verified back on SES.

To help prevent fraud, new accounts are automatically placed in a sandbox mode where you can only send emails to addresses that you have personally verified with Amazon. Fortunately, this is enough for us to wire everything together.
You must make a request to Amazon to move out of the sandbox mode. This can take a day or two, so get this started as soon as possible. Review Moving Out of the Amazon SES Sandbox for more on this.
Back in the code, add boto3 to the requirements file:
boto3==1.34.140
Update send_email:
def send_email(email, body):
    # time.sleep(10)  # simulate long-running process
    ses = boto3.client(
        'ses',
        region_name=os.getenv('SES_REGION'),
        aws_access_key_id=os.getenv('AWS_ACCESS_KEY_ID'),
        aws_secret_access_key=os.getenv('AWS_SECRET_ACCESS_KEY')
    )
    ses.send_email(
        Source=os.getenv('SES_EMAIL_SOURCE'),
        Destination={'ToAddresses': [email]},
        Message={
            'Subject': {'Data': 'Confirm Your Account'},
            'Body': {
                'Text': {'Data': body}
            }
        }
    )
    user = User.query.filter_by(email=email).first()
    user.email_sent = True
    db.session.commit()
    return True
Here, we created a new SES client resource and then attempted to send an email.
Import os and boto3:
import os
import boto3
Update the environment variables for the worker in docker-compose.yml, making sure to update the values:
- SES_REGION=us-east-2
- SES_EMAIL_SOURCE=your_email
- AWS_ACCESS_KEY_ID=your_access_key_id
- AWS_SECRET_ACCESS_KEY=your_secret_access_key
It's worth noting that by default,
Boto3will check theAWS_ACCESS_KEY_IDandAWS_SECRET_ACCESS_KEYenvironment variables for credentials. So, we didn't need to explicitly pass them in when creating the SES client resource. In other words, as long as those environment variables are defined, we can simplify the code:ses = boto3.client('ses', region_name=os.getenv('SES_REGION'))For more on this, review the official Boto3 docs.
Test
Update the containers:
$ docker compose up -d --build
Then, register a user from the browser, making sure to use the same email that you used with SES. You should see a confirmation email in your inbox. Click the link and you should be redirected back to http://localhost:5003.

Remember: If you're still in sandbox mode, you can only send emails to verified addresses. If you try to send an email to an unverified address, the task will fail:
raise error_class(parsed_response, operation_name)
botocore.errorfactory.MessageRejected: An error occurred (MessageRejected) when calling the SendEmail operation:
Email address is not verified. The following identities failed the check in region US-EAST-2: [email protected]
Also, since you're probably testing with a single email address, you may want to remove the unique constraint on the model. Otherwise, you will need to remove the user from the database between tests.
email = db.Column(db.String(255), unique=False, nullable=False)
While the unique constraint is False, you may also want to ensure the following code from the confirm_email view works:
if user.confirmed:
    flash('Account already confirmed.', 'success')
    return redirect(url_for('main.home'))
Think about how you can test this?
- Register two users under the same email
- Confirm one of them
- Remove the unconfirmed user from the database
- Try to confirm the other user
You should see:

Don't forget to add the unique constraint back in once you're done testing!
For more info on the process we went through to send emails on SES via
Boto3, review the Send an Email Using the AWS SDK for Python (Boto) guide.
Conclusion
In this tutorial, we detailed how to send confirmation emails that newly registered users must click on before their account is fully activated.
Looking for some challenges?
- Redis Queue: Add RQ Dashboard, a web-based monitoring system for Redis Queue. See Asynchronous Tasks with Flask and Redis Queue for more info.
- Email templates: As mentioned, along with the plain-text email template, generate an HTML version of the confirmation email template.
- Tools: Don't like the tools we're using? Swap out Redis Queue for Celery or SES for Mailgun.
- Re-send confirmation email: Try incorporating functionality to re-send the confirmation email into this flow.
- Password reset: Along the same lines, try adding password reset via email into this flow.
- Verification codes: Want an additional layer of security? Add a verification code or two factor auth (via SMS).
- Handling failures: What happens if an exception occurs? If a confirmation email fails to send, you may lose that potential user. So, you may want to set up an auto retry policy with Redis Queue in case of a failure.
As always, you can find the code in the repo. Cheers!