 Michael Herman
Let's look at how to deploy Hashicorp's Vault and Consul to DigitalOcean with Docker Swarm.
This tutorial assumes that you have a basic working knowledge of using Vault and Consul to manage secrets. Please refer to the Managing Secrets with Vault and Consul tutorial for more info.
Upon completion, you will be able to:
- Provision hosts on DigitalOcean with Docker Machine
- Configure a Docker Swarm cluster to run on DigitalOcean
- Run Vault and Consul on Docker Swarm
Main dependencies:
- Docker v20.10.8
- Docker-Compose v1.29.2
- Docker-Machine v0.16.2
- Vault v1.8.3
- Consul v1.10.3
Contents
Consul
Create a new project directory:
$ mkdir vault-consul-swarm && cd vault-consul-swarm
Then, add a docker-compose.yml file to the project root:
version: "3.8"

services:

  server-bootstrap:
    image: consul:1.10.3
    ports:
      - 8500:8500
    command: "agent -server -bootstrap-expect 3 -ui -client 0.0.0.0 -bind '{{ GetInterfaceIP \"eth0\" }}'"

  server:
    image: consul:1.10.3
    command: "agent -server -retry-join server-bootstrap -client 0.0.0.0 -bind '{{ GetInterfaceIP \"eth0\" }}'"
    deploy:
      replicas: 2
    depends_on:
      - server-bootstrap

  client:
    image: consul:1.10.3
    command: "agent -retry-join server-bootstrap -client 0.0.0.0 -bind '{{ GetInterfaceIP \"eth0\" }}'"
    deploy:
      replicas: 2
    depends_on:
      - server-bootstrap

networks:
  default:
    external: true
    name: core
This configuration should look familiar.
- Refer to the Compose File section of the Running Flask on Docker Swarm blog post for more info on using a compose file for Docker Swarm mode.
- Review the Consul and Docker guide for info on the above Consul config.
Docker Swarm
Sign up for a DigitalOcean account (if you don’t already have one), and then generate an access token so you can access the DigitalOcean API.
Add the token to your environment:
$ export DIGITAL_OCEAN_ACCESS_TOKEN=[your_digital_ocean_token]
Spin up three droplets:
$ for i in 1 2 3; do
    docker-machine create \
      --driver digitalocean \
      --digitalocean-region "nyc1" \
      --digitalocean-image=debian-10-x64 \
      --engine-install-url "https://releases.rancher.com/install-docker/19.03.9.sh" \
      --digitalocean-access-token $DIGITAL_OCEAN_ACCESS_TOKEN \
      node-$i;
done
Initialize Swarm mode on the first node, node-1:
$ docker-machine ssh node-1 -- docker swarm init --advertise-addr $(docker-machine ip node-1)
Use the join token from the output of the previous command to add the remaining two nodes to the Swarm as workers:
$ for i in 2 3; do
    docker-machine ssh node-$i -- docker swarm join --token YOUR_JOIN_TOKEN HOST:PORT;
done
For example:
for i in 2 3; do
    docker-machine ssh node-$i -- docker swarm join --token SWMTKN-1-18xrfgcgq7k6krqr7tvav3ydx5c5104y662lzh4pyct2t0ror3-e3ed1ggivhf8z15i40z6x55g5 67.205.165.166:2377;
done
You should see:
This node joined a swarm as a worker.
This node joined a swarm as a worker.
Point the Docker daemon at node-1, create an attachable overlay network (called core), and deploy the stack:
$ eval $(docker-machine env node-1)
$ docker network create -d overlay --attachable core
$ docker stack deploy --compose-file=docker-compose.yml secrets
List out the services in the stack:
$ docker stack ps -f "desired-state=running" secrets
You should see something similar to:
ID             NAME                         IMAGE          NODE     DESIRED STATE   CURRENT STATE
b5f5eycrhf3o   secrets_client.1             consul:1.10.3   node-1   Running         Running 7 seconds ago
zs7a5t8khcew   secrets_server.1             consul:1.10.3   node-2   Running         Running 9 seconds ago
qnhtlan6m0sp   secrets_server-bootstrap.1   consul:1.10.3   node-1   Running         Running 7 seconds ago
u61eycesmsl7   secrets_client.2             consul:1.10.3   node-2   Running         Running 9 seconds ago
vgpql8lfy5fi   secrets_server.2             consul:1.10.3   node-3   Running         Running 9 seconds ago
Grab the IP associated with node-1:
$ docker-machine ip node-1
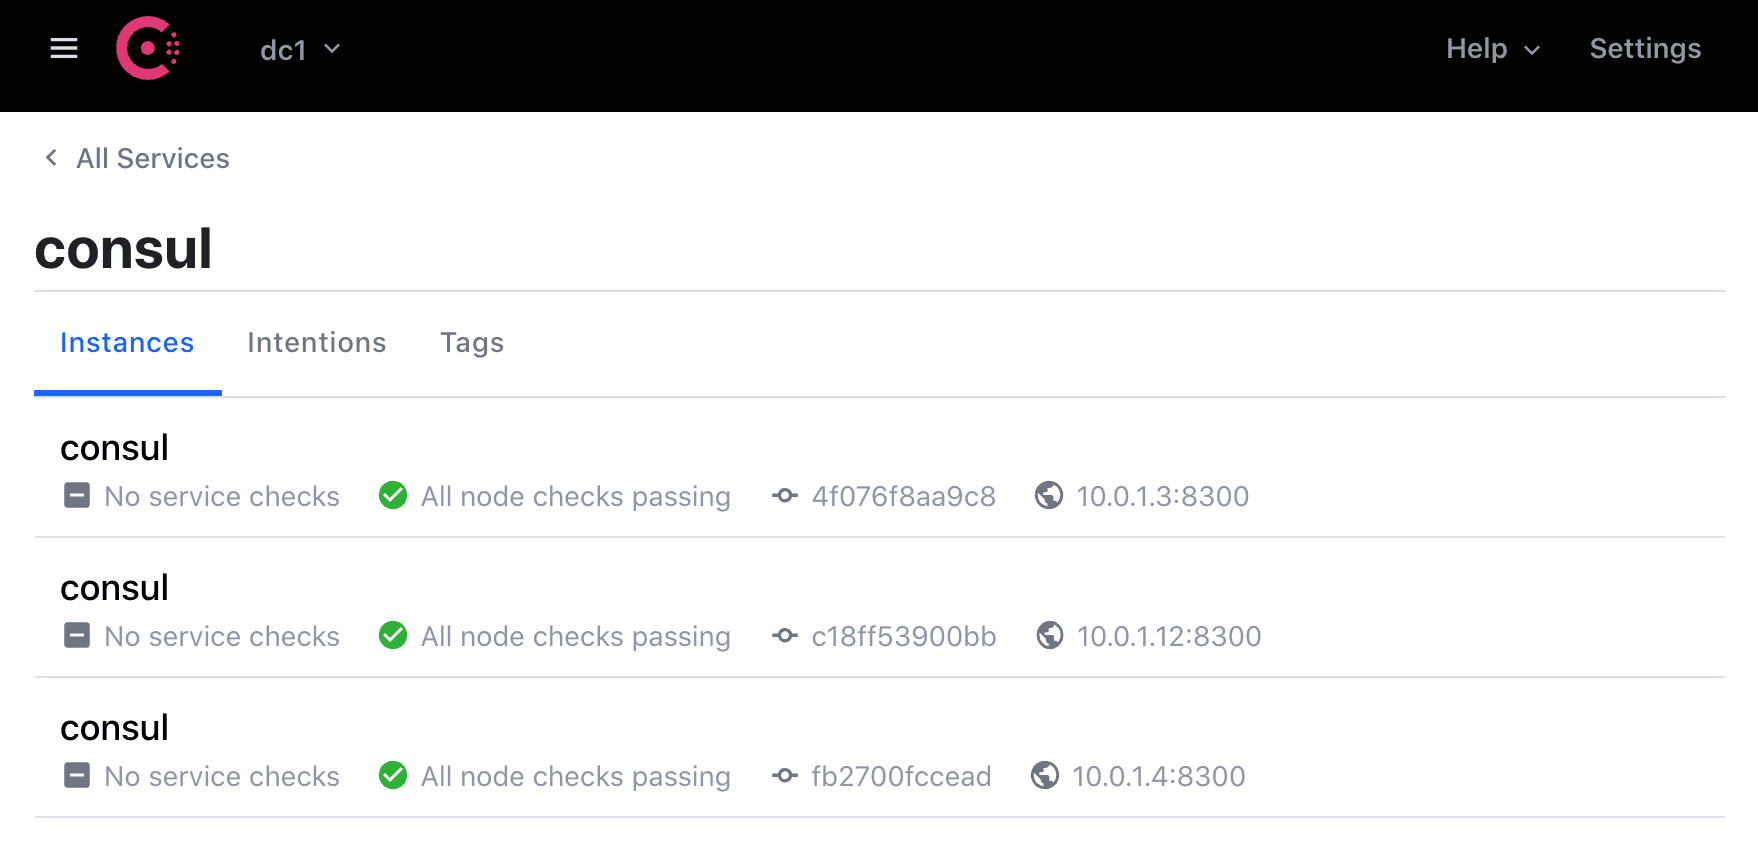
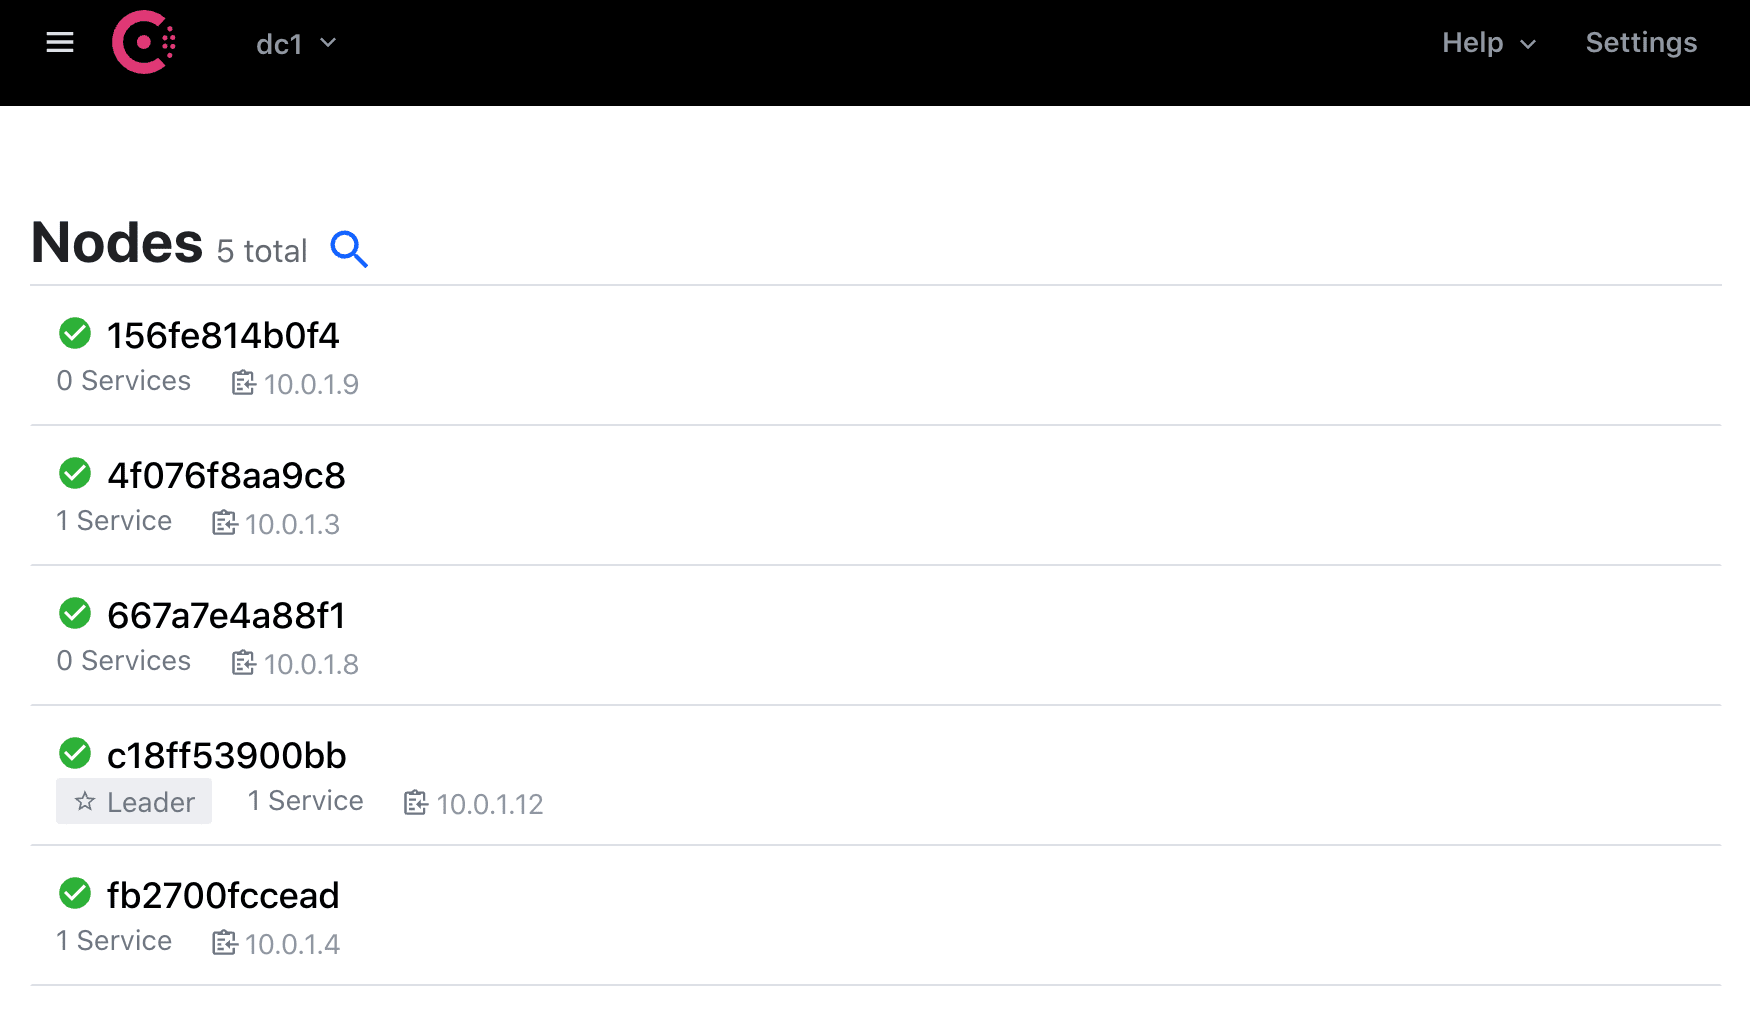
Then, test out the Consul UI in your browser at http://YOUR_MACHINE_IP:8500/ui. There should be three running services and five nodes.
Vault
Add the vault service to docker-compose.yml:
vault:
  image: vault:1.8.3
  deploy:
    replicas: 1
  ports:
    - 8200:8200
  environment:
    - VAULT_ADDR=http://127.0.0.1:8200
    - VAULT_LOCAL_CONFIG={"backend":{"consul":{"address":"http://server-bootstrap:8500","path":"vault/"}},"listener":{"tcp":{"address":"0.0.0.0:8200","tls_disable":1}},"ui":true, "disable_mlock":true}
  command: server
  depends_on:
    - consul
Take note of the VAULT_LOCAL_CONFIG environment variable:
{
  "backend": {
    "consul": {
      "address": "http://server-bootstrap:8500",
      "path": "vault/"
    }
  },
  "listener": {
    "tcp": {
      "address": "0.0.0.0:8200",
      "tls_disable": 1
    }
  },
  "ui": true,
  "disable_mlock": true
}
Review the Consul Backend section from the Managing Secrets with Vault and Consul blog post for more info. Also, setting disable_mlock to true is not recommended for production environments; however, it must be enabled since --cap-add is not available in Docker Swarm mode. See the following GitHub issues for details:
Test
Re-deploy the stack:
$ docker stack deploy --compose-file=docker-compose.yml secrets
Wait a few seconds for the services to spin up, then check the status:
$ docker stack ps -f "desired-state=running" secrets
Again, you should see something similar to:
ID             NAME                         IMAGE           NODE      DESIRED STATE   CURRENT STATE
xtfsetfrbrs7   secrets_client.1             consul:1.10.3   node-3    Running         Running 19 minutes ago
ydqxexgiyzb2   secrets_client.2             consul:1.10.3   node-1    Running         Running 19 minutes ago
izlku3y6j8rp   secrets_server-bootstrap.1   consul:1.10.3   node-2    Running         Running 19 minutes ago
zqpkcrhrix2x   secrets_server.1             consul:1.10.3   node-1    Running         Running 19 minutes ago
kmlxuhxw1akv   secrets_server.2             consul:1.10.3   node-2    Running         Running 19 minutes ago
wfmscoj53m39   secrets_vault.1              vault:1.8.3     node-3    Running         Running about a minute ago
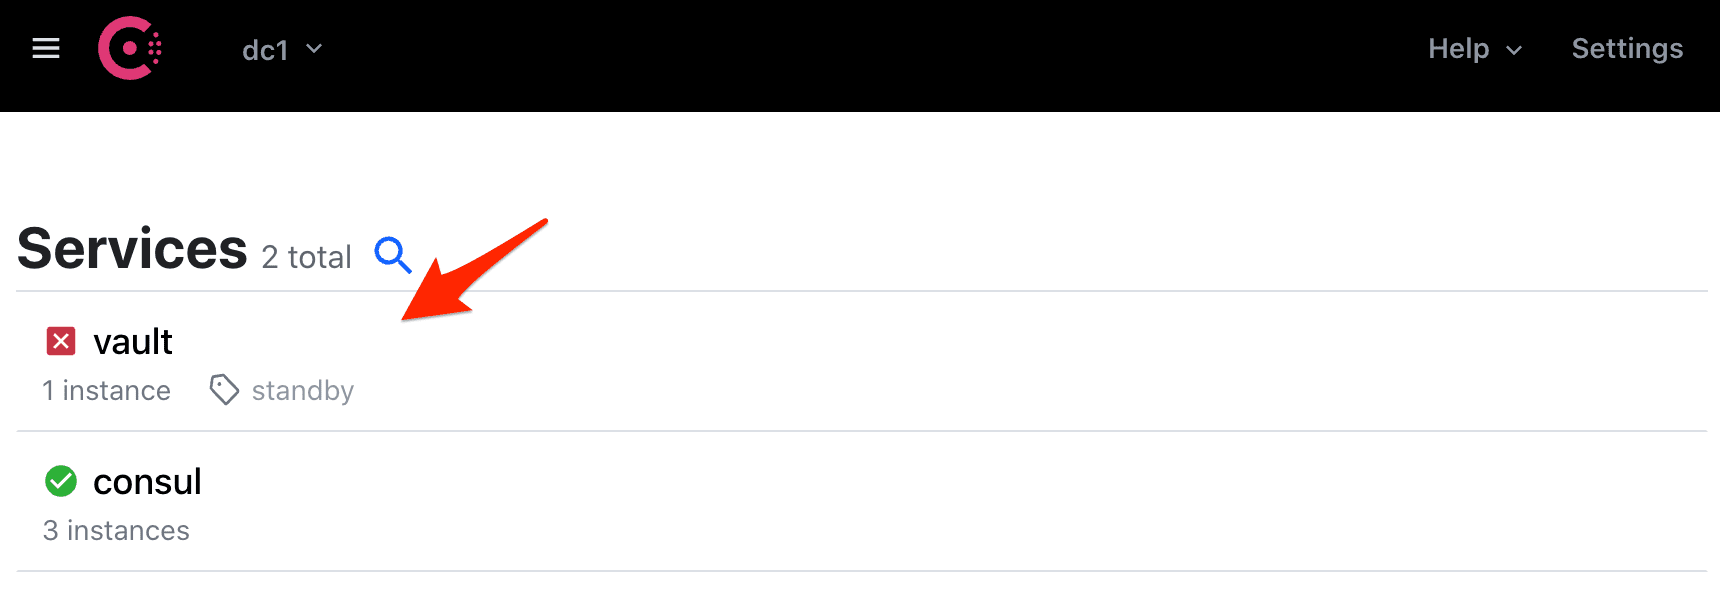
Next, ensure Vault is listed on the "Services" section of the Consul UI:
You should now be able to interact with Vault via the CLI, HTTP API, and the UI. Start by initializing and unsealing Vault. Then, log in and create a new secret.
Remove the nodes once done:
$ docker-machine rm node-1 node-2 node-3 -y
Automation Script
Finally, let's create a quick script to automate the deployment process:
- Provision three DigitalOcean droplets with Docker Machine
- Configure Docker Swarm mode
- Add nodes to the Swarm
- Deploy the stack
Add a new file called deploy.sh to the project root:
#!/bin/bash


echo "Spinning up three droplets..."

for i in 1 2 3; do
  docker-machine create \
    --driver digitalocean \
    --digitalocean-region "nyc1" \
    --digitalocean-image=debian-10-x64 \
    --engine-install-url "https://releases.rancher.com/install-docker/19.03.9.sh" \
    --digitalocean-access-token $DIGITAL_OCEAN_ACCESS_TOKEN \
    node-$i;
done


echo "Initializing Swarm mode..."

docker-machine ssh node-1 -- docker swarm init --advertise-addr $(docker-machine ip node-1)


echo "Adding the nodes to the Swarm..."

TOKEN=`docker-machine ssh node-1 docker swarm join-token worker | grep token | awk '{ print $5 }'`

for i in 2 3; do
  docker-machine ssh node-$i \
    -- docker swarm join --token ${TOKEN} $(docker-machine ip node-1):2377;
done


echo "Creating networking..."

eval $(docker-machine env node-1)
docker network create -d overlay --attachable core


echo "Deploying the stack..."

docker stack deploy --compose-file=docker-compose.yml secrets
Try it out!
$ sh deploy.sh
Bring down the droplets once done:
$ docker-machine rm node-1 node-2 node-3 -y
The code can be found in the vault-consul-swarm repo. Cheers!