Getting Started
Part 1, Chapter 3
Objectives
- Set up Celery with Django
- Execute Celery tasks in the Django shell
- Monitor a Celery app with Flower
Setting up Redis
You can set up and run Redis directly from your operating system or from a Docker container. While you don't have to go the Docker route in this chapter, the remaining chapters all use Docker, so it's highly recommend to stick with Docker in this chapter as well.
With Docker
Start by installing Docker if you haven't already done so. Then, open your terminal and run the following command:
$ docker run -p 6379:6379 --name some-redis -d redis
This downloads the official Redis Docker image from Docker Hub and runs it on port 6379 in the background.
To test if Redis is up and running, run:
$ docker exec -it some-redis redis-cli ping
You should see:
PONG
Without Docker
Either download Redis from source or via a package manager (like APT, YUM, Homebrew, or Chocolatey) and then start the Redis server via:
$ redis-server
To test if Redis is up and running, run:
$ redis-cli ping
You should see:
PONG
Next, we'll look at how to set up Celery in a Django project.
Setting up Celery
Create a Django project
Create a new project directory:
$ mkdir django-celery-project && cd django-celery-project
Then, create and activate a new Python virtual environment:
$ python3.12 -m venv venv
$ source venv/bin/activate
(venv)$
Feel free to swap out virtualenv and Pip for uv, Poetry, or Pipenv. For more, review Modern Python Environments.
Install Django and start a new project:
(venv)$ pip install django==5.1.5
(venv)$ django-admin startproject django_celery_example .
(venv)$ python manage.py startapp polls
Register the polls app in the Django settings:
INSTALLED_APPS = [
    'django.contrib.admin',
    'django.contrib.auth',
    'django.contrib.contenttypes',
    'django.contrib.sessions',
    'django.contrib.messages',
    'django.contrib.staticfiles',
    'polls'          # new
]
Below is the project structure
├── django_celery_example
│   ├── __init__.py
│   ├── asgi.py
│   ├── settings.py
│   ├── urls.py
│   └── wsgi.py
├── manage.py
└── polls
    ├── __init__.py
    ├── admin.py
    ├── apps.py
    ├── migrations
    │   └── __init__.py
    ├── models.py
    ├── tests.py
    └── views.py
Add Celery
Next, let's install and configure Celery.
Create a requirements.txt in the project root, and then add the redis-py and Celery dependencies to it:
django==5.1.5
celery==5.4.0
redis==5.0.1
Install:
(venv)$ pip install -r requirements.txt
Create a django_celery_example/celery.py file in the same folder as wsgi.py:
"""
https://docs.celeryq.dev/en/stable/django/first-steps-with-django.html
"""
import os

from celery import Celery

from django.conf import settings

# this code copied from manage.py
# set the default Django settings module for the 'celery' app.
os.environ.setdefault('DJANGO_SETTINGS_MODULE', 'django_celery_example.settings')

# you can change the name here
app = Celery("django_celery_example")

# read config from Django settings, the CELERY namespace would make celery
# config keys has `CELERY` prefix
app.config_from_object('django.conf:settings', namespace='CELERY')

# discover and load tasks.py from from all registered Django apps
app.autodiscover_tasks(lambda: settings.INSTALLED_APPS)


@app.task
def divide(x, y):
    import time
    time.sleep(5)
    return x / y
In the same folder, update __init__.py like so:
# This will make sure the app is always imported when
# Django starts so that shared_task will use this app.
from .celery import app as celery_app

__all__ = ('celery_app',)
Since Celery can read config from the Django settings file, add the following config to django_celery_example/settings.py for better configuration management:
CELERY_BROKER_URL = "redis://127.0.0.1:6379/0"
CELERY_RESULT_BACKEND = "redis://127.0.0.1:6379/0"
It's worth noting here that the Celery documentation refers to the broker URL as BROKER_URL instead of CELERY_BROKER_URL. So, why are we using CELERY_BROKER_URL?
app.config_from_object('django.conf:settings', namespace='CELERY') tells Celery to read values from the CELERY namespace in settings.py. So, if you just set BROKER_URL in your Django settings file, the setting would be ignored since it lacks the CELERY namespace. This rule applies for all Celery config keys.
Celery 4 introduced a new lowercase config name style. The change is backwards compatible so you can still use the uppercase names. If you do use the lowercase style, there are a few config settings that have tweaks to the actual names so be sure to review the docs.
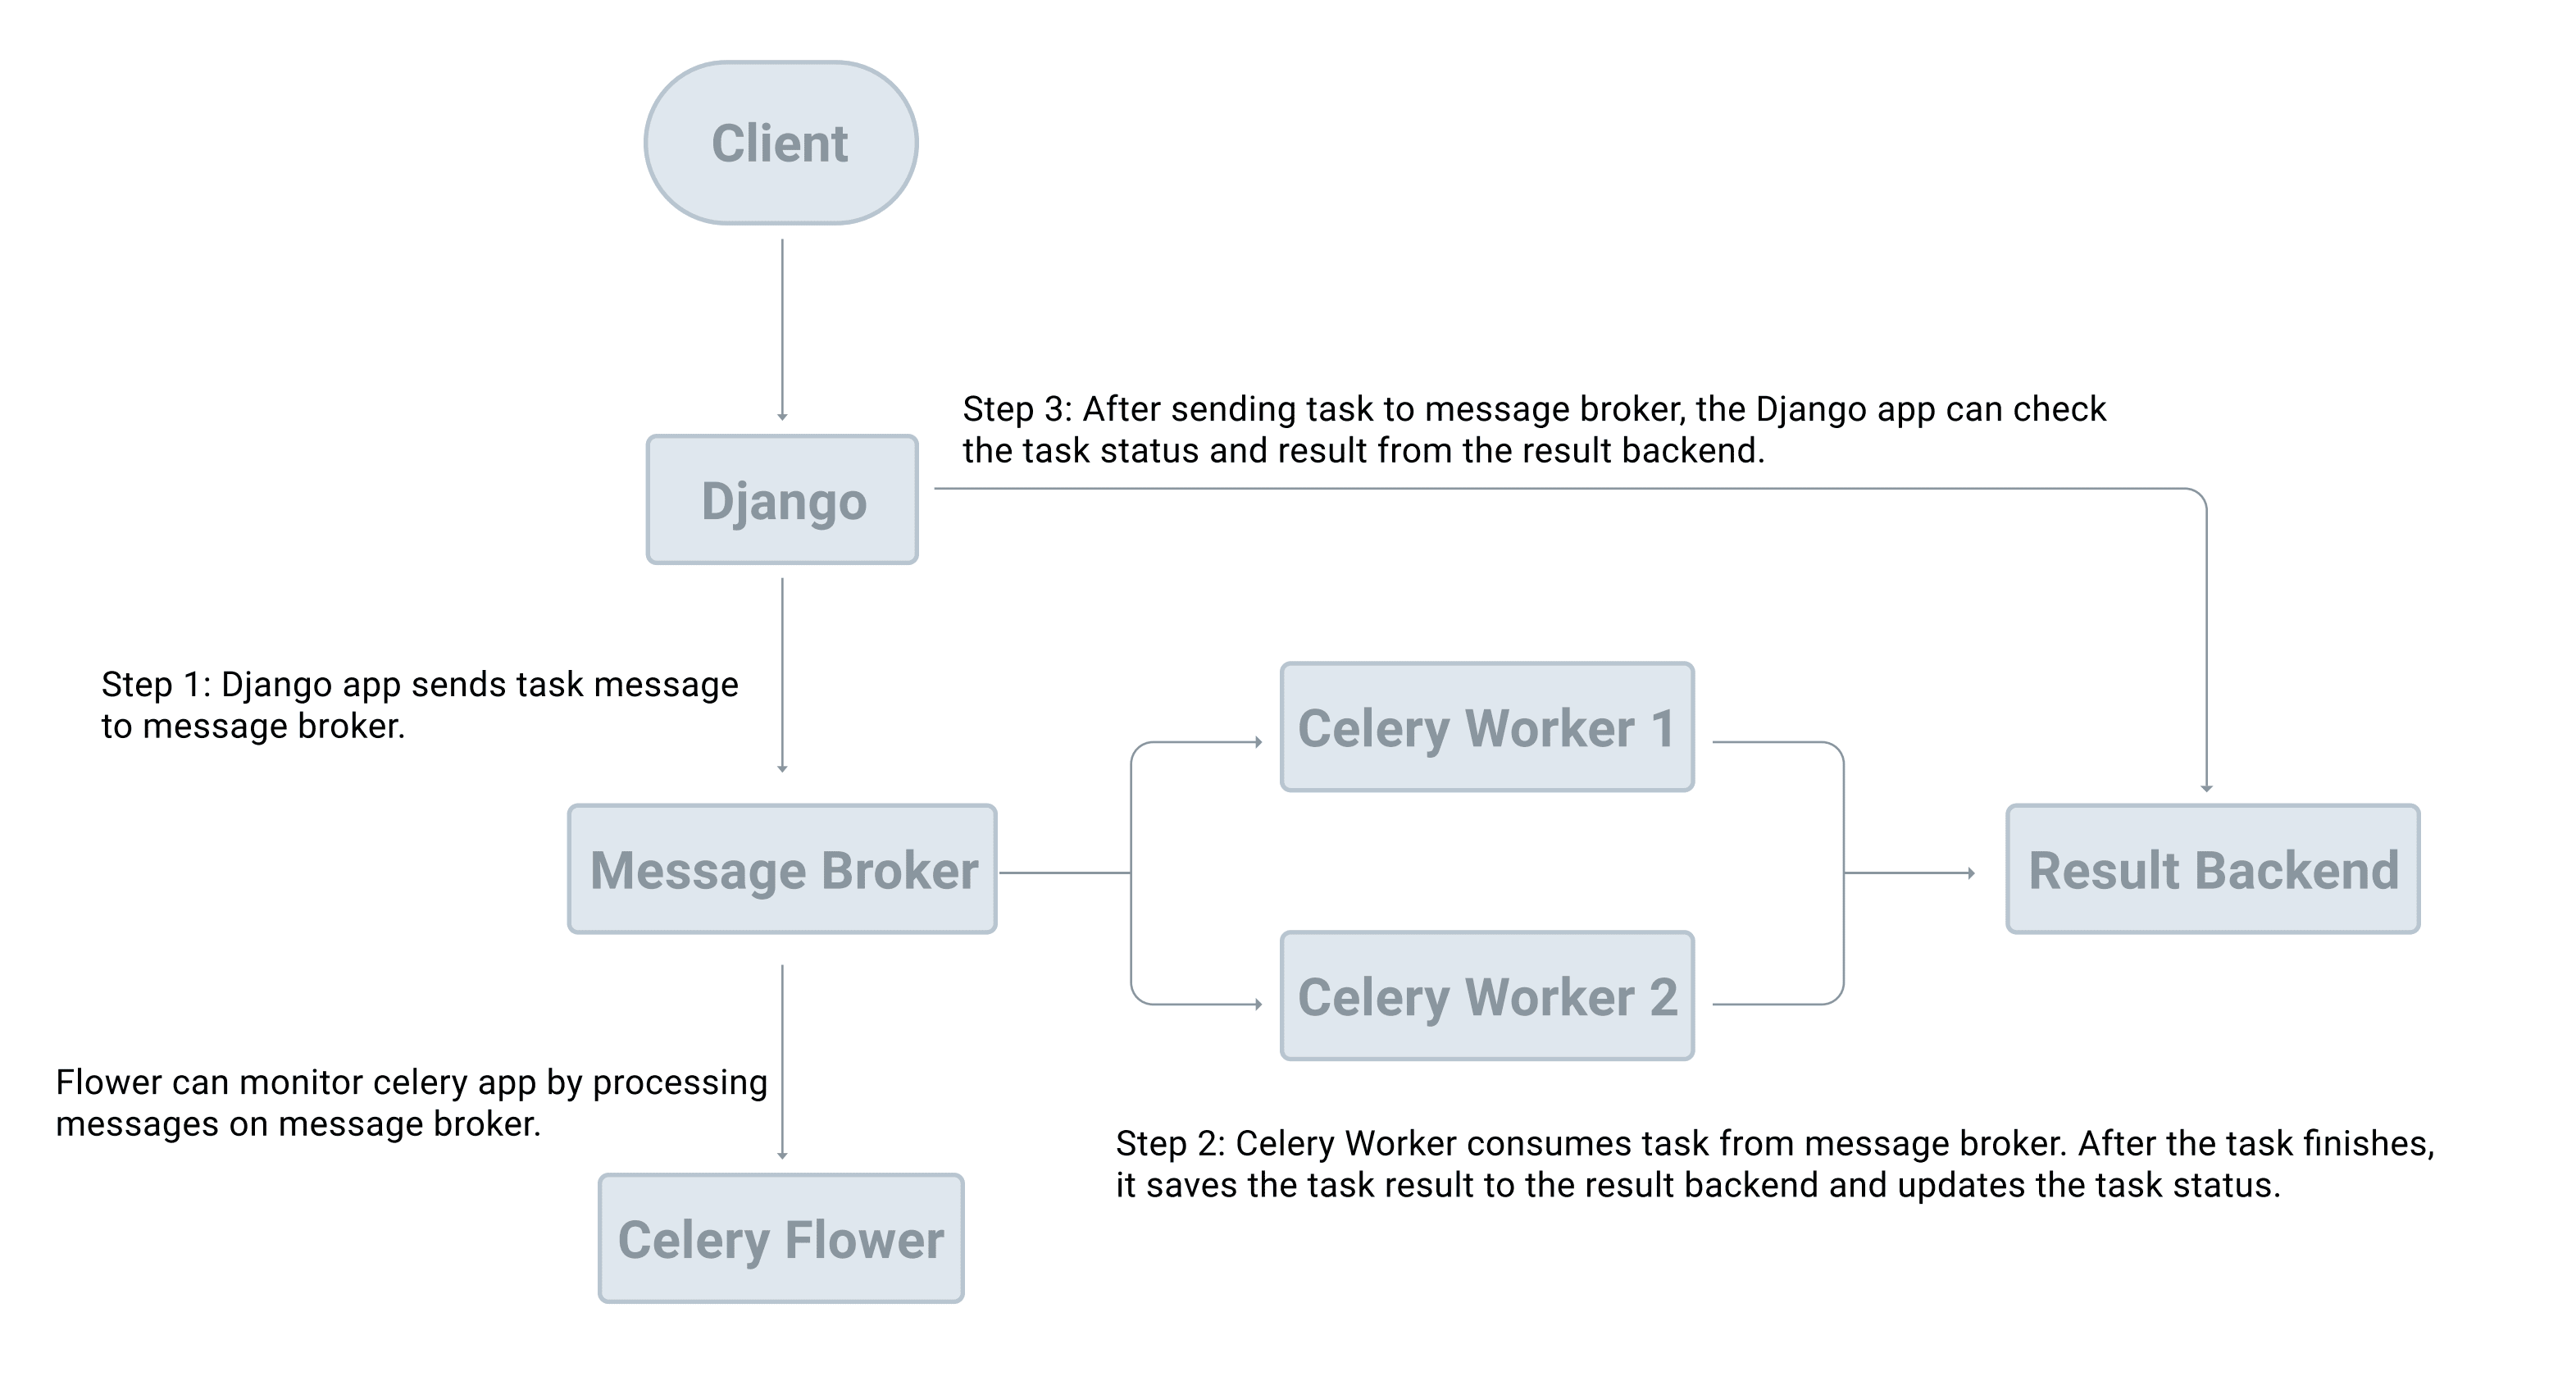
Sending a Task to Celery
With the config done, let's try sending a task to Celery to see how it works.
In a new terminal window, navigate to your project directory, activate the virtual environment, and then run:
(venv)$ celery -A django_celery_example worker --loglevel=info
You should see something similar to:
[config]
.> app:         django_celery_example:0x10cadce30
.> transport:   redis://127.0.0.1:6379/0
.> results:     redis://127.0.0.1:6379/0
.> concurrency: 16 (prefork)
.> task events: OFF (enable -E to monitor tasks in this worker)

[queues]
.> celery           exchange=celery(direct) key=celery


[tasks]
  . django_celery_example.celery.divide
Back in the first terminal window, apply the migrations and then enter the Django shell
(venv)$ python manage.py migrate
(venv)$ python manage.py shell
>>>
Let's send some tasks to the Celery worker:
>>> from django_celery_example.celery import divide
>>> task = divide.delay(1, 2)
What's happening?
- We used the
delaymethod to send a new message to the message broker. The worker process then picked up and executed the task from the queue. - After releasing from the Enter key, the code finished executing while the
dividetask ran in the background.
Turn to the Celery worker terminal. You should see something similar to:
[2025-01-17 02:04:54,293: INFO/MainProcess] Task django_celery_example.celery.divide[2fcaa812-295d-42ff-8d3d-17db8bda6cfe] received
[2025-01-17 02:04:59,319: INFO/ForkPoolWorker-16] Task django_celery_example.celery.divide[2fcaa812-295d-42ff-8d3d-17db8bda6cfe] succeeded in 5.022000698023476s: 0.5
The worker process received the task at 02:04:54. It took about five seconds for the task to start and finish.
Add another task or two. As you do this, picture the workflow in your head:
- The Celery client (the producer) adds a new task to the queue via the message broker.
- The Celery worker (the consumer) grabs the tasks from the queue, again, via the message broker.
- Once processed, results are stored in the result backend.
Add another new task:
>>> task = divide.delay(1, 2)

>>> type(task)
<class 'celery.result.AsyncResult'>
After we called the delay method, we get an AsyncResult instance, which can be used to check the task state along with the return value or exception details.
Add a new task then print task.state and task.result:
>>> print(task.state, task.result)
PENDING None

>>> print(task.state, task.result)
PENDING None

>>> print(task.state, task.result)
PENDING None

>>> print(task.state, task.result)
PENDING None

>>> print(task.state, task.result)
PENDING None

>>> print(task.state, task.result)
SUCCESS 0.5

>>> print(task.state, task.result)
SUCCESS 0.5
What happens if there's an error?
>>> task = divide.delay(1, 0)

# wait a few seconds before checking the state and result

>>> task.state
'FAILURE'

>>> task.result
ZeroDivisionError('division by zero')
Monitoring Celery with Flower
Flower is a real-time web application monitoring and administration tool for Celery.
Add the dependency to the requirements.txt file:
flower==2.0.1
Open a third terminal window, navigate to the project directory. Activate your virtual environment and then install Flower:
(venv)$ pip install -r requirements.txt
Once installed, spin up the server:
(venv)$ celery -A django_celery_example flower --port=5555
Navigate to http://localhost:5555 in your browser of choice to view the dashboard. Click "Tasks" in the nav bar at the top to view the finished tasks.
In the first terminal window, run a few more tasks, making sure you have at least one that will fail:
>>> task = divide.delay(1, 2)
>>> task = divide.delay(1, 0)
>>> task = divide.delay(1, 2)
>>> task = divide.delay(1, 3)
Back in Flower you should see:
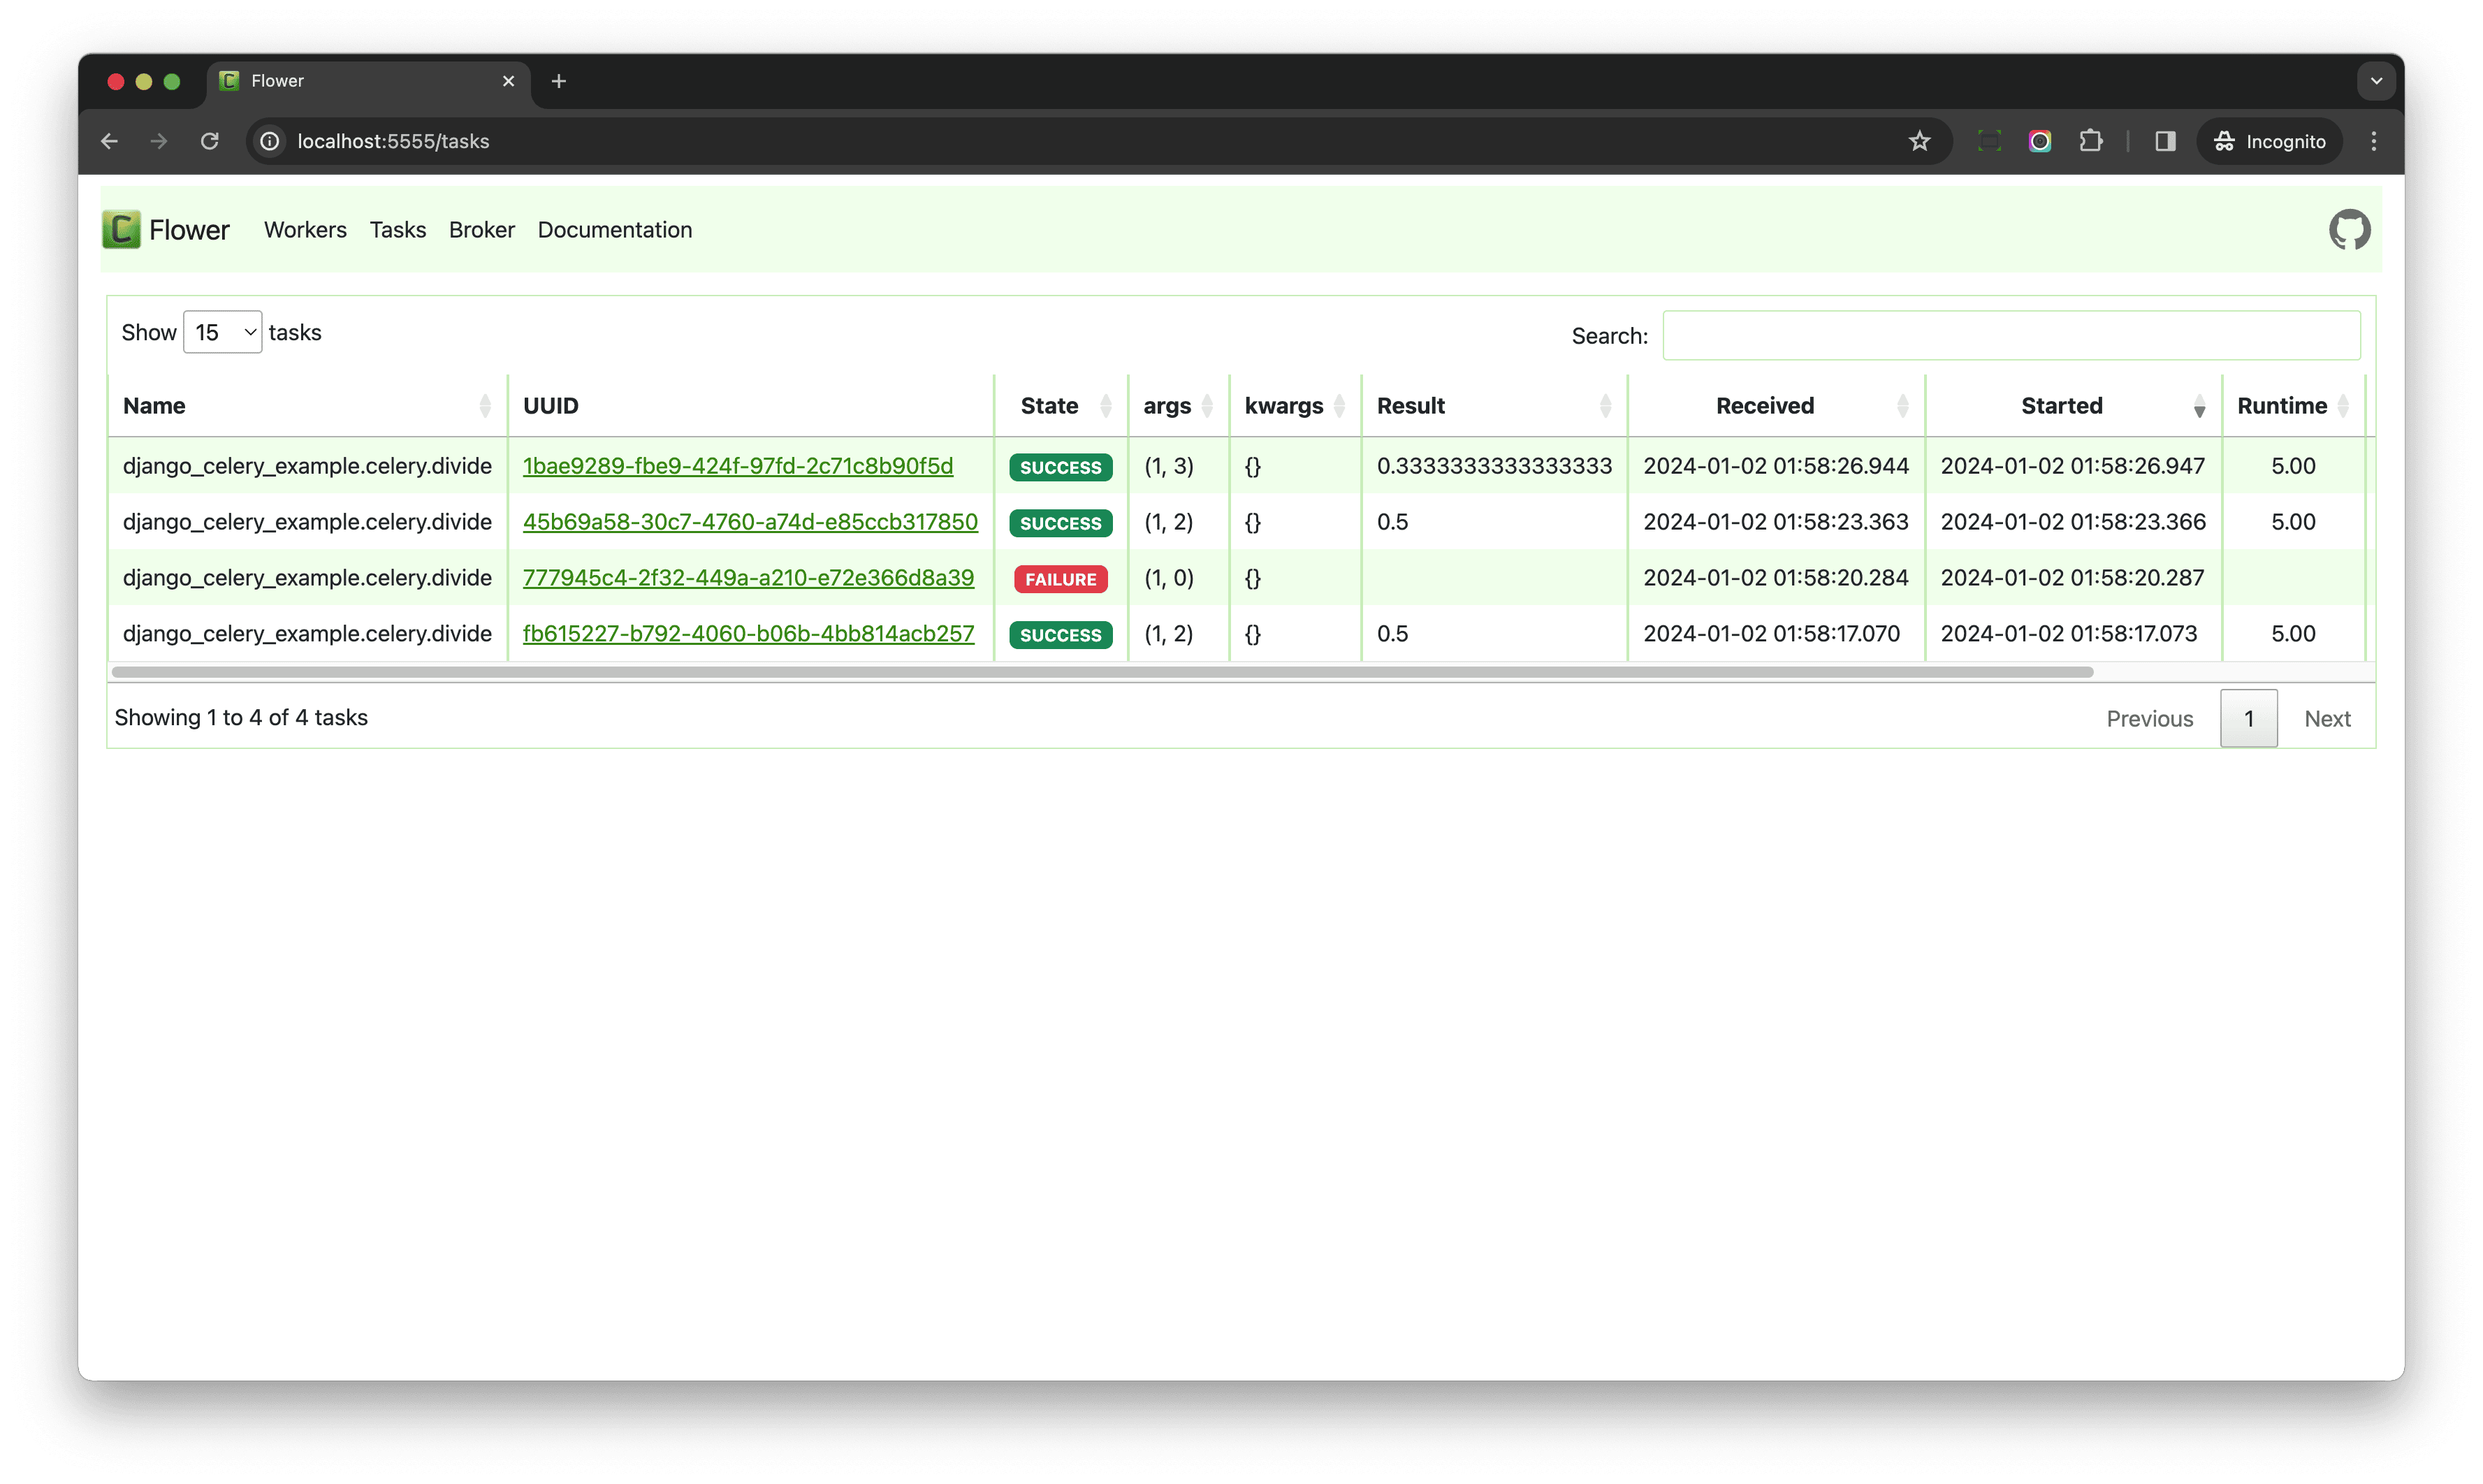
Take note of the UUID column. This is the id of AsyncResult. Copy the UUID for the failed task and open the terminal window where the Django shell is running to view the details:
>>> from celery.result import AsyncResult
>>> task = AsyncResult('4c58b116-460f-4666-8a49-23344e24287b')  # replace with your UUID
>>>
>>> task.state
'FAILURE'
>>>
>>> task.result
ZeroDivisionError('division by zero')
Familiarize yourself a bit with the Flower dashboard. It's a powerful tool that can help make it easier to learn Celery since you can get feedback much quicker than from the terminal.
Conclusion
In this chapter, we looked at the basic building blocks of Celery and producer/consumer-based task queues in general. You should be able to explain from a high-level how Celery works and be able to integrate it into a Django application.
✓ Mark as Completed