 Caleb Pollman
In this post, we'll develop a React app using Test-Driven Development (TDD) with Jest and Enzyme. Upon completion, you will be able to:
- Use TDD to develop a React app
- Test a React app with Enzyme and Jest
- Write and use CSS variables for reuse and responsive design
- Create a reusable React component that renders and functions differently based on the provided props
- Use React PropTypes to type check component props
- Approach an app from a responsive design perspective
- Use the Flexible Box Module to create a flexible layout
This post assumes you have at least a basic knowledge of React. If you are completely new to React, it's recommended that you complete the official Intro To React tutorial.
Parts:
- Part 1 (this post!): In the first part, we'll set up the overall project and then dive into developing the UI with Test-Driven Development.
- Part 2: In this part, we'll finish the UI by adding the number and operator keys before we dive in to adding the basic calculator functionality.
We will be using:
- React v17.02
- Node v14.16.1
Other dependency versions here.
Contents
Project Overview
We'll be building a basic calculator app consisting of four UI components. Each component will have a separate set of tests housed in a corresponding test file.
What is Test-Driven Development?
Test-Driven Development (TDD) is a development method that utilizes repetition of a short development cycle called Red-Green-Refactor.
Process:
- Add a test
- Run all tests and see if the new test fails (red)
- Write the code to pass the test (green)
- Run all tests
- Refactor
- Repeat
Pros:
- Design before implementation
- Helps prevent future regressions and bugs
- Increases confidence that the code works as expected
Cons:
- Takes longer to develop (but it can save time in the long run)
- Testing edge cases is hard
- Mocking, faking, and stubbing are all even harder
Design Process
Think about what you know about a basic calculator...
From a visual perspective, a basic calculator:
- Can do four operations with keys for each (operator keys): addition, subtraction, multiplication, and division
- Has 12 keys that update the display:
0through9(number keys),.(for decimals), andce(for backspace) - Has an
=(equals) key.
From a functional perspective:
- When a number key is clicked, the calculator updates the display to reflect the new display value.
- When an operator key is clicked, the calculator saves the selected operator and the current display value to memory and then updates the display.
- When the submit (or "equals") key is clicked, the calculator takes the stored value, the stored operator, along with the current value of the display and creates an output based off the aforementioned inputs.
-
Finally, based off what we determined above we know we will have three types of keys and three different functions that correspond to the key types:
Key Type Function Name Function Description Number keys updateDisplayUpdates and renders the display value to the DOM Operator keys setOperatorSaves the chosen operator to the component state object Submit key callOperatorHandles math operations
And we will have these variables:
displayValue- inputed or computed value to be displayed.numbers- array of string values used for the number keys.operators- array of string values used for the operator keys.selectedOperator- selected operation held in memory.storedValue- inputed or computed value held in memory.
With that, we can now think about our React components. There will be four components related to the calculator:
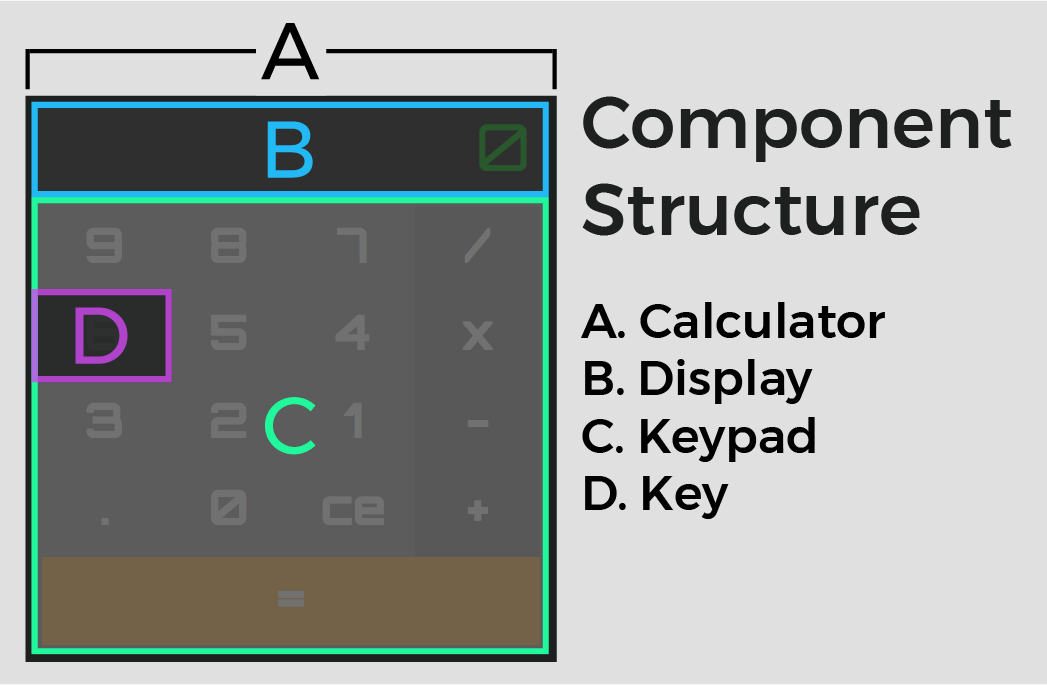
Calculator Component
This is the main UI stateful component for our app. It renders the Display and Keypad components and houses all app functions as well as the app's state.
Display Component

This is a stateless component, which receives a single prop, displayValue.
Keypad Component
This is also a stateless component, which houses all of the keys. it receives the following props:
callOperatornumbersoperatorssetOperatorupdateDisplay
Key Component

The final component is also stateless and it receives the following props:
keyAction- the function related to the key type.keyType- a string used to determine which CSS rules theKeywill have.keyValue- a string used to determine the value to be passed to thekeyActionfunction.
Getting Started
Project Setup
Start by cloning down the initial project repository:
$ git clone -b init [email protected]:calebpollman/react-calculator.git
$ cd react-calculator
$ npm install
$ npm start
The project repo was initialized using the extremely useful Create React App generator.
A new browser tab should open to http://localhost:3000 with the only contents of the DOM being Hello World!. Kill the server once done.
Because we are using TDD to develop the UI, the changes to the view will be slow. We'll focus on writing tests up front, and the UI will gradually be completed throughout the post.
Test Config
For testing, we'll use Jest, a full-featured testing solution that comes with Create React App, and Enzyme, a powerful set of testing utilities for React.
Add Enzyme:
$ npm i -D enzyme
Enzyme requires react-test-renderer for React apps version 15.5 or greater:
$ npm i -D react-test-renderer @wojtekmaj/enzyme-adapter-react-17
Add a new file in the "src" directory titled setupTests.js:
import { configure } from 'enzyme';
import Adapter from '@wojtekmaj/enzyme-adapter-react-17';

configure({ adapter: new Adapter() });
Create React App runs the setupTests.js file before each test, so it will execute and properly configure Enzyme.
Configure Font and Initial CSS
Import Application Font
For our application font, we'll use Orbitron, a font designed for displays that resembles something you would see in a technologically advanced future, if the future was 1983. We need two weights, regular (400) and bold (700), and we will load the font from Google Fonts. Navigate to index.html in the "public" directory and add the link element in the head of the HTML:
<!DOCTYPE html>
<html lang="en">
  <head>
    <meta charset="utf-8">
    <meta name="viewport" content="width=device-width, initial-scale=1, shrink-to-fit=no">
    <meta name="theme-color" content="#000000">
    <link href="https://fonts.googleapis.com/css?family=Orbitron:400,700" rel="stylesheet">
    <link rel="shortcut icon" href="%PUBLIC_URL%/favicon.png">
    <title>Calcultronic 5000</title>
  </head>
  <body>
    <noscript>
      You need to enable JavaScript to run this app.
    </noscript>
    <div id="root"></div>
  </body>
</html>
Write CSS Variables
Next, we'll write our first variable and a basic CSS reset. Since we want the variables globally available to the application, we'll define them from the :root scope. The syntax for defining variables is to use custom property notation, each will begin with -- followed by the variable name. Let's write a variable for our application font and continue updating the variables as needed.
Navigate to the index.css file and add the following:
/*
app variables
*/

:root {
  /* font */
  --main-font: 'Orbitron', sans-serif;
}

/*
app CSS reset
*/

body, div, p {
  margin: 0;
  padding: 0;
}
We then need to import the CSS into our application. In index.js update the import statements at the top of the file:
import React from 'react';
import ReactDOM from 'react-dom';
import './index.css';

ReactDOM.render(
  <div>Hello World!</div>,
  document.getElementById('root')
);
App Component
Shallow Rendering Tests
We'll start out building each component by first adding a corresponding test file and then a shallow render test using Enzyme.
Shallow render tests are useful to keep yourself constrained to testing the component as a unit and avoiding indirectly testing the behavior of child components. You can find more information on shallow rendering in the Enzyme docs.
Write App Shallow Render Test
Begin by adding the first failing test (red) for the App component, and then write the code for it to pass (green). First, add a new spec file to "src/components/App" called App.spec.js, and add a shallow render test:
import React from 'react';
import { shallow } from 'enzyme';
import App from './App';

describe('App', () => {
  it('should render a <div />', () => {
    const wrapper = shallow(<App />);
    expect(wrapper.find('div').length).toEqual(1);
  });
});
Run the test:
$ npm test
Once the test runner is up and running, your terminal should look something like this:
 FAIL  src/components/App/App.spec.js
  App
    ✕ should render a <div /> (58ms)

  ● App › should render a <div />

    ReactShallowRenderer render(): Shallow rendering works only with custom components,
    but the provided element type was `object`.

       5 | describe('App', () => {
       6 |   it('should render a <div />', () => {
    >  7 |     const wrapper = shallow(<App />);
         |                     ^
       8 |     expect(wrapper.find('div').length).toEqual(1);
       9 |   });
      10 | });

      at ReactShallowRenderer.render (node_modules/react-test-renderer/cjs/react-test-renderer-shallow.development.js:786:15)
      at fn (node_modules/enzyme-adapter-react-16/src/ReactSixteenAdapter.js:668:53)
      at withSetStateAllowed (node_modules/enzyme-adapter-utils/src/Utils.js:99:18)
      at Object.render (node_modules/enzyme-adapter-react-16/src/ReactSixteenAdapter.js:668:18)
      at new ShallowWrapper (node_modules/enzyme/src/ShallowWrapper.js:397:22)
      at shallow (node_modules/enzyme/src/shallow.js:10:10)
      at Object.<anonymous> (src/components/App/App.spec.js:7:21)

  console.error node_modules/react/cjs/react.development.js:167
    Warning: React.createElement: type is invalid -- expected a string (for built-in components)
    or a class/function (for composite components) but got: object. You likely forgot to export your
    component from the file it's defined in, or you might have mixed up default and named imports.

    Check your code at App.spec.js:7.

Test Suites: 1 failed, 1 total
Tests:       1 failed, 1 total
Snapshots:   0 total
Time:        1.999s, estimated 2s
Ran all test suites.
The test has failed since the App component has not been written.
Create the App Component
Go ahead and get the test passing by creating the App component. Navigate to App.jsx and add the following code:
import React from 'react';

const App = () => <div className="app-container" />;

export default App;
Run the test:
$ npm test
The first test should now pass:
 PASS  src/components/App/App.spec.js
  App
    ✓ should render a <div /> (9ms)

Test Suites: 1 passed, 1 total
Tests:       1 passed, 1 total
Snapshots:   0 total
Time:        2.369s
Ran all test suites related to changed files.
You may have noticed that if you didn't exit the test runner it's still running on the command line. As long as it's running, it will continue watching the project and run the tests anytime a file changes. You may leave it running as you continue through this tutorial, or you can exit and run it at your leisure.
Add App CSS
Now that our first test passes, let's add some style to the App component. Since it's functioning as a wrapper for the rest of the application, we'll use it to set the window size for the application and center the content (the Calculator component) of App horizontally and vertically using the flexbox module.
Navigate to App.css in the "src/components/App" directory and add the following class:
.app-container {
  height: 100vh;
  width: 100vw;
  align-items: center;
  display: flex;
  justify-content: center;
}
About these CSS properties:
height: 100vh;sets application height to 100% of the browser window view height.width: 100vw;sets application width to 100% of the browser window view width.align-items: center;vertically aligns the content inside of the flex-container, if thedisplayproperty is set toflex.display: flex;sets theAppclass to use theflexboxmodule.justify-content: center;horizontally aligns the content inside of the flex-container, ifdisplayproperty is set toflex.
Import the CSS to App:
import React from 'react';
import './App.css';

const App = () => <div className="app-container" />;

export default App;
Import App to index.js:
import React from 'react';
import ReactDOM from 'react-dom';
import App from './components/App/App';
import './index.css';

ReactDOM.render(
  <App />,
  document.getElementById('root')
);
Calculator Component
Check for Calculator in App
Because the App component will contain the Calculator component, let's write a test that checks for the presence of the Calculator component in App. This test will use containsMatchingElement, an Enzyme method that returns true or false based on whether a React element matches an element in the render tree.
We should also refactor the file to use beforeEach, a setup method from Jest to reduce boilerplate in our tests moving forward. As the name suggests, any code placed in the beforeEach is executed before each it block. We'll create the wrapper object outside of the beforeEach to make it accessible to tests.
Add the test and refactor App.spec.js, making sure to import the Calculator component at the top of the file:
import React from 'react';
import { shallow } from 'enzyme';
import App from './App';
import Calculator from '../Calculator/Calculator';

describe('App', () => {
  let wrapper;

  beforeEach(() => wrapper = shallow(<App />));

  it('should render a <div />', () => {
    expect(wrapper.find('div').length).toEqual(1);
  });

  it('should render the Calculator Component', () => {
    expect(wrapper.containsMatchingElement(<Calculator />)).toEqual(true);
  });
});
This test will fail as the Calculator component does not exist:
 FAIL  src/components/App/App.spec.js
  App
    ✓ should render a <div /> (9ms)
    ✕ should render the Calculator Component (7ms)

  ● App › should render the Calculator Component

    expect(received).toEqual(expected) // deep equality

    Expected: true
    Received: false

      13 |
      14 |   it('should render the Calculator Component', () => {
    > 15 |     expect(wrapper.containsMatchingElement(<Calculator />)).toEqual(true);
         |                                                             ^
      16 |   });
      17 | });
      18 |

      at Object.<anonymous> (src/components/App/App.spec.js:15:61)

  console.error node_modules/react/cjs/react.development.js:167
    Warning: React.createElement: type is invalid -- expected a string (for built-in components)
    or a class/function (for composite components) but got: object. You likely forgot to export your
    component from the file it's defined in, or you might have mixed up default and named imports.

    Check your code at App.spec.js:15.

Test Suites: 1 failed, 1 total
Tests:       1 failed, 1 passed, 2 total
Snapshots:   0 total
Time:        2.803s
Ran all test suites related to changed files.
Write Calculator Shallow Rendering Test
Before we write the Calculator component to pass the App › should render the Calculator Component test, add the Calculator test file and set up a shallow render test in the new test file, like we did with the App component.
Create Calculator.spec.js, and add the shallow render test as well as the beforeEach setup method to the file:
import React from 'react';
import { shallow } from 'enzyme';
import Calculator from './Calculator';

describe('Calculator', () => {
  let wrapper;

  beforeEach(() => wrapper = shallow(<Calculator />));

  it('should render a <div />', () => {
    expect(wrapper.find('div').length).toEqual(1);
  });
});
This test will fail immediately.
Create the Calculator Component
Our application mostly consists of stateless components, but Calculator will be stateful so we can take advantage of React's internal application state.
Stateful components are class-based and allow us to set mutable component state variables that may be passed as
propsto child components.
Navigate to Calculator.jsx and define the initial state variables and methods that were discussed earlier in the Design Process portion of the post:
import React, { Component } from 'react';

class Calculator extends Component {
  state = {
    // value to be displayed in <Display />
    displayValue: '0',
    // values to be displayed in number <Keys />
    numbers: [],
    // values to be displayed in operator <Keys />
    operators: [],
    // operator selected for math operation
    selectedOperator: '',
    // stored value to use for math operation
    storedValue: '',
  }

  callOperator = () => {
    console.log('call operation');
  }

  setOperator = () => {
    console.log('set operation');
  }

  updateDisplay = () => {
    console.log('update display');
  }

  render = () => {
    return (
      <div className="calculator-container" />
    );
  }
}

export default Calculator;
This passes the Calculator › should render a <div /> test, but not App › should render the Calculator Component. Why? Because the App component has not been updated to contain the Calculator component. Let's do that now.
In App.jsx update the code to the following:
import React from 'react';
import Calculator from '../Calculator/Calculator';
import './App.css';

const App = () => (
  <div className="app-container">
    <Calculator />
  </div>
);

export default App;
All tests now pass with the creation of the Calculator component:
 PASS  src/components/Calculator/Calculator.spec.js
 PASS  src/components/App/App.spec.js

Test Suites: 2 passed, 2 total
Tests:       3 passed, 3 total
Snapshots:   0 total
Time:        2.5s
Ran all test suites related to changed files.
Add Snapshot Testing for App
Although snapshots are not part of TDD as they are written after a component has been written (think "green-green-refactor" instead of "red-green-refactor"), they are worth including since they will quickly alert you of any unexpected changes to a rendered component. It's best to add them after you've finished the writing of the component.
From the Jest Docs:
A typical snapshot test case for a mobile app renders a UI component, takes a screenshot, then compares it to a reference image stored alongside the test. The test will fail if the two images do not match: either the change is unexpected, or the screenshot needs to be updated to the new version of the UI component.
You'll need to use a snapshot serializer for Jest version 24 or greater. We'll use enzyme-to-json:
$ npm i -D enzyme-to-json
Navigate to App.spec.js and add toMatchSnapshot as the first test in the file, just after the beforeEach:
...
describe('App', () => {
  let wrapper;

  beforeEach(() => wrapper = shallow(<App />));

  it('should render correctly', () => expect(wrapper).toMatchSnapshot());
  ...
});
As we complete the UI of each component, we'll add a snapshot tests as the first test in each
specfile. This creates a pattern of placing the generic tests (snapshot, shallow render) that appear in eachspecfile above the component specific tests.
The new snapshot test passes immediately, and it will continue to pass until there has been a UI change in that component. This also created a "__snapshots__" directory for the App component along with a file named App.spec.js.snap.
 PASS  src/components/Calculator/Calculator.spec.js
 PASS  src/components/App/App.spec.js
 › 1 snapshot written.

Snapshot Summary
 › 1 snapshot written from 1 test suite.

Test Suites: 2 passed, 2 total
Tests:       4 passed, 4 total
Snapshots:   1 written, 1 total
Time:        1.642s, estimated 2s
Ran all test suites.
Now we can add the Calculator styles.
Add Calculator CSS
Start by updating the CSS variables, with the variables related to Calculator, and adding a media query. Because of the minimal visual design of the application, we only use one media query that updates the font sizes and removes the margins around the Calculator component for tablets or smaller devices.
Navigate to index.css and update the file like so:
/*
app variables
*/

:root {
  /* background colors */
  --calculator-background-color: #696969;

  /* font */
  --main-font: 'Orbitron', sans-serif;

  /* calculator dimensions */
  --calculator-height: 72%;
  --calculator-width: 36%;
}

/*
media query for tablet or smaller screen
*/

@media screen and (max-width: 1024px) {
  :root {
    /* calculator dimensions */
    --calculator-height: 100%;
    --calculator-width: 100%;
  }
}

/*
app CSS reset
*/

body, div, p {
  margin: 0;
  padding: 0;
}
Next update the component CSS in Calculator.css:
.calculator-container {
  background-color: var(--calculator-background-color);
  height: var(--calculator-height);
  width: var(--calculator-width);
}
Then import the CSS file in at the top of Calculator.jsx:
import './Calculator.css';
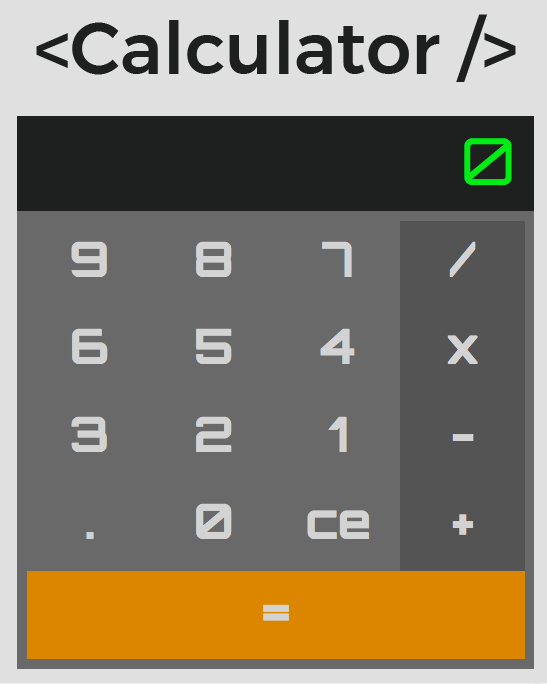
We now have our first component rendering to the DOM! Fire up the browser by running the app:
$ npm start
Then open your browser (if it hasn't opened automatically) to http://localhost:3000. The DOM should match this screenshot:

Now is a great time to pause and review everything we've done thus far. Experiment with the CSS as well.
Display Component
Check for Display in Calculator
Because the Calculator component will contain the Display and Keypad components, the next step is to write a test that checks for the presence of the Display component in Calculator.
Add the test to Calculator.spec.js:
it('should render the Display Component', () => {
  expect(wrapper.containsMatchingElement(<Display />)).toEqual(true);
});
Make sure to import the Display component at the top of the file:
import Display from '../Display/Display';
As with the previous containsMatchingElement test, it will fail as the Display component does not exist.
Before we write the Display component, add the Display test file and set up a shallow render test in the new test file like we did with the Calculator component.
Create, then navigate to Display.spec.js, and add the shallow render test as well as the beforeEach setup method:
import React from 'react';
import {shallow} from 'enzyme';
import Display from './Display';

describe('Display', () => {
  let wrapper;

  beforeEach(() => wrapper = shallow(<Display />));

  it('should render a <div />', () => {
    expect(wrapper.find('div').length).toEqual(1);
  });
});
This will also fail since the Display component still does not exist.
Add the component in Display.jsx and also import prop-types at the top of the file:
import React from 'react';
import PropTypes from 'prop-types';

const Display = ({ displayValue }) => <div className="display-container" />;

Display.propTypes = { displayValue: PropTypes.string.isRequired };

export default Display;
prop-types allow us to document the intended types of properties passed to our components as well as throw warnings during development, if the types passed to the component do not match the props contained in the
ComponentName.propTypesobject.
Adding the component to Display.jsx will pass the Display shallow render test but with a prop-type warning. The Calculator › should render the Display component test should still fail, though:
 PASS  src/components/App/App.spec.js
 PASS  src/components/Display/Display.spec.js
  ● Console

    console.error node_modules/prop-types/checkPropTypes.js:20
      Warning: Failed prop type: The prop `displayValue` is marked as required in `Display`,
      but its value is `undefined`.
          in Display (at Display.spec.js:8)

 FAIL  src/components/Calculator/Calculator.spec.js
  ● Console

    console.error node_modules/prop-types/checkPropTypes.js:20
      Warning: Failed prop type: The prop `displayValue` is marked as required in `Display`,
      but its value is `undefined`.
          in Display (at Calculator.spec.js:16)

  ● Calculator › should render the Display Component

    expect(received).toEqual(expected) // deep equality

    Expected: true
    Received: false

      14 |
      15 |   it('should render the Display Component', () => {
    > 16 |     expect(wrapper.containsMatchingElement(<Display />)).toEqual(true);
         |                                                          ^
      17 |   });
      18 | });
      19 |

      at Object.<anonymous> (src/components/Calculator/Calculator.spec.js:16:58)

Test Suites: 1 failed, 2 passed, 3 total
Tests:       1 failed, 5 passed, 6 total
Snapshots:   1 passed, 1 total
Time:        2.583s
We need to import and add the Display component inside of Calculator.jsx, and then update the render method so that we pass the displayValue prop to Display:
import React, { Component } from 'react';
import Display from '../Display/Display';
import './Calculator.css';

class Calculator extends Component {
  ...
  render = () => {
    // unpack the component state by using Object Destructuring
    const { displayValue } = this.state;

    return (
      <div className="calculator-container">
        <Display displayValue={displayValue} />
      </div>
    );
  }
}
...
Add the displayValue prop to the beforeEach block as well, using an empty string as the value, in Display.spec.js:
...
describe('Display', () => {
  let wrapper;

  beforeEach(() => wrapper = shallow(<Display displayValue={''} />));
  ...
});
...
Then update the Calculator › should render the Display component test to account for the required prop in Display. We can access the state variables and methods of Calculator by utilizing the instance method on the wrapper object.
In Calculator.spec.js update the test:
it('should render the Display Component', () => {
  expect(wrapper.containsMatchingElement(
    <Display displayValue={wrapper.instance().state.displayValue} />
  )).toEqual(true);
});
All tests should pass!
 PASS  src/components/Calculator/Calculator.spec.js
 PASS  src/components/Display/Display.spec.js
 PASS  src/components/App/App.spec.js

Test Suites: 3 passed, 3 total
Tests:       6 passed, 6 total
Snapshots:   1 passed, 1 total
Time:        1.964s, estimated 2s
Ran all test suites.
Display Renders displayValue
Next, let's test the rendering of the actual displayValue so that way our calculator displays something.
Begin by writing a test in Display.spec.js:
it('renders the value of displayValue', () => {
  wrapper.setProps({ displayValue: 'test' });
  expect(wrapper.text()).toEqual('test');
});
Again we'll have a failing test in the console:
 PASS  src/components/App/App.spec.js
 PASS  src/components/Calculator/Calculator.spec.js
 FAIL  src/components/Display/Display.spec.js
  ● Display › renders the value of displayValue

    expect(received).toEqual(expected) // deep equality

    Expected: "test"
    Received: ""

      14 |   it('renders the value of displayValue', () => {
      15 |     wrapper.setProps({ displayValue: 'test' });
    > 16 |     expect(wrapper.text()).toEqual('test');
         |                            ^
      17 |   });
      18 | });
      19 |

      at Object.<anonymous> (src/components/Display/Display.spec.js:16:28)

Test Suites: 1 failed, 2 passed, 3 total
Tests:       1 failed, 6 passed, 7 total
Snapshots:   1 passed, 1 total
Time:        2.489s
Ran all test suites.
We need to refactor Display.jsx to render the value of displayValue. Let's also add some classNames to our HTML elements to prepare for adding style:
...
const Display = ({ displayValue }) => (
  <div className="display-container">
    <p className="display-value">
      {displayValue}
    </p>
  </div>
);
...
Note we are using a parentheses to extend the implicit return functionality of the arrow function.
Tests and test suites should all be green!
Add Snapshot Testing for Display
With our component finished, we can navigate to Display.spec.js and add toMatchSnapshot as the first test in the file, just after the beforeEach:
...
describe('Display', () => {
  ...
  it('should render correctly', () => expect(wrapper).toMatchSnapshot());
  ...
});
Add Display CSS
Following the same pattern of adding CSS we used in the previous components, first update the variables and media query in index.css:
/*
app variables
*/

:root {
  /* background colors */
  --display-background-color: #1d1f1f;

  /* font */
  --main-font: 'Orbitron', sans-serif;

  /* font colors */
  --display-text-color: #23e000;

  /* font sizes */
  --display-text-size: 4em;

  /* font weights */
  --display-text-weight: 400;

  /* calculator dimensions */
  --calculator-height: 72%;
  --calculator-width: 36%;

  /* display dimensions */
  --display-height: 24%;
  --display-width: 92%;
}

/*
media query for tablet or smaller screen
*/

@media screen and (max-width: 1024px) {
  :root {
    /* font sizes */
    --display-text-size: 10em;

    /* calculator dimensions */
    --calculator-height: 100%;
    --calculator-width: 100%;
  }
}

/*
app CSS reset
*/

body, div, p {
  margin: 0;
  padding: 0;
}
Then add the component CSS in Display.css:
.display-container {
  align-items: center;
  background: var(--display-background-color);
  display: flex;
  height: var(--display-height);
  padding: 0 4%;
  width: var(--display-width);
}

.display-value {
  color: var(--display-text-color);
  font-size: var(--display-text-size);
  font-family: var(--main-font);
  font-weight: var(--display-text-weight);
  margin-left: auto;
  overflow: hidden;
}
About these CSS properties:
margin-left: auto;pushes the element to right edge of the container.overflow: hidden;specifies that if the HTML is larger than the container, the overflow will be hidden.
And import the CSS file to Display.jsx:
import React from 'react';
import PropTypes from 'prop-types';
import './Display.css';
...
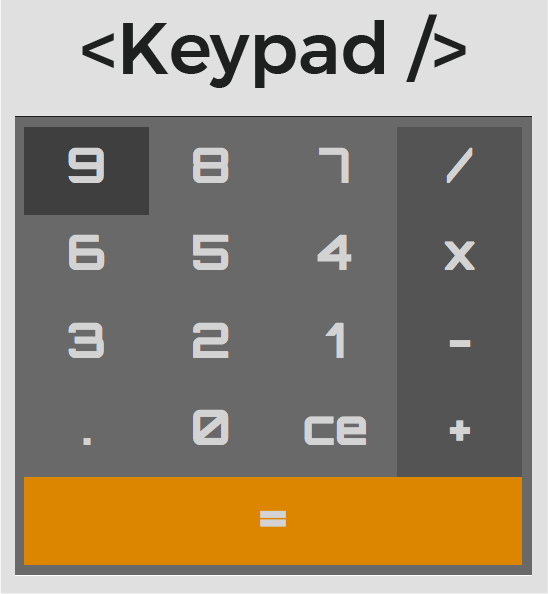
Now that we have completed the CSS for Display, let's fire up the browser and take a look at the output!
$ npm start
The output should match this screenshot:

The Display component now renders in the browser, and we are ready to move on to testing and writing the Keypad component.
Keypad Component
Add Keypad Component and Tests
Now that we have the Display component built out, we need to add in our Keypad component to Calculator. We'll start by testing for it in the Calculator component tests.
Refactor the Calculator › should render the Display component test in Calculator.spec.js:
it('should render the Display and Keypad Components', () => {
  expect(wrapper.containsAllMatchingElements([
    <Display displayValue={wrapper.instance().state.displayValue} />,
    <Keypad
      callOperator={wrapper.instance().callOperator}
      numbers={wrapper.instance().state.numbers}
      operators={wrapper.instance().state.operators}
      setOperator={wrapper.instance().setOperator}
      updateDisplay={wrapper.instance().updateDisplay}
    />
  ])).toEqual(true);
});
containsAllMatchingElementstakes an array of elements and returnstrueif all elements are found in the DOM tree.
Make sure to import in the Keypad component:
import Keypad from '../Keypad/Keypad';
Our new test fails! The Keypad component does not yet exist.
Before we add the component, follow the pattern we used with the Display component:
- Create the spec file, Keypad.spec.js in "src/components/Keypad"
- add the
Keypadshallow render test
import React from 'react';
import { shallow } from 'enzyme';
import Keypad from './Keypad';

describe('Keypad', () => {
  let wrapper;

  beforeEach(() => {
    wrapper = shallow(
      <Keypad
        callOperator={jest.fn()}
        numbers={[]}
        operators={[]}
        setOperator={jest.fn()}
        updateDisplay={jest.fn()}
      />
    );
  });

  it('should render a <div />', () => {
    expect(wrapper.find('div').length).toEqual(1);
  });
});
Because we're rendering
Keypaddirectly from it's file, it does not have access to theCalculatormethods. In place of these methods, we usejest.fn(), a Jest function that creates a mock function. More info here.
If you check the console, you should see two test suites failing. Now add the JSX to Keypad.jsx:
import React from 'react';
import PropTypes from 'prop-types';

const Keypad = ({ callOperator, numbers, operators, setOperator, updateDisplay }) =>
  <div className="keypad-container" />;

Keypad.propTypes = {
  callOperator: PropTypes.func.isRequired,
  numbers: PropTypes.array.isRequired,
  operators: PropTypes.array.isRequired,
  setOperator: PropTypes.func.isRequired,
  updateDisplay: PropTypes.func.isRequired,
}

export default Keypad;
Import the Keypad in Calculator.jsx:
import Keypad from '../Keypad/Keypad';
Then, add the Keypad to the render method, making sure to unpack the values of numbers and operators from this.state and passing all required props to Keypad:
render = () => {
  // unpack the component state by using Object Destructuring
  const { displayValue, numbers, operators } = this.state;

  return (
    <div className="calculator-container">
      <Display displayValue={displayValue} />
      <Keypad
        callOperator={this.callOperator}
        numbers={numbers}
        operators={operators}
        setOperator={this.setOperator}
        updateDisplay={this.updateDisplay}
      />
    </div>
  );
}
All tests should pass.
Calculator Snapshot
Add the Calculator snapshot now that we have completed the UI for the component, just below the beforeEach in Calculator.spec.js:
it('should render correctly', () => expect(wrapper).toMatchSnapshot());
 PASS  src/components/App/App.spec.js
 PASS  src/components/Keypad/Keypad.spec.js
 PASS  src/components/Display/Display.spec.js
 PASS  src/components/Calculator/Calculator.spec.js
 › 1 snapshot written.

Snapshot Summary
 › 1 snapshot written from 1 test suite.

Test Suites: 4 passed, 4 total
Tests:       10 passed, 10 total
Snapshots:   1 written, 2 passed, 3 total
Time:        2.726s
Ran all test suites related to changed files.
Next Time
We'll take a break here and pick back up in the next part, starting with testing for the rendering of the values contained in the numbers and operators arrays in Keypad. We'll then move on to testing for the Key component, proceed to the application event and functionality tests, and then do some final refactors.
If you would like to skip ahead, you can grab the final code from the react-calculator repo on GitHub.
Cheers!
Part 2 is available!