 Michael Herman
In this tutorial, we'll first take a look at Kubernetes and container orchestration in general and then we'll walk through a step-by-step tutorial that details how to deploy a Flask-based microservice (along with Postgres and Vue.js) to a Kubernetes cluster.
This is an intermediate-level tutorial. It assumes that you have basic working knowledge of Flask and Docker. Review the Test-Driven Development with Python, Flask, and Docker course for more info on these tools.
Dependencies:
- Kubernetes v1.21.0
- Minikube v1.19.0
- Docker v20.10.5
- Docker-Compose v1.28.5
Contents
Objectives
By the end of this tutorial, you will be able to:
- Explain what container orchestration is and why you may need to use an orchestration tool
- Discuss the pros and cons of using Kubernetes over other orchestration tools like Docker Swarm and Elastic Container Service (ECS)
- Explain the following Kubernetes primitives: Node, Pod, Service, Label, Deployment, Ingress, and Volume
- Spin up a Python-based microservice locally with Docker Compose
- Configure a Kubernetes cluster to run locally with Minikube
- Set up a volume to hold Postgres data within a Kubernetes cluster
- Use Kubernetes Secrets to manage sensitive information
- Run Flask, Gunicorn, Postgres, and Vue on Kubernetes
- Expose Flask and Vue to external users via an Ingress
What is Container Orchestration?
As you move from deploying containers on a single machine to deploying them across a number of machines, you'll need an orchestration tool to manage (and automate) the arrangement, coordination, and availability of the containers across the entire system.
Orchestration tools help with:
- Cross-server container communication
- Horizontal scaling
- Service discovery
- Load balancing
- Security/TLS
- Zero-downtime deploys
- Rollbacks
- Logging
- Monitoring
This is where Kubernetes fits in along with a number of other orchestration tools, like Docker Swarm, ECS, Mesos, and Nomad.
Which one should you use?
- use Kubernetes if you need to manage large, complex clusters
- use Docker Swarm if you are just getting started and/or need to manage small to medium-sized clusters
- use ECS if you're already using a number of AWS services
| Tool | Pros | Cons |
|---|---|---|
| Kubernetes | large community, flexible, most features, hip | complex setup, high learning curve, hip |
| Docker Swarm | easy to set up, perfect for smaller clusters | limited by the Docker API |
| ECS | fully-managed service, integrated with AWS | vendor lock-in |
There's also a number of managed Kubernetes services on the market:
- Google Kubernetes Engine (GKE)
- Elastic Kubernetes Service (EKS)
- Azure Kubernetes Service (AKS)
- DigitalOcean Kubernetes
For more, review the Choosing the Right Containerization and Cluster Management Tool blog post.
Kubernetes Concepts
Before diving in, let's look at some of the basic building blocks that you have to work with from the Kubernetes API:
- A Node is a worker machine provisioned to run Kubernetes. Each Node is managed by the Kubernetes master.
- A Pod is a logical, tightly-coupled group of application containers that run on a Node. Containers in a Pod are deployed together and share resources (like data volumes and network addresses). Multiple Pods can run on a single Node.
- A Service is a logical set of Pods that perform a similar function. It enables load balancing and service discovery. It's an abstraction layer over the Pods; Pods are meant to be ephemeral while services are much more persistent.
- Deployments are used to describe the desired state of Kubernetes. They dictate how Pods are created, deployed, and replicated.
- Labels are key/value pairs that are attached to resources (like Pods) which are used to organize related resources. You can think of them like CSS selectors. For example:
- Environment -
dev,test,prod - App version -
beta,1.2.1 - Type -
client,server,db
- Environment -
- Ingress is a set of routing rules used to control the external access to Services based on the request host or path.
- Volumes are used to persist data beyond the life of a container. They are especially important for stateful applications like Redis and Postgres.
- A PersistentVolume defines a storage volume independent of the normal Pod-lifecycle. It's managed outside of the particular Pod that it resides in.
- A PersistentVolumeClaim is a request to use the PersistentVolume by a user.
For more, review the Learn Kubernetes Basics tutorial as well as the Kubernetes Concepts slides from the Scaling Flask with Kubernetes talk.
Project Setup
Clone down the flask-vue-kubernetes repo, and then build the images and spin up the containers:
$ git clone https://github.com/testdrivenio/flask-vue-kubernetes
$ cd flask-vue-kubernetes
$ docker-compose up -d --build
Create and seed the database books table:
$ docker-compose exec server python manage.py recreate_db
$ docker-compose exec server python manage.py seed_db
Test out the following server-side endpoints in your browser of choice.
http://localhost:5001/books/ping
{
  "container_id": "dee114fa81ea",
  "message": "pong!",
  "status": "success"
}
container_idis the id of the Docker container the app is running in.
$ docker ps --filter name=flask-vue-kubernetes_server --format "{{.ID}}"

dee114fa81ea
{
  "books": [{
    "author": "J. K. Rowling",
    "id": 2,
    "read": false,
    "title": "Harry Potter and the Philosopher's Stone"
  }, {
    "author": "Dr. Seuss",
    "id": 3,
    "read": true,
    "title": "Green Eggs and Ham"
  }, {
    "author": "Jack Kerouac",
    "id": 1,
    "read": false,
    "title": "On the Road"
  }],
  "container_id": "dee114fa81ea",
  "status": "success"
}
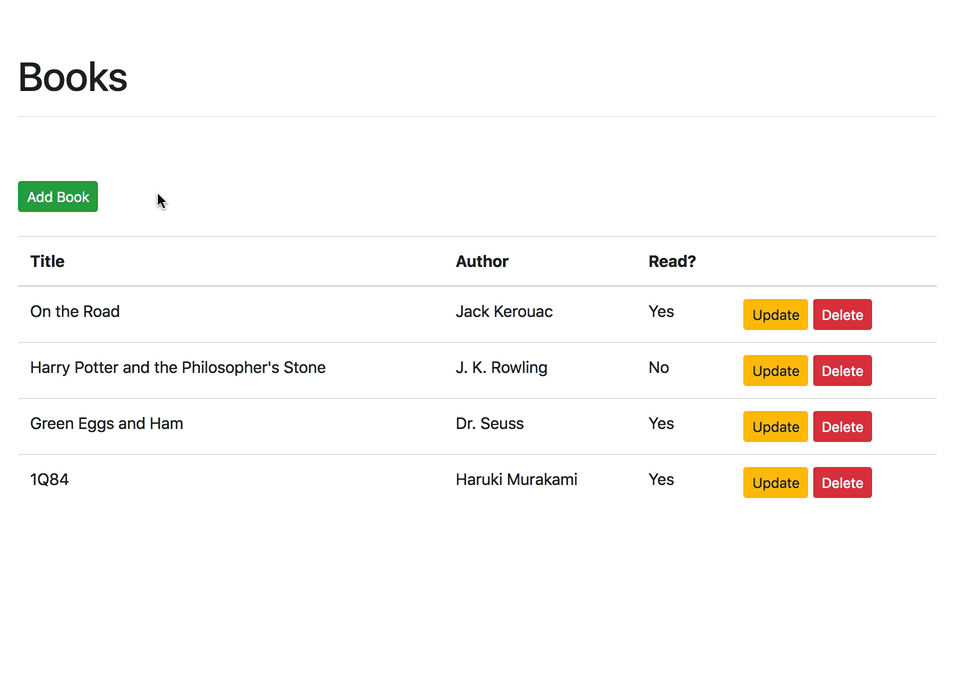
Navigate to http://localhost:8080. Make sure the basic CRUD functionality works as expected:
Take a quick look at the code before moving on:
├── .gitignore
├── README.md
├── deploy.sh
├── docker-compose.yml
├── kubernetes
│   ├── flask-deployment.yml
│   ├── flask-service.yml
│   ├── minikube-ingress.yml
│   ├── persistent-volume-claim.yml
│   ├── persistent-volume.yml
│   ├── postgres-deployment.yml
│   ├── postgres-service.yml
│   ├── secret.yml
│   ├── vue-deployment.yml
│   └── vue-service.yml
└── services
    ├── client
    │   ├── .babelrc
    │   ├── .editorconfig
    │   ├── .eslintignore
    │   ├── .eslintrc.js
    │   ├── .postcssrc.js
    │   ├── Dockerfile
    │   ├── Dockerfile-minikube
    │   ├── README.md
    │   ├── build
    │   ├── config
    │   │   ├── dev.env.js
    │   │   ├── index.js
    │   │   └── prod.env.js
    │   ├── index.html
    │   ├── package-lock.json
    │   ├── package.json
    │   ├── src
    │   │   ├── App.vue
    │   │   ├── assets
    │   │   │   └── logo.png
    │   │   ├── components
    │   │   │   ├── Alert.vue
    │   │   │   ├── Books.vue
    │   │   │   ├── HelloWorld.vue
    │   │   │   └── Ping.vue
    │   │   ├── main.js
    │   │   └── router
    │   │       └── index.js
    │   └── static
    │       └── .gitkeep
    ├── db
    │   ├── create.sql
    │   └── Dockerfile
    └── server
        ├── .dockerignore
        ├── Dockerfile
        ├── entrypoint.sh
        ├── manage.py
        ├── project
        │   ├── __init__.py
        │   ├── api
        │   │   ├── __init__.py
        │   │   ├── books.py
        │   │   └── models.py
        │   └── config.py
        └── requirements.txt
Want to learn how to build this project? Check out the Developing a Single Page App with Flask and Vue.js blog post.
Minikube
Minikube is a tool which allows developers to use and run a Kubernetes cluster locally. It's a great way to quickly get a cluster up and running so you can start interacting with the Kubernetes API.
Follow the official Get Started guide to get Minikube installed along with:
- A Hypervisor (like VirtualBox or HyperKit) to manage virtual machines
- Kubectl to deploy and manage apps on Kubernetes
If you’re on a Mac, we recommend installing Kubectl and Minikube with Homebrew:
$ brew update
$ brew install kubectl
$ brew install minikube
Then, start the cluster and pull up the Minikube dashboard:
$ minikube config set vm-driver hyperkit
$ minikube start
$ minikube dashboard
It's worth noting that the config files will be located in the ~/.kube directory while all the virtual machine bits will be in the ~/.minikube directory.
Now we can start creating objects via the Kubernetes API.
If you run into problems with Minikube, it's often best to remove it completely and start over.
For example:
$ minikube stop; minikube delete
$ rm /usr/local/bin/minikube
$ rm -rf ~/.minikube
# re-download minikube
$ minikube start
Creating Objects
To create a new object in Kubernetes, you must provide a "spec" that describes its desired state.
Example:
apiVersion: apps/v1
kind: Deployment
metadata:
  name: flask
spec:
  replicas: 1
  template:
    metadata:
      labels:
        app: flask
    spec:
      containers:
      - name: flask
        image: mjhea0/flask-kubernetes:latest
        ports:
        - containerPort: 5000
Required Fields:
apiVersion- Kubernetes API versionkind- the type of object you want to createmetadata- info about the object so that it can be uniquely identifiedspec- desired state of the object
In the above example, this spec will create a new Deployment for a Flask app with a single replica (Pod). Take note of the containers section. Here, we specified the Docker image along with the container port the application will run on.
In order to run our app, we'll need to set up the following objects:

Volume
Again, since containers are ephemeral, we need to configure a volume, via a PersistentVolume and a PersistentVolumeClaim, to store the Postgres data outside of the Pod.
Take note of the YAML file in kubernetes/persistent-volume.yml:
apiVersion: v1
kind: PersistentVolume
metadata:
  name: postgres-pv
  labels:
    type: local
spec:
  capacity:
    storage: 2Gi
  storageClassName: standard
  accessModes:
    - ReadWriteOnce
  hostPath:
    path: "/data/postgres-pv"
This configuration will create a hostPath PersistentVolume at "/data/postgres-pv" within the Node. The size of the volume is 2 gibibytes with an access mode of ReadWriteOnce, which means that the volume can be mounted as read-write by a single node.
It's worth noting that Kubernetes only supports using a hostPath on a single-node cluster.
Create the volume:
$ kubectl apply -f ./kubernetes/persistent-volume.yml
View details:
$ kubectl get pv
You should see:
NAME         CAPACITY  ACCESS MODES  RECLAIM POLICY  STATUS     CLAIM   STORAGECLASS   REASON  AGE
postgres-pv  2Gi       RWO           Retain          Available          standard               14s
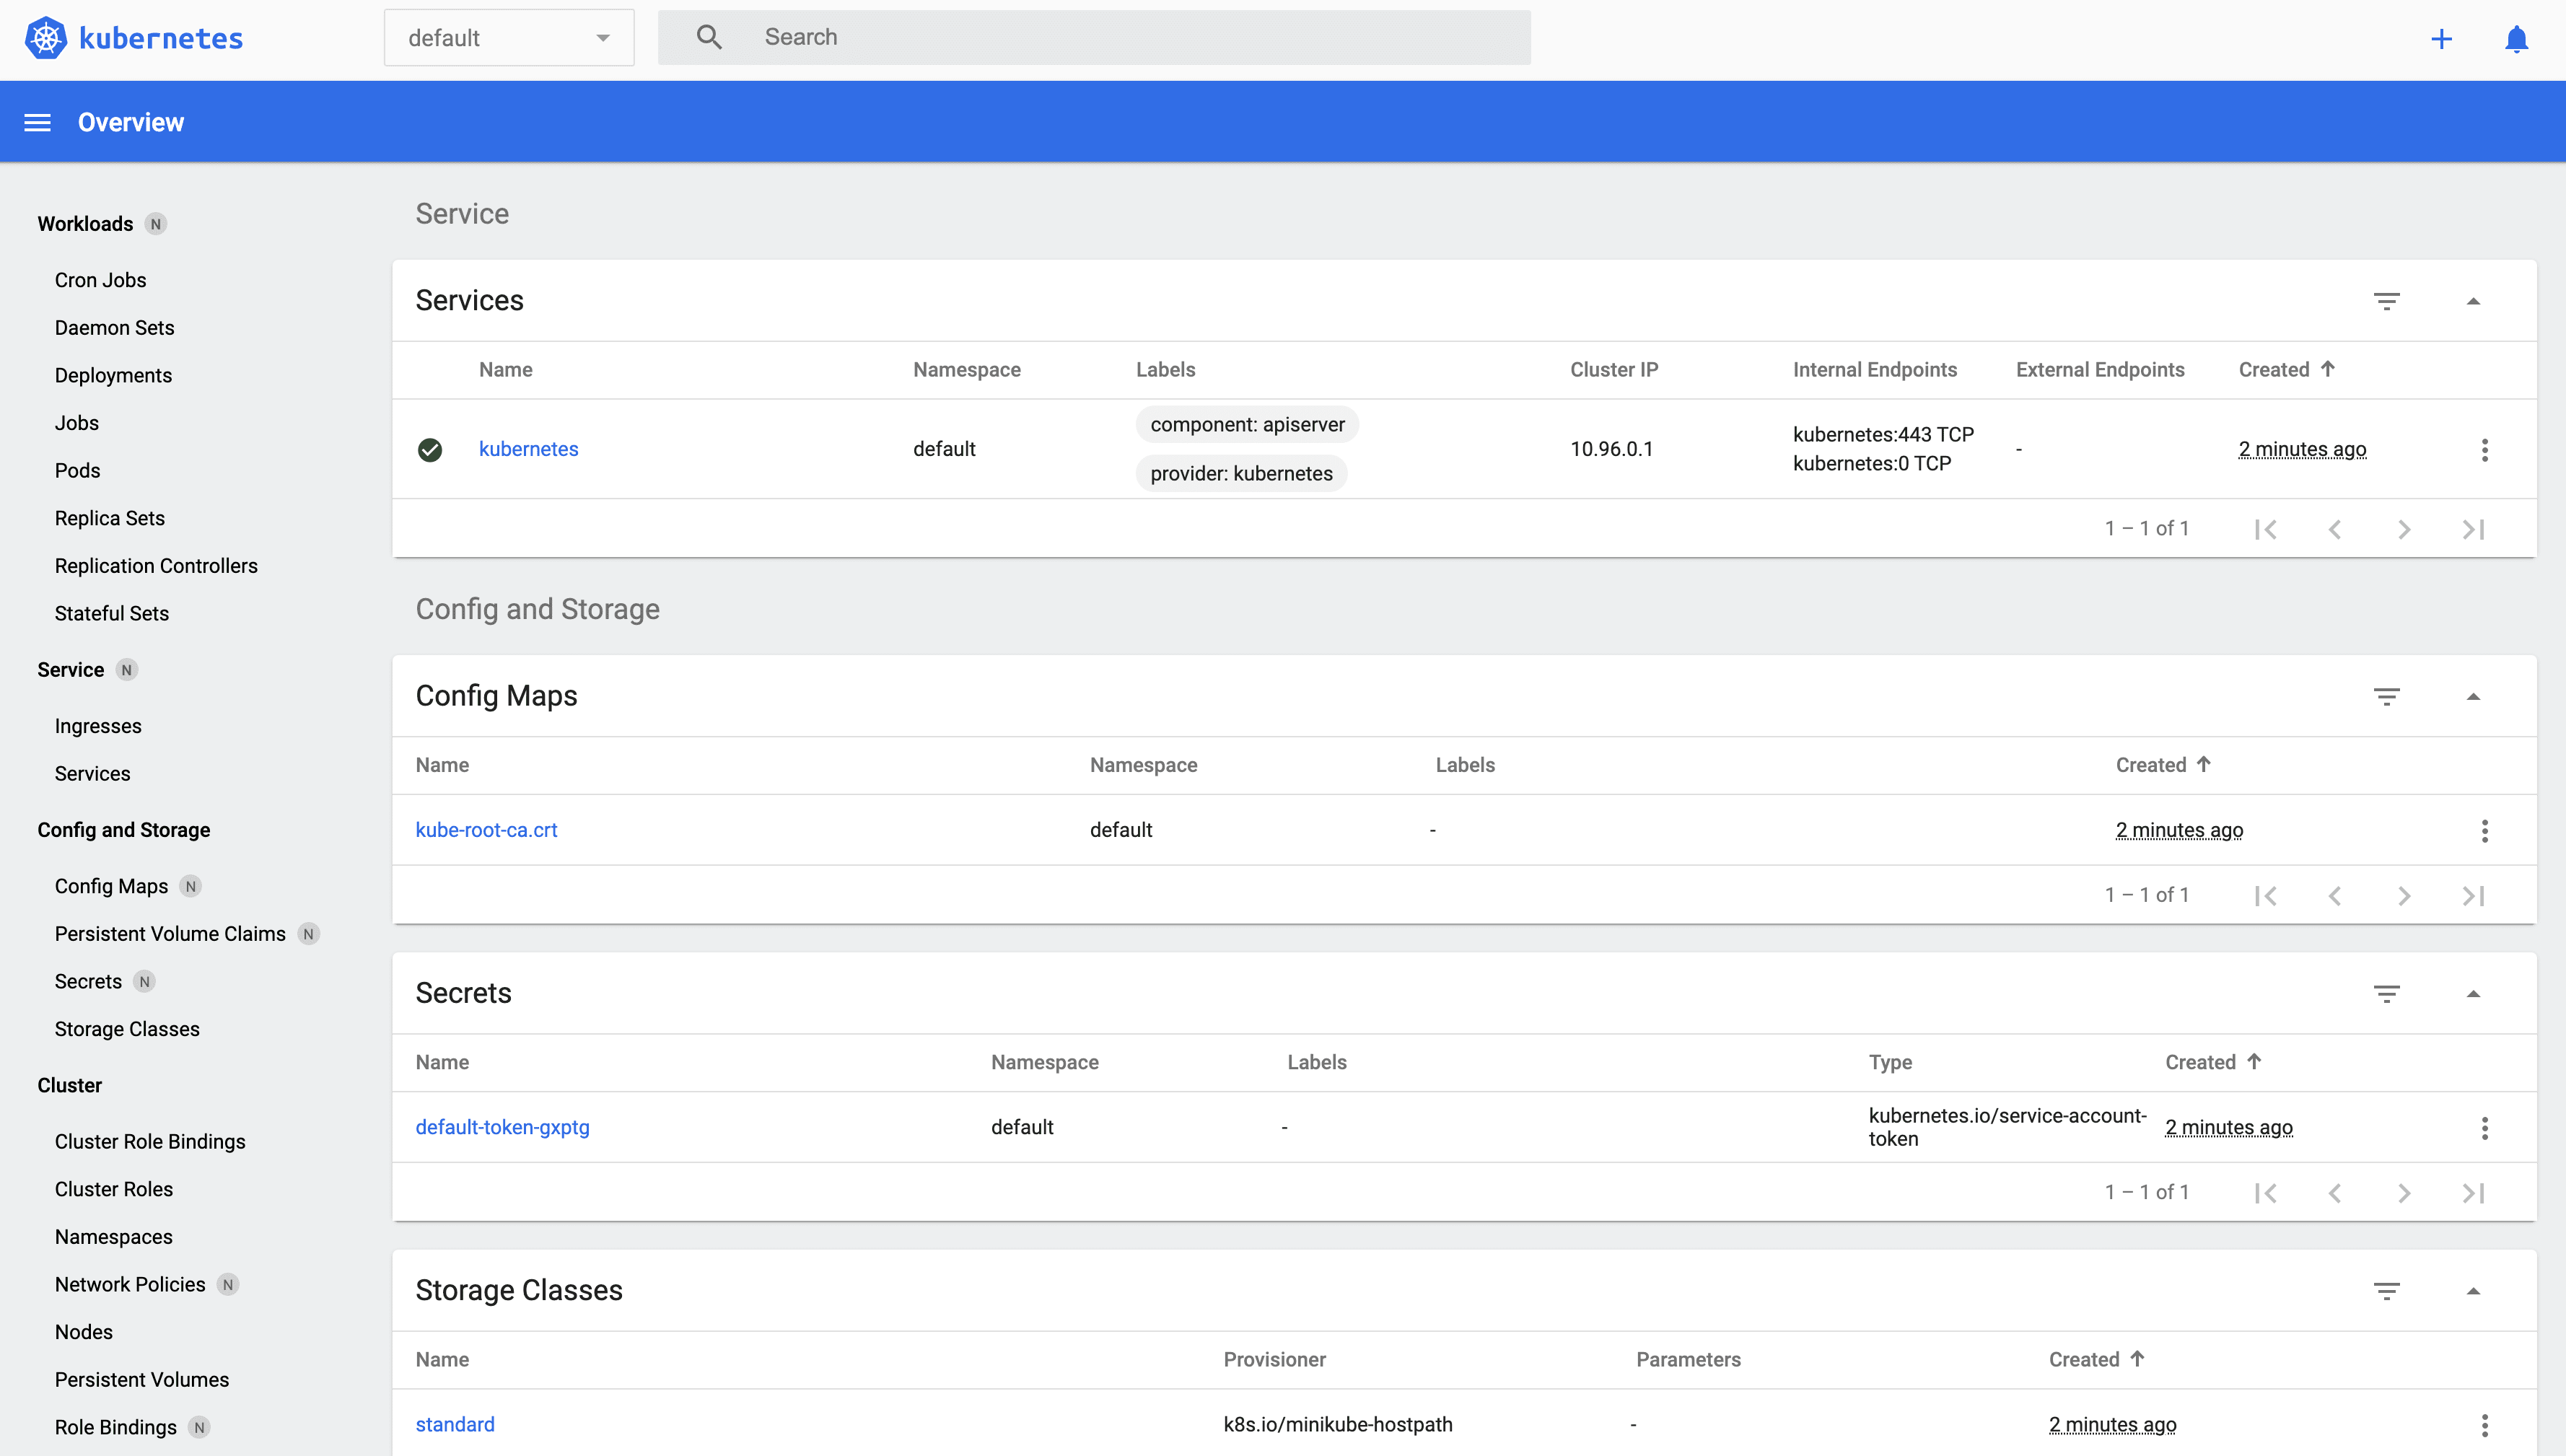
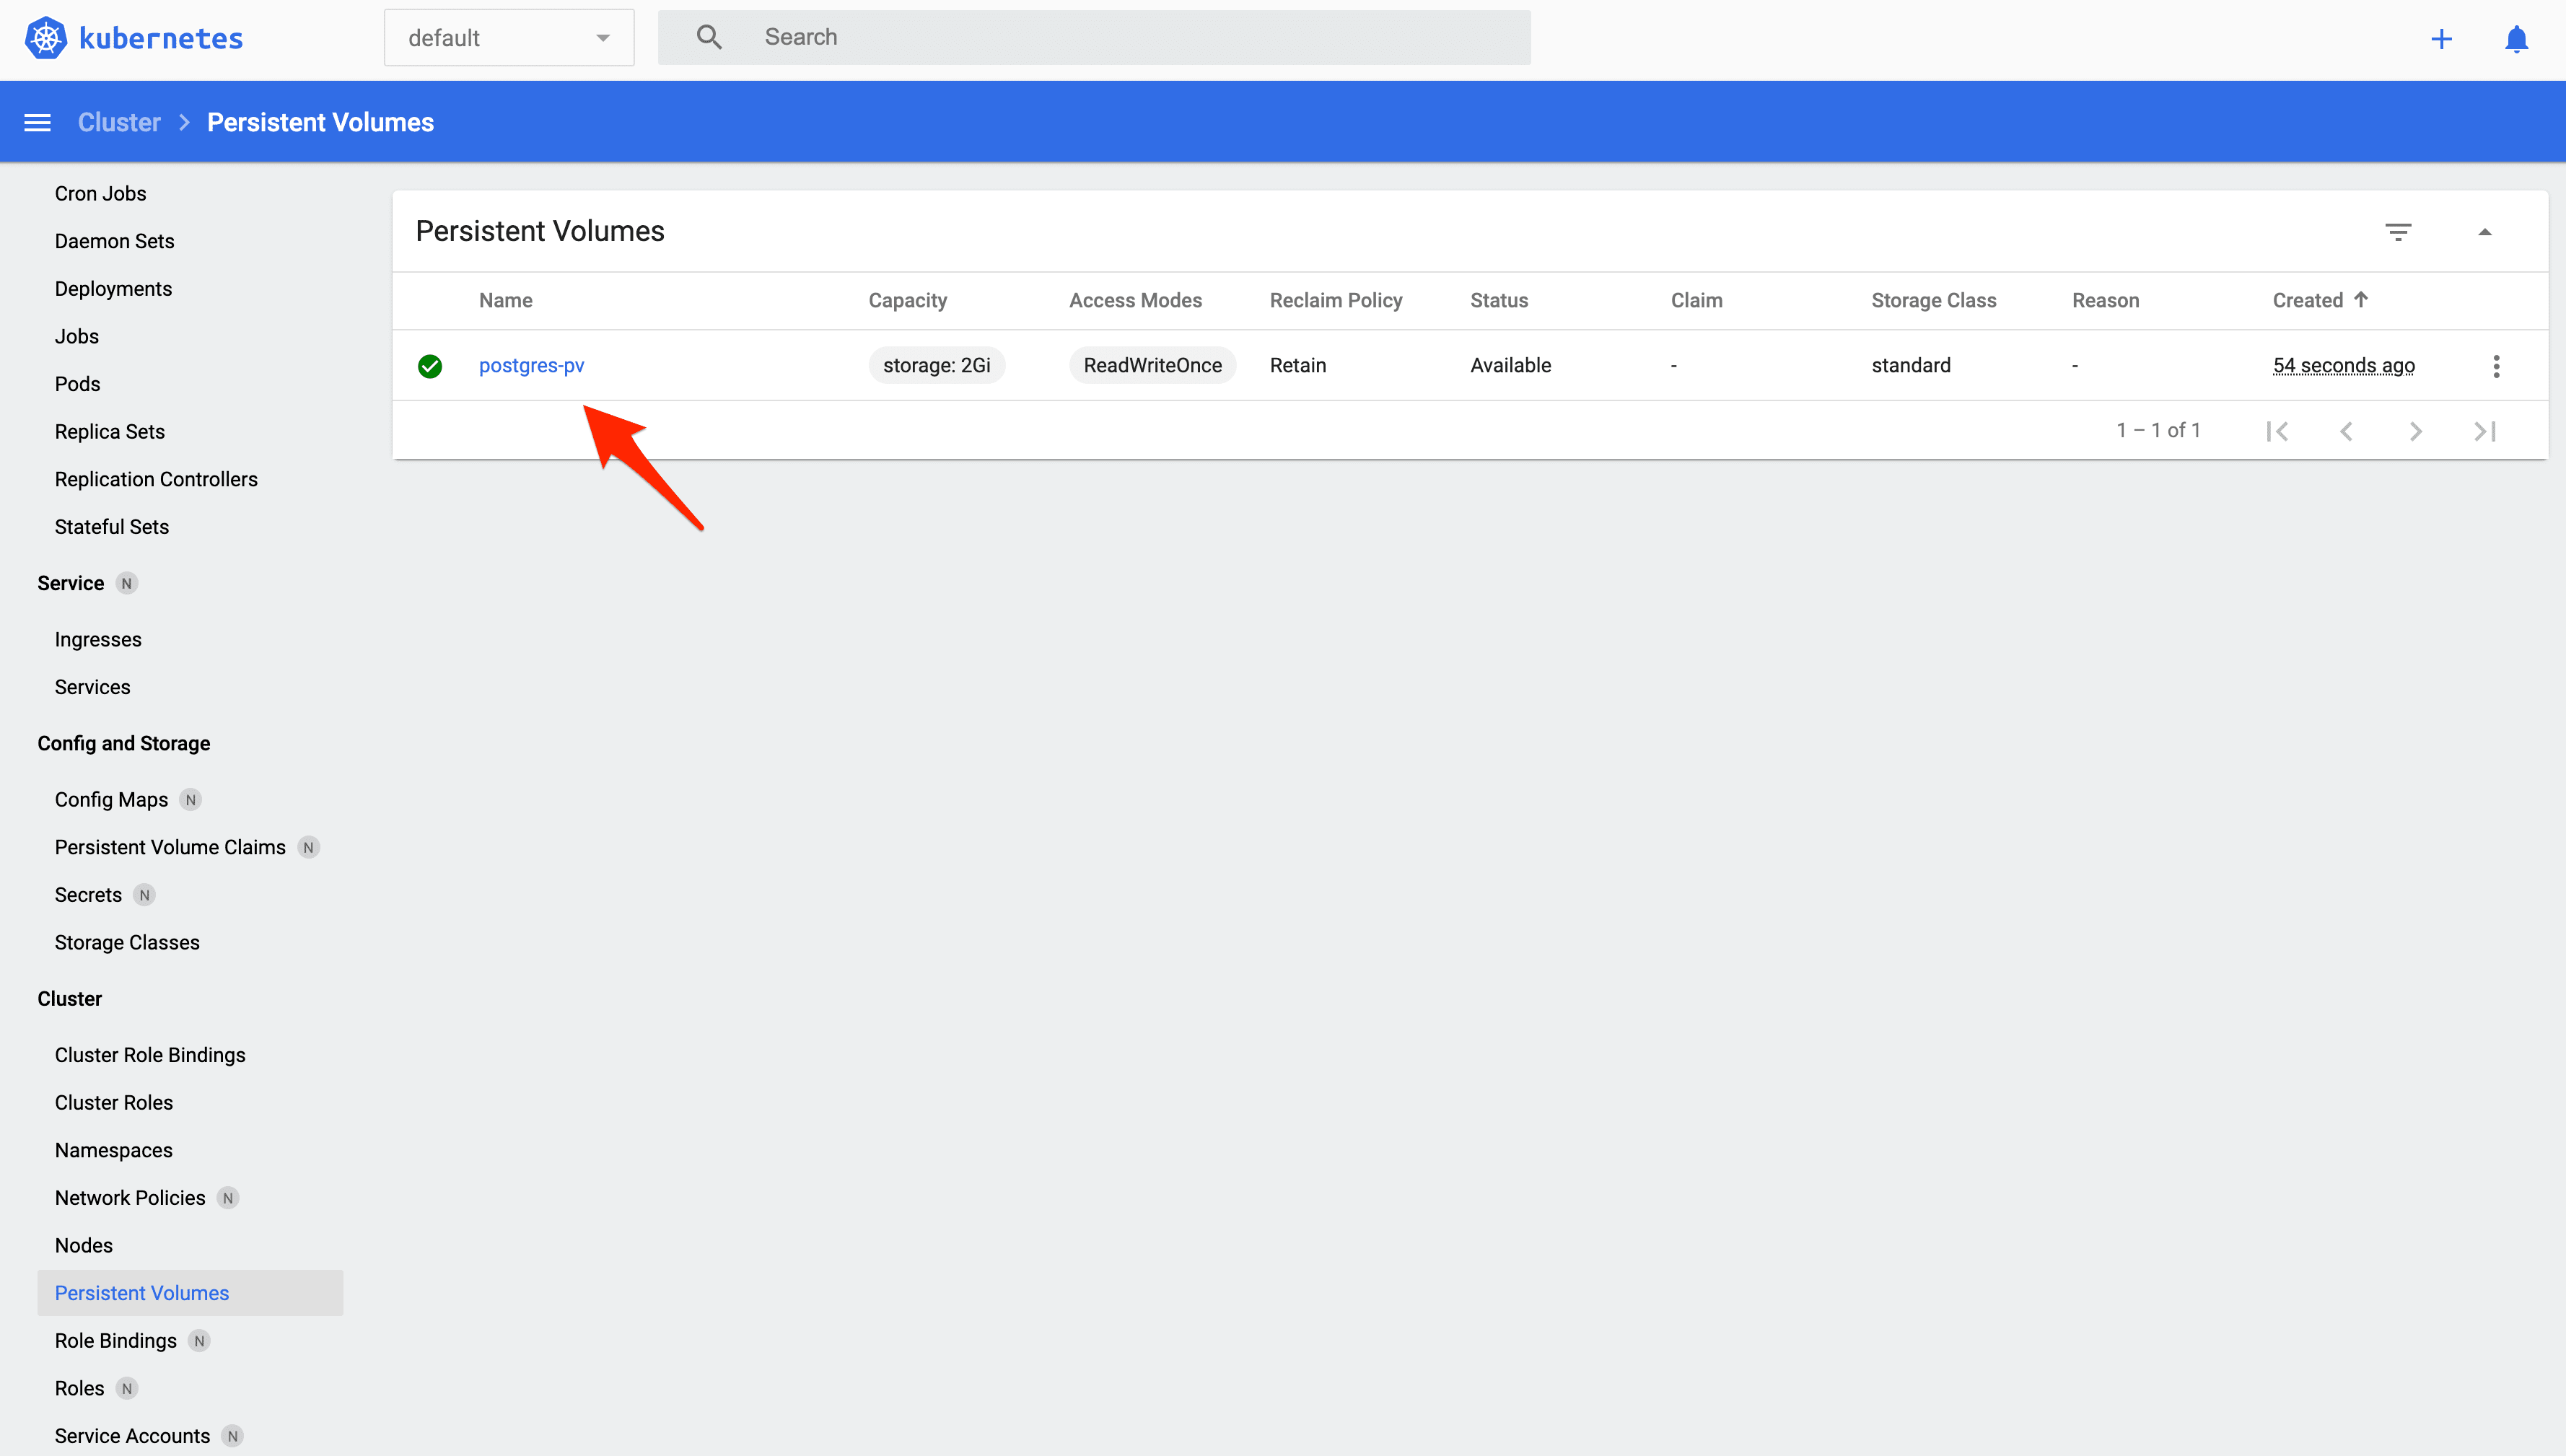
You should also see this object in the dashboard:
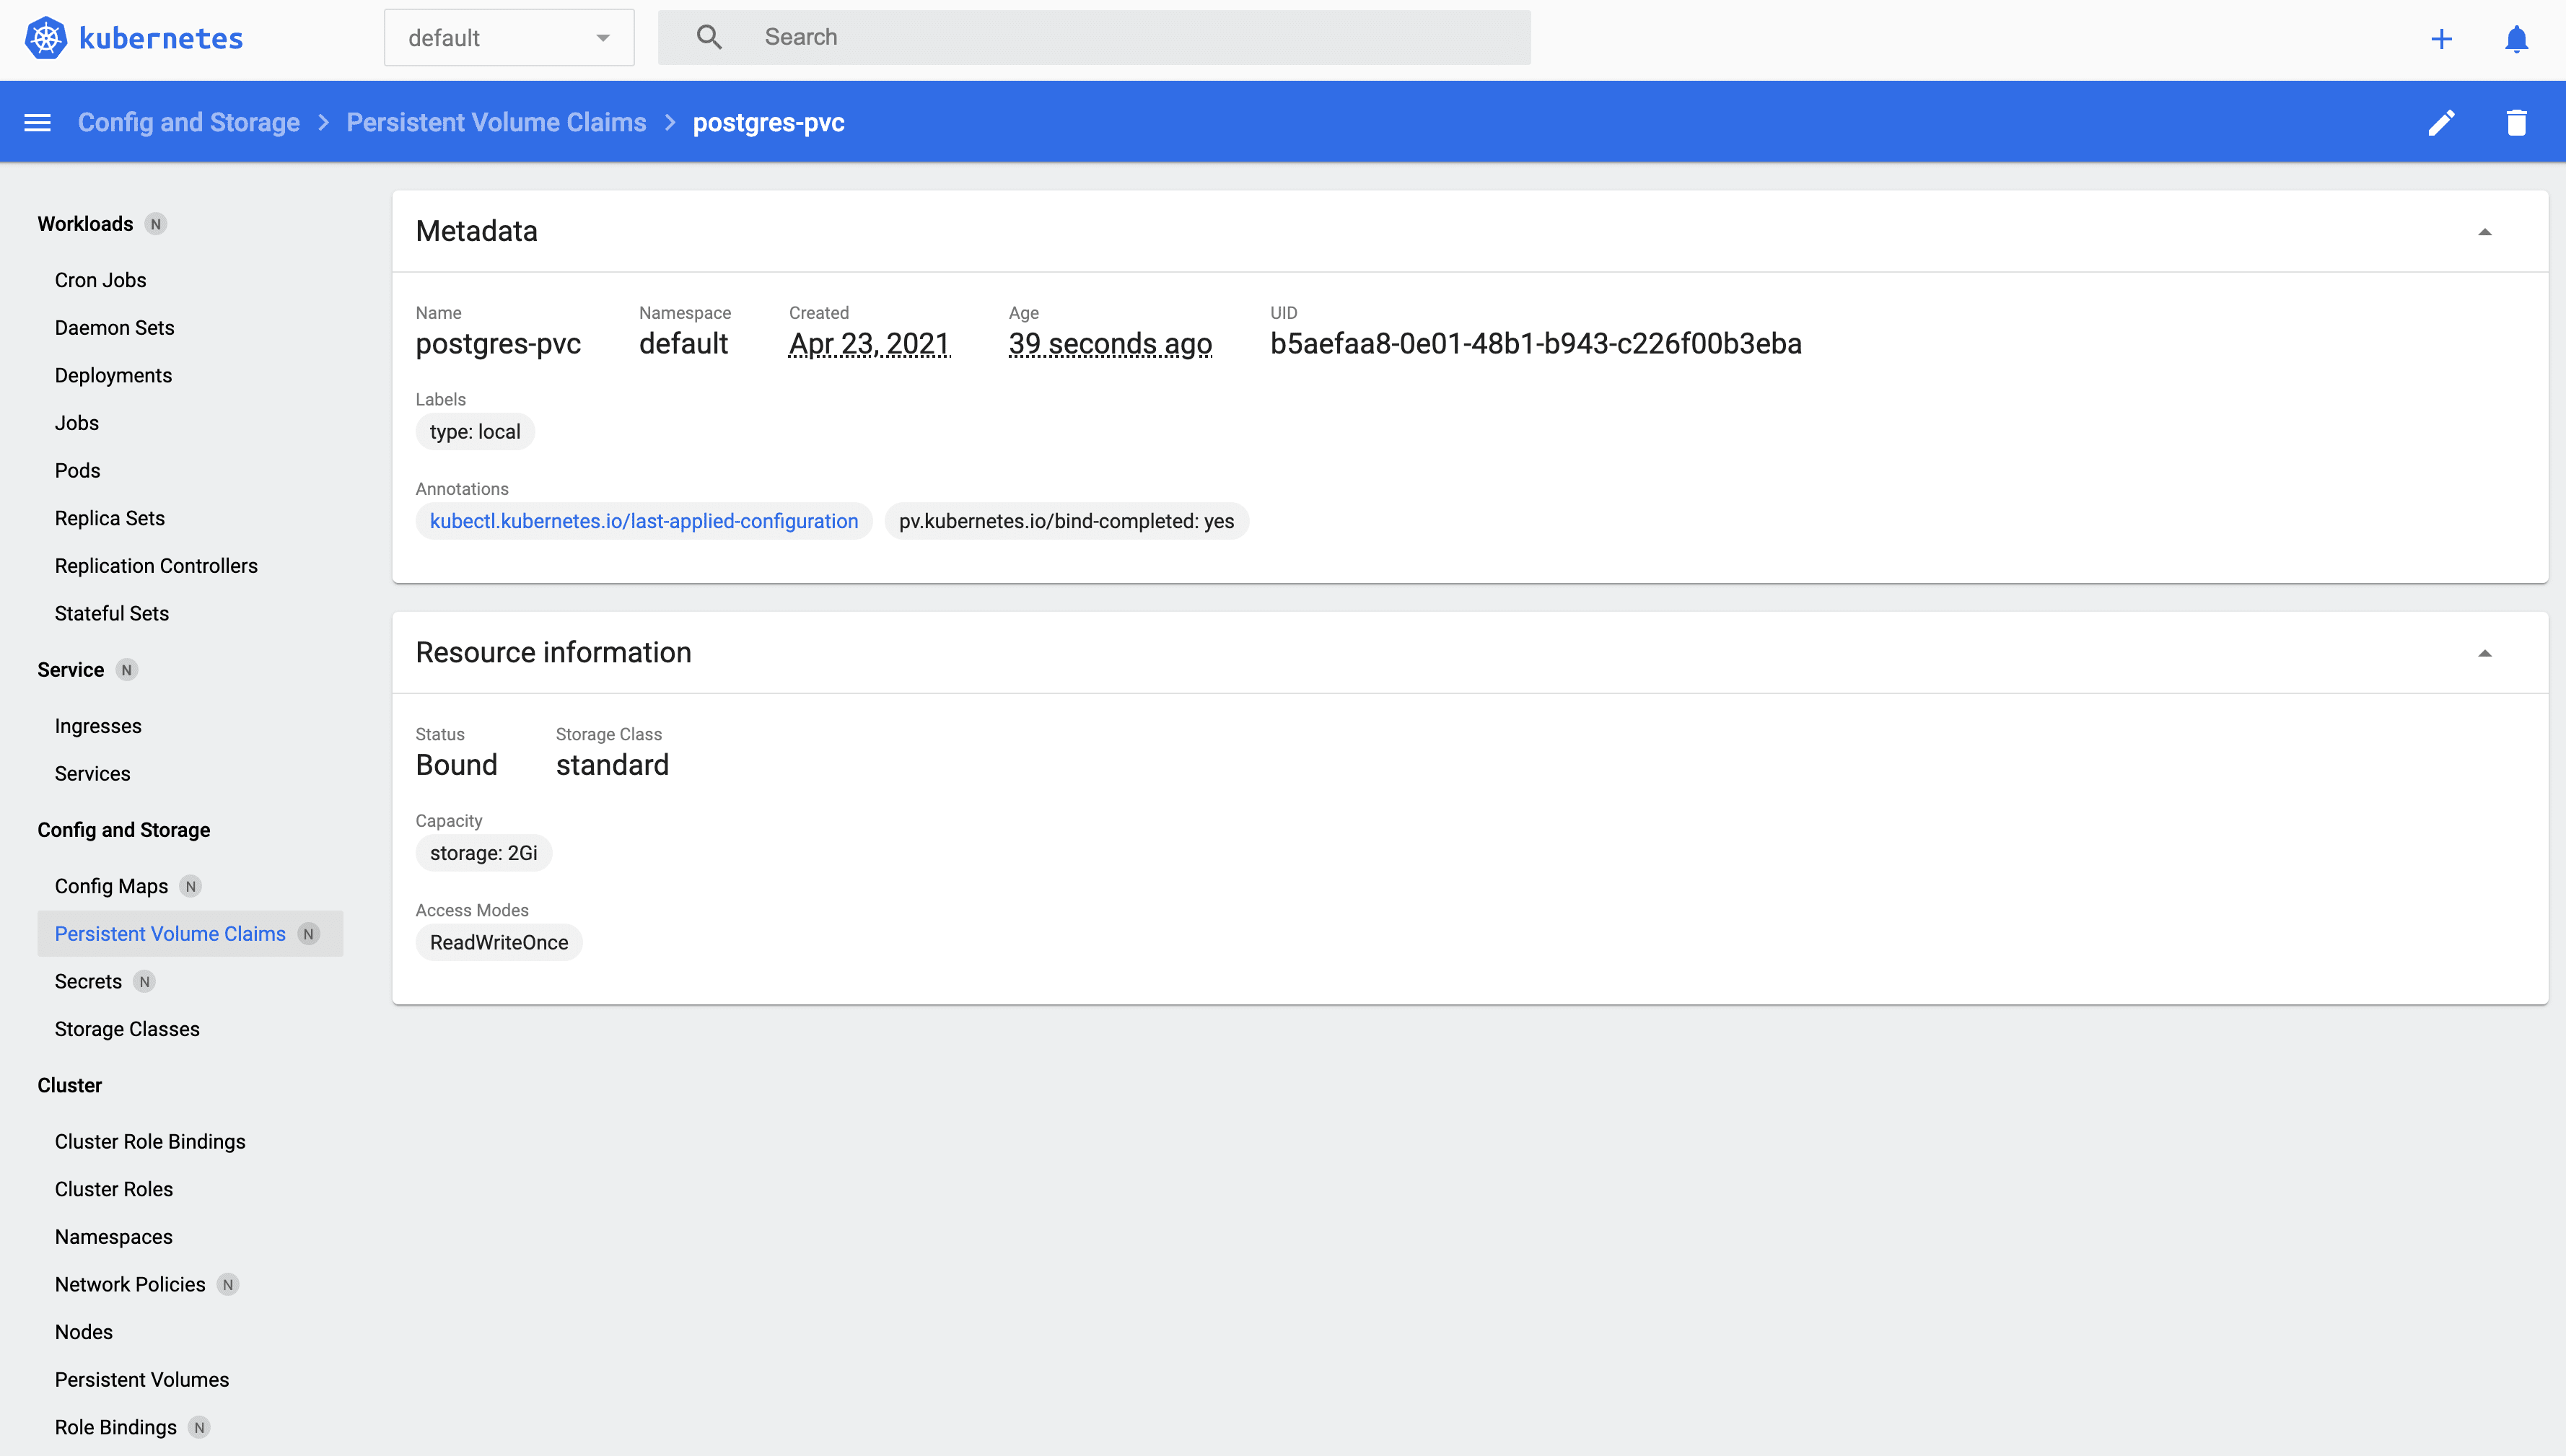
kubernetes/persistent-volume-claim.yml:
apiVersion: v1
kind: PersistentVolumeClaim
metadata:
  name: postgres-pvc
  labels:
    type: local
spec:
  accessModes:
    - ReadWriteOnce
  resources:
    requests:
      storage: 2Gi
  volumeName: postgres-pv
  storageClassName: standard
Create the volume claim:
$ kubectl apply -f ./kubernetes/persistent-volume-claim.yml
View details:
$ kubectl get pvc

NAME           STATUS   VOLUME        CAPACITY   ACCESS MODES   STORAGECLASS   AGE
postgres-pvc   Bound    postgres-pv   2Gi        RWO            standard       15s
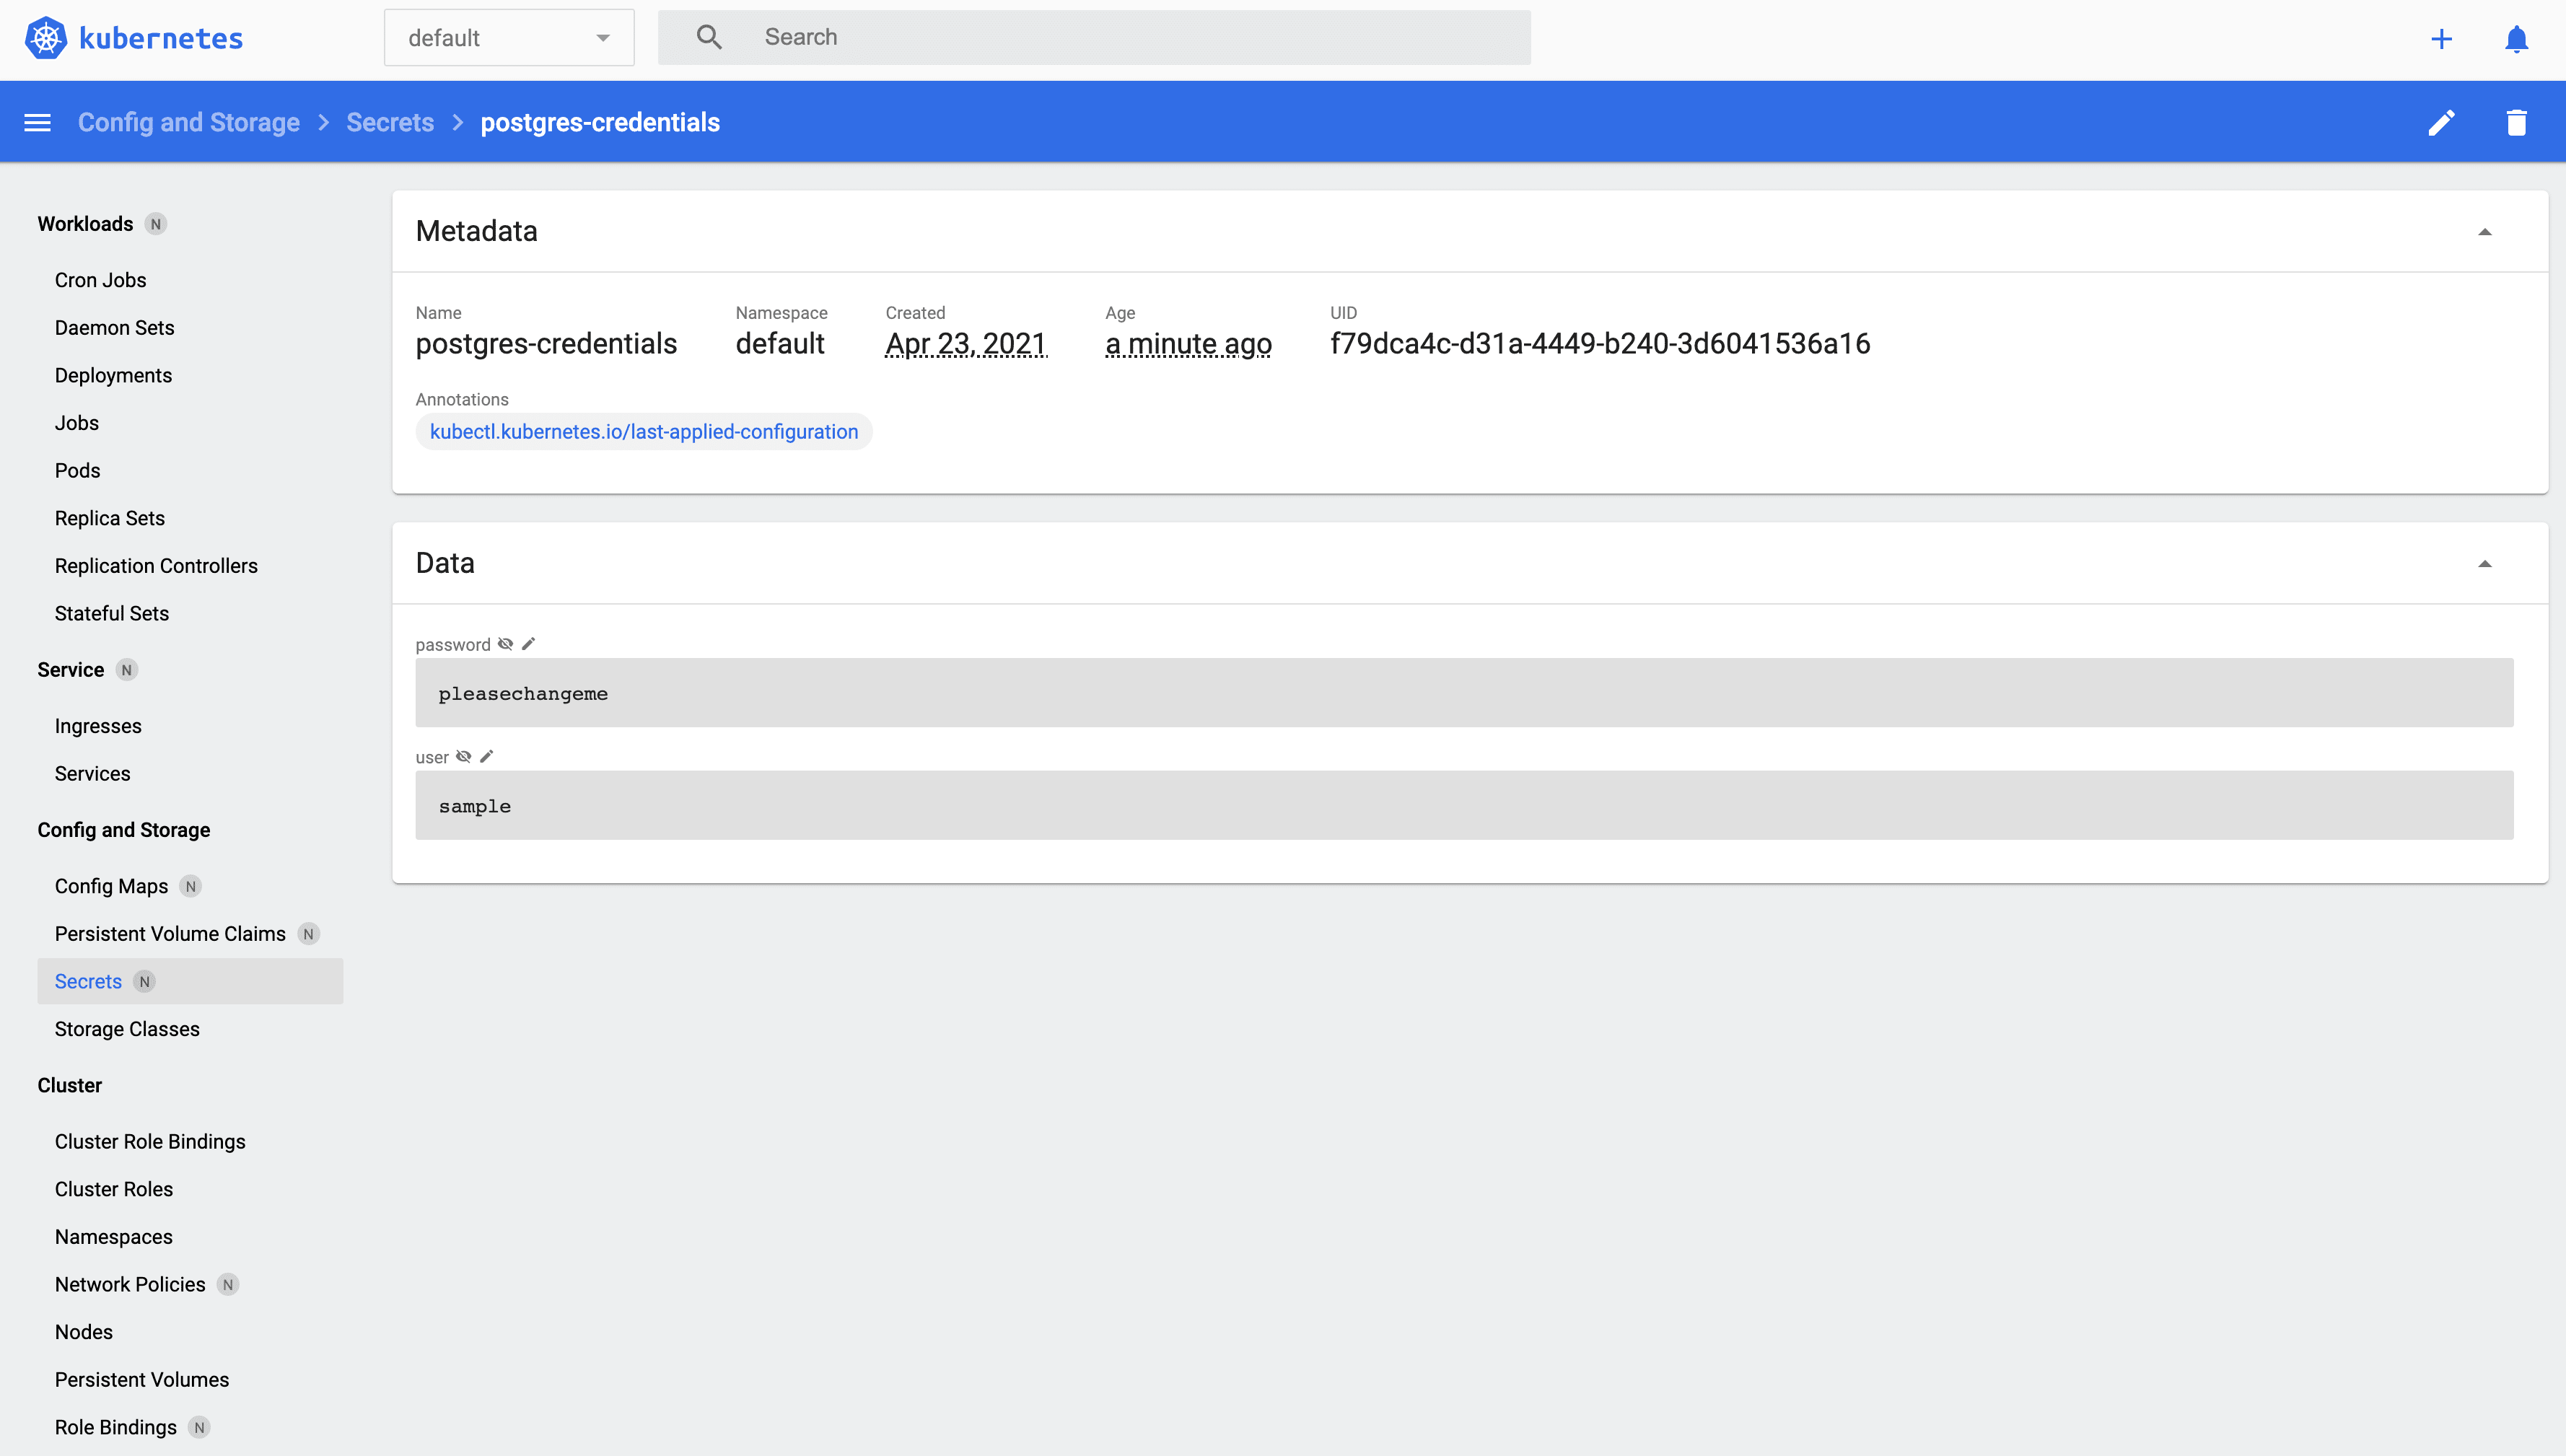
Secrets
Secrets are used to handle sensitive info such as passwords, API tokens, and SSH keys. We'll set up a Secret to store our Postgres database credentials.
kubernetes/secret.yml:
apiVersion: v1
kind: Secret
metadata:
  name: postgres-credentials
type: Opaque
data:
  user: c2FtcGxl
  password: cGxlYXNlY2hhbmdlbWU=
The user and password fields are base64 encoded strings (security via obscurity):
$ echo -n "pleasechangeme" | base64
cGxlYXNlY2hhbmdlbWU=

$ echo -n "sample" | base64
c2FtcGxl
Keep in mind that any user with access to the cluster will be able to read the values in plaintext. Take a look at Vault if you want to encrypt secrets in transit and at rest.
Add the Secrets object:
$ kubectl apply -f ./kubernetes/secret.yml
Postgres
With the volume and database credentials set up in the cluster, we can now configure the Postgres database itself.
kubernetes/postgres-deployment.yml:
apiVersion: apps/v1
kind: Deployment
metadata:
  name: postgres
  labels:
    name: database
spec:
  replicas: 1
  selector:
    matchLabels:
      service: postgres
  template:
    metadata:
      labels:
        service: postgres
    spec:
      containers:
      - name: postgres
        image: postgres:13-alpine
        env:
          - name: POSTGRES_USER
            valueFrom:
              secretKeyRef:
                name: postgres-credentials
                key: user
          - name: POSTGRES_PASSWORD
            valueFrom:
              secretKeyRef:
                name: postgres-credentials
                key: password
        volumeMounts:
          - name: postgres-volume-mount
            mountPath: /var/lib/postgresql/data
      volumes:
      - name: postgres-volume-mount
        persistentVolumeClaim:
          claimName: postgres-pvc
      restartPolicy: Always
What's happening here?
metadata- The
namefield defines the Deployment name -postgres labelsdefine the labels for the Deployment -name: database
- The
specreplicasdefine the number of Pods to run -1selectordefines how the Deployment finds which Pods to managetemplatemetadatalabelsindicate which labels should be assigned to the Pod -service: postgres
speccontainersdefine the containers associated with each Podvolumesdefine the volume claim -postgres-volume-mountrestartPolicydefines the restart policy -Always
Further, the Pod name is postgres and the image is postgres:13-alpine, which will be pulled from Docker Hub. The database credentials, from the Secret object, are passed in as well.
Finally, when applied, the volume claim will be mounted into the Pod. The claim is mounted to "/var/lib/postgresql/data" -- the default location -- while the data will be stored in the PersistentVolume, "/data/postgres-pv".
Create the Deployment:
$ kubectl create -f ./kubernetes/postgres-deployment.yml
Status:
$ kubectl get deployments

NAME       READY   UP-TO-DATE   AVAILABLE   AGE
postgres   1/1     1            1           12s
kubernetes/postgres-service.yml:
apiVersion: v1
kind: Service
metadata:
  name: postgres
  labels:
    service: postgres
spec:
  selector:
    service: postgres
  type: ClusterIP
  ports:
  - port: 5432
What's happening here?
metadata- The
namefield defines the Service name -postgres labelsdefine the labels for the Service -name: database
- The
specselectordefines the Pod label and value that the Service applies to -service: postgrestypedefines the type of Service -ClusterIPportsportdefines the port exposed to the cluster
Take a moment to go back to the Deployment spec. How does the
selectorin the Service relate back to the Deployment?
Since the Service type is ClusterIP, it's not exposed externally, so it's only accessible from within the cluster by other objects.
Create the service:
$ kubectl create -f ./kubernetes/postgres-service.yml
Create the books database, using the Pod name:
$ kubectl get pods

NAME                        READY   STATUS    RESTARTS   AGE
postgres-95566f9-xs2cf   1/1     Running   0          93s

$ kubectl exec postgres-95566f9-xs2cf --stdin --tty -- createdb -U sample books
Verify the creation:
$ kubectl exec postgres-95566f9-xs2cf --stdin --tty -- psql -U sample

psql (13.2)
Type "help" for help.

sample=# \l
                                 List of databases
   Name    |  Owner   | Encoding |  Collate   |   Ctype    |   Access privileges
-----------+----------+----------+------------+------------+-----------------------
 books     | sample   | UTF8     | en_US.utf8 | en_US.utf8 |
 postgres  | postgres | UTF8     | en_US.utf8 | en_US.utf8 |
 sample    | postgres | UTF8     | en_US.utf8 | en_US.utf8 |
 template0 | postgres | UTF8     | en_US.utf8 | en_US.utf8 | =c/postgres          +
           |          |          |            |            | postgres=CTc/postgres
 template1 | postgres | UTF8     | en_US.utf8 | en_US.utf8 | =c/postgres          +
           |          |          |            |            | postgres=CTc/postgres
(5 rows)

sample=#
You can also get the Pod name via:
$ kubectl get pod -l service=postgres -o jsonpath="{.items[0].metadata.name}"
Assign the value to a variable and then create the database:
$ POD_NAME=$(kubectl get pod -l service=postgres -o jsonpath="{.items[0].metadata.name}")
$ kubectl exec $POD_NAME --stdin --tty -- createdb -U sample books
Flask
Take a moment to review the Flask project structure along with the Dockerfile and the entrypoint.sh files:
- "services/server"
- services/server/Dockerfile
- services/server/entrypoint.sh
kubernetes/flask-deployment.yml:
apiVersion: apps/v1
kind: Deployment
metadata:
  name: flask
  labels:
    name: flask
spec:
  replicas: 1
  selector:
    matchLabels:
      app: flask
  template:
    metadata:
      labels:
        app: flask
    spec:
      containers:
      - name: flask
        image: mjhea0/flask-kubernetes:latest
        env:
        - name: FLASK_ENV
          value: "development"
        - name: APP_SETTINGS
          value: "project.config.DevelopmentConfig"
        - name: POSTGRES_USER
          valueFrom:
            secretKeyRef:
              name: postgres-credentials
              key: user
        - name: POSTGRES_PASSWORD
          valueFrom:
            secretKeyRef:
              name: postgres-credentials
              key: password
      restartPolicy: Always
This should look similar to the Postgres Deployment spec. The big difference is that you can either use my pre-built and pre-pushed image on Docker Hub, mjhea0/flask-kubernetes, or build and push your own.
For example:
$ docker build -t <YOUR_DOCKER_HUB_NAME>/flask-kubernetes ./services/server
$ docker push <YOUR_DOCKER_HUB_NAME>/flask-kubernetes
If you use your own, make sure you replace mjhea0 with your Docker Hub name in kubernetes/flask-deployment.yml as well.
Alternatively, if don't want to push the image to a Docker registry, after you build the image locally, you can set the
image-pull-policyflag toNeverto always use the local image.
Create the Deployment:
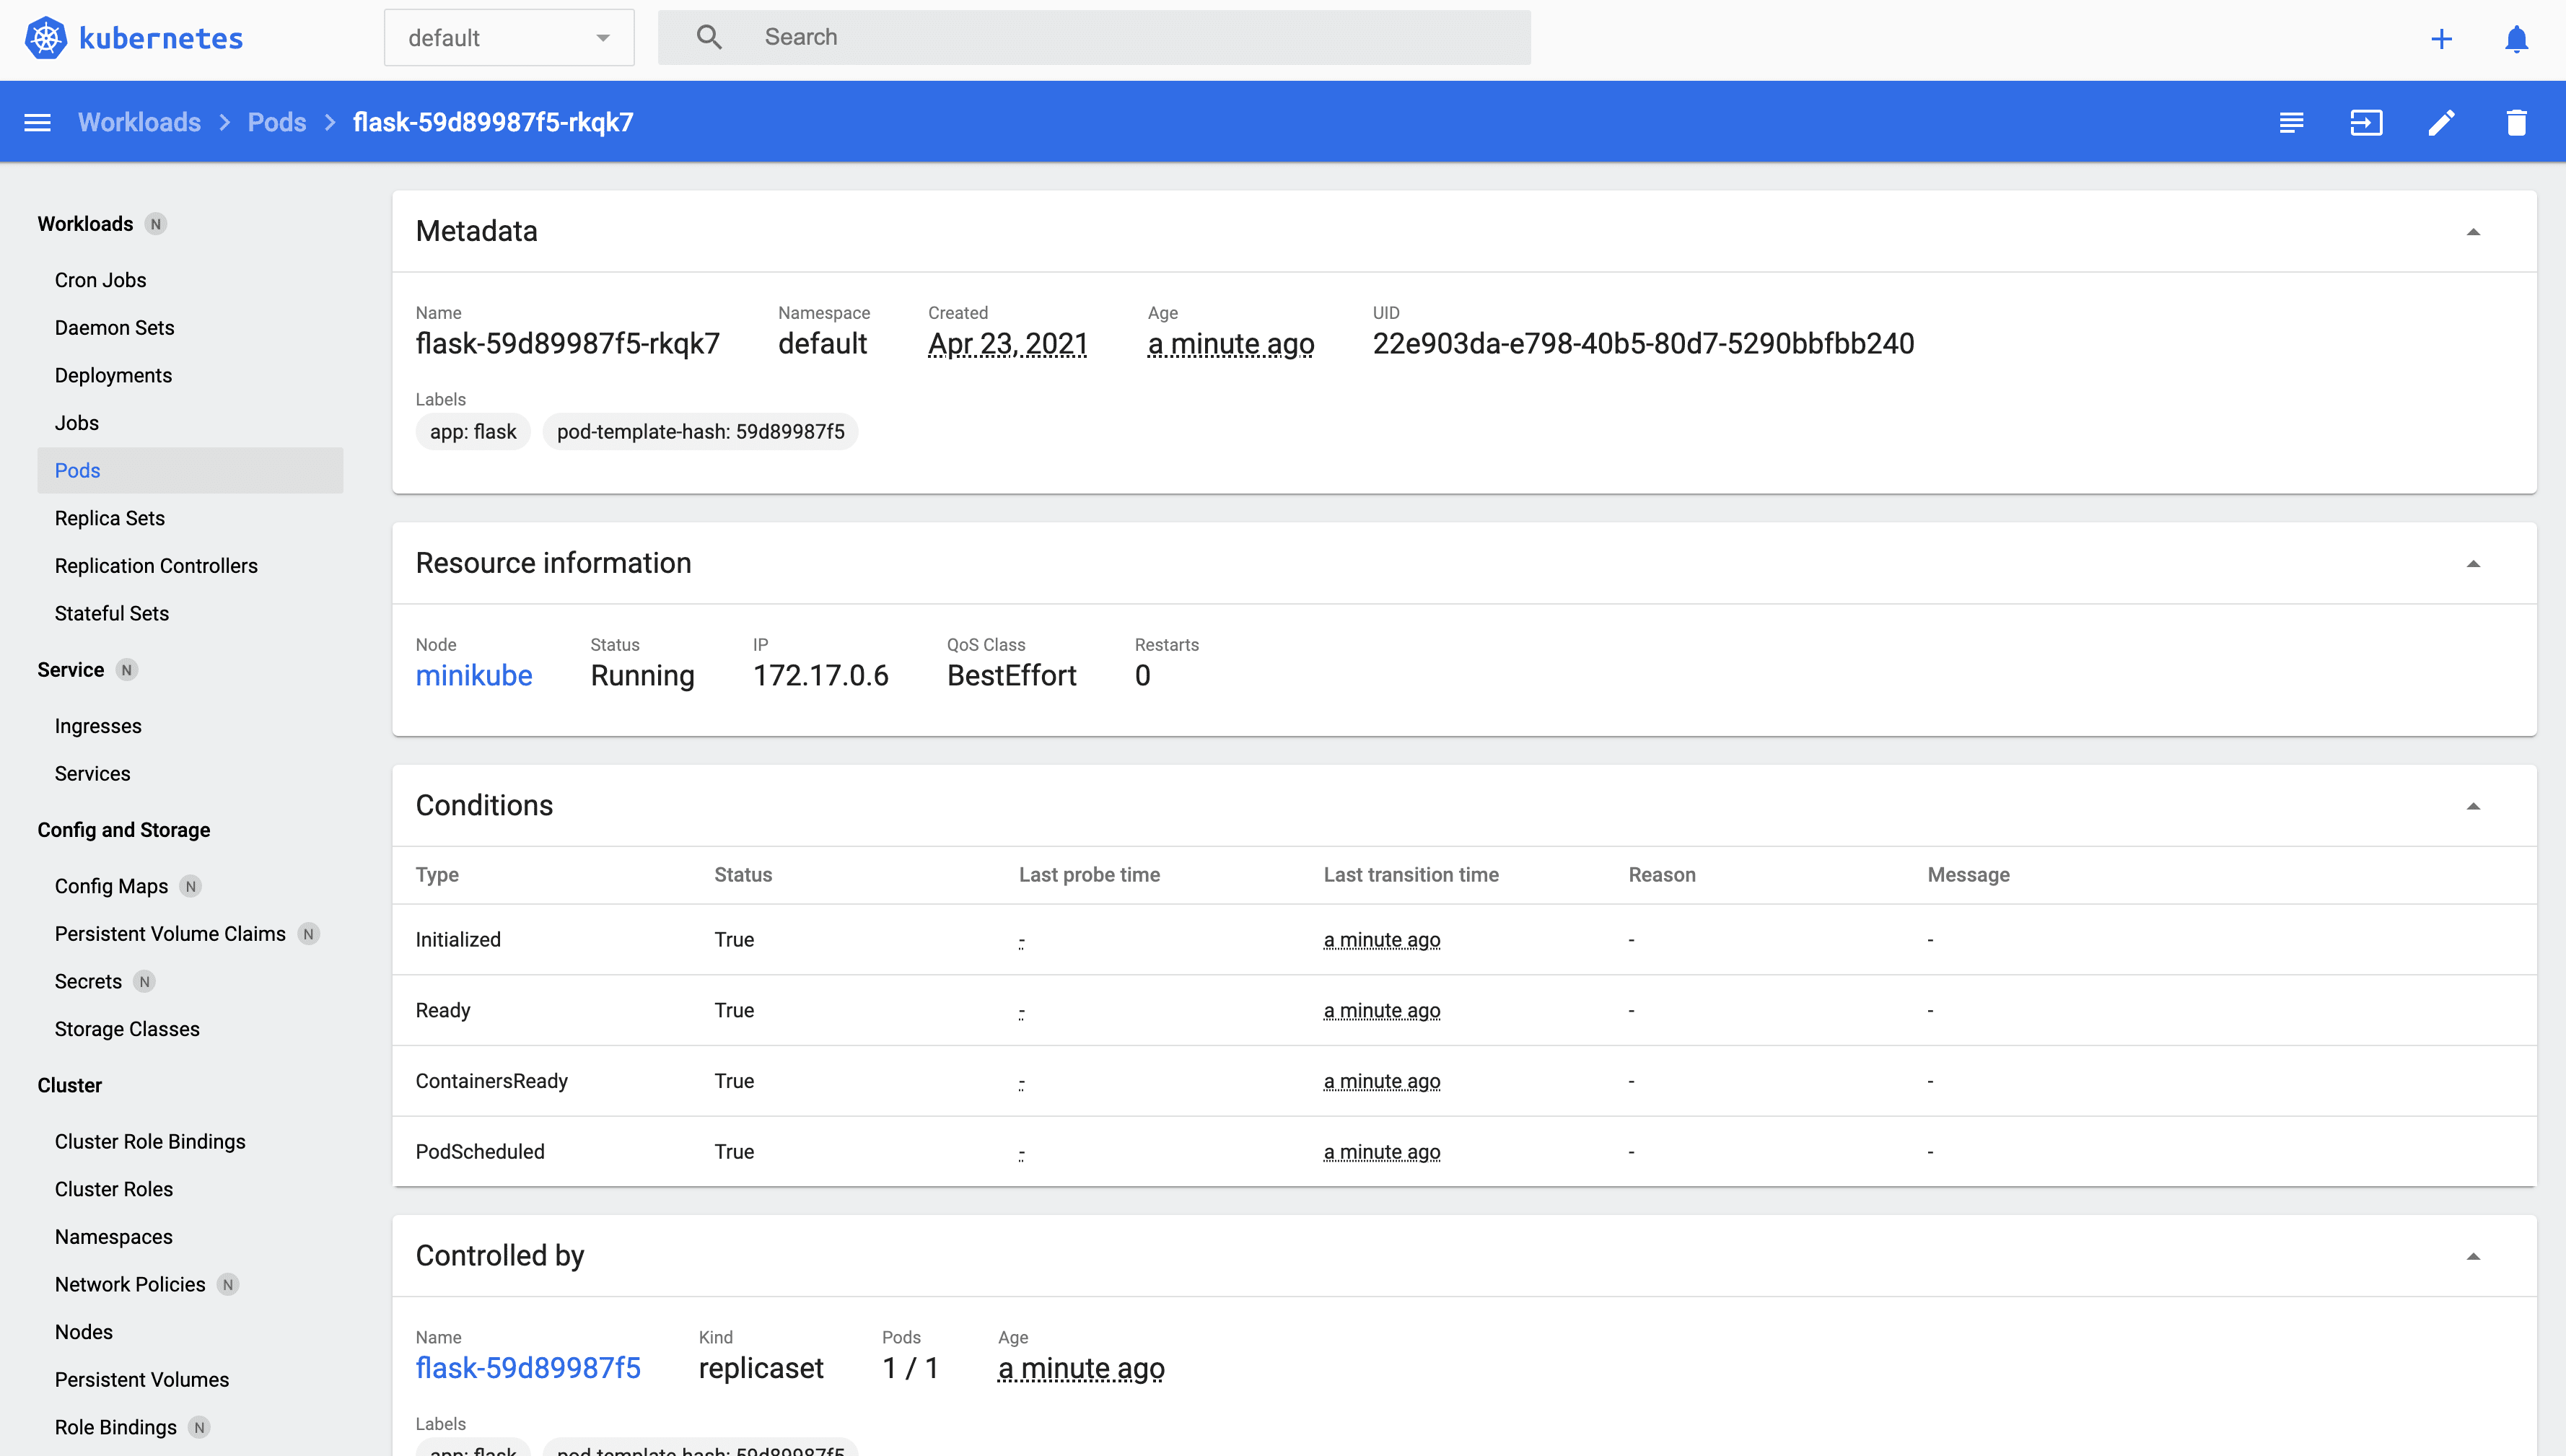
$ kubectl create -f ./kubernetes/flask-deployment.yml

This will immediately spin up a new Pod:
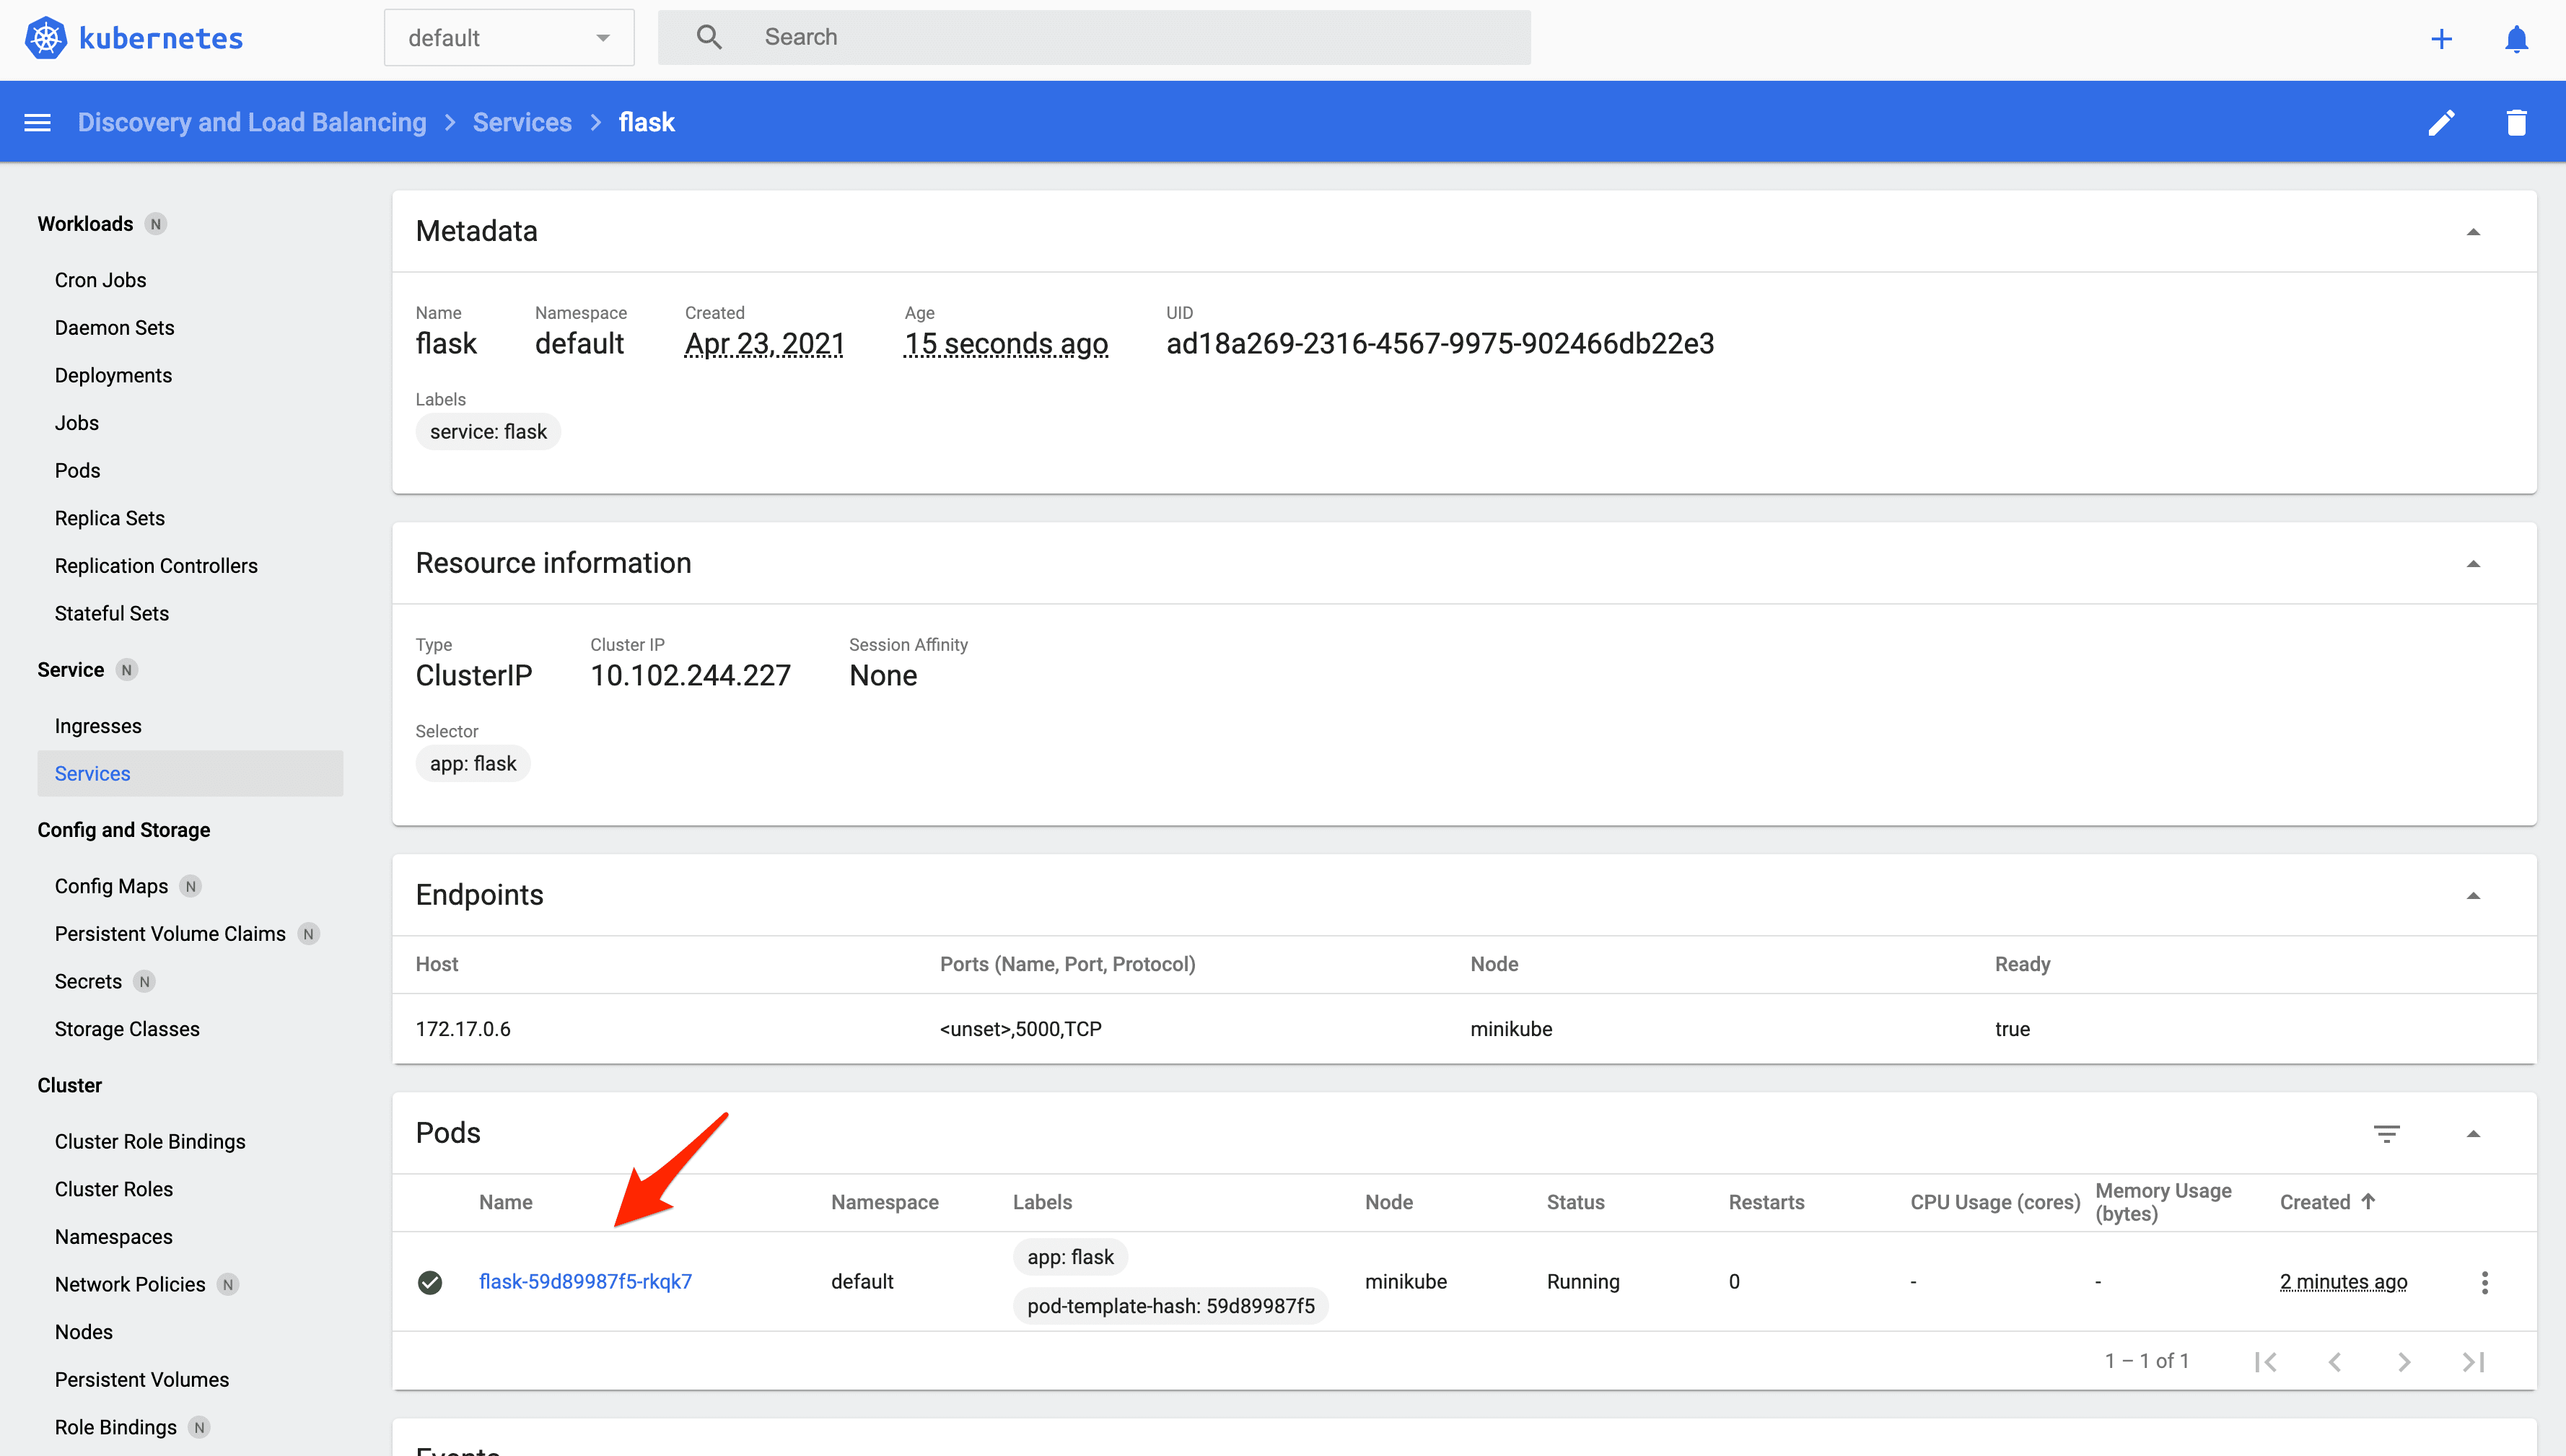
kubernetes/flask-service.yml:
apiVersion: v1
kind: Service
metadata:
  name: flask
  labels:
    service: flask
spec:
  selector:
    app: flask
  ports:
  - port: 5000
    targetPort: 5000
Curious about the
targetPortand how it relates to theport? Review the offical Services guide.
Create the service:
$ kubectl create -f ./kubernetes/flask-service.yml
Make sure the Pod is associated with the Service:
Apply the migrations and seed the database:
$ kubectl get pods

NAME                        READY     STATUS    RESTARTS   AGE
flask-66988cb97d-n88b4      1/1       Running   0          21m
postgres-95566f9-xs2cf      1/1       Running   0          36m
$ kubectl exec flask-66988cb97d-n88b4 --stdin --tty -- python manage.py recreate_db
$ kubectl exec flask-66988cb97d-n88b4 --stdin --tty -- python manage.py seed_db
Verify:
$ kubectl exec postgres-95566f9-xs2cf --stdin --tty -- psql -U sample

psql (13.2)
Type "help" for help.

sample=# \c books
You are now connected to database "books" as user "sample".

books=# select * from books;

 id |                  title                   |    author     | read
----+------------------------------------------+---------------+------
  1 | On the Road                              | Jack Kerouac  | t
  2 | Harry Potter and the Philosopher's Stone | J. K. Rowling | f
  3 | Green Eggs and Ham                       | Dr. Seuss     | t
(3 rows)
Ingress
To enable traffic to access the Flask API inside the cluster, you can use either a NodePort, LoadBalancer, or Ingress:
- A NodePort exposes a Service on an open port on the Node.
- As the name implies, a LoadBalancer creates an external load balancer that points to a Service in the cluster.
- Unlike the previous two methods, an Ingress is not a type of Service; instead, it sits on top of the Services as an entry point into the cluster.
For more, review the official Publishing Services guide.
kubernetes/minikube-ingress.yml:
apiVersion: networking.k8s.io/v1
kind: Ingress
metadata:
  name: minikube-ingress
  annotations:
spec:
  rules:
  - host: hello.world
    http:
      paths:
      - path: /
        pathType: Prefix
        backend:
          service:
            name: vue
            port:
              number: 8080
      - path: /books
        pathType: Prefix
        backend:
          service:
            name: flask
            port:
              number: 5000
Here, we defined the following HTTP rules:
/- routes requests to the Vue Service (which we still need to set up)/books- routes requests to the Flask Service
Enable the Ingress addon:
$ minikube addons enable ingress
Create the Ingress object:
$ kubectl apply -f ./kubernetes/minikube-ingress.yml
If you see an
Internal error occurred: failed calling webhook "validate.nginx.ingress.kubernetes.io"error, try removing theValidatingWebhookConfiguration:$ kubectl delete -A ValidatingWebhookConfiguration ingress-nginx-admissionFor more, review this Stack Overflow thread.
Next, you need to update your /etc/hosts file to route requests from the host we defined, hello.world, to the Minikube instance.
Add an entry to /etc/hosts:
$ echo "$(minikube ip) hello.world" | sudo tee -a /etc/hosts
Try it out:
http://hello.world/books/ping:
{
  "container_id": "flask-66988cb97d-n88b4",
  "message":"pong!", "status":
  "success"
}
{
  "books": [{
    "author": "Jack Kerouac",
    "id": 1,
    "read": true,
    "title": "On the Road"
  }, {
    "author": "J. K. Rowling",
    "id": 2,
    "read": false,
    "title": "Harry Potter and the Philosopher's Stone"
  }, {
    "author": "Dr. Seuss",
    "id": 3,
    "read": true,
    "title": "Green Eggs and Ham"
  }],
  "container_id": "flask-66988cb97d-n88b4",
  "status": "success"
}
Vue
Moving right along, review the Vue project along with the associated Dockerfiles:
- "services/client"
- /services/client/Dockerfile
- /services/client/Dockerfile-minikube
kubernetes/vue-deployment.yml:
apiVersion: apps/v1
kind: Deployment
metadata:
  name: vue
  labels:
    name: vue
spec:
  replicas: 1
  selector:
    matchLabels:
      app: vue
  template:
    metadata:
      labels:
        app: vue
    spec:
      containers:
      - name: vue
        image: mjhea0/vue-kubernetes:latest
      restartPolicy: Always
Again, either use my image or build and push your own image to Docker Hub:
$ docker build -t <YOUR_DOCKERHUB_NAME>/vue-kubernetes ./services/client \
    -f ./services/client/Dockerfile-minikube
$ docker push <YOUR_DOCKERHUB_NAME>/vue-kubernetes
Create the Deployment:
$ kubectl create -f ./kubernetes/vue-deployment.yml
Verify that a Pod was created along with the Deployment:
$ kubectl get deployments vue

NAME   READY   UP-TO-DATE   AVAILABLE   AGE
vue    1/1     1            1           40s


$ kubectl get pods

NAME                        READY   STATUS    RESTARTS   AGE
flask-66988cb97d-n88b4      1/1     Running   0          37m
postgres-95566f9-xs2cf      1/1     Running   0          71m
vue-cd9d7d445-xl7wd         1/1     Running   0          2m32s
How can you verify that the Pod and Deployment were created successfully in the dashboard?
kubernetes/vue-service.yml:
apiVersion: v1
kind: Service
metadata:
  name: vue
  labels:
    service: vue
  name: vue
spec:
  selector:
    app: vue
  ports:
  - port: 8080
    targetPort: 8080
Create the service:
$ kubectl create -f ./kubernetes/vue-service.yml
Ensure http://hello.world/ works as expected.

Scaling
Kubernetes makes it easy to scale, adding additional Pods as necessary, when the traffic load becomes too much for a single Pod to handle.
For example, let's add another Flask Pod to the cluster:
$ kubectl scale deployment flask --replicas=2
Confirm:
$ kubectl get deployments flask

NAME    READY   UP-TO-DATE   AVAILABLE   AGE
flask   2/2     2            2           11m
$ kubectl get pods -o wide

NAME                     READY   STATUS    RESTARTS   AGE     IP            NODE       NOMINATED NODE   READINESS GATES
flask-66988cb97d-hqpbh   1/1     Running   0          27s     172.17.0.10   minikube   <none>           <none>
flask-66988cb97d-n88b4   1/1     Running   0          39m     172.17.0.7    minikube   <none>           <none>
postgres-95566f9-xs2cf   1/1     Running   0          74m     172.17.0.6    minikube   <none>           <none>
vue-cd9d7d445-xl7wd      1/1     Running   0          5m18s   172.17.0.9    minikube   <none>           <none>
Make a few requests to the service:
$ for ((i=1;i<=10;i++)); do curl http://hello.world/books/ping; done
You should see different container_ids being returned, indicating that requests are being routed appropriately via a round robin algorithm between the two replicas:
{"container_id":"flask-66988cb97d-n88b4","message":"pong!","status":"success"}
{"container_id":"flask-66988cb97d-hqpbh","message":"pong!","status":"success"}
{"container_id":"flask-66988cb97d-hqpbh","message":"pong!","status":"success"}
{"container_id":"flask-66988cb97d-n88b4","message":"pong!","status":"success"}
{"container_id":"flask-66988cb97d-n88b4","message":"pong!","status":"success"}
{"container_id":"flask-66988cb97d-hqpbh","message":"pong!","status":"success"}
{"container_id":"flask-66988cb97d-n88b4","message":"pong!","status":"success"}
{"container_id":"flask-66988cb97d-hqpbh","message":"pong!","status":"success"}
{"container_id":"flask-66988cb97d-n88b4","message":"pong!","status":"success"}
{"container_id":"flask-66988cb97d-hqpbh","message":"pong!","status":"success"}
What happens if you scale down as traffic is hitting the cluster? Open two terminal windows and test this on your on. You should see traffic being re-routed appropriately. Try it again, but this time scale up.
Helpful Commands
| Command | Explanation |
|---|---|
minikube start |
Starts a local Kubernetes cluster |
minikube ip |
Displays the IP address of the cluster |
minikube dashboard |
Opens the Kubernetes dashboard in your browser |
kubectl version |
Displays the Kubectl version |
kubectl cluster-info |
Displays the cluster info |
kubectl get nodes |
Lists the Nodes |
kubectl get pods |
Lists the Pods |
kubectl get deployments |
Lists the Deployments |
kubectl get services |
Lists the Services |
minikube stop |
Stops a local Kubernetes cluster |
minikube delete |
Removes a local Kubernetes cluster |
Check out the Kubernetes Cheatsheet for more commands.
Automation Script
Ready to put everything together?
Take a look at the deploy.sh script in the project root. This script:
- Creates a PersistentVolume and a PersistentVolumeClaim
- Adds the database credentials via Kubernetes Secrets
- Creates the Postgres Deployment and Service
- Creates the Flask Deployment and Service
- Enables Ingress
- Applies the Ingress rules
- Creates the Vue Deployment and Service
#!/bin/bash


echo "Creating the volume..."

kubectl apply -f ./kubernetes/persistent-volume.yml
kubectl apply -f ./kubernetes/persistent-volume-claim.yml


echo "Creating the database credentials..."

kubectl apply -f ./kubernetes/secret.yml


echo "Creating the postgres deployment and service..."

kubectl create -f ./kubernetes/postgres-deployment.yml
kubectl create -f ./kubernetes/postgres-service.yml
POD_NAME=$(kubectl get pod -l service=postgres -o jsonpath="{.items[0].metadata.name}")
kubectl exec $POD_NAME --stdin --tty -- createdb -U sample books


echo "Creating the flask deployment and service..."

kubectl create -f ./kubernetes/flask-deployment.yml
kubectl create -f ./kubernetes/flask-service.yml
FLASK_POD_NAME=$(kubectl get pod -l app=flask -o jsonpath="{.items[0].metadata.name}")
kubectl exec $FLASK_POD_NAME --stdin --tty -- python manage.py recreate_db
kubectl exec $FLASK_POD_NAME --stdin --tty -- python manage.py seed_db


echo "Adding the ingress..."

minikube addons enable ingress
kubectl delete -A ValidatingWebhookConfiguration ingress-nginx-admission
kubectl apply -f ./kubernetes/minikube-ingress.yml


echo "Creating the vue deployment and service..."

kubectl create -f ./kubernetes/vue-deployment.yml
kubectl create -f ./kubernetes/vue-service.yml
Try it out!
$ sh deploy.sh
Once done, create the books database, apply the migrations, and seed the database:
$ POD_NAME=$(kubectl get pod -l service=postgres -o jsonpath="{.items[0].metadata.name}")
$ kubectl exec $POD_NAME --stdin --tty -- createdb -U sample books

$ FLASK_POD_NAME=$(kubectl get pod -l app=flask -o jsonpath="{.items[0].metadata.name}")
$ kubectl exec $FLASK_POD_NAME --stdin --tty -- python manage.py recreate_db
$ kubectl exec $FLASK_POD_NAME --stdin --tty -- python manage.py seed_db
Update /etc/hosts, and then test it out in the browser.
Conclusion
In this tutorial, we looked at how to run a Flask-based microservice on Kubernetes.
At this point, you should have a basic understanding of how Kubernetes works and be able to deploy a cluster with an app running on it.
Additional Resources:
- Learn Kubernetes Basics
- Configuration Best Practices
- Scaling Flask with Kubernetes
- Running Flask on Docker Swarm (compare and contrast running Flask on Docker Swarm vs. Kubernetes)
- Deploying a Node App to Google Cloud with Kubernetes
You can find the code in the flask-vue-kubernetes repo on GitHub.