 Michael Herman
In this tutorial, we'll look at how to set up your own private PyPI server using pypiserver, a PyPI compatible server, and Docker. We'll host the server on an AWS EC2 instance.
Contents
AWS Setup
Let's start by setting up an EC2 instance that will be used for hosting your PyPI server.
First, you'll need to sign up for an AWS account (if you don't already have one).
Setting up your first AWS account?
It's a good idea to create a non-root IAM user, with "Administrator Access" and "Billing" policies, and a Billing Alert via CloudWatch to alert you if your AWS usage costs exceed a certain amount. For more info, review Lock Away Your AWS Account Root User Access Keys and Creating a Billing Alarm, respectively.
EC2
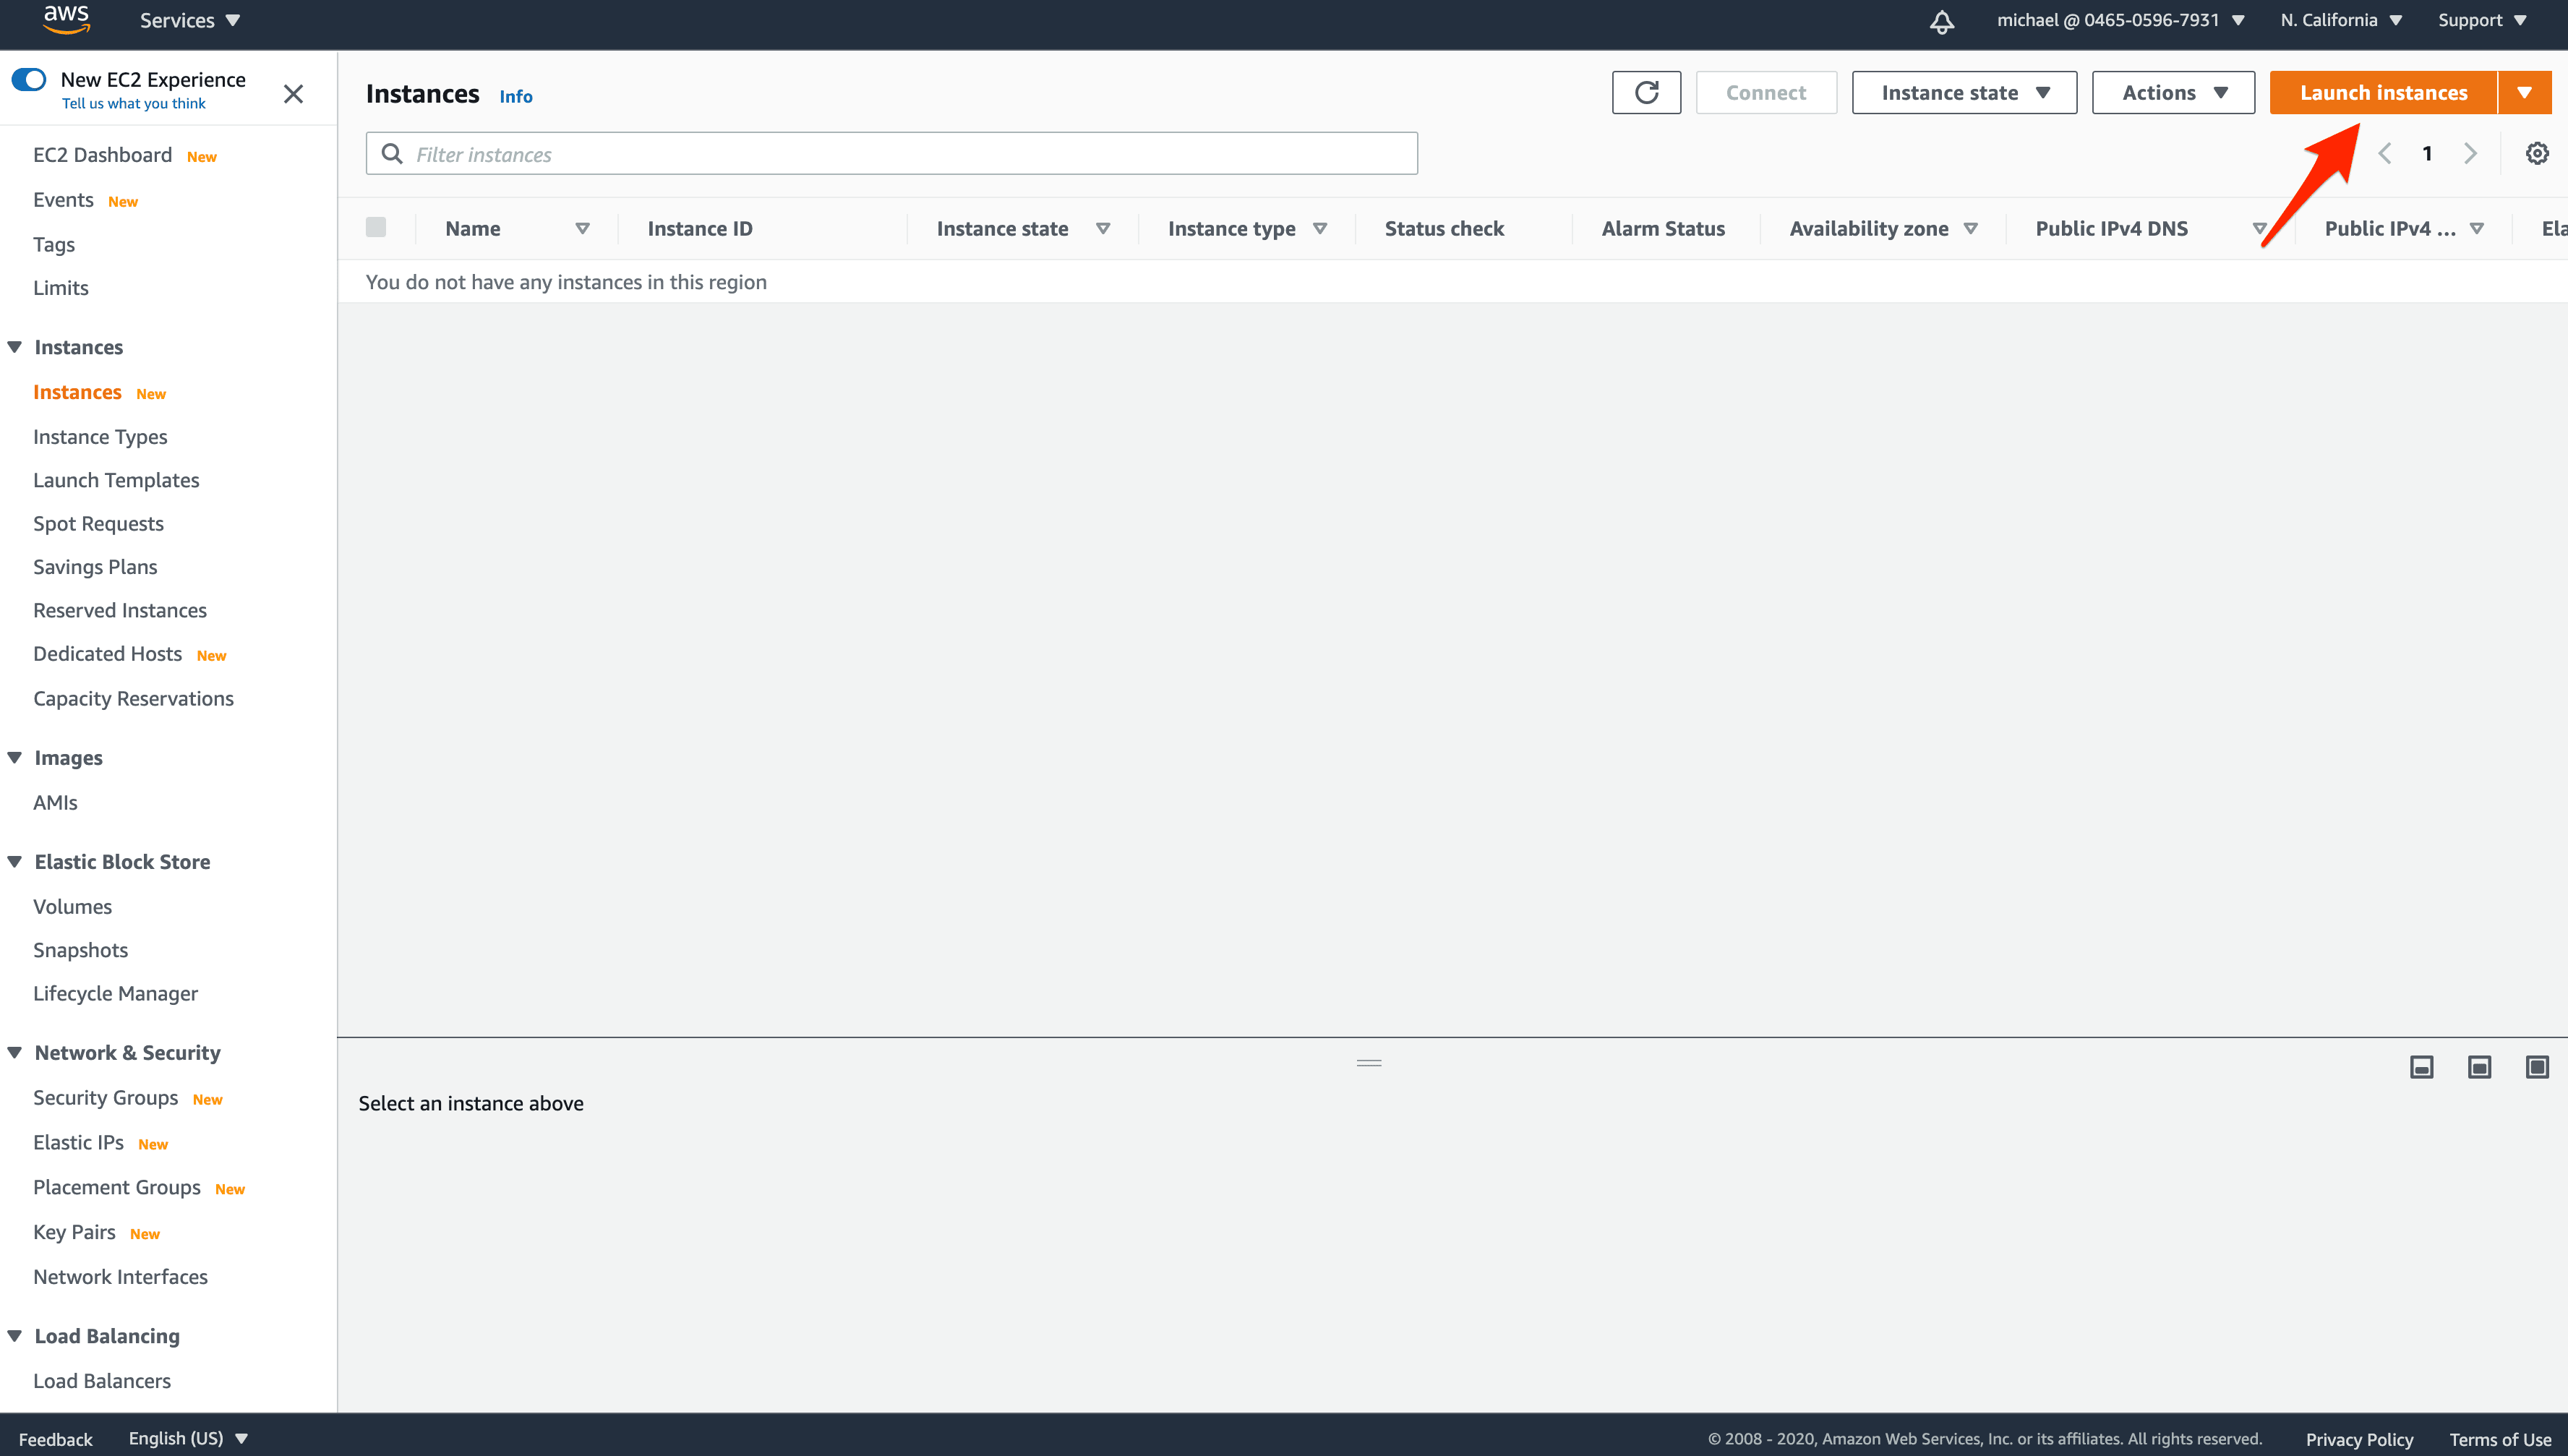
Log in to the AWS Console, navigate to the EC2 Console and click "Instances" on the left sidebar. Then, click the "Launch instances" button:
Next, stick with the basic Amazon Linux AMI:

Use a t2.micro Instance Type:

Create a new Key Pair so you can connect to the instance over SSH. Save this .pem file somewhere safe.
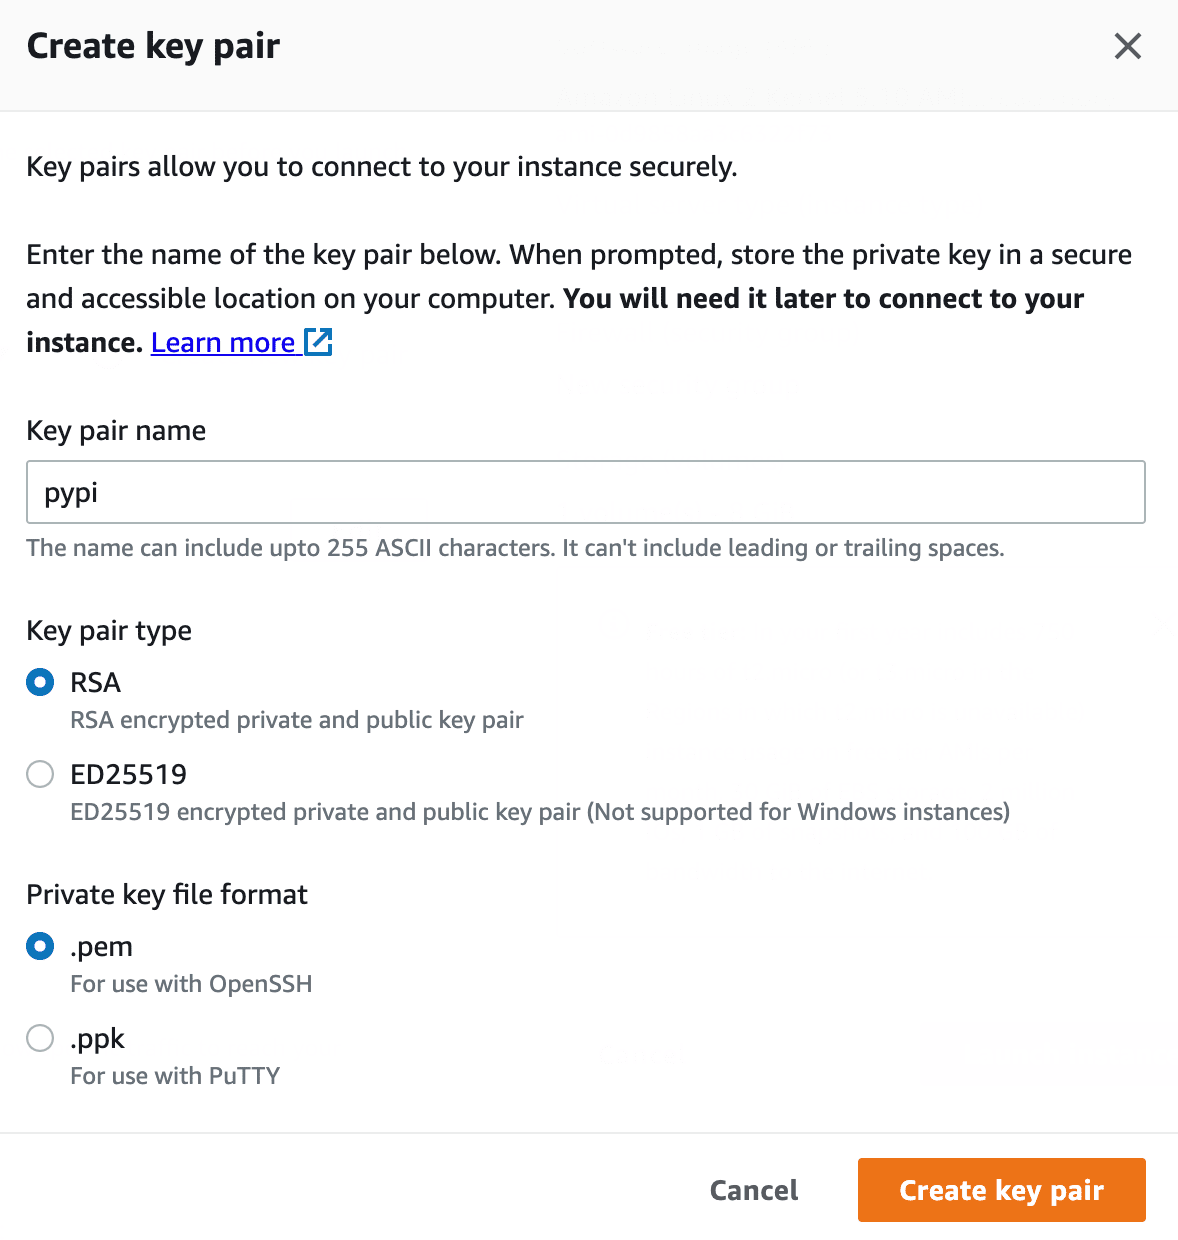
On a Mac or a Linux box? It's recommended to save the .pem file to the "/Users/$USER/.ssh" directory. Be sure to set the proper permissions as well -- i.e.,
chmod 400 ~/.ssh/pypi.pem.
Under "Network settings", we'll stick with the default VPC to keep things simple for this tutorial, but feel free to update this.
Next, create a new Security Group (akin to a firewall) called pypi-security-group, making sure at least ports 22 (for SSH) and 8080 (for HTTP traffic) are open.

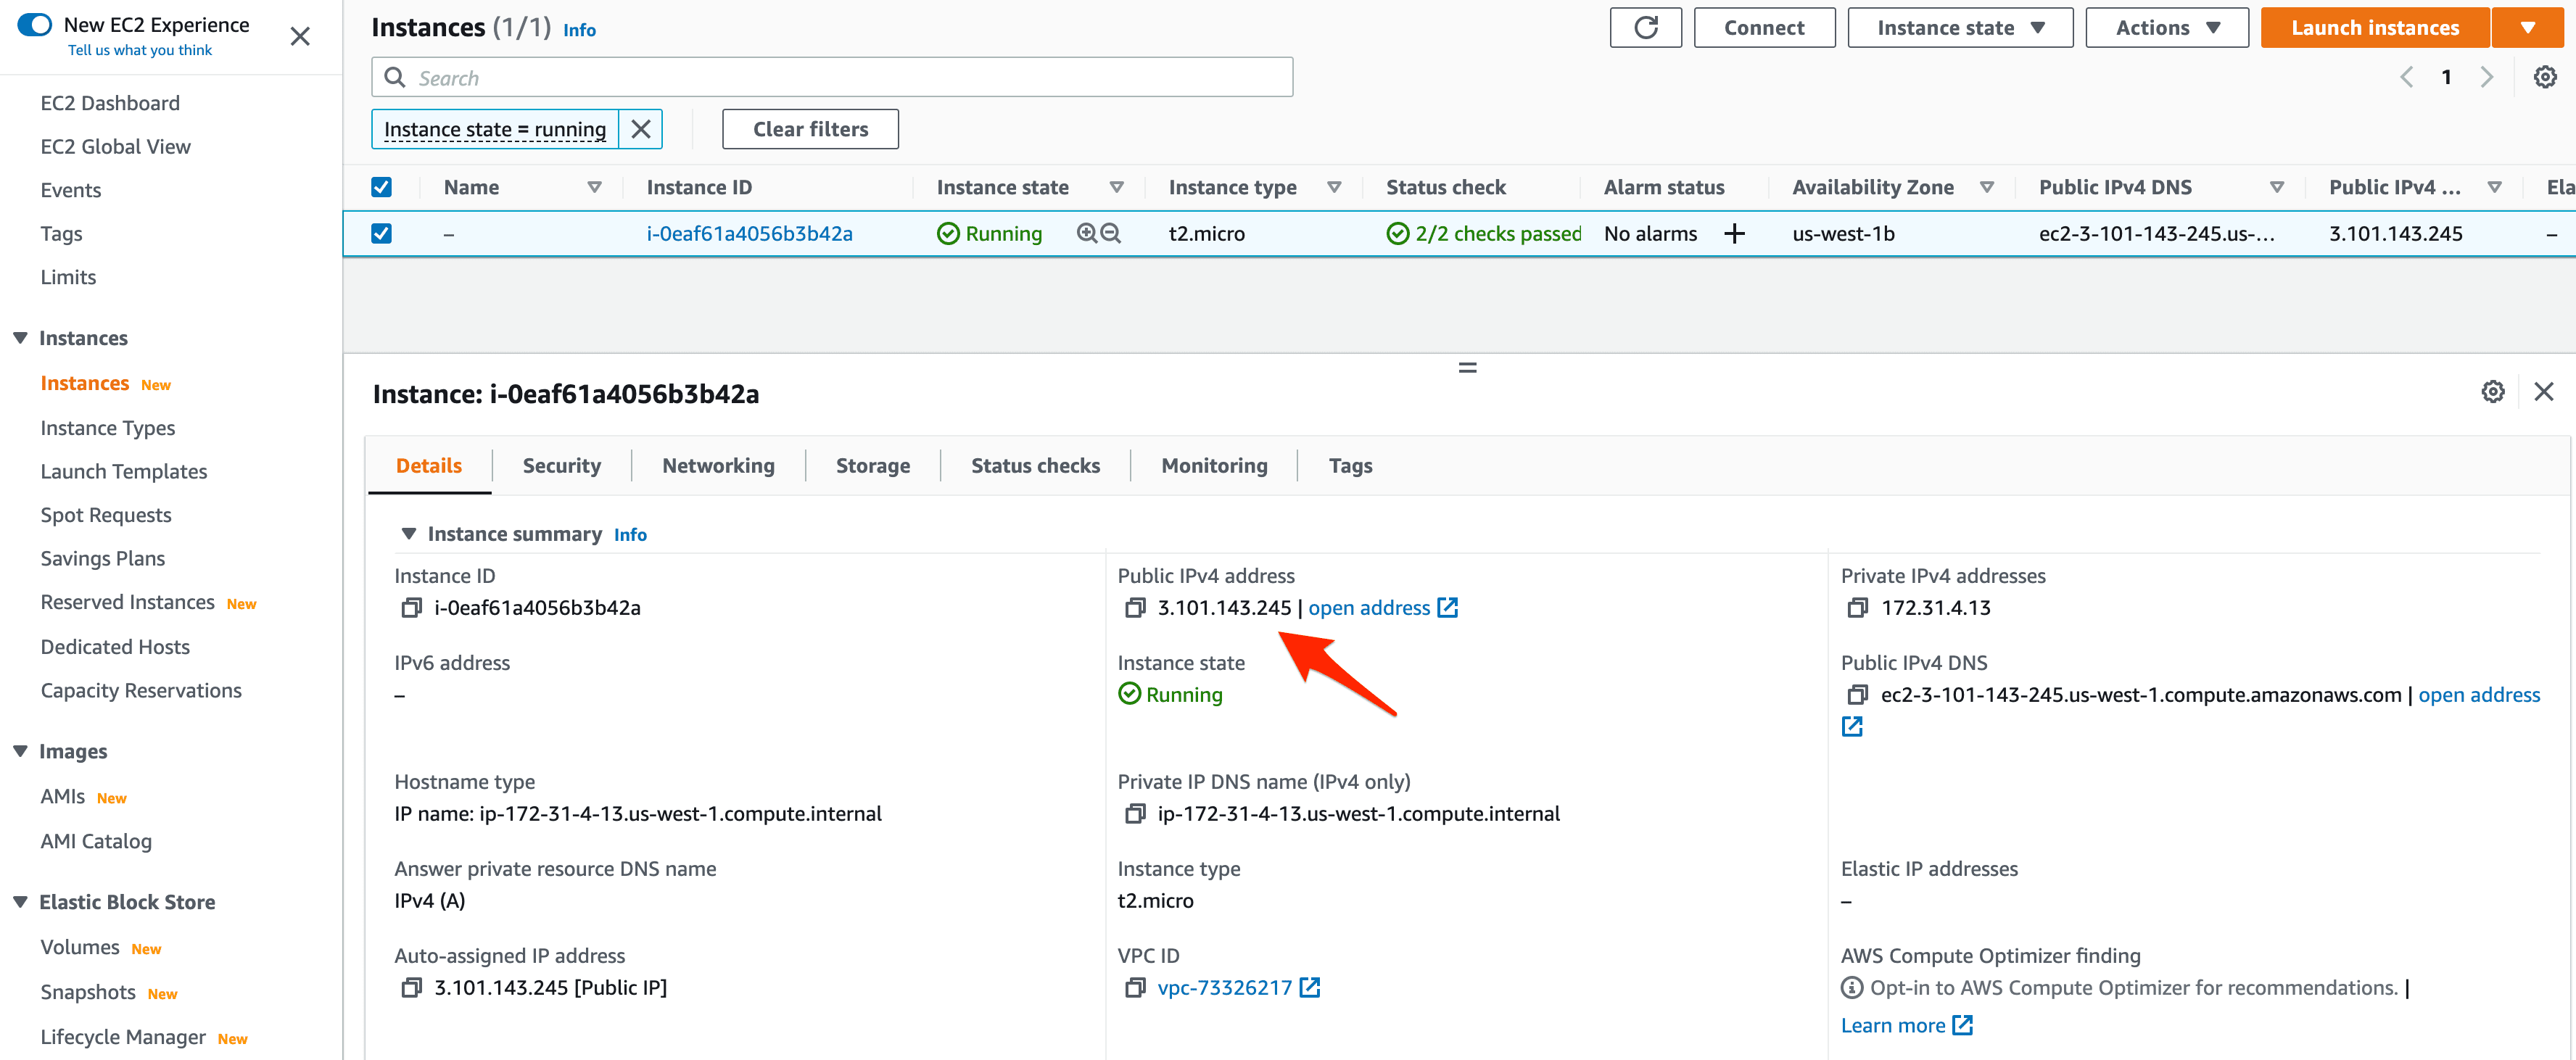
Click "Launch instance" to create the new instance. On the "Launch Status" page, click "View all instances". Then, on the main instances page, grab the public IP of your newly created instance:
Docker
With the instance up and running, we can now install Docker on it.
SSH into the instance using your Key Pair like so:
$ ssh -i your-key-pair.pem ec2-user@<PUBLIC-IP-ADDRESS>

# example:
# ssh -i ~/.ssh/pypi.pem [email protected]
Start by installing and starting the latest version of Docker and version 2.7.0 of Docker Compose:
[ec2-user]$ sudo yum update -y
[ec2-user]$ sudo yum install -y docker
[ec2-user]$ sudo service docker start

[ec2-user]$ sudo curl -L "https://github.com/docker/compose/releases/download/v2.7.0/docker-compose-$(uname -s)-$(uname -m)" -o /usr/local/bin/docker-compose
[ec2-user]$ sudo chmod +x /usr/local/bin/docker-compose

[ec2-user]$ docker --version
Docker version 20.10.13, build a224086

[ec2-user]$ docker-compose --version
Docker Compose version v2.7.0
Add the ec2-user to the docker group so you can execute Docker commands without having to use sudo:
[ec2-user]$ sudo usermod -a -G docker ec2-user
For the changes to take effect, you'll need to exit the SSH session and log back in.
PyPI Setup
SSH back into the instance if you haven't already done so.
Start by creating a new project directory for the PyPI server:
[ec2-user]$ mkdir /home/ec2-user/pypi
[ec2-user]$ cd /home/ec2-user/pypi
Add a docker-compose.yml file:
version: '3.7'

services:
  pypi-server:
    image: pypiserver/pypiserver:latest
    ports:
      - 8080:8080
    volumes:
      - type: volume
        source: pypi-server
        target: /data/packages
    command: -P . -a . /data/packages
    restart: always

volumes:
  pypi-server:
Notes:
- We defined a single service called
pypi-serverthat uses the pypiserver Docker image. - We also defined a named volume called
pypi-serverthat maps to the "/data/packages" folder in the container. If the container goes down for whatever reason, the volume and uploaded PyPI packages will persist. - The
-P . -a .allows unauthorized access and/data/packagesindicates that packages will be served from the "/data/packages" folder in the container.
Go ahead and spin up the container:
[ec2-user]$ docker-compose up -d --build
Once done, grab the instance IP, and navigate to http://<PUBLIC-IP-ADDRESS>:8080 in your browser. You should see something similar to:

Uploading and Downloading (without auth)
If you don't already have a package that you'd like to use to test your PyPI server, go ahead and clone down the private-pypi repo.
Change to the "sample-package" folder, create and activate a virtual environment, and then compress the package:
$ python setup.py sdist
Install Twine:
$ pip install twine
Then, upload the package to your PyPI server:
$ twine upload --repository-url http://<PUBLIC-IP-ADDRESS>:8080 dist/*

# example:
# twine upload --repository-url http://3.101.143.245:8080 dist/*
You will be prompted to enter a username and password. Since we are currently allowing unauthorized access, just keep both of them blank for now. If all goes well, you should see something like:
Uploading distributions to http://3.101.143.245:8080
Enter your username:
Enter your password:
Uploading muddy_wave-0.1.tar.gz
100%|█████████████████████████████████████████████| 3.64k/3.64k [00:00<00:00, 30.6kB/s]
To install your package, run:
$ pip install --index-url http://<PUBLIC-IP-ADDRESS>:8080 muddy_wave --trusted-host <PUBLIC-IP-ADDRESS>

# example:
# pip install --index-url http://3.101.143.245:8080 muddy_wave --trusted-host 3.101.143.245
You should see something like:
Looking in indexes: http://3.101.143.245:8080
Collecting muddy_wave
  Downloading http://3.101.143.245:8080/packages/muddy_wave-0.1.tar.gz (1.0 kB)
Using legacy 'setup.py install' for muddy-wave, since package 'wheel' is not installed.
Installing collected packages: muddy-wave
    Running setup.py install for muddy-wave ... done
Successfully installed muddy-wave-0.1
You can test the package in the shell:
>>> import muddy_wave
>>> muddy_wave.hello_world()
hello, world!
You should also be able to view the package at http://<PUBLIC-IP-ADDRESS>:8080/packages/ in your browser.
With that, let's look at how to add authentication.
Authentication
For auth, we'll use basic authentication with htpasswd.
SSH back into the instance and install htpasswd via httpd-tools:
[ec2-user]$ sudo yum install -y httpd-tools
Create an "auth" folder:
[ec2-user]$ mkdir /home/ec2-user/pypi/auth
[ec2-user]$ cd /home/ec2-user/pypi/auth
Now, create your first user:
[ec2-user]$ htpasswd -sc .htpasswd <SOME-USERNAME>
Use
htpasswd -s .htpasswd <SOME-USERNAME>for adding additional users.
Next, update the Docker Compose file like so:
version: '3.7'

services:
  pypi-server:
    image: pypiserver/pypiserver:latest
    ports:
      - 8080:8080
    volumes:
      - type: bind
        source: /home/ec2-user/pypi/auth
        target: /data/auth
      - type: volume
        source: pypi-server
        target: /data/packages
    command: -P /data/auth/.htpasswd -a update,download,list /data/packages
    restart: always

volumes:
  pypi-server:
Notes:
- We defined a bind mount to mount the "/home/ec2-user/pypi/auth" folder (where the .htpasswd file resides) on the host to "/data/auth" inside the container.
- We also updated the command so that the /data/auth/.htpasswd is used as the password file (
-P /data/auth/.htpasswd) and the update, download, and list commands require authentication (-a update,download,list).
Update the container:
[ec2-user]$ cd /home/ec2-user/pypi
[ec2-user]$ docker-compose up -d --build
To test, navigate to http://<PUBLIC-IP-ADDRESS>:8080/packages/. You should be prompted to enter your username and password.
Uploading and Downloading (with auth)
To upload, bump the version in sample-package/setup.py:
from setuptools import setup


setup(
    name='muddy_wave',
    packages=['muddy_wave'],
    description='Hello, world!',
    version='0.2',  # updated
    url='http://github.com/testdrivenio/private-pypi/sample-package',
    author='Michael Herman',
    author_email='[email protected]',
    keywords=['pip', 'pypi']
)
Remove the files and folders associated with the previous release:
$ rm -rf build dist muddy_wave.egg-info .eggs
Create the new release:
$ python setup.py sdist
Upload the package:
$ twine upload --repository-url http://<PUBLIC-IP-ADDRESS>:8080 dist/*

# example:
# twine upload --repository-url http://3.101.143.245:8080 dist/*
Make sure you enter your username and password at the prompts.
If you'd prefer to not have to add the URL or enter your username and password each time, add the config for the PyPI server to your .pypirc file, which should should be located in your home directory -- e.g., ~/.pypirc.
For example:
[distutils]
index-servers=
    pypi
    aws

[pypi]
username: michael
password: supersecret

[aws]
repository: http://3.101.143.245:8080
username: michael
password: supersecret
To upload, run:
$ twine upload --repository aws dist/*
To install the new version, run:
$ pip install --index-url http://<PUBLIC-IP-ADDRESS>:8080 muddy_wave==0.2 --trusted-host <PUBLIC-IP-ADDRESS>

# example:
# pip install --index-url http://3.101.143.245:8080 muddy_wave==0.2 --trusted-host 3.101.143.245
You will be prompted for your username and password:
Looking in indexes: http://3.101.143.245:8080
User for 3.101.143.245:8080: michael
Password:
Collecting muddy_wave==0.2
  Downloading http://3.101.143.245:8080/packages/muddy_wave-0.2.tar.gz (1.0 kB)
Using legacy 'setup.py install' for muddy-wave, since package 'wheel' is not installed.
Installing collected packages: muddy-wave
  Attempting uninstall: muddy-wave
    Found existing installation: muddy-wave 0.1
    Uninstalling muddy-wave-0.1:
      Successfully uninstalled muddy-wave-0.1
    Running setup.py install for muddy-wave ... done
Successfully installed muddy-wave-0.2
If you'd prefer to not have to add --index-url http://3.101.143.245:8080 and -trusted-host 3.101.143.245 each time, add the config for the PyPI server to your pip.conf file, which, again, should should be located in your home directory -- e.g., ~/.pip/pip.conf.
For example:
[global]
extra-index-url = http://3.101.143.245:8080
trusted-host = 3.101.143.245
Now, to install, run:
$ pip install muddy_wave==0.2
Output:
Looking in indexes: https://pypi.org/simple, http://3.101.143.245:8080
User for 3.101.143.245:8080: mjhea0
Password:
Collecting muddy_wave==0.2
  Downloading http://3.101.143.245:8080/packages/muddy_wave-0.2.tar.gz (1.0 kB)
Using legacy 'setup.py install' for muddy-wave, since package 'wheel' is not installed.
Installing collected packages: muddy-wave
  Attempting uninstall: muddy-wave
    Found existing installation: muddy-wave 0.3
    Uninstalling muddy-wave-0.3:
      Successfully uninstalled muddy-wave-0.3
    Running setup.py install for muddy-wave ... done
Successfully installed muddy-wave-0.2
Supporting HTTPS
It's recommended to configure HTTPS since the username and password are sent over plain text with HTTP. There are a number of different ways to achieve this. A few examples:
| Proxy | Certificate Manager | Resource |
|---|---|---|
| Nginx | Let's Encrypt and Certbot | pypiserver docs |
| nginx-proxy | Let's Encrypt and letsencrypt-nginx-proxy-companion | TestDriven.io tutorial |
| AWS Application Load Balancer | AWS Certificate Manager | AWS docs |
The third approach is by far the easiest. You'll need to set up an SSL certificate with Certificate Manager, create an HTTPS listener with an Application Load Balancer, and then proxy 443 traffic to HTTP port 80 on the instance via a Target Group.