 Jan Giacomelli
In this tutorial, we'll take a look at how to deploy a machine learning (ML) model to AWS Lambda, via Serverless Framework, and execute it using Boto3. We'll also create a CI/CD pipeline with GitHub Actions to automate the deployment process and run end-to-end tests.
Contents
Project Setup
Playing around with ML models on your local machine can be fun. Nevertheless, at the end of the day, you need to deploy it somewhere to serve its purpose in production. While there are a number of different deployment options available, AWS Lambda is a great choice for when you have spiky traffic or when it's rarely used. Plus, AWS Lambda makes it easy to perform ML operations in parallel. You just call your Lambda function with Boto3 from within your code that needs ML functionality. With that, let's build an ML service for performing sentiment analysis.
Start by creating a new project:
$ mkdir ml_lambda && cd ml_lambda && git init
$ python3.11 -m venv venv
$ source venv/bin/activate
(venv)$
Create a new .gitignore file. Then, add the contents from the Python .gitignore template found here. Add the .gitignore to git and commit:
$ git add .gitignore
$ git commit -m 'Initial commit'
Second, add PyTorch and Transformers to a requirements.txt file:
torch==2.0.1
transformers==4.31.0
Install them:
(venv)$ pip install -r requirements.txt
Third, create a new module called sentiment_model.py:
from transformers import pipeline


class SentimentModel:
    def __init__(self):
        self._sentiment_analysis = pipeline("sentiment-analysis",model="ProsusAI/finbert")

    def predict(self, text):
        return self._sentiment_analysis(text)[0]["label"]
Here, we used the FinBERT pre-trained natural language processing (NLP) model, which is designed to predict sentiment on financial text.
Want to test it out locally? Add the following to the bottom of the module:
if __name__ == "__main__":
    sample_text = "The Dow Jones Industrial Average (^DJI) turned green."

    model = SentimentModel()
    sentiment = model.predict(text=sample_text)
    print(sentiment)
Then, execute the module. Try some different sample text. Make sure to remove the if block once done.
Finally, create a new project on GitHub and update the git remote.
AWS Lambda Handler
AWS Lambda is a serverless compute service where you can run your code. Instead of traditional deployment offerings, where you "rent" space on a server, you only pay for actual execution time. Therefore, it's a great choice when you have little traffic or spikes in traffic from time to time.
Running Python code on AWS Lambda is fairly simple. You need to specify a handler function and point Lambda to it. Here's what the expected signature needs to look like for the handler function:
def handle(event, context):
    ...
Create a new module called handler.py:
import logging

from sentiment_model import SentimentModel


LOGGER = logging.getLogger()
LOGGER.setLevel(logging.INFO)

model = SentimentModel()


def handle(event, context):
    if event.get("source") == "KEEP_LAMBDA_WARM":
        LOGGER.info("No ML work to do. Just staying warm...")
        return "Keeping Lambda warm"

    return {
        "sentiment": model.predict(text=event["text"])
    }
So what's going on here?
First, outside of the handle function, we configured the logger and initialized our model. Code written outside of the handle function is executed only during Lambda's cold starts. For cold starts, Lambda has to:
- Find space on an EC2 instance
- Initialize the execution environment
- Initialize the module
Cold starts are needed after re-deployments and when the Lambda isn't used for a while. AWS hasn't disclosed the exact amount of time during which a Lambda will stay warm. Nevertheless, if you search the web, you'll find times between five and fifteen minutes. Since cold starting a Lambda takes a few seconds, you'll often want to keep your Lambda in a warm state. We'll actually use a separate Lambda function for this, which will periodically ping our Lambda to keep it warm. Since you, again, pay for execution time, we don't want to execute the full ML model when we're just trying to keep it warm, so we added the following if block:
if event.get("source") == "KEEP_LAMBDA_WARM":
    LOGGER.info("No ML work to do. Just staying warm...")
    return "Keeping Lambda warm"
To learn more about cold starts, review Lambda execution environments from the docs.
Serverless Framework
To deploy our Lambda function, we'll use Serverless Framework, which helps you develop and deploy serverless applications with ease. It's simple to use for our use case. We need to create a serverless.yml configuration file that tells Serverless Framework which serverless cloud resources to create and how to invoke our application running on them. The framework supports multiple cloud vendors, like AWS, Google Cloud, and Azure, to name a few.
It's highly recommended that you go through Your First Serverless Framework Project before continuing on with this one so you have some context on how Serverless Framework works.
Add a new serverless.yml configuration file:
service: ml-model

frameworkVersion: '3'
useDotenv: true

provider:
  name: aws
  region: ${opt:region, 'eu-west-1'}
  stage: ${opt:stage, 'development'}
  logRetentionInDays: 30
  ecr:
    images:
      appimage:
        path: ./

functions:
  ml_model:
    image:
      name: appimage
    timeout: 90
    memorySize: 4096
    environment:
      TORCH_HOME: /tmp/.ml_cache
      TRANSFORMERS_CACHE: /tmp/.ml_cache/huggingface

custom:
  warmup:
    MLModelWarmer:
      enabled: true
      events:
        - schedule: rate(4 minutes)
      concurrency: ${env:WARMER_CONCURRENCY, 2}
      verbose: false
      timeout: 100
      payload:
        source: KEEP_LAMBDA_WARM

plugins:
  - serverless-plugin-warmup
There are quite a few things going on inside this file.
First, we defined the name of our service:
service: ml-model
Second, we defined some global configuration:
frameworkVersion: '3'
frameworkVersion is used to pin a specific version of Serverless Framework.
Third, we configured a provider:
provider:
  name: aws
  region: ${opt:region, 'eu-west-1'}
  stage: ${opt:stage, 'development'}
  logRetentionInDays: 30
  ecr:
    images:
      appimage:
        path: ./
We set defaults for region and stage, Ireland (eu-west-1) and development respectively. opt:region and opt:stage can be read in from the command line. For example:
$ serverless deploy --region us-east-1 --stage production
Next, we set the log retention days so that all logs inside CloudWatch from our application will be deleted after thirty days. At the end, we defined that we'll use a Docker image to deploy our ML model. It will be built on path ./ and stored inside ECR.
Fourth, we defined our Lambda function:
functions:
  ml_model:
    image:
      name: appimage
    timeout: 90
    memorySize: 4096
    environment:
      TORCH_HOME: /tmp/.ml_cache
      TRANSFORMERS_CACHE: /tmp/.ml_cache/huggingface
Since we're using the AWS provider, all defined functions will be AWS Lambda functions.
We specified which Docker image will be used, which will be pushed to ECR and downloaded from there. Then we set timeout and memory limits. We finished the function's definition by setting writable folders for the PyTorch and HuggingFace libraries. These libraries will download some files. Therefore, the destination must be writable. We used a "/tmp" folder for that, which is the only folder that's writable on AWS Lambda.
With ML libraries like PyTorch and HuggingFace's transformers, you can use pre-trained models (which we're doing). These models are downloaded from the Internet and stored on disk -- to cache them. This way you don't need to download them every time the code gets executed. Libraries always check whether they can load the model from the local cache first. If it's not there, they download it. They use default settings for the cache location. On Lambda, the default location is not writable. Only the "/tmp" folder is writable. Therefore, we need to set the cache location inside "/tmp". To clearly indicate that the destination is the cache destination for the ML models, we named it ".ml_cache".
For more on customizing PyTorch and HuggingFace's cache, review the following resources:
- PyTorch: Where are my downloaded models saved?
- HuggingFace: Caching models
By setting environment variables TORCH_HOME and TRANSFORMERS_CACHE, we told our libraries to use this location for caching. Feel free to rename the destination to your liking.
We're using 90 seconds for timeout because the model needs to be loaded and this can take some time.
Fifth, we specified configuration for our Lambda's warmer, which is just another Lambda, to keep our core Lambda warm:
custom:
  warmup:
    MLModelWarmer:
      enabled: true
      name: ${self:service}-${self:provider.stage}-warmer
      roleName: ${self:service}-${self:provider.stage}-warmer-role
      events:
        - schedule: rate(4 minutes)
      concurrency: ${env:WARMER_CONCURRENCY, 2}
      verbose: false
      timeout: 100
      payload:
        source: KEEP_LAMBDA_WARM
plugins:
  - serverless-plugin-warmup
Here, we used the serverless-plugin-warmup plugin. Take note of the payload:
{ "source": "KEEP_LAMBDA_WARM" }
Add the following package.json file as well to install serverless-plugin-warmup:
{
  "name": "ml-model",
  "version": "1.0.0",
  "description": "",
  "main": "index.js",
  "dependencies": {},
  "devDependencies": {
    "serverless-plugin-warmup": "8.2.1"
  },
  "scripts": {
    "test": "echo \"Error: no test specified\" && exit 1"
  },
  "author": "",
  "license": "ISC"
}
Dockerfile
The only thing left before deployment is our Dockerfile:
###########
# BUILDER #
###########
FROM public.ecr.aws/lambda/python:3.10 as builder

RUN pip3 install --upgrade pip

COPY requirements.txt  .
RUN  pip3 install -r requirements.txt --target "${LAMBDA_TASK_ROOT}"

#########
# FINAL #
#########
FROM public.ecr.aws/lambda/python:3.10
RUN pip3 install --upgrade pip

COPY --from=builder ${LAMBDA_TASK_ROOT} ${LAMBDA_TASK_ROOT}

COPY . ${LAMBDA_TASK_ROOT}

CMD [ "handler.handle" ]
So, we used a base image for Lambda provided by AWS. The image is built in two stages to keep the final image size minimal. At the end, we specified which function will be called when Lambda is invoked.
Your project directory should now look like this:
├── Dockerfile
├── handler.py
├── package.json
├── requirements.txt
├── sentiment_model.py
└── serverless.yml
Deployment with GitHub Actions
Since we're true professionals, we'll use GitHub Actions to deploy our Lambda function. To do that we first need to add a CI/CD configuration.
Create the following file and folders:
└── .github
    └── workflows
        └── lambda.yml
Then, add the CI/CD configuration to .github/workflows/lambda.yml:
name: ML Lambda Deploy
on:
  push:

env:
  AWS_ACCESS_KEY_ID: ${{ secrets.AWS_ACCESS_KEY_ID }}
  AWS_SECRET_ACCESS_KEY: ${{ secrets.AWS_SECRET_ACCESS_KEY }}
  AWS_DEFAULT_REGION: eu-west-1

jobs:
  deploy-development:
    strategy:
      fail-fast: false
      matrix:
        python-version: ['3.10']
        node-version: [18]
        os: [ubuntu-latest]
    runs-on: ${{ matrix.os }}
    steps:
      - name: Checkout Code
        uses: actions/checkout@v3
      - name: Set up Python 3.10
        uses: actions/setup-python@v3
        with:
          python-version: ${{ matrix.python-version }}
      - uses: actions/setup-node@v3
        with:
          node-version: ${{ matrix.node-version }}
      - name: Install Serverless Framework
        run: npm install -g serverless
      - name: Install NPM dependencies
        run: npm install
      - name: Deploy
        run: sls deploy --stage development --verbose
Inside the newly added job, deploy-development, we:
- Prepared the basic environment by installing Python and Node.
- Installed Serverless Framework as a global dependency -- so we're able to run
slscommands. - Installed dependencies from package.json -- at this point, it's just the serverless-plugin-warmup plugin.
- Deployed our application by running the
sls deploy --stage development --verbosecommand.
You can try to deploy directly from your computer to AWS by running
npm installandserverless deploy --stage developmentinside "services/tasks_api". You need Serverless Framework installed as well as npm and Node.js. You also need to set your AWS credentials.
AWS Credentials
Before you can commit and push, you'll need to add AWS credentials to GitHub.
If you don't have an AWS account yet, create one from the AWS console.
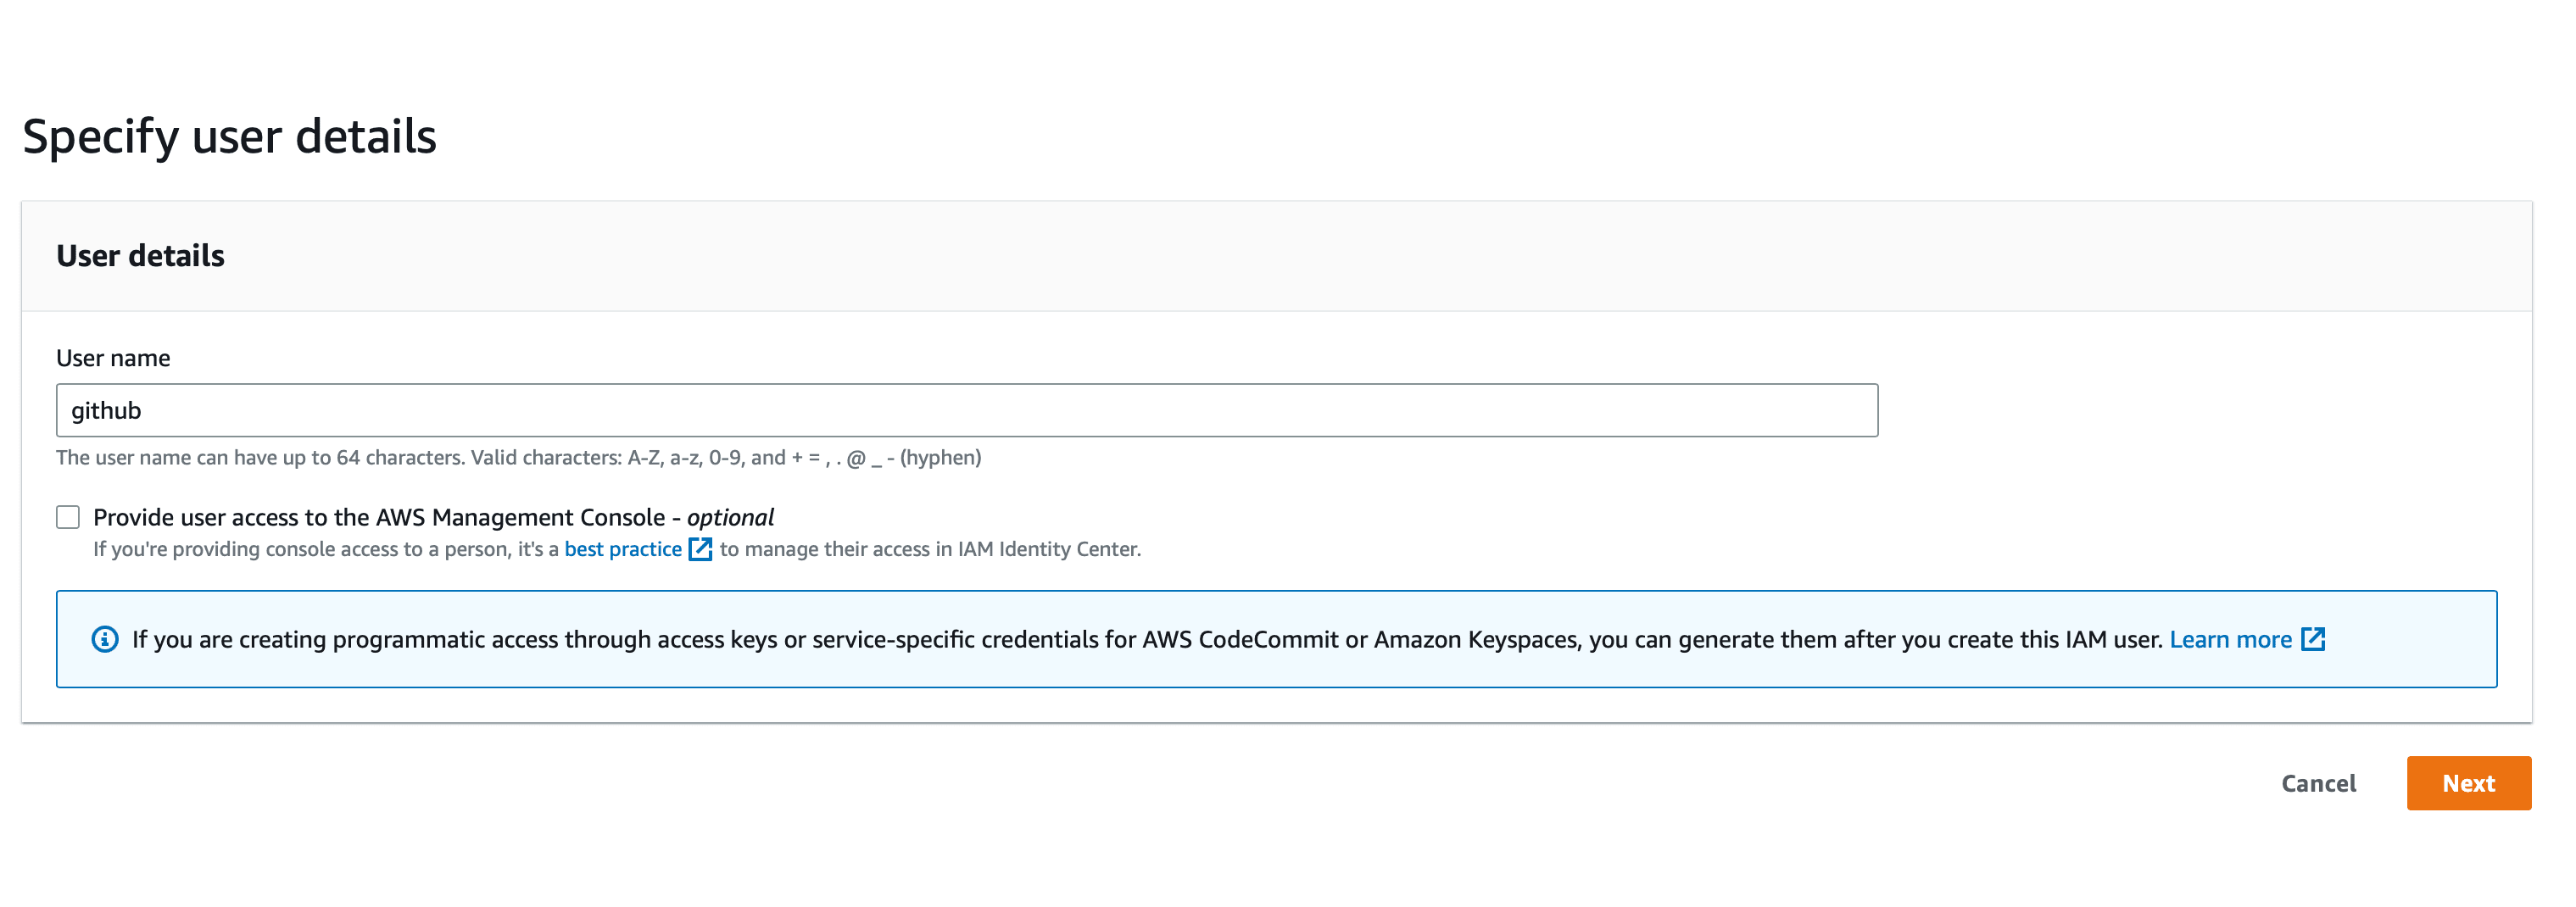
First, open the IAM console. Then, click "Add user". Enter github for the user name. Click "Next".
On the next step, select "Attach policies directly" and select "AdministratorAccess".

Click "Next" and then "Create user". Once your user is created (you'll see it in the list of users), click on it to open its details. Once you're there, switch to the "Security credentials" tab and click on "Create access key".

After that, select "Application running outside of AWS" and click "Next". On next screen, click on "Create access key".

After you have credentials for your github IAM user, you need to add them to GitHub. To do that go to your repository and click on "Settings" -> "Secrets and variables -> Actions". Next, click on "New repository secret". Create a secret for AWS_ACCESS_KEY_ID. Then, create another one for AWS_SECRET_ACCESS_KEY. Make sure to set the values to the values of the credentials that you just created.
Commit and push your code.
Check the pipeline's output to make sure it was successful. Extend the Deploy steps inside the deploy-development job's output to see the details.
It can take several minutes for the deployment to succeed.
End-to-End Test
Finally, let's add an end-to-end test for our Lambda. This way we'll make sure that our Lambda is working as expected. Also, it'll provide an example of its usage.
First, add Boto3 and pytest to requirements.txt:
boto3==1.28.25
pytest==7.4.0
torch==2.0.1
transformers==4.31.0
Second, create a new module called tests.py:
import json

import boto3


def test_sentiment_is_predicted():
    client = boto3.client('lambda')
    response = client.invoke(
        FunctionName='ml-model-development-ml_model',
        InvocationType='RequestResponse',
        Payload=json.dumps({
            "text": "I am so happy! I love this tutorial! You really did a great job!"
        })
    )

    assert json.loads(response['Payload'].read().decode('utf-8'))["sentiment"] == "positive"
Here, we used Boto3 to invoke our Lambda function. We passed the text -- a very positive one -- to predict the sentiment for as a payload Then, we asserted that the sentiment is positive.
Feel free to run your tests locally via
python -m pytest tests.py. Just make sure to install the new dependencies. You'll need to have your AWS credentials set up.
Add the end-to-end test job to .github/workflows/lambda.yml
name: ML Lambda Deploy
on:
  push:

env:
  AWS_ACCESS_KEY_ID: ${{ secrets.AWS_ACCESS_KEY_ID }}
  AWS_SECRET_ACCESS_KEY: ${{ secrets.AWS_SECRET_ACCESS_KEY }}
  AWS_DEFAULT_REGION: eu-west-1
  APP_ENVIRONMENT: development  # new

jobs:
  deploy-development:
    strategy:
      fail-fast: false
      matrix:
        python-version: ['3.10']
        node-version: [18]
        os: [ubuntu-latest]
    runs-on: ${{ matrix.os }}
    steps:
      - name: Checkout Code
        uses: actions/checkout@v3
      - name: Set up Python 3.10
        uses: actions/setup-python@v3
        with:
          python-version: ${{ matrix.python-version }}
      - uses: actions/setup-node@v3
        with:
          node-version: ${{ matrix.node-version }}
      - name: Install Serverless Framework
        run: npm install -g serverless
      - name: Install NPM dependencies
        run: npm install
      - name: Deploy
        run: sls deploy --stage development --verbose
  e2e:  # new
    needs: [deploy-development]
    strategy:
      fail-fast: false
      matrix:
        python-version: [ '3.10' ]
        os: [ ubuntu-latest ]
    runs-on: ${{ matrix.os }}
    steps:
      - name: Checkout Code
        uses: actions/checkout@v3
      - name: Set up Python 3.10
        uses: actions/setup-python@v3
        with:
          python-version: ${{ matrix.python-version }}
      - name: Install Dependencies
        run: pip install -r requirements.txt
      - name: Run pytest
        run: pytest tests.py
That's it! Commit and push your code. You should see the pipeline running. It should succeed.
Congrats! Now you have a fully automated CI/CD pipeline that deploys your Lambda function serving ML model.
You can destroy AWS resources by replacing
sls deploy --stage development --verbosewithsls remove --stage development --verboseinside the deploy-development job.
Conclusion
In this tutorial, you learned how to deploy a ML model to AWS Lambda and how to consume it with the Boto3 library. You also learned how to create a CI/CD pipeline that deploys your Lambda function automatically and runs end-to-end tests for it. You used Serverless Framework to deploy your Lambda function and GitHub Actions to create a CI/CD pipeline.