 Nik Tomazic
This tutorial looks at how to implement a Django REST-based authentication system (via Django REST Framework) and integrate it with Auth.js (formerly known as NextAuth.js) on the frontend. It covers setting up credentials-based authentication as well as social authentication with Google.
How do I make Django REST Framework and Auth.js work together?
How can Django and Next.js be used together?
Contents
Introduction
Django's default authentication system is an excellent out-of-the-box solution for full-stack Django projects. That said, it can be pretty difficult to utilize Django's built-in authentication when using Django REST Framework with client-server architecture. On top of that, Django doesn't natively support social authentication.
Fortunately, you can expose your Django's authentication system as an API and add social auth support with the django-allauth and dj-rest-auth community-developed packages. Once your auth system is exposed, connecting to it from your frontend is relatively easy.
Curious about how to just use the django-allauth and dj-rest-auth packages to implement a Django REST-based authentication system? Check out Django REST Framework Authentication.
While credentials-based authentication is easy to implement on the frontend, problems arise when adding social authentication. Each social provider is different, and adding support for each of them individually can be extremely time-consuming.
Due to that, there's Auth.js, a standardized open-source authentication solution for Next.js, SvelteKit, and SolidStart. The library comes with credentials-based authentication, passwordless authentication, social authentication, and more. It also supports more than 60 social providers.
In this tutorial, we'll look at how to implement a Django REST-based authentication system and connect to it from a Next.js frontend. By the end of this tutorial, you'll have a fully working authentication system that supports social authentication. We'll first work on the backend and then move on to the frontend.
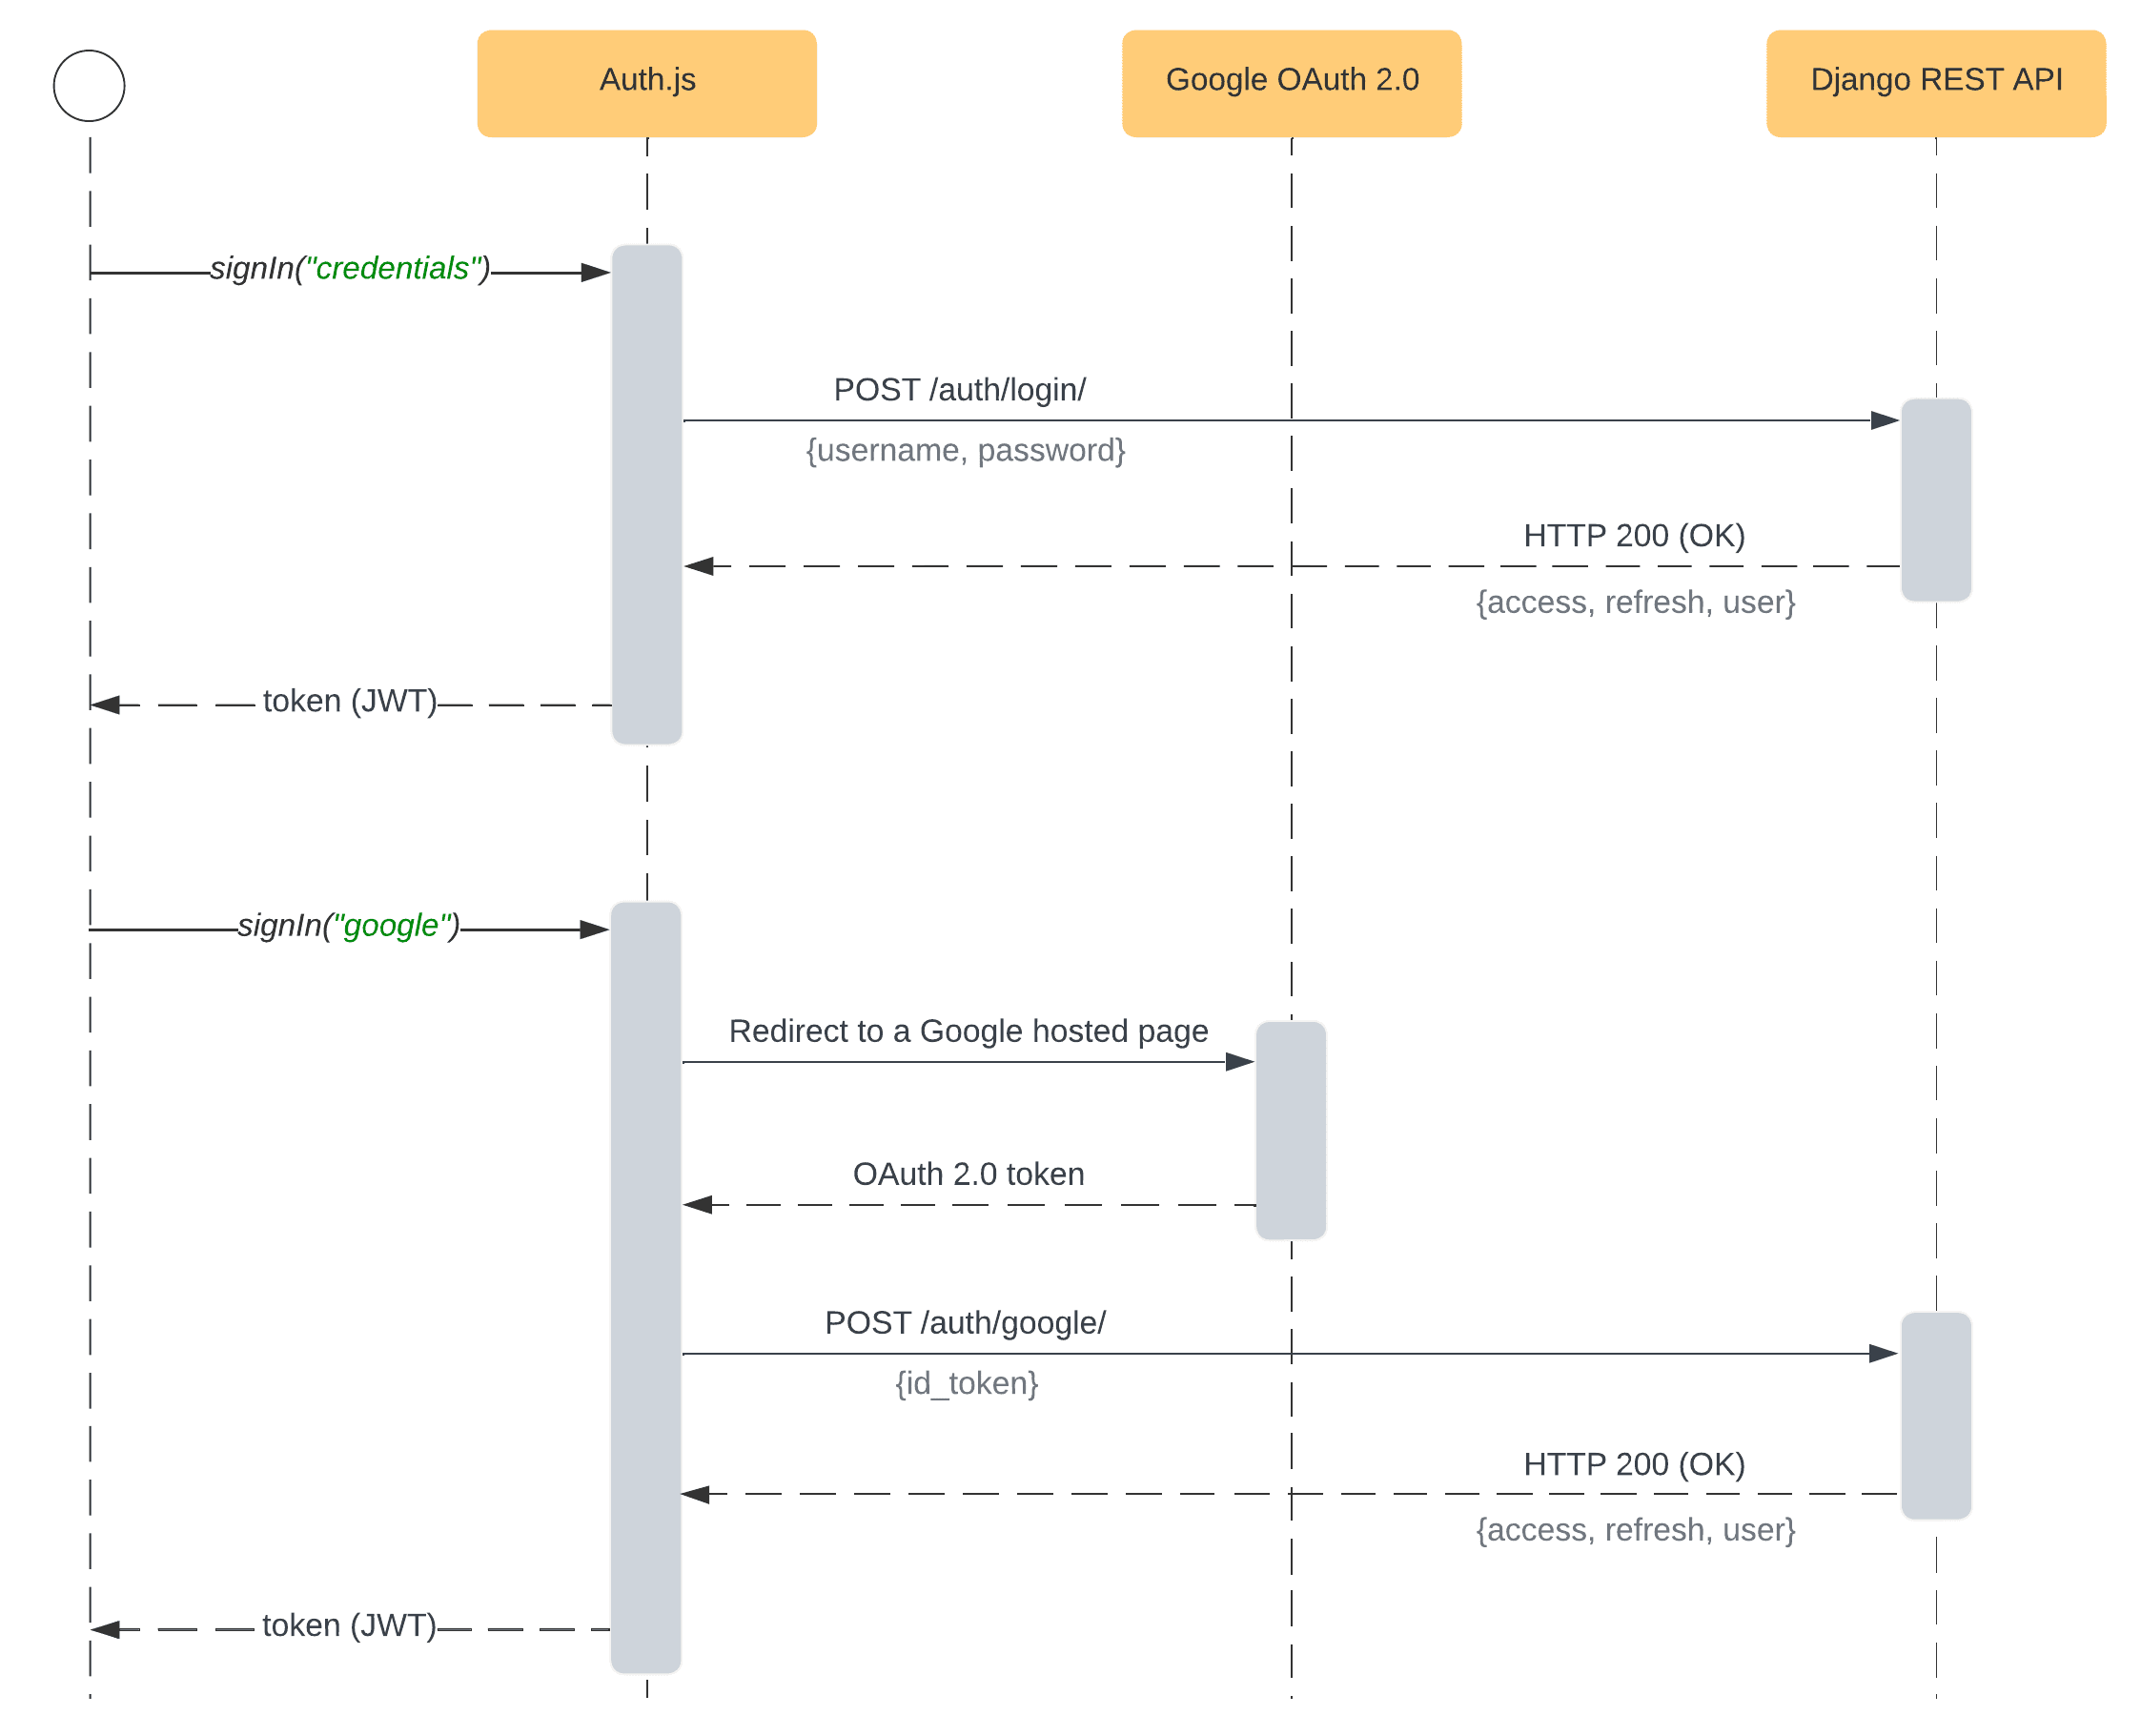
The implemented solution will have the following authentication flow:
Objectives
By the end of this tutorial, you'll be able to:
- Implement a Django REST-based authentication system using Django REST Framework, django-allauth, and dj-rest-auth.
- Enable and configure JSON Web Token authentication via djangorestframework-simplejwt.
- Set up django-cors-headers to avoid CORS problems when connecting from the frontend.
- Set up Auth.js to support credentials-based authentication as well as social authentication.
- Connect Django REST-based authentication system with Auth.js.
- Add social authentication with Google.
Backend
In this section, we'll create a new Django project, start a dedicated app for authentication, install and configure all the dependencies, and test the authentication system via cURL.
Feel free to skip the Django setup and follow along with your project.
Django Setup
Start by creating a new directory for your project and a virtual environment:
$ mkdir django-rest-authjs && cd django-rest-authjs
$ python3.11 -m venv env
$ source env/bin/activate
(env)$
Feel free to swap out virtualenv and Pip for Poetry or Pipenv. For more, review Modern Python Environments.
Next, install Django and bootstrap a new project:
(env)$ pip install Django==4.2.3
(env)$ django-admin startproject core .
Migrate the database and run the server:
(env)$ python manage.py migrate
(env)$ python manage.py runserver
Lastly, open your favorite web browser and navigate to http://localhost:8000. You should be able to see the default Django landing page.
Authentication App
To make our project a bit more organized we'll start a dedicated app for authentication. The app will include authentication views and URLs.
Create a new app:
(env)$ python manage.py startapp authentication
Add it to INSTALLED_APPS in core/settings.py:
# core/settings.py

INSTALLED_APPS = [
    # ...
    "authentication.apps.AuthenticationConfig",
]
Create an app-level urls.py file in the "authentication" folder:
# authentication/urls.py

from django.urls import path
from . import views

urlpatterns = [
    # URLs will come here
]
Register the app-level urls.py globally:
# core/urls.py

from django.contrib import admin
from django.urls import path, include


urlpatterns = [
    path('api/auth/', include('authentication.urls')),
    path("admin/", admin.site.urls),
]
That's it for the initial setup.
Credentials-based Authentication
In this section, we'll set up Django REST Framework, django-allauth, and dj-rest-auth to enable credentials-based authentication. Additionally, we'll set up django-cors-headers to avoid CORS problems when connecting from the frontend.
Django REST Framework
Start by installing Django REST Framework:
(env)$ pip install djangorestframework==3.14.0
Next, navigate to core/settings.py and add it to INSTALLED_APPS along with authtoken:
# core/settings.py

INSTALLED_APPS = [
    # ...
    "rest_framework",
    "rest_framework.authtoken",
]
The authtoken app is required since we'll use token-based authentication instead of Django's default SessionAuthentication. Token authentication is more appropriate for client-server setups.
There are two token-based authentication systems we can choose from:
- Built-in TokenAuthentication
- JWT Authentication via a third-party package
I recommend you go with JWT authentication via the djangorestframework-simplejwt plugin. JWT approach is better because it is more secure, easier on the database, and has standardized HTTP responses.
To install the Simple JWT plugin, run:
$(env) pip install djangorestframework-simplejwt==5.2.2
Next, add it to INSTALLED_APPS under rest_framework.authtoken:
# core/settings.py

INSTALLED_APPS = [
    # ...
    "rest_framework.authtoken",
    "rest_framework_simplejwt",
]
Then, add the following settings to the bottom of core/settings.py:
# core/settings.py

SIMPLE_JWT = {
    "ACCESS_TOKEN_LIFETIME": timedelta(minutes=60),
    "REFRESH_TOKEN_LIFETIME": timedelta(days=7),
    "ROTATE_REFRESH_TOKENS": False,
    "BLACKLIST_AFTER_ROTATION": False,
    "UPDATE_LAST_LOGIN": True,
    "SIGNING_KEY": "complexsigningkey",  # generate a key and replace me
    "ALGORITHM": "HS512",
}
Feel free to modify these settings according to your needs. To learn what each variable does, check out the official docs.
Don't forget about the import:
from datetime import timedelta
Lastly, change the default DRF authentication class:
# core/settings.py

REST_FRAMEWORK = {
    "DEFAULT_AUTHENTICATION_CLASSES": [
        "rest_framework_simplejwt.authentication.JWTAuthentication",
    ]
}
django-allauth
First, install django-allauth:
(env)$ pip install django-allauth==0.52.0
Next, navigate to settings.py, and add it to INSTALLED_APPS along with the account and socialaccount apps:
# core/settings.py

INSTALLED_APPS = [
    "django.contrib.sites",  # make sure 'django.contrib.sites' is installed
    # ...
    "allauth",
    "allauth.account",
    "allauth.socialaccount",  # add if you want social authentication
]
django-allauth depends on Django's "sites" framework so make sure you have it installed. On top of that, make sure that you have the SITE_ID set:
# core/settings.py

SITE_ID = 1  # make sure SITE_ID is set
Next, you should turn off the email verification functionality:
# core/settings.py

ACCOUNT_EMAIL_REQUIRED = False
ACCOUNT_EMAIL_VERIFICATION = "none"
Email verification should be turned off in this step because our Django project isn't configured to send out emails. On top of that, we don't have the endpoints that would allow users to verify their email addresses. More on this at the end of the tutorial.
Lastly, migrate the database once again:
(env)$ python manage.py migrate
dj-rest-auth
Start by installing the dj-rest-auth package:
(env)$ pip install "dj-rest-auth[with_social]==4.0.0"
We need to use the with_social specifier since we want to enable the standard registration process. Additionally, we'll utilize this package later when we enable social authentication.
Next, navigate to core/settings.py add it to INSTALLED_APPS:
# core/settings.py

INSTALLED_APPS = [
    # ...
    "dj_rest_auth",
    "dj_rest_auth.registration",
]
Then add the following configuration settings to settings.py:
# core/settings.py

REST_AUTH = {
    "USE_JWT": True,
    "JWT_AUTH_HTTPONLY": False,
}
Notes:
USE_JWTis required because we're using djangorestframework-simplejwt.JWT_AUTH_HTTPONLYshould be off, otherwise dj-rest-auth won't send out refresh tokens.
For all
REST_AUTHsettings check out the official docs.
At the time of writing, the official installation guide tells you to register the dj_rest_auth.urls. I don't recommend you do that since the default URLs contain broken URLs if not correctly configured (e.g., password reset, email verification).
Instead, take a look at the dj-rest-auth source code and handpick the URLs you need:
Update authentication/urls.py like so:
# authentication/urls.py

from dj_rest_auth.jwt_auth import get_refresh_view
from dj_rest_auth.registration.views import RegisterView
from dj_rest_auth.views import LoginView, LogoutView, UserDetailsView
from django.urls import path
from rest_framework_simplejwt.views import TokenVerifyView

urlpatterns = [
    path("register/", RegisterView.as_view(), name="rest_register"),
    path("login/", LoginView.as_view(), name="rest_login"),
    path("logout/", LogoutView.as_view(), name="rest_logout"),
    path("user/", UserDetailsView.as_view(), name="rest_user_details"),
    path("token/verify/", TokenVerifyView.as_view(), name="token_verify"),
    path("token/refresh/", get_refresh_view().as_view(), name="token_refresh"),
]
django-cors-headers
The last package we need to install and configure is django-cors-headers. This package will set the correct CORS headers when our frontend communicates with the backend.
First, install it by running the following command:
$(env) pip install django-cors-headers==4.1.0
Add it to INSTALLED_APPS in core/settings.py:
# core/settings.py

INSTALLED_APPS = [
    # ...
    "corsheaders",
]
Add the CorsMiddleware to the MIDDLEWARE list:
# core/settings.py

MIDDLEWARE = [
    # ...
    "corsheaders.middleware.CorsMiddleware",
    "django.middleware.common.CommonMiddleware",
    # ...
]
You should place CorsMiddleware as high as possible. Especially before any middleware that can generate responses such as Django's CommonMiddleware or Whitenoise's WhiteNoiseMiddleware.
Lastly, add the following settings to the bottom of core/settings.py:
# core/settings.py

if DEBUG:
    CORS_ALLOW_ALL_ORIGINS = True
else:
    CORS_ALLOWED_ORIGINS = [
        "http://localhost:3000/",
        "http://127.0.0.1:3000/",
    ]
Great! That's it.
You now have a fully working credentials-based authentication system that uses JSON web tokens.
Testing
To test the API, we'll use cURL. We'll also pipe the responses into jq to automatically format and color highlight them.
Start by running the Django development server:
(env)$ python manage.py runserver
Register
First, create a user:
$ curl -XPOST -H "Content-type: application/json" -d '{
      "username": "user1",
      "password1": "complexpassword123",
      "password2": "complexpassword123"
  }' 'http://localhost:8000/api/auth/register/' | jq
You should get a similar response:
{
  "access": "eyJhb...",
  "refresh": "eyJhb...",
  "user": {
    "pk": 1,
    "username": "user1",
    "email": ""
  }
}
You can now use the access token to authenticate yourself. The access token is valid for the time specified in core/settings.py, and then it has to be refreshed using the refresh token.
Login
Log in as the newly created user:
$ curl -XPOST -H "Content-type: application/json" -d '{
      "username": "user1",
      "password": "complexpassword123"
  }' 'http://localhost:8000/api/auth/login/' | jq
The response will be similar to this one:
{
  "access": "eyJhb...",
  "refresh": "eyJhb...",
  "user": {
    "pk": 1,
    "username": "user1",
    "email": ""
  }
}
User Details
Get user details via the obtained access token:
$ curl -XGET -H 'Authorization: Bearer <your_access_token>' \
    -H "Content-type: application/json" 'http://localhost:8000/api/auth/user/' | jq
Response:
{
  "pk": 1,
  "username": "user1",
  "email": ""
}
Token Verify
To verify that the token is still valid, you can pass it to /api/auth/token/verify/ like so:
$ curl -XPOST -H "Content-type: application/json" -d '{
    "token": "<your_access_token>"
  }' 'http://localhost:8000/api/auth/token/verify/' | jq
Response:
{}
Status codes:
200means the token is still valid.4xxmeans that the token is no longer valid.
Token Refresh
To obtain a refreshed access token, you'll have to use your refresh token like so:
$ curl -XPOST -H "Content-type: application/json" -d '{
    "refresh": "your_refresh_token>"
  }' 'http://localhost:8000/api/auth/token/refresh/' | jq
Response:
{
  "access": "eyJhb...",
  "access_expiration": "2023-07-11T17:42:22.480739Z"
}
The response will contain a new access token and the expiration time.
Logout
To log the user out try sending the following request:
$ curl -XPOST -H 'Authorization: Bearer <your_access-token>' \
    -H "Content-type: application/json" 'http://localhost:8000/api/auth/logout/' | jq
Response:
{
  "detail": "Neither cookies or blacklist are enabled. Delete the token on client."
}
Since we disabled cookies and haven't configured the blacklist, this endpoint doesn't do anything. There's no need to call it when signing out the user. The only thing you have to do is to delete the token from the client.
If you want a more secure approach, go ahead and set up a blacklist via the JWT Blacklist app.
Social Authentication with Google
In this section, we'll look at how to set up social authentication. I'll guide you through setting up social authentication with Google, but you can use similar steps for any other social provider.
If you're not interested in setting up social authentication, feel free to skip this section.
Setup
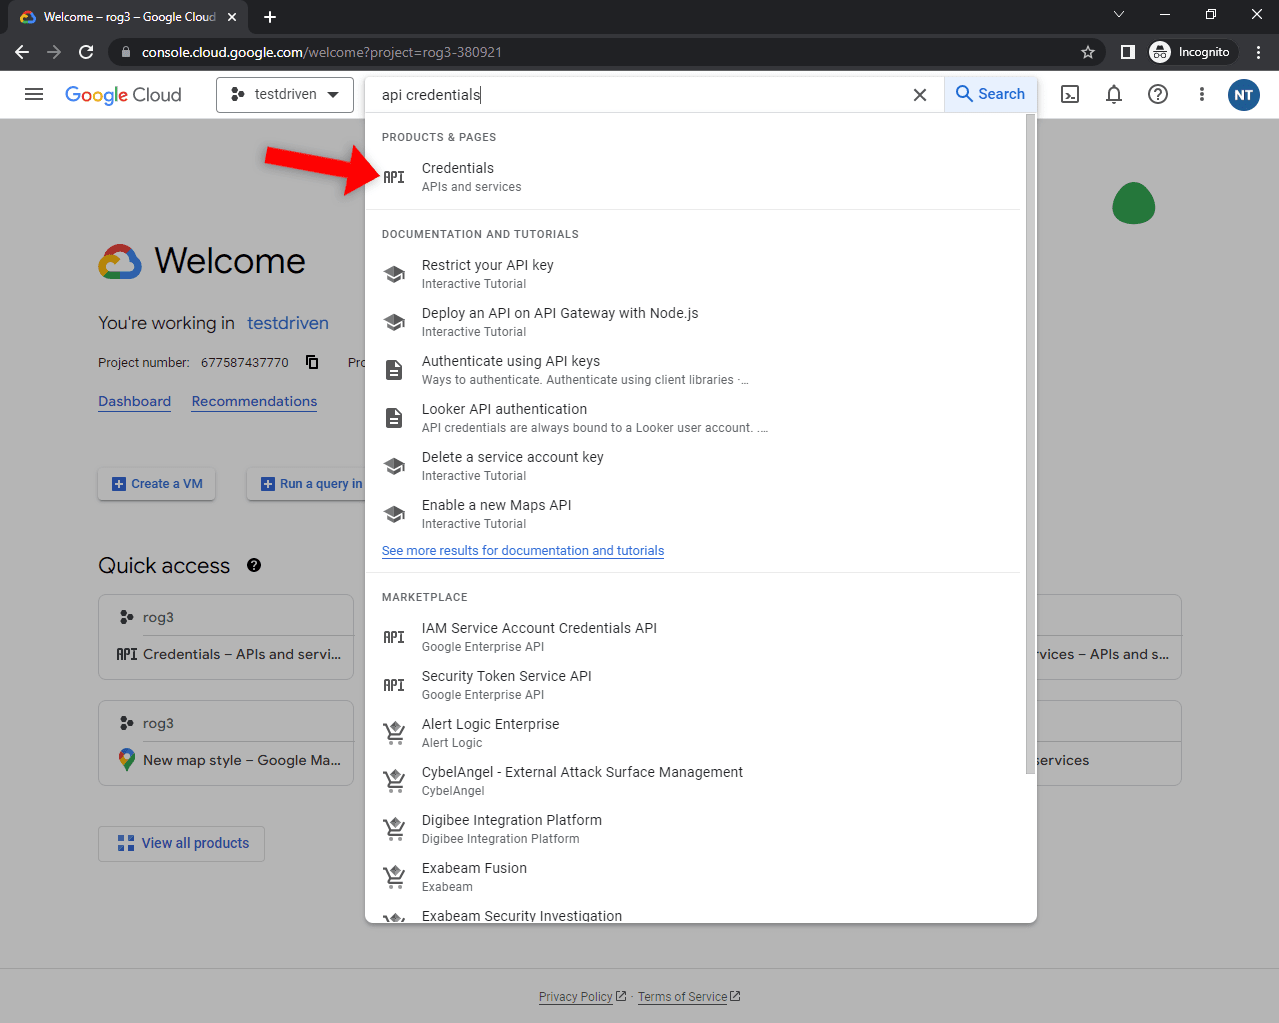
To enable Google sign up, you first need to create an OAuth Client key. Go ahead and navigate to your Google Cloud Console, select the project you'd like to use, and search for "API Credentials":
Next, click on the "Create credentials" button and select "OAuth Client ID" in the dropdown:

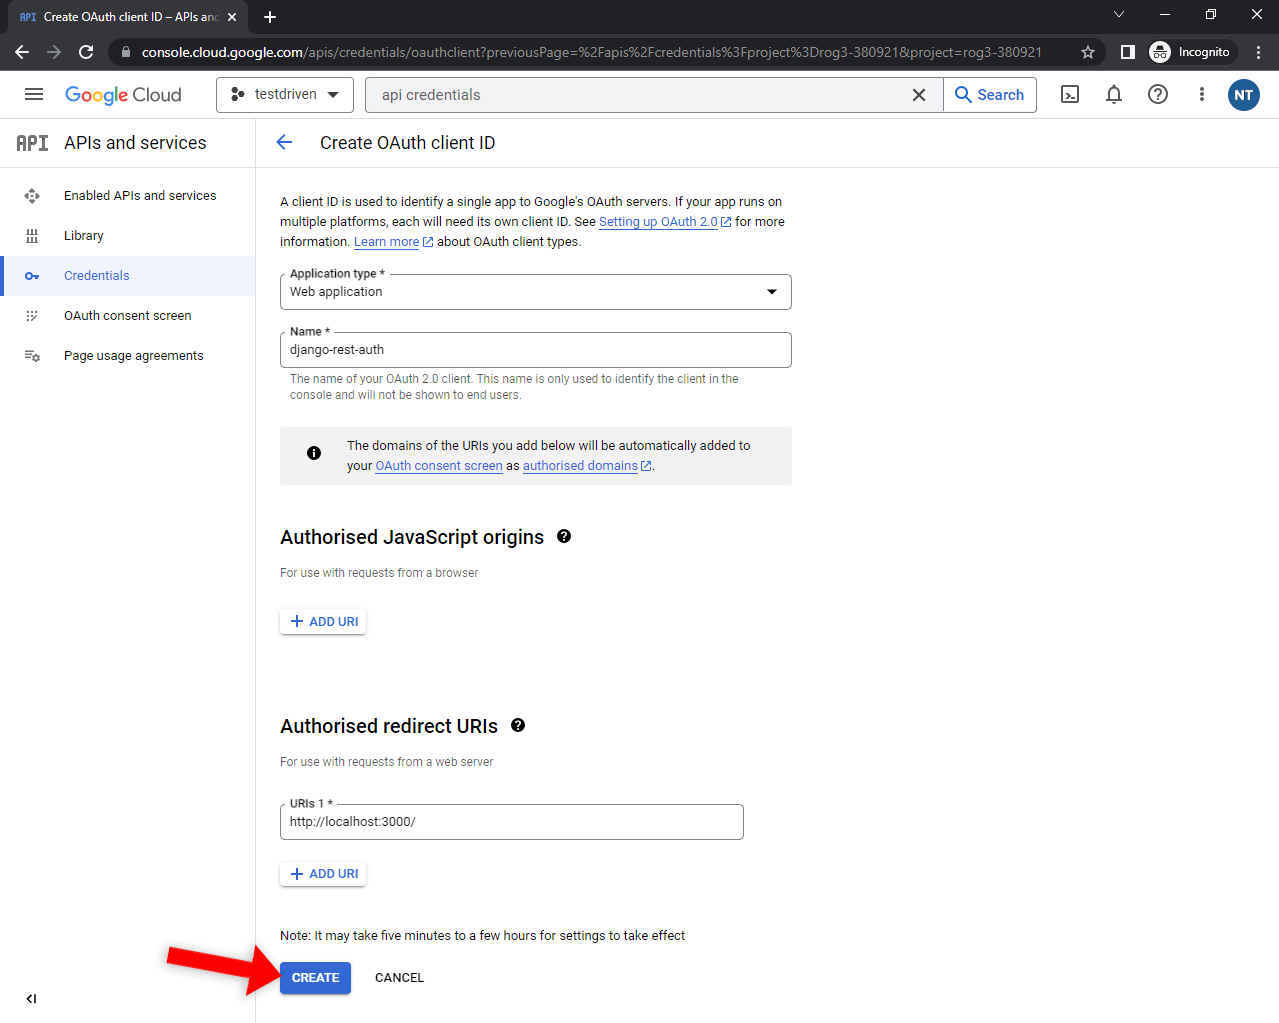
Select "Web application", pick a custom name, and add your frontend URL as the authorized redirect URI. For easier testing, I recommend you also add:
- http://127.0.0.1:3000
- http://127.0.0.1:3000/api/auth/callback/google
- https://developers.google.com/oauthplayground
Lastly, click "Create" to generate the credentials:
You'll be presented with your "Client ID" and "Client secret". Take note of them since we'll need them in the next step.
Moving along, head back to your Django project and add the following app to INSTALLED_APPS:
# core/settings.py

INSTALLED_APPS = [
    # ...
    "allauth.socialaccount.providers.google",
]
Next, add the SOCIALACCOUNT_PROVIDERS setting to core/settings.py like so:
# core/settings.py

SOCIALACCOUNT_PROVIDERS = {
    "google": {
        "APP": {
            "client_id": "<your google client id>",  # replace me
            "secret": "<your google secret>",        # replace me
            "key": "",                               # leave empty
        },
        "SCOPE": [
            "profile",
            "email",
        ],
        "AUTH_PARAMS": {
            "access_type": "online",
        },
        "VERIFIED_EMAIL": True,
    },
}
Make sure to replace
<your google client id>and<your google secret>with your actual keys. Leave thekeyproperty empty since it isn't required for Google social authentication.
Add a new view in authentication/views.py that inherits from SocialLoginView:
# authentication/views.py

from dj_rest_auth.registration.views import SocialLoginView
from allauth.socialaccount.providers.google.views import GoogleOAuth2Adapter
from allauth.socialaccount.providers.oauth2.client import OAuth2Client


class GoogleLogin(SocialLoginView):
    adapter_class = GoogleOAuth2Adapter
    callback_url = "http://127.0.0.1:3000/"
    client_class = OAuth2Client
Lastly, add the following two URLs to authentication/urls.py:
# authentication/urls.py

from allauth.socialaccount.views import signup
from authentication.views import GoogleLogin

urlpatterns = [
    # ...
    path("google/", GoogleLogin.as_view(), name="google_login"),
]
Don't forget about the import:
from authentication.views import GoogleLogin
Testing
To test if the API endpoint works, you first need to obtain an id_token and then POST it to the backend's endpoint. The easiest way to get the id_token is via Google's OAuth 2.0 Playground.
To get the token, you can follow this wonderful article.
Next, pass the id_token as the access_token in the cURL request body:
$ curl -XPOST -H "Content-type: application/json" -d '{
    "access_token": "<your_id_token>"
  }' 'http://localhost:8000/api/auth/google/'
You should get a similar response:
{
  "access": "eyJhb...",
  "refresh": "eyJhb...",
  "user": {
    "pk": 2,
    "username": "user2",
    "email": ""
  }
}
You can now use the access token to authenticate yourself.
Frontend
In this section, we’ll bootstrap a Next.js project, set up Chakra UI, install and configure Auth.js, and enable credentials-based and social authentication. Lastly, we'll also test the authentication system.
The web app will have the following endpoints:
/prompts the user to sign in./profiledisplays the user's account information./api/auth/...handled by Auth.js dynamic API router.
Feel free to skip the first two sections and follow along with your own project.
Next.js Setup
Start by using create-next-app to generate a Next.js project:
$ npx [email protected] django-rest-authjs-frontend

√ Would you like to use TypeScript? ... Yes
√ Would you like to use ESLint? ... Yes
√ Would you like to use Tailwind CSS? ... No
√ Would you like to use `src/` directory? ... No
√ Would you like to use App Router? (recommended) ... No
√ Would you like to customize the default import alias? ... No

Creating a new Next.js app in ~\django-rest-authjs-frontend.
For the sake of simplicity, I recommend that you only say "Yes" to TypeScript and ESLint. You can also opt-in for TailwindCSS if you prefer that over Chakra UI.
Chakra UI Setup
To simplify the UI building process, we'll incorporate Chakra UI -- a minimalistic, modular, and accessible component library for building React UIs rapidly. The library has built-in components, specialized hooks, a styled system, and more.
Feel free to swap Chakra UI for MUI, AntDesign, TailwindCSS, or any other frontend library.
Install it by running the following command:
$ npm i @chakra-ui/[email protected] @chakra-ui/[email protected] @emotion/[email protected] \
        @emotion/[email protected] [email protected]
Next, create a new theme via extendTheme() and wrap the Component with the ChakraProvider in pages/_app.tsx like so:
// pages/_app.tsx

import type {AppProps} from "next/app";
import {ChakraProvider, extendTheme} from "@chakra-ui/react";

export const theme = extendTheme({});

export default function App({Component, pageProps: {session, ...pageProps}}: AppProps) {
  return (
    <ChakraProvider theme={theme}>
      <Component {...pageProps} />
    </ChakraProvider>
  );
}
Don't forget about the import:
import {ChakraProvider, extendTheme} from "@chakra-ui/react";
We created a new theme since we'll need to pass it to the color mode script in the next step. Additionally, defining a theme like this allows you to customize Chakra in the future easily.
Next, let's take care of the color mode script.
The color mode script makes sure local storage syncing works correctly. It must be added before any content (in our case, in the pages/_document.tsx file).
Include ColorModeScript in your pages/_document.tsx like so:
// pages/_document.tsx

import {Head, Html, Main, NextScript} from "next/document";
import {ColorModeScript} from "@chakra-ui/react";
import {theme} from "./_app";

export default function Document() {
  return (
    <Html lang="en">
      <Head/>
      <body>
        <ColorModeScript initialColorMode={theme.config.initialColorMode}/>
        <Main/>
        <NextScript/>
      </body>
    </Html>
  );
}
Again, don't forget about the imports:
import {ColorModeScript} from "@chakra-ui/react";
import {theme} from "./_app";
Views
Let's replace the default Next.js index page with a login prompt.
Navigate to pages/index.tsx and replace its contents with the following:
// pages/index.tsx

import {Box, Button, Spinner, Text, VStack} from "@chakra-ui/react";

export default function Home() {
  return (
    <Box m={8}>
      <VStack>
        <Text>You are not authenticated.</Text>
        <Button colorScheme="blue" onClick={() => console.log("Beep boop")}>
          Sign in
        </Button>
      </VStack>
    </Box>
  );
}
Start the development server:
$ npx next dev
Open your favorite web browser and navigate to http://127.0.0.1:3000/. You should see a page with the "You are not authenticated" message and a sign in button. Clicking the button should print the debug message to the console.
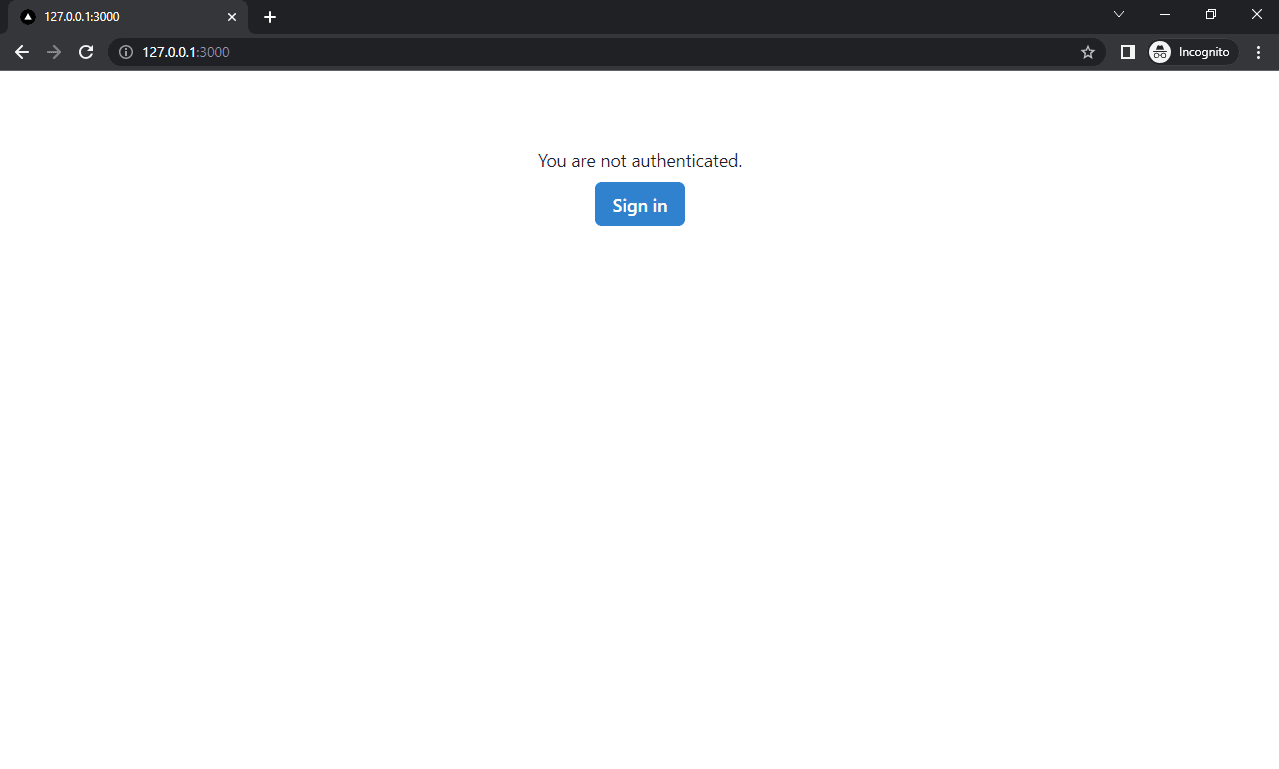
Excellent. That's it for the initial setup.
Credentials-based Authentication
In this section, we'll install Auth.js and take care of the credentials-based authentication.
Axios
Before working with Auth.js, let's install Axios -- a simple promise-based HTTP client for the browser and Node.js. This library will allow us to send HTTP requests to our backend with an elegant and concise syntax.
Install it via NPM:
$ npm install [email protected]
Auth.js
Moving along, install Auth.js:
$ npm install [email protected]
For Auth.js to work properly, we first have to set some environment variables. In Next.js, the environment variables are automatically loaded from .env.local from the project root.
Go ahead and create .env.local with the following contents:
# .env.local

NEXTAUTH_URL=http://127.0.0.1:3000/
NEXTAUTH_SECRET=verycomplexsecretkey
NEXTAUTH_BACKEND_URL=http://127.0.0.1:8000/api/
NEXT_PUBLIC_BACKEND_URL=http://127.0.0.1:8000/api/
Next, we have to create a dynamic route handler and Auth.js configurations folder. Create an "auth" folder in the "pages/api" folder and a [...nextauth].js file in the newly created folder.
pages/
├── api/
│   └── auth/
│       └── [...nextauth].js
├── _app.tsx
├── _document.tsx
└── index.tsx
Before working on the code, let's clarify how Auth.js sessions work. Auth.js comes with two built-in ways of handling sessions:
- Using a database (the session is stored in the database)
- Using a JWT token (the session is stored in a token)
Since we're using Django as our backend, we'll have to go with the second approach. The downside of this approach is the tedious argument passing and storing accessToken, refreshToken, and other sensitive variables in the JWT token.
Paste in the following contents in [...nextauth].js:
// pages/api/auth/[...nextauth].js

import NextAuth from "next-auth";
import CredentialsProvider from "next-auth/providers/credentials";
import axios from "axios";

// These two values should be a bit less than actual token lifetimes
const BACKEND_ACCESS_TOKEN_LIFETIME = 45 * 60;            // 45 minutes
const BACKEND_REFRESH_TOKEN_LIFETIME = 6 * 24 * 60 * 60;  // 6 days

const getCurrentEpochTime = () => {
  return Math.floor(new Date().getTime() / 1000);
};

const SIGN_IN_HANDLERS = {
  "credentials": async (user, account, profile, email, credentials) => {
    return true;
  },
};
const SIGN_IN_PROVIDERS = Object.keys(SIGN_IN_HANDLERS);

export const authOptions = {
  secret: process.env.AUTH_SECRET,
  session: {
    strategy: "jwt",
    maxAge: BACKEND_REFRESH_TOKEN_LIFETIME,
  },
  providers: [
    CredentialsProvider({
      name: "Credentials",
      credentials: {
        username: {label: "Username", type: "text"},
        password: {label: "Password", type: "password"}
      },
      // The data returned from this function is passed forward as the
      // `user` variable to the signIn() and jwt() callback
      async authorize(credentials, req) {
        try {
          const response = await axios({
            url: process.env.NEXTAUTH_BACKEND_URL + "auth/login/",
            method: "post",
            data: credentials,
          });
          const data = response.data;
          if (data) return data;
        } catch (error) {
          console.error(error);
        }
        return null;
      },
    }),
  ],
  callbacks: {
    async signIn({user, account, profile, email, credentials}) {
      if (!SIGN_IN_PROVIDERS.includes(account.provider)) return false;
      return SIGN_IN_HANDLERS[account.provider](
        user, account, profile, email, credentials
      );
    },
    async jwt({user, token, account}) {
      // If `user` and `account` are set that means it is a login event
      if (user && account) {
        let backendResponse = account.provider === "credentials" ? user : account.meta;
        token["user"] = backendResponse.user;
        token["access_token"] = backendResponse.access;
        token["refresh_token"] = backendResponse.refresh;
        token["ref"] = getCurrentEpochTime() + BACKEND_ACCESS_TOKEN_LIFETIME;
        return token;
      }
      // Refresh the backend token if necessary
      if (getCurrentEpochTime() > token["ref"]) {
        const response = await axios({
          method: "post",
          url: process.env.NEXTAUTH_BACKEND_URL + "auth/token/refresh/",
          data: {
            refresh: token["refresh_token"],
          },
        });
        token["access_token"] = response.data.access;
        token["refresh_token"] = response.data.refresh;
        token["ref"] = getCurrentEpochTime() + BACKEND_ACCESS_TOKEN_LIFETIME;
      }
      return token;
    },
    // Since we're using Django as the backend we have to pass the JWT
    // token to the client instead of the `session`.
    async session({token}) {
      return token;
    },
  }
};

export default NextAuth(authOptions);
Notes:
- We first defined the backend token lifetimes and a method for getting the UNIX time.
- The sign in handlers will only be used with social authentication. When using credentials-based authentication, the verification is already performed in the
authorize()method. - We then defined the
authOptions, and addedCredentialsProviderto itsproviders. - In
CredentialsProvider, we defined which fields the sign in form should contain and defined theauthorize()method, which forwards the credentials to the backend to verify them. - We then used the
signIn(),jwt(), andsession()callbacks to attach data to the JWT token and pass it to the client. Backend token refreshing was implemented in thejwt()callback.
To learn more about Auth.js callbacks, take a look at Auth.js Callbacks.
Lastly, wrap your app with SessionProvider in pages/_app.tsx like so:
// pages/_app.tsx

import type {AppProps} from "next/app";
import {SessionProvider} from "next-auth/react";
import {ChakraProvider, extendTheme} from "@chakra-ui/react";

export const theme = extendTheme({});

export default function App({Component, pageProps: {session, ...pageProps}}: AppProps) {
  return (
    <SessionProvider session={session}>
      <ChakraProvider theme={theme}>
        <Component {...pageProps} />
      </ChakraProvider>
    </SessionProvider>
  );
}
Don't forget about the import:
import {SessionProvider} from "next-auth/react";
The SessionProvider will ensure you can access the session via the useSession() hook.
To inject the
Sessiontype, create a new folder named "types" in the project root. Then add the following file named next-auth.d.ts to it.
Views
Carrying on, let's work on the views.
First, modify your pages/index.tsx like so:
// pages/index.tsx

import {useRouter} from "next/router";
import {signIn, useSession} from "next-auth/react";
import {Box, Button, Spinner, Text, VStack} from "@chakra-ui/react";

export default function Home() {

  const router = useRouter();
  const {data: session, status} = useSession();

  if (status == "loading") {
    return <Spinner size="lg"/>;
  }

  // If the user is authenticated redirect to `/profile`
  if (session) {
    router.push("profile");
    return;
  }

  return (
    <Box m={8}>
      <VStack>
        <Text>You are not authenticated.</Text>
        <Button
            colorScheme="blue"
            onClick={() => signIn(undefined, {callbackUrl: "/profile"})}
        >
          Sign in
        </Button>
      </VStack>
    </Box>
  );
}
Notes:
- We used the
useSession()hook to obtain the session from theSessionProvider. - While the session is loading, the user is presented with the
Spinnercomponent. - In case the user is already logged in, we redirect them to
/profileviauseRouter(). - The sign in button now invokes the
signIn()method.
Next, create a new file named profile.tsx in the "pages" folder with the following contents:
// pages/profile.tsx

import {useState} from "react";
import {signOut, useSession} from "next-auth/react";
import {Box, Button, Code, HStack, Spinner, Text, VStack} from "@chakra-ui/react";
import axios from "axios";

export default function Home() {

  const {data: session, status} = useSession({required: true});
  const [response, setResponse] = useState("{}");

  const getUserDetails = async (useToken: boolean) => {
    try {
      const response = await axios({
        method: "get",
        url: process.env.NEXT_PUBLIC_BACKEND_URL + "auth/user/",
        headers: useToken ? {Authorization: "Bearer " + session?.access_token} : {},
      });
      setResponse(JSON.stringify(response.data));
    } catch (error) {
      setResponse(error.message);
    }
  };

  if (status == "loading") {
    return <Spinner size="lg"/>;
  }

  if (session) {
    return (
      <Box m={8}>
        <VStack>
          <Text>PK: {session.user.pk}</Text>
          <Text>Username: {session.user.username}</Text>
          <Text>Email: {session.user.email || "Not provided"}</Text>
          <Code>
            {response}
          </Code>
        </VStack>
        <HStack justifyContent="center" mt={4}>
          <Button colorScheme="blue" onClick={() => getUserDetails(true)}>
            User details (with token)
          </Button>
          <Button colorScheme="orange" onClick={() => getUserDetails(false)}>
            User details (without token)
          </Button>
          <Button colorScheme="red" onClick={() => signOut({callbackUrl: "/"})}>
            Sign out
          </Button>
        </HStack>
      </Box>
    );
  }

  return <></>;
}
Notes:
- We used
useRouter()anduseSession()the same way as in the previous code snippet. - We added the
getUserDetails()method, which fetches user information and displays it. - Clicking the sign out button, invokes the
signOut()method.
Testing
Restart the Next development server:
$ npx next dev
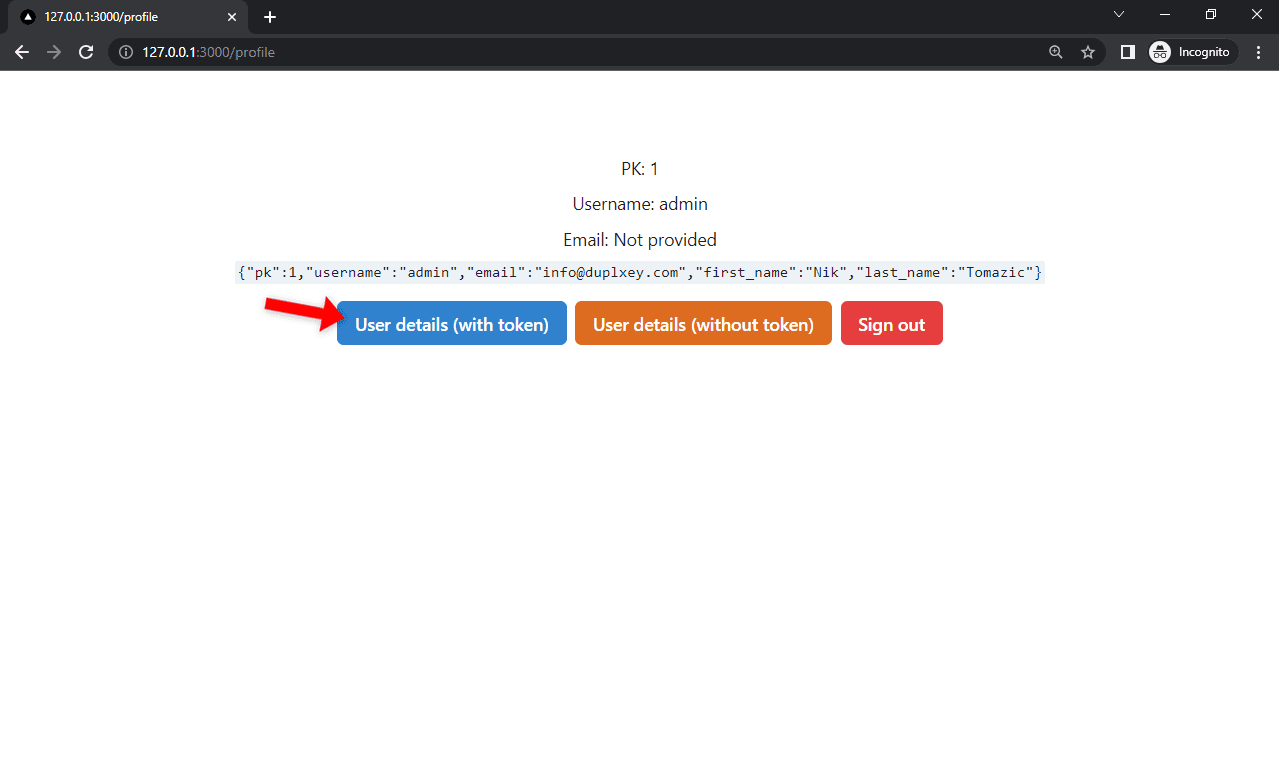
Then open your favorite web browser and navigate to http://127.0.0.1:3000. Click the "Sign in" button to see if you get redirected to the sign in form. Fill out the form and click the "Sign in with Credentials" button.
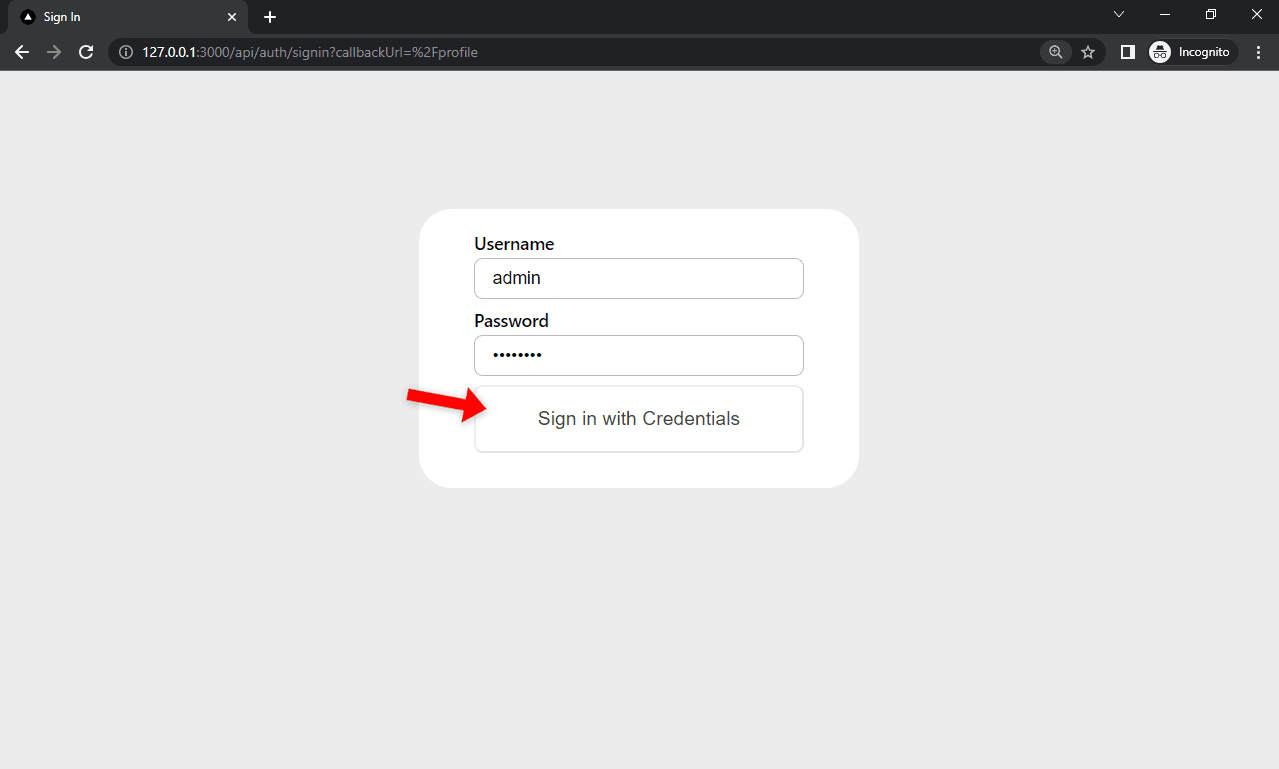
If the login is successful, you'll be redirected to the profile page. Try fetching your user information by using your accessToken.
Social Authentication with Google
In this section, we'll set up social authentication with Google. Integrating other social providers with Auth.js is practically analog. Just make sure your Django backend works before moving to the frontend part.
Feel free to skip this section if you're not interested in social authentication.
Setup
First, add the following two environment variables to .env.local:
# .env.local

# ...
GOOGLE_CLIENT_ID=<your_google_client_id>
GOOGLE_CLIENT_SECRET=<your_google_secret>
Make sure to replace
<your_google_client_id>and<your_google_secret>with your actual keys. Remember that the keys must match those provided in core/settings.py.
Next, register the Google sign in handler in [...nextauth].js:
// pages/api/auth/[...nextauth].js

const SIGN_IN_HANDLERS = {
  // ...
  "google": async (user, account, profile, email, credentials) => {
    try {
      const response = await axios({
        method: "post",
        url: process.env.NEXTAUTH_BACKEND_URL + "auth/google/",
        data: {
          access_token: account["id_token"]
        },
      });
      account["meta"] = response.data;
      return true;
    } catch (error) {
      console.error(error);
      return false;
    }
  }
};
The only purpose of this handler is to forward the user's id_token to the Django social endpoint. Django then takes care of everything else -- e.g., creates the account, signs the user in, etc.
Then add GoogleProvider to the bottom of the providers array in [...nextauth].js:
// pages/api/auth/[...nextauth].js

export const authOptions = {
  // ...
  providers: [
    // ...
    GoogleProvider({
      clientId: process.env.GOOGLE_CLIENT_ID,
      clientSecret: process.env.GOOGLE_CLIENT_SECRET,
      authorization: {
        params: {
          prompt: "consent",
          access_type: "offline",
          response_type: "code"
        }
      }
    }),
  ],
  // ...
};
Don't forget to import GoogleProvider at the top of the file:
import GoogleProvider from "next-auth/providers/google";
That's all we have to do.
Testing
Before testing, ensure your Django backend is running and accessible at the URL defined in .env.local. After that, kill the Next development server process and start it again:
$ npx next dev
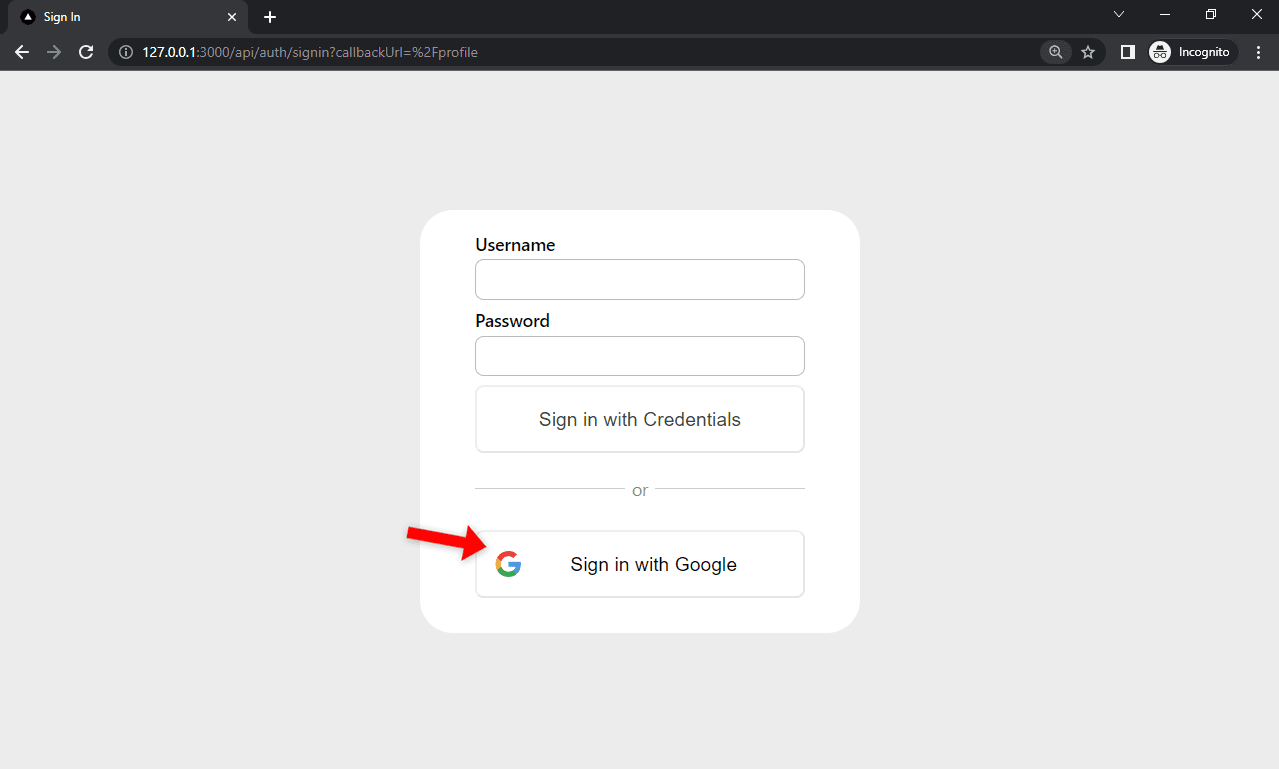
Navigate to http://127.0.0.1:3000/ in your favorite web browser and click on the "Sign in" button. Select "Sign in with Google" and test whether social authentication works.
Conclusion
In this tutorial, we've successfully implemented a Django REST authentication system and linked it with Auth.js. The implemented system supports credentials-based authentication as well as social authentication with Google. It's built in such a way that it's easy to add other social providers such as Twitter, GitHub, and so on.
The source code is available on the django-rest-authjs GitHub repo.
Future steps
- Make sure to implement refresh token rotation for social providers.
- By default, Auth.js doesn't take care of account creation. If you wish to enable user sign ups, either handle it in the
authorize()method or create a dedicated sign up page. - To enable email verification and password reset functionality, take a look at "Email Verification and Password Reset" section of the Django REST Framework Authentication article.
- To enable social account linking functionality, look into "Social Connect Views".