This tutorial looks at how to implement a Django REST-based authentication system with the django-allauth and dj-rest-auth packages. Additionally, it demonstrates how to set up social authentication with Google when using Django REST Framework.
How do I add authentication and registration endpoints to Django Rest Framework?
Contents
Introduction
Django's default authentication system is an excellent out-of-the-box solution for full-stack Django projects. That said, it can be pretty difficult to utilize Django's built-in authentication when using Django REST Framework with client-server architecture. On top of that, Django doesn't natively support social authentication.
Fortunately, the django-allauth and dj-rest-auth packages solve those two problems:
- django-allauth addresses authentication, registration, user management as well as social authentication. It aims to bridge the gap between local authentication and social authentication.
- dj-rest-auth, on the other hand, provides a set of REST API endpoints for handling user registration and other authentication tasks.
Combining these two packages might not be as easy as it sounds. If you're reading this tutorial you've probably already found out that the packages' documentation is not that well-structured or beginner friendly.
As a result, I've decided to write this tutorial, which aims to explain one of the possible approaches to configuring these two packages to work together. The tutorial is split into three main parts:
- Credentials-based authentication
- Email verification and password reset
- Social authentication
At the end of each part, you'll have a working authentication system. Feel free to peruse only the parts that are relevant to your project requirements.
Project Setup
In this section of the tutorial, we'll create a new Django project and start a dedicated app for authentication.
Feel free to skip the Django setup and follow along with your project.
Django Setup
Start by creating a new directory for your project and a virtual environment:
$ mkdir django-rest-allauth && cd django-rest-allauth
$ python3.11 -m venv env
$ source env/bin/activate
(env)$
Feel free to swap out virtualenv and Pip for Poetry or Pipenv. For more, review Modern Python Environments.
Next, install Django and bootstrap a new project:
(env)$ pip install Django==4.2.1
(env)$ django-admin startproject core .
Migrate the database and run the server:
(env)$ python manage.py migrate
(env)$ python manage.py runserver
Lastly, open your favorite web browser and navigate to http://localhost:8000. You should be able to see the default Django landing page.
Authentication App
To make our project a bit more organized we'll start a dedicated app for authentication. The app will be used to define the authentication URLs and views.
Create a new app by running the following command:
(env)$ python manage.py startapp authentication
Next, navigate to core/settings.py and add it to INSTALLED_APPS:
# core/settings.py

INSTALLED_APPS = [
    # ...
    "authentication.apps.AuthenticationConfig",
]
Create an app-level urls.py file in the authentication app:
# authentication/urls.py

from django.urls import path

from . import views


urlpatterns = [
    # URLs will come here
]
Lastly, update the global urls.py with the authentication app:
# core/urls.py

from django.contrib import admin
from django.urls import path, include


urlpatterns = [
    path('api/auth/', include('authentication.urls')),
    path("admin/", admin.site.urls),
]
Great. That's it for the initial setup.
Credentials-based Authentication
In this section, we'll install and configure Django REST Framework, django-allauth, and dj-rest-auth to enable credentials-based authentication.
Django REST Framework
Start by installing Django REST Framework:
(env)$ pip install djangorestframework==3.14.0
Next, navigate to core/settings.py and add it to INSTALLED_APPS along with authtoken:
# core/settings.py

INSTALLED_APPS = [
    # ...
    "rest_framework",
    "rest_framework.authtoken",
]
The authtoken app is required since we'll use TokenAuthentication instead of Django's default SessionAuthentication. Token authentication is a simple token-based HTTP authentication scheme that is appropriate for client-server setups.
Next, add the following to the bottom of the settings file to define the default authentication classes:
# settings/core.py

REST_FRAMEWORK = {
    "DEFAULT_AUTHENTICATION_CLASSES": [
        "rest_framework.authentication.TokenAuthentication",
    ]
}
Migrate the database:
(env)$ python manage.py migrate
django-allauth
First, install django-allauth:
(env)$ pip install django-allauth==0.52.0
Next, navigate to settings.py, and add it to INSTALLED_APPS along with the account and socialaccount apps:
# core/settings.py

INSTALLED_APPS = [
    "django.contrib.sites",  # make sure 'django.contrib.sites' is installed
    # ...
    "allauth",
    "allauth.account",
    "allauth.socialaccount",  # add if you want social authentication
]
django-allauth depends on Django's "sites" framework so make sure you have it installed. On top of that, make sure that you have the SITE_ID set:
# core/settings.py

SITE_ID = 1  # make sure SITE_ID is set
Lastly, migrate the database once again:
(env)$ python manage.py migrate
dj-rest-auth
Start by installing the dj-rest-auth package:
(env)$ pip install "dj-rest-auth[with_social]==4.0.0"
We need to use the with_social specifier since we want to enable the standard registration process. Additionally, we'll utilize this package later when we enable social authentication.
Next, navigate to core/settings.py add it to INSTALLED_APPS:
# core/settings.py

INSTALLED_APPS = [
    # ...
    "dj_rest_auth",
    "dj_rest_auth.registration",
]
At the time of writing, the official installation guide tells you to register the dj_rest_auth.urls. I don't recommend you do that since the default URLs contain URLs that are broken if not properly configured (e.g., password reset, email verification).
Instead let's take a look at the dj-rest-auth source code and handpick the URLs we need:
Update authentication/urls.py like so:
# authentication/urls.py

from dj_rest_auth.registration.views import RegisterView
from dj_rest_auth.views import LoginView, LogoutView, UserDetailsView
from django.urls import path


urlpatterns = [
    path("register/", RegisterView.as_view(), name="rest_register"),
    path("login/", LoginView.as_view(), name="rest_login"),
    path("logout/", LogoutView.as_view(), name="rest_logout"),
    path("user/", UserDetailsView.as_view(), name="rest_user_details"),
]
That's it. The basic authentication flow should now be working. Let's test it.
Testing
To test the API we'll use cURL. We'll also pipe the responses into jq to automatically format and color highlight them.
Start by running the Django development server:
(env)$ python manage.py runserver
Register
Then, to create an account run the following in a new terminal window:
$ curl -XPOST -H "Content-type: application/json" -d '{
      "username": "user1",
      "password1": "complexpassword123",
      "password2": "complexpassword123"
  }' 'http://localhost:8000/api/auth/register/' | jq
By default, you'll get an empty response.
Login
You can now use the created account to obtain an authentication token:
$ curl -XPOST -H "Content-type: application/json" -d '{
      "username": "user1",
      "password": "complexpassword123"
  }' 'http://localhost:8000/api/auth/login/' | jq
The response will be similar to this one:
{
    "key": "<your_token>"
}
User Details
Now pass the token in the Authorization header to fetch the user details:
$ curl -XGET -H 'Authorization: Token <your_token>' \
    -H "Content-type: application/json" 'http://localhost:8000/api/auth/user/' | jq
Response:
{
    "pk": 1,
    "username": "user1",
    "email": "[email protected]",
    "first_name": "",
    "last_name": ""
}
Logout
As you might have guessed, sending a POST request to the logout endpoint destroys the token:
$ curl -XPOST -H 'Authorization: Token <your_token>' \
    -H "Content-type: application/json" 'http://localhost:8000/api/auth/logout/' | jq
Response:
{
    "detail": "Successfully logged out."
}
Email Verification and Password Reset
In this section, we'll look at how to configure Django SMTP settings and enable email verification along with the password resetting functionality.
SMTP Settings
As mentioned above, some of the authentication endpoints rely on sending emails (e.g., password reset, email verification, and so on). For Django to be able to send emails you'll need to configure the SMTP settings.
If your SMTP settings are already configured feel free to skip this section.
For testing purposes you can use Django's Console Email Backend:
EMAIL_BACKEND = "django.core.mail.backends.console.EmailBackend"This backend prints out the emails in your console instead of sending real emails.
You can use your own SMTP server or utilize Brevo (formerly SendInBlue), Mailgun, SendGrid, or a similar service. I suggest you go with Brevo since they're relatively cheap and allow you to send a decent amount of emails daily (for free).
To configure SMTP, add the following to core/settings.py:
# core/settings.py

EMAIL_BACKEND = "django.core.mail.backends.smtp.EmailBackend"
EMAIL_HOST = "<your email host>"                    # smtp-relay.sendinblue.com
EMAIL_USE_TLS = False                               # False
EMAIL_PORT = "<your email port>"                    # 587
EMAIL_HOST_USER = "<your email user>"               # your email address
EMAIL_HOST_PASSWORD = "<your email password>"       # your password
DEFAULT_FROM_EMAIL = "<your default from email>"    # email ending with @sendinblue.com
Code and Configuration
Now that we have SMTP configured, we can make email verification mandatory on sign-up and enable password resetting. To do so, add the following django-allauth settings to core/settings.py:
# core/settings.py

ACCOUNT_EMAIL_REQUIRED = True
ACCOUNT_EMAIL_VERIFICATION = "mandatory"
Next, let's take care of the URLs found in the confirmation and password reset email templates. The {{ password_reset_url }} and {{ activate_url }} get replaced with the following values:
http://localhost:8000/api/auth/register/account-confirm-email/<str:key>/
http://localhost:8000/api/auth/password/reset/confirm/<str:uidb64>/<str:token>/
By default, django-allauth takes care of these URLs. It renders a form and submits a request back to the backend. Since we're building a REST-based API we don't want that to happen; instead, we want to redirect these two URLs to our frontend from where we can POST the keys back to the backend.
This tutorial does not provide a client side app. The URL
http://localhost:3000is used merely as a placeholder. If you decide to test the app with your own frontend, make sure to configure django-cors-headers for handling cross origin requests.
To set up the redirects, first define the following two settings in core/settings.py:
# core/settings.py

# <EMAIL_CONFIRM_REDIRECT_BASE_URL>/<key>
EMAIL_CONFIRM_REDIRECT_BASE_URL = \
    "http://localhost:3000/email/confirm/"

# <PASSWORD_RESET_CONFIRM_REDIRECT_BASE_URL>/<uidb64>/<token>/
PASSWORD_RESET_CONFIRM_REDIRECT_BASE_URL = \
    "http://localhost:3000/password-reset/confirm/"
Make sure to include the trailing slash
/at the end of the URLs.
Next, add the following two views to authentication/views.py:
# authentication/views.py

from django.conf import settings
from django.http import HttpResponseRedirect


def email_confirm_redirect(request, key):
    return HttpResponseRedirect(
        f"{settings.EMAIL_CONFIRM_REDIRECT_BASE_URL}{key}/"
    )


def password_reset_confirm_redirect(request, uidb64, token):
    return HttpResponseRedirect(
        f"{settings.PASSWORD_RESET_CONFIRM_REDIRECT_BASE_URL}{uidb64}/{token}/"
    )
Lastly, register the newly created views in authentication/urls.py:
# authentication/urls.py

from dj_rest_auth.registration.views import (
    ResendEmailVerificationView,
    VerifyEmailView,
)
from dj_rest_auth.views import (
    PasswordResetConfirmView,
    PasswordResetView,
)
from authentication.views import email_confirm_redirect, password_reset_confirm_redirect
from dj_rest_auth.registration.views import RegisterView
from dj_rest_auth.views import LoginView, LogoutView, UserDetailsView
from django.urls import path


urlpatterns = [
    # ...
    path("register/verify-email/", VerifyEmailView.as_view(), name="rest_verify_email"),
    path("register/resend-email/", ResendEmailVerificationView.as_view(), name="rest_resend_email"),
    path("account-confirm-email/<str:key>/", email_confirm_redirect, name="account_confirm_email"),
    path("account-confirm-email/", VerifyEmailView.as_view(), name="account_email_verification_sent"),
    path("password/reset/", PasswordResetView.as_view(), name="rest_password_reset"),
    path(
        "password/reset/confirm/<str:uidb64>/<str:token>/",
        password_reset_confirm_redirect,
        name="password_reset_confirm",
    ),
    path("password/reset/confirm/", PasswordResetConfirmView.as_view(), name="password_reset_confirm"),
]
Don't forget to import all the required views from dj_rest_auth.
Great! That's it. We now have a fully-working authentication system with email verification and password reset functionality.
Testing
Let's test the API.
Register
Creating a new user now requires you to provide a valid email address:
$ curl -XPOST -H "Content-type: application/json" -d '{
      "username": "user2",
      "email": "<your email address>",
      "password1": "complexpassword123",
      "password2": "complexpassword123"
  }' 'http://localhost:8000/api/auth/register/' | jq
Make sure to replace
<your email address>with your actual email address.
Response:
{
    "detail": "Verification e-mail sent."
}
As you register a verification email will be sent to your email. Go ahead and check your inbox:

By clicking on the link you should get redirected to your frontend:
http://localhost:3000/email/confirm/<key>
Verify Email
From the frontend you can then POST the key back to the backend to verify the email address:
$ curl -XPOST -H "Content-type: application/json" -d '{
      "key": "OQ:1ptSAe:gh_07-gQ_1ak6muKCAly..."
  }' 'http://localhost:8000/api/auth/register/verify-email/' | jq
Response:
{
    "detail": "ok"
}
Once you've successfully verified your email address you'll be able to log in.
Password Reset
To request a new password, you need to POST to /api/auth/password/reset/ like so:
$ curl -XPOST -H "Content-type: application/json" -d '{
      "email": "<your email address>"
  }' 'http://localhost:8000/api/auth/password/reset/' | jq
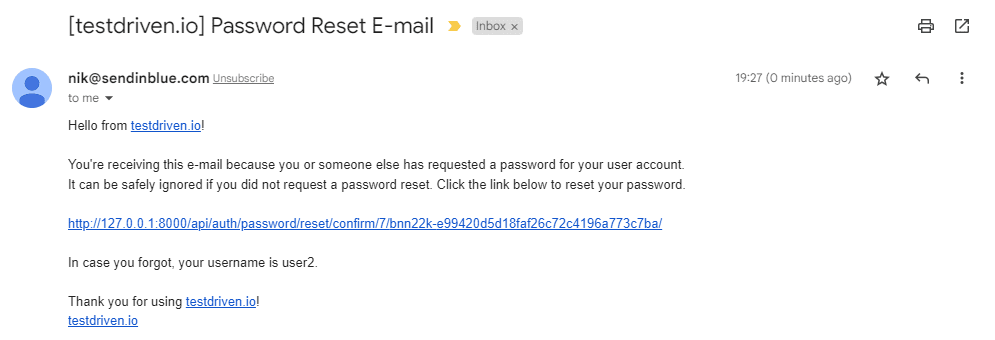
After you send the request you'll receive a similar email:

By clicking on the link you'll get redirected to your frontend:
http://localhost:3000/password-reset/confirm/<uidb64>/<token>/
From there you can use the uid and token to change the password:
$ curl -XPOST -H "Content-type: application/json" -d '{
      "uid": "7",
      "token": "bn8cnn-6a1bcbebf3a54cc48c064113e6b97d9f",
      "new_password1": "differentpassword123",
      "new_password2": "differentpassword123",
  }' 'http://localhost:8000/api/auth/password/reset/' | jq
Social Authentication
In this section, we'll take a look at how to set up social authentication. I'll guide you through the process of setting up social authentication with Google, but you can use similar steps for any other social provider.
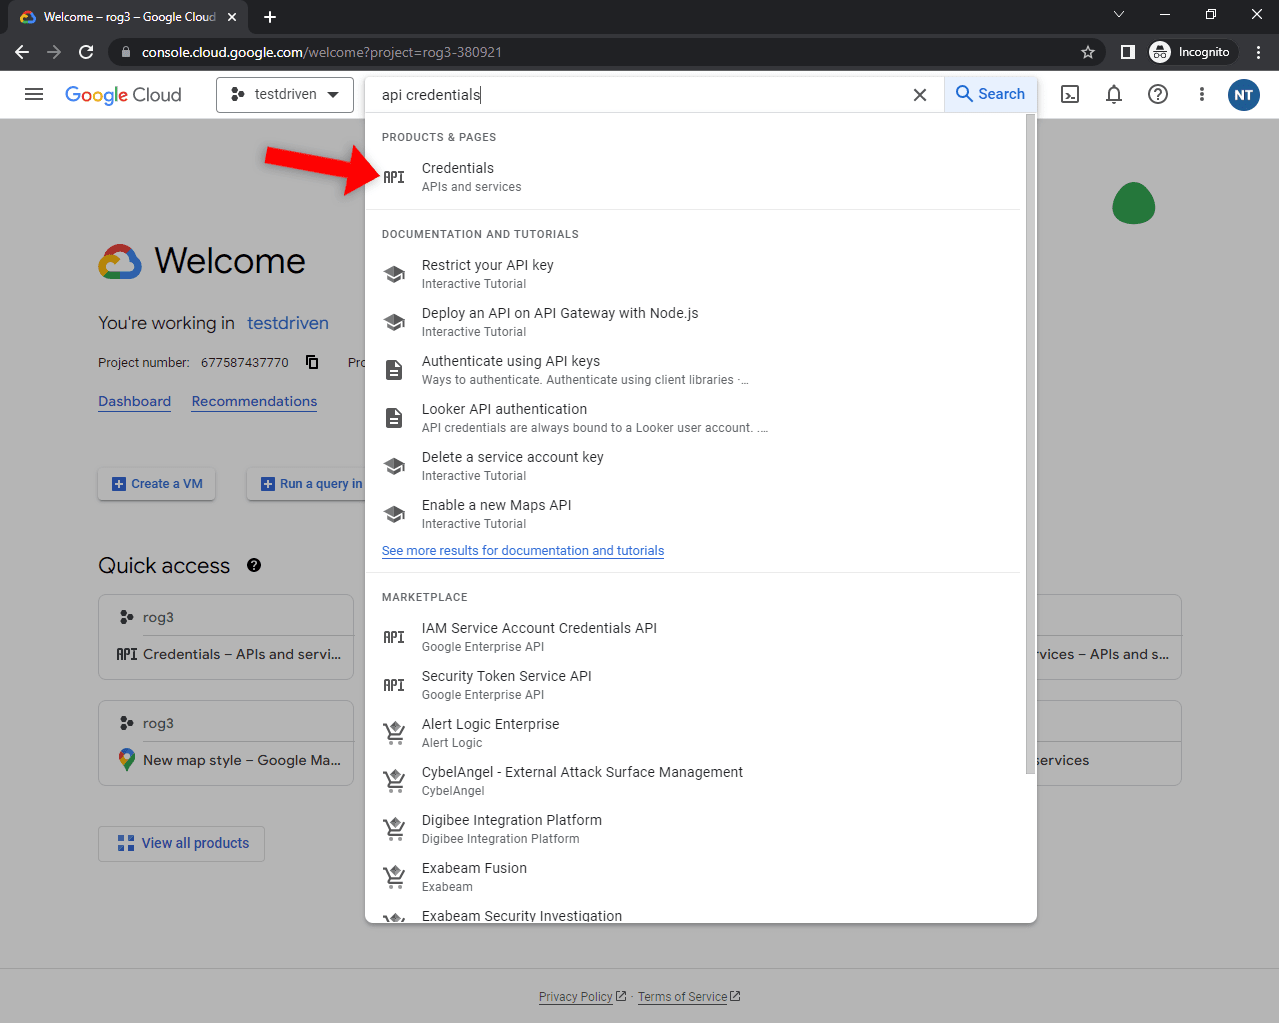
To enable Google sign up you first need to create an OAuth Client key. Go ahead and navigate to your Google Cloud Console, select the project you'd like to use, and search for "API Credentials":

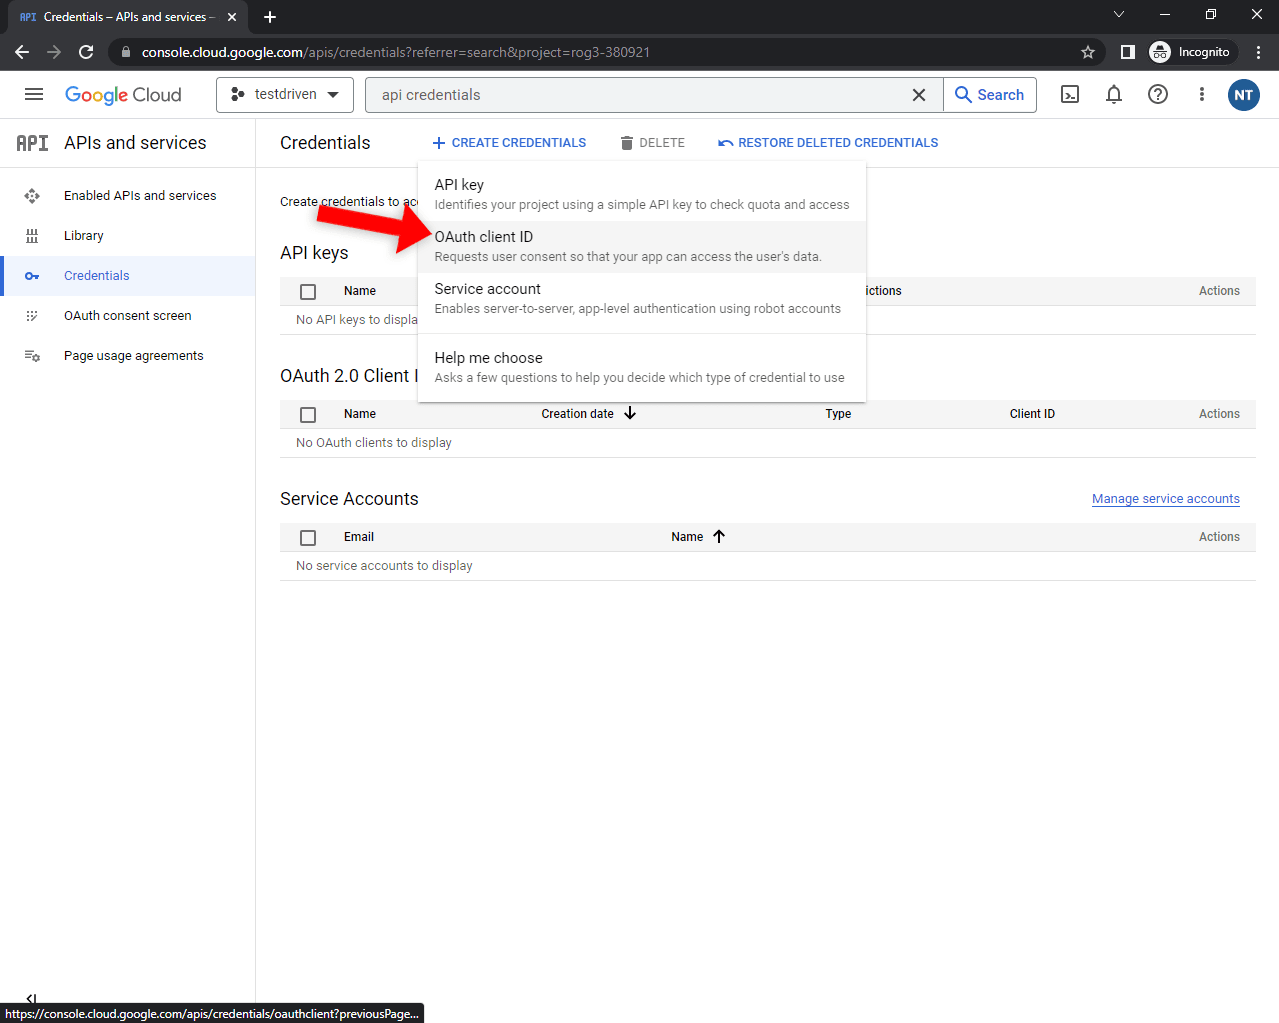
Next, click on the "Create credentials" button and select "OAuth Client ID" in the dropdown:

Select "Web application", pick a custom name, and add your frontend URL as the authorized redirect URI. For easier testing, I recommend you also add:
Lastly, click "Create" to generate the credentials.
You'll be presented with your "Client ID" and "Client secret". Take note of them since we'll need them in the next step.
Moving along, head back to your Django project and add the following app to INSTALLED_APPS:
# core/settings.py

INSTALLED_APPS = [
    # ...
    "allauth.socialaccount.providers.google",
]
Next, add the SOCIALACCOUNT_PROVIDERS setting to core/settings.py like so:
# core/settings.py

SOCIALACCOUNT_PROVIDERS = {
    "google": {
        "APP": {
            "client_id": "<your google client id>",  # replace me
            "secret": "<your google secret>",        # replace me
            "key": "",                               # leave empty
        },
        "SCOPE": [
            "profile",
            "email",
        ],
        "AUTH_PARAMS": {
            "access_type": "online",
        },
        "VERIFIED_EMAIL": True,
    },
}
Make sure to replace
<your google client id>and<your google secret>with your actual keys. Leave thekeyproperty empty since it isn't required for Google social authentication.
Add a new view in authentication/views.py that inherits from SocialLoginView:
# authentication/views.py

from dj_rest_auth.registration.views import SocialLoginView
from allauth.socialaccount.providers.google.views import GoogleOAuth2Adapter
from allauth.socialaccount.providers.oauth2.client import OAuth2Client


class GoogleLogin(SocialLoginView):
    adapter_class = GoogleOAuth2Adapter
    callback_url = "http://localhost:3000/"
    client_class = OAuth2Client
Lastly, add the following two URLs to authentication/urls.py:
# authentication/urls.py

from allauth.socialaccount.views import signup
from authentication.views import GoogleLogin

urlpatterns = [
    # ...
    path("signup/", signup, name="socialaccount_signup"),
    path("google/", GoogleLogin.as_view(), name="google_login"),
]
That's it!
Testing
To test if the API endpoint works, you first need to obtain an id_token and then POST it to the backend's endpoint. The easiest way to get the id_token is via Google's OAuth 2.0 Playground.
To get the token you can follow this wonderful article.
Next, pass the id_token as the access_token in the cURL request body:
$ curl -XPOST -H "Content-type: application/json" -d '{
    "access_token": "<your_id_token>"
  }' 'http://localhost:8000/api/auth/google/'
You should get a similar response:
{
    "key": "3a67e32d6fbc043b29b64fafc6f79c5e94af94a9"
}
You can now use the key to authenticate yourself.
Conclusion
We have successfully created a fully-fledged authentication API that supports credentials-based authentication and social authentication. The implemented API also has email verification and password reset functionality.
The final source code is available on the django-rest-allauth GitHub repo.
Future steps
- Consider swapping token authentication with djangorestframework-simplejwt or django-rest-knox. They provide further configuration options and are more secure.
- To add another social provider such as Twitter or GitHub, take a look the at dj-rest-auth docs.
- To enable social account linking functionality, look into "Social Connect Views".
- To use the backend with a JavaScript-based frontend you'll most likely want to set up CORS headers via django-cors-headers.
 Nik Tomazic