In this tutorial, we'll build a real-time chat application with Django Channels, focusing on how to integrate Django with Django Channels.
Why another chat app? Well, a chat app is the easiest way to show the power of Channels. That said, this tutorial goes beyond the basics by implementing multiple request types, message/chat room persistency, and private (one-to-one) messaging. After going through the tutorial, you'll be able to build real-time applications.
Contents
What is Django Channels?
Django Channels (or just Channels) extends the built-in capabilities of Django allowing Django projects to handle not only HTTP but also protocols that require long-running connections, such as WebSockets, MQTT (IoT), chatbots, radios, and other real-time applications. On top of this, it provides support for a number of Django's core features like authentication and sessions.
A basic Channels setup looks something like this:
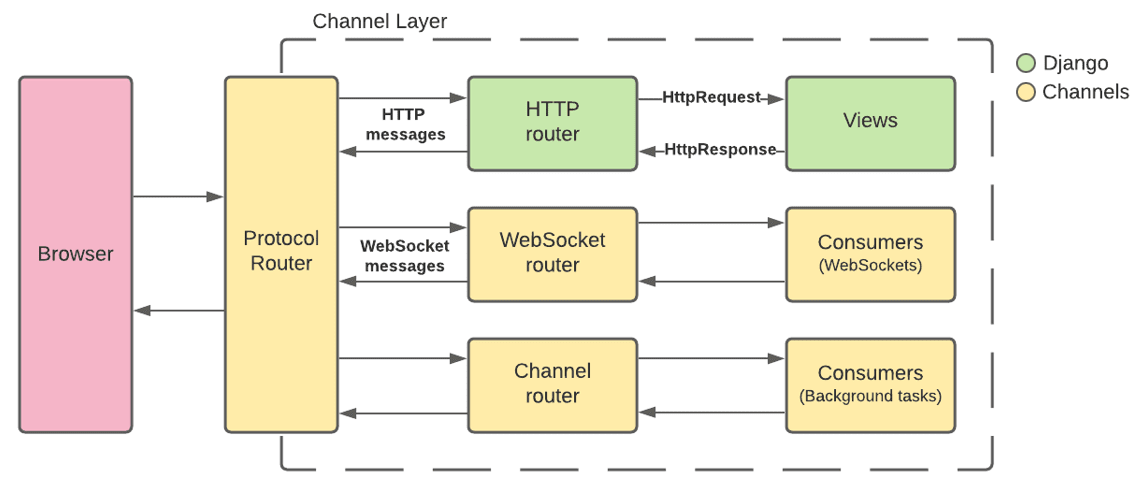
To learn more about Channels, check out the Introduction guide from the official documentation.
Sync vs Async
Because of the differences between Channels and Django, we'll have to frequently switch between sync and async code execution. For example, the Django database needs to be accessed using synchronous code while the Channels channel layer needs to be accessed using asynchronous code.
The easiest way to switch between the two is by using the built-in Django asgiref (asgrief.sync) functions:
sync_to_async- takes a sync function and returns an async function that wraps itasync_to_sync- takes an async function and returns a sync function
Don't worry about this just yet, we'll show a practical example later in the tutorial.
Project Setup
Again, we'll be building a chat application. The app will have multiple rooms where Django authenticated users can chat. Each room will have a list of currently connected users. We'll also implement private, one-to-one messaging.
Django Project Setup
Start by creating a new directory and setting up a new Django project:
$ mkdir django-channels-example && cd django-channels-example
$ python3.9 -m venv env
$ source env/bin/activate

(env)$ pip install django==4.0
(env)$ django-admin startproject core .
After that, create a new Django app called chat:
(env)$ python manage.py startapp chat
Register the app in core/settings.py under INSTALLED_APPS:
# core/settings.py

INSTALLED_APPS = [
    'django.contrib.admin',
    'django.contrib.auth',
    'django.contrib.contenttypes',
    'django.contrib.sessions',
    'django.contrib.messages',
    'django.contrib.staticfiles',
    'chat.apps.ChatConfig',  # new
]
Create Database Models
Next, let's create two Django models, Room and Message, in chat/models.py:
# chat/models.py

from django.contrib.auth.models import User
from django.db import models


class Room(models.Model):
    name = models.CharField(max_length=128)
    online = models.ManyToManyField(to=User, blank=True)

    def get_online_count(self):
        return self.online.count()

    def join(self, user):
        self.online.add(user)
        self.save()

    def leave(self, user):
        self.online.remove(user)
        self.save()

    def __str__(self):
        return f'{self.name} ({self.get_online_count()})'


class Message(models.Model):
    user = models.ForeignKey(to=User, on_delete=models.CASCADE)
    room = models.ForeignKey(to=Room, on_delete=models.CASCADE)
    content = models.CharField(max_length=512)
    timestamp = models.DateTimeField(auto_now_add=True)

    def __str__(self):
        return f'{self.user.username}: {self.content} [{self.timestamp}]'
Notes:
Roomrepresents a chat room. It contains anonlinefield for tracking when users connect and disconnect from the chat room.Messagerepresents a message sent to the chat room. We'll use this model to store all the messages sent in the chat.
Run the makemigrations and migrate commands to sync the database:
(env)$ python manage.py makemigrations
(env)$ python manage.py migrate
Register the models in chat/admin.py so they're accessible from the Django admin panel:
# chat/admin.py

from django.contrib import admin

from chat.models import Room, Message

admin.site.register(Room)
admin.site.register(Message)
Views and URLs
The web application will have the following two URLs:
/chat/- chat room selector/chat/<ROOM_NAME>/- chat room
Add the following views to chat/views.py:
# chat/views.py

from django.shortcuts import render

from chat.models import Room


def index_view(request):
    return render(request, 'index.html', {
        'rooms': Room.objects.all(),
    })


def room_view(request, room_name):
    chat_room, created = Room.objects.get_or_create(name=room_name)
    return render(request, 'room.html', {
        'room': chat_room,
    })
Create a urls.py file within the chat app:
# chat/urls.py

from django.urls import path

from . import views

urlpatterns = [
    path('', views.index_view, name='chat-index'),
    path('<str:room_name>/', views.room_view, name='chat-room'),
]
Update the project-level urls.py file with the chat app as well:
# core/urls.py

from django.contrib import admin
from django.urls import path, include

urlpatterns = [
    path('chat/', include('chat.urls')),  # new
    path('admin/', admin.site.urls),
]
Templates and Static Files
Create an index.html file inside a new folder called "templates" in "chat":
<!-- chat/templates/index.html -->

{% load static %}

<!DOCTYPE html>
<html lang="en">
    <head>
        <title>django-channels-chat</title>
        <link rel="stylesheet" href="https://cdn.jsdelivr.net/npm/[email protected]/dist/css/bootstrap.min.css">
        <script src="https://cdn.jsdelivr.net/npm/[email protected]/dist/js/bootstrap.min.js"></script>
        <style>
            #roomSelect {
                height: 300px;
            }
        </style>
    </head>
    <body>
        <div class="container mt-3 p-5">
            <h2>django-channels-chat</h2>
            <div class="row">
                <div class="col-12 col-md-8">
                    <div class="mb-2">
                        <label for="roomInput">Enter a room name to connect to it:</label>
                        <input type="text" class="form-control" id="roomInput" placeholder="Room name">
                        <small id="roomInputHelp" class="form-text text-muted">If the room doesn't exist yet, it will be created for you.</small>
                    </div>
                    <button type="button" id="roomConnect" class="btn btn-success">Connect</button>
                </div>
                <div class="col-12 col-md-4">
                    <label for="roomSelect">Active rooms</label>
                    <select multiple class="form-control" id="roomSelect">
                        {% for room in rooms %}
                            <option>{{ room }}</option>
                        {% endfor %}
                    </select>
                </div>
            </div>
        </div>
        <script src="{% static 'index.js' %}"></script>
    </body>
</html>
Next, add room.html inside the same folder:
<!-- chat/templates/room.html -->

{% load static %}

<!DOCTYPE html>
<html lang="en">
    <head>
        <title>django-channels-chat</title>
        <link rel="stylesheet" href="https://cdn.jsdelivr.net/npm/[email protected]/dist/css/bootstrap.min.css">
        <script src="https://cdn.jsdelivr.net/npm/[email protected]/dist/js/bootstrap.min.js"></script>
        <style>
            #chatLog {
                height: 300px;
                background-color: #FFFFFF;
                resize: none;
            }

            #onlineUsersSelector {
                height: 300px;
            }
        </style>
    </head>
    <body>
        <div class="container mt-3 p-5">
            <h2>django-channels-chat</h2>
            <div class="row">
                <div class="col-12 col-md-8">
                    <div class="mb-2">
                        <label for="chatLog">Room: #{{ room.name }}</label>
                        <textarea class="form-control" id="chatLog" readonly></textarea>
                    </div>
                    <div class="input-group">
                        <input type="text" class="form-control" id="chatMessageInput" placeholder="Enter your chat message">
                        <div class="input-group-append">
                            <button class="btn btn-success" id="chatMessageSend" type="button">Send</button>
                        </div>
                    </div>
                </div>
                <div class="col-12 col-md-4">
                    <label for="onlineUsers">Online users</label>
                    <select multiple class="form-control" id="onlineUsersSelector">
                    </select>
                </div>
            </div>
            {{ room.name|json_script:"roomName" }}
        </div>
        <script src="{% static 'room.js' %}"></script>
    </body>
</html>
To make our code more readable, we'll include the JavaScript code in separate files -- index.js and room.js, respectively. Because we can't access the Django context in JavaScript, we can use the json_script template tag to store room.name and then fetch it in the JavaScript file.
Inside "chat", create a folder called "static". Then, inside "static", create an index.js and a room.js file.
index.js:
// chat/static/index.js

console.log("Sanity check from index.js.");

// focus 'roomInput' when user opens the page
document.querySelector("#roomInput").focus();

// submit if the user presses the enter key
document.querySelector("#roomInput").onkeyup = function(e) {
    if (e.keyCode === 13) {  // enter key
        document.querySelector("#roomConnect").click();
    }
};

// redirect to '/room/<roomInput>/'
document.querySelector("#roomConnect").onclick = function() {
    let roomName = document.querySelector("#roomInput").value;
    window.location.pathname = "chat/" + roomName + "/";
}

// redirect to '/room/<roomSelect>/'
document.querySelector("#roomSelect").onchange = function() {
    let roomName = document.querySelector("#roomSelect").value.split(" (")[0];
    window.location.pathname = "chat/" + roomName + "/";
}
room.js:
// chat/static/room.js

console.log("Sanity check from room.js.");

const roomName = JSON.parse(document.getElementById('roomName').textContent);

let chatLog = document.querySelector("#chatLog");
let chatMessageInput = document.querySelector("#chatMessageInput");
let chatMessageSend = document.querySelector("#chatMessageSend");
let onlineUsersSelector = document.querySelector("#onlineUsersSelector");

// adds a new option to 'onlineUsersSelector'
function onlineUsersSelectorAdd(value) {
    if (document.querySelector("option[value='" + value + "']")) return;
    let newOption = document.createElement("option");
    newOption.value = value;
    newOption.innerHTML = value;
    onlineUsersSelector.appendChild(newOption);
}

// removes an option from 'onlineUsersSelector'
function onlineUsersSelectorRemove(value) {
    let oldOption = document.querySelector("option[value='" + value + "']");
    if (oldOption !== null) oldOption.remove();
}

// focus 'chatMessageInput' when user opens the page
chatMessageInput.focus();

// submit if the user presses the enter key
chatMessageInput.onkeyup = function(e) {
    if (e.keyCode === 13) {  // enter key
        chatMessageSend.click();
    }
};

// clear the 'chatMessageInput' and forward the message
chatMessageSend.onclick = function() {
    if (chatMessageInput.value.length === 0) return;
    // TODO: forward the message to the WebSocket
    chatMessageInput.value = "";
};
Your final "chat" app directory structure should now look like this:
chat
├── __init__.py
├── admin.py
├── apps.py
├── migrations
│   ├── 0001_initial.py
│   ├── __init__.py
├── models.py
├── static
│   ├── index.js
│   └── room.js
├── templates
│   ├── index.html
│   └── room.html
├── tests.py
├── urls.py
└── views.py
Testing
With the basic project setup don, let's test things out in the browser.
Start the Django development server:
(env)$ python manage.py runserver
Navigate to http://localhost:8000/chat/. You'll see the room selector:
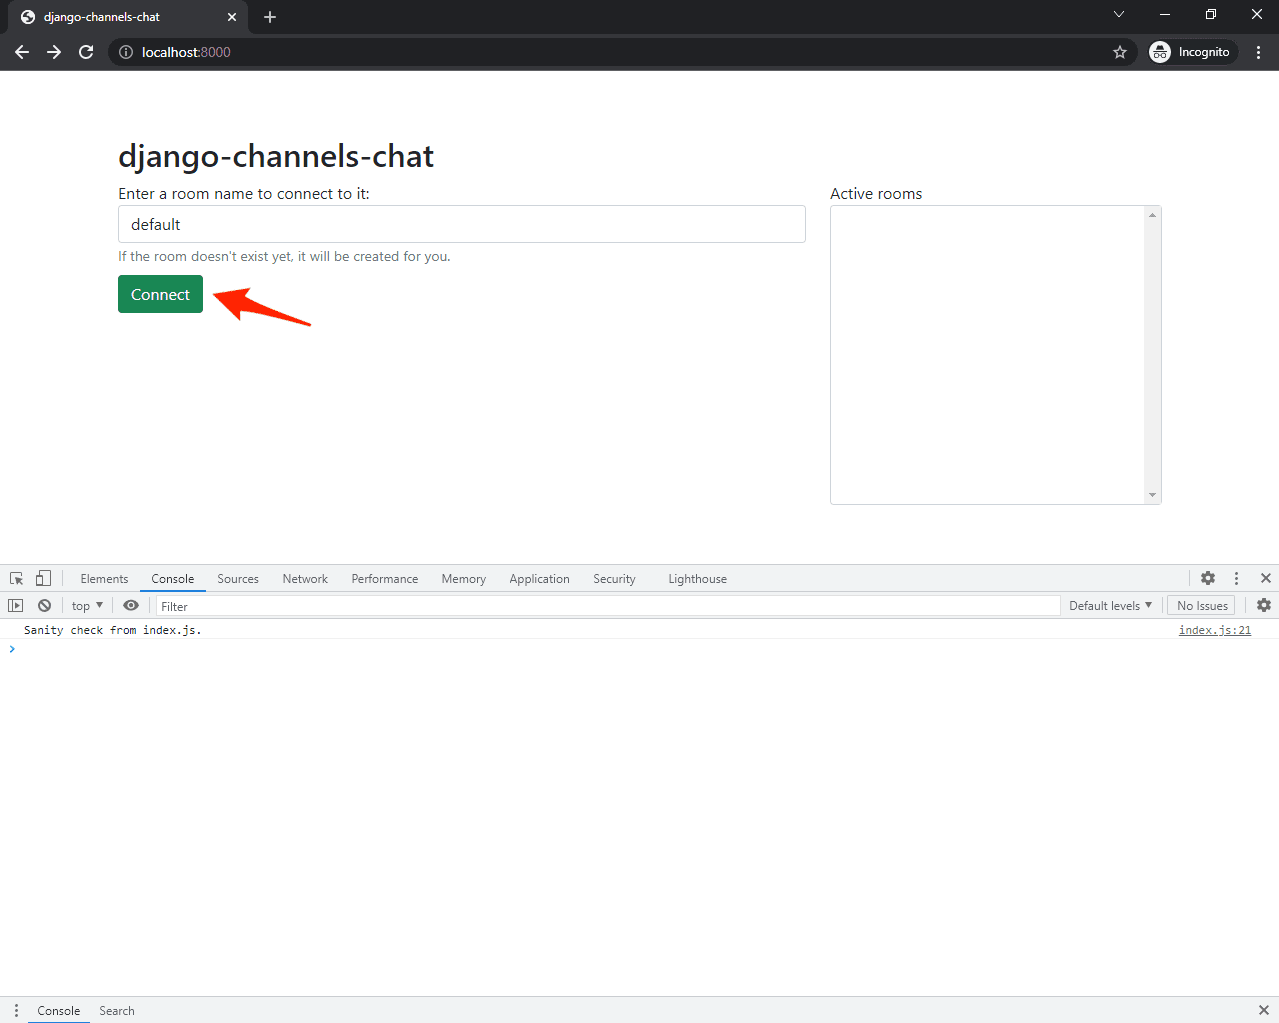
To ensure that the static files are configured correctly, open the 'Developer Console'. You should see the sanity check:
Sanity check from index.js.
Next, enter something in the 'Room name' text input and press enter. You'll be redirected to the room:
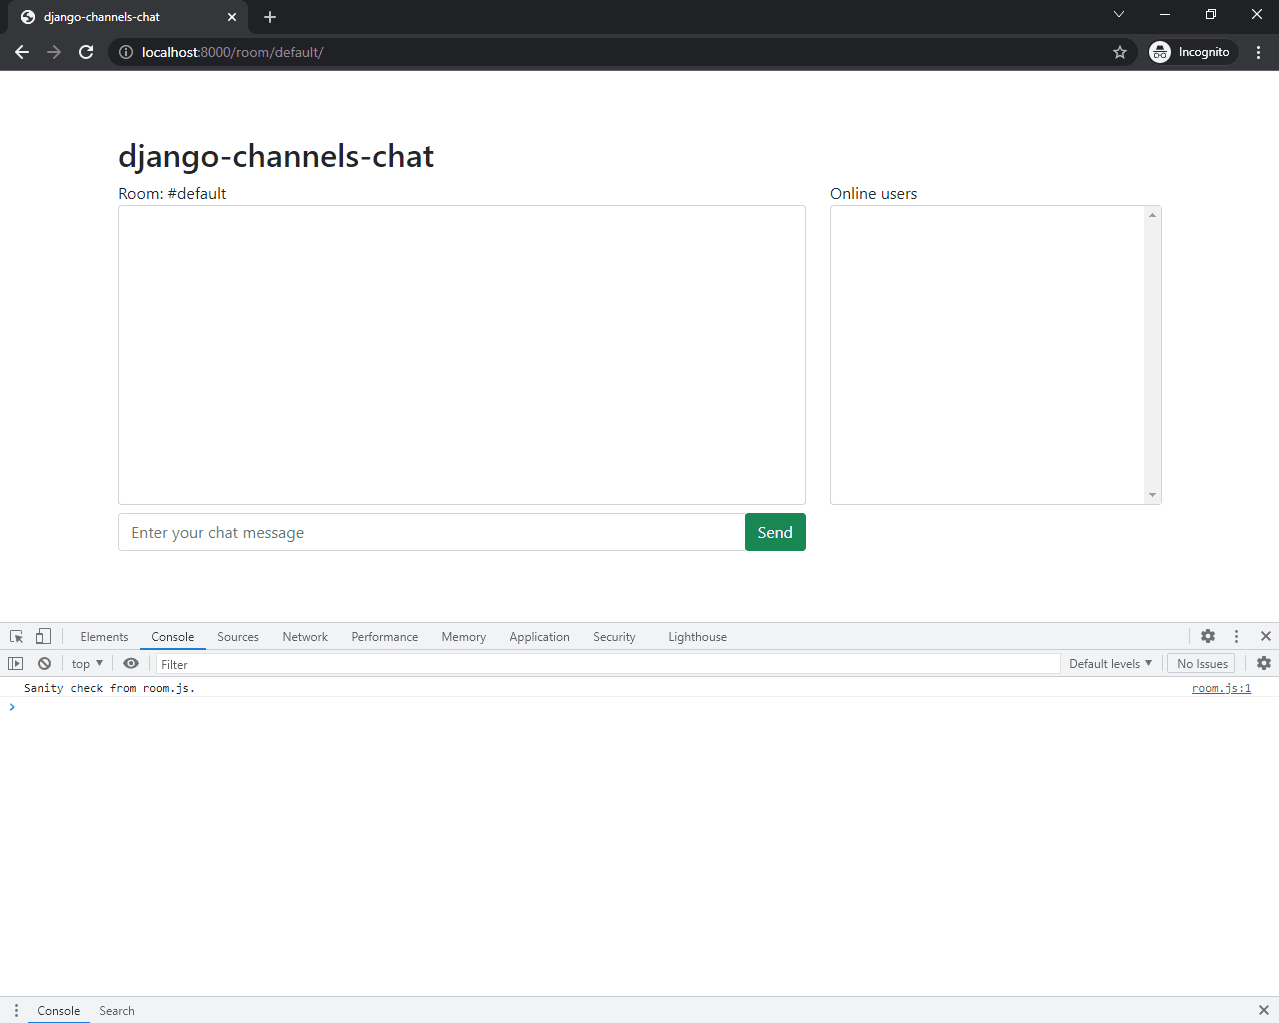
These are just static templates. We'll implement the functionality for the chat and online users later.
Add Channels
Next, let's wire up Django Channels.
Start by installing the package:
(env)$ pip install channels==3.0.4
Then, add channels to your INSTALLED_APPS inside core/settings.py:
# core/settings.py

INSTALLED_APPS = [
    'django.contrib.admin',
    'django.contrib.auth',
    'django.contrib.contenttypes',
    'django.contrib.sessions',
    'django.contrib.messages',
    'django.contrib.staticfiles',
    'chat.apps.ChatConfig',
    'channels',  # new
]
Since we'll be using WebSockets instead of HTTP to communicate from the client to the server, we need to wrap our ASGI config with ProtocolTypeRouter in core/asgi.py:
# core/asgi.py

import os

from channels.routing import ProtocolTypeRouter
from django.core.asgi import get_asgi_application

os.environ.setdefault('DJANGO_SETTINGS_MODULE', 'core.settings')

application = ProtocolTypeRouter({
  'http': get_asgi_application(),
})
This router will route traffic to different parts of the web application depending on the protocol used.
Django versions <= 2.2 don't have built-in ASGI support. In order to get
channelsrunning with older Django versions please refer to the official installation guide.
Next, we need to let Django know the location of our ASGI application. Add the following to your core/settings.py file, just below the WSGI_APPLICATION setting:
# core/settings.py

WSGI_APPLICATION = 'core.wsgi.application'
ASGI_APPLICATION = 'core.asgi.application'  # new
When you run the development server now, you'll see that Channels is being used:
Starting ASGI/Channels version 3.0.4 development server at http://127.0.0.1:8000/
Add Channel Layer
A channel layer is a kind of a communication system, which allows multiple parts of our application to exchange messages, without shuttling all the messages or events through the database.
We need a channel layer to give consumers (which we'll implement in the next step) the ability to talk to one another.
While we could use use the InMemoryChannelLayer layer since we're in development mode, we'll use a production-ready layer, RedisChannelLayer.
Since this layer requires Redis, run the following command to get it up and running with Docker:
(env)$ docker run -p 6379:6379 -d redis:5
This command downloads the image and spins up a Redis Docker container on port 6379.
If you don't want to use Docker, feel free to download Redis directly from the official website.
To connect to Redis from Django, we need to install an additional package called channels_redis:
(env)$ pip install channels_redis==3.3.1
After that, configure the layer in core/settings.py like so:
# core/settings.py

CHANNEL_LAYERS = {
    'default': {
        'BACKEND': 'channels_redis.core.RedisChannelLayer',
        'CONFIG': {
            "hosts": [('127.0.0.1', 6379)],
        },
    },
}
Here, we let channels_redis know where the Redis server is located.
To test if everything works as expected, open the Django shell:
(env)$ python manage.py shell
Then run:
>>> import channels.layers
>>> channel_layer = channels.layers.get_channel_layer()
>>>
>>> from asgiref.sync import async_to_sync
>>> async_to_sync(channel_layer.send)('test_channel', {'type': 'hello'})
>>> async_to_sync(channel_layer.receive)('test_channel')
{'type': 'hello'}
Here, we connected to the channel layer using the settings defined in core/settings.py. We then used channel_layer.send to send a message to the test_channel group and channel_layer.receive to read all the messages sent to the same group.
Take note that we wrapped all the function calls in
async_to_syncbecause the channel layer is asynchronous.
Enter quit() to exit the shell.
Add Channels Consumer
A consumer is the basic unit of Channels code. They are tiny ASGI applications, driven by events. They are akin to Django views. However, unlike Django views, consumers are long-running by default. A Django project can have multiple consumers that are combined using Channels routing (which we'll take a look at in the next section).
Each consumer has it's own scope, which is a set of details about a single incoming connection. They contain pieces of data like protocol type, path, headers, routing arguments, user agent, and more.
Create a new file called consumers.py inside "chat":
# chat/consumers.py

import json

from asgiref.sync import async_to_sync
from channels.generic.websocket import WebsocketConsumer

from .models import Room


class ChatConsumer(WebsocketConsumer):

    def __init__(self, *args, **kwargs):
        super().__init__(args, kwargs)
        self.room_name = None
        self.room_group_name = None
        self.room = None

    def connect(self):
        self.room_name = self.scope['url_route']['kwargs']['room_name']
        self.room_group_name = f'chat_{self.room_name}'
        self.room = Room.objects.get(name=self.room_name)

        # connection has to be accepted
        self.accept()

        # join the room group
        async_to_sync(self.channel_layer.group_add)(
            self.room_group_name,
            self.channel_name,
        )

    def disconnect(self, close_code):
        async_to_sync(self.channel_layer.group_discard)(
            self.room_group_name,
            self.channel_name,
        )

    def receive(self, text_data=None, bytes_data=None):
        text_data_json = json.loads(text_data)
        message = text_data_json['message']

        # send chat message event to the room
        async_to_sync(self.channel_layer.group_send)(
            self.room_group_name,
            {
                'type': 'chat_message',
                'message': message,
            }
        )

    def chat_message(self, event):
        self.send(text_data=json.dumps(event))
Here, we created a ChatConsumer, which inherits from WebsocketConsumer. WebsocketConsumer provides three methods, connect(), disconnect(), and receive():
- Inside
connect()we calledaccept()in order to accept the connection. After that, we added the user to the channel layer group. - Inside
disconnect()we removed the user from the channel layer group. - Inside
receive()we parsed the data to JSON and extracted themessage. Then, we forwarded themessageusinggroup_sendtochat_message.
When using channel layer's
group_send, your consumer has to have a method for every JSON messagetypeyou use. In our situation,typeis equaled tochat_message. Thus, we added a method calledchat_message.If you use dots in your message types, Channels will automatically convert them to underscores when looking for a method -- e.g,
chat.messagewill becomechat_message.
Since WebsocketConsumer is a synchronous consumer, we had to call async_to_sync when working with the channel layer. We decided to go with a sync consumer since the chat app is closely connected to Django (which is sync by default). In other words, we wouldn't get a performance boost by using an async consumer.
You should use sync consumers by default. What's more, only use async consumers in cases where you're absolutely certain that you're doing something that would benefit from async handling (e.g., long-running tasks that could be done in parallel) and you're only using async-native libraries.
Add Channels Routing
Channels provides different routing classes which allow us to combine and stack consumers. They are similar to Django's URLs.
Add a routing.py file to "chat":
# chat/routing.py

from django.urls import re_path

from . import consumers

websocket_urlpatterns = [
    re_path(r'ws/chat/(?P<room_name>\w+)/$', consumers.ChatConsumer.as_asgi()),
]
Register the routing.py file inside core/asgi.py:
# core/asgi.py

import os

from channels.routing import ProtocolTypeRouter, URLRouter
from django.core.asgi import get_asgi_application

import chat.routing

os.environ.setdefault('DJANGO_SETTINGS_MODULE', 'core.settings')

application = ProtocolTypeRouter({
  'http': get_asgi_application(),
  'websocket': URLRouter(
      chat.routing.websocket_urlpatterns
    ),
})
WebSockets (frontend)
To communicate with Channels from the frontend, we'll use the WebSocket API.
WebSockets are extremely easy to use. First, you need to establish a connection by providing a url and then you can listen for the following events:
onopen- called when a WebSocket connection is establishedonclose- called when a WebSocket connection is destroyedonmessage- called when a WebSocket receives a messageonerror- called when a WebSocket encounters an error
To integrate WebSockets into the application, add the following to the bottom of room.js:
// chat/static/room.js

let chatSocket = null;

function connect() {
    chatSocket = new WebSocket("ws://" + window.location.host + "/ws/chat/" + roomName + "/");

    chatSocket.onopen = function(e) {
        console.log("Successfully connected to the WebSocket.");
    }

    chatSocket.onclose = function(e) {
        console.log("WebSocket connection closed unexpectedly. Trying to reconnect in 2s...");
        setTimeout(function() {
            console.log("Reconnecting...");
            connect();
        }, 2000);
    };

    chatSocket.onmessage = function(e) {
        const data = JSON.parse(e.data);
        console.log(data);

        switch (data.type) {
            case "chat_message":
                chatLog.value += data.message + "\n";
                break;
            default:
                console.error("Unknown message type!");
                break;
        }

        // scroll 'chatLog' to the bottom
        chatLog.scrollTop = chatLog.scrollHeight;
    };

    chatSocket.onerror = function(err) {
        console.log("WebSocket encountered an error: " + err.message);
        console.log("Closing the socket.");
        chatSocket.close();
    }
}
connect();
After establishing the WebSocket connection, in the onmessage event, we determined the message type based on data.type. Take note how we wrapped the WebSocket inside the connect() method to have the ability to re-establish the connection in case it drops.
Lastly, change the TODO inside chatMessageSend.onclickForm to the following:
// chat/static/room.js

chatSocket.send(JSON.stringify({
    "message": chatMessageInput.value,
}));
The full handler should now look like this:
// chat/static/room.js

chatMessageSend.onclick = function() {
    if (chatMessageInput.value.length === 0) return;
    chatSocket.send(JSON.stringify({
        "message": chatMessageInput.value,
    }));
    chatMessageInput.value = "";
};
The first version of the chat is done.
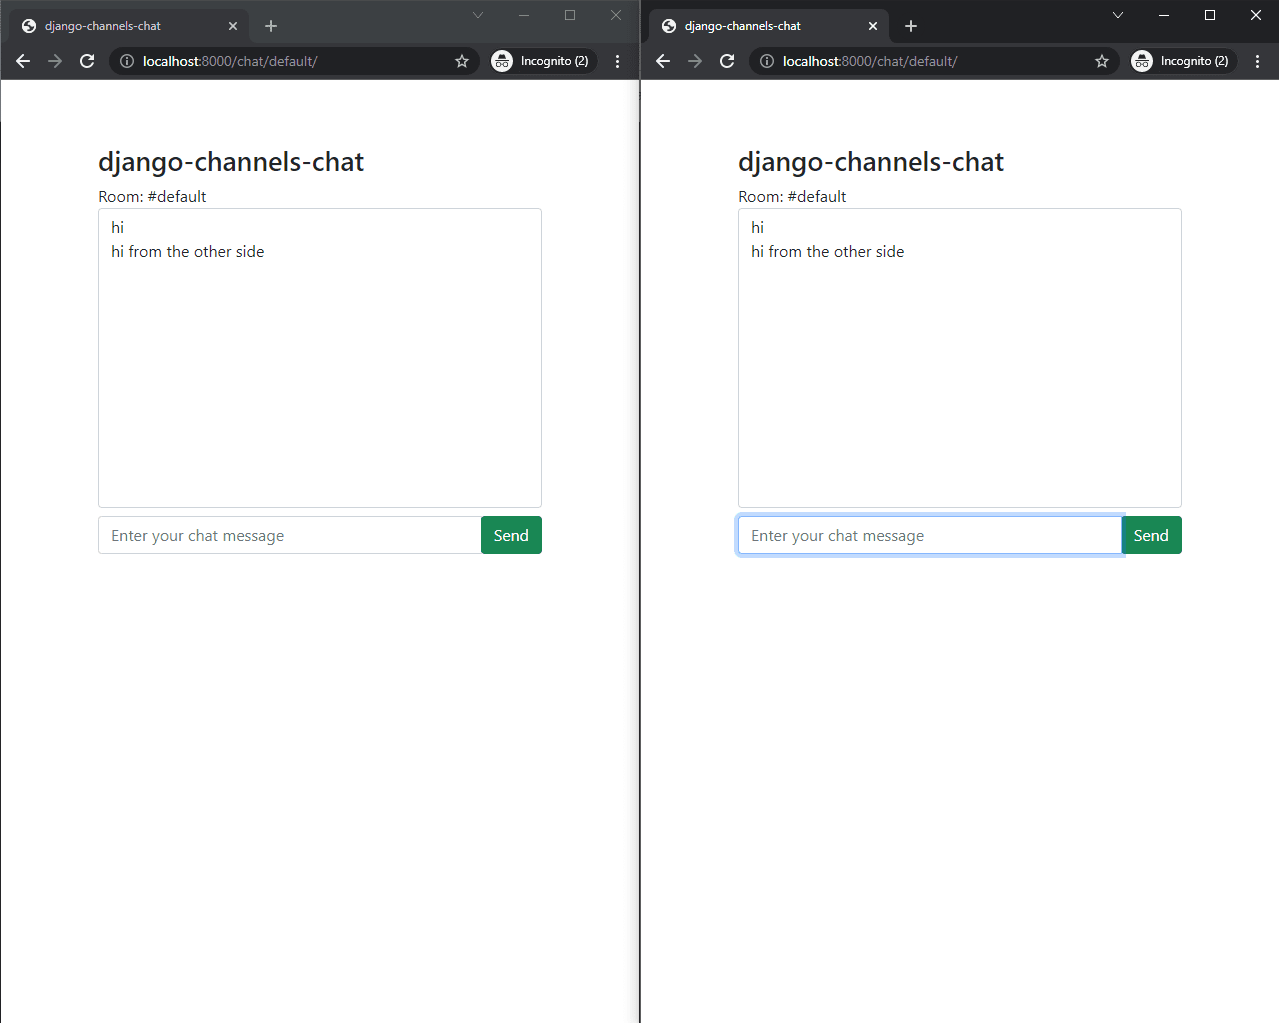
To test, run the development server. Then, open two private/incognito browser windows and, in each, navigate to http://localhost:8000/chat/default/. You should be able to send a messages:
That's it for the basic functionality. Next, we'll look at authentication.
Authentication
Backend
Channels comes with a built-in class for Django session and authentication management called AuthMiddlewareStack.
To use it, the only thing we have to do is to wrap URLRouter inside core/asgi.py like so:
# core/asgi.py

import os

from channels.auth import AuthMiddlewareStack  # new import
from channels.routing import ProtocolTypeRouter, URLRouter
from django.core.asgi import get_asgi_application

import chat.routing

os.environ.setdefault('DJANGO_SETTINGS_MODULE', 'core.settings')

application = ProtocolTypeRouter({
  'http': get_asgi_application(),
  'websocket': AuthMiddlewareStack(  # new
        URLRouter(
            chat.routing.websocket_urlpatterns
        )
    ),  # new
})
Now, whenever an authenticated client joins, the user object will be added to the scope. It can accessed like so:
user = self.scope['user']
If you want to run Channels with a frontend JavaScript framework (like Angular, React, or Vue), you'll have to use a different authentication system (e.g., token authentication). If you want to learn how to use token authentication with Channels, check out the following courses:
Let's modify the ChatConsumer to block non-authenticated users from talking and to display the user's username with the message.
Change chat/consumers.py to the following:
# chat/consumers.py

import json

from asgiref.sync import async_to_sync
from channels.generic.websocket import WebsocketConsumer

from .models import Room, Message  # new import


class ChatConsumer(WebsocketConsumer):

    def __init__(self, *args, **kwargs):
        super().__init__(args, kwargs)
        self.room_name = None
        self.room_group_name = None
        self.room = None
        self.user = None  # new

    def connect(self):
        self.room_name = self.scope['url_route']['kwargs']['room_name']
        self.room_group_name = f'chat_{self.room_name}'
        self.room = Room.objects.get(name=self.room_name)
        self.user = self.scope['user']  # new

        # connection has to be accepted
        self.accept()

        # join the room group
        async_to_sync(self.channel_layer.group_add)(
            self.room_group_name,
            self.channel_name,
        )

    def disconnect(self, close_code):
        async_to_sync(self.channel_layer.group_discard)(
            self.room_group_name,
            self.channel_name,
        )

    def receive(self, text_data=None, bytes_data=None):
        text_data_json = json.loads(text_data)
        message = text_data_json['message']

        if not self.user.is_authenticated:  # new
            return                          # new

        # send chat message event to the room
        async_to_sync(self.channel_layer.group_send)(
            self.room_group_name,
            {
                'type': 'chat_message',
                'user': self.user.username,  # new
                'message': message,
            }
        )
        Message.objects.create(user=self.user, room=self.room, content=message)  # new

    def chat_message(self, event):
        self.send(text_data=json.dumps(event))
Frontend
Next, let's modify room.js to display the user's username. Inside chatSocket.onMessage, add the following:
// chat/static/room.js

chatSocket.onmessage = function(e) {
    const data = JSON.parse(e.data);
    console.log(data);

    switch (data.type) {
        case "chat_message":
            chatLog.value += data.user + ": " + data.message + "\n";  // new
            break;
        default:
            console.error("Unknown message type!");
            break;
    }

    // scroll 'chatLog' to the bottom
    chatLog.scrollTop = chatLog.scrollHeight;
};
Testing
Create a superuser, which you'll use for testing:
(env)$ python manage.py createsuperuser
Run the server:
(env)$ python manage.py runserver
Open the browser and log in using the Django admin login at http://localhost:8000/admin.
Then navigate to http://localhost:8000/chat/default. Test it out!
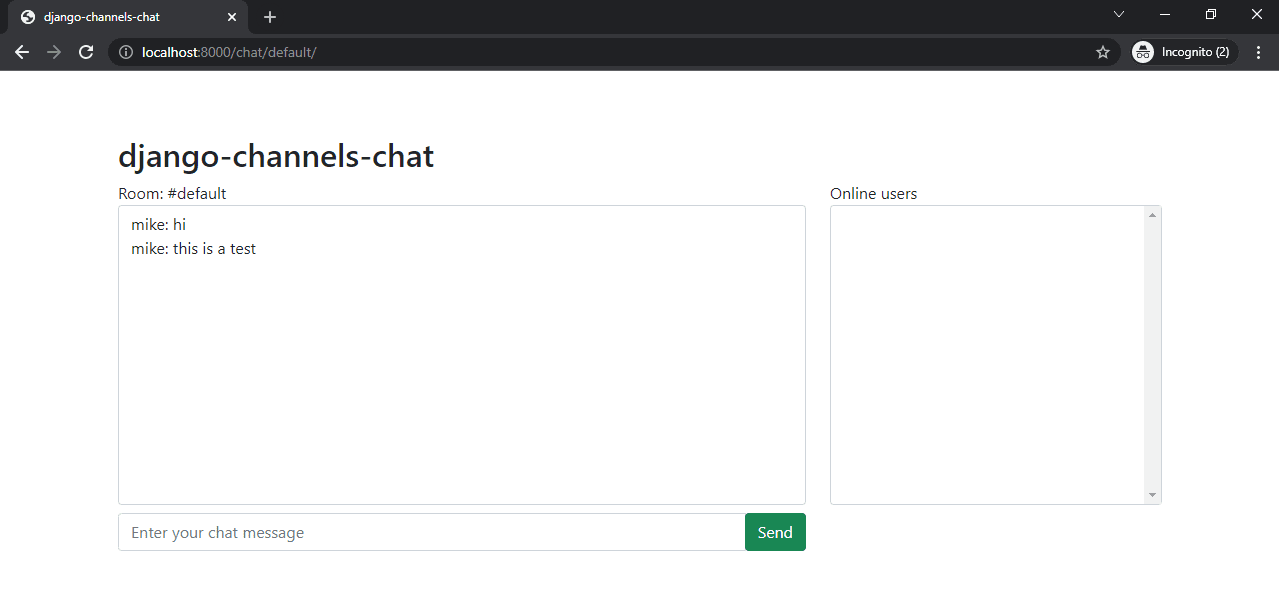
Log out of the Django admin. Navigate to http://localhost:8000/chat/default. What happens when you try to post a message?
User Messages
Next, we'll add the following three message types:
user_list- sent to the newly joined user (data.users= list of online users)user_join- sent when a user joins a chat roomuser_leave- sent when a user leaves a chat room
Backend
At the end of the connect method in ChatConsumer add:
# chat/consumers.py

def connect(self):
    # ...

    # send the user list to the newly joined user
    self.send(json.dumps({
        'type': 'user_list',
        'users': [user.username for user in self.room.online.all()],
    }))

    if self.user.is_authenticated:
        # send the join event to the room
        async_to_sync(self.channel_layer.group_send)(
            self.room_group_name,
            {
                'type': 'user_join',
                'user': self.user.username,
            }
        )
        self.room.online.add(self.user)
At the end of the disconnect method in ChatConsumer add:
# chat/consumers.py

def disconnect(self, close_code):
    # ...

    if self.user.is_authenticated:
        # send the leave event to the room
        async_to_sync(self.channel_layer.group_send)(
            self.room_group_name,
            {
                'type': 'user_leave',
                'user': self.user.username,
            }
        )
        self.room.online.remove(self.user)
Because we added new message types, we also need to add the methods for the channel layer. At the end of chat/consumers.py add:
# chat/consumers.py

def user_join(self, event):
    self.send(text_data=json.dumps(event))

def user_leave(self, event):
    self.send(text_data=json.dumps(event))
Your consumers.py after this step should look like this: consumers.py.
Frontend
To handle the messages from the frontend add the following cases to the switch statement in the chatSocket.onmessage handler:
// chat/static/room.js

switch (data.type) {
    // ...
    case "user_list":
        for (let i = 0; i < data.users.length; i++) {
            onlineUsersSelectorAdd(data.users[i]);
        }
        break;
    case "user_join":
        chatLog.value += data.user + " joined the room.\n";
        onlineUsersSelectorAdd(data.user);
        break;
    case "user_leave":
        chatLog.value += data.user + " left the room.\n";
        onlineUsersSelectorRemove(data.user);
        break;
    // ...
Testing
Run the server again, log in, and visit http://localhost:8000/chat/default.
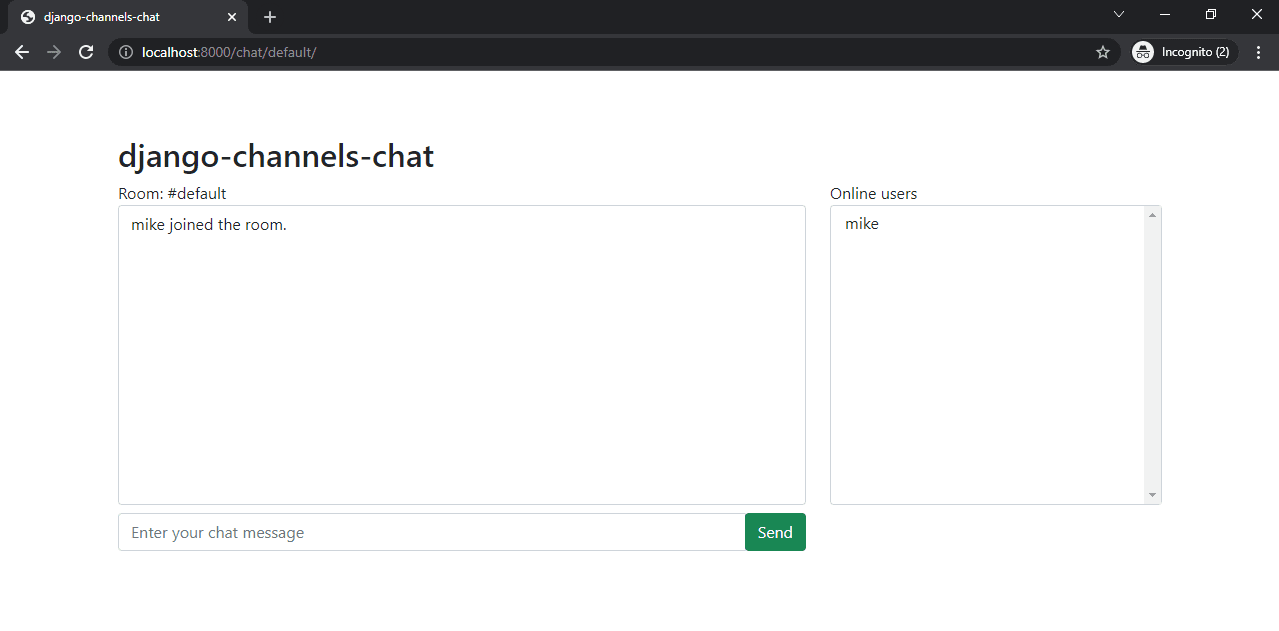
You should now be able to see join and leave messages. The user list should be populated as well.
Private Messaging
The Channels package doesn't allow direct filtering, so there's no built-in method for sending messages from a client to another client. With Channels you can either send a message to:
- The consumer's client (
self.send) - A channel layer group (
self.channel_layer.group_send)
Thus, in order to implement private messaging, we'll:
- Create a new group called
inbox_%USERNAME%every time a client joins. - Add the client to their own inbox group (
inbox_%USERNAME%). - Remove the client from their inbox group (
inbox_%USERNAME%) when they disconnect.
Once implemented, each client will have their own inbox for private messages. Other clients can then send private messages to inbox_%TARGET_USERNAME%.
Backend
Modify chat/consumers.py.
# chat/consumers.py

class ChatConsumer(WebsocketConsumer):

    def __init__(self, *args, **kwargs):
        # ...
        self.user_inbox = None  # new

    def connect(self):
        # ...
        self.user_inbox = f'inbox_{self.user.username}'  # new

        # accept the incoming connection
        self.accept()

        # ...

        if self.user.is_authenticated:
            # -------------------- new --------------------
            # create a user inbox for private messages
            async_to_sync(self.channel_layer.group_add)(
                self.user_inbox,
                self.channel_name,
            )
            # ---------------- end of new ----------------
            # ...

    def disconnect(self, close_code):
        # ...

        if self.user.is_authenticated:
            # -------------------- new --------------------
            # delete the user inbox for private messages
            async_to_sync(self.channel_layer.group_discard)(
                self.user_inbox,
                self.channel_name,
            )
            # ---------------- end of new ----------------
            # ...
So, we:
- Added
user_inboxtoChatConsumerand initialized it onconnect(). - Added the user to the
user_inboxgroup when they connect. - Removed the user from the
user_inboxgroup when they disconnect.
Next, modify receive() to handle private messages:
# chat/consumers.py

def receive(self, text_data=None, bytes_data=None):
    text_data_json = json.loads(text_data)
    message = text_data_json['message']

    if not self.user.is_authenticated:
        return

    # -------------------- new --------------------
    if message.startswith('/pm '):
        split = message.split(' ', 2)
        target = split[1]
        target_msg = split[2]

        # send private message to the target
        async_to_sync(self.channel_layer.group_send)(
            f'inbox_{target}',
            {
                'type': 'private_message',
                'user': self.user.username,
                'message': target_msg,
            }
        )
        # send private message delivered to the user
        self.send(json.dumps({
            'type': 'private_message_delivered',
            'target': target,
            'message': target_msg,
        }))
        return
    # ---------------- end of new ----------------

    # send chat message event to the room
    async_to_sync(self.channel_layer.group_send)(
        self.room_group_name,
        {
            'type': 'chat_message',
            'user': self.user.username,
            'message': message,
        }
    )
    Message.objects.create(user=self.user, room=self.room, content=message)
Add the following methods at the end of chat/consumers.py:
# chat/consumers.py

def private_message(self, event):
    self.send(text_data=json.dumps(event))

def private_message_delivered(self, event):
    self.send(text_data=json.dumps(event))
Your final chat/consumers.py file should be equal to this one: consumers.py
Frontend
To handle private messages in the frontend, add private_message and private_message_delivered cases inside the switch(data.type) statement:
// chat/static/room.js

switch (data.type) {
    // ...
    case "private_message":
        chatLog.value += "PM from " + data.user + ": " + data.message + "\n";
        break;
    case "private_message_delivered":
        chatLog.value += "PM to " + data.target + ": " + data.message + "\n";
        break;
    // ...
}
To make the chat a bit more convenient, we can change the message input to pm %USERNAME% when the user clicks one of the online users in the onlineUsersSelector. Add the following handler to the bottom:
// chat/static/room.js

onlineUsersSelector.onchange = function() {
    chatMessageInput.value = "/pm " + onlineUsersSelector.value + " ";
    onlineUsersSelector.value = null;
    chatMessageInput.focus();
};
Testing
That's it! The chap app is now complete. Let's test it out one last time.
Create two superusers for testing, and then run the server.
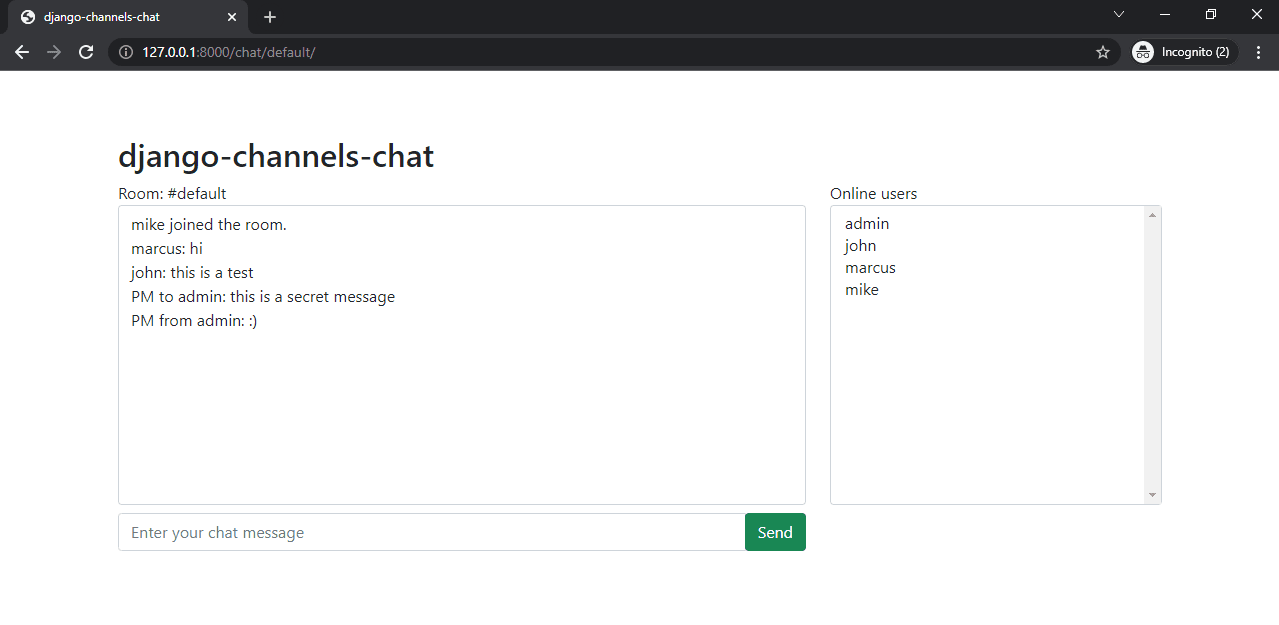
Open two different private/incognito browsers, logging into both at http://localhost:8000/admin.
Then navigate to http://localhost:8000/chat/default in both browsers. Click on one of the connected users to send them a private message:
Conclusion
In this tutorial, we looked at how to use Channels with Django. You learned about the differences between synchronous and asynchronous code execution along with the following Channels' concepts:
- Consumers
- Channel layers
- Routing
Finally, we tied everything together with WebSockets and built a chat application.
Our chat is far from perfect. If you want to practice what you learned, you can improve it by:
- Adding admin-only chat rooms.
- Sending the last ten messages to the user when they join a chat room.
- Allowing users to edit and delete messages.
- Adding '{user} is typing' functionality.
- Adding message reactions.
The ideas are ranked from the easiest to the hardest to implement.
You can grab the code from the django-channels-example repository on GitHub.
 Nik Tomazic