 Nik Tomazic
Django projects often involve long-running administrative tasks such as generating reports, removing inactive users, clearing auth tokens, and generating thumbnails. While these tasks are not as critical as tasks triggered by users, they can still significantly affect your web app's speed and availability if not appropriately handled.
Instead of running administrative tasks on the main thread and blocking your web app, you should always utilize a task queue. A task queue allows you to run tasks asynchronously, meaning your web app stays fast and responsive.
In this tutorial, we'll look at how to run background tasks directly from Django admin. We'll be using Celery, but similar concepts apply to any other task queues, such as Django-RQ, Django Q, or Huey.
Contents
Objectives
By the end of this tutorial, you'll be able to:
- Explain the basics of Celery
- Integrate Celery with Django using Docker Compose
- Define custom Celery tasks and trigger them via Django views and Django admin
- Use the Celery result backend to fetch task details and status
Project Setup
To make the tutorial easier to follow along, I've prepared a dockerized Django project. All the project does is provide an API view that simulates a long-running task of report generation.
First, clone the base branch of the GitHub repo:
$ git clone https://github.com/duplxey/django-celery-admin.git \
    --single-branch --branch base && cd django-celery-admin
Next, build and spin up the containers using Docker:
$ chmod +x web/entrypoint.sh
$ docker compose up --build -d
Then create a superuser:
$ docker compose exec web python manage.py createsuperuser
You should now be able to log in at http://localhost:8000/admin/ using your credentials.
To kick off the report generation navigate to http://localhost:8000/generate-report/. You'll notice that the web app will essentially freeze for 15 seconds. That is because the report generation happens synchronously (blocking the main thread).
Celery Setup
As mentioned before, Celery is an asynchronous task queue that lets you run time-consuming tasks in the background. Without a task queue, your Django app has to wait for a task to complete before returning a response and proceeding to the subsequent request.
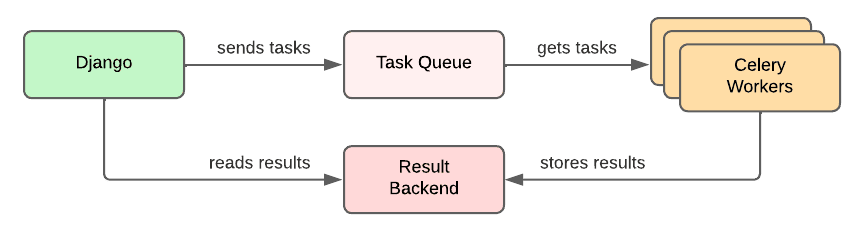
At its core, Celery has four components:
- Tasks (custom code that'll run in the worker process)
- Task Queue (responsible for delivering messages/tasks to the worker)
- Worker (an additional process that executes tasks async to your Django app)
- Result backend (a store for keeping task status and results)
A simplified Celery architecture looks something like this:
For more details on Celery, check out the official Celery documentation as well as the Working with Django and Celery guide.
Start by adding celery and redis to web/requirements.txt file:
# web/requirements.txt

Django==5.1.7
celery==5.4.0
redis==5.2.1
Next, modify the docker-compose.yml like so:
# docker-compose.yml

services:
  web:
    build: ./web
    command: python manage.py runserver 0.0.0.0:8000
    volumes:
      - ./web:/usr/src/app/
    ports:
      - "8000:8000"
    environment:
      - DEBUG=1
      - SECRET_KEY=niks4af)ge#ff42is0vpsk07qach(mrcool1_#wx8c6izoi3vi
      - ALLOWED_HOSTS=localhost 127.0.0.1 [::1]
      - CELERY_BROKER=redis://redis:6379/0
      - CELERY_BACKEND=redis://redis:6379/0
    depends_on:
      - redis

  celery:
    build: ./web
    entrypoint: []
    command: celery --app=core worker --loglevel=info
    volumes:
      - ./web:/usr/src/app/
    environment:
      - DEBUG=1
      - SECRET_KEY=niks4af)ge#ff42is0vpsk07qach(mrcool1_#wx8c6izoi3vi
      - ALLOWED_HOSTS=localhost 127.0.0.1 [::1]
      - CELERY_BROKER=redis://redis:6379/0
      - CELERY_BACKEND=redis://redis:6379/0
    depends_on:
      - redis
      - web

  redis:
    image: redis:7.4.2-alpine
    volumes:
      - redis_data:/data
    ports:
      - "6379:6379"

volumes:
  redis_data:
What's happening here?
- First, we added two Docker services:
celeryandredis. Redis will be used as a message broker and storage backend for Celery. - To allow Celery and Django to connect to Redis, we defined two environmental variables,
CELERY_BROKERandCELERY_BACKEND. - Lastly, To persist Redis data, we created a volume called
redis_data.
Load the environmental variables in web/core/settings.py like so:
# web/core/settings.py

CELERY_BROKER_URL = os.environ.get("CELERY_BROKER", "redis://redis:6379/0")
CELERY_RESULT_BACKEND = os.environ.get("CELERY_BROKER", "redis://redis:6379/0")
Then create a celery.py file in the "web/core" folder with the following contents:
# web/core/celery.py

import os

from celery import Celery

os.environ.setdefault("DJANGO_SETTINGS_MODULE", "core.settings")

app = Celery("core", result_extended=True)
app.config_from_object("django.conf:settings", namespace="CELERY")
app.autodiscover_tasks()
What's happening here?
- We set a new environmental variable called
DJANGO_SETTINGS_MODULE, which tells Celery where our Django settings.py file is. - We imported
Celeryand used it to initialize the Celeryappinstance. - Lastly, we called
autodiscover_tasks(), which automatically scans our Django project, finds Celery tasks, and registers them.
Lastly, update core/__init__.py to import Celery when Django starts:
# web/core/__init__.py

from .celery import app as celery_app

__all__ = [
    "celery_app",
]
Great, we've successfully installed Celery.
To apply the changes, restart the Docker Compose project:
$ docker compose down
$ docker compose up --build -d
Define Task
Let's transform our synchronous generate_report_view() into a Celery task.
Create a tasks.py file in the "web/reports" folder with the following contents:
# web/reports/tasks.py

import time

from celery import shared_task

from reports.models import Report


@shared_task
def generate_report_task(report_id, **kwargs):
    report = Report.objects.get(id=report_id)

    # Simulate a long-running report generation
    time.sleep(15)
    report.content = "testdriven.io is cool!"
    report.is_ready = True
    report.save()

    return "The report has been successfully generated!"
In this code snippet, we defined a new Celery task using the @shared_task decorator. Instead of creating the report instance within the task, we're passing it to the task by ID. By doing that, Django knows what the report's ID will be before the task completes.
Additionally, we added **kwargs to the function's signature, allowing us to pass custom arguments to the task later on.
Since our Celery container doesn't have hot-reload enabled, restart it before proceeding:
$ docker compose restart celery
Trigger Task
Trigger Task via View
To trigger the task from our view, modify it like so:
# web/reports/views.py

from django.http import JsonResponse

from reports.models import Report
from reports.tasks import generate_report_task


def generate_report_view(request):
    report = Report.objects.create()
    task = generate_report_task.delay(report.pk)

    return JsonResponse({
        "status": "The report is being generated...",
        "task_id": task.id,
    })
Celery's delay() method is a shortcut for asynchronously applying a task by sending a message to the broker. As mentioned in the previous section, we must pass the report ID.
Test the endpoint, by navigating to http://localhost:8000/generate-report/ in your browser:
{
  "status": "The report is being generated...",
  "task_id": "7b3b8132-41bc-4bca-a0bb-bd91e65e283a"
}
You'll notice that the response is now instant. If you check out the reports admin panel, you'll see a new report was created. After 15 seconds, the report should be ready.
Trigger Task via Admin
Kicking off the task via Django admin is a tad more complicated. We have to:
- Create a new Django admin view.
- Override the
ModelAdmin'sget_urls()method to register the view. - Override an admin template and add a trigger button.
Let's do it!
First, navigate to web/reports/admin.py and paste in the following code:
# web/reports/admin.py

from django.contrib import admin
from django.db import transaction
from django.shortcuts import redirect
from django.urls import path, reverse

from reports.models import Report
from reports.tasks import generate_report_task


class ReportAdmin(admin.ModelAdmin):
    list_display = ["__str__", "created_at", "updated_at", "is_ready"]
    change_list_template = "admin/reports/report/change_list.html"
    readonly_fields = ["created_at", "updated_at"]

    def get_urls(self):
        urls = super().get_urls()
        custom_urls = [
            path(
                "generate/",
                self.admin_site.admin_view(self.admin_generate_report_view),
                name="reports_generate",
            ),
        ]
        return custom_urls + urls

    def admin_generate_report_view(self, request):
        with transaction.atomic():
            report = Report.objects.create()

        result = generate_report_task.delay(report_id=report.id)

        self.message_user(request, "Started generating a report...")
        return redirect(reverse(
            "admin:reports_report_change",
            kwargs={"object_id": report.id},
        ))


admin.site.register(Report, ReportAdmin)
What's happening here?
- We defined a view called
admin_generate_report_view()which kicks off the task. - We registered the view by overriding the
get_urls()method. Note that when overriding Django admin URLs, the custom URLs always have to come first. - We changed the
change_list_templateby providing a path to a custom template.
Next, create the following directory structure in your "web/reports" folder:
templates/
└── admin/
    └── reports/
        └── report/
            └── change_list.html
Then put the following code into the HTML file:
<!-- web/reports/templates/admin/reports/report/change_list.html -->

{% extends "admin/change_list.html" %}

{% block object-tools-items %}
  <style>
    .generatelink {
      background: var(--link-fg) !important;
    }

    .generatelink:hover {
      background: var(--link-hover-color) !important;
    }
  </style>
  <li>
    <a href="{% url "admin:reports_generate" %}" class="generatelink">
      Generate report
    </a>
  </li>
  {{ block.super }}
{% endblock %}
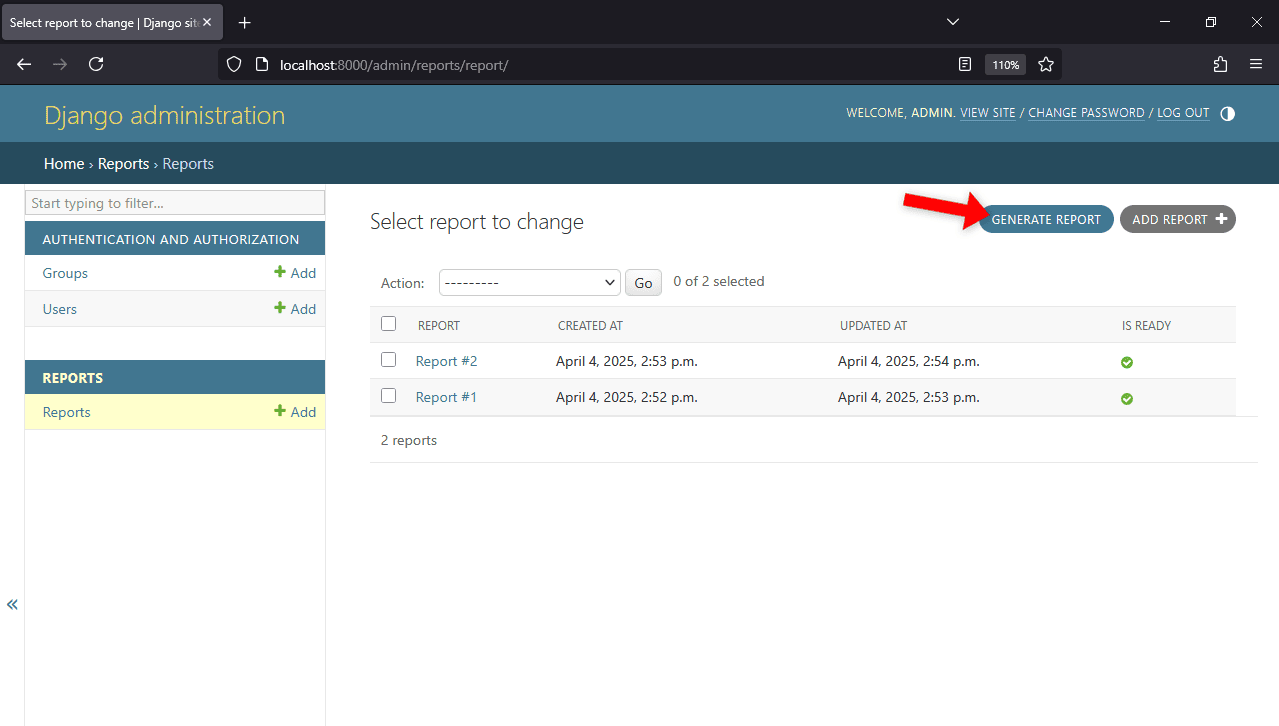
In this template, we added a custom "Generate report" button next to the history button.
Navigate to your admin site, click the generate button, and you should be redirected to the report details page. In 15 seconds, refresh the page, and the report should be ready.
If you wish to add trigger buttons to other Django admin places, check out the Django source code to see what templates you must override.
Task Status
Remember the result backend I was talking about before? Well, let's leverage it to display real-time task status and redirect the user only once the report generation has completed.
To achieve that, we'll have to:
- Enable extended Celery result backend.
- Define an admin view that returns Celery task's status.
- Create a Django admin page that displays a spinner and polls for status.
- Pass a
redirect_urlto the task and redirect to it once the task is done.
First, add the following two settings to your web/core/settings.py file:
# web/core/settings.py

CELERY_RESULT_EXTENDED = True
CELERY_TASK_TRACK_STARTED = True
The first setting tells Celery to store not only the task status and result but also the task name, arguments, named arguments, and so on. The second setting tells Celery to keep track of all the status changes (not only PENDING and the final ones).
Restart the Celery container:
$ docker compose restart celery
Next, create a CustomAdminConfig and CustomAdminSite in web/core/admin.py like so:
# web/core/admin.py

from django.contrib import admin
from django.http import JsonResponse
from django.shortcuts import render
from django.urls import path
from django.contrib.admin.apps import AdminConfig
from celery.result import AsyncResult


class CustomAdminConfig(AdminConfig):
    default_site = "core.admin.CustomAdminSite"


class CustomAdminSite(admin.AdminSite):
    def get_urls(self):
        urls = super().get_urls()
        custom_urls = [
            path(
                "task-status/<str:task_id>/",
                self.admin_view(self.admin_task_status_view),
                name="task_status",
            )
        ]
        return custom_urls + urls

    def admin_task_status_view(self, request, task_id):
        task = AsyncResult(task_id)
        task_data = {
            "id": task.id,
            "name": task.name,
            "args": task.args,
            "kwargs": task.kwargs,
            "state": task.state,
        }

        # Return JSON response if requested
        if request.headers.get("Accept", "").startswith("application/json"):
            return JsonResponse(task_data)

        # Otherwise, render HTML response
        return render(
            request,
            "admin/task_status.html",
            {
                "title": "Task Status",
                "task": task_data,
            },
        )
We defined a custom Django admin site with a admin_task_status_view() that fetches Celery tasks by ID and returns their status. We'll later use this endpoint to poll for status from our Django template.
Next, switch the admin site in web/core/settings.py like so:
# web/core/settings.py

INSTALLED_APPS = [
    "core.admin.CustomAdminConfig",  # the default admin was replaced by this one
    "django.contrib.auth",
    "django.contrib.contenttypes",
    "django.contrib.sessions",
    "django.contrib.messages",
    "django.contrib.staticfiles",
    "reports.apps.ReportsConfig",
]
Lastly, take care of the templates by creating the following directory structure in "web":
templates/
└── admin/
    ├── components/
    │   └── spinner.html
    └── task_status.html
In the spinner.html file, add the following code:
<!-- web/templates/admin/components/spinner.html -->

<div class="spinner"></div>
<style>
  .spinner {
    width: 32px;
    height: 32px;
    border: 3px solid var(--border-color);
    border-top: 3px solid var(--button-bg);
    border-radius: 50%;
    animation: spin 1s linear infinite;
    margin: 12px 0;
  }

  @keyframes spin {
    0% {
      transform: rotate(0deg);
    }
    100% {
      transform: rotate(360deg);
    }
  }
</style>
And add the following to task_status.html:
<!-- web/templates/admin/task_status.html -->

{% extends "admin/base_site.html" %}

{% block content %}
  <ul style="padding-left: 24px;">
    <li><b>Task ID:</b> {{ task.id }}</li>
    <li><b>Task Name:</b> {{ task.name }}</li>
    <li><b>Task Args:</b> {{ task.args }}</li>
    <li><b>Task Kwargs:</b> {{ task.kwargs }}</li>
    <li><b>Task State:</b> {{ task.state }}</li>
  </ul>
  {% if task.state == "PENDING" or task.state == "STARTED" %}
    <hr style="margin: 12px 0;">
    <div>
      <p>Task is running...</p>
      {% include "admin/components/spinner.html" %}
      <p>(Last update: <span id="lastUpdate"></span>)</p>
    </div>
    <script>
      let intervalId = null;
      const lastUpdateSpan = document.getElementById("lastUpdate");

      async function fetchStatusAndUpdate() {
        try {
          console.log("Fetching task status...");

          // Fetch task status from the server
          const response = await fetch(`/admin/task-status/{{ task.id }}/`, {
            headers: { Accept: "application/json" }
          });
          const data = await response.json();

          if (data["state"] === "SUCCESS" || data["state"] === "FAILURE") {
            // Stop with the polling
            if (intervalId) {
              clearInterval(intervalId);
            }

            // If 'redirect_url' is present redirect to that URL
            if (data["kwargs"] && data["kwargs"]["redirect_url"]) {
              window.location.href = data["kwargs"]["redirect_url"];
            }
          }

          // Update the 'lastUpdate' span
          lastUpdateSpan.innerHTML = new Date().toLocaleTimeString();
        } catch (error) {
          console.error("Error fetching task status:", error);
        }
      }

      // Instantly check the status and then poll every 3 seconds
      intervalId = setInterval(fetchStatusAndUpdate, 3000);
      fetchStatusAndUpdate();
    </script>
  {% endif %}
{% endblock %}
What is happening here?
- The template fetches the task status and displays it.
- After that, it polls for task status updates every 3 seconds using
setInterval(). - Once the task succeeds or fails it redirects the user to the
redirect_url.
Lastly, modify ReportAdmin's admin_generate_report_view() to pass the redirect URL to the task instead of instantly redirecting to the report details page:
# web/reports/admin.py

class ReportAdmin(admin.ModelAdmin):

    ...

    def admin_generate_report_view(self, request):
        with transaction.atomic():
            report = Report.objects.create()

        redirect_url = reverse("admin:reports_report_change", kwargs={
            "object_id": report.id,
        })
        result = generate_report_task.delay(
            report_id=report.id,
            redirect_url=redirect_url,
        )

        self.message_user(request, "Started generating a report...")
        return redirect("admin:task_status", result.id)
Good job!
We now have a custom admin view that polls for task status and redirects the user to redirect_url once the task has completed. To test it out, navigate to your Django admin and trigger the report generation like before.

Conclusion
In this tutorial, we've examined how to integrate Celery with Django to kick off long-running tasks from Django admin. Additionally, we've learned how to leverage the result backend to fetch task status and display it in near real-time.
The final project can be viewed in the django-celery-admin GitHub repo.
To get the most out of Django admin and Celery, check out the following resources: