 Nik Tomazic
Django's automatically generated admin site is one of the biggest strengths of the framework. The centralized admin interface lets you easily view and manipulate your models' data. This can save you a lot of time while developing and managing content.
Even though the admin site is highly customizable, many developers aren't aware of its full capabilities. This results in developers creating views and functions for things that could be easily implemented with a bit of admin site tweaking.
In this article, we'll look at how to customize Django's admin site through practical examples. We'll cover the built-in customization options as well as customization via third-party packages such as DjangoQL, django-import-export, and django-admin-interface.
Contents
- Objectives
- Project Setup
- Basic Admin Site Customization
- Django Model and Admin
- Customize Admin Site with ModelAdmin Class
- Override Django Admin Forms
- Override Django Admin Templates
- Advanced Search with DjangoQL
- Import and Export Data with Django Import Export
- Style Admin Site with Django Admin Interface
- Conclusion
Objectives
By the end of this article, you'll be able to:
- Perform basic Django admin site configuration
- Explain how Django model attributes affect the admin site
- Use
list_displayto control which model fields are displayed - Add custom fields to
list_displayand format existing ones - Add links to related model objects in
list_display - Enable search and filters via
search_fieldsandlist_filter - Handle model inlines for both
N:1andM:Mrelationships - Use Django admin actions and create custom ones
- Override Django admin forms and templates
- Utilize DjangoQL for advanced searching functionality
- Import data in and export data to different formats using
django-import-export - Modify the appearance of your admin site via
django-admin-interface
Project Setup
To demonstrate the different admin site customization options, I've prepared a simple web app. The web app serves as an event ticket sales system. It allows you to manage venues, concerts, concert categories, and tickets.
It has the following entity-relationship model:
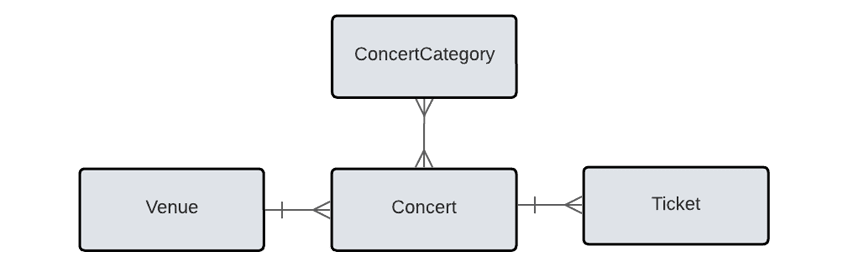
I highly recommend you first follow along with this web app. After reading, you can then apply the gained knowledge to your Django projects.
First, grab the source code from the repository on GitHub:
$ git clone https://github.com/duplxey/django-admin-customization.git --branch base
$ cd django-admin-customization
Create a virtual environment and activate it:
$ python3.11 -m venv env && source env/bin/activate
Install the requirements and migrate the database:
(venv)$ pip install -r requirements.txt
(venv)$ python manage.py migrate
Create a superuser and populate the database:
(venv)$ python manage.py createsuperuser
(venv)$ python manage.py populate_db
Run the development server:
(venv)$ python manage.py runserver
Open your favorite web browser and navigate to http://localhost:8000/admin. Try using your superuser credentials to access the Django admin site. After that, ensure the database is populated with a few venues, concert categories, concerts, and tickets.
Before continuing, I suggest you check the models in tickets/models.py. Pay attention to what fields a model has and how the models are connected.
Basic Admin Site Customization
The Django admin site provides some basic configuration options. These options allow you to change the site's title, header, site URL, and more. The site_header setting can be especially convenient if you have multiple environments and want to differentiate between them easily.
The admin.site settings are usually modified in your project's main urls.py file.
Rename the Django admin to "TicketPlus" and tag the current environment as dev:
# core/urls.py

admin.site.site_title = "TicketsPlus site admin (DEV)"
admin.site.site_header = "TicketsPlus administration"
admin.site.index_title = "Site administration"
All the settings can be viewed by checking Django's contrib/admin/sites.py file.
Another thing you should do is change the default /admin URL. This'll make it more difficult for malicious actors to find your admin panel.
Change your core/urls.py like so:
# core/urls.py

urlpatterns = [
    path("secretadmin/", admin.site.urls),
]
Your admin site should now be accessible at http://localhost:8000/secretadmin.
Django Model and Admin
Some Django model attributes directly affect the Django admin site. Most importantly:
__str__()is used to define object's display nameMetaclass is used to set various metadata options (e.g.,orderingandverbose_name)
Here's an example of how these attributes are used in practice:
# tickets/models.py

class ConcertCategory(models.Model):
    name = models.CharField(max_length=64)
    description = models.TextField(max_length=256, blank=True, null=True)

    class Meta:
        verbose_name = "concert category"
        verbose_name_plural = "concert categories"
        ordering = ["-name"]

    def __str__(self):
        return f"{self.name}"
- We provided the plural form since the plural of "concert category" isn't "concert categorys".
- By providing the
orderingattribute the categories are now ordered by name.
For all the
Metaclass options, check out Model Meta options.
Customize Admin Site with ModelAdmin Class
In this section, we'll take a look at how to use the ModelAdmin class to customize the admin site.
Control List Display
The list_display attribute allows you to control which model fields are displayed on the model list page. Another great thing about it is that it can display related model fields using the __ operator.
Go ahead and set ConcertAdmin's list_display:
# tickets/admin.py

class ConcertAdmin(admin.ModelAdmin):
    list_display = ["name", "venue", "starts_at", "price", "tickets_left"]
    readonly_fields = ["tickets_left"]
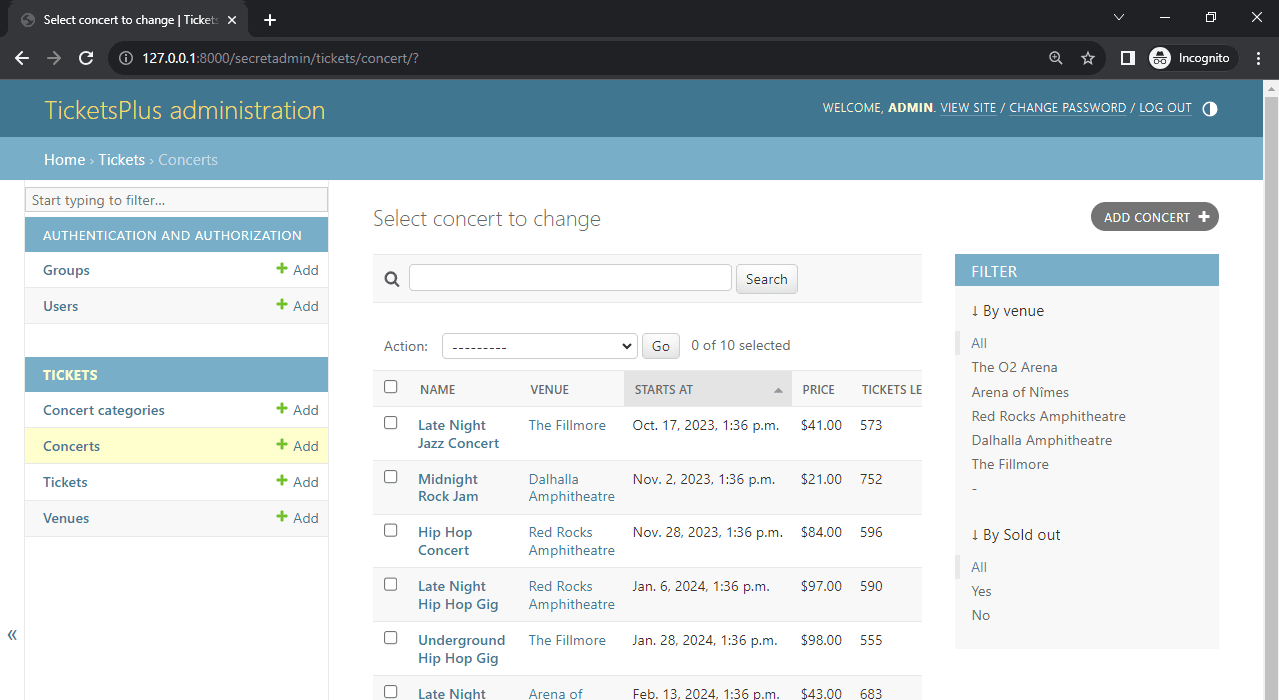
Wait for the server to refresh and check out the concert list page in the admin.
The new list looks great, but there's a problem. By adding the venue to the list_display, we introduced the N + 1 problem. Since Django needs to fetch the venue name for each concert separately, many more queries get executed.
To avoid the N + 1 problem, we can use the list_select_related attribute, which works similarly to the select_related method:
# tickets/admin.py

class ConcertAdmin(admin.ModelAdmin):
    list_display = ["name", "venue", "starts_at", "price", "tickets_left"]
    list_select_related = ["venue"]
    readonly_fields = ["tickets_left"]
To learn more about Django performance as well as the N + 1, check out Django Performance Optimization Tips and Automating Performance Testing in Django.
Next, set the other ModelAdmins' list_displays for venues and tickets:
# tickets/admin.py

class VenueAdmin(admin.ModelAdmin):
    list_display = ["name", "address", "capacity"]


class TicketAdmin(admin.ModelAdmin):
    list_display = [
        "customer_full_name", "concert",
        "payment_method", "paid_at", "is_active",
    ]
    list_select_related = ["concert", "concert__venue"]  # to avoid N + 1
List Display Custom Fields
The list_display setting can also be used to add custom fields. To add a custom field, you must define a new method within the ModelAdmin class.
Add a "Sold Out" field, which is True if no tickets are available:
# tickets/admin.py

class ConcertAdmin(admin.ModelAdmin):
    list_display = ["name", "venue", "starts_at", "tickets_left", "display_sold_out"]
    list_select_related = ["venue"]

    def display_sold_out(self, obj):
        return obj.tickets_left == 0

    display_sold_out.short_description = "Sold out"
    display_sold_out.boolean = True
We used short_description to set the column name and boolean to tell Django that this column has a boolean value. This way, Django displays the tick/cross icon instead of True and False. We also had to add our display_sold_out method to list_display.
Next, let's add a custom field called display_price:
# tickets/admin.py

class ConcertAdmin(admin.ModelAdmin):
    list_display = [
        "name", "venue", "starts_at", "tickets_left", "display_sold_out",  "display_price"
    ]
    # ...

    def display_price(self, obj):
        return f"${obj.price}"

    display_price.short_description = "Price"
    display_price.admin_order_field = "price"
We used admin_order_field to tell Django by what field this column is orderable.
Link Related Model Objects
Sometimes it can be helpful to add links to related model objects instead of just showing their display name. To demonstrate how this is done, we'll link venues on the concert list page.
Before we do that, let's take a look at the Django admin site URL structure:
| Page | URL | Description |
|---|---|---|
| List | admin:<app>_<model>_changelist |
Displays the list of objects |
| Add | admin:<app>_<model>_add |
Object add form |
| Change | admin:<app>_<model>_change |
Object change form (requires objectId) |
| Delete | admin:<app>_<model>_delete |
Object delete form (requires objectId) |
| History | admin:<app>_<model>_history |
Displays object's history (requires objectId) |
To add a link to the venue change page, we'll have to use the following URL:
Format: admin:<app>_<model>_change
Actual: admin:tickets_venue_change
Add the display_venue method to ConcertAdmin like so:
# tickets/admin.py

class ConcertAdmin(DjangoQLSearchMixin, admin.ModelAdmin):
    list_display = [
        "name", "venue", "starts_at", "tickets_left",
        "display_sold_out",  "display_price", "display_venue",
    ]
    list_select_related = ["venue"]

    # ...

    def display_venue(self, obj):
        link = reverse("admin:tickets_venue_change", args=[obj.venue.id])
        return format_html('<a href="{}">{}</a>', link, obj.venue)

    display_venue.short_description = "Venue"
We used the reverse method to reverse the URL and passed obj.venue.id as the objectId.
Don't forget about the imports:
from django.urls import reverse
from django.utils.html import format_html
Wait for the development server to refresh and navigate to the concert list page. The venues should now be clickable.
Filter Model Objects
Django admin makes it easy to filter objects. To enable filtering you must specify which fields or related model fields should be filterable. Best of all, Django can stack filters -- e.g., filter by two or more fields simultaneously.
Go ahead and add the list_filter attribute to ConcertAdmin like so:
# tickets/admin.py

class ConcertAdmin(admin.ModelAdmin):
    # ...
    list_filter = ["venue"]
To filter by a related object's fields, use the
__operator.When selecting filters, ensure not to include fields with too many values. For example,
tickets_leftis a lousy filter choice since each concert has a different amount of tickets left.
For more advanced filtering functionality, you can also define custom filters. To define a custom filter, you must specify the options or so-called lookups and a queryset for each lookup.
For example, to filter by whether a concert is sold out or not, create a SoldOutFilter and include it in ConcertAdmin's list_filters:
# tickets/admin.py

class SoldOutFilter(SimpleListFilter):
    title = "Sold out"
    parameter_name = "sold_out"

    def lookups(self, request, model_admin):
        return [
            ("yes", "Yes"),
            ("no", "No"),
        ]

    def queryset(self, request, queryset):
        if self.value() == "yes":
            return queryset.filter(tickets_left=0)
        else:
            return queryset.exclude(tickets_left=0)


class ConcertAdmin(admin.ModelAdmin):
    # ...
    list_filter = ["venue", SoldOutFilter]
Don't forget about the import:
from django.contrib.admin import SimpleListFilter
Visit your admin site and make sure the filters work as expected.
Search Model Objects
Django admin provides basic search functionality. It can be enabled by specifying which model fields should be searchable via the search_fields attribute. Keep in mind that Django doesn't support fuzzy queries by default.
Let's make our concerts searchable by their names, venues, and venue addresses.
Add the search_fields attribute to ConcertAdmin like so:
# tickets/admin.py

class ConcertAdmin(admin.ModelAdmin):
    # ...
    search_fields = ["name", "venue__name", "venue__address"]
Wait for the server to refresh and test the search box.
Handle Model Inlines
The admin interface allows you to edit models on the same page as the parent model via inlines. Django provides two types of inlines StackedInline and TabularInline. The main difference between them is how they look.
Let's use an inline to display venue concerts on the venue details page.
Create a ConcertInline and add it to VenueAdmin's inlines like so:
# tickets/admin.py

class ConcertInline(admin.TabularInline):
    model = Concert
    fields = ["name", "starts_at", "price", "tickets_left"]

    # optional: make the inline read-only
    readonly_fields = ["name", "starts_at", "price", "tickets_left"]
    can_delete = False
    max_num = 0
    extra = 0
    show_change_link = True


class VenueAdmin(admin.ModelAdmin):
    list_display = ["name", "address", "capacity"]
    inlines = [ConcertInline]
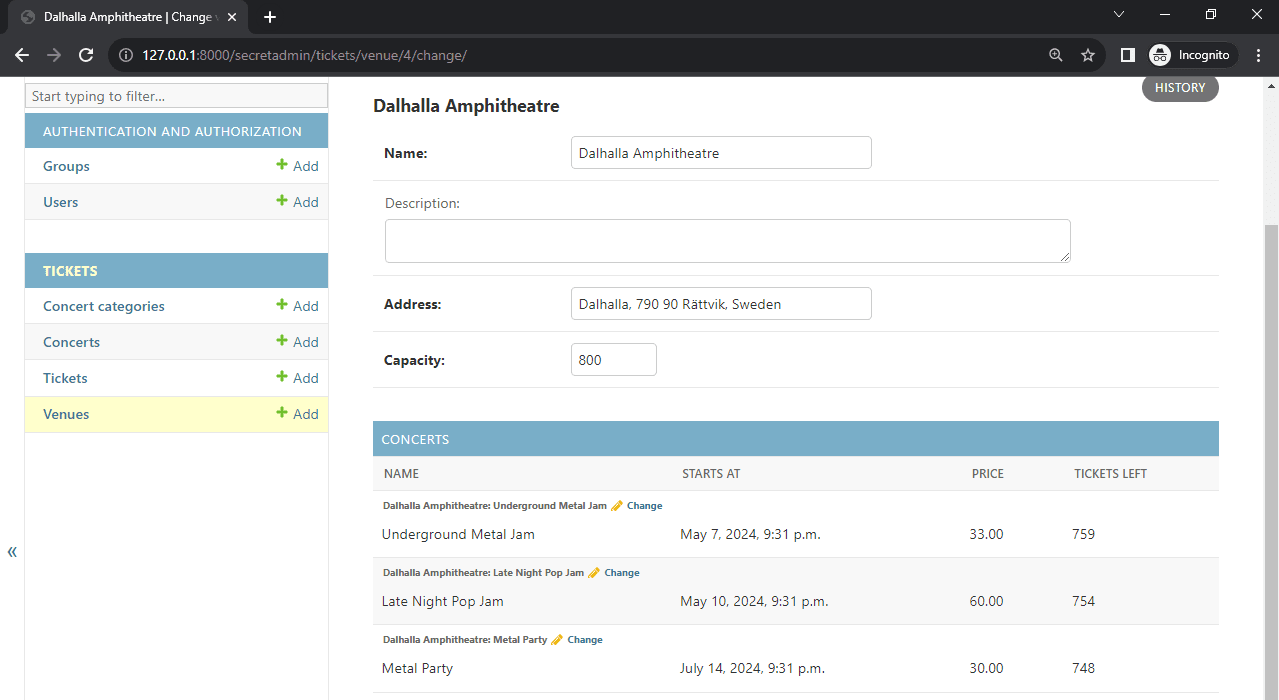
Visit your admin site and navigate to some venue's details page. Scroll down and there should be the "Concerts" inline section.
For more information on inlines and how to handle many-to-many relationships, check out the Django admin site docs.
Custom Admin Actions
Django admin actions allow you to perform an "action" on an object or a group of objects. An action can be used to modify an object's attributes, delete the object, copy it, and so forth. Actions are primarily utilized for frequently performed "actions" or bulk changes.
A perfect example is activating or deactivating a ticket. Suppose we have many tickets we'd like to activate. It would be pretty tedious to click each of them, change their is_active property and save the model. Instead, we can define an action that'll do just that.
Define activate_tickets and deactivate_tickets actions and add them to TicketAdmin like so:
# tickets/admin.py
@admin.action(description="Activate selected tickets")
def activate_tickets(modeladmin, request, queryset):
queryset.update(is_active=True)
@admin.action(description="Deactivate selected tickets")
def deactivate_tickets(modeladmin, request, queryset):
queryset.update(is_active=False)
class TicketAdmin(admin.ModelAdmin):
# ...
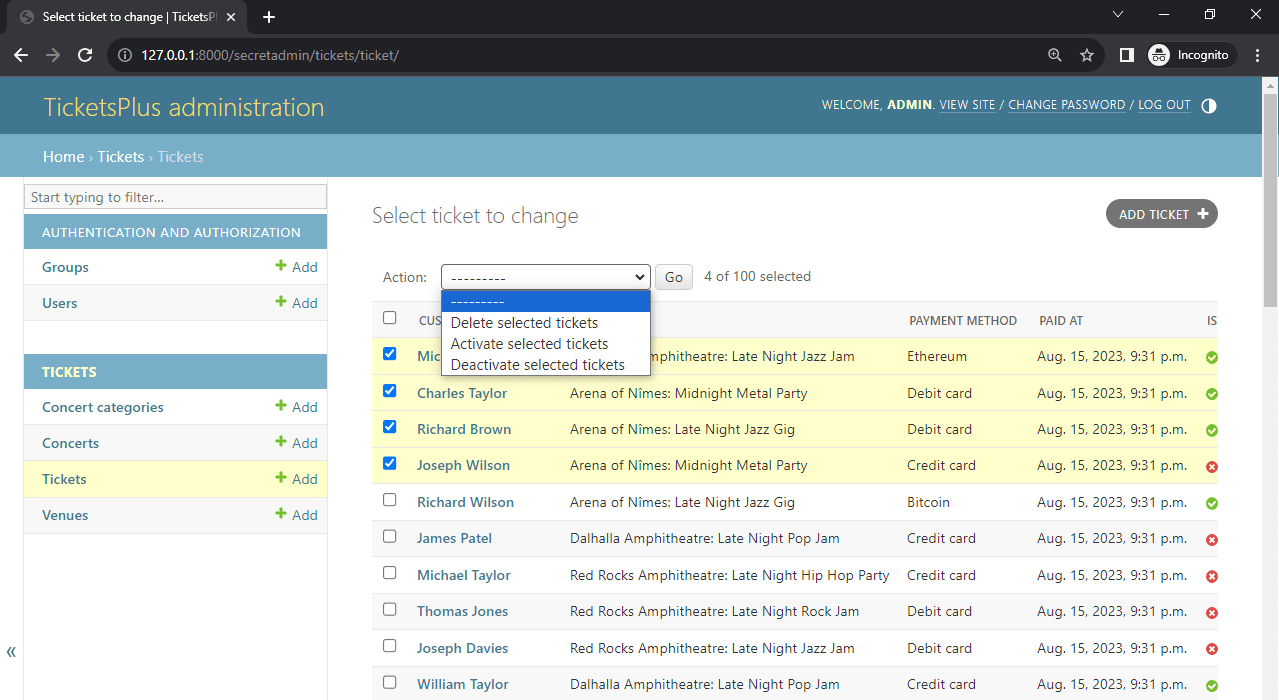
actions = [activate_tickets, deactivate_tickets]
Open your admin page once again, navigate to the ticket list view, and you should be able to see the custom actions. Test them by activating and deactivating a number of tickets at once.
For more information on Django admin actions, check out Admin actions.
Override Django Admin Forms
By default, Django automatically generates a ModelForm for your model. That form is then used on the add and change page. If you want to customize the form or implement unique data validation, you'll have to override the form.
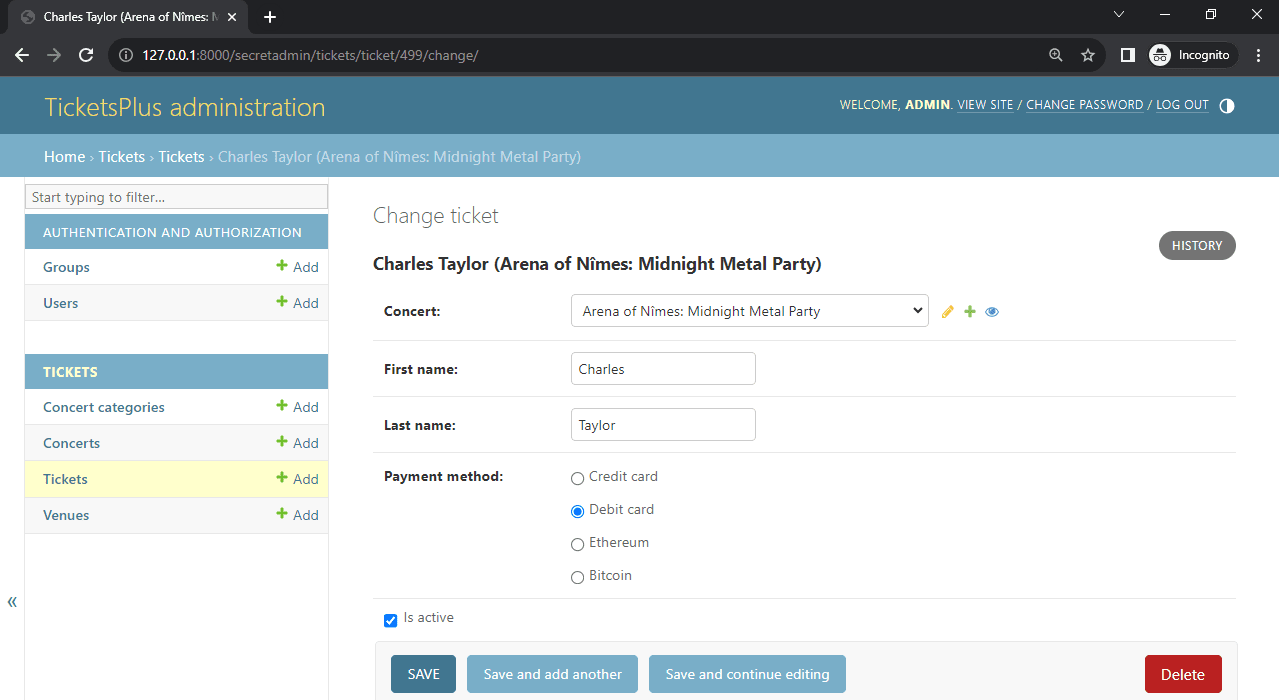
To demonstrate this, let's split customer_full_name into two input boxes and display radio buttons instead of a dropdown for the payment methods.
Go ahead and create a forms.py file in the tickets app:
# tickets/forms.py

from django import forms
from django.forms import ModelForm, RadioSelect

from tickets.models import Ticket


class TicketAdminForm(ModelForm):
    first_name = forms.CharField(label="First name", max_length=32)
    last_name = forms.CharField(label="Last name", max_length=32)

    class Meta:
        model = Ticket
        fields = [
            "concert",
            "first_name",
            "last_name",
            "payment_method",
            "is_active"
        ]
        widgets = {
            "payment_method": RadioSelect(),
        }

    def __init__(self, *args, **kwargs):
        instance = kwargs.get('instance')
        initial = {}

        if instance:
            customer_full_name_split = instance.customer_full_name.split(" ", maxsplit=1)
            initial = {
                "first_name": customer_full_name_split[0],
                "last_name": customer_full_name_split[1],
            }

        super().__init__(*args, **kwargs, initial=initial)

    def save(self, commit=True):
        self.instance.customer_full_name = self.cleaned_data["first_name"] + " " \
                                            + self.cleaned_data["last_name"]
        return super().save(commit)
Here:
- We added the
first_nameandlast_nameform fields. - We used the
Metaclass to specify what model this form relates to and what fields to include. - On form
__init__(), we populated the form using model instance data. - On
save(), we mergedfirst_nameandlast_nameand saved it ascustomer_full_name.
Next, set TicketAdmin's form like so:
# tickets/admin.py

class TicketAdmin(admin.ModelAdmin):
    # ...
    form = TicketAdminForm
Don't forget about the import:
from tickets.forms import TicketAdminForm
Restart the development server and navigate to a ticket's details page. If everything went well, you should see that the first and last names are now in separate boxes and payment methods use radio buttons instead of a dropdown.
Override Django Admin Templates
The Django admin site allows you to customize any visual aspect of it by overriding templates. All you have to do is:
- Check out Django's source code and copy the original template.
- Paste the template in "templates/admin" or "templates/registration", respectively.
- Modify the template to your liking.
Most of the time, you'll be able to get away with just changing a portion of the original template.
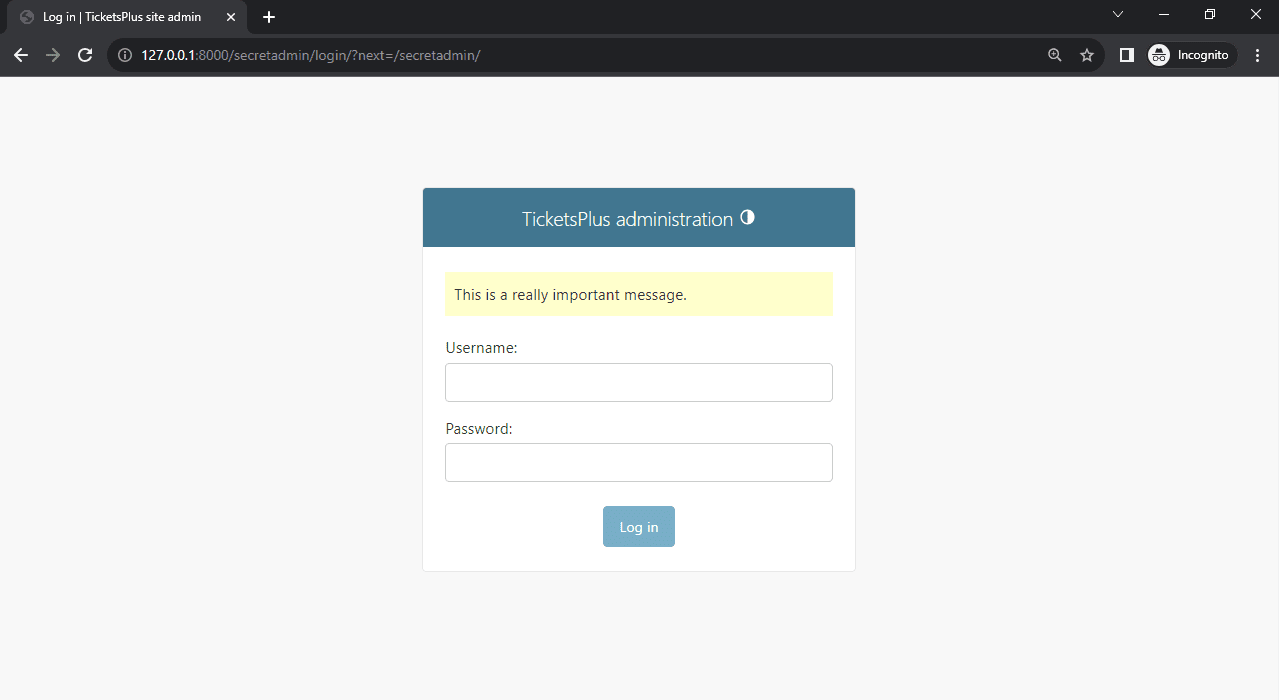
For example, if we want to add a message above the login form, we can inherit from login.html and then change the content_title block:
<!-- templates/admin/login.html -->

{% extends "admin/login.html" %}

{% block content_title %}
    <p style="background: #ffffcc; padding: 10px 8px">
        This is a really important message.
    </p>
{% endblock %}
Navigate to your login page, and you should be able to see the yellow message.
Advanced Search with DjangoQL
DjangoQL is a powerful third-party package that allows you to perform advanced queries without relying on raw SQL. It has its own syntax and auto-completion, supports logical operators, and works for any Django model.
Start by installing the package:
(env)$ pip install djangoql==0.17.1
Add to INSTALLED_APPS in core/settings.py:
# core/settings.py

INSTALLED_APPS = [
    # ...
    "djangoql",
]
Next, add DjangoQLSearchMixin as the parent class to all ModelAdmins where you want to enable advanced searching capabilities.
Let's add it to the TicketAdmin for example:
# tickets/admin.py

class TicketAdmin(DjangoQLSearchMixin, admin.ModelAdmin):
    # ...
Don't forget about the import:
from djangoql.admin import DjangoQLSearchMixin
You can now use the same search box as before to perform advanced queries. Examples:
is_active = Truereturns active ticketspayment_method = "ET" or payment_method = "BC"returns tickets purchased with cryptoconcert.venue.name ~ "Amphitheatre"returns tickets for concerts in amphitheatresconcert.tickets_left > 500returns tickets for concerts with more than 500 tickets left
For more information on DjangoQL language check out DjangoQL language reference.
Import and Export Data with Django Import Export
In this section, we'll look at how to import and export object data via django-import-export, which is an excellent package for easily importing and exporting data in different formats, including JSON, CSV, and YAML. The package also comes with built-in admin integration.
First, install it:
(env)$ pip install django-import-export==3.2.0
Next, add it to INSTALLED_APPS in core/settings.py:
# core/settings.py

INSTALLED_APPS = [
    # ...
    "import_export",
]
Collect the static files:
(env)$ python manage.py collectstatic
After that, add ImportExportActionModelAdmin as the parent class to all the ModelAdmins you want to be importable/exportable.
Here's an example for the TicketAdmin:
# tickets/admin.py

class TicketAdmin(DjangoQLSearchMixin, ImportExportActionModelAdmin):
    # ...
We had to remove the
admin.ModelAdminbase class, becauseImportExportActionModelAdminalready inherits from it. Including both of the classes would result in a TypeError.
Don't forget about the import:
from import_export.admin import ImportExportActionModelAdmin
If you want a model to be exportable-only use
ExportActionModelAdmin.
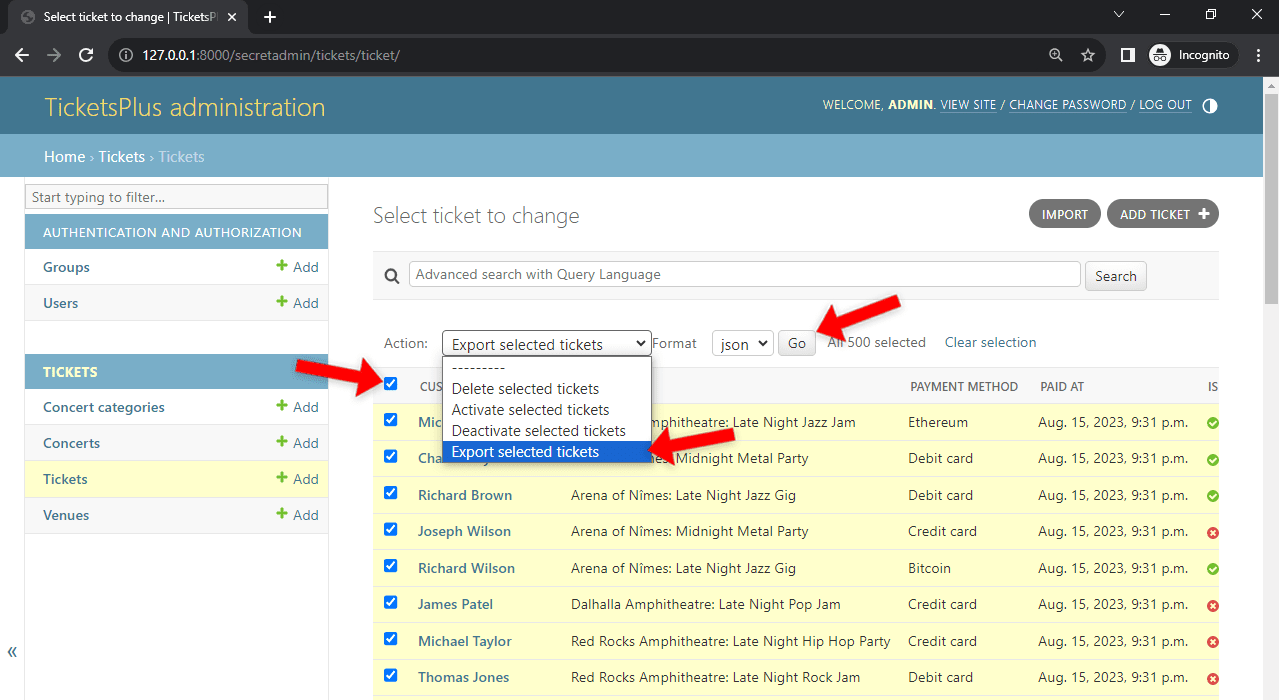
If you navigate to your ticket page now, you should see that the export action has been added. Test it by selecting a few tickets and the desired format. Then, click "Go".
You can then test the import functionality by importing the just exported file.
Style Admin Site with Django Admin Interface
Customizing the appearance of the admin site through template overriding can be awkward. You might accidentally break stuff, Django admin templates may change in the future, and it'll be a hassle to maintain.
A better approach to styling your admin site is via the django-admin-interface package. This package comes with beautiful pre-made admin interface themes and allows you to customize different aspects of your admin site easily, including changing the colors, title, favicon, logo, and more.
Start by installing it via pip:
(env)$ pip install django-admin-interface==0.26.0
Next, add admin_interface and colorfield to INSTALLED_APPS before django.contrib.admin:
# core/settings.py

INSTALLED_APPS = [
    #...
    "admin_interface",
    "colorfield",
    #...
    "django.contrib.admin",
    #...
]

X_FRAME_OPTIONS = "SAMEORIGIN"              # allows you to use modals insated of popups
SILENCED_SYSTEM_CHECKS = ["security.W019"]  # ignores redundant warning messages
Migrate the database:
(env)$ python manage.py migrate
Collect static files:
(env)$ python manage.py collectstatic --clear
Start the development server and navigate to http://localhost:8000/secretadmin. You'll notice that your Django admin site looks more modern, and there'll be an "Admin Interface" section.
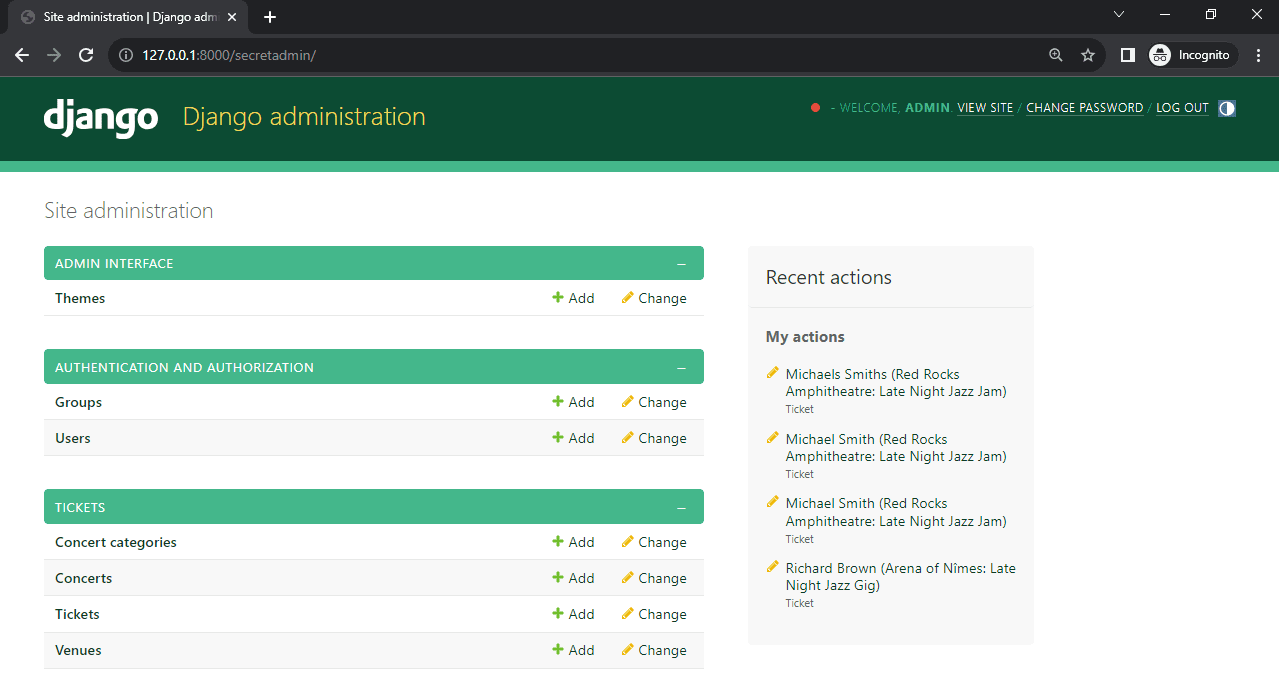
Click "Admin Interface > Themes" to see all the currently installed themes. By default, there should be only one theme called "Django". If you wish, you can install three more themes via fixtures:
(env)$ python manage.py loaddata admin_interface_theme_bootstrap.json
(env)$ python manage.py loaddata admin_interface_theme_foundation.json
(env)$ python manage.py loaddata admin_interface_theme_uswds.json
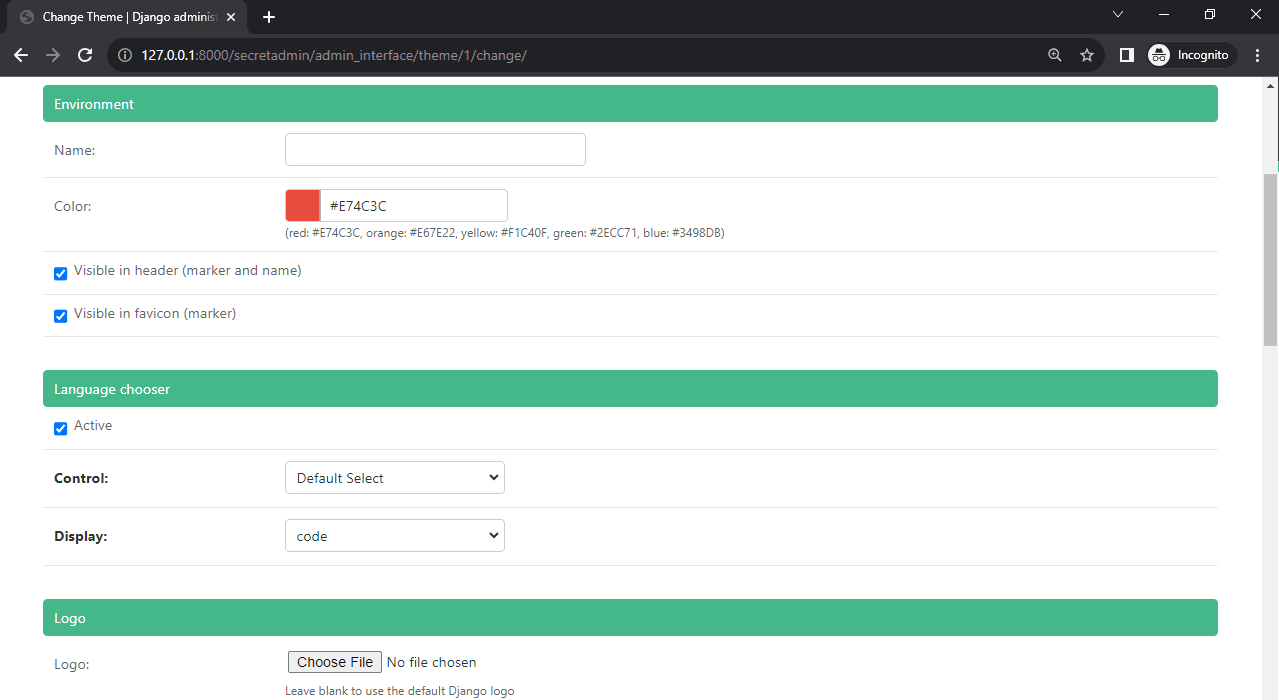
Clicking on an existing theme allows you to customize all the previously mentioned aspects.
Conclusion
In this article, we've covered many Django admin customization concepts. You should now be able to apply these concepts in practice and tailor the Django admin site to your project's needs.
I suggest you to also check out our other Django admin related articles:
- Adding Charts to Django with Chart.js
- Supporting Multiple Languages in Django
- Creating a Custom User Model in Django
Grab the final source code from django-admin-customization GitHub repo.