 Michael Herman
Reducing test execution time is key for software development teams that wish to implement frequent delivery approaches (like continuous integration and delivery) or accelerate development cycle times in general. Developers simply cannot afford to wait hours on end for tests to complete in environments where frequent builds and tests are the norm. Distributing tests across a number of machines is one solution to this problem.
This article looks at how to distribute automated tests across a number of machines with Selenium Grid and Docker Swarm.
We'll also look at how to run tests against a number of browsers and automate the provisioning and deprovisioning of machines to keep costs down.
Contents
Objectives
After completing this tutorial, you will be able to:
- Containerize a Selenium Grid with Docker
- Run automated tests on Selenium Grid
- Describe the differences between distributed and parallel computing
- Deploy a Selenium Grid to DigitalOcean via Docker Compose and Machine
- Automate the provisioning and deprovisioning of resources on DigitalOcean
Project Setup
Let's start with a basic Selenium test in Python:
import time
import unittest

from selenium import webdriver
from selenium.webdriver.common.keys import Keys


class HackerNewsSearchTest(unittest.TestCase):

    def setUp(self):
        self.browser = webdriver.Chrome()

    def test_hackernews_search_for_testdrivenio(self):
        browser = self.browser
        browser.get('https://news.ycombinator.com')
        search_box = browser.find_element_by_name('q')
        search_box.send_keys('testdriven.io')
        search_box.send_keys(Keys.RETURN)
        time.sleep(3)  # simulate long running test
        self.assertIn('testdriven.io', browser.page_source)

    def test_hackernews_search_for_selenium(self):
        browser = self.browser
        browser.get('https://news.ycombinator.com')
        search_box = browser.find_element_by_name('q')
        search_box.send_keys('selenium')
        search_box.send_keys(Keys.RETURN)
        time.sleep(3)  # simulate long running test
        self.assertIn('selenium', browser.page_source)

    def test_hackernews_search_for_testdriven(self):
        browser = self.browser
        browser.get('https://news.ycombinator.com')
        search_box = browser.find_element_by_name('q')
        search_box.send_keys('testdriven')
        search_box.send_keys(Keys.RETURN)
        time.sleep(3)  # simulate long running test
        self.assertIn('testdriven', browser.page_source)

    def test_hackernews_search_with_no_results(self):
        browser = self.browser
        browser.get('https://news.ycombinator.com')
        search_box = browser.find_element_by_name('q')
        search_box.send_keys('?*^^%')
        search_box.send_keys(Keys.RETURN)
        time.sleep(3)  # simulate long running test
        self.assertNotIn('<em>', browser.page_source)

    def tearDown(self):
        self.browser.quit()  # quit vs close?


if __name__ == '__main__':
    unittest.main()
Following along?
- Create a new project directory.
- Save the above code in a new file called test.py.
- Create and activate a virtual environment.
- Install Selenium:
pip install selenium==3.141.0. - Install ChromeDriver globally. (We're using version 88.0.4324.96.)
- Ensure it works:
python test.py.
In this test, we navigate to https://news.ycombinator.com, perform four searches, and then assert that the search results page is rendered appropriately. Nothing too spectacular, but it's enough to work with. Feel free to use your own Selenium tests in place of this test.
Execution time: about 25 seconds
$ python test.py

....
----------------------------------------------------------------------
Ran 4 tests in 24.533s

OK
Selenium Grid
When it comes to distributed testing, Selenium Grid is one of the most powerful and popular open-source tools. With it, we can spread the test load across multiple machines and run them cross-browser.
Let's say you have a suite of 90 tests that you run locally on your laptop against a single version of Chrome. Perhaps it takes six minutes to run those tests. Using Selenium Grid you could spin up three different machines to run them, which would decrease the test execution time by (roughly) one-third. You could also run the same tests against different browsers and platforms. So, not only are you saving time, but you are also helping to ensure that your web application behaves and looks the same when it's rendered on different browsers and environments.
Selenium Grid uses a client-server model that includes a central hub and multiple nodes (the browsers which run the tests).

For example, you could have three nodes connected to the hub, each running a different browser. Then, when you run your tests with a specific remote WebDriver, the WebDriver request is sent to the central hub and it searches for an available node that matches the specified criteria (like a browser version, for instance). Once a node is found, the script is sent and the tests are run.
Instead of dealing with the hassle of manually configuring and installing Selenium Grid, we can use official images from Selenium Docker to spin up a hub and several nodes.
To get up and running, add the following code to a new file called docker-compose.yml to the root directory of your project:
version: '3.8'

services:

  hub:
    image: selenium/hub:3.141.59
    ports:
      - 4444:4444

  chrome:
    image: selenium/node-chrome:3.141.59
    depends_on:
      - hub
    environment:
      - HUB_HOST=hub

  firefox:
    image: selenium/node-firefox:3.141.59
    depends_on:
      - hub
    environment:
      - HUB_HOST=hub
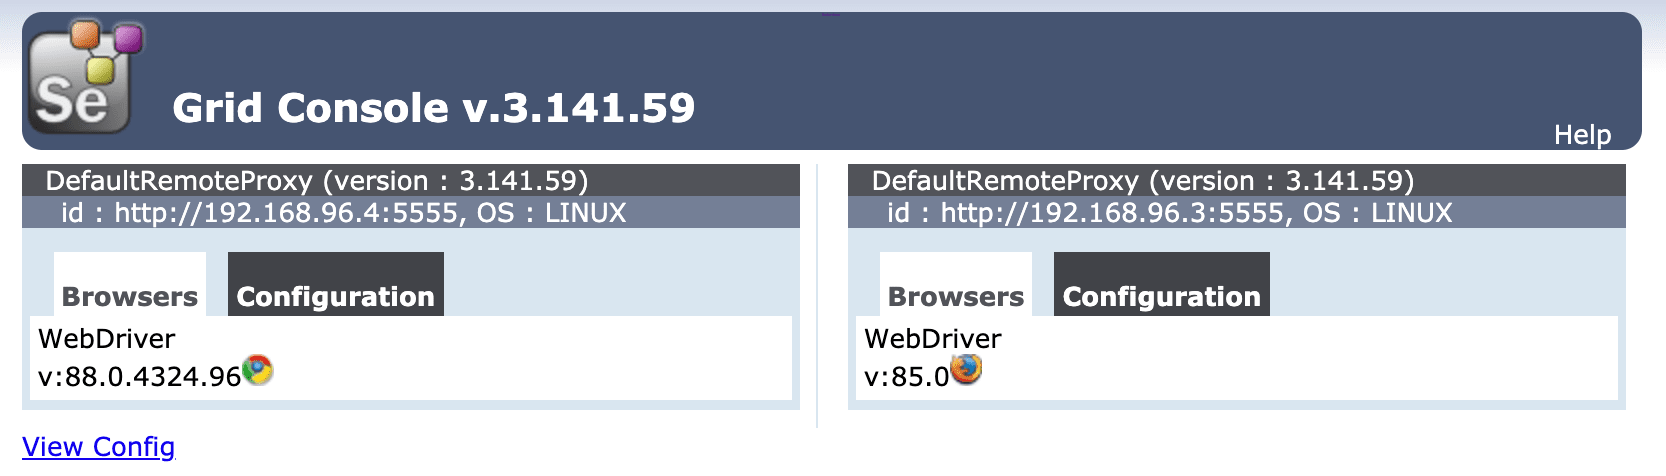
We used the 3.141.59 tag, which is associated with the following versions of Selenium, WebDriver, Chrome, and Firefox:
Selenium: 3.141.59
Chrome: 88.0.4324.96
ChromeDriver: 88.0.4324.96
Firefox: 85.0
GeckoDriver: 0.29.0
Refer to the releases page, if you'd like to use different versions of Chrome or Firefox
Pull and then run the images:
$ docker-compose up -d
This guide uses Docker version 18.09.2.
Once done, open a browser and navigate to the Selenium Grid console at http://localhost:4444/grid/console to ensure all is well:
Configure the remote driver in the test file by updating the setUp method:
def setUp(self):
    caps = {'browserName': os.getenv('BROWSER', 'chrome')}
    self.browser = webdriver.Remote(
        command_executor='http://localhost:4444/wd/hub',
        desired_capabilities=caps
    )
Make sure to add the import as well:
import os
Run the test via Selenium Grid on the Chrome node:
$ export BROWSER=chrome && python test.py

....
----------------------------------------------------------------------
Ran 4 tests in 21.054s

OK
Try Firefox as well:
$ export BROWSER=firefox && python test.py

....
----------------------------------------------------------------------
Ran 4 tests in 25.058s

OK
To simulate a longer test run, let's run the same test sequentially twenty times -- ten on Chrome, ten on Firefox.
Add a new file called sequential_test_run.py to the project root:
from subprocess import check_call


for counter in range(10):
    chrome_cmd = 'export BROWSER=chrome && python test.py'
    firefox_cmd = 'export BROWSER=firefox && python test.py'
    check_call(chrome_cmd, shell=True)
    check_call(firefox_cmd, shell=True)
Run the tests:
$ python sequential_test_run.py
Execution time: about 8 minutes
Distributed vs Parallel
That's all well and good, but the tests are still not running in parallel.
This can confusing as "parallel" and "distributed" are often used interchangeably by testers and developers. Review Distributed vs parallel computing for more info.
Thus far we've only dealt with distributing the tests across multiple machines, which is handled by Selenium Grid. The test runner or framework, like pytest or nose, is responsible for running the tests in parallel. To keep things simple, we'll use the subprocess module rather than a full framework. It's worth noting that if you are using either pytest or nose, check out the pytest-xdist plugin or the Parallel Testing with nose guide for help with parallel execution, respectively.
Running in Parallel
Add a new file called parallel_test_run.py to the project root:
from subprocess import Popen


processes = []

for counter in range(10):
    chrome_cmd = 'export BROWSER=chrome && python test.py'
    firefox_cmd = 'export BROWSER=firefox && python test.py'
    processes.append(Popen(chrome_cmd, shell=True))
    processes.append(Popen(firefox_cmd, shell=True))

for counter in range(10):
    processes[counter].wait()
This will run the test file concurrently twenty times using a separate process for each.
$ python parallel_test_run.py
Execution time: about 4 minutes
This should take a little under four minutes to run, which, compared to running all twenty tests sequentially, cuts the execution time in half. We can speed things up even further by registering more nodes.
DigitalOcean
Let's spin up a DigitalOcean droplet so that we have a few more cores to work with.
Start by signing up if you don’t already have an account, and then generate an access token so we can use the DigitalOcean API.
Add the token to your environment:
$ export DIGITAL_OCEAN_ACCESS_TOKEN=[your_digital_ocean_token]
Provision a new droplet with Docker Machine:
$ docker-machine create \
    --driver digitalocean \
    --digitalocean-access-token $DIGITAL_OCEAN_ACCESS_TOKEN \
    --engine-install-url "https://releases.rancher.com/install-docker/19.03.9.sh" \
    selenium-grid;
--engine-install-urlis required since, as of writing, Docker v20.10.0 doesn't work with Docker Machine.
Once done, point the Docker daemon at the machine and set it as the active machine:
$ docker-machine env selenium-grid
$ eval $(docker-machine env selenium-grid)
Spin up the three containers -- the hub and two nodes -- on the droplet:
$ docker-compose up -d
Grab the IP of the droplet:
$ docker-machine ip selenium-grid
Ensure Selenium Grid is up and running at http://YOUR_IP:4444/grid/console, and then update the IP address in the test file:
command_executor='http://YOUR_IP:4444/wd/hub',
Run the tests in parallel again:
$ python parallel_test_run.py
Refresh the Grid console. Two tests should be running while the remaining 18 are queued:
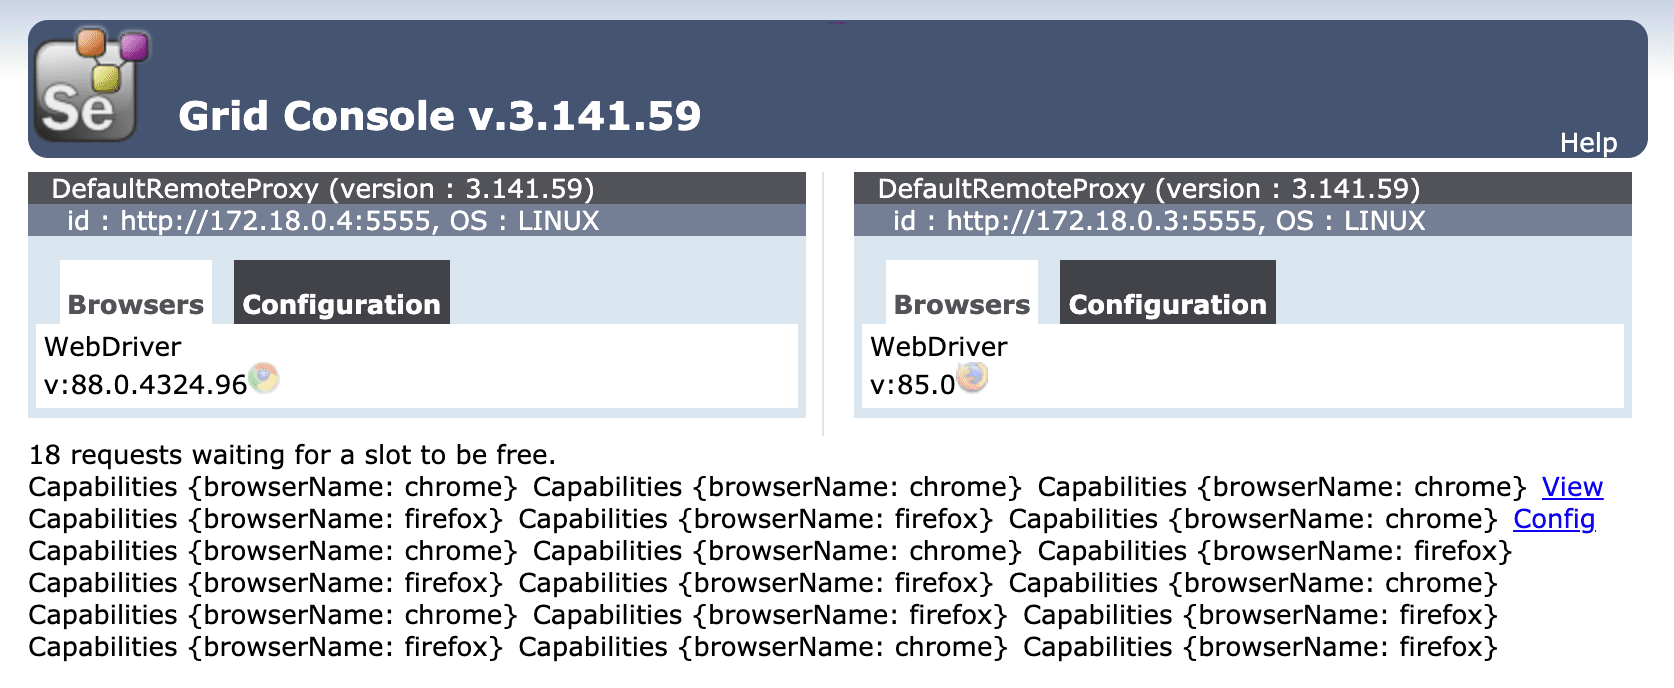
Again, this should take about four minutes to run.
Docker Swarm Mode
Moving right along, we should spin up a few more nodes for the tests to run on. However, since there are limited resources on the droplet, let's add a number of droplets for the nodes to reside on. This is where Docker Swarm comes into play.
To create the Swarm cluster, let's start fresh by first spinning down the old droplet:
$ docker-machine rm selenium-grid
Then, spin up five new droplets:
$ for i in 1 2 3 4 5; do
    docker-machine create \
      --driver digitalocean \
      --digitalocean-access-token $DIGITAL_OCEAN_ACCESS_TOKEN \
      --engine-install-url "https://releases.rancher.com/install-docker/19.03.9.sh" \
      node-$i;
done
Initialize Swarm mode on node-1:
$ docker-machine ssh node-1 -- docker swarm init --advertise-addr $(docker-machine ip node-1)
You should see something similar to:
Swarm initialized: current node (ae0iz7lqwz6g9p0oso4f5g6sd) is now a manager.

To add a worker to this swarm, run the following command:

    docker swarm join --token SWMTKN-1-54ca6zbkpya4mw15mctnmnkp7uzqmtcj8hm354ym2qqr8n5iyq-2v63f4ztawazzzitiibgpnh39 134.209.115.249:2377

To add a manager to this swarm, run 'docker swarm join-token manager' and follow the instructions.
Take note of the join command as it contains a token that we need in order to add node workers to the Swarm.
If you forget, you can always run
docker-machine ssh node-1 -- docker swarm join-token worker.
Add the remaining four nodes to the Swarm as workers:
$ for i in 2 3 4 5; do
    docker-machine ssh node-$i \
      -- docker swarm join --token YOUR_JOIN_TOKEN;
done
Update the docker-compose.yml file to deploy Selenium Grid in Swarm mode:
version: '3.8'

services:

  hub:
    image: selenium/hub:3.141.59
    ports:
      - 4444:4444
    deploy:
      mode: replicated
      replicas: 1
      placement:
        constraints:
          - node.role == worker

  chrome:
    image: selenium/node-chrome:3.141.59
    volumes:
      - /dev/urandom:/dev/random
    depends_on:
      - hub
    environment:
      - HUB_PORT_4444_TCP_ADDR=hub
      - HUB_PORT_4444_TCP_PORT=4444
      - NODE_MAX_SESSION=1
    entrypoint: bash -c 'SE_OPTS="-host $$HOSTNAME -port 5555" /opt/bin/entry_point.sh'
    ports:
      - 5555:5555
    deploy:
      replicas: 1
      placement:
        constraints:
          - node.role == worker

  firefox:
    image: selenium/node-firefox:3.141.59
    volumes:
      - /dev/urandom:/dev/random
    depends_on:
      - hub
    environment:
      - HUB_PORT_4444_TCP_ADDR=hub
      - HUB_PORT_4444_TCP_PORT=4444
      - NODE_MAX_SESSION=1
    entrypoint: bash -c 'SE_OPTS="-host $$HOSTNAME -port 5556" /opt/bin/entry_point.sh'
    ports:
      - 5556:5556
    deploy:
      replicas: 1
      placement:
        constraints:
          - node.role == worker
Major changes:
- Placement constraints: We set up a placement constraint of
node.role == workerso that all tasks will be run on the worker nodes. It’s generally best to keep manager nodes free from CPU and/or memory-intensive tasks. - Entrypoint: Here, we updated the host set in
SE_OPTSwithin the entry_point.sh script so nodes running on different hosts will be able to successfully link back to the hub.
With that, point the Docker daemon at node-1 and deploy the stack:
$ eval $(docker-machine env node-1)
$ docker stack deploy --compose-file=docker-compose.yml selenium
Add a few more nodes:
$ docker service scale selenium_chrome=4 selenium_firefox=4
Review the stack:
$ docker stack ps selenium
You should see something like:
ID             NAME                 IMAGE                            NODE      DESIRED STATE   CURRENT STATE
99filw99x8bc   selenium_chrome.1    selenium/node-chrome:3.141.59    node-3    Running         Running 41 seconds ago
9ff9cwx1dmqw   selenium_chrome.2    selenium/node-chrome:3.141.59    node-4    Running         Running about a minute ago
ige7rlnj1e03   selenium_chrome.3    selenium/node-chrome:3.141.59    node-5    Running         Running 59 seconds ago
ewsg5mxiy9eg   selenium_chrome.4    selenium/node-chrome:3.141.59    node-2    Running         Running 56 seconds ago
y3ud4iojz8u0   selenium_firefox.1   selenium/node-firefox:3.141.59   node-4    Running         Running about a minute ago
bvpizrfdhlq0   selenium_firefox.2   selenium/node-firefox:3.141.59   node-5    Running         Running about a minute ago
0jdw3sr7ld62   selenium_firefox.3   selenium/node-firefox:3.141.59   node-3    Running         Running 50 seconds ago
4esw9a2wvcf3   selenium_firefox.4   selenium/node-firefox:3.141.59   node-2    Running         Running about a minute ago
3dd04mt1t7n8   selenium_hub.1       selenium/hub:3.141.59            node-5    Running         Running about a minute ago
Then, grab the name of the node running the hub along with the IP address and set it as an environment variable:
$ NODE=$(docker service ps --format "{{.Node}}" selenium_hub)
$ export NODE_HUB_ADDRESS=$(docker-machine ip $NODE)
Update the setUp method again:
def setUp(self):
    caps = {'browserName': os.getenv('BROWSER', 'chrome')}
    address = os.getenv('NODE_HUB_ADDRESS')
    self.browser = webdriver.Remote(
        command_executor=f'http://{address}:4444/wd/hub',
        desired_capabilities=caps
    )
Test!
$ python parallel_test_run.py
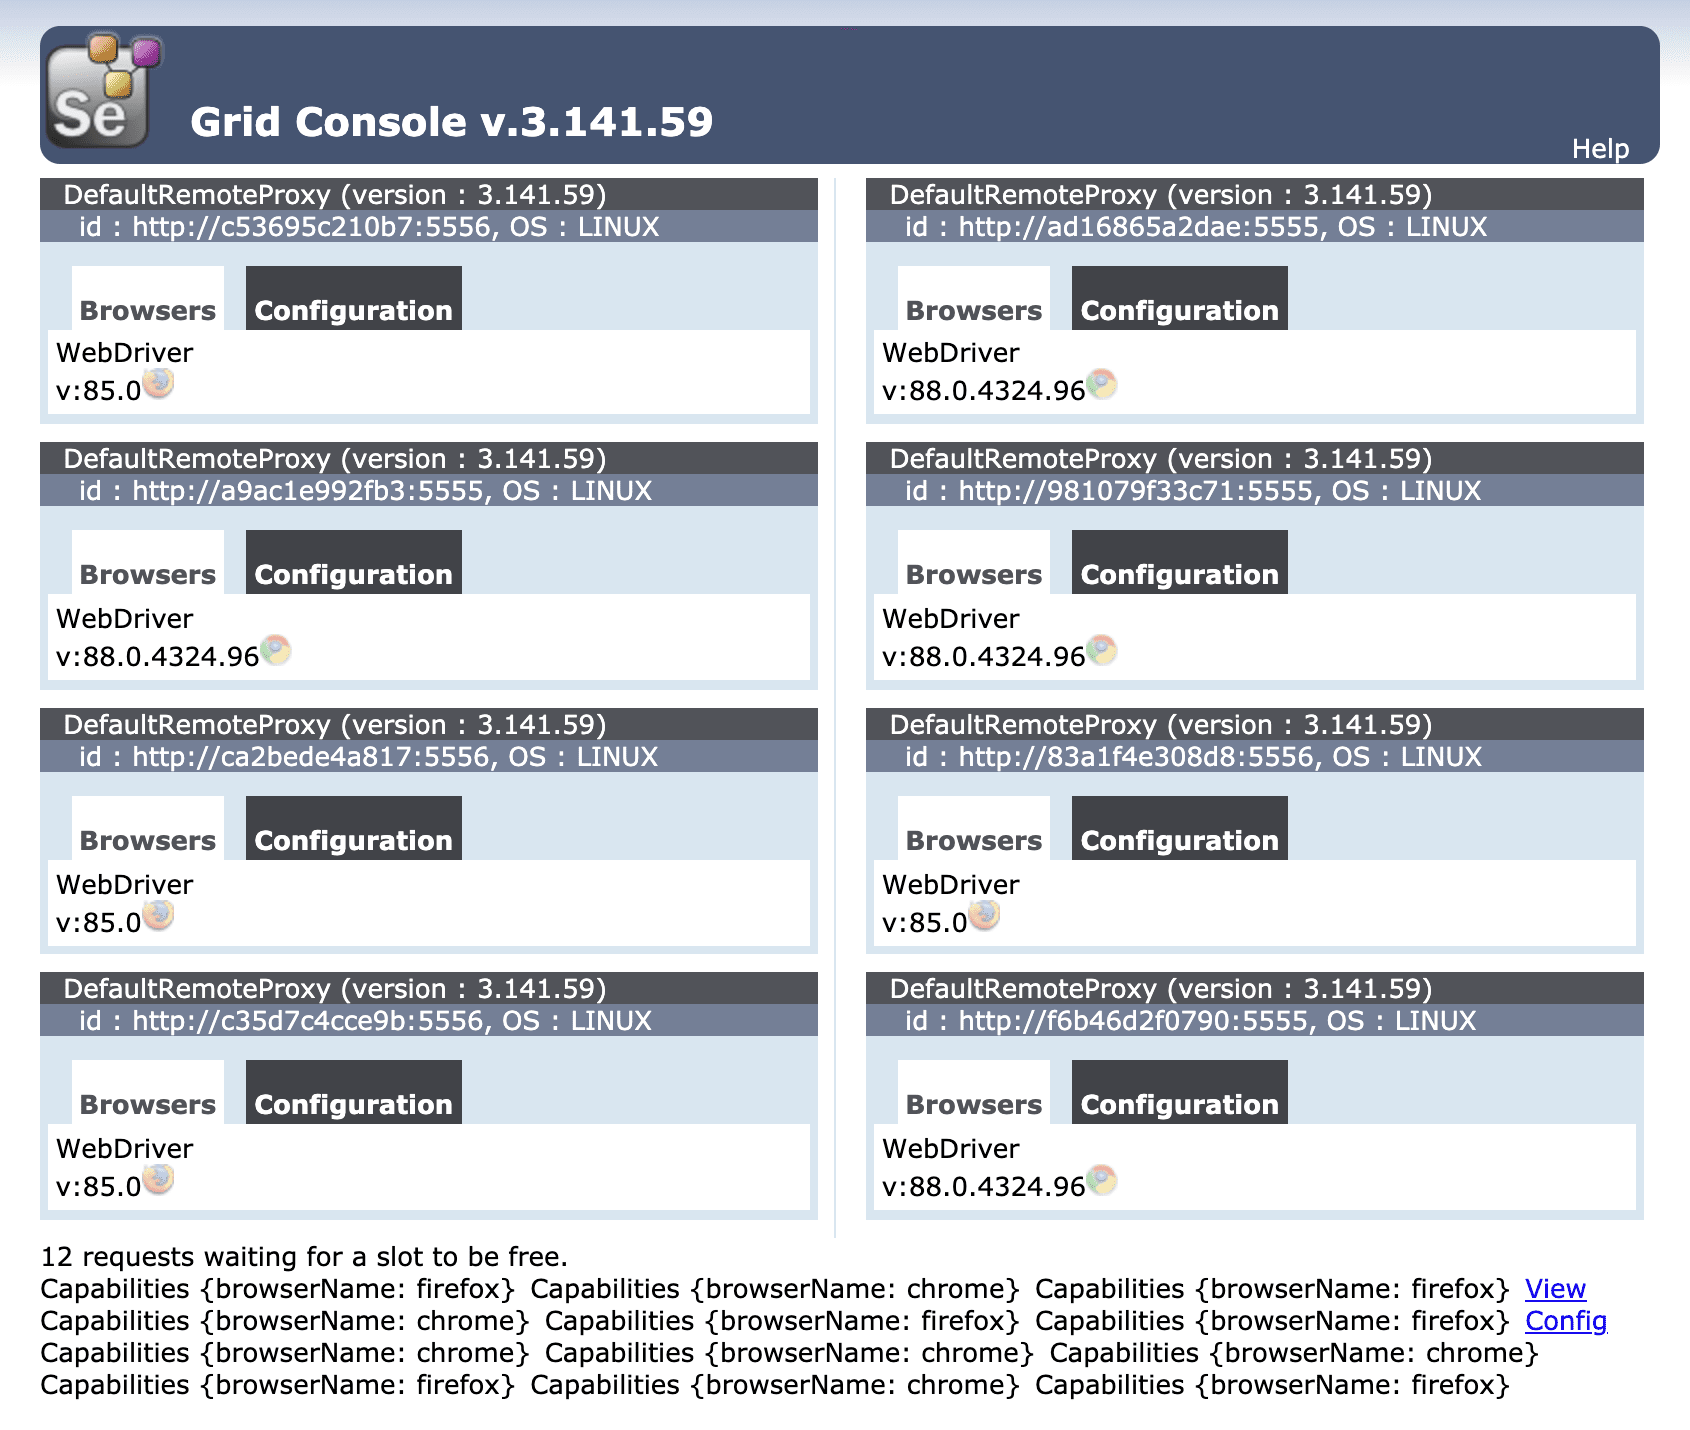
Execution time: about 1.5 minutes
Remove the droplets:
$ docker-machine rm node-1 node-2 node-3 node-4 node-5 -y
To recap, to create a Swarm, we:
- Spun up new droplets
- Initialized Swarm mode on one of the droplets (
node-1, in this case) - Added the nodes to the Swarm as workers
Automation Scripts
Since it's not cost-effective to leave the droplets idle, waiting for the client to run tests, we should automatically provision the droplets before test runs and then deprovision them after.
Let's write a script that:
- Provisions the droplets with Docker Machine
- Configures Docker Swarm mode
- Adds nodes to the Swarm
- Deploys Selenium Grid
- Runs the tests
- Spins down the droplets
create.sh:
#!/bin/bash


echo "Spinning up five droplets..."

for i in 1 2 3 4 5; do
  docker-machine create \
    --driver digitalocean \
    --digitalocean-access-token $DIGITAL_OCEAN_ACCESS_TOKEN \
    --engine-install-url "https://releases.rancher.com/install-docker/19.03.9.sh" \
    node-$i;
done


echo "Initializing Swarm mode..."

docker-machine ssh node-1 -- docker swarm init --advertise-addr $(docker-machine ip node-1)

docker-machine ssh node-1 -- docker node update --availability drain node-1

echo "Adding the nodes to the Swarm..."

TOKEN=`docker-machine ssh node-1 docker swarm join-token worker | grep token | awk '{ print $5 }'`

docker-machine ssh node-2 "docker swarm join --token ${TOKEN} $(docker-machine ip node-1):2377"
docker-machine ssh node-3 "docker swarm join --token ${TOKEN} $(docker-machine ip node-1):2377"
docker-machine ssh node-4 "docker swarm join --token ${TOKEN} $(docker-machine ip node-1):2377"
docker-machine ssh node-5 "docker swarm join --token ${TOKEN} $(docker-machine ip node-1):2377"


echo "Deploying Selenium Grid to http://$(docker-machine ip node-1):4444..."

eval $(docker-machine env node-1)
docker stack deploy --compose-file=docker-compose.yml selenium
docker service scale selenium_chrome=2 selenium_firefox=2
destroy.sh:
#!/bin/bash

docker-machine rm node-1 node-2 node-3 node-4 node-5 -y
Test!
$ sh create.sh

$ eval $(docker-machine env node-1)
$ NODE=$(docker service ps --format "{{.Node}}" selenium_hub)
$ export NODE_HUB_ADDRESS=$(docker-machine ip $NODE)

$ python parallel_test_run.py

$ sh destroy.sh
Conclusion
This article looked at configuring Selenium Grid with Docker and Docker Swarm to distribute tests across a number of machines.
The full code can be found in the selenium-grid-docker-swarm-test repository.
Looking for some challenges?
- Try further reducing test execution time by running all test methods in parallel on different Selenium Grid nodes.
- Configure the running of tests on Travis or Jenkins (or some other CI tool) so they are part of the continuous integration process.