Getting Started
Part 1, Chapter 3
Objectives
- Set up Celery with FastAPI
- Execute Celery tasks in the Python shell
- Monitor a Celery app with Flower
Setting up Redis
You can set up and run Redis directly from your operating system or from a Docker container. While you don't have to go the Docker route in this chapter, we'll use Docker a lot in later chapters, so it's highly recommend to stick with Docker in this chapter as well.
With Docker
Start by installing Docker if you haven't already done so. Then, open your terminal and run the following command:
$ docker run -p 6379:6379 --name some-redis -d redis
This downloads the official Redis Docker image from Docker Hub and runs it on port 6379 in the background.
To test if Redis is up and running, run:
$ docker exec -it some-redis redis-cli ping
You should see:
PONG
Without Docker
Either download Redis from source or via a package manager (like APT, YUM, Homebrew, or Chocolatey) and then start the Redis server via:
$ redis-server
To test if Redis is up and running, run:
$ redis-cli ping
You should see:
PONG
Next, we'll look at how to set up Celery in a FastAPI project.
Setting up Celery
Create a FastAPI project
Create a new project directory:
$ mkdir fastapi-celery-project && cd fastapi-celery-project
Then, create and activate a new Python virtual environment:
$ python3.11 -m venv venv
$ source venv/bin/activate
(venv)$
Feel free to swap out virtualenv and Pip for uv, Poetry, or Pipenv. For more, review Modern Python Environments.
Create a requirements.txt file:
fastapi==0.108.0
uvicorn[standard]==0.25.0
Install:
(venv)$ pip install -r requirements.txt
Create a new file called main.py:
from fastapi import FastAPI

app = FastAPI()


@app.get("/")
async def root():
    return {"message": "Hello World"}
Run the app:
(venv)$ uvicorn main:app --reload

INFO:     Uvicorn running on http://127.0.0.1:8000 (Press CTRL+C to quit)
INFO:     Started reloader process [66193] using WatchFiles
INFO:     Started server process [66399]
INFO:     Waiting for application startup.
INFO:     Application startup complete.
Visit http://localhost:8000 in your browser. You should see {"message":"Hello World"}.
Press Ctrl+C to terminate the development server.
Project structure thus far:
├── main.py
└── requirements.txt
Add Celery
Next, let's install and configure Celery.
Update requirements.txt, adding redis-py and Celery:
celery==5.3.6
redis==5.0.1
Install:
(venv)$ pip install -r requirements.txt
Update main.py:
from celery import Celery
from fastapi import FastAPI

app = FastAPI()


celery = Celery(
    __name__,
    broker="redis://127.0.0.1:6379/0",
    backend="redis://127.0.0.1:6379/0"
)


@app.get("/")
async def root():
    return {"message": "Hello World"}


@celery.task
def divide(x, y):
    import time
    time.sleep(5)
    return x / y
Notes:
- After creating a FastAPI instance, we created a new instance of Celery.
- The
brokerandbackendtells Celery to use the Redis service we just launched. Rather than hard-coding these values, you can define them in a separate config file or pull them from environment variables. - We defined a Celery task called
divide, which simulates a long-running task.
Sending a Task to Celery
With the config done, let's try sending a task to Celery to see how it works.
In a new terminal window, navigate to your project directory, activate the virtual environment, and then run:
(venv)$ celery -A main.celery worker --loglevel=info
You should see something similar to:
[config]
.> app:         main:0x10ad0d5f8
.> transport:   redis://127.0.0.1:6379/0
.> results:     redis://127.0.0.1:6379/0
.> concurrency: 8 (prefork)
.> task events: OFF (enable -E to monitor tasks in this worker)

[queues]
.> celery           exchange=celery(direct) key=celery


[tasks]
  . main.divide
Back in the first terminal window, run:
(venv)$ python
Let's send some tasks to the Celery worker:
>>> from main import app, divide
>>> task = divide.delay(1, 2)
What's happening?
- We used the
delaymethod to send a new message to the message broker. The worker process then picked up and executed the task from the queue. - After releasing from the Enter key, the code finished executing while the
dividetask ran in the background.
Turn to the Celery worker terminal. You should see something similar to:
[2024-01-04 15:40:53,959: INFO/MainProcess] Task main.divide[3d5b4872-2fa4-4e08-b916-aadf59f54271] received
[2024-01-04 15:40:58,978: INFO/ForkPoolWorker-16] Task main.divide[3d5b4872-2fa4-4e08-b916-aadf59f54271] succeeded in 5.0168835959921125s: 0.5
The worker process received the task at 15:40:53. It took about five seconds for the task to start and finish.
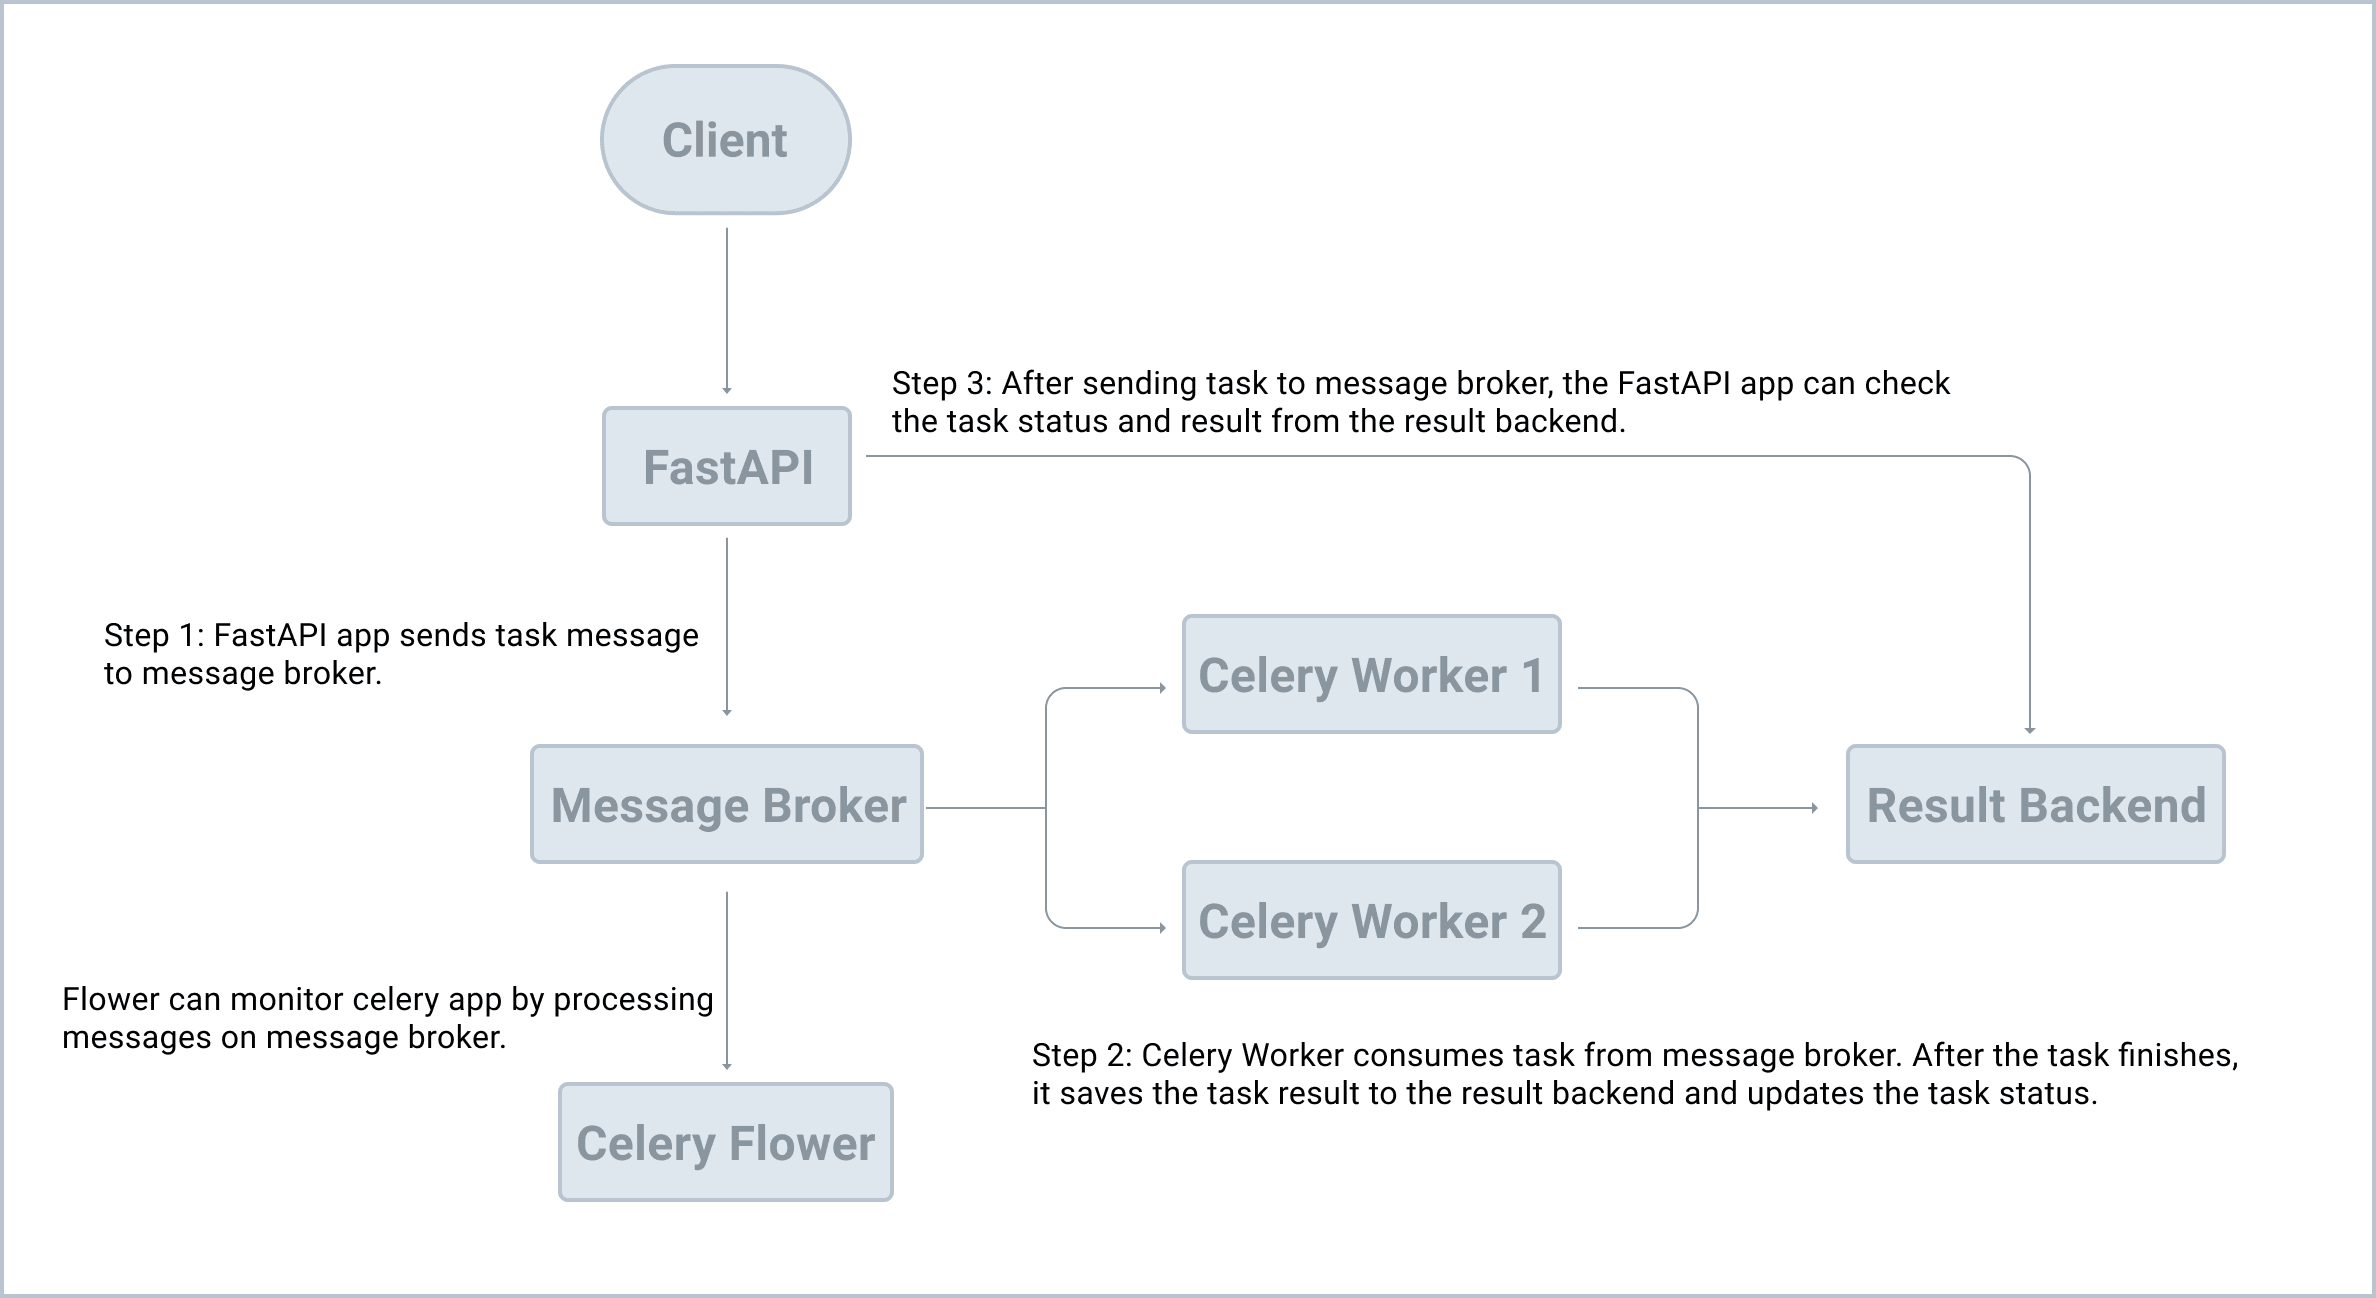
Add another task or two. As you do this, picture the workflow in your head:
- The Celery client (the producer) adds a new task to the queue via the message broker.
- The Celery worker (the consumer) grabs the tasks from the queue, again, via the message broker.
- Once processed, results are stored in the result backend.
Add another new task:
>>> task = divide.delay(1, 2)

>>> type(task)
<class 'celery.result.AsyncResult'>
After we called the delay method, we get an AsyncResult instance, which can be used to check the task state along with the return value or exception details.
Add a new task then print task.state and task.result:
>>> print(task.state, task.result)
PENDING None

>>> print(task.state, task.result)
PENDING None

>>> print(task.state, task.result)
PENDING None

>>> print(task.state, task.result)
PENDING None

>>> print(task.state, task.result)
PENDING None

>>> print(task.state, task.result)
SUCCESS 0.5

>>> print(task.state, task.result)
SUCCESS 0.5
What happens if there's an error?
>>> task = divide.delay(1, 0)

# wait a few seconds before checking the state and result

>>> task.state
'FAILURE'

>>> task.result
ZeroDivisionError('division by zero')
Monitoring Celery with Flower
Flower is a real-time web application monitoring and administration tool for Celery.
Add the dependency to the requirements.txt file:
flower==2.0.1
Open a third terminal window, navigate to the project directory. Activate your virtual environment and then install Flower:
(venv)$ pip install -r requirements.txt
Once installed, spin up the server:
(venv)$ celery -A main.celery flower --port=5555
Navigate to http://localhost:5555 in your browser of choice to view the dashboard. Click "Tasks" in the nav bar at the top to view the finished tasks.
In the first terminal window, run a few more tasks, making sure you have at least one that will fail:
>>> task = divide.delay(1, 2)
>>> task = divide.delay(1, 0)
>>> task = divide.delay(1, 2)
>>> task = divide.delay(1, 3)
Back in Flower you should see:
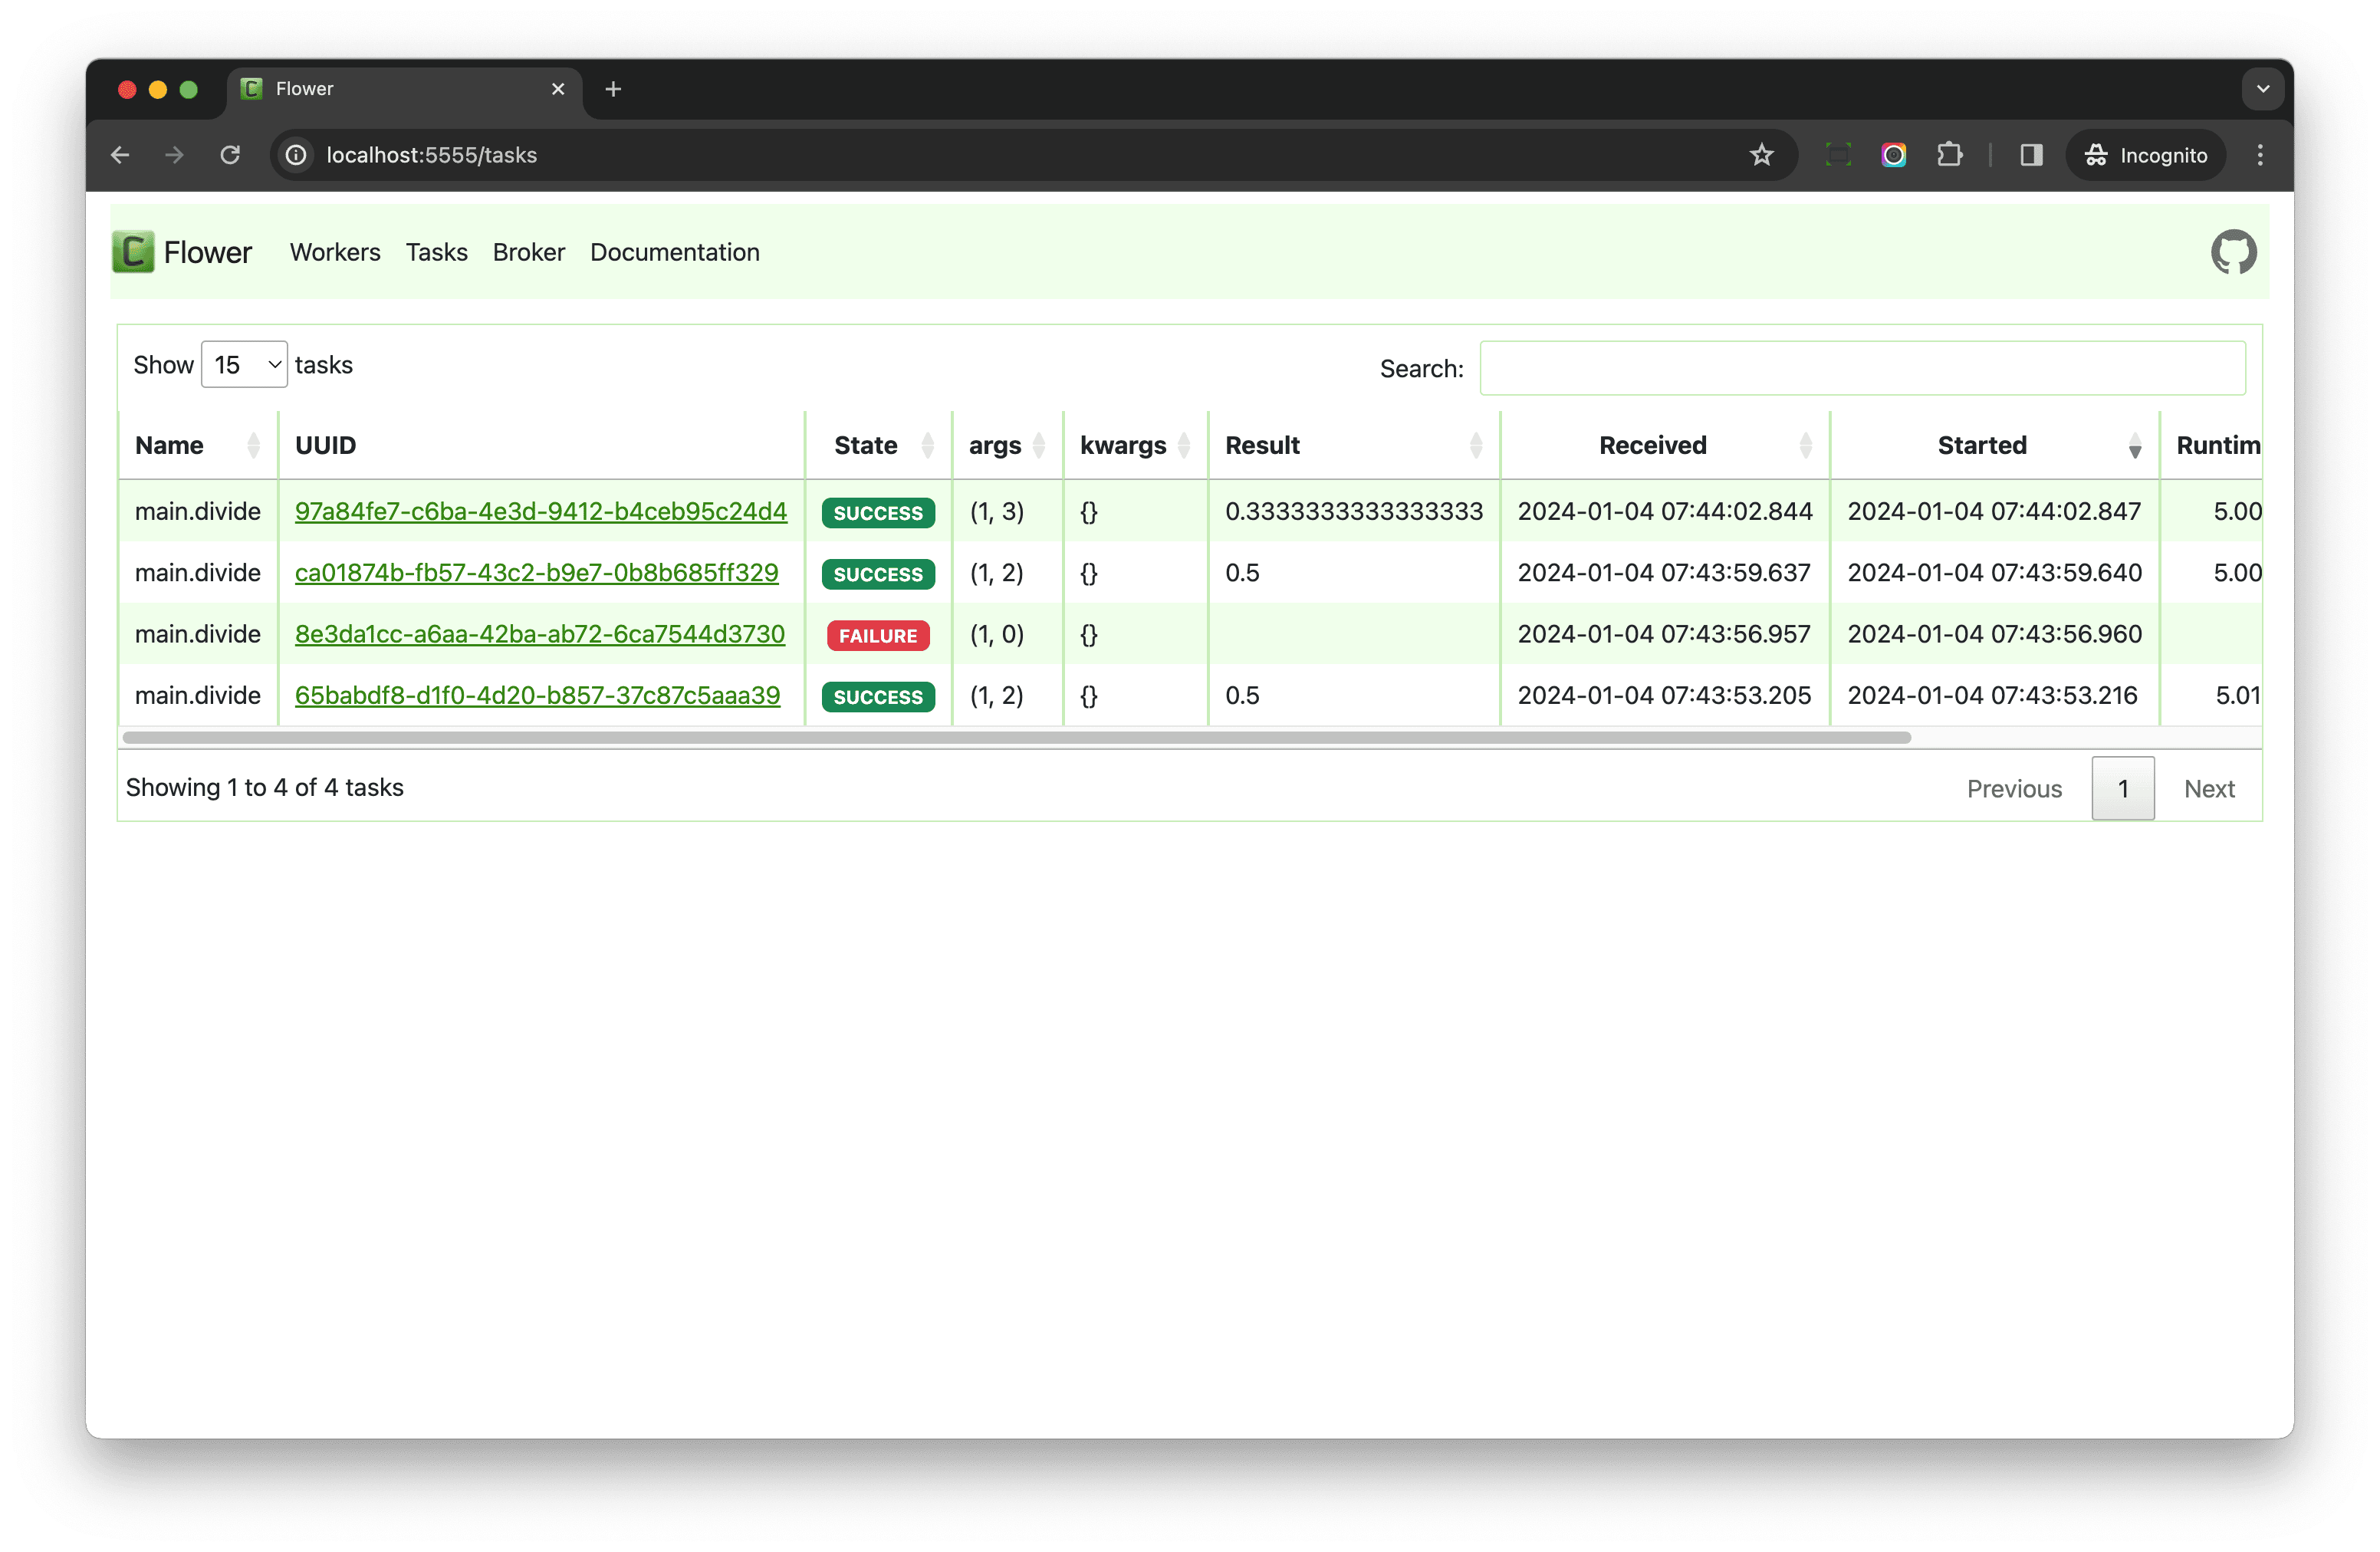
Take note of the UUID column. This is the id of AsyncResult. Copy the UUID for the failed task and open the terminal window where the FastAPI shell is running to view the details:
>>> from celery.result import AsyncResult
>>> task = AsyncResult('8e3da1cc-a6aa-42ba-ab72-6ca7544d3730')  # replace with your UUID
>>>
>>> task.state
'FAILURE'
>>>
>>> task.result
ZeroDivisionError('division by zero')
Familiarize yourself a bit with the Flower dashboard. It's a powerful tool that can help make it easier to learn Celery since you can get feedback much quicker than from the terminal.
✓ Mark as Completed