 Michael Herman
Stripe Connect is a service designed for processing and managing payments on behalf of others. It's used by marketplaces and platforms (e.g., Uber, Shopify, Kickstarter, and Airbnb) that need to pay multiple parties. We use it at TestDriven.io to power our payments platform so that we can easily pay content creators and affiliates.
This tutorial looks at how to integrate Stripe Connect into a Django application.
This is an intermediate-level tutorial. It assumes that you are familiar with both Stripe and Django. Review the Django Stripe Tutorial post for more info.
Contents
Learning Objectives
By the end of this tutorial, you should be able to:
- Explain what Stripe Connect is and why you may need to use it
- Describe the similarities and differences between the types of Stripe Connect accounts
- Integrate Stripe Connect into an existing Django app
- Link a Stripe account to your Django app using an Oauth-like flow
- Explain the differences between Direct and Destination charges
Stripe Connect Accounts
With Stripe Connect, you first need to decide the type(s) of user accounts that you want to work with on your platform:
"Platform" refers to your marketplace web application while "user" is the person being paid for selling goods or services through your platform.
With Standard and Express accounts, users on your platform go through an OAuth-like flow, where they are sent to Stripe, create or link their Stripe accounts, and then are redirected back to your platform. This can be quite disruptive. The user also needs to maintain two accounts - one for your platform and one for Stripe - which is not ideal. This probably won't work if you expect to onboard a large number of users per month. On the other hand, if you're just getting started and want to get going quickly, stick with Standard accounts. Start there. If you find that you need more control over the onboarding experience, to make it more seamless, then you may want to switch to integrating with Express or Custom accounts.
Besides the UX, with Express and Custom accounts, you (the platform) are ultimately liable for fraud and must handle disputed transactions.
For reference, the TestDriven.io platform uses both Standard and Express accounts, depending on the type of transaction that is made and how many parties are involved.
When choosing the type(s) of accounts to work with, ask yourself:
- How seamless does the onboarding experience need to be?
- Who should handle fraud and payment disputes?
We'll stick with Standard accounts in this tutorial. For more, review the Choosing an approach and Best Practices guides from Stripe.
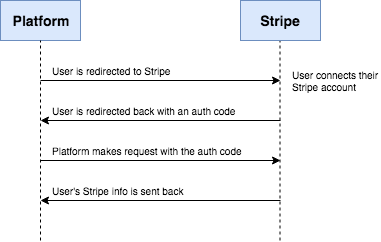
Workflow
Again, with Standard (and Express) accounts, users go through an OAuth-like flow to connect their Stripe accounts:
- Authenticated users on your platform click a link that takes them to Stripe
- They then connect a Stripe account by either logging in to an existing account or creating a new account
- Once connected, users are redirected back to your platform with an authorization code
- You then make a request to Stripe with that code in order to get the information needed for processing payments
Initial Setup
To get going, clone down the django-stripe-connect repo, and then check out the v1 tag to the master branch:
$ git clone https://github.com/testdrivenio/django-stripe-connect --branch v1 --single-branch
$ cd django-stripe-connect
$ git checkout tags/v1 -b master
Create a virtual environment and install the dependencies:
$ pipenv shell
$ pipenv install
Apply the migrations, create a superuser, and add the fixtures to the DB:
$ python manage.py migrate
$ python manage.py createsuperuser
$ python manage.py loaddata fixtures/users.json
$ python manage.py loaddata fixtures/courses.json
Run the server:
$ python manage.py runserver
At http://localhost:8000/ you should see:
Make sure you are able to log in as the superuser:
Try logging in as both a buyer and a seller.
Buyer:
- email:
[email protected] - password:
justatest
Seller:
- email:
[email protected] - password:
justatest
Essentially, this sample application is similar to the TestDriven.io platform - users can create and sell courses. The CustomUser model extends the built-in User model, creating sellers and buyers. Sellers can buy and sell courses while buyers can only, well, buy courses. When a new user is added, they are a buyer by default. Superusers can change a user's status.
Take a quick look at the project structure before moving on:
├── Pipfile
├── Pipfile.lock
├── apps
│   ├── courses
│   │   ├── __init__.py
│   │   ├── admin.py
│   │   ├── apps.py
│   │   ├── migrations
│   │   ├── models.py
│   │   ├── tests.py
│   │   ├── urls.py
│   │   └── views.py
│   └── users
│       ├── __init__.py
│       ├── admin.py
│       ├── apps.py
│       ├── forms.py
│       ├── managers.py
│       ├── migrations
│       ├── models.py
│       ├── signals.py
│       ├── tests.py
│       └── views.py
├── fixtures
│   ├── courses.json
│   └── users.json
├── manage.py
├── my_project
│   ├── __init__.py
│   ├── settings.py
│   ├── urls.py
│   └── wsgi.py
├── static
│   └── bulma.min.css
└── templates
    ├── _base.html
    ├── courses
    │   ├── course_detail.html
    │   └── course_list.html
    ├── home.html
    ├── login.html
    └── nav.html
Configure Stripe
Stripe Checkout has been pre-configured as well as the Stripe Python Library. In order to process payments, create a Stripe account (if you don't already have one) and add your test secret and test publishable keys to the bottom of the settings.py file:
STRIPE_PUBLISHABLE_KEY = '<your test publishable key here>'
STRIPE_SECRET_KEY = '<your test secret key here>'
Ensure you can process a charge. First, log in with the buyer account:
- email:
[email protected] - password:
justatest
Then, purchase a course:
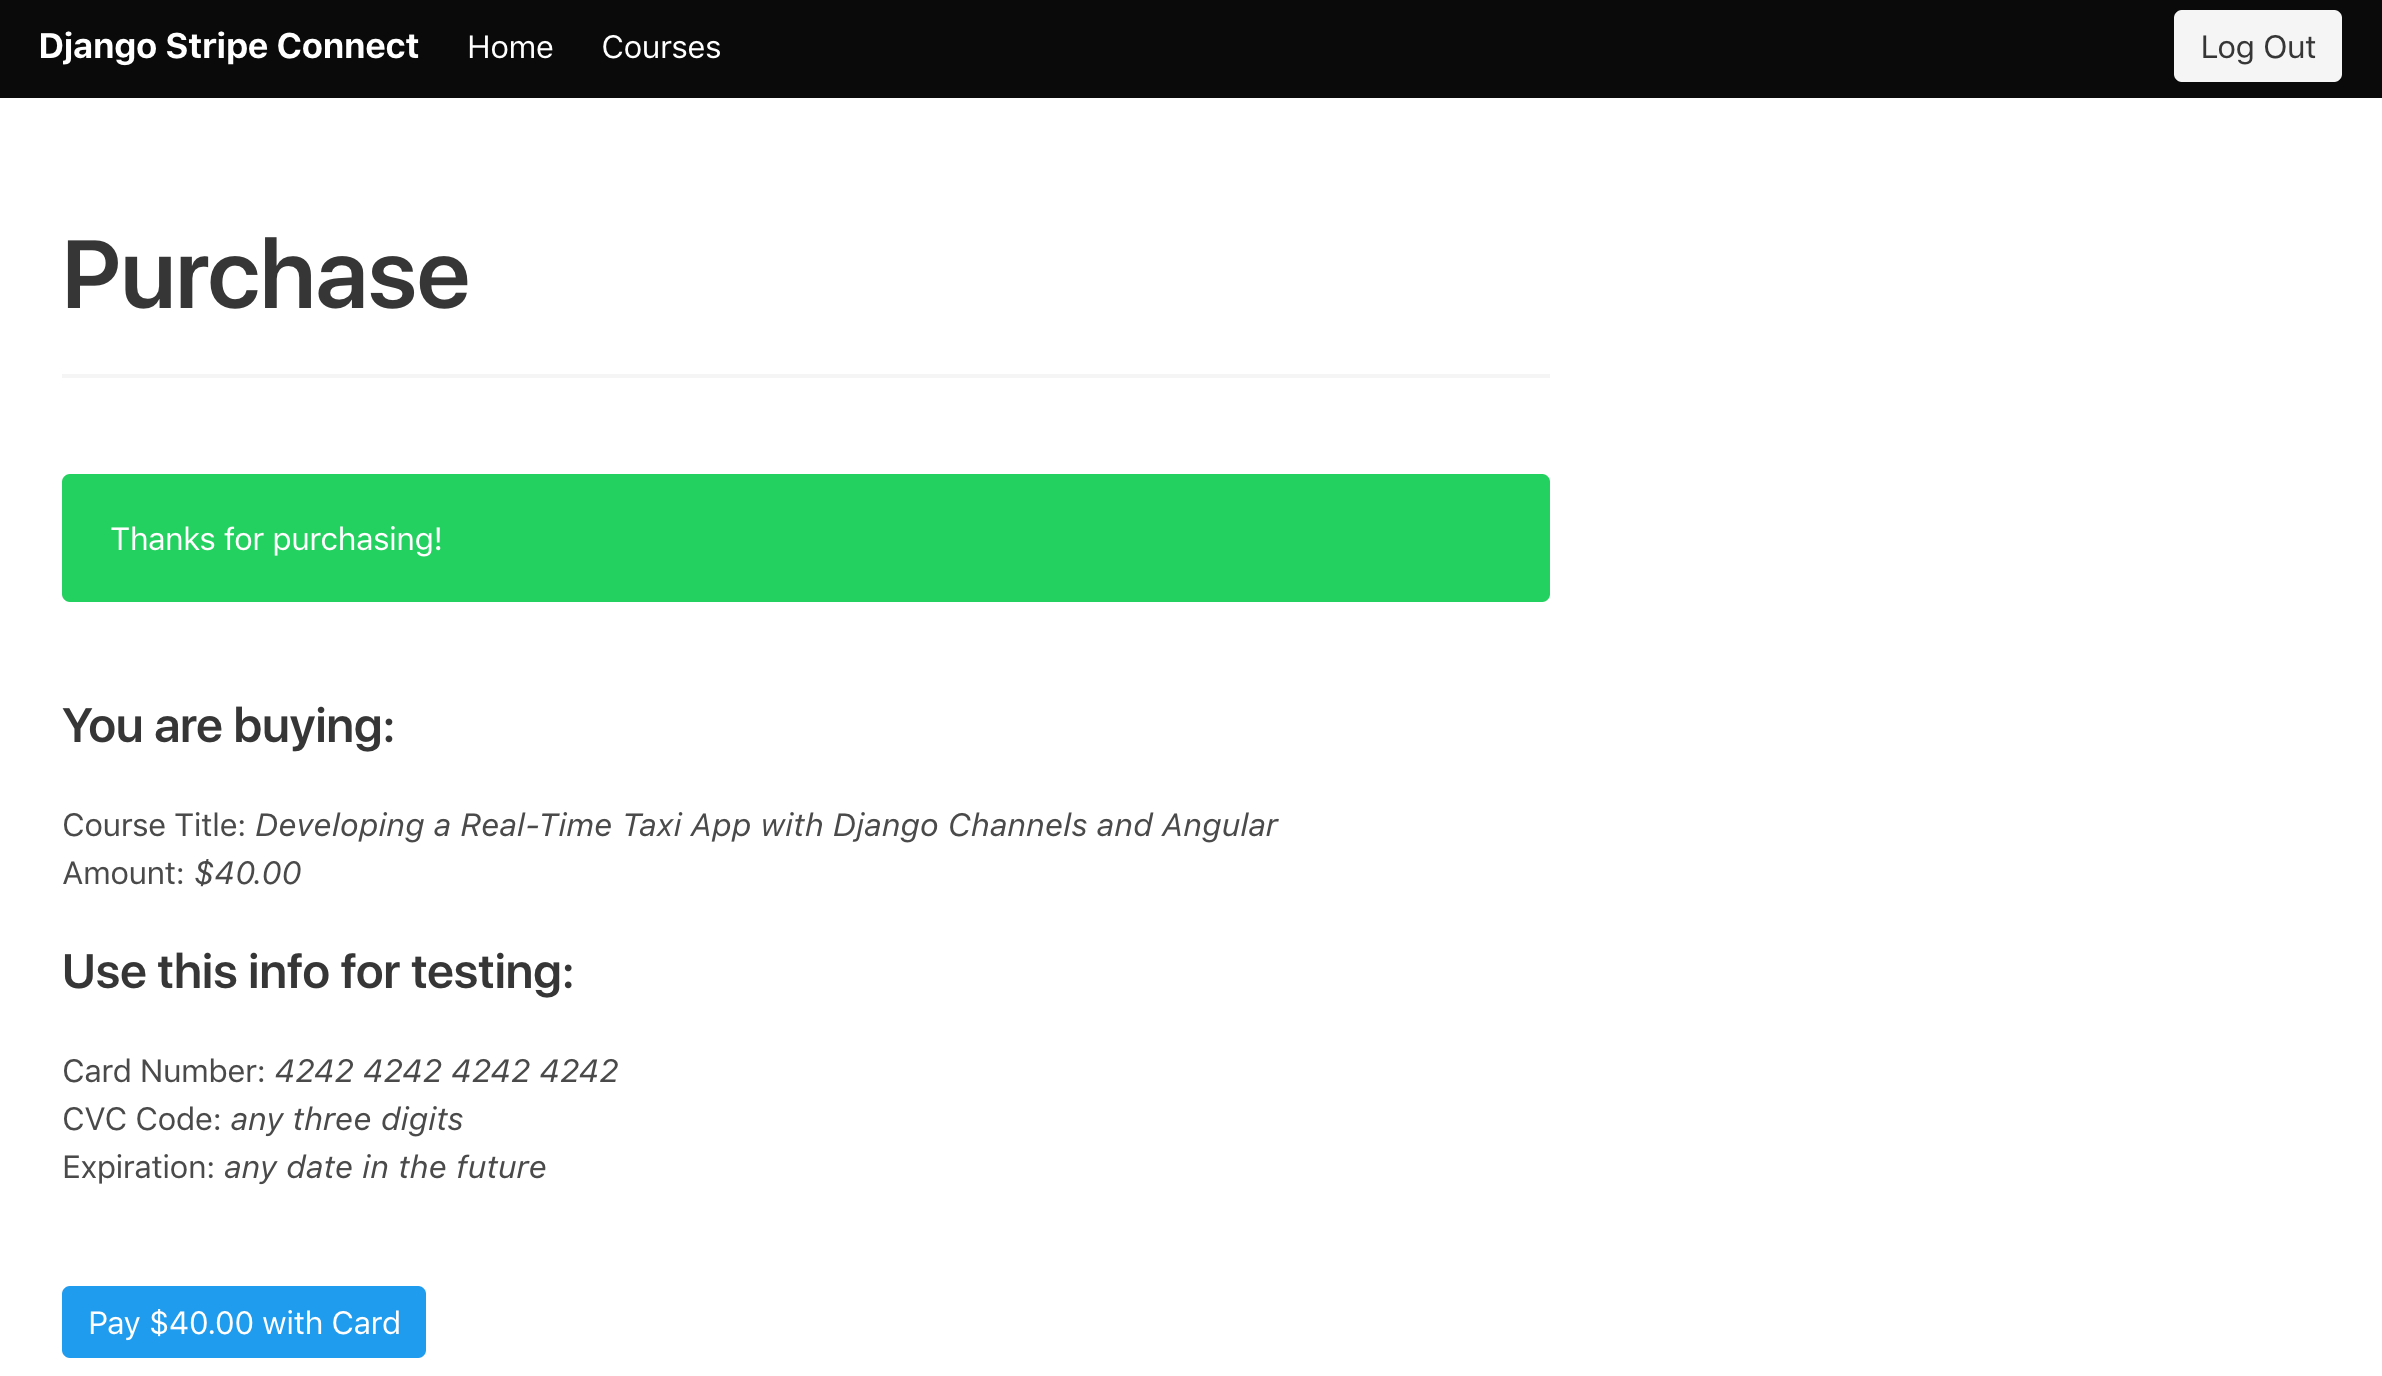
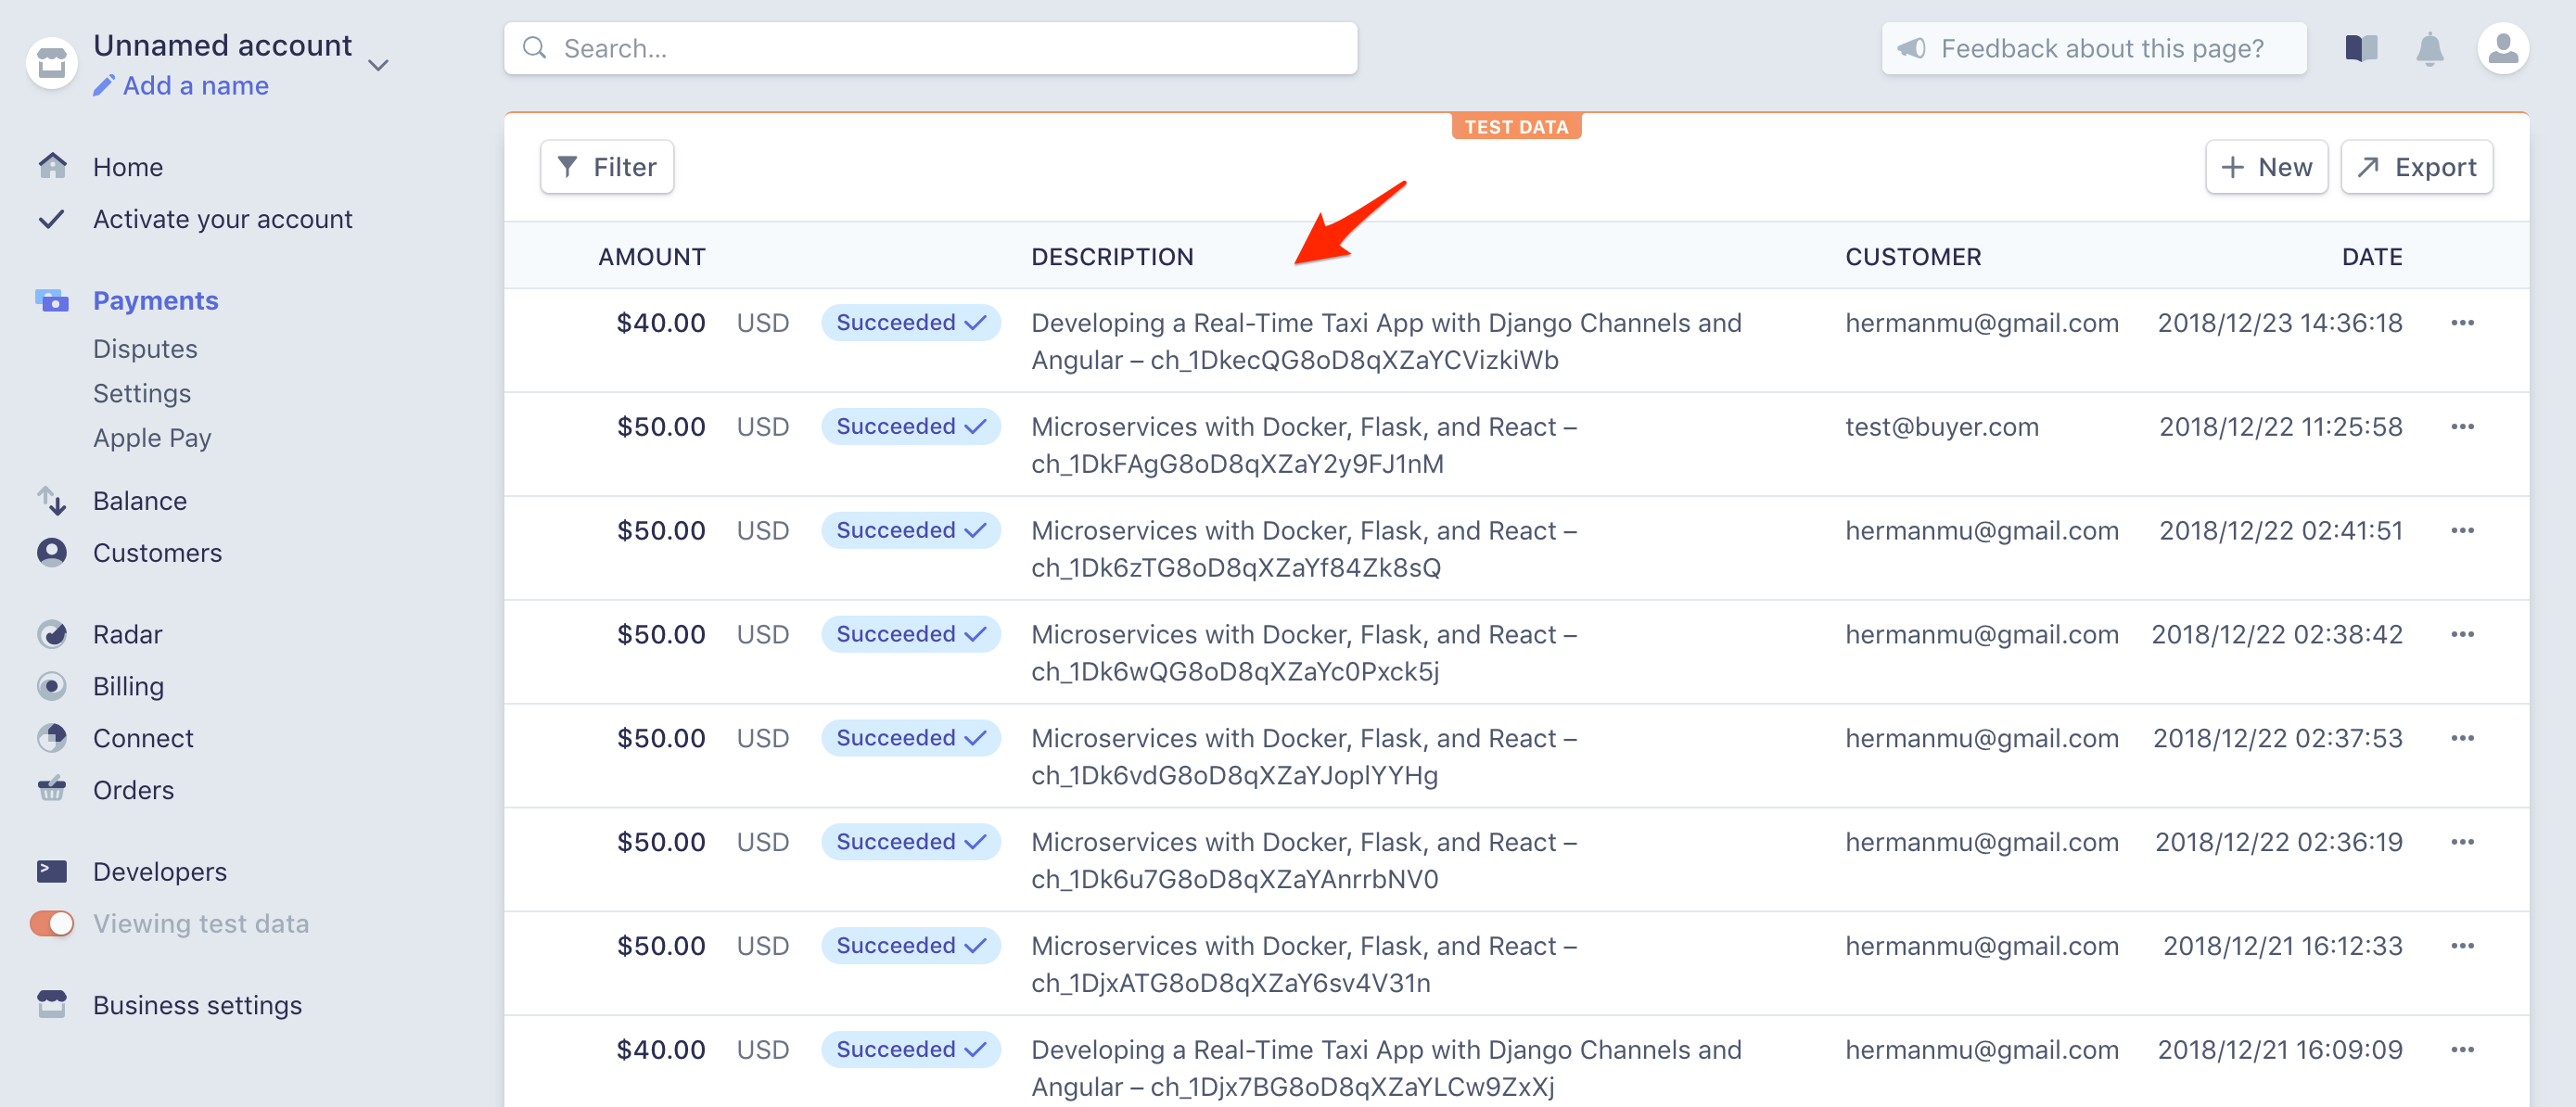
You should see the charge on the Stripe dashboard under "Payments":
Need help? Refer to the Add Stripe section from the Django Stripe Tutorial blog post.
To register your platform with Stripe Connect, click on "Connect" in the left sidebar on the Stripe dashboard:
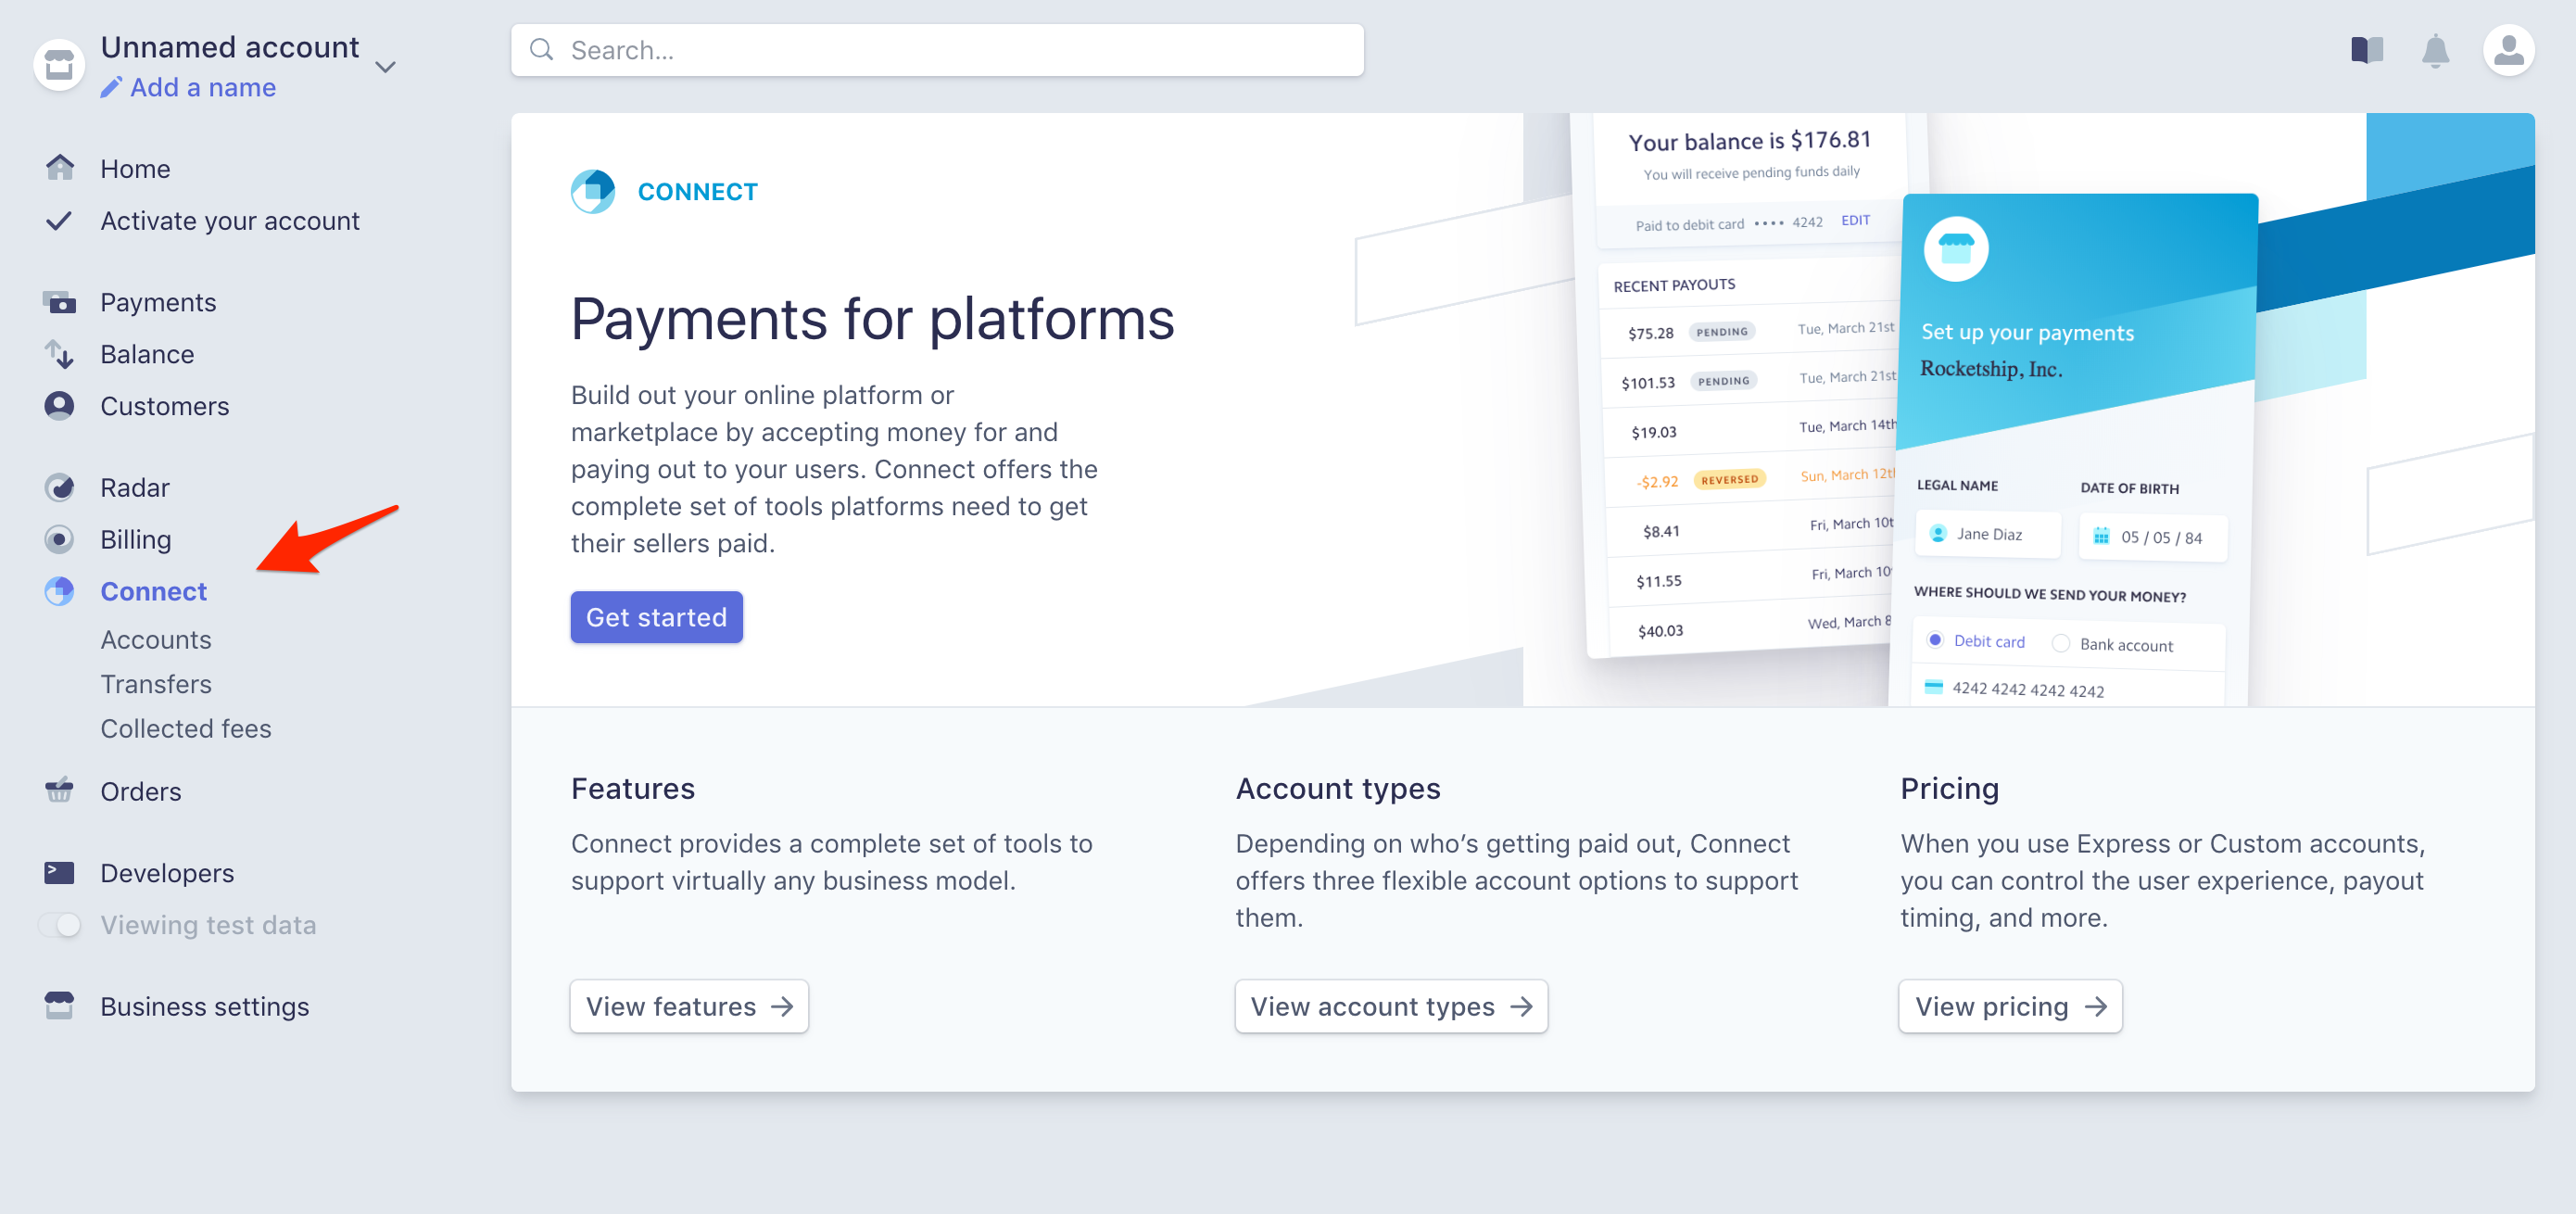
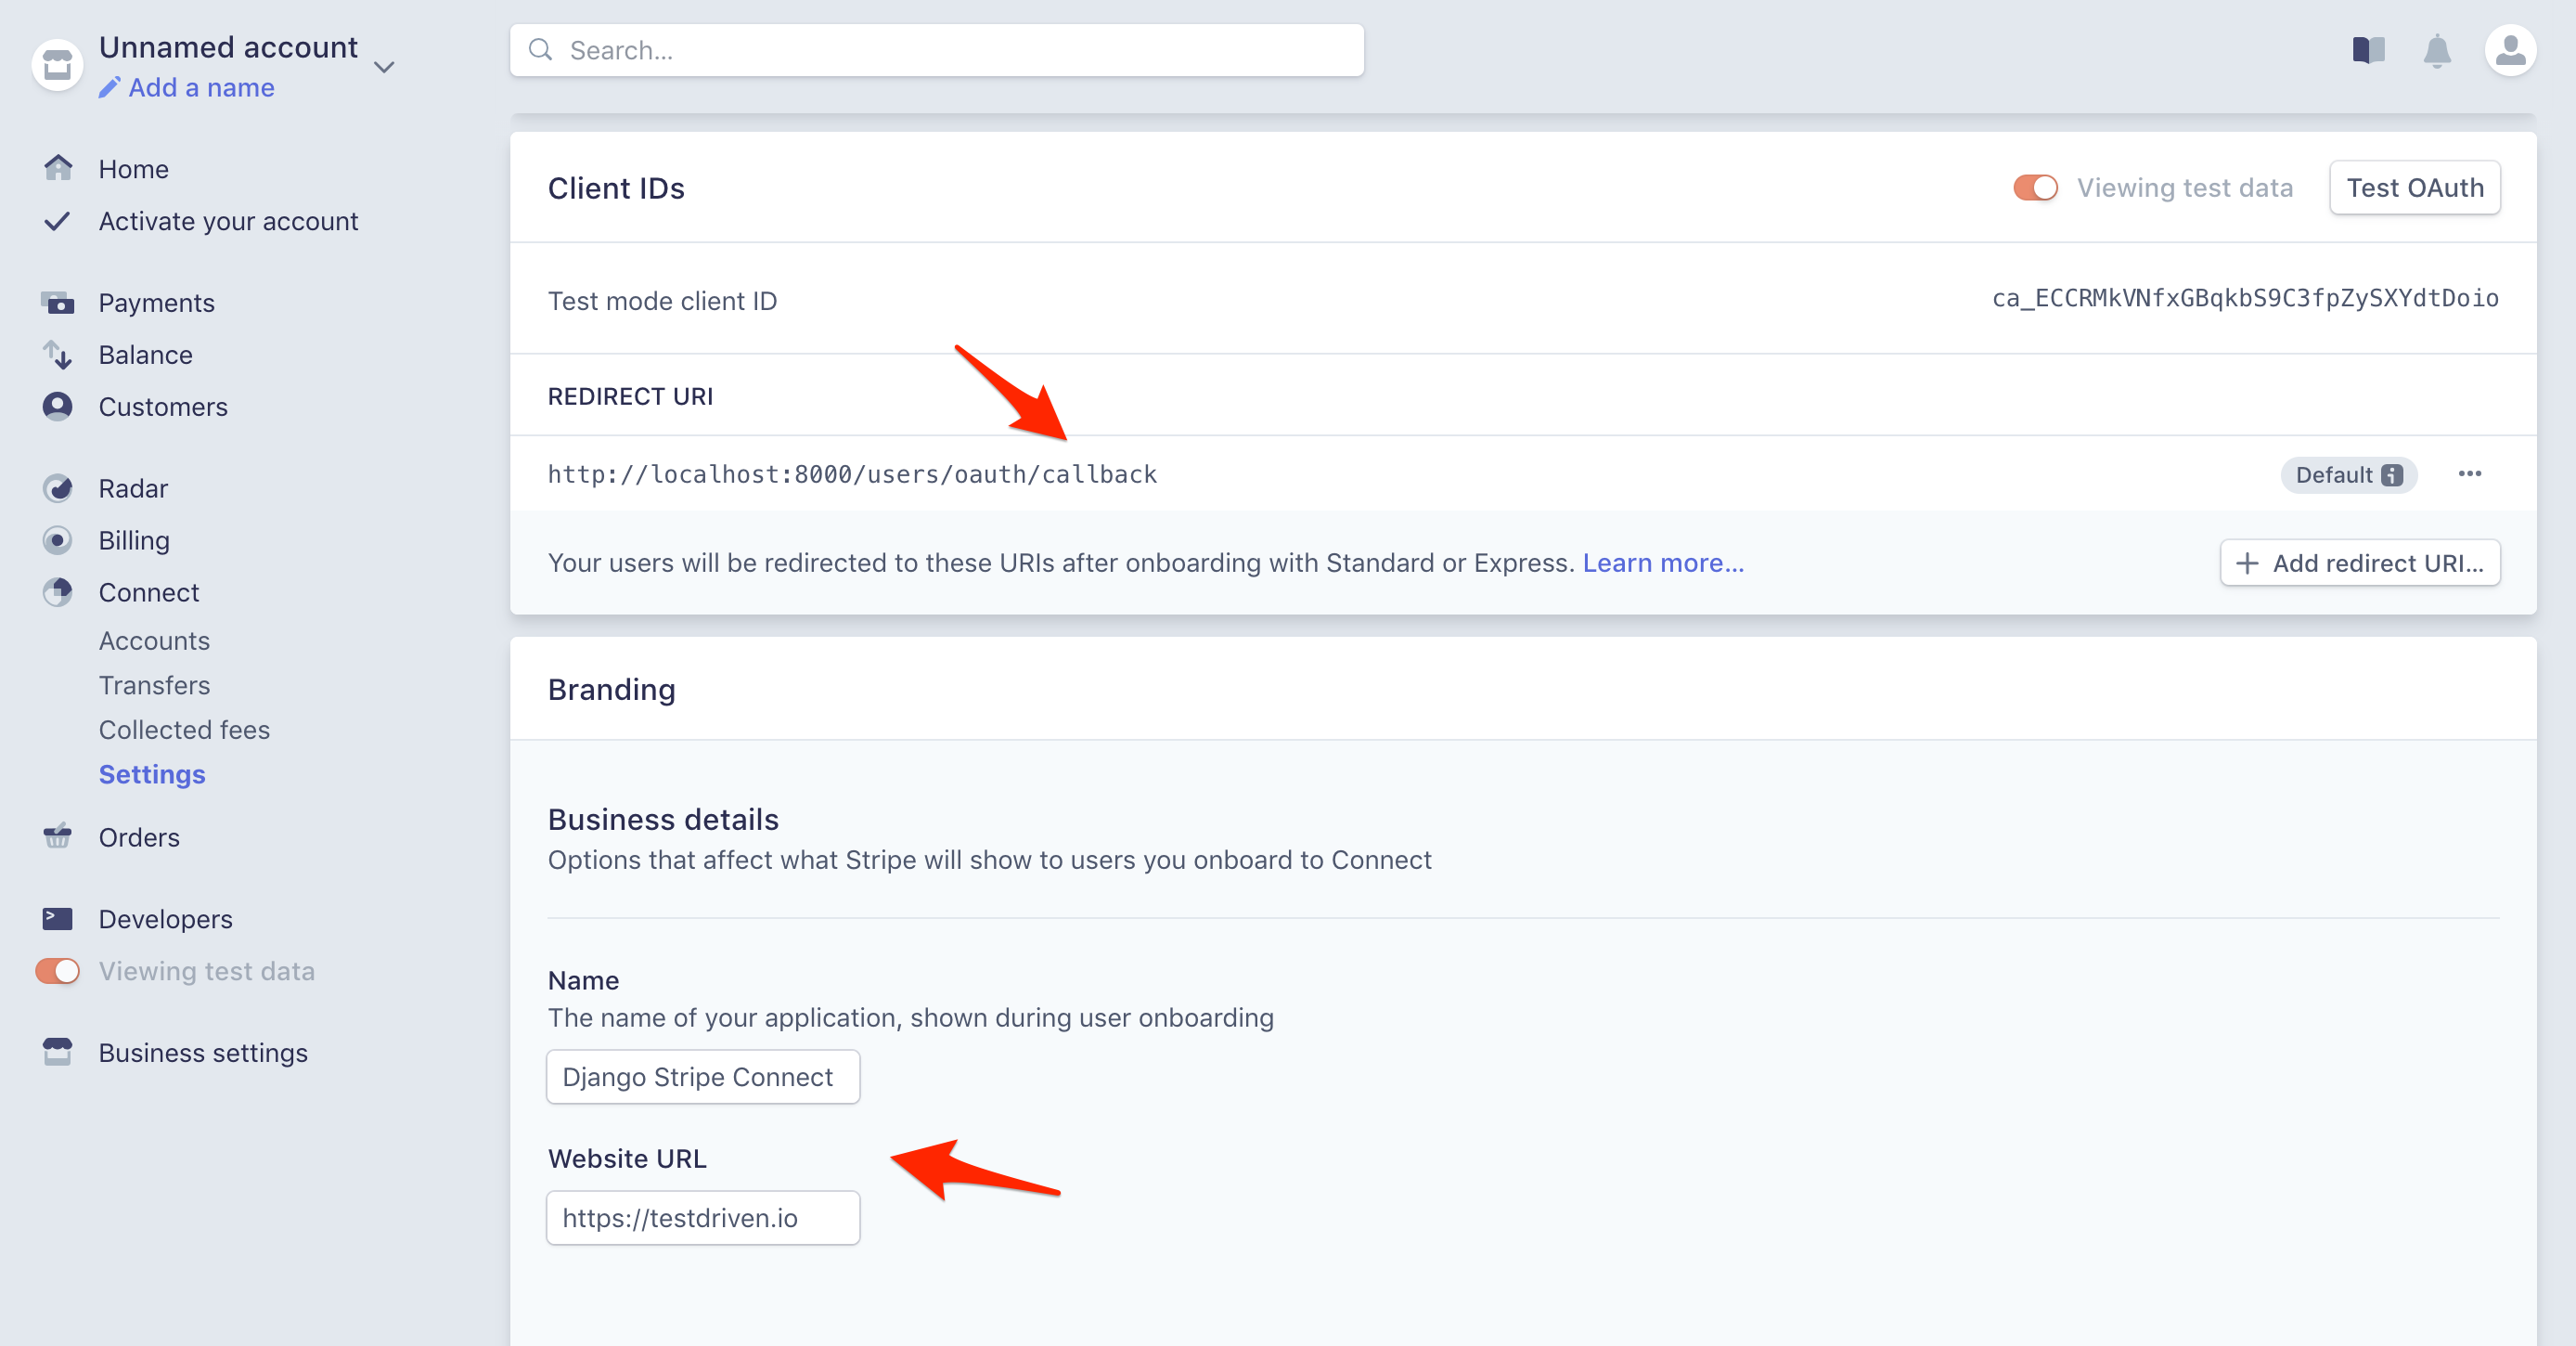
Then, click the "Get started" button. Once you're registered, click the "Settings" link and grab your test client ID:
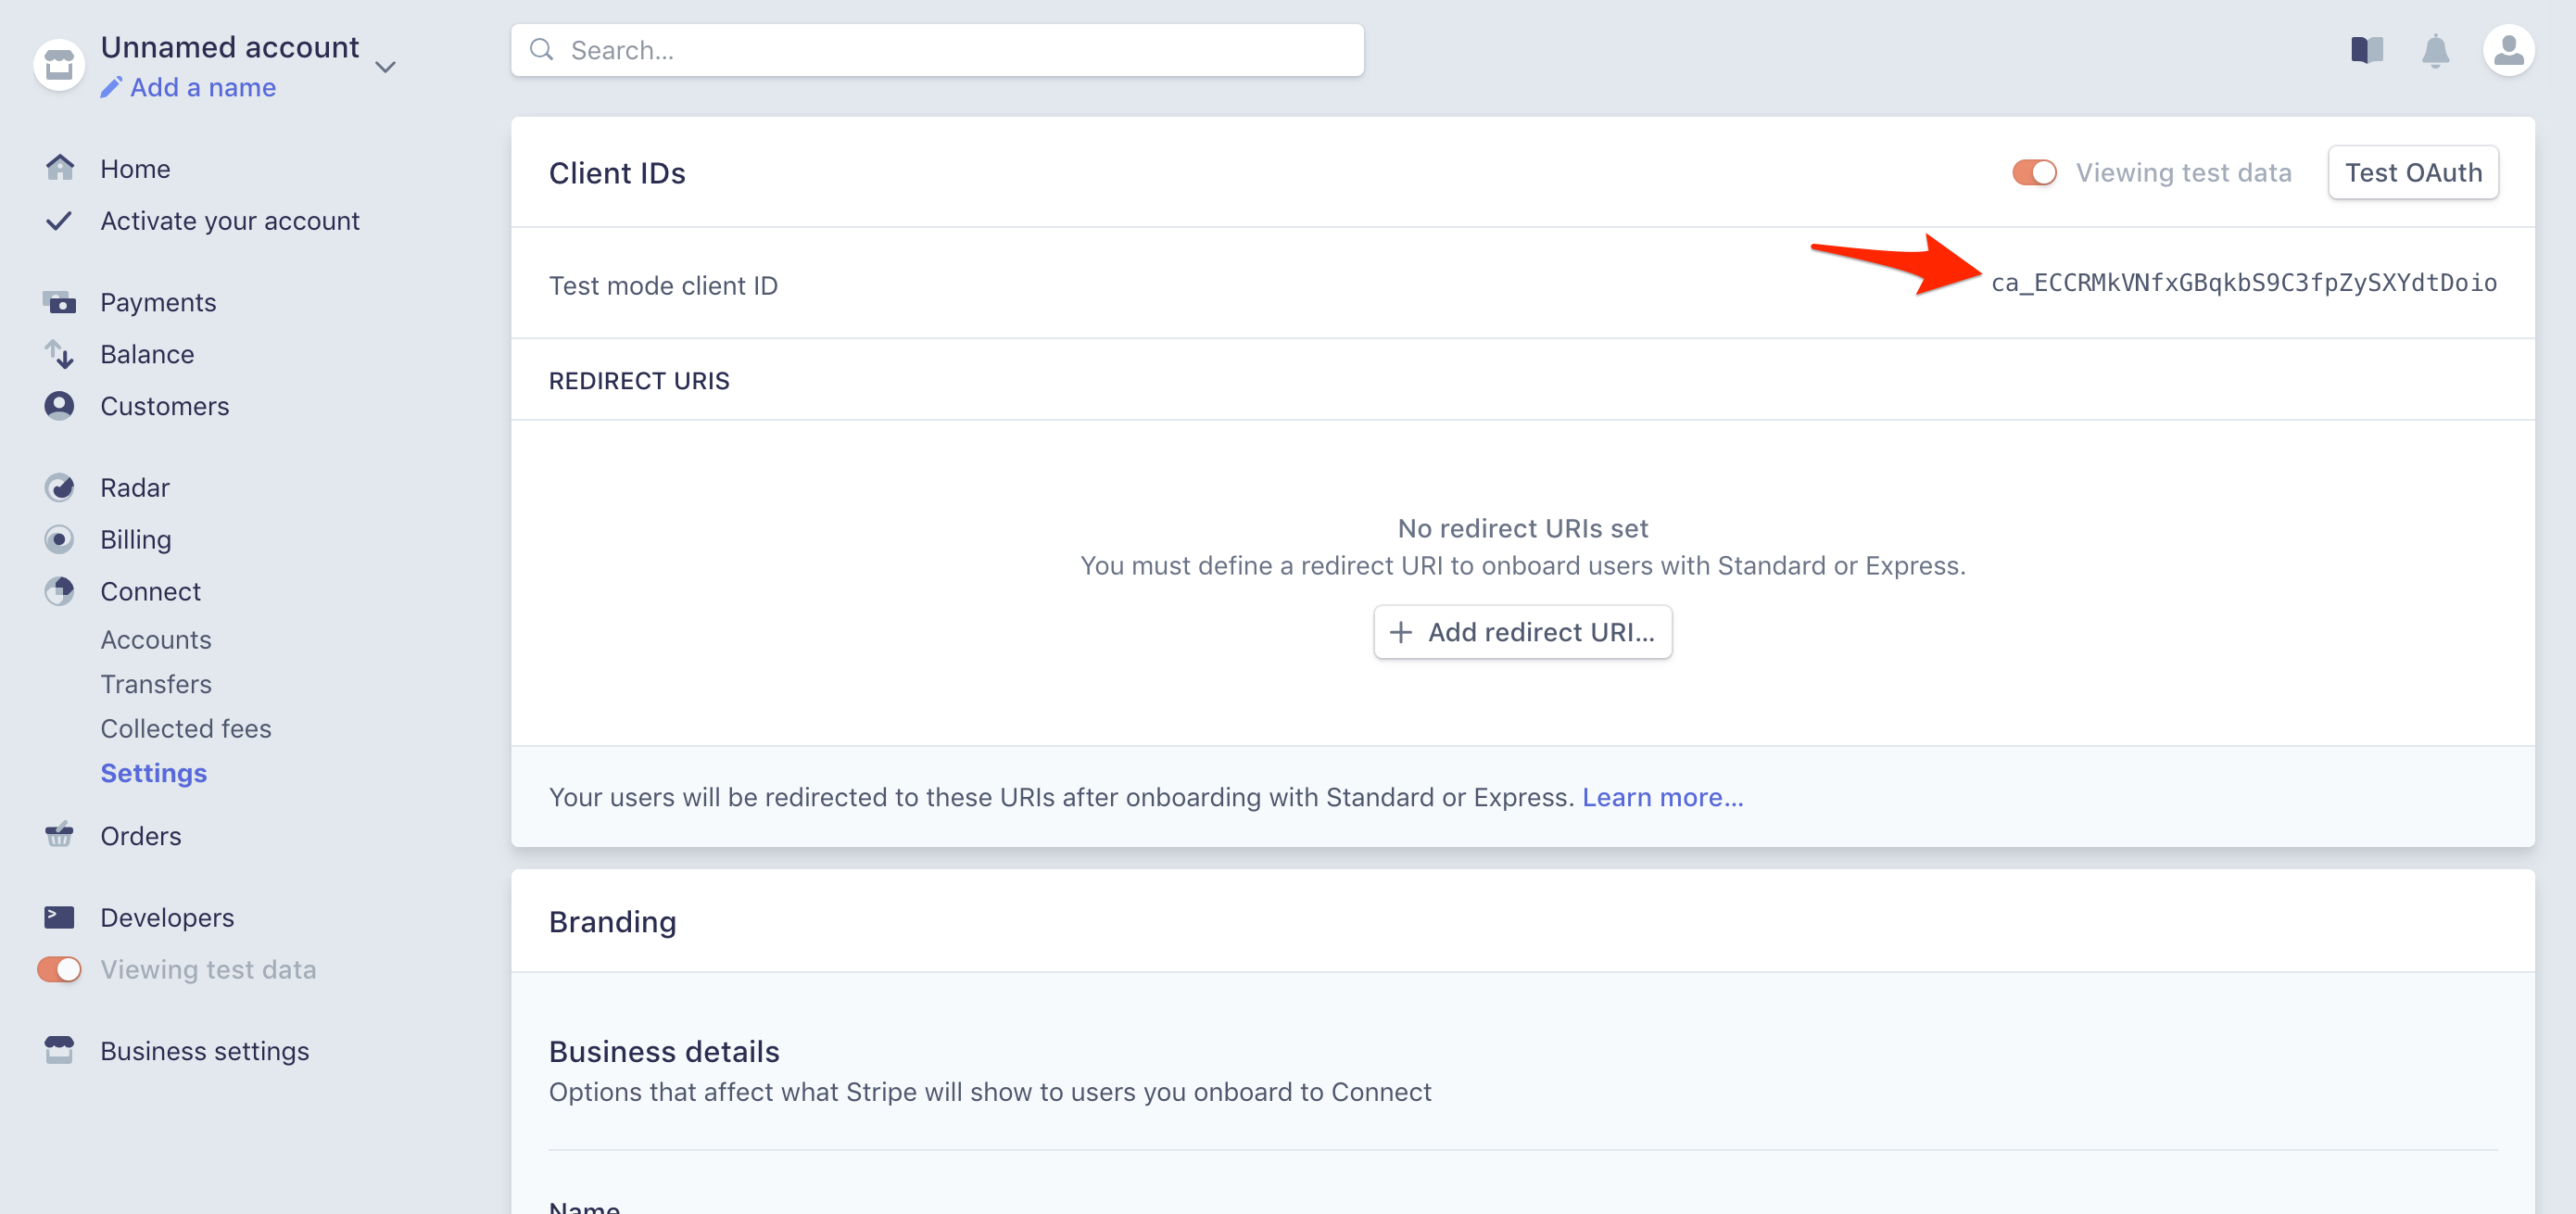
Add this to the bottom of settings.py:
STRIPE_CONNECT_CLIENT_ID = '<your test connect client id here>'
Back on the dashboard, use http://localhost:8000/users/oauth/callback as the redirect URI. Feel free to update the "Branding" section as well:
Connect Account
Moving on, let's add a link to the "Connect Stripe Account" button on the home page that sends users to Stripe so they can link their account.
Redirect to Stripe
Add a view to apps/users/views.py:
import urllib

from django.urls import reverse
from django.http import HttpResponseRedirect
from django.views import View
from django.conf import settings
from django.shortcuts import redirect


class StripeAuthorizeView(View):

    def get(self, request):
        if not self.request.user.is_authenticated:
            return HttpResponseRedirect(reverse('login'))
        url = 'https://connect.stripe.com/oauth/authorize'
        params = {
            'response_type': 'code',
            'scope': 'read_write',
            'client_id': settings.STRIPE_CONNECT_CLIENT_ID,
            'redirect_uri': f'http://localhost:8000/users/oauth/callback'
        }
        url = f'{url}?{urllib.parse.urlencode(params)}'
        return redirect(url)
If the user is authenticated, we create the OAuth link from the response_type, scope, client_id, and redirect_uri and then redirect them to Stripe via the authorize URL.
scopecan beread_onlyorread_write:
- Use
read_onlywhen the platform just needs view access.- Use
read_writewhen the platform needs view, create, and modify access in order to perform charges on behalf of the connected account.For more, review What permissions does the platform receive when connecting a Stripe account?
Update the project-level URLs in my_project/urls.py:
urlpatterns = [
    path('', TemplateView.as_view(template_name='home.html'), name='home'),
    path('login/', LoginView.as_view(template_name='login.html'), name='login'),
    path('logout/', LogoutView.as_view(), {'next_page': settings.LOGOUT_REDIRECT_URL}, name='logout'),
    path('courses/', include('apps.courses.urls')),
    path('users/', include('apps.users.urls')),
    path('admin/', admin.site.urls),
]
Then, add the app-level URLs by adding a urls.py file to "apps/users":
from django.urls import path

from .views import StripeAuthorizeView


urlpatterns = [
  path('authorize/', StripeAuthorizeView.as_view(), name='authorize'),
]
Add the href to the "Connect Stripe Account" button in the home.html template:
<a href="{% url 'authorize' %}" class="button is-info">Connect Stripe Account</a>
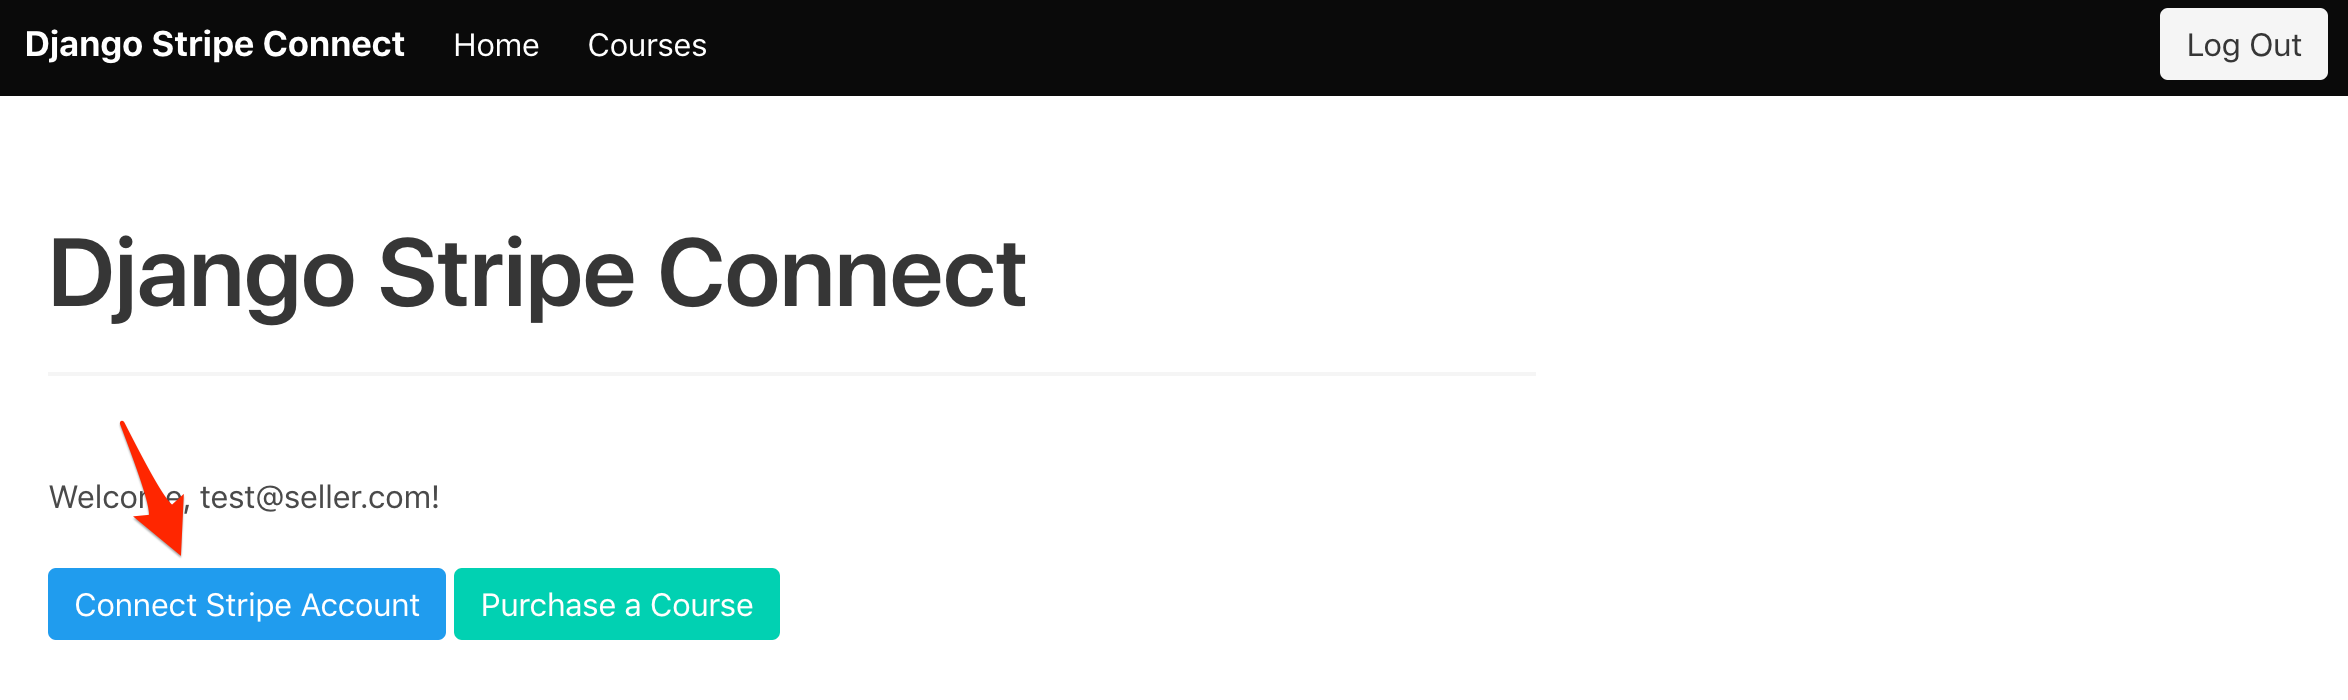
To test, run the Django server, and then log in with the seller account:
- email:
[email protected] - password:
justatest
Make sure you're redirected to Stripe when you click "Connect Stripe Account":
Don't do anything just yet as we still need to set up the redirect view.
Redirect Back
Add a new view to apps/users/views.py
class StripeAuthorizeCallbackView(View):

    def get(self, request):
        code = request.GET.get('code')
        if code:
            data = {
                'client_secret': settings.STRIPE_SECRET_KEY,
                'grant_type': 'authorization_code',
                'client_id': settings.STRIPE_CONNECT_CLIENT_ID,
                'code': code
            }
            url = 'https://connect.stripe.com/oauth/token'
            resp = requests.post(url, params=data)
            print(resp.json())
        url = reverse('home')
        response = redirect(url)
        return response
After the Stripe account is connected, the user is redirected back to the platform, where we'll use the provided authorization code to call the access token URL to obtain the user's Stripe credentials.
Install the requests library:
$ pipenv install requests==2.21.0
Add the import to apps/users/views.py:
import requests
Add the callback URL to apps/users/urls.py
from django.urls import path

from .views import StripeAuthorizeView, StripeAuthorizeCallbackView


urlpatterns = [
  path('authorize/', StripeAuthorizeView.as_view(), name='authorize'),
  path('oauth/callback/', StripeAuthorizeCallbackView.as_view(), name='authorize_callback'),
]
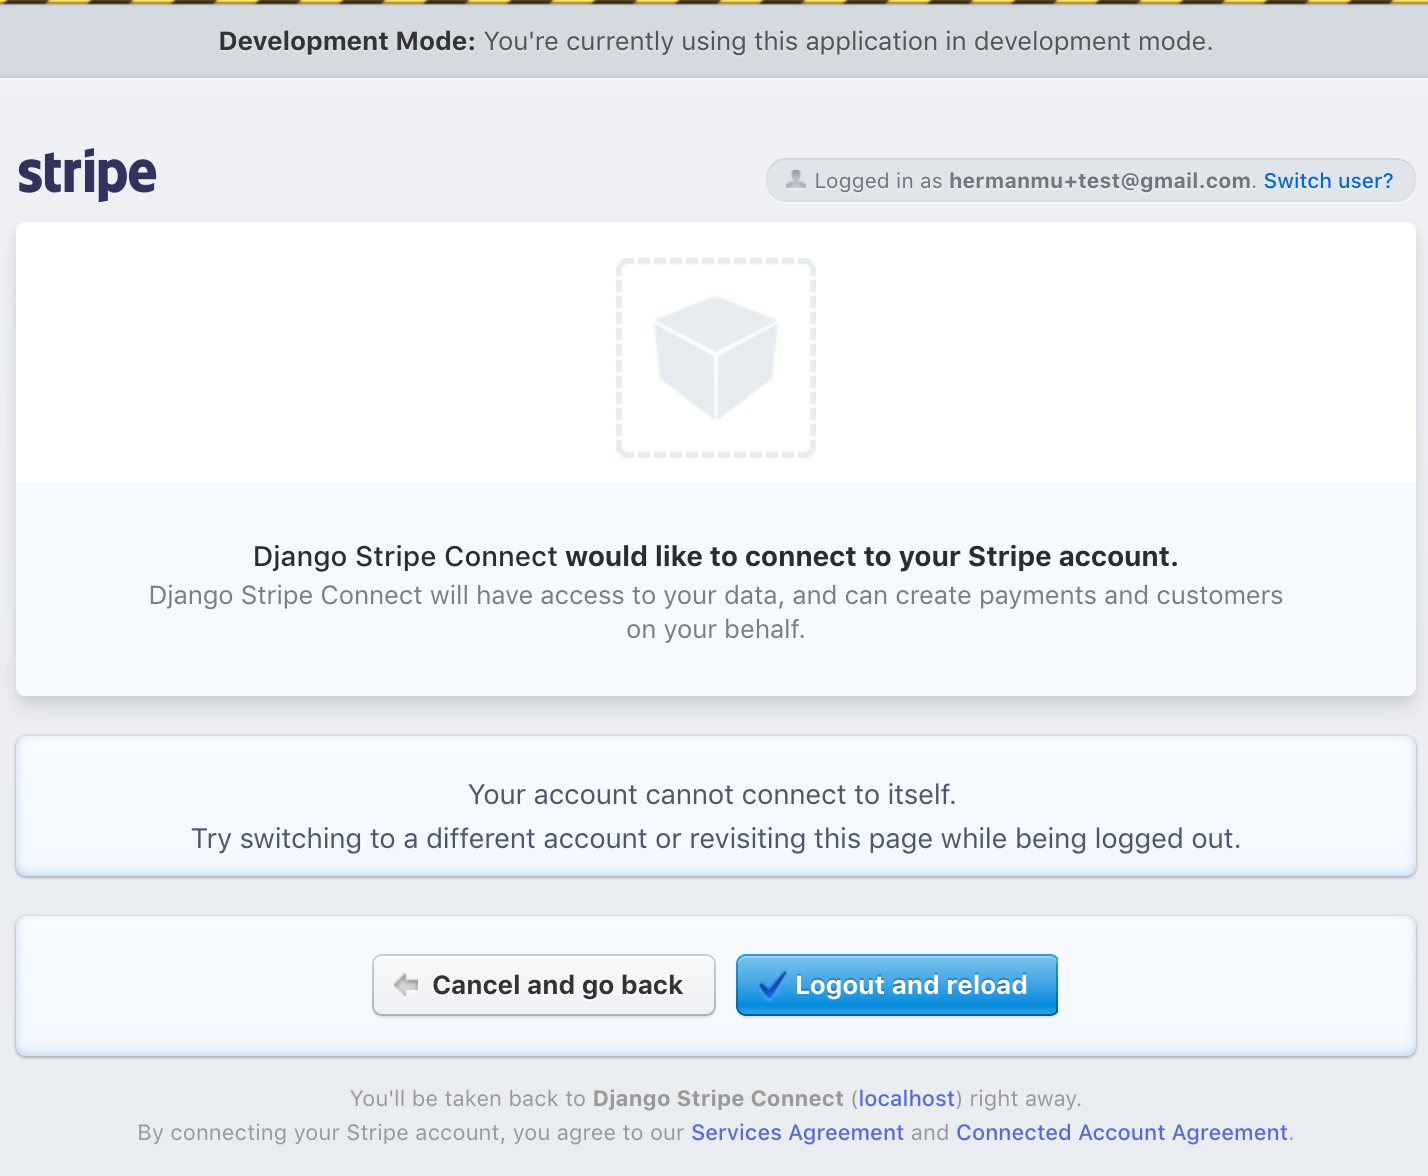
Next, create a new Stripe account for testing purposes, which you'll use to connect to the platform account. Once done, you can test the full OAuth process:
- Navigate to http://localhost:8000/ in an incognito or private browser window
- Log in to the platform with
[email protected]/justatest - Click "Connect Stripe Account"
- Log in with the new Stripe Account
- Click the "Connect my Stripe account" button, which will redirect you back to the Django app
In your terminal you should see the output from print(resp.json()):
{
  'access_token': 'sk_test_nKM42TMNPm6M3c98U07abQss',
  'livemode': False,
  'refresh_token': 'rt_5QhvTKUgPuFF1EIRsHV4b4DtTxDZgMQiQRvOoMewQptbyfRc',
  'token_type': 'bearer',
  'stripe_publishable_key': 'pk_test_8iD6CpftCZLTp40k1pAl22hp',
  'stripe_user_id': 'acct_i3qMgnSiH35BL8aU',
  'scope': 'read_write'
}
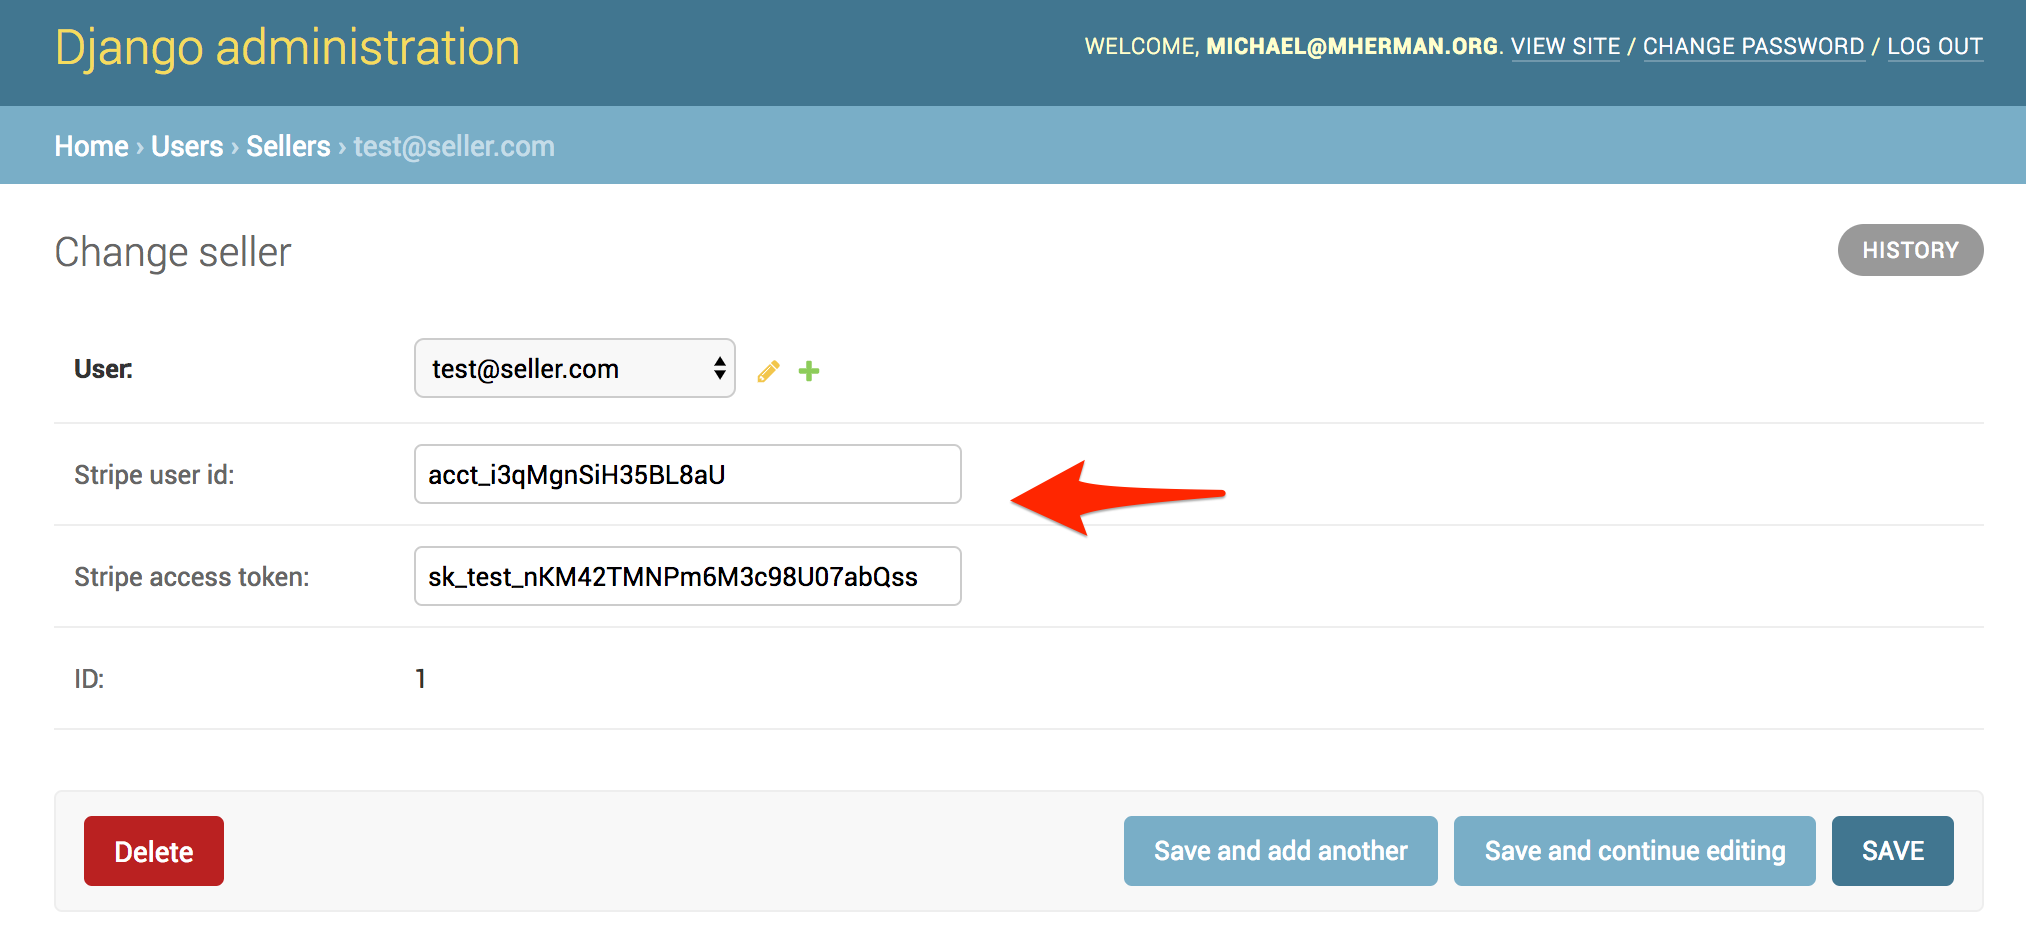
We can now add the access_token and stripe_user_id to the Seller model:
class StripeAuthorizeCallbackView(View):

    def get(self, request):
        code = request.GET.get('code')
        if code:
            data = {
                'client_secret': settings.STRIPE_SECRET_KEY,
                'grant_type': 'authorization_code',
                'client_id': settings.STRIPE_CONNECT_CLIENT_ID,
                'code': code
            }
            url = 'https://connect.stripe.com/oauth/token'
            resp = requests.post(url, params=data)
            # add stripe info to the seller
            stripe_user_id = resp.json()['stripe_user_id']
            stripe_access_token = resp.json()['access_token']
            seller = Seller.objects.filter(user_id=self.request.user.id).first()
            seller.stripe_access_token = stripe_access_token
            seller.stripe_user_id = stripe_user_id
            seller.save()
        url = reverse('home')
        response = redirect(url)
        return response
Add the import to the top:
from .models import Seller
You may want to save the
refresh_tokenas well so you can request a newaccess_token.
To recap, after a user connects a Stripe account, you are given a temporary authorization code that is used to request the user's access token and id - which are then used for connecting to Stripe and processing payments on the user's behalf, respectively.
Test it out once more. Once done, log out, log back in as the superuser, and verify that the seller was updated in the Django admin:
Finally, hide the "Connect Stripe Account" button in the home template if the user has already connected their Stripe account:
{% if user.is_seller and not user.seller.stripe_user_id %}
  <a href="{% url 'authorize' %}" class="button is-info">Connect Stripe Account</a>
{% endif %}
With that, we can turn our attention to the purchasing side of things.
Buy a Course
First, you need to make a decision on the how you want the charge to be handled:
We'll look at the first two approaches in this tutorial. Just keep in mind that the account type together with the payment approach determines the liability:
| Account Type | Payment Approach | Liability |
|---|---|---|
| Standard | Direct | User |
| Standard | Destination | Platform |
| Express | Direct | User |
| Express | Destination | Platform |
| Express | Separate Charge and Transfer | Platform |
| Custom | Direct | User |
| Custom | Destination | Platform |
| Custom | Separate Charge and Transfer | Platform |
There are exceptions to this, so be sure to review the Choosing an approach guide for more info on the differences between the three approaches.
TestDriven.io uses destination charges, since all charges and customers are "owned" by the platform rather than the connected account.
Direct
Use Direct charges when you want the payment to be handled by the connected Stripe account rather than the platform account.
Update CourseChargeView in apps/courses/views.py like so:
class CourseChargeView(View):

    def post(self, request, *args, **kwargs):
        stripe.api_key = settings.STRIPE_SECRET_KEY
        json_data = json.loads(request.body)
        course = Course.objects.filter(id=json_data['course_id']).first()
        try:
            charge = stripe.Charge.create(
                amount=json_data['amount'],
                currency='usd',
                source=json_data['token'],
                description=json_data['description'],
                stripe_account=course.seller.stripe_user_id,
            )
            if charge:
                return JsonResponse({'status': 'success'}, status=202)
        except stripe.error.StripeError as e:
            return JsonResponse({'status': 'error'}, status=500)
Try this out.
Did you notice that the charge only shows up on the connected account's dashboard? With Direct charges the customer is technically purchasing from the business associated with the connected account, not the platform. The connected account is responsible for paying the Stripe fees along with any potential refunds or chargebacks. If you need to review the charge, you can retrieve it from the API.
You can also charge a customer object. Think about where you want that customer to live - platform account, connected account, or both?
class CourseChargeView(View):

    def post(self, request, *args, **kwargs):
        stripe.api_key = settings.STRIPE_SECRET_KEY
        json_data = json.loads(request.body)
        course = Course.objects.filter(id=json_data['course_id']).first()
        try:
            customer = stripe.Customer.create(
                email=self.request.user.email,
                source=json_data['token'],
                stripe_account=course.seller.stripe_user_id,
            )
            charge = stripe.Charge.create(
                amount=json_data['amount'],
                currency='usd',
                customer=customer.id,
                description=json_data['description'],
                stripe_account=course.seller.stripe_user_id,
            )
            if charge:
                return JsonResponse({'status': 'success'}, status=202)
        except stripe.error.StripeError as e:
            return JsonResponse({'status': 'error'}, status=500)
In this example, the customer is created on the connected account and that customer id is then used to process the charge.
What if the customer already exists on the connected account?
class CourseChargeView(View):

    def post(self, request, *args, **kwargs):
        stripe.api_key = settings.STRIPE_SECRET_KEY
        json_data = json.loads(request.body)
        course = Course.objects.filter(id=json_data['course_id']).first()
        try:
            customer = get_or_create_customer(
                self.request.user.email,
                json_data['token'],
                course.seller.stripe_access_token,
                course.seller.stripe_user_id,
            )
            charge = stripe.Charge.create(
                amount=json_data['amount'],
                currency='usd',
                customer=customer.id,
                description=json_data['description'],
                stripe_account=course.seller.stripe_user_id,
            )
            if charge:
                return JsonResponse({'status': 'success'}, status=202)
        except stripe.error.StripeError as e:
            return JsonResponse({'status': 'error'}, status=500)


# helpers

def get_or_create_customer(email, token, stripe_access_token, stripe_account):
    stripe.api_key = stripe_access_token
    connected_customers = stripe.Customer.list()
    for customer in connected_customers:
        if customer.email == email:
            print(f'{email} found')
            return customer
    print(f'{email} created')
    return stripe.Customer.create(
        email=email,
        source=token,
        stripe_account=stripe_account,
    )
Test it out, making sure a customer object is created only if it does not already exist.
What if you wanted to "share" the customer between the two accounts? In this case you'd probably want to store the customer info on the platform account so you can charge that customer directly, when the connected account is not involved, and then use that same customer object to process charges, when the connected account is involved. There's no need to create the customer twice if you don't have to. Implement this on your on. Refer to the Shared Customers guide for more info.
Before moving on to the next approach, let's quickly look at how the platform can collect a convenience fee on each transaction:
class CourseChargeView(View):

    def post(self, request, *args, **kwargs):
        stripe.api_key = settings.STRIPE_SECRET_KEY
        json_data = json.loads(request.body)
        course = Course.objects.filter(id=json_data['course_id']).first()
        fee_percentage = .01 * int(course.fee)
        try:
            customer = get_or_create_customer(
                self.request.user.email,
                json_data['token'],
                course.seller.stripe_access_token,
                course.seller.stripe_user_id,
            )
            charge = stripe.Charge.create(
                amount=json_data['amount'],
                currency='usd',
                customer=customer.id,
                description=json_data['description'],
                application_fee=int(json_data['amount'] * fee_percentage),
                stripe_account=course.seller.stripe_user_id,
            )
            if charge:
                return JsonResponse({'status': 'success'}, status=202)
        except stripe.error.StripeError as e:
            return JsonResponse({'status': 'error'}, status=500)
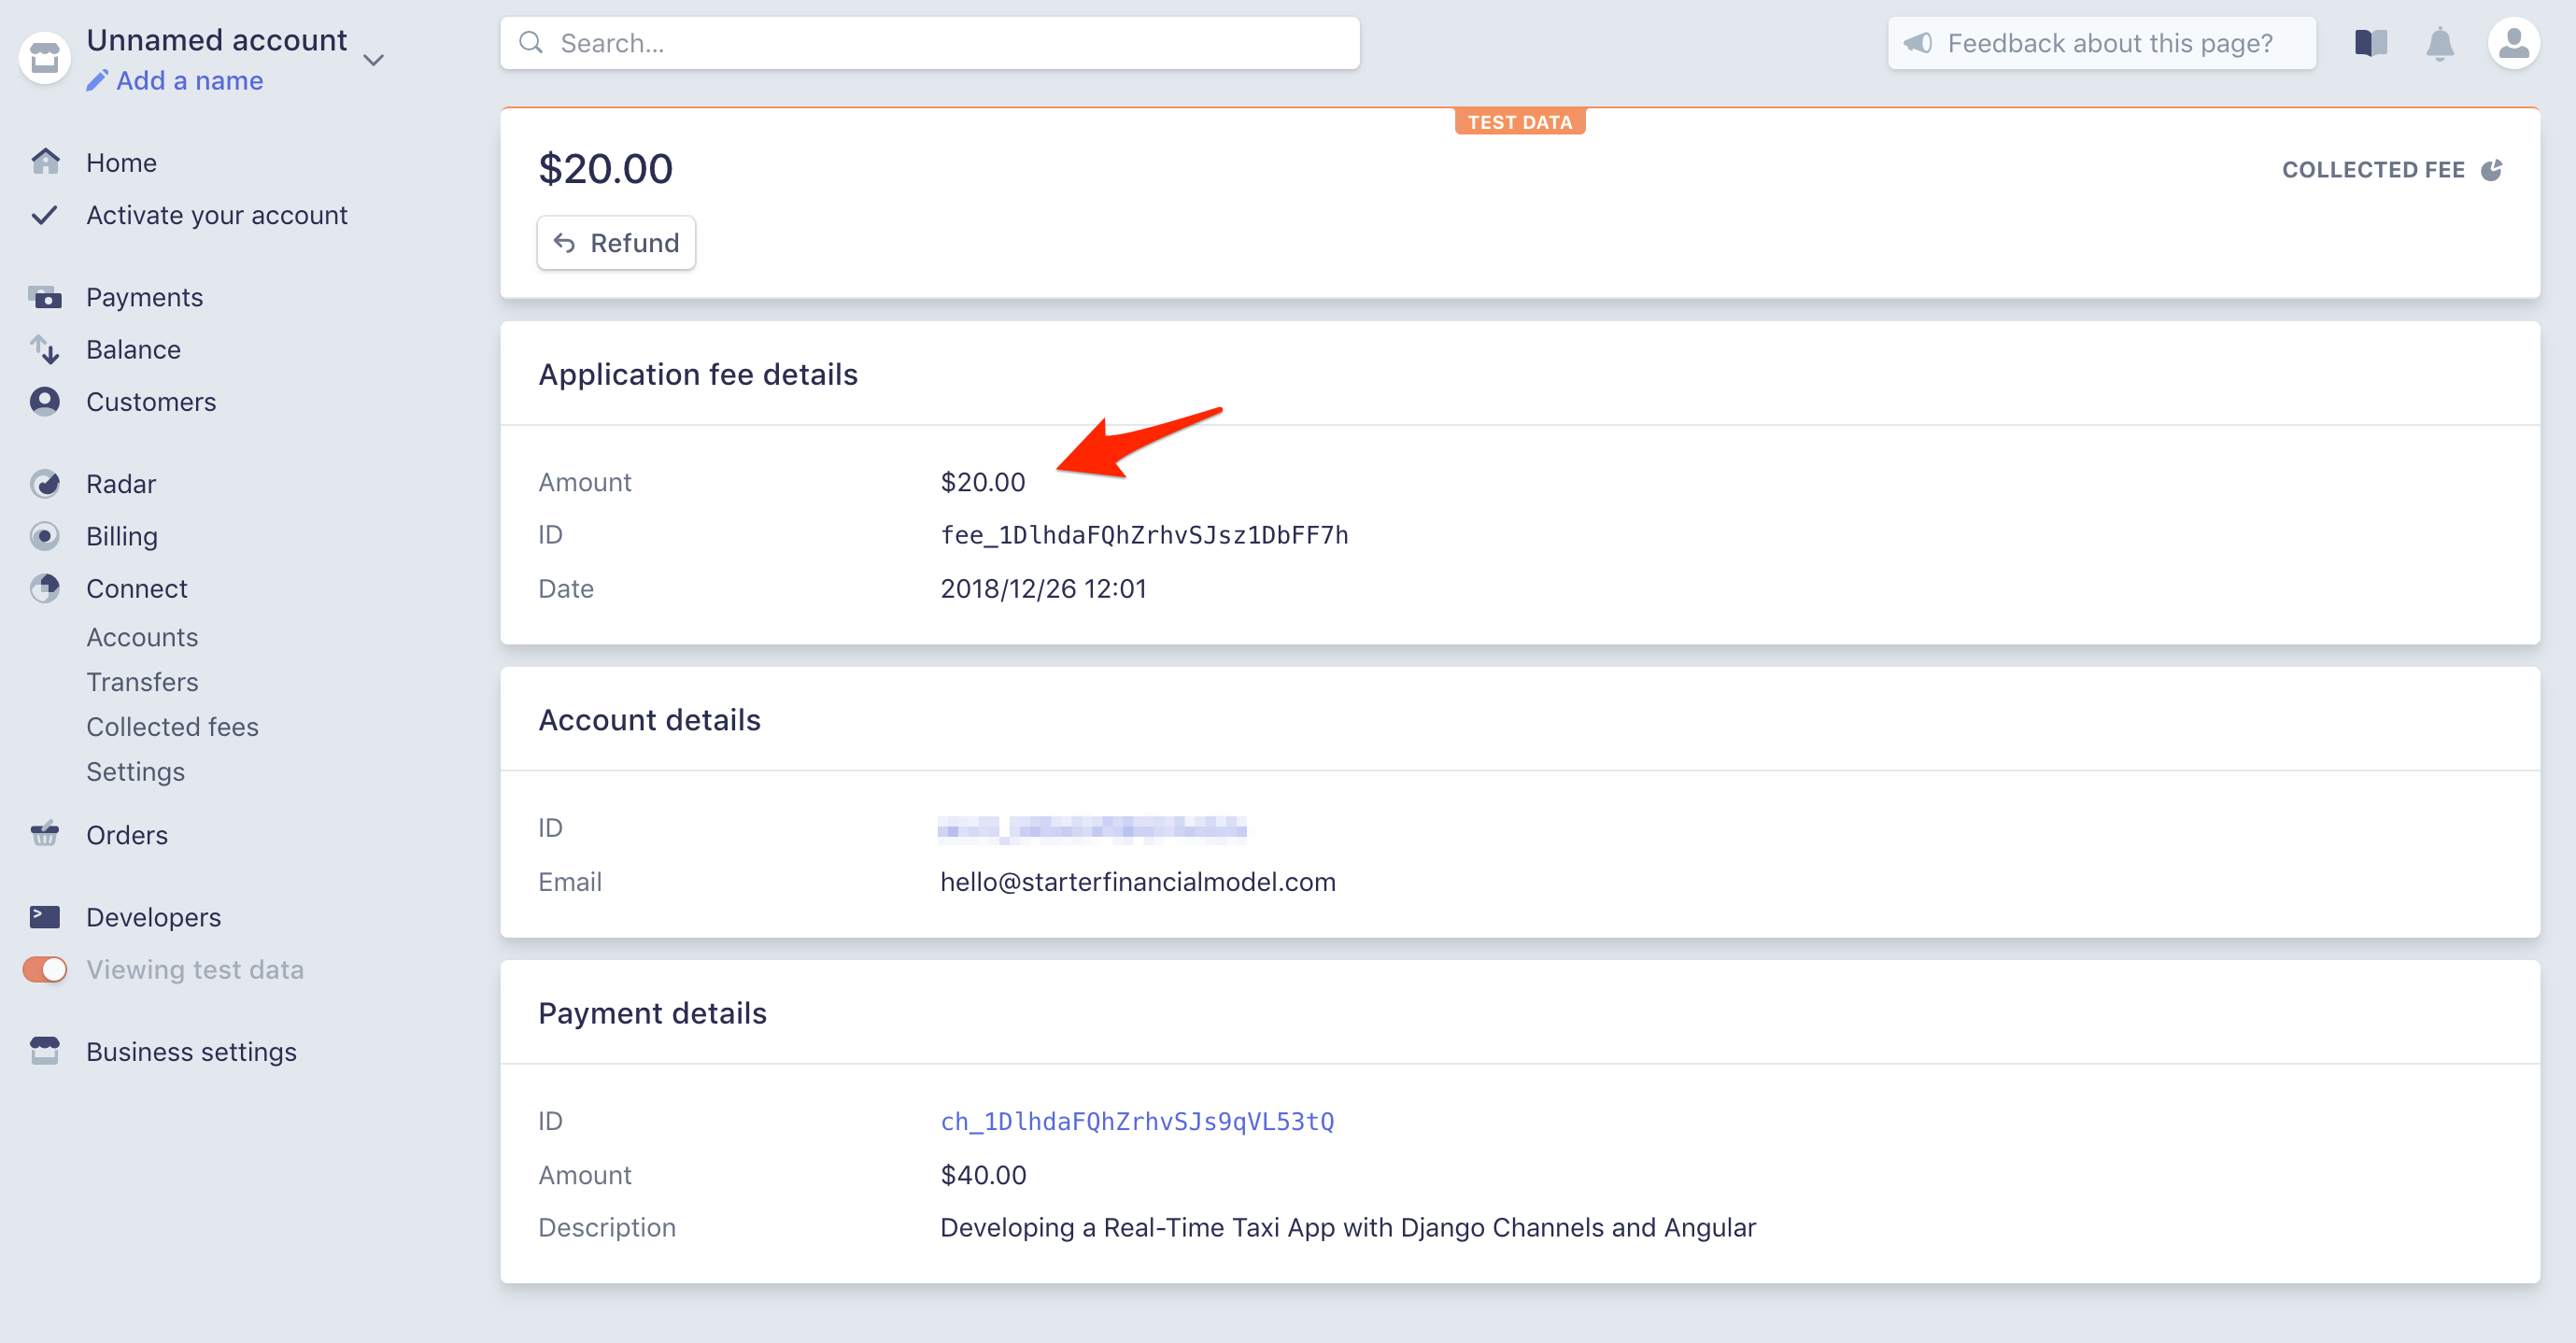
Now, after a charge is processed, you should see the a collected fee on the platform account:
Destination
Destination charges work best when you (the platform) want to maintain ownership over the customer. With this approach, the platform account charges the customer and is responsible for paying Stripe fees and any potential refunds or chargebacks.
class CourseChargeView(View):

    def post(self, request, *args, **kwargs):
        stripe.api_key = settings.STRIPE_SECRET_KEY
        json_data = json.loads(request.body)
        course = Course.objects.filter(id=json_data['course_id']).first()
        fee_percentage = .01 * int(course.fee)
        try:
            customer = get_or_create_customer(
                self.request.user.email,
                json_data['token'],
            )
            charge = stripe.Charge.create(
                amount=json_data['amount'],
                currency='usd',
                customer=customer.id,
                description=json_data['description'],
                destination={
                    'amount': int(json_data['amount'] - (json_data['amount'] * fee_percentage)),
                    'account': course.seller.stripe_user_id,
                },
            )
            if charge:
                return JsonResponse({'status': 'success'}, status=202)
        except stripe.error.StripeError as e:
            return JsonResponse({'status': 'error'}, status=500)

# helpers

def get_or_create_customer(email, token):
    stripe.api_key = settings.STRIPE_SECRET_KEY
    connected_customers = stripe.Customer.list()
    for customer in connected_customers:
        if customer.email == email:
            print(f'{email} found')
            return customer
    print(f'{email} created')
    return stripe.Customer.create(
        email=email,
        source=token,
    )
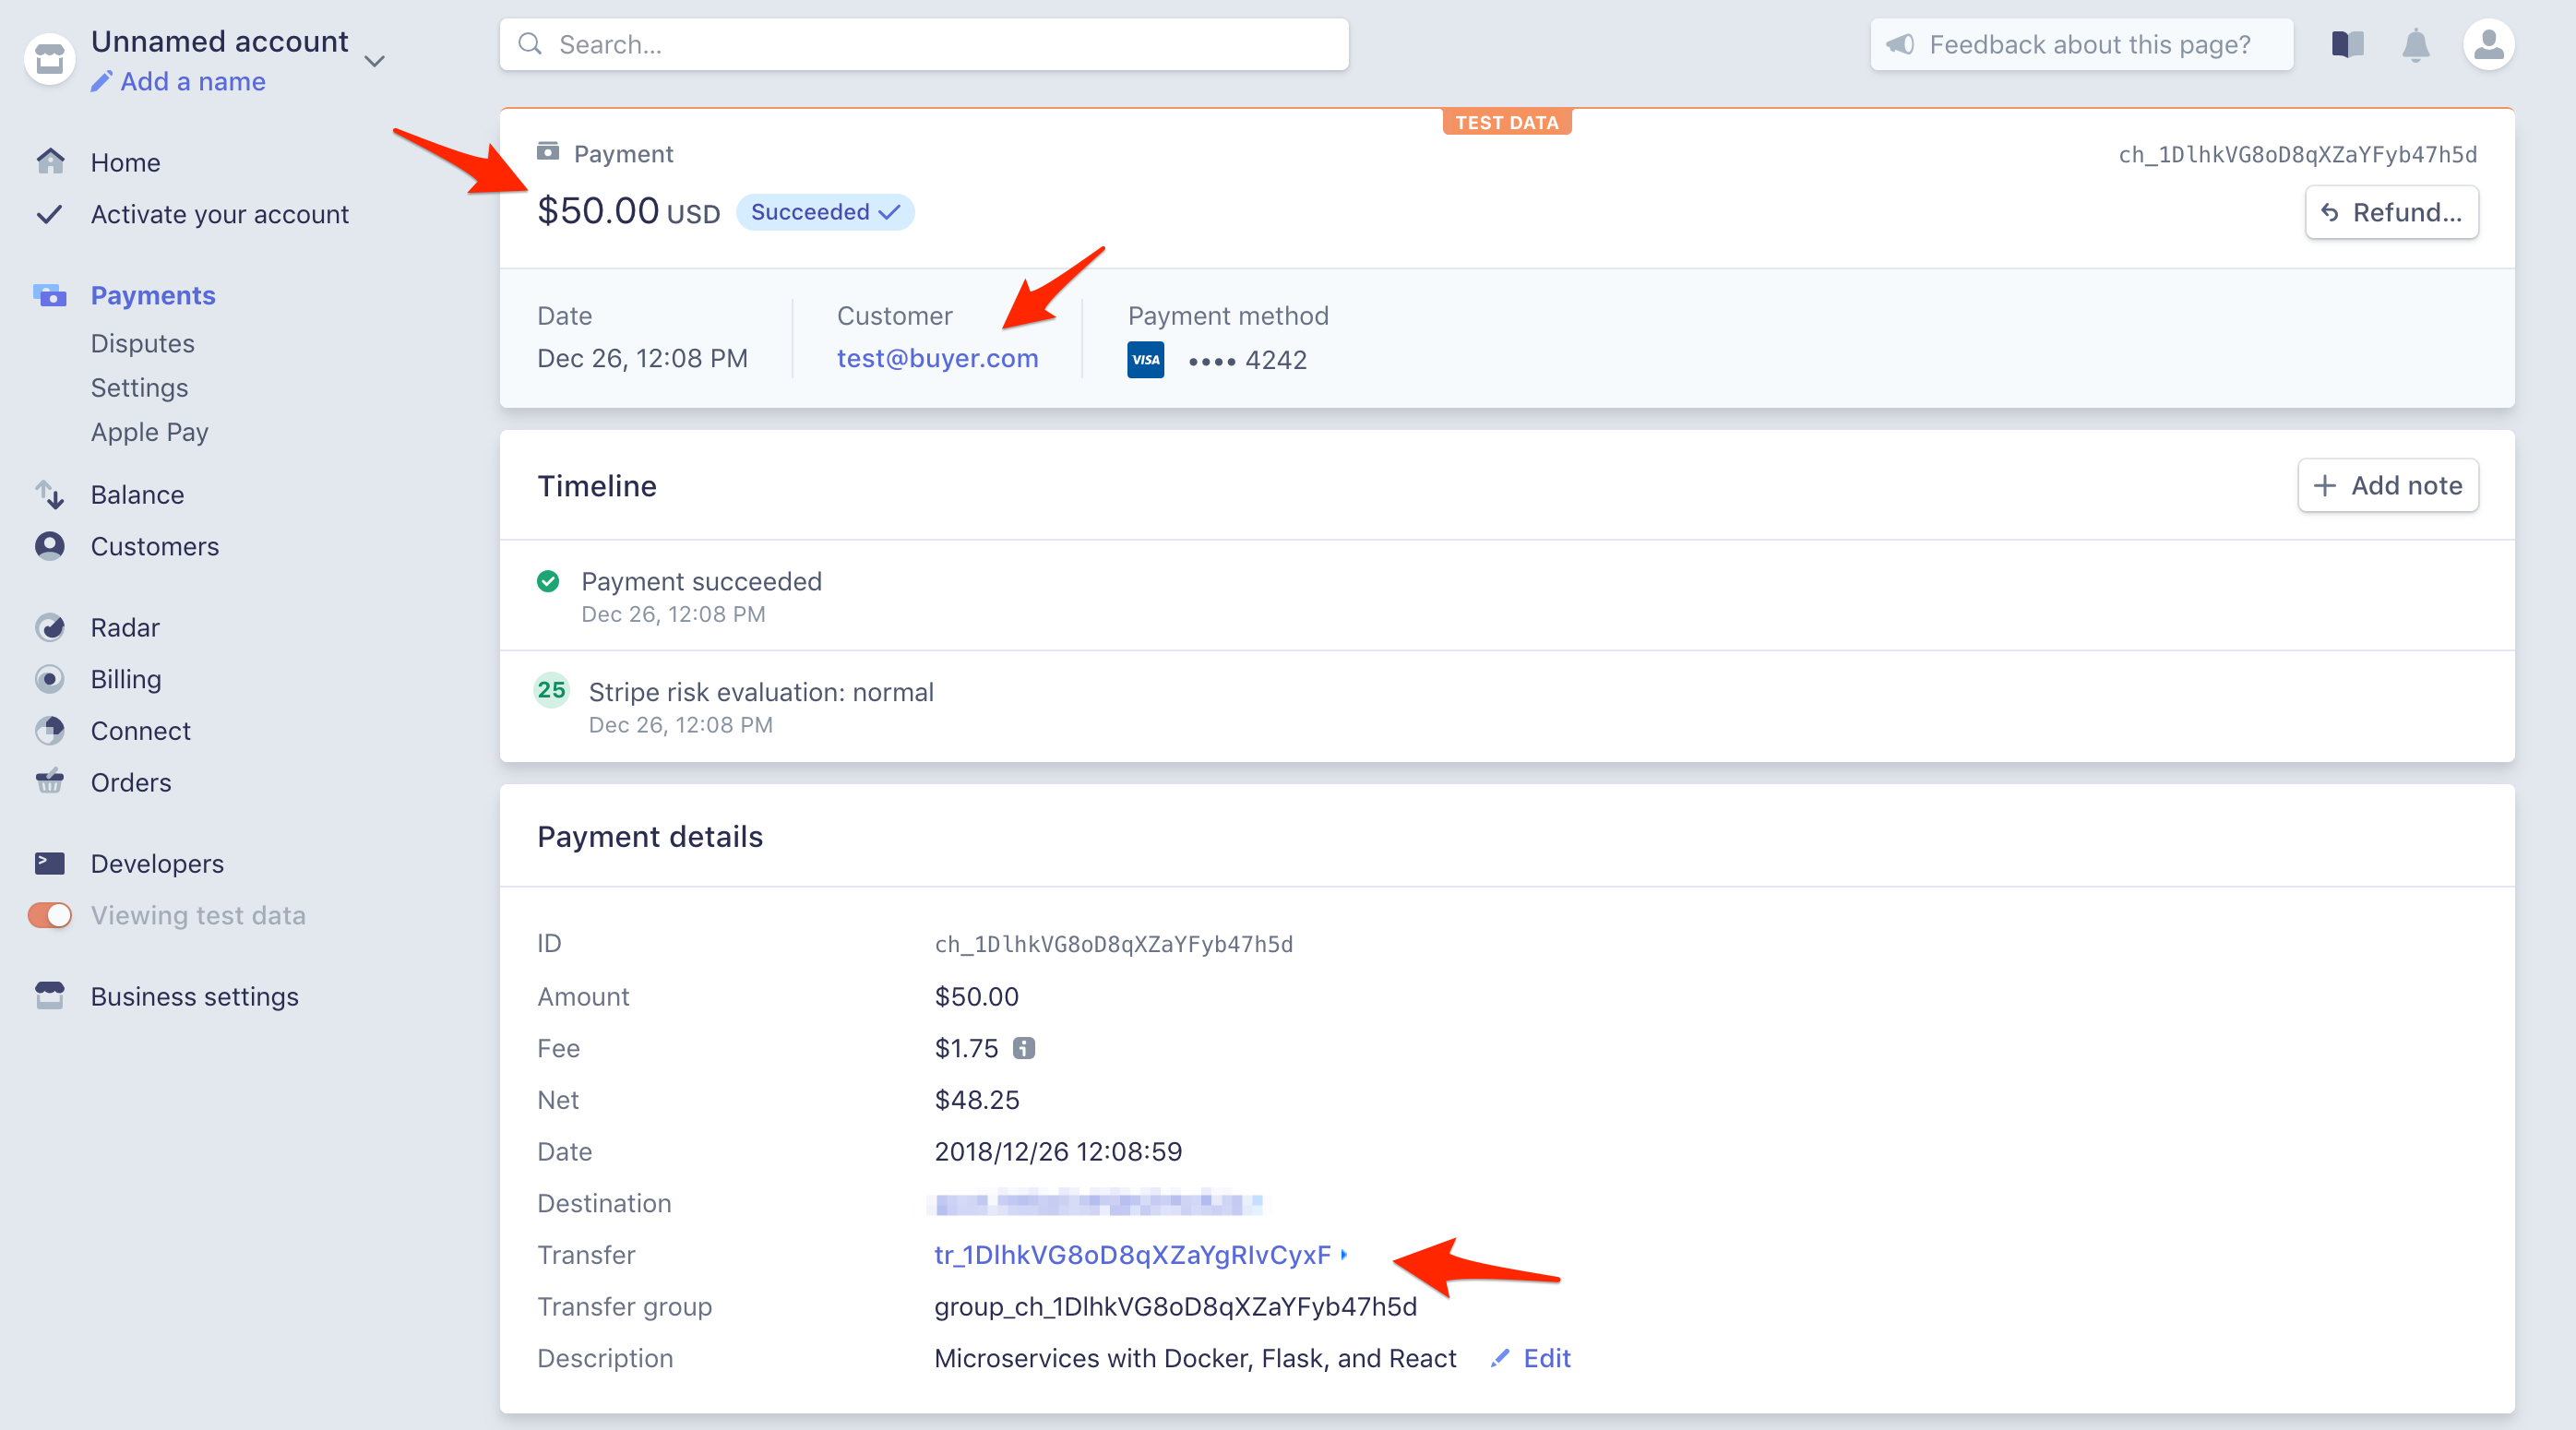
Test this out. This should create a customer and a charge on the platform. You should also see a transfer to the connected account:
Conclusion
This tutorial took you through the process of setting up Stripe Connect to securely manage payments on behalf of others.
You should now be able to:
- Explain what Stripe Connect is and why you may need to use it
- Describe the similarities and differences between the types of Stripe Connect accounts
- Integrate Stripe Connect into an existing Django app
- Link a Stripe account to your Django app using an Oauth-like flow
- Explain the differences between Direct and Destination charges
Looking for some challenges?
- Add a sign up form and a user account page
- Send emails asynchronously to the buyer and seller after a sale is made
- Experiment with Custom accounts in order to make the Stripe Connect integration seamless for end users
- Handle subscriptions
- Add a sales dashboard page for buyers
You can find the final code in the django-stripe-connect repo on GitHub. Cheers!