 Michael Herman
Let's look at how to spin up a Docker Swarm cluster on DigitalOcean and then configure a microservice, powered by Flask and Postgres, to run on it.
This is an intermediate-level tutorial. It assumes that you have basic working knowledge of Flask, Docker, and container orchestration. Review the following courses for more info on each of these tools and topics:
Docker dependencies:
- Docker v19.03.9
- Docker-Compose v1.27.4
- Docker-Machine v0.16.2
Contents
Objectives
By the end of this tutorial, you will be able to:
- Explain what container orchestration is and why you may need to use an orchestration tool
- Discuss the pros and cons of using Docker Swarm over other orchestration tools like Kubernetes and Elastic Container Service (ECS)
- Spin up a Flask-based microservice locally with Docker Compose
- Build Docker images and push them up to the Docker Hub image registry
- Provision hosts on DigitalOcean with Docker Machine
- Configure a Docker Swarm cluster to run on DigitalOcean
- Run Flask, Nginx, and Postgres on Docker Swarm
- Use a round robin algorithm to route traffic on a Swarm cluster
- Monitor a Swarm cluster with Docker Swarm Visualizer
- Use Docker Secrets to manage sensitive information within Docker Swarm
- Configure health checks to check the status of a service before it's added to a cluster
- Access the logs of a service running on a Swarm cluster
What is Container Orchestration?
As you move from deploying containers on a single machine to deploying them across a number of machines, you'll need an orchestration tool to manage (and automate) the arrangement, coordination, and availability of the containers across the entire system.
This is where Docker Swarm (or "Swarm mode") fits in along with a number of other orchestration tools -- like Kubernetes, ECS, Mesos, and Nomad.
Which one should you use?
- use Kubernetes if you need to manage large, complex clusters
- use Docker Swarm if you are just getting started and/or need to manage small to medium-sized clusters
- use ECS if you're already using a number of AWS services
| Tool | Pros | Cons |
|---|---|---|
| Kubernetes | large community, flexible, most features, hip | complex setup, high learning curve, hip |
| Docker Swarm | easy to set up, perfect for smaller clusters | limited by the Docker API |
| ECS | fully-managed service, integrated with AWS | vendor lock-in |
There's also a number of managed Kubernetes-based services on the market:
- Google Kubernetes Engine (GKE)
- Elastic Container Service (EKS)
- Azure Kubernetes Service (AKS)
For more, review the Choosing the Right Containerization and Cluster Management Tool article.
Project Setup
Clone down the base branch from the flask-docker-swarm repo:
$ git clone https://github.com/testdrivenio/flask-docker-swarm --branch base --single-branch
$ cd flask-docker-swarm
Build the images and spin up the containers locally:
$ docker-compose up -d --build
Create and seed the database users table:
$ docker-compose run web python manage.py recreate_db
$ docker-compose run web python manage.py seed_db
Test out the following URLs in your browser of choice.
{
  "container_id": "3c9dc22aa37a",
  "message": "pong!",
  "status": "success"
}
container_idis the ID of the Docker container the app is running in:$ docker ps --filter name=flask-docker-swarm-web --format "{{.ID}}" 3c9dc22aa37a
{
  "container_id": "3c9dc22aa37a",
  "status": "success",
  "users": [{
    "active": true,
    "admin": false,
    "email": "[email protected]",
    "id": 1,
    "username": "michael"
  }]
}
Take a quick look at the code before moving on:
├── README.md
├── docker-compose.yml
└── services
    ├── db
    │   ├── Dockerfile
    │   └── create.sql
    ├── nginx
    │   ├── Dockerfile
    │   └── prod.conf
    └── web
        ├── Dockerfile
        ├── manage.py
        ├── project
        │   ├── __init__.py
        │   ├── api
        │   │   ├── main.py
        │   │   ├── models.py
        │   │   └── users.py
        │   └── config.py
        └── requirements.txt
Docker Hub
Since Docker Swarm uses multiple Docker engines, we'll need to use a Docker image registry to distribute our three images to each of the engines. This tutorial uses the Docker Hub image registry but feel free to use a different registry service or run your own private registry within Swarm.
Create an account on Docker Hub, if you don't already have one, and then log in:
$ docker login
Build, tag, and push the images to Docker Hub:
$ docker build -t mjhea0/flask-docker-swarm_web:latest -f ./services/web/Dockerfile ./services/web
$ docker push mjhea0/flask-docker-swarm_web:latest

$ docker build -t mjhea0/flask-docker-swarm_db:latest -f ./services/db/Dockerfile ./services/db
$ docker push mjhea0/flask-docker-swarm_db:latest

$ docker build -t mjhea0/flask-docker-swarm_nginx:latest -f ./services/nginx/Dockerfile ./services/nginx
$ docker push mjhea0/flask-docker-swarm_nginx:latest
Be sure you replace
mjhea0with your namespace on Docker Hub.
Compose File
Moving on, let's set up a new Docker Compose file for use with Docker Swarm:
version: '3.8'

services:

  web:
    image: mjhea0/flask-docker-swarm_web:latest
    deploy:
      replicas: 1
      restart_policy:
        condition: on-failure
      placement:
        constraints: [node.role == worker]
    expose:
      - 5000
    environment:
      - FLASK_ENV=production
      - APP_SETTINGS=project.config.ProductionConfig
      - DB_USER=postgres
      - DB_PASSWORD=postgres
      - SECRET_CODE=myprecious
    depends_on:
      - db
    networks:
      - app

  db:
    image: mjhea0/flask-docker-swarm_db:latest
    deploy:
      replicas: 1
      restart_policy:
        condition: on-failure
      placement:
        constraints: [node.role == manager]
    volumes:
      - data-volume:/var/lib/postgresql/data
    expose:
      - 5432
    environment:
      - POSTGRES_USER=postgres
      - POSTGRES_PASSWORD=postgres
    networks:
      - app

  nginx:
    image: mjhea0/flask-docker-swarm_nginx:latest
    deploy:
      replicas: 1
      restart_policy:
        condition: on-failure
      placement:
        constraints: [node.role == worker]
    ports:
      - 80:80
    depends_on:
      - web
    networks:
      - app

networks:
  app:
    driver: overlay

volumes:
  data-volume:
    driver: local
Save this file as docker-compose-swarm.yml in the project root. Take note of the differences between the two compose files:
- Image: Instead of referencing the local build directory, we are now using an image to set the context.
- Deploy: We added a deploy keyword to configure the number of replicas, restart polices, and placement constraints for each service. Refer to the official documentation for more info on setting up your compose file for Docker Swarm.
- Network: We are now using an overlay network to connect multiple Docker engines across each host and enable communication between Swarm services.
Docker Swarm
Sign up for a DigitalOcean account (if you don’t already have one), and then generate an access token so you can access the DigitalOcean API.
Add the token to your environment:
$ export DIGITAL_OCEAN_ACCESS_TOKEN=[your_digital_ocean_token]
Spin up four DigitalOcean droplets:
$ for i in 1 2 3 4; do
    docker-machine create \
      --driver digitalocean \
      --digitalocean-access-token $DIGITAL_OCEAN_ACCESS_TOKEN \
      --digitalocean-region "nyc1" \
      --digitalocean-image "debian-10-x64" \
      --digitalocean-size "s-4vcpu-8gb" \
      --engine-install-url "https://releases.rancher.com/install-docker/19.03.9.sh" \
      node-$i;
  done
--engine-install-urlis required since, as of writing, Docker v20.10.0 doesn't work with Docker Machine.
This will take a few minutes. Once complete, initialize Swarm mode on node-1:
$ docker-machine ssh node-1 -- docker swarm init --advertise-addr $(docker-machine ip node-1)
Grab the join token from the output of the previous command, and then add the remaining nodes to the Swarm as workers:
$ for i in 2 3 4; do
    docker-machine ssh node-$i \
      -- docker swarm join --token YOUR_JOIN_TOKEN;
  done
Point the Docker daemon at node-1 and deploy the stack:
$ eval $(docker-machine env node-1)
$ docker stack deploy --compose-file=docker-compose-swarm.yml flask
List out the services in the stack:
$ docker stack ps -f "desired-state=running" flask
You should see something similar to:
ID              NAME            IMAGE                                    NODE         DESIRED STATE       CURRENT STATE
uz84le3651f8    flask_nginx.1   mjhea0/flask-docker-swarm_nginx:latest   node-3       Running             Running 23 seconds ago
nv365bhsoek1    flask_web.1     mjhea0/flask-docker-swarm_web:latest     node-2       Running             Running 32 seconds ago
uyl11jk2h71d    flask_db.1      mjhea0/flask-docker-swarm_db:latest      node-1       Running             Running 38 seconds ago
Now, to update the database based on the schema provided in the web service, we first need to point the Docker daemon at the node that flask_web is running on:
$ NODE=$(docker service ps -f "desired-state=running" --format "{{.Node}}" flask_web)
$ eval $(docker-machine env $NODE)
Assign the container ID for flask_web to a variable:
$ CONTAINER_ID=$(docker ps --filter name=flask_web --format "{{.ID}}")
Create the database table and apply the seed:
$ docker container exec -it $CONTAINER_ID python manage.py recreate_db
$ docker container exec -it $CONTAINER_ID python manage.py seed_db
Finally, point the Docker daemon back at node-1 and retrieve the IP associated with the machine that flask_nginx is running on:
$ eval $(docker-machine env node-1)
$ docker-machine ip $(docker service ps -f "desired-state=running" --format "{{.Node}}" flask_nginx)
Test out the endpoints:
Let's add another web app to the cluster:
$ docker service scale flask_web=2

flask_web scaled to 2
overall progress: 2 out of 2 tasks
1/2: running   [==================================================>]
2/2: running   [==================================================>]
verify: Service converged
Confirm that the service did in fact scale:
$ docker stack ps -f "desired-state=running" flask

ID              NAME            IMAGE                                    NODE         DESIRED STATE       CURRENT STATE
uz84le3651f8    flask_nginx.1   mjhea0/flask-docker-swarm_nginx:latest   node-3       Running             Running 7 minutes ago
nv365bhsoek1    flask_web.1     mjhea0/flask-docker-swarm_web:latest     node-2       Running             Running 7 minutes ago
uyl11jk2h71d    flask_db.1      mjhea0/flask-docker-swarm_db:latest      node-1       Running             Running 7 minutes ago
n8ld0xkm3pd0    flask_web.2     mjhea0/flask-docker-swarm_web:latest     node-4       Running             Running 7 seconds ago
Make a few requests to the service:
$ for ((i=1;i<=10;i++)); do curl http://YOUR_MACHINE_IP/ping; done
You should see different container_ids being returned, indicating that requests are being routed appropriately via a round robin algorithm between the two replicas:
{"container_id":"3e984eb707ea","message":"pong!","status":"success"}
{"container_id":"e47de2a13a2e","message":"pong!","status":"success"}
{"container_id":"3e984eb707ea","message":"pong!","status":"success"}
{"container_id":"e47de2a13a2e","message":"pong!","status":"success"}
{"container_id":"3e984eb707ea","message":"pong!","status":"success"}
{"container_id":"e47de2a13a2e","message":"pong!","status":"success"}
{"container_id":"3e984eb707ea","message":"pong!","status":"success"}
{"container_id":"e47de2a13a2e","message":"pong!","status":"success"}
{"container_id":"3e984eb707ea","message":"pong!","status":"success"}
{"container_id":"e47de2a13a2e","message":"pong!","status":"success"}
What happens if we scale in as traffic is hitting the cluster?
Traffic is re-routed appropriately. Try this again, but this time scale out.
Docker Swarm Visualizer
Docker Swarm Visualizer is an open source tool designed to monitor a Docker Swarm cluster.
Add the service to docker-compose-swarm.yml:
visualizer:
  image: dockersamples/visualizer:latest
  ports:
    - 8080:8080
  volumes:
    - "/var/run/docker.sock:/var/run/docker.sock"
  deploy:
    placement:
      constraints: [node.role == manager]
  networks:
    - app
Point the Docker daemon at node-1 and update the stack:
$ eval $(docker-machine env node-1)
$ docker stack deploy --compose-file=docker-compose-swarm.yml flask
It could take a minute or two for the visualizer to spin up. Navigate to http://YOUR_MACHINE_IP:8080 to view the dashboard:
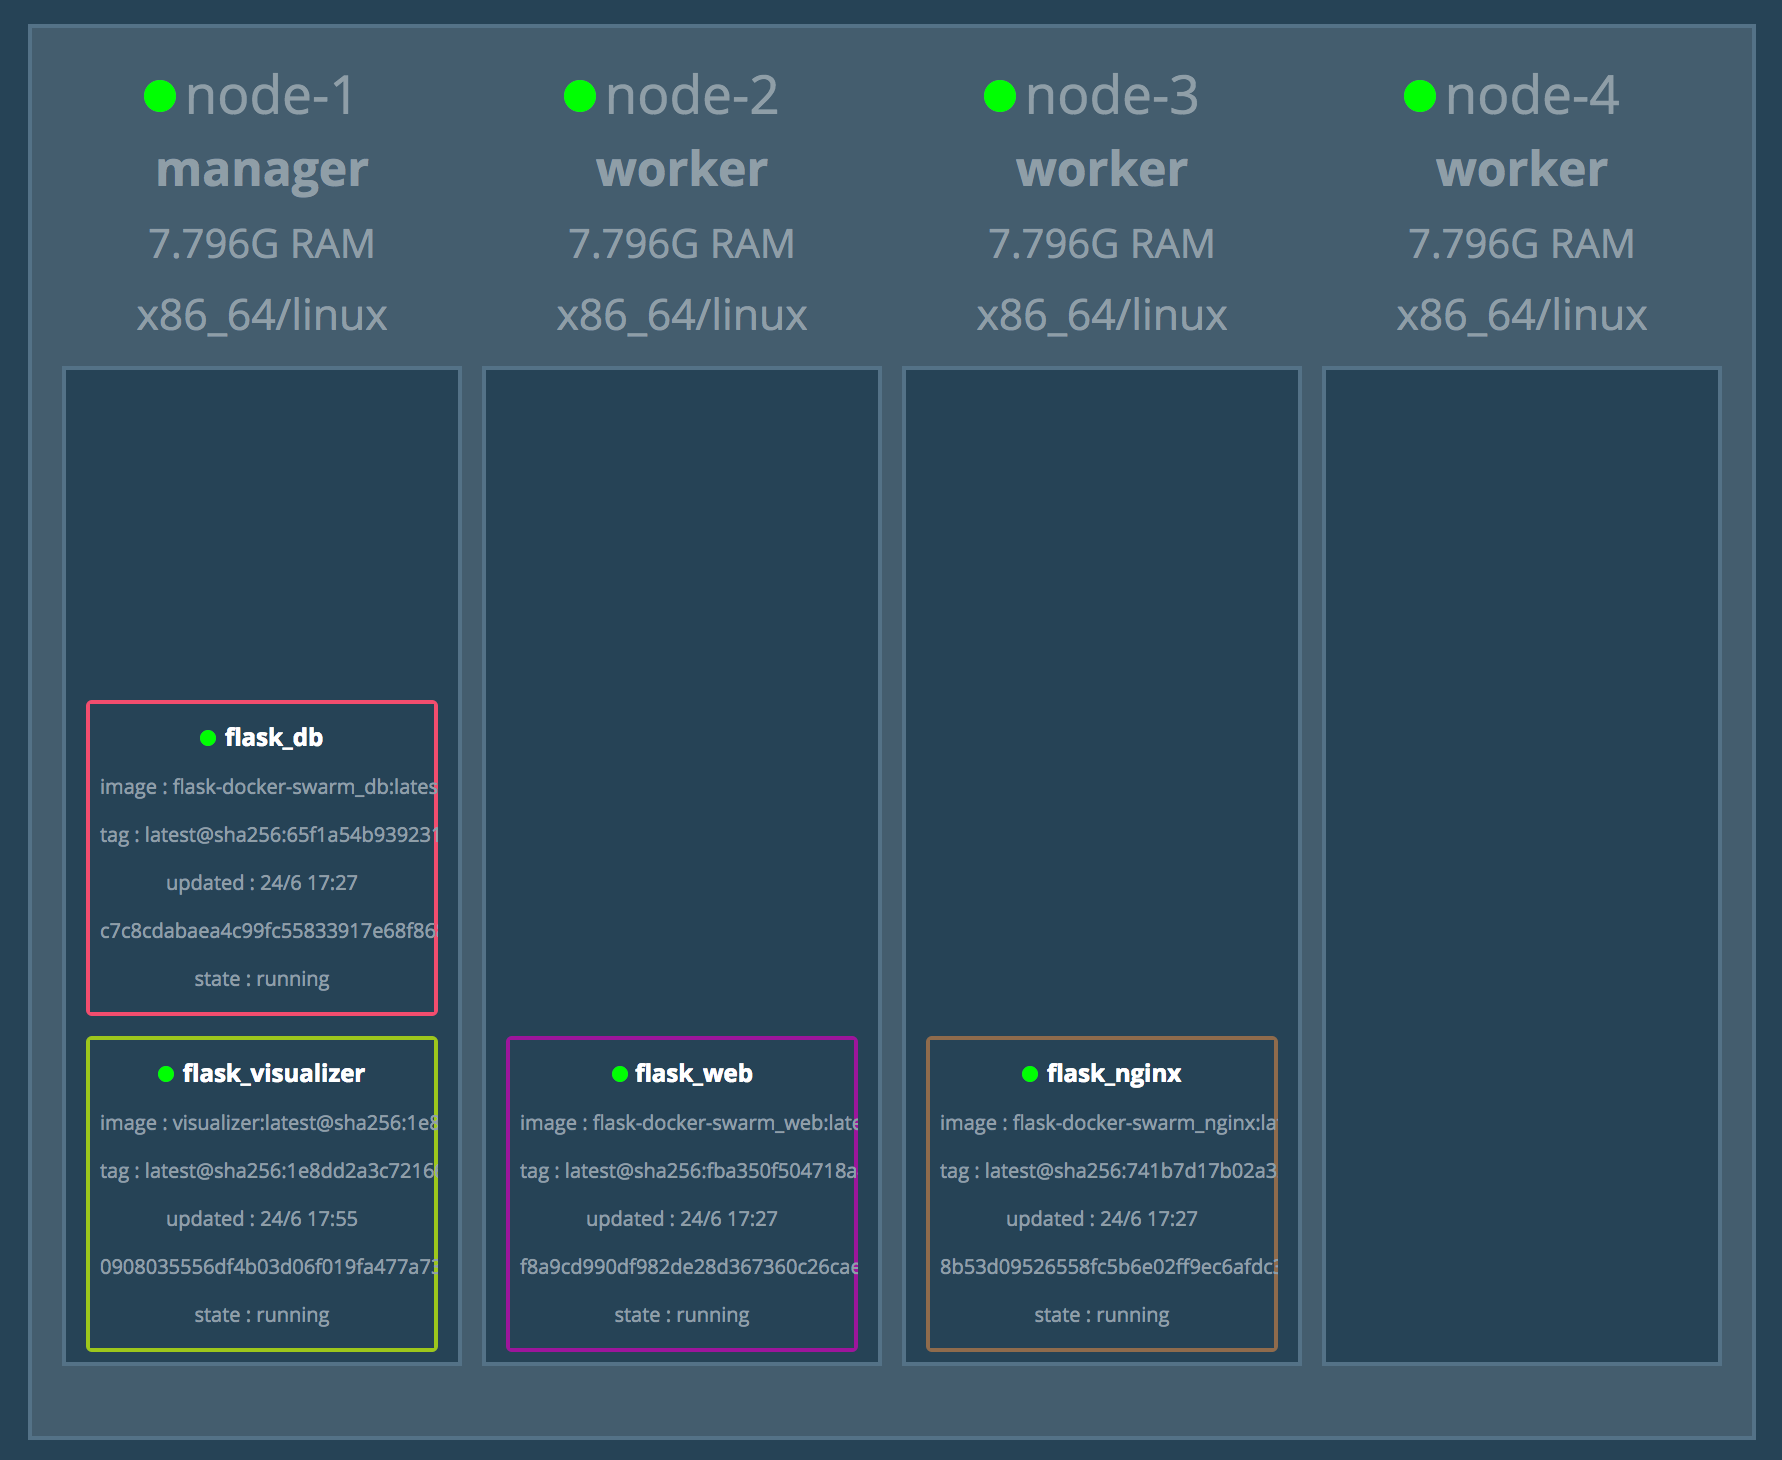
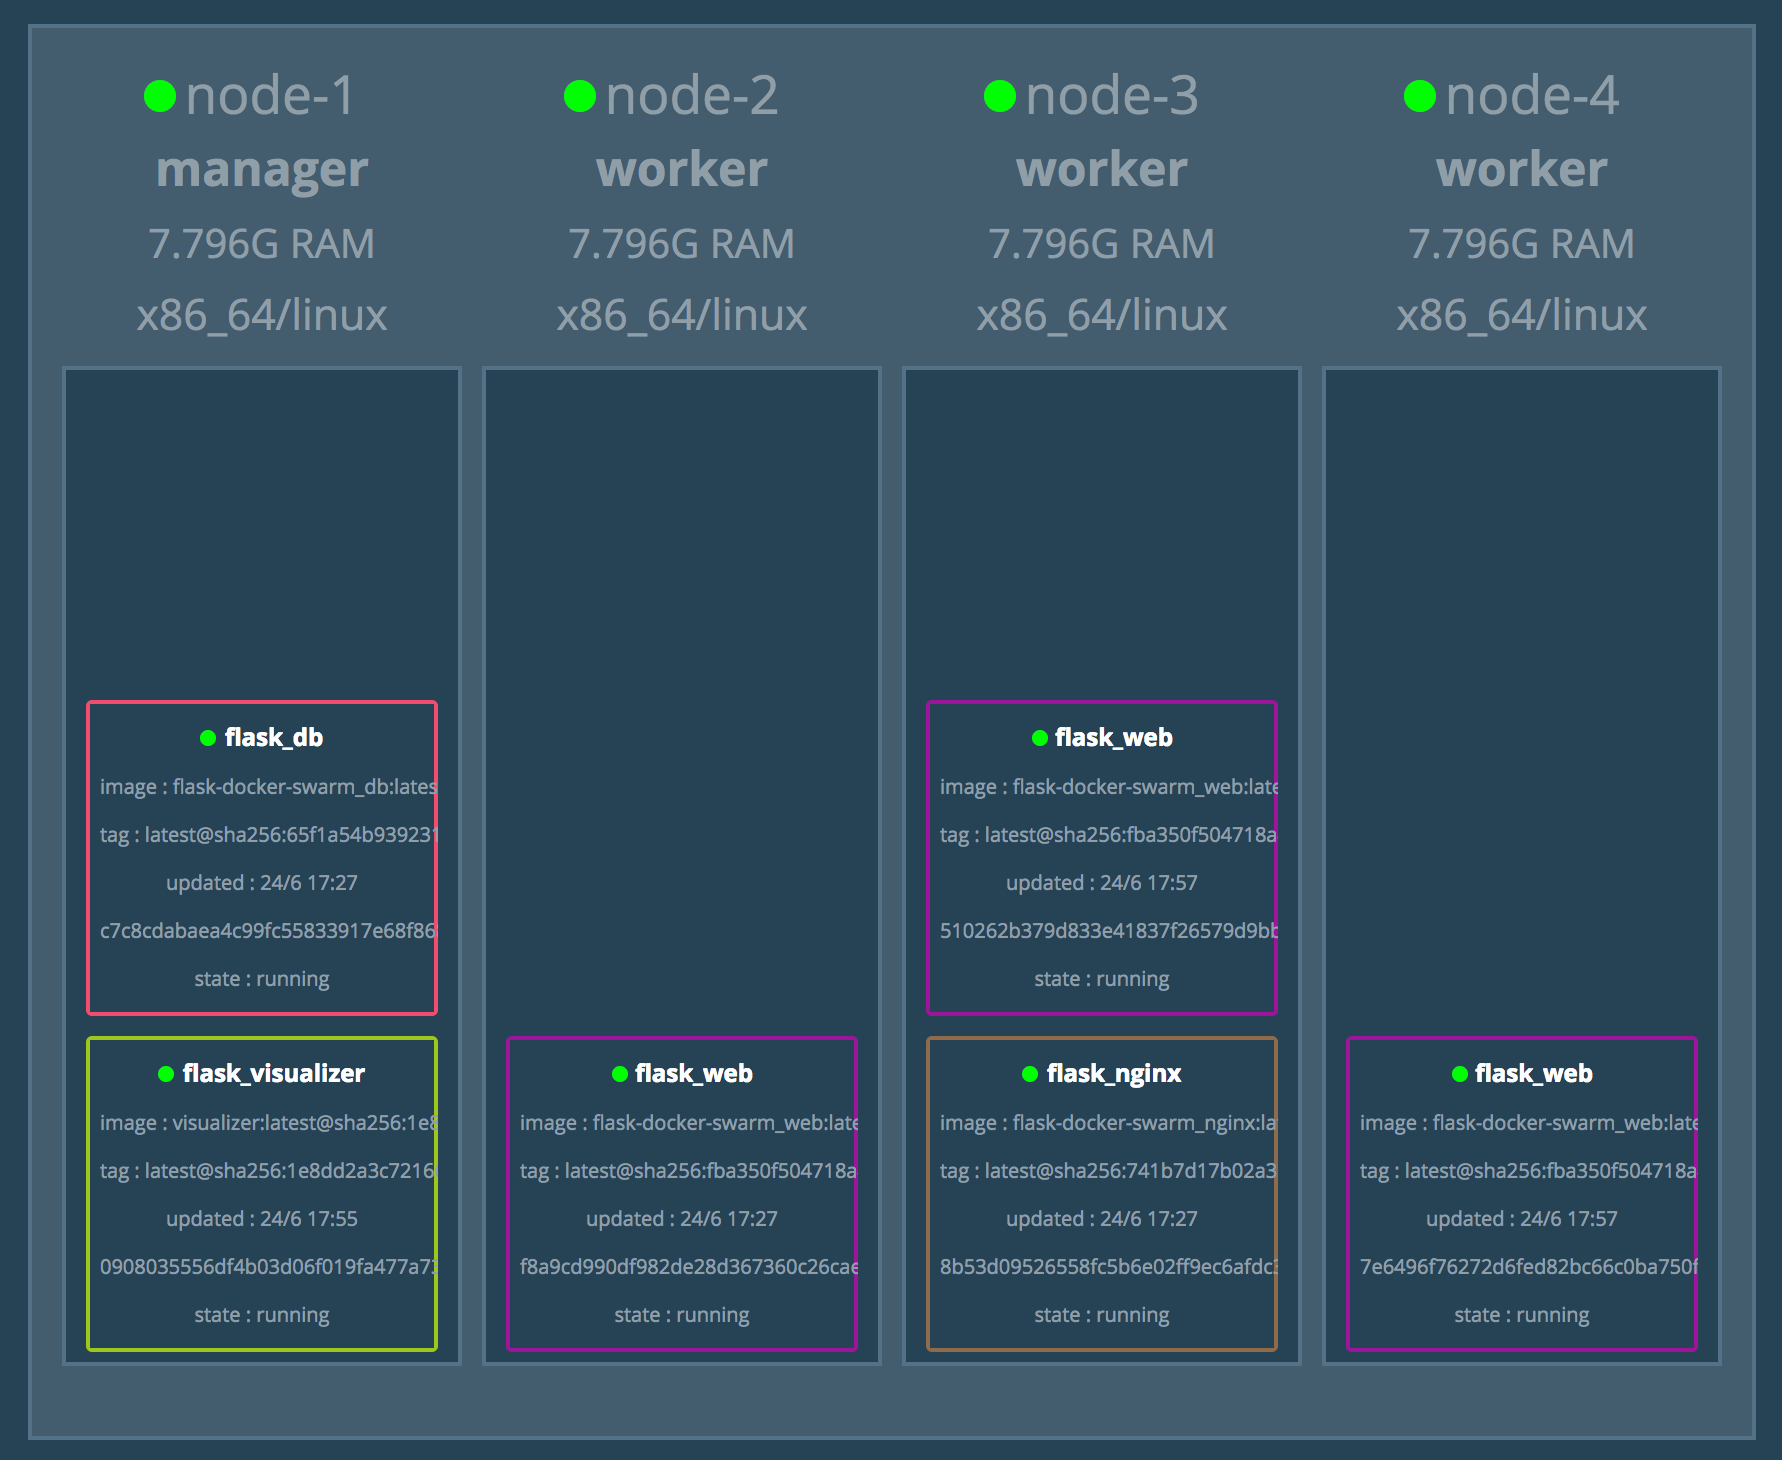
Add two more replicas of flask_web:
$ docker service scale flask_web=3
Docker Secrets
Docker Secrets is a secrets management tool specifically designed for Docker Swarm. With it you can easily distribute sensitive info (like usernames and passwords, SSH keys, SSL certificates, API tokens, etc.) across the cluster.
Docker can read secrets from either its own database (external mode) or from a local file (file mode). We'll look at the former.
In the services/web/project/api/main.py file, take note of the /secret route. If the secret in the request payload is the same as the SECRET_CODE variable, a message in the response payload will be equal to yay!. Otherwise, it will equal nay!.
# yay
{
  "container_id": "6f91a81a6357",
  "message": "yay!",
  "status": "success"
}

# nay
{
  "container_id": "6f91a81a6357",
  "message": "nay!",
  "status": "success"
}
Test out the /secret endpoint in the terminal:
$ curl -X POST http://YOUR_MACHINE_IP/secret \
    -d '{"secret": "myprecious"}' \
    -H 'Content-Type: application/json'
You should see:
{
  "container_id": "6f91a81a6357",
  "message": "yay!",
  "status": "success"
}
Let's update the SECRET_CODE, so that it's being set by a Docker Secret rather than an environment variable. Start by creating a new secret from the manager node:
$ eval $(docker-machine env node-1)
$ echo "foobar" | docker secret create secret_code -
Confirm that it was created:
$ docker secret ls
You should see something like:
ID                          NAME             DRIVER    CREATED             UPDATED
za3pg2cbbf92gi9u1v0af16e3   secret_code                15 seconds ago      15 seconds ago
Next, remove the SECRET_CODE environment variable and add the secrets config to the web service in docker-compose-swarm-yml:
web:
  image: mjhea0/flask-docker-swarm_web:latest
  deploy:
    replicas: 1
    restart_policy:
      condition: on-failure
    placement:
      constraints: [node.role == worker]
  expose:
    - 5000
  environment:
    - FLASK_ENV=production
    - APP_SETTINGS=project.config.ProductionConfig
    - DB_USER=postgres
    - DB_PASSWORD=postgres
  secrets:
    - secret_code
  depends_on:
    - db
  networks:
    - app
At the bottom of the file, define the source of the secret, as external, just below the volumes declaration:
secrets:
  secret_code:
    external: true
That's it. We can gain access to this secret within the Flask App.
Review the secrets configuration reference guide as well as this Stack Overflow answer for more info on both external and file-based secrets.
Turn back to services/web/project/api/main.py.
Change:
SECRET_CODE = os.environ.get("SECRET_CODE")
To:
SECRET_CODE = open("/run/secrets/secret_code", "r").read().strip()
Reset the Docker environment back to localhost:
$ eval $(docker-machine env -u)
Re-build the image and push the new version to Docker Hub:
$ docker build -t mjhea0/flask-docker-swarm_web:latest -f ./services/web/Dockerfile ./services/web
$ docker push mjhea0/flask-docker-swarm_web:latest
Point the daemon back at the manager, and then update the service:
$ eval $(docker-machine env node-1)
$ docker stack deploy --compose-file=docker-compose-swarm.yml flask
For more on defining secrets in a compose file, refer to the the Use Secrets in Compose section of the docs.
Test it out again:
$ curl -X POST http://YOUR_MACHINE_IP/secret \
    -d '{"secret": "foobar"}' \
    -H 'Content-Type: application/json'

{
  "container_id": "6f91a81a6357",
  "message": "yay!",
  "status": "success"
}
Looking for a challenge? Try using Docker Secrets to manage the database credentials rather than defining them directly in the compose file.
Health Checks
In a production environment you should use health checks to test whether a specific container is working as expected before routing traffic to it. In our case, we can use a health check to ensure that the Flask app (and the API) is up and running; otherwise, we could run into a situation where a new container is spun up and added to the cluster that appears to be healthy when in fact the app is actually down and not able to handle traffic.
You can add health checks to either a Dockerfile or to a compose file. We'll look at the latter.
Curious about how to add health checks to a Dockerfile? Review the health check instruction from the official docs.
It's worth noting that the health check settings defined in a compose file will override the settings from a Dockerfile.
Update the web service in docker-compose-swarm.yml like so:
web:
  image: mjhea0/flask-docker-swarm_web:latest
  deploy:
    replicas: 1
    restart_policy:
      condition: on-failure
    placement:
      constraints: [node.role == worker]
  expose:
    - 5000
  environment:
    - FLASK_ENV=production
    - APP_SETTINGS=project.config.ProductionConfig
    - DB_USER=postgres
    - DB_PASSWORD=postgres
  secrets:
    - secret_code
  depends_on:
    - db
  networks:
    - app
  healthcheck:
    test: curl --fail http://localhost:5000/ping || exit 1
    interval: 10s
    timeout: 2s
    retries: 5
Options:
testis the actual command that will be run to check the health status. It should return0if healthy or1if unhealthy. For this to work, the curl command must be available in the container.- After the container starts,
intervalcontrols when the first health check runs and how often it runs from there on out. retriessets how many times the health check will retry a failed check before the container is considered unhealthy.- If a single health check takes longer than the time defined in the
timeoutthat run will be considered a failure.
Before we can test the health check, we need to add curl to the container. Remember: The command you use for the health check needs to be available inside the container.
Update the Dockerfile like so:
###########
# BUILDER #
###########

# Base Image
FROM python:3.12 as builder

# Lint
RUN pip install flake8==6.1.0 black==23.10.1
WORKDIR /home/app
COPY project ./project
COPY manage.py .
RUN flake8 --ignore=E501 .
RUN black --check .

# Install Requirements
COPY requirements.txt .
RUN pip wheel --no-cache-dir --no-deps --wheel-dir /home/app/wheels -r requirements.txt


#########
# FINAL #
#########

# Base Image
FROM python:3.12-slim

# ----- NEW ----
# Install curl
RUN apt-get update && apt-get install -y curl

# Create directory for the app user
RUN mkdir -p /home/app

# Create the app user
RUN groupadd app && useradd -g app app

# Create the home directory
ENV HOME=/home/app
ENV APP_HOME=/home/app/web
RUN mkdir $APP_HOME
WORKDIR $APP_HOME

# Install Requirements
COPY --from=builder /home/app/wheels /wheels
COPY --from=builder /home/app/requirements.txt .
RUN pip install --no-cache /wheels/*

# Copy in the Flask code
COPY . $APP_HOME

# Chown all the files to the app user
RUN chown -R app:app $APP_HOME

# Change to the app user
USER app

# run server
CMD gunicorn --log-level=debug -b 0.0.0.0:5000 manage:app
Again, reset the Docker environment:
$ eval $(docker-machine env -u)
Build and push the new image:
$ docker build -t mjhea0/flask-docker-swarm_web:latest -f ./services/web/Dockerfile ./services/web
$ docker push mjhea0/flask-docker-swarm_web:latest
Update the service:
$ eval $(docker-machine env node-1)
$ docker stack deploy --compose-file=docker-compose-swarm.yml flask
Then, find the node that the flask_web service is on:
$ docker service ps flask_web
Point the daemon at that node:
$ eval $(docker-machine env <NODE>)
Make sure to replace
<NODE>with the actual node -- e.g.,node-2,node-3, ornode-4.
Grab the container ID:
$ docker ps
Then run:
$ docker inspect --format='{{json .State.Health}}' <CONTAINER_ID>
You should see something like:
{
  "Status": "healthy",
  "FailingStreak": 0,
  "Log": [
    {
      "Start": "2021-02-23T03:31:44.886509504Z",
      "End": "2021-02-23T03:31:45.104507568Z",
      "ExitCode": 0,
      "Output": "  % Total    % Received % Xferd  Average Speed   Time    Time     Time  Current\n                                 Dload  Upload   Total   Spent    Left  Speed\n\r  0     0    0     0    0     0      0      0 --:--:-- --:--:-- --:--:--     0\r100    69  100    69    0     0  11629      0 --:--:-- --:--:-- --:--:-- 13800\n{\"container_id\":\"a6127b1f469d\",\"message\":\"pong!\",\"status\":\"success\"}\n"
    }
  ]
}
Want to see a failing health check? Update the test command in docker-compose-swarm.yml to ping port 5001 instead of 5000:
healthcheck:
  test: curl --fail http://localhost:5001/ping || exit 1
  interval: 10s
  timeout: 2s
  retries: 5
Just like before, update the service and then find the node and container id that the flask_web service is on. Then, run:
$ docker inspect --format='{{json .State.Health}}' <CONTAINER_ID>
You should see something like:
{
  "Status": "starting",
  "FailingStreak": 1,
  "Log": [
    {
      "Start": "2021-02-23T03:34:39.644618421Z",
      "End": "2021-02-23T03:34:39.784855122Z",
      "ExitCode": 1,
      "Output": "  % Total    % Received % Xferd  Average Speed   Time    Time     Time  Current\n                                 Dload  Upload   Total   Spent    Left  Speed\n\r  0     0    0     0    0     0      0      0 --:--:-- --:--:-- --:--:--     0curl: (7) Failed to connect to localhost port 5001: Connection refused\n"
    }
  ]
}
The service should be down in the Docker Swarm Visualizer dashboard as well.
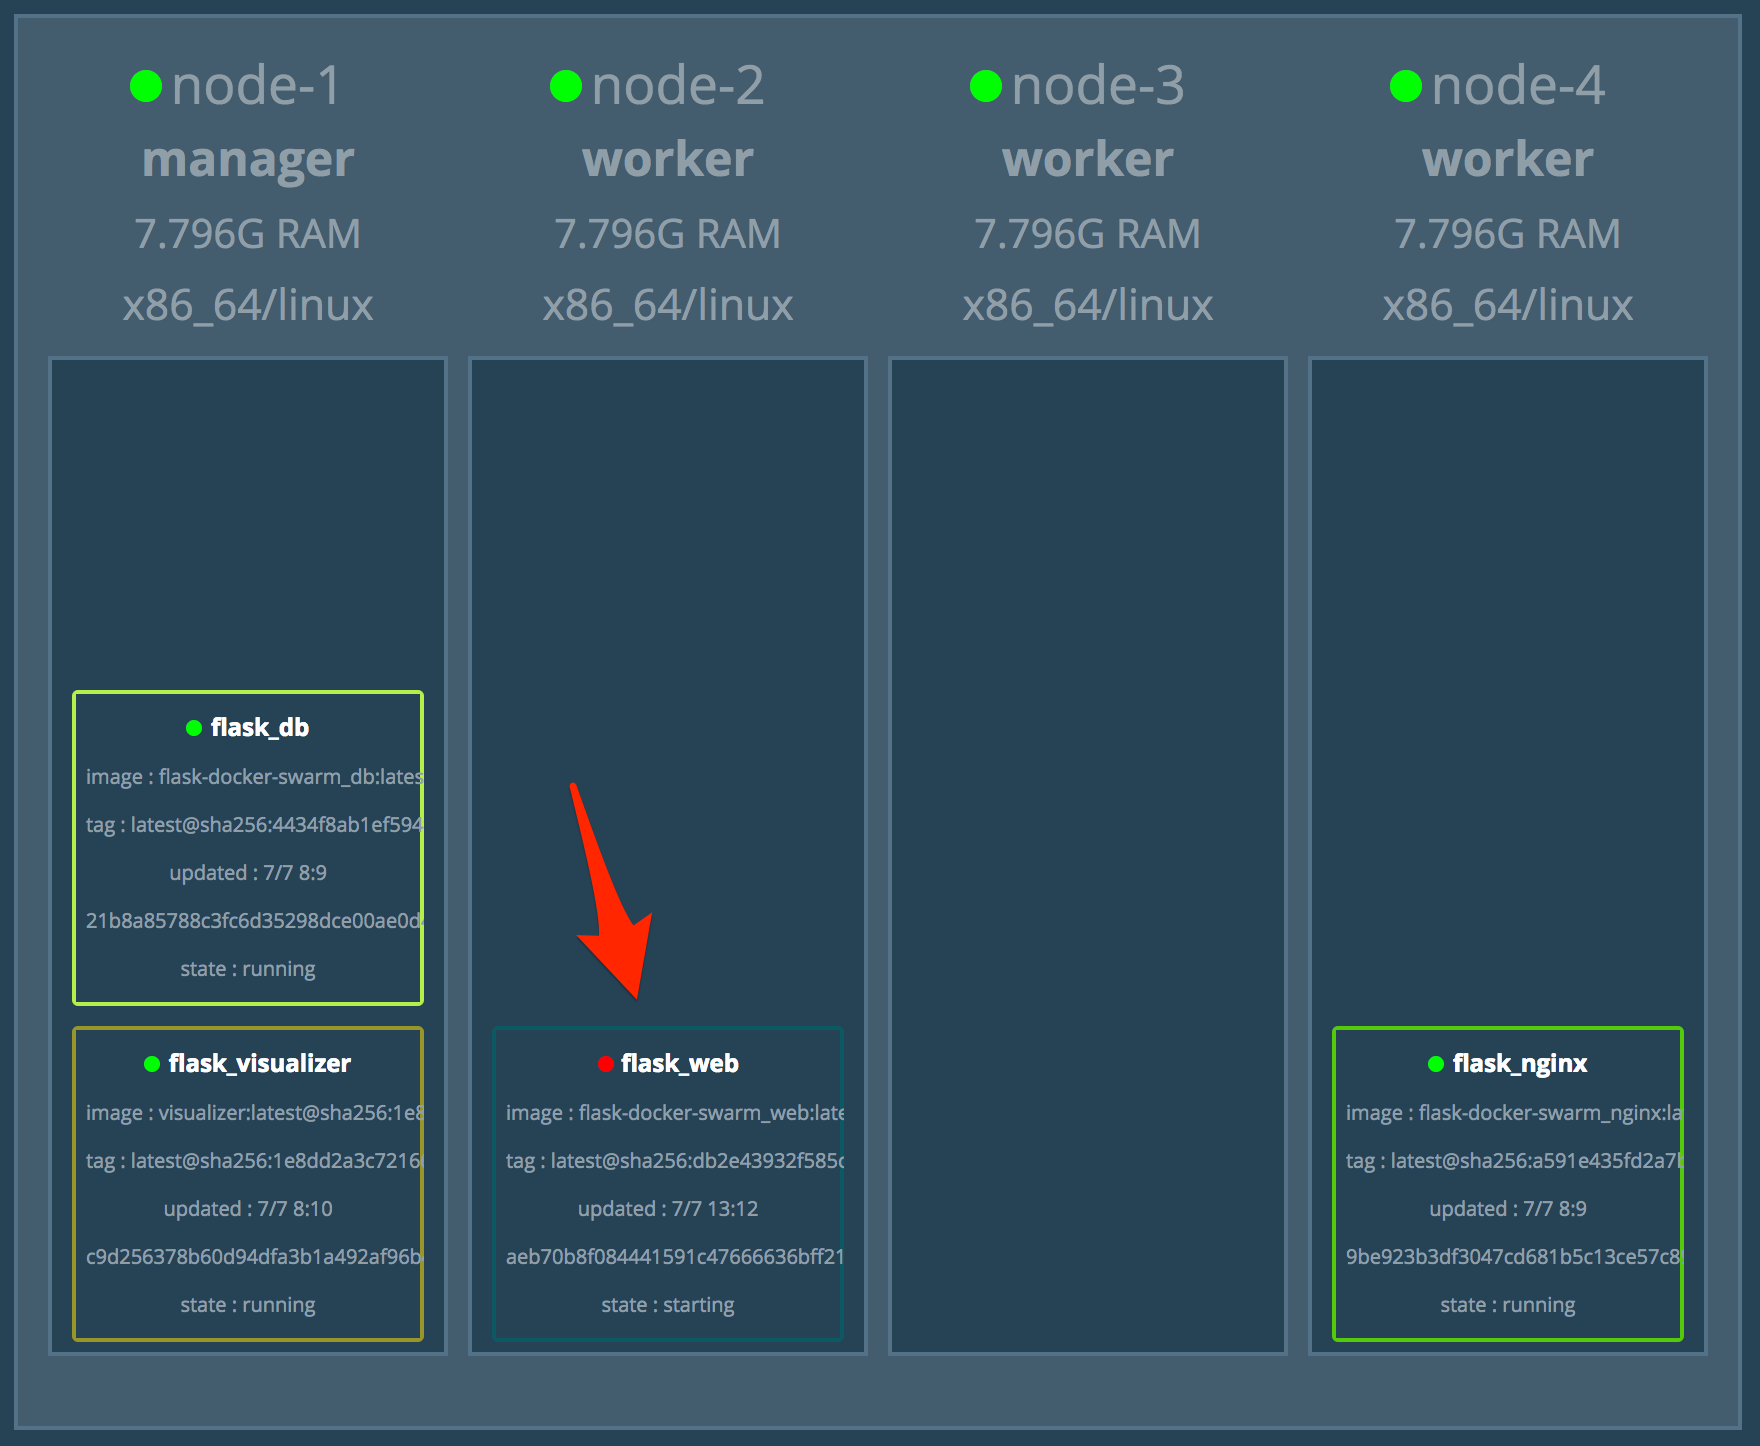
Update the health check and the service. Make sure all is well before moving on.
Logging
When working with a distributed system it's important to set up proper logging and monitoring so you can gain insight into what's happening when things go wrong. We've already set up the Docker Swarm Visualizer tool to help with monitoring, but much more can be done.
In terms of logging, you can run the following command (from the node manager) to access the logs of a service running on multiple nodes:
$ docker service logs -f SERVICE_NAME
Review the docs to learn more about the logs command as well as how to configure the default logging driver.
Try it out:
$ eval $(docker-machine env node-1)
$ docker service logs -f flask_web
You'll probably want to aggregate log events from each service to help make analysis and visualization easier. One popular approach is to set up an ELK (Elasticsearch, Logstash, and Kibana) stack in the Swarm cluster. This is beyond the scope of this tutorial, but take a look at the following resources for help on this:
- Centralized Logging with the ELK Stack
- Example of a Docker Swarm ELK Stack
- Docker Examples of the Elastic Stack
Finally, Prometheus (along with its de-facto GUI Grafana) is a powerful monitoring solution. Check out Docker Swarm instrumentation with Prometheus for more info.
All done?
Bring down the stack and remove the nodes:
$ docker stack rm flask
$ docker-machine rm node-1 node-2 node-3 node-4 -y
Automation Script
Ready to put everything together? Let’s write a script that will:
- Provision the droplets with Docker Machine
- Configure Docker Swarm mode
- Add nodes to the Swarm
- Create a new Docker Secret
- Deploy the Flask microservice
- Create the database table and apply the seed
Add a new file called deploy.sh to the project root:
#!/bin/bash


echo "Spinning up four droplets..."

for i in 1 2 3 4; do
  docker-machine create \
    --driver digitalocean \
    --digitalocean-access-token $DIGITAL_OCEAN_ACCESS_TOKEN \
    --digitalocean-region "nyc1" \
    --digitalocean-image "debian-10-x64" \
    --digitalocean-size "s-4vcpu-8gb" \
    --engine-install-url "https://releases.rancher.com/install-docker/19.03.9.sh" \
    node-$i;
done


echo "Initializing Swarm mode..."

docker-machine ssh node-1 -- docker swarm init --advertise-addr $(docker-machine ip node-1)


echo "Adding the nodes to the Swarm..."

TOKEN=`docker-machine ssh node-1 docker swarm join-token worker | grep token | awk '{ print $5 }'`

for i in 2 3 4; do
  docker-machine ssh node-$i \
    -- docker swarm join --token ${TOKEN} $(docker-machine ip node-1):2377;
done


echo "Creating secret..."

eval $(docker-machine env node-1)
echo "foobar" | docker secret create secret_code -


echo "Deploying the Flask microservice..."

docker stack deploy --compose-file=docker-compose-swarm.yml flask


echo "Create the DB table and apply the seed..."

sleep 15
NODE=$(docker service ps -f "desired-state=running" --format "{{.Node}}" flask_web)
eval $(docker-machine env $NODE)
CONTAINER_ID=$(docker ps --filter name=flask_web --format "{{.ID}}")
docker container exec -it $CONTAINER_ID python manage.py recreate_db
docker container exec -it $CONTAINER_ID python manage.py seed_db


echo "Get the IP address..."
eval $(docker-machine env node-1)
docker-machine ip $(docker service ps -f "desired-state=running" --format "{{.Node}}" flask_nginx)
Try it out!
$ sh deploy.sh
Bring down the droplets once done:
$ docker-machine rm node-1 node-2 node-3 node-4 -y
Conclusion
In this tutorial we looked at how to run a Flask app on DigitalOcean via Docker Swarm.
At this point, you should understand how Docker Swarm works and be able to deploy a cluster with an app running on it. Make sure you dive into some of the more advanced topics like logging, monitoring, and using rolling updates to enable zero-downtime deployments before using Docker Swarm in production.
You can find the code in the flask-docker-swarm repo on GitHub.