In this article, we'll first look at what OAuth is. Then, we'll use the OAuthLib and Requests libraries to implement OAuth2.
Contents
Objectives
By the end of this article, you will be able to:
- Explain what OAuth and OAuth2 are and how they can be used
- Describe the OAuth2 flow between a web client and server
- Implement OAuth2 via the Web Application Flow (also known as the Authorization Code Grant)
What is OAuth?
OAuth is a secure open protocol for authorizing users between unrelated services. Put another way, it enables one service to access resources hosted on other services without having to share user credentials, like username and password.
It's all about delegation:
- One service (client) accesses resources from another service (resource server) on behalf of a user.
- The user does not have to share their credentials with the client.
Parties involved:
- Resource owner / user - the person who gives permission to access their protected resources hosted by a third-party provider
- Client - the web application acting on behalf of the user to access their resources hosted by a third-party provider
- Authorization server - the third-party server contacted by the client that displays a prompt for the user to authorize the client to act on the user's behalf
- Resource server - the third-party server hosting the user's protected resources
The authorization server and resource server may be the same entity.
OAuth2 is the latest version of the OAuth protocol used by services like Google, Spotify, Trello, and Vimeo, to name a few.
OAuth2 Web Application Flow
The OAuth2 protocol can be used in different types of applications, but it's most commonly used in web, mobile, and desktop applications. This section will address the deployment of OAuth2 in a web application, also known as the Web Application Flow (or Authorization Code Grant).
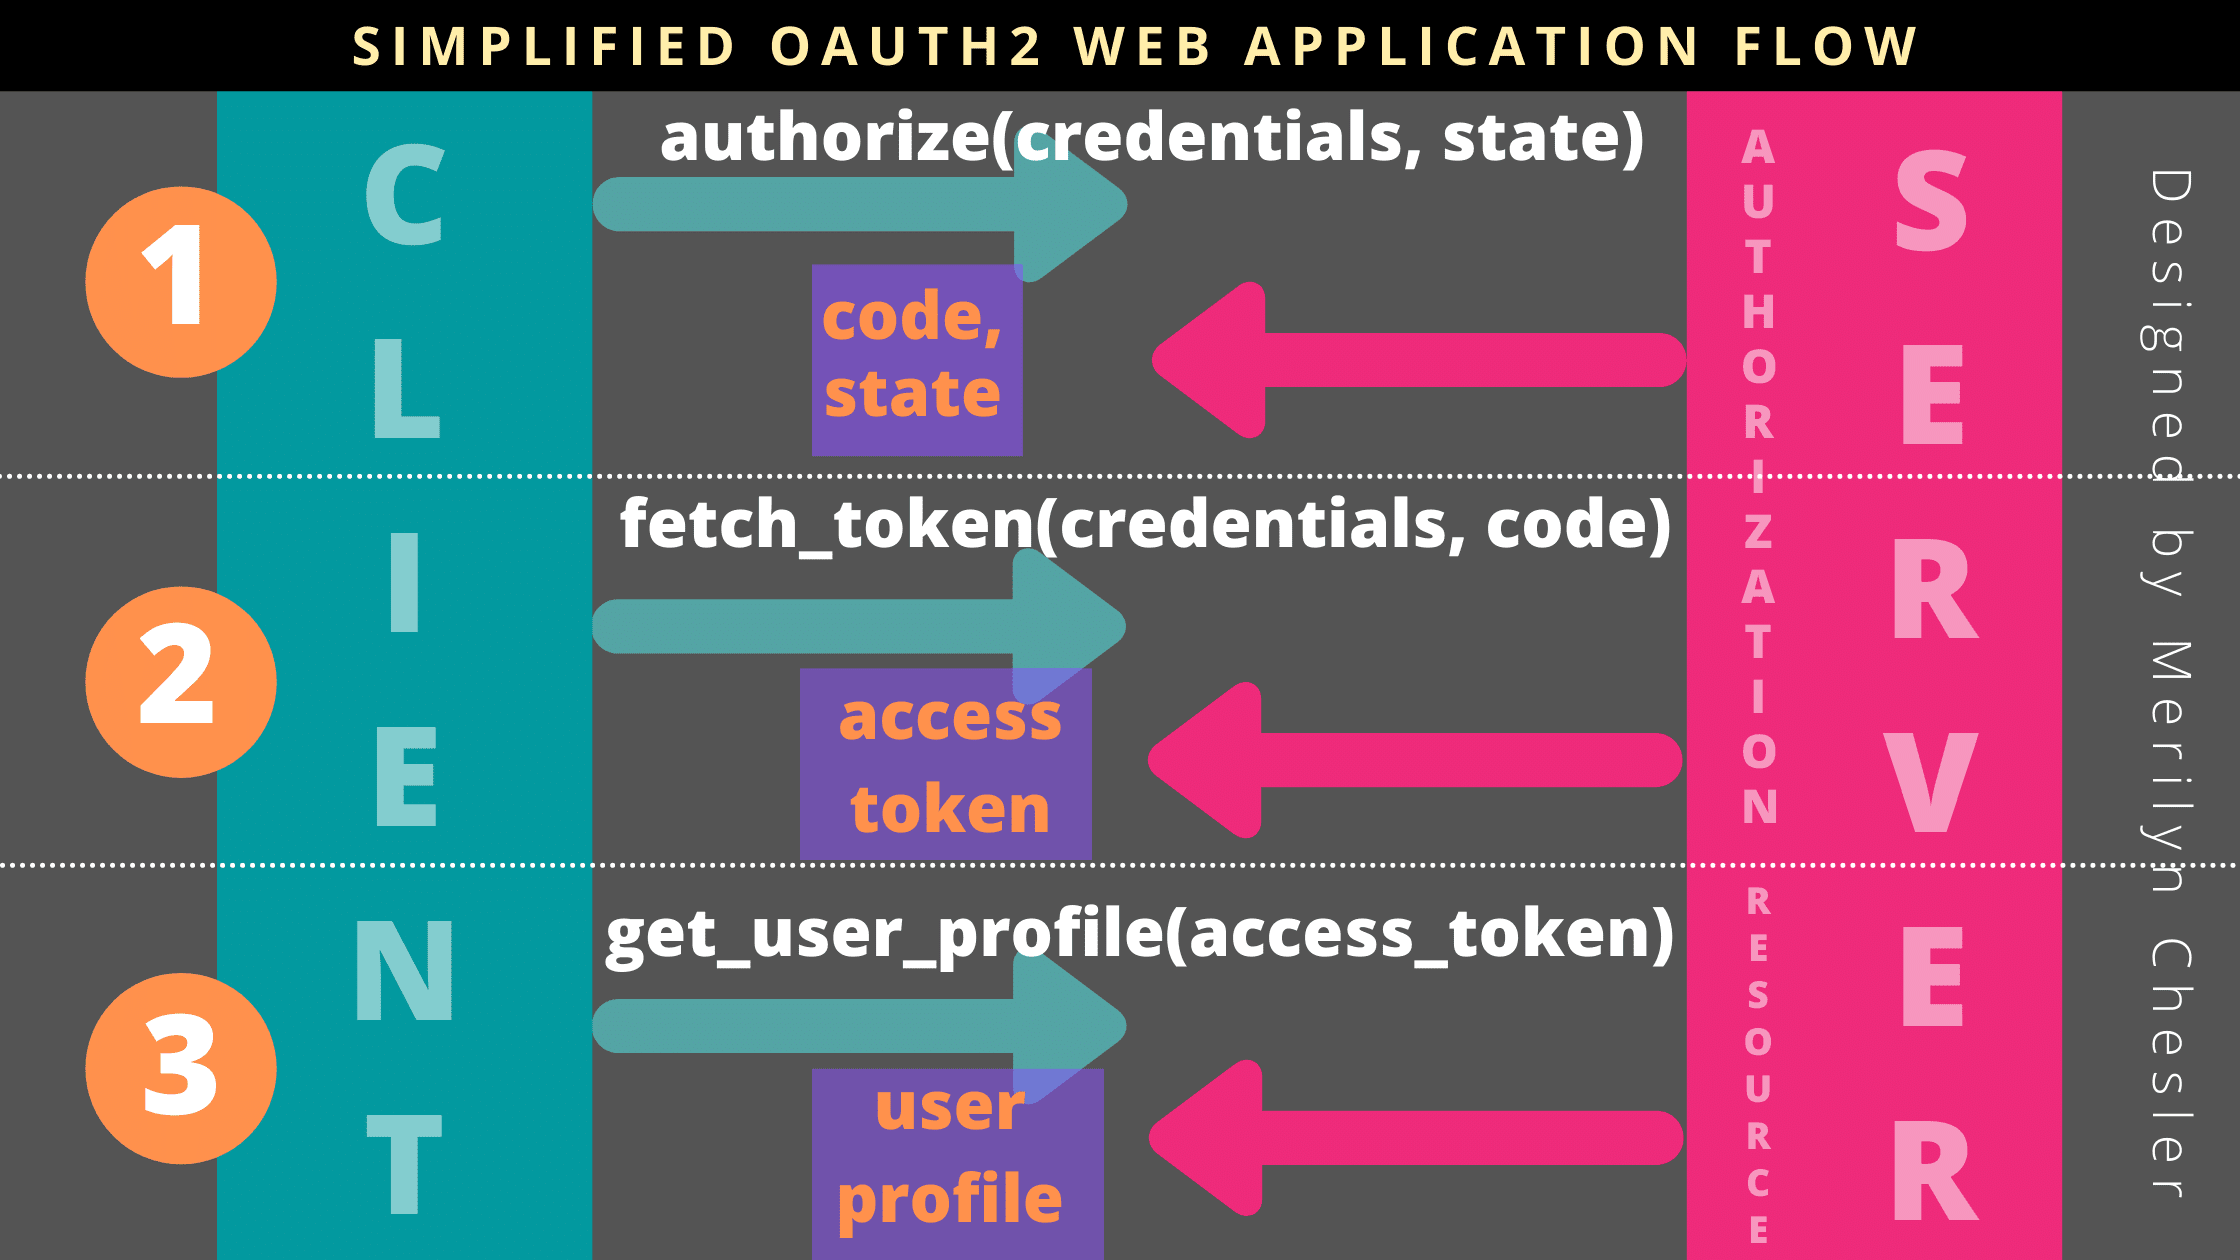
A simplified Web Application Flow is illustrated in this diagram:

The flow is basically a communication and exchange of information between a client (the web application) and a server (the OAuth2 provider), and it consists of three steps:
- Authorize
- Fetch access token
- Obtain user info
Before this flow can be implemented, a web developer typically has to register their web application with an OAuth2 provider and supply the following information:
- Name of the application
- Where the application is hosted
- A URI endpoint (also known as the redirect URI or callback URL)
Once registered, the OAuth2 provider will provide the registrant with this information:
- Client ID - a public credential to uniquely identify the web application, similar to a username
- Client secret - a private credential to pass along to the server, similar to a password
- Authorization server URL - a URL for the client to request authorization
- Access token URL - a URL for the client to exchange an authorization code for an access token
- Resource server URL - a URL for the client to access protected resources with an access token, which could also be the same as the authorization server
We'll now look at the three steps involved in the Web Application Flow in more depth.
Note that the term "client" will be used interchangeably with "web application".
Step 1: Authorize
The first step, authorize, is typically invoked at the beginning of the login process. In this step, the web application requests permission from the user to authorize access to their account hosted at a third-party OAuth2 provider.
Client - request permission
To start, the web application constructs a URL with the following information:
- Response Type - tells the authorization server which flow or grant to use (use
codefor the Web Application Flow) - Client ID - identifies the web application
- Redirect URI - where to redirect the user back to
- Scope - specifies which portion(s) of the user profile the web application wishes to access
- State - is a randomly-generated string that the web application provides, which the authorization server will simply pass back so that the web application can then validate to mitigate fraud
Here's a sample URL:
https://api.authorization-server.com/authorize
  ?response_type=code
  &client_id=123
  &redirect_uri=https://your-web-app.com/redirect
  &scope=photos
  &state=1234-zyxa-9134-wpst
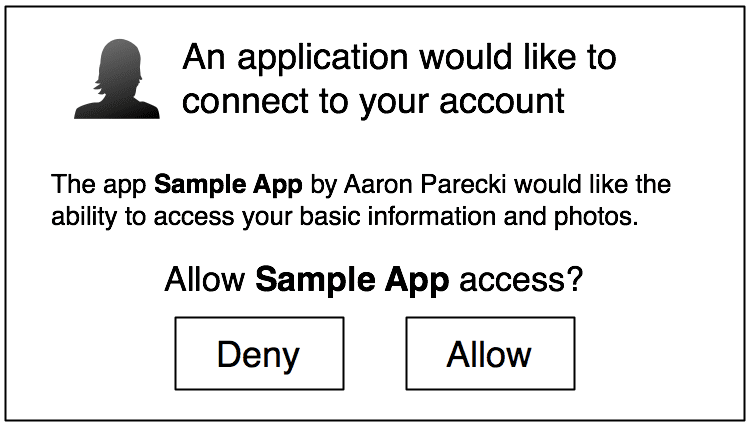
The user is then redirected to that URL, and the authorization server will present them with a prompt asking if they would like to authorize this application’s request:

Authorization Server - redirect back
After the user authorizes the web application to access their third-party account, the authorization server will redirect the user back to the web application via the redirect URL with the following information:
- Code - a short-lived authorization code that the web application expects from the server
- State - the state credential passed earlier from the client
Here's a sample redirect URL:
https://your-web-app.com/redirect
  ?code=123456
  &state=1234-zyxa-9134-wpst
In this step, the web application should verify that the state value matches the one it sends before to the authorization server. Doing this will help prevent any malicious attempts from hackers and CSRF attacks.
Step 2: Fetch Access Token
The second step is to exchange the authorization code for an access token.
Client - exchange
The web application sends an HTTP POST request to the authorization server's token endpoint with the following:
- Grant Type - tells the authorization server, again, which flow or grant to use (use
authorization_codefor the Web Application Flow) - Code - the authorization code received by the web application from the authorization server
- Redirect URI - where to redirect the user back to
- Client ID - the same client identifier used in the authorization step
- Client Secret - the password equivalent provided by the OAuth2 provider during registration
Here's a sample request URL:
https://api.authorization-server.com/token
  grant_type=authorization_code
  &code=123456
  &redirect_uri=https://your-web-app.com/redirect
  &client_id=123
  &client_secret=456
Authorization Server - grant token
The token endpoint will verify all the parameters in the request, ensuring that the code hasn’t expired and that the client ID and secret match. If everything checks out, it will generate an access token and return it in the response!
Assuming the authorization code is valid, the authorization server will generate an access token and return it back to the client.
For example:
{
  "access_token": "KtsgPkCR7Y9b8F3fHo8MKg83ECKbJq31clcB",
  "expires_in": 3600,
  "token_type": "bearer"
}
Additional properties (like scope and refresh_token) may be returned in the response depending on the OAuth2 provider.
Step 3: Obtain User Info
Finally, the web application can use the access token to access protected resources on behalf of the user.
Client - request resources
The web application typically sends an HTTP GET request to the resource server with the following credentials with the access token in the HTTP Authorization header.
For example:
GET /user HTTP/1.1
Host: api.resource-server.com
Authorization: Bearer access_token
The header type (Bearer in the above example) varies depending on the OAuth2 provider.
Resource Server - send resources
The resource server, which is sometimes the same as the authorization server, validates the access token. If valid, the resource server sends the requested data back.
For example:
{
   "name": "Aaron Smith",
   "bio": "Software Engineer",
   "avatar_url": "http://api.resource-server.com/image/aaron_smith"
}
Implementation
OAuthLib is a popular Python framework that implements generic, specification-compliant and comprehensive interfaces to OAuth1 and OAuth2. Requests is a popular Python HTTP library that makes sending HTTP/1.1 requests rather straightforward. Together, they can be used to implement the OAuth2 Web Application Flow.
Step 1: Authorize
OAuthLib provides a WebApplicationClient class that implements the Web Application Flow described above. After you register with an OAuth2 provider and obtain a client ID, create a new instance of WebApplicationClient in the web application.
For example:
from oauthlib.oauth2 import WebApplicationClient

client_id = 'xxxxx'
client = WebApplicationClient(client_id)
To facilitate the authorization step in the Web Application Flow, the WebApplicationClient class provides a prepare_request_uri() method that takes an authorization server URL and its corresponding credentials to form a complete URL.
For example:
authorization_url = 'https://api.authorization-server.com/authorize'

url = client.prepare_request_uri(
  authorization_url,
  redirect_uri = 'https://your-web-app.com/redirect',
  scope = ['read:user'],
  state = 'D8VAo311AAl_49LAtM51HA'
)
When printed, url will return:
https://api.authorization-server.com/authorize
  ?response_type=code
  &client_id=xxxxx
  &redirect_uri=https://your-web-app.com/redirect
  &scope=read:user
  &state=D8VAo311AAl_49LAtM51HA
The web application can redirect the user to this URL. At this point, the authorization server will present a prompt, asking the user to authorize the request.
Step 2: Fetch Access Token
Again, in this step, after the user approves the request, they are redirected back to the client with a response containing an authorization code and state.
After extracting and validating the accuracy of the state value, the web application can utilize the WebApplicationClient's prepare_request_body() method to construct the URL needed to fetch an access token from the authorization server.
For example:
data = client.prepare_request_body(
  code = 'yyyyyyy',
  redirect_uri = 'https://your-web-app.com/redirect',
  client_id = 'xxxxx',
  client_secret = 'zzzzzzz'
)
When printed, data will return:
grant_type=authorization_code
  &client_id=xxxxx
  &client_secret=zzzzzzz
  &code=yyyyyyy
  &redirect_uri=https//your-web-app.com/redirect
Notice that the key-value pair of grant_type=authorization_code is conveniently pre-pended by prepare_request_body().
At this point, we can utilize the Requests library to send an HTTP POST request to the token URL provided by the OAuth2 provider.
For example:
token_url = 'https://api.authorization-server.com/token'
response = requests.post(token_url, data=data)
OAuthLib's WebApplicationClient class also provides a parse_request_body_response() method to help us manage the response data as a Python dictionary. For example, we can pass response.text to this method, which will save the dictionary in client.token:
client.parse_request_body_response(response.text)
The value of client.token might look something like this:
{
   'access_token': 'KtsgPkCR7Y9b8F3fHo8MKg83ECKbJq31clcB',
   'scope': ['read:user'],
   'expires_at': 1619473575.641959,
   'expires_in': 3599,
   'token_type': 'bearer'
}
Step 3: Obtain User Info
The last step in the Web Application Flow is to retrieve the desired protected resource from the resource server. We'll need to prepare an HTTP Authorization header with the correct type and value. Depending on the implementation of the OAuth2 provider, the authorization header type could be Token or Bearer. We can use the get() method from the Requests library to send an HTTP GET request to the resource server with the correctly-formatted Authorization header.
For example:
header = {
    'Authorization': 'Bearer {}'.format(client.token['access_token'])
}

response = requests.get('https://api.resource-server.com/user', headers=header)
The response in JSON format, via response.json(), could look something like this:
{
   "name": "Aaron Smith",
   "bio": "Software Engineer",
   "avatar_url": "http://api.resource-server.com/user/images/aaron_smith/"
}
Example
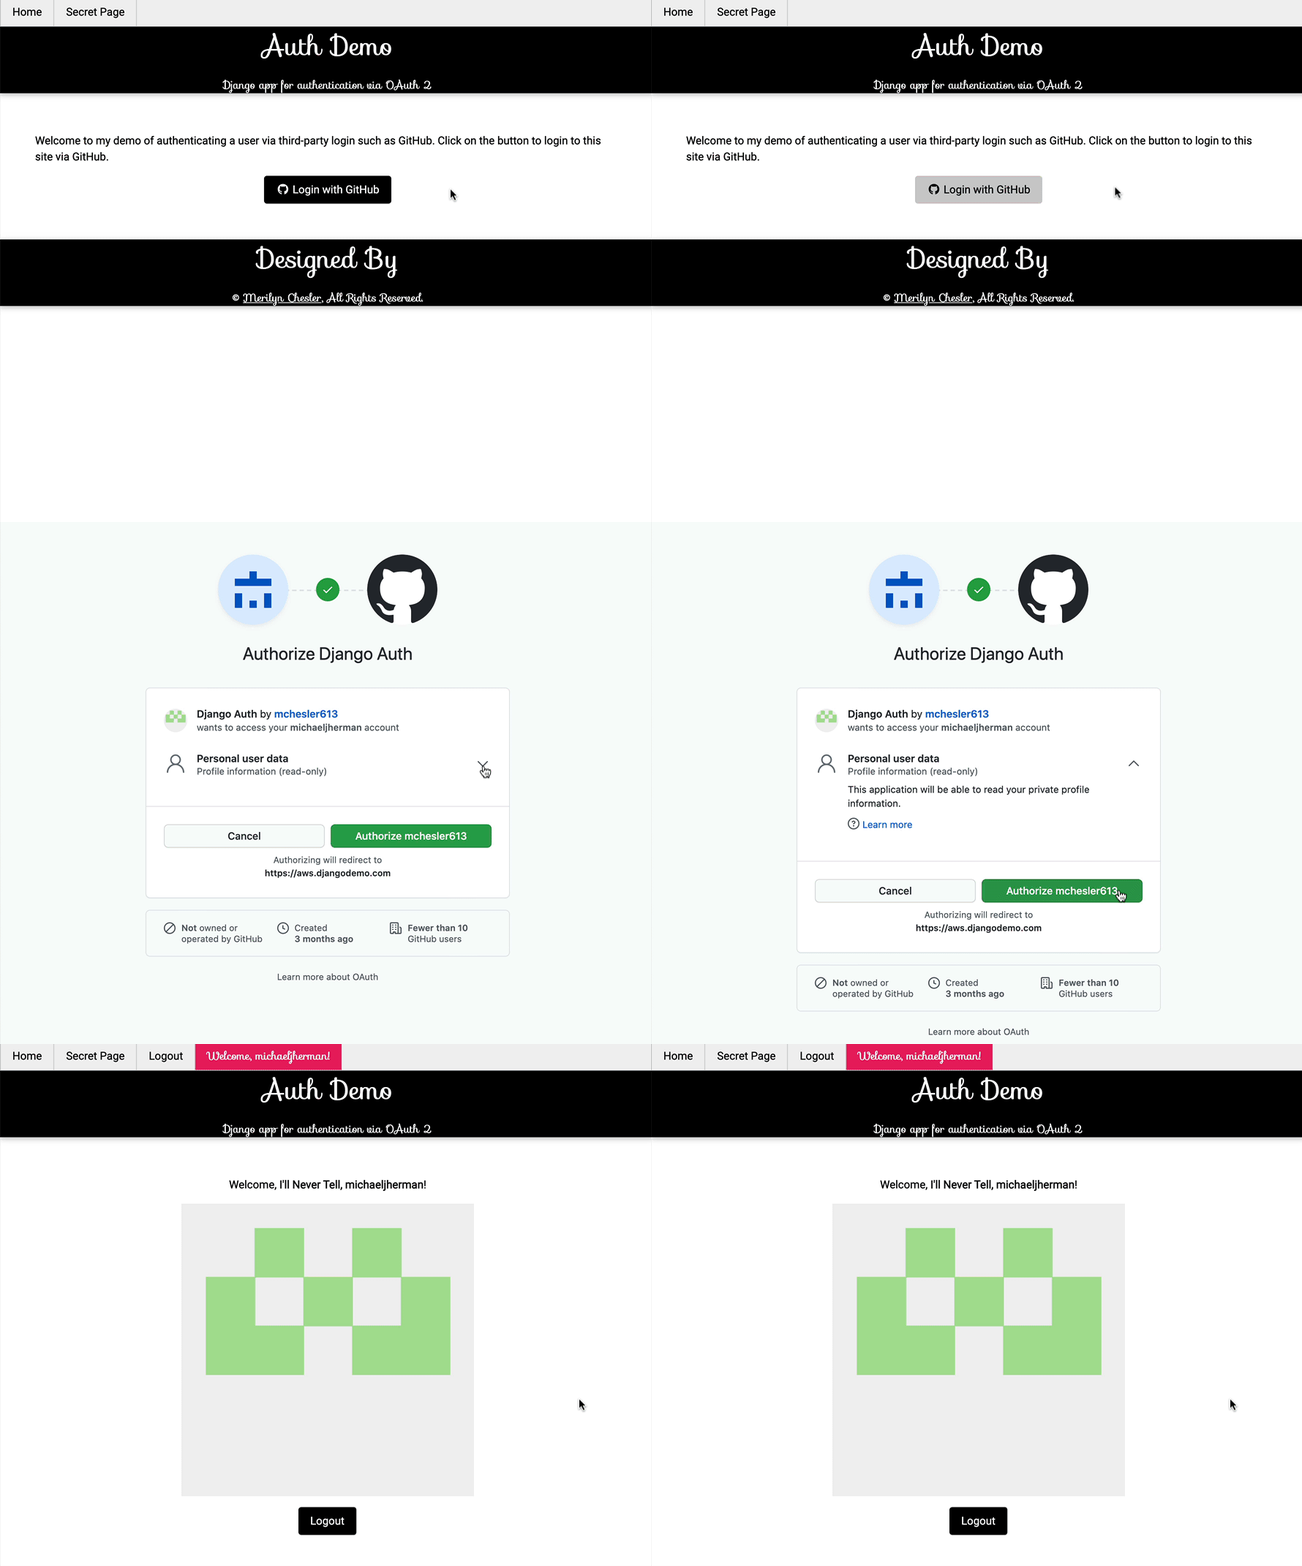
A real-life example of an OAuth2 implementation using OAuthLib and Requests can be found in this Django app, which uses GitHub as the OAuth2 provider. You can explore its implementation here.

To learn more about integrating OAuth2 in your web applications from common providers, visit these links:
Conclusion
The OAuth2 integration may first appear to be challenging, but this article along with using friendly libraries such as OAuthLib and Requests will help you solidify your understanding of OAuth2. Try implementing a quick example using GitHub as the first provider. Slowly but surely, you'll get better at this as you add more providers to your repertoire.
 Merilyn Chesler