Django offers multiple language support out-of-the-box. In fact, Django is translated into more than 100 languages. This tutorial looks at how to add multiple language support to your Django project.
Contents
- Objectives
- Project Setup
- Internationalization vs Localization
- Django's Internationalization Framework
- Translating Templates, Models, and Forms
- Using Rosetta Translation Interface
- Add Language Prefix to URLs
- Translating Models with django-parler
- Allowing Users to Switch Languages
- Add Locale-Support
- Conclusion
Objectives
By the end of this tutorial, you should be able to:
- Explain the difference between internationalization and localization
- Add language prefixes to URLs
- Translate templates
- Allow users to switch between languages
- Translate models
- Add locale-support
Project Setup
Here's a quick look at the app you'll be building:

It may look simple, but it will get you comfortable with adding internationalization to Django.
To start, clone down the base branch from the django-lang repo:
$ git clone https://github.com/Samuel-2626/django-lang --branch base --single-branch
$ cd django-lang
Next, create and activate a virtual environment, install the project's dependencies, apply migrations, and create a superuser:
$ python3.9 -m venv env
$ source env/bin/activate

(env)$ pip install -r requirements.txt
(env)$ python manage.py makemigrations
(env)$ python manage.py migrate
(env)$ python manage.py createsuperuser
Feel free to swap out virtualenv and Pip for uv, Poetry, or Pipenv. For more, review Modern Python Environments.
Take note of the Course model in course/models.py:
from django.db import models

class Course(models.Model):
    title = models.CharField(max_length=90)
    description = models.TextField()
    date = models.DateField()
    price = models.DecimalField(max_digits=10, decimal_places=2)

    def __str__(self):
        return self.title
Run the following management command to add some data to your database:
$ python manage.py add_courses
In the next section, we'll look briefly at internationalization and localization.
Internationalization vs Localization
Internationalization and localization represent two sides to the same coin. Together, they allow you to deliver your web application's content to different locales.
- Internationalization, represented by i18n (18 is the number of letters between i and n), is the processing of developing your application so that it can be used by different locales. This process is generally handled by developers.
- Localization, represented by l10n (10 is the number of letters between l and n), on the other hand, is the process of translating your application to a particular language and locale. This is generally handled by translators.
For more, review Localization vs. Internationalization from W3C.
Recall that Django, via its internationalization framework, has been translated into more than 100 languages:
Through the internationalization framework, we can easily mark strings for translation, both in Python code and in our templates. It makes use of the GNU gettext toolkit to generate and manage a plain text file that represents a language known as the message file. The message file ends with .po as its extension. Another file is generated for each language once the translation is done, which ends with the .mo extension. This is known as the compiled translation.
Let's start by installing the gettext toolkit.
On macOS, it's recommended to use Homebrew:
$ brew install gettext
$ brew link --force gettext
For most Linux distributions, it comes pre-installed. And finally, for Windows, the steps to install can be found here.
In the next section, we'll prepare our Django project for internationalization and localization.
Django's Internationalization Framework
Django comes with some default internationalization settings in the settings.py file:
# Internationalization
# https://docs.djangoproject.com/en/3.1/topics/i18n/

LANGUAGE_CODE = 'en-us'

TIME_ZONE = 'UTC'

USE_I18N = True

USE_L10N = True

USE_TZ = True
The first setting is the LANGUAGE_CODE. By default, it's set to United States English (en-us). This is a locale-specific name. Let's update it to a generic name, English (en).
LANGUAGE_CODE = 'en'
See list of language identifiers for more.
For the LANGUAGE_CODE to take effect, USE_I18N must be True, which enables Django’s translation system.
Take note of the remaining settings:
TIME_ZONE = 'UTC'

USE_L10N = True

USE_TZ = True
Notes:
- 'UTC' is the default TIME_ZONE.
- Since USE_L10N is set to
True, Django will display numbers and dates using the format of the current locale. - Finally, when USE_TZ is
True, datetimes will be timezone-aware.
Let's add some additional settings to complement the existing ones:
from django.utils.translation import gettext_lazy as _

LANGUAGES = (
    ('en', _('English')),
    ('fr', _('French')),
    ('es', _('Spanish')),
)
What's happening here?
- We specified the languages we want our project to be available in. If this is not specified, Django will assume our project should be available in all of its supported languages.
- This LANGUAGE setting consists of the language code and the language name. Recall that the language codes can be locale-specific, such as 'en-gb' or generic such as 'en'.
- Also,
gettext_lazyis used to translate the language names instead ofgettextto prevent circular imports. You should almost always use gettext_lazy when you're in the global scope.
Add django.middleware.locale.LocaleMiddleware to the MIDDLEWARE settings list. This middleware should come after the SessionMiddleware because the LocaleMiddleware needs to use the session data. It should also be placed before the CommonMiddleware because the CommonMiddleware needs the active language to resolve the URLs being requested. Hence, the order is very important.
MIDDLEWARE = [
    'django.middleware.security.SecurityMiddleware',
    'django.contrib.sessions.middleware.SessionMiddleware',
    'django.middleware.locale.LocaleMiddleware', # new
    'django.middleware.common.CommonMiddleware',
    'django.middleware.csrf.CsrfViewMiddleware',
    'django.contrib.auth.middleware.AuthenticationMiddleware',
    'django.contrib.messages.middleware.MessageMiddleware',
    'django.middleware.clickjacking.XFrameOptionsMiddleware',
]
This middleware is used to determine the current language based on the request data.
Add a locale path directory for your application where message files will reside:
LOCALE_PATHS = [
    BASE_DIR / 'locale/',
]
Django looks at the LOCALE_PATHS setting for translation files. Keep in mind that locale paths that appear first have the highest precedence.
You need to create the "locale" directory inside of your root project and add a new folder for each language:
locale
├── en
├── es
└── fr
Open the shell and run the following command from your project directory to create a .po message file for each language:
(env)$ django-admin makemessages --all --ignore=env
You should now have:
locale
├── en
│   └── LC_MESSAGES
│       └── django.po
├── es
│   └── LC_MESSAGES
│       └── django.po
└── fr
    └── LC_MESSAGES
        └── django.po
Take note of one of the .po message files:
msgid: represents the translation string as it appears in the source code.msgstr: represents the language translation, which is empty by default. You'll have to supply the actual translation for any given string.
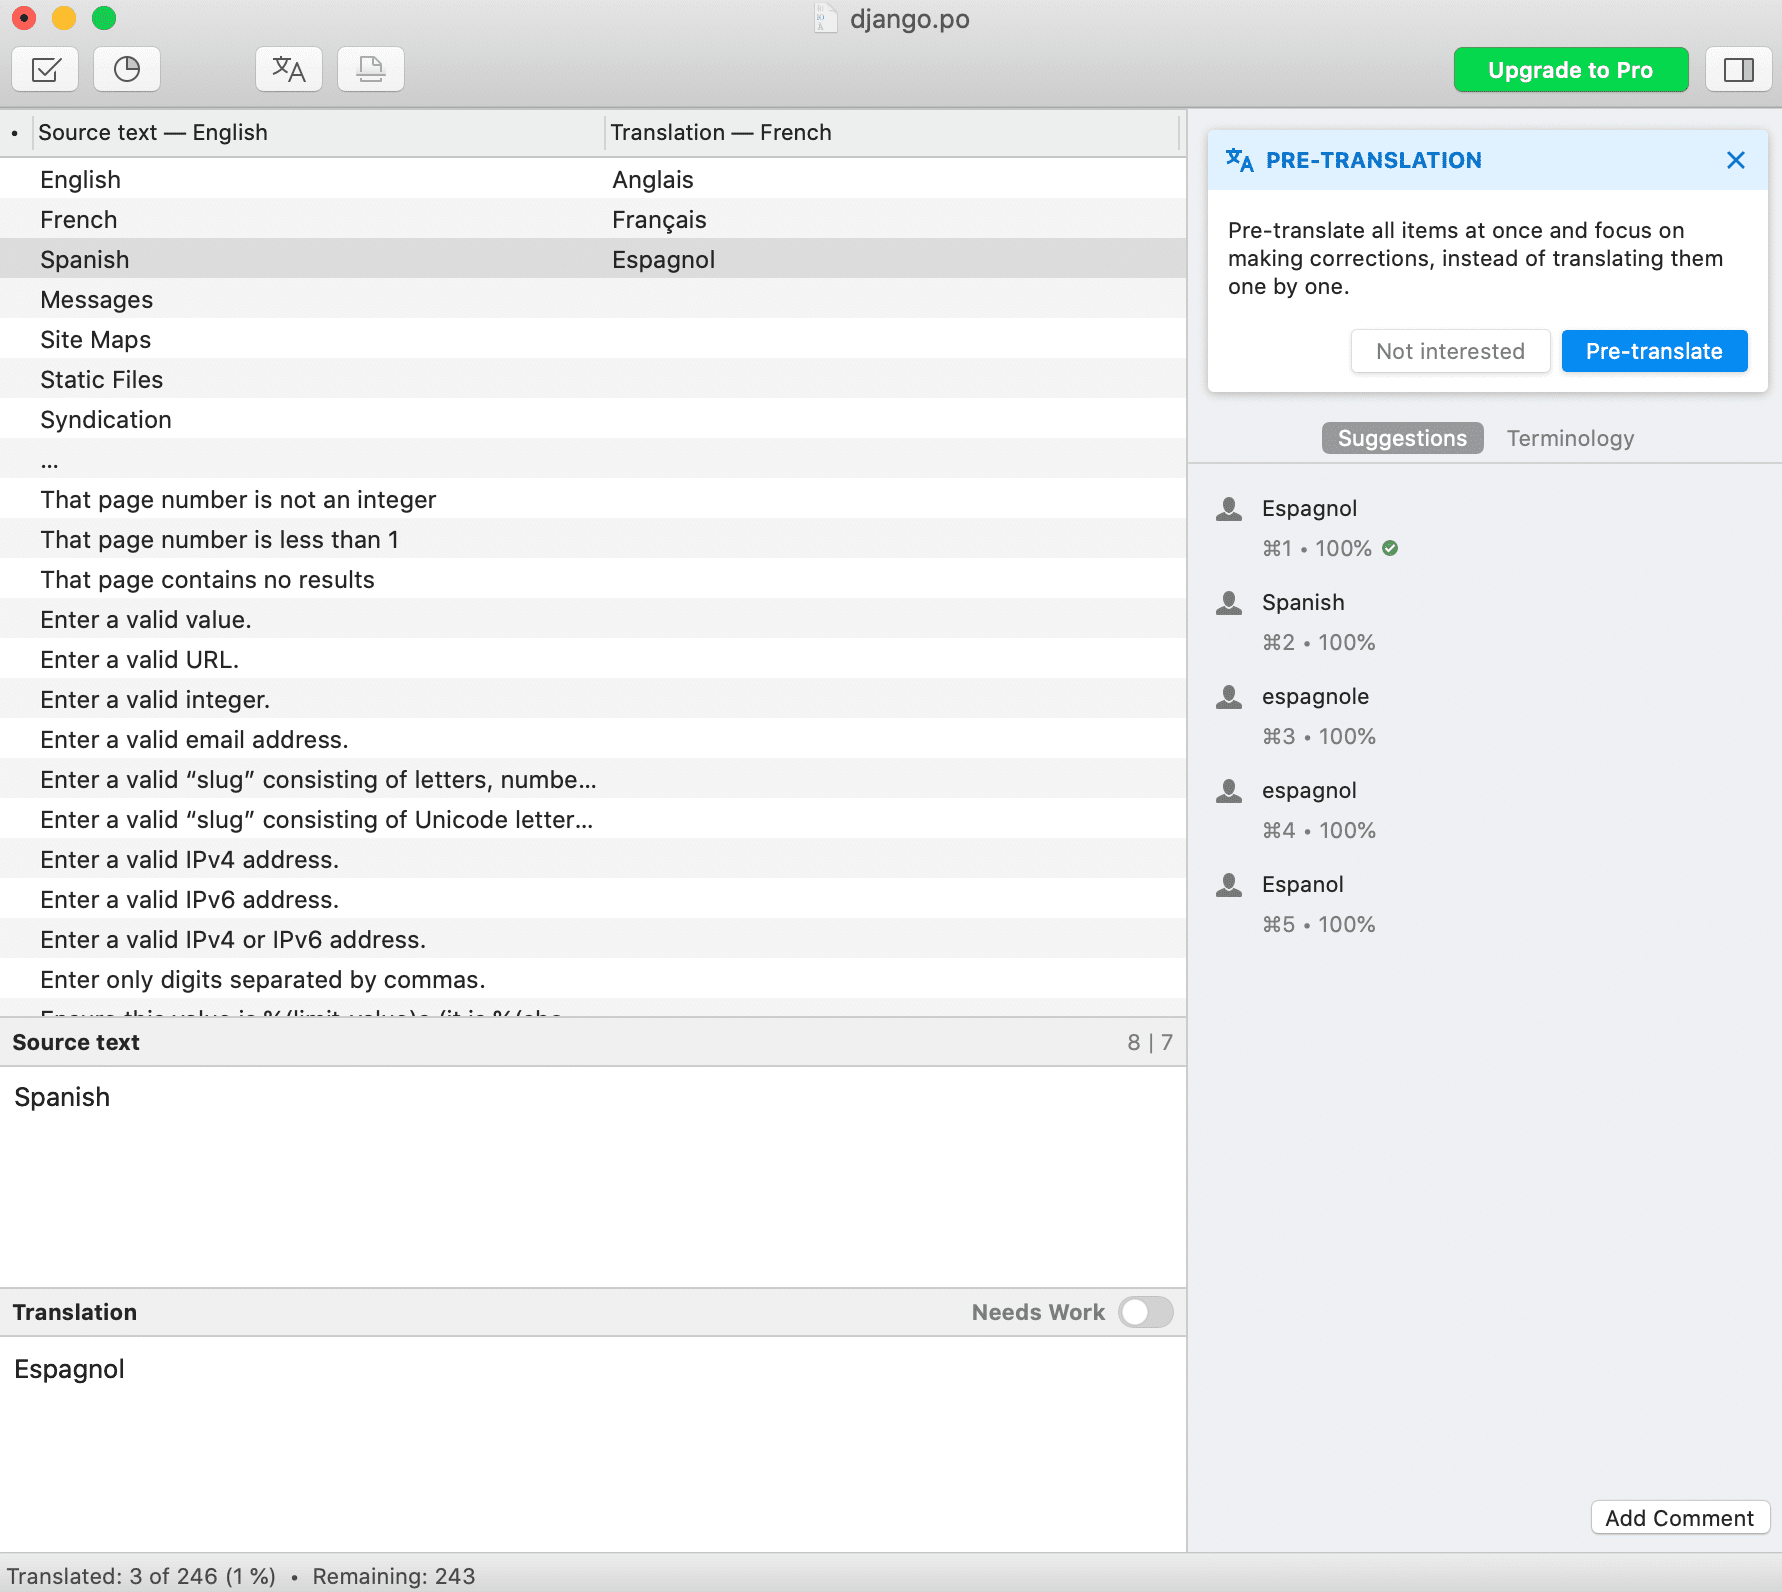
Currently, only the LANGUAGES from our settings.py file have been marked for translation. Therefore, for each msgstr under the "fr" and "es" directories, enter the French or Spanish equivalent of the word manually, respectively. You can edit .po files from your regular code editor; however, it's recommended to use an editor designed specifically for .po like Poedit.
For this tutorial, make the following changes:
# locale/fr/LC_MESSAGES/django.po

msgid "English"
msgstr "Anglais"

msgid "French"
msgstr "Français"

msgid "Spanish"
msgstr "Espagnol"


# locale/es/LC_MESSAGES/django.po

msgid "English"
msgstr "Inglés"

msgid "French"
msgstr "Francés"

msgid "Spanish"
msgstr "Español"
Poedit example:
Next, let's compile the messages by running the following command:
(env)$ django-admin compilemessages --ignore=env
A .mo compiled message file has been generated for each language:
locale
├── en
│   └── LC_MESSAGES
│       ├── django.mo
│       └── django.po
├── es
│   └── LC_MESSAGES
│       ├── django.mo
│       └── django.po
└── fr
    └── LC_MESSAGES
        ├── django.mo
        └── django.po
--
That's it for this section!
You've covered a lot thus far, let's recap before moving on to other concepts. Recall that the goal of this tutorial is to teach you how to add multiple language support to your Django project. In the first section, you set up the project and looked at what you'll be building. You then learned the difference between internationalization and localization along with how the Django internationalization framework works under the hood. Finally, we configured the project to allow multiple language support and saw it in action:
- Added internationalization to our Django project
- Set the languages that we'd like the project available in
- Generated the messages files via
gettext_lazy - Manually added the translations
- Compiled the translations
Translating Templates, Models, and Forms
You can translate model field names and forms by marking them for translation using either the gettext or gettext_lazy function:
Edit the course/models.py file like so:
from django.db import models
from django.utils.translation import gettext_lazy as _

class Course(models.Model):
    title = models.CharField(_('title'), max_length=90)
    description = models.TextField(_('description'))
    date = models.DateField(_('date'))
    price = models.DecimalField(_('price'), max_digits=10, decimal_places=2)

    def __str__(self):
        return self.title
(env)$ django-admin makemessages --all --ignore=env
Feel free to update the msgstr translations for French and Spanish either manually or using the Poedit interface, and then compile the messages
(env)$ django-admin compilemessages --ignore=env
We can also do this for forms by adding a label.
For instance:
from django import forms
from django.utils.translation import gettext_lazy as _

class ExampleForm(forms.Form):
    first_name = forms.CharField(label=_('first name'))
To translate our templates, Django offers the {% trans %} and {% blocktrans %} template tags to translate strings. You have to add {% load i18n %} at the top of the HTML file to use the translation templates tags.
The {% trans %} template tag allows you to mark a literal for translation. Django simply executes the gettext function on the given text internally.
The {% trans %} tag is useful for simple translation strings, but it can't handle content for translation that includes variables.
The {% blocktrans %} template tag, on the other hand, allows you to mark content that includes literals and variables.
Update the following element in the course/templates/index.html file to see this in action:
<h1>{% trans "TestDriven.io Courses" %}</h1>
Don't forget to add {% load i18n %} to the top of the file.
(env)$ django-admin makemessages --all --ignore=env
Update the following msgstr translations:
# locale/fr/LC_MESSAGES/django.po

msgid "TestDriven.io Courses"
msgstr "Cours TestDriven.io"


# locale/es/LC_MESSAGES/django.po

msgid "TestDriven.io Courses"
msgstr "Cursos de TestDriven.io"
Compile the messages:
(env)$ django-admin compilemessages --ignore=env
Using Rosetta Translation Interface
We'll be using a third-party library called Rosetta to edit translations using the same interface as the Django administration site. It makes it easy to edit .po files and it updates compiled translation files automatically for you.
Rosetta has already been installed as part of the dependencies; therefore, all you need to do is to add it to your installed apps:
INSTALLED_APPS = [
    'django.contrib.admin',
    'django.contrib.auth',
    'django.contrib.contenttypes',
    'django.contrib.sessions',
    'django.contrib.messages',
    'django.contrib.staticfiles',
    'course.apps.CourseConfig',
    'rosetta',  # NEW
]
You'll also need to add Rosetta's URL to your main URL configuration in django_lang/urls.py:
urlpatterns = [
    path('admin/', admin.site.urls),
    path('rosetta/', include('rosetta.urls')),  # NEW
    path('', include('course.urls')),
]
Create and apply the migrations, and then run the server:
(env)$ python manage.py makemigrations
(env)$ python manage.py migrate
(env)$ python manage.py runserver
Make sure you're logged in as an admin, and then navigate to http://127.0.0.1:8000/rosetta/ in your browser:
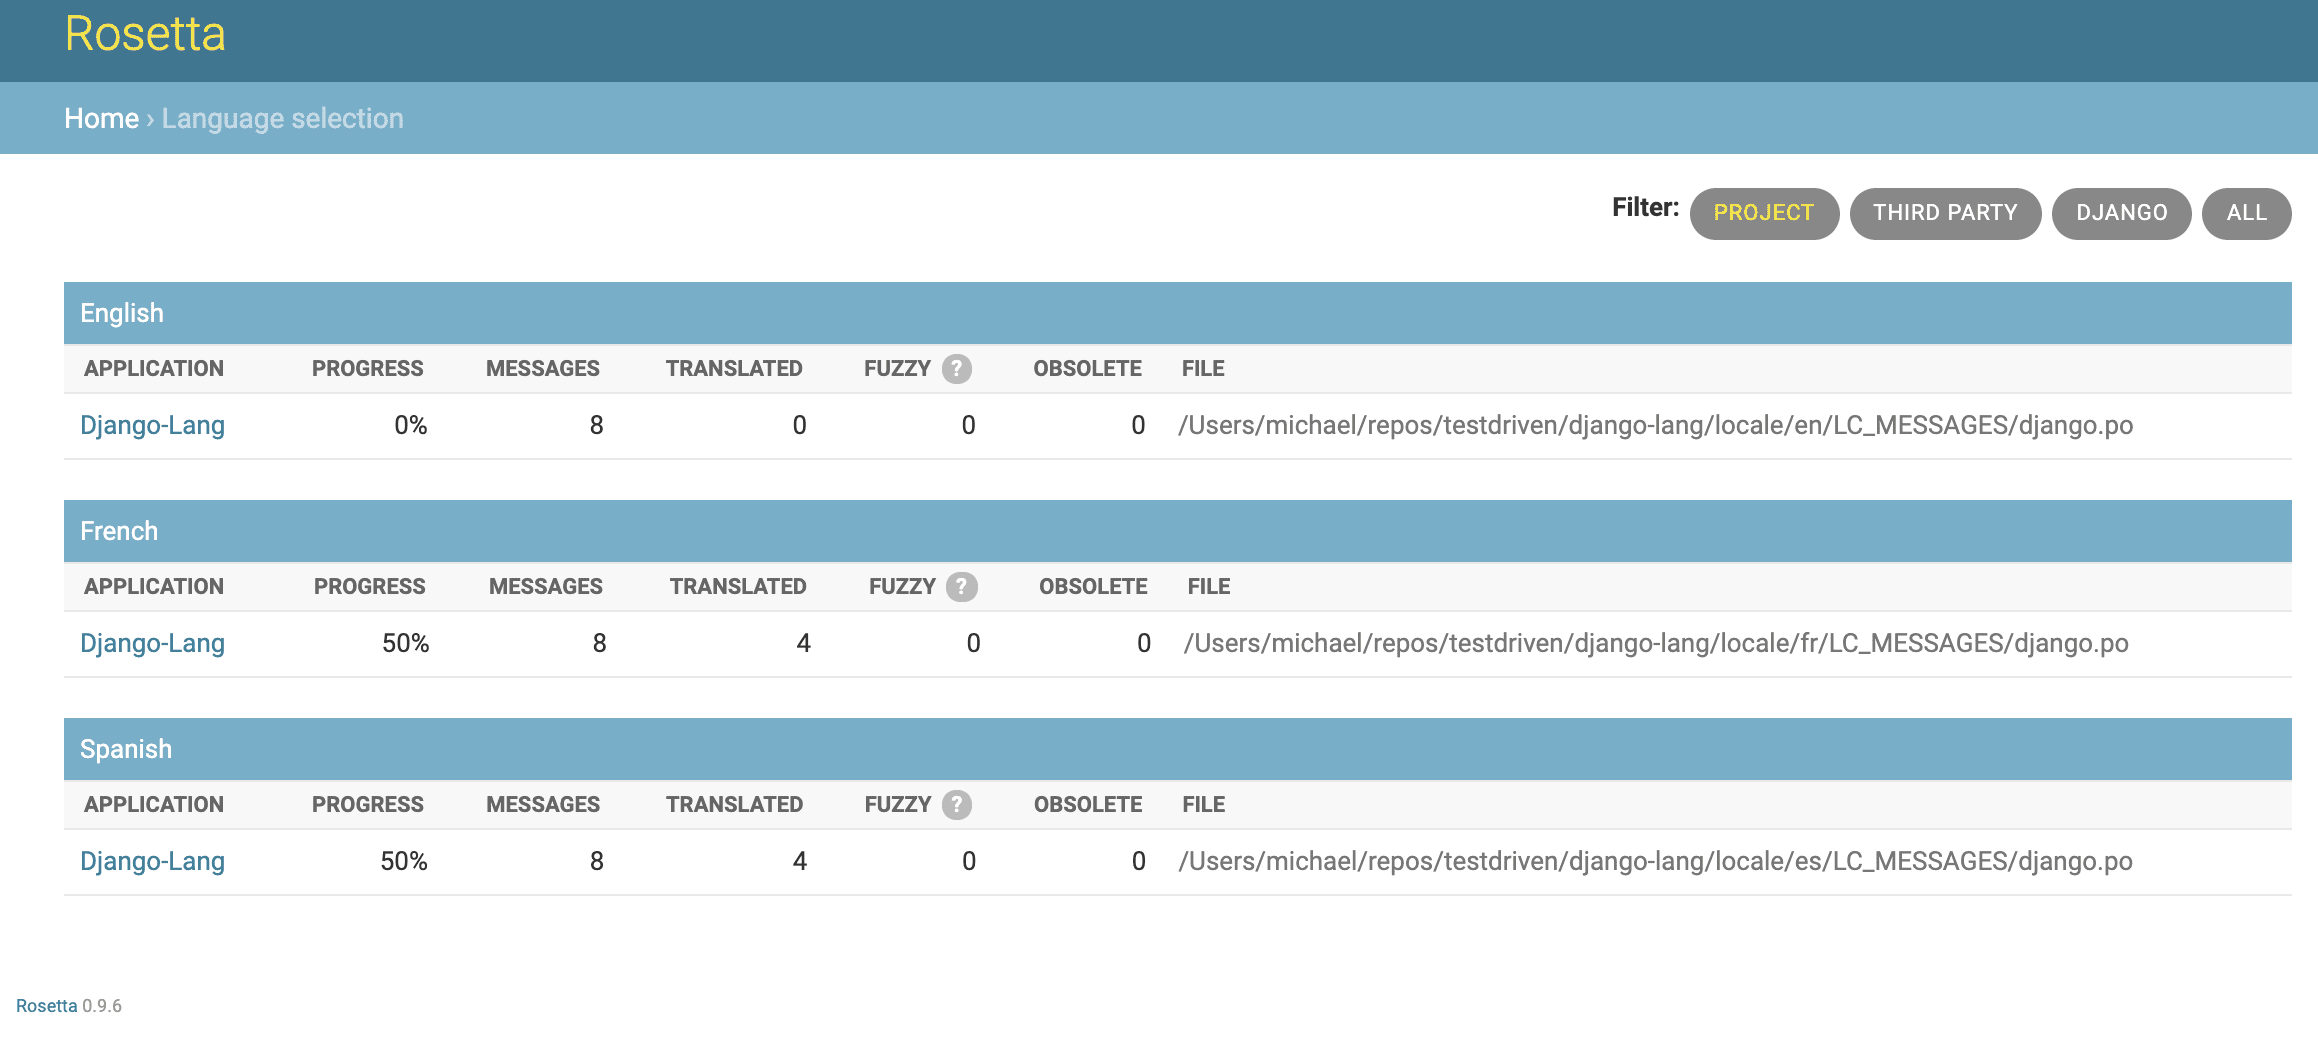
Under the projects, click on each application to edit translations.
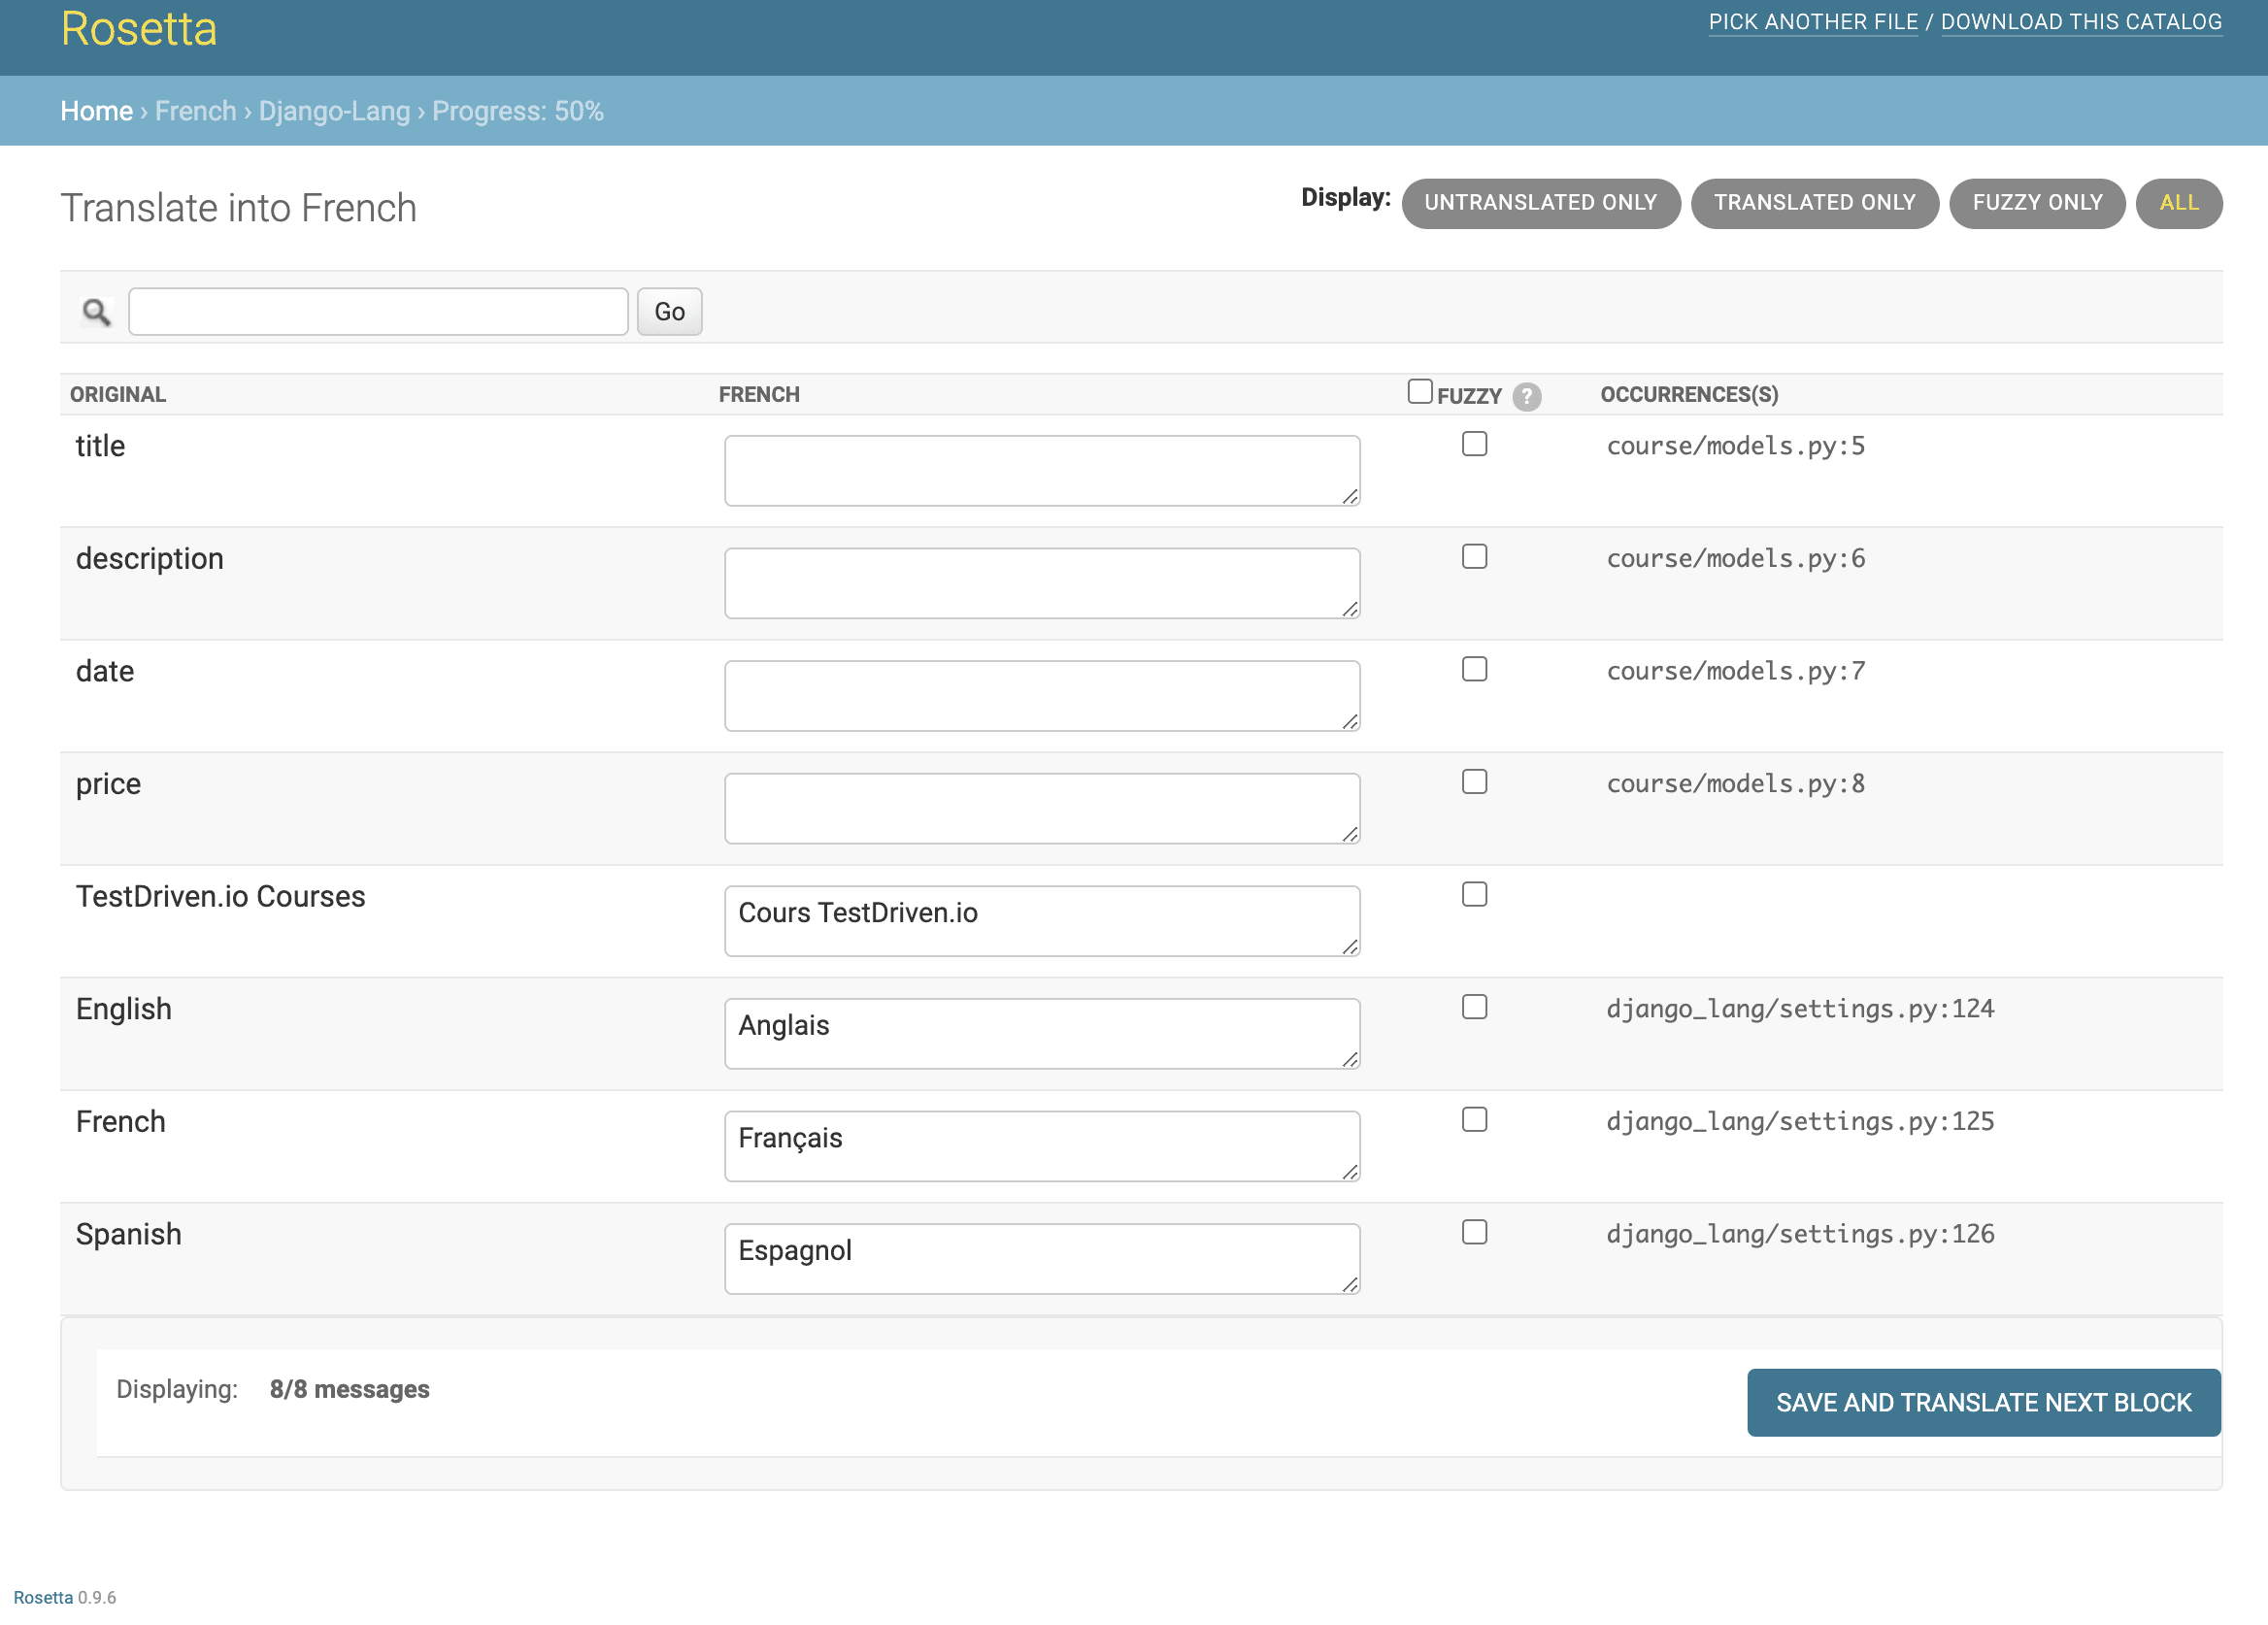
When you finish editing translations, click the "Save and translate next block" button to save the translations to their respective .po file. Rosetta will then compile the message file, so there's no need to manually run the django-admin compilemessages --ignore=env command.
Note that after you add new translations in a production environment, you'll have to reload your server after running the
django-admin compilemessages --ignore=envcommand, or after saving the translations with Rosetta, for changes to take effect.
Add Language Prefix to URLs
With Django's internationalization framework, you can serve each language version under a different URL extension. For instance, the English version of your site can be served under /en/, the French version under /fr/, and so on. This approach makes the site optimized for search engines as each URL will be indexed for each language, which in turn will rank better for each language. To do this, the Django internationalization framework needs to identify the current language from the requested URL; therefore, the LocalMiddleware needs to be added in the MIDDLEWARE setting of your project, which we've already done.
Next, add the i18n_patterns function to django_lang/urls.py:
from django.conf.urls.i18n import i18n_patterns
from django.contrib import admin
from django.urls import path, include
from django.utils.translation import gettext_lazy as _

urlpatterns = i18n_patterns(
    path(_('admin/'), admin.site.urls),
    path('rosetta/', include('rosetta.urls')),
    path('', include('course.urls')),
)
Run the development server again, and navigate to http://127.0.0.1:8000/ in your browser. You will be redirected to the requested URL, with the appropriate language prefix. Take a look at the URL in your browser; it should now look like http://127.0.0.1:8000/en/.
Change the requested URL from
ento eitherfrores. The heading should change.
Translating Models with django-parler
Django's internationalization framework doesn't support translating models out-of-the-box, so we'll use a third-party library called django-parler. There are a number of plugins that perform this function; however, this is one of the more popular ones.
How does it work?
django-parler will create a separate database table for each model that contains translations. This table includes all of the translated fields. It also has a foreign key to link to the original object.
django-parler has already been installed as part of the dependencies, so just add it to your installed apps:
INSTALLED_APPS = [
    'django.contrib.admin',
    'django.contrib.auth',
    'django.contrib.contenttypes',
    'django.contrib.sessions',
    'django.contrib.messages',
    'django.contrib.staticfiles',
    'course.apps.CourseConfig',
    'rosetta',
    'parler',  # NEW
]
Also, add the following code to your settings:
PARLER_LANGUAGES = {
    None: (
        {'code': 'en',}, # English
        {'code': 'fr',}, # French
        {'code': 'es',}, # Spanish
    ),
    'default': {
        'fallbacks': ['en'],
        'hide_untranslated': False,
    }
}
Here, you defined the available languages (English, French, Spanish) for django-parler. You also specified English as the default language and indicated that django-parler should not hide untranslated content.
What to know?
- django-parler provides a
TranslatableModelmodel class and aTranslatedFieldswrapper to translate model fields. - django-parler manages translations by generating another model for each translatable model.
Note that, because Django uses a separate table for translations, there will be some Django features that you can't use. Also, this migration will delete the previous records in your database.
Update course/models.py again to look like this:
from django.db import models
from parler.models import TranslatableModel, TranslatedFields


class Course(TranslatableModel):
    translations = TranslatedFields(
        title=models.CharField(max_length=90),
        description=models.TextField(),
        date=models.DateField(),
        price=models.DecimalField(max_digits=10, decimal_places=2),
    )

    def __str__(self):
        return self.title
Next, create the migrations:
(env)$ python manage.py makemigrations
Before proceeding, replace the following line in the newly created migration file:
bases=(parler.models.TranslatedFieldsModelMixin, models.Model),
With the following one:
bases = (parler.models.TranslatableModel, models.Model)
There happens to be a minor issue found in django-parler that we just resolved. Failing to do this will prevent migrations from applying.
Next, apply the migrations:
(env)$ python manage.py migrate
One of the awesome features of django_parler is that it integrates smoothly with the Django administration site. It includes a TranslatableAdmin class that overrides the ModelAdmin class provided by Django to manage translations.
Edit course/admin.py like so:
from django.contrib import admin
from parler.admin import TranslatableAdmin

from .models import Course

admin.site.register(Course, TranslatableAdmin)
Run the following management command to add some data again to your database:
(env)$ python manage.py add_courses
Run the server, and then navigate to http://127.0.0.1:8000/admin/ in your browser. Select one of the courses. For each course, a separate field for each language is now available.
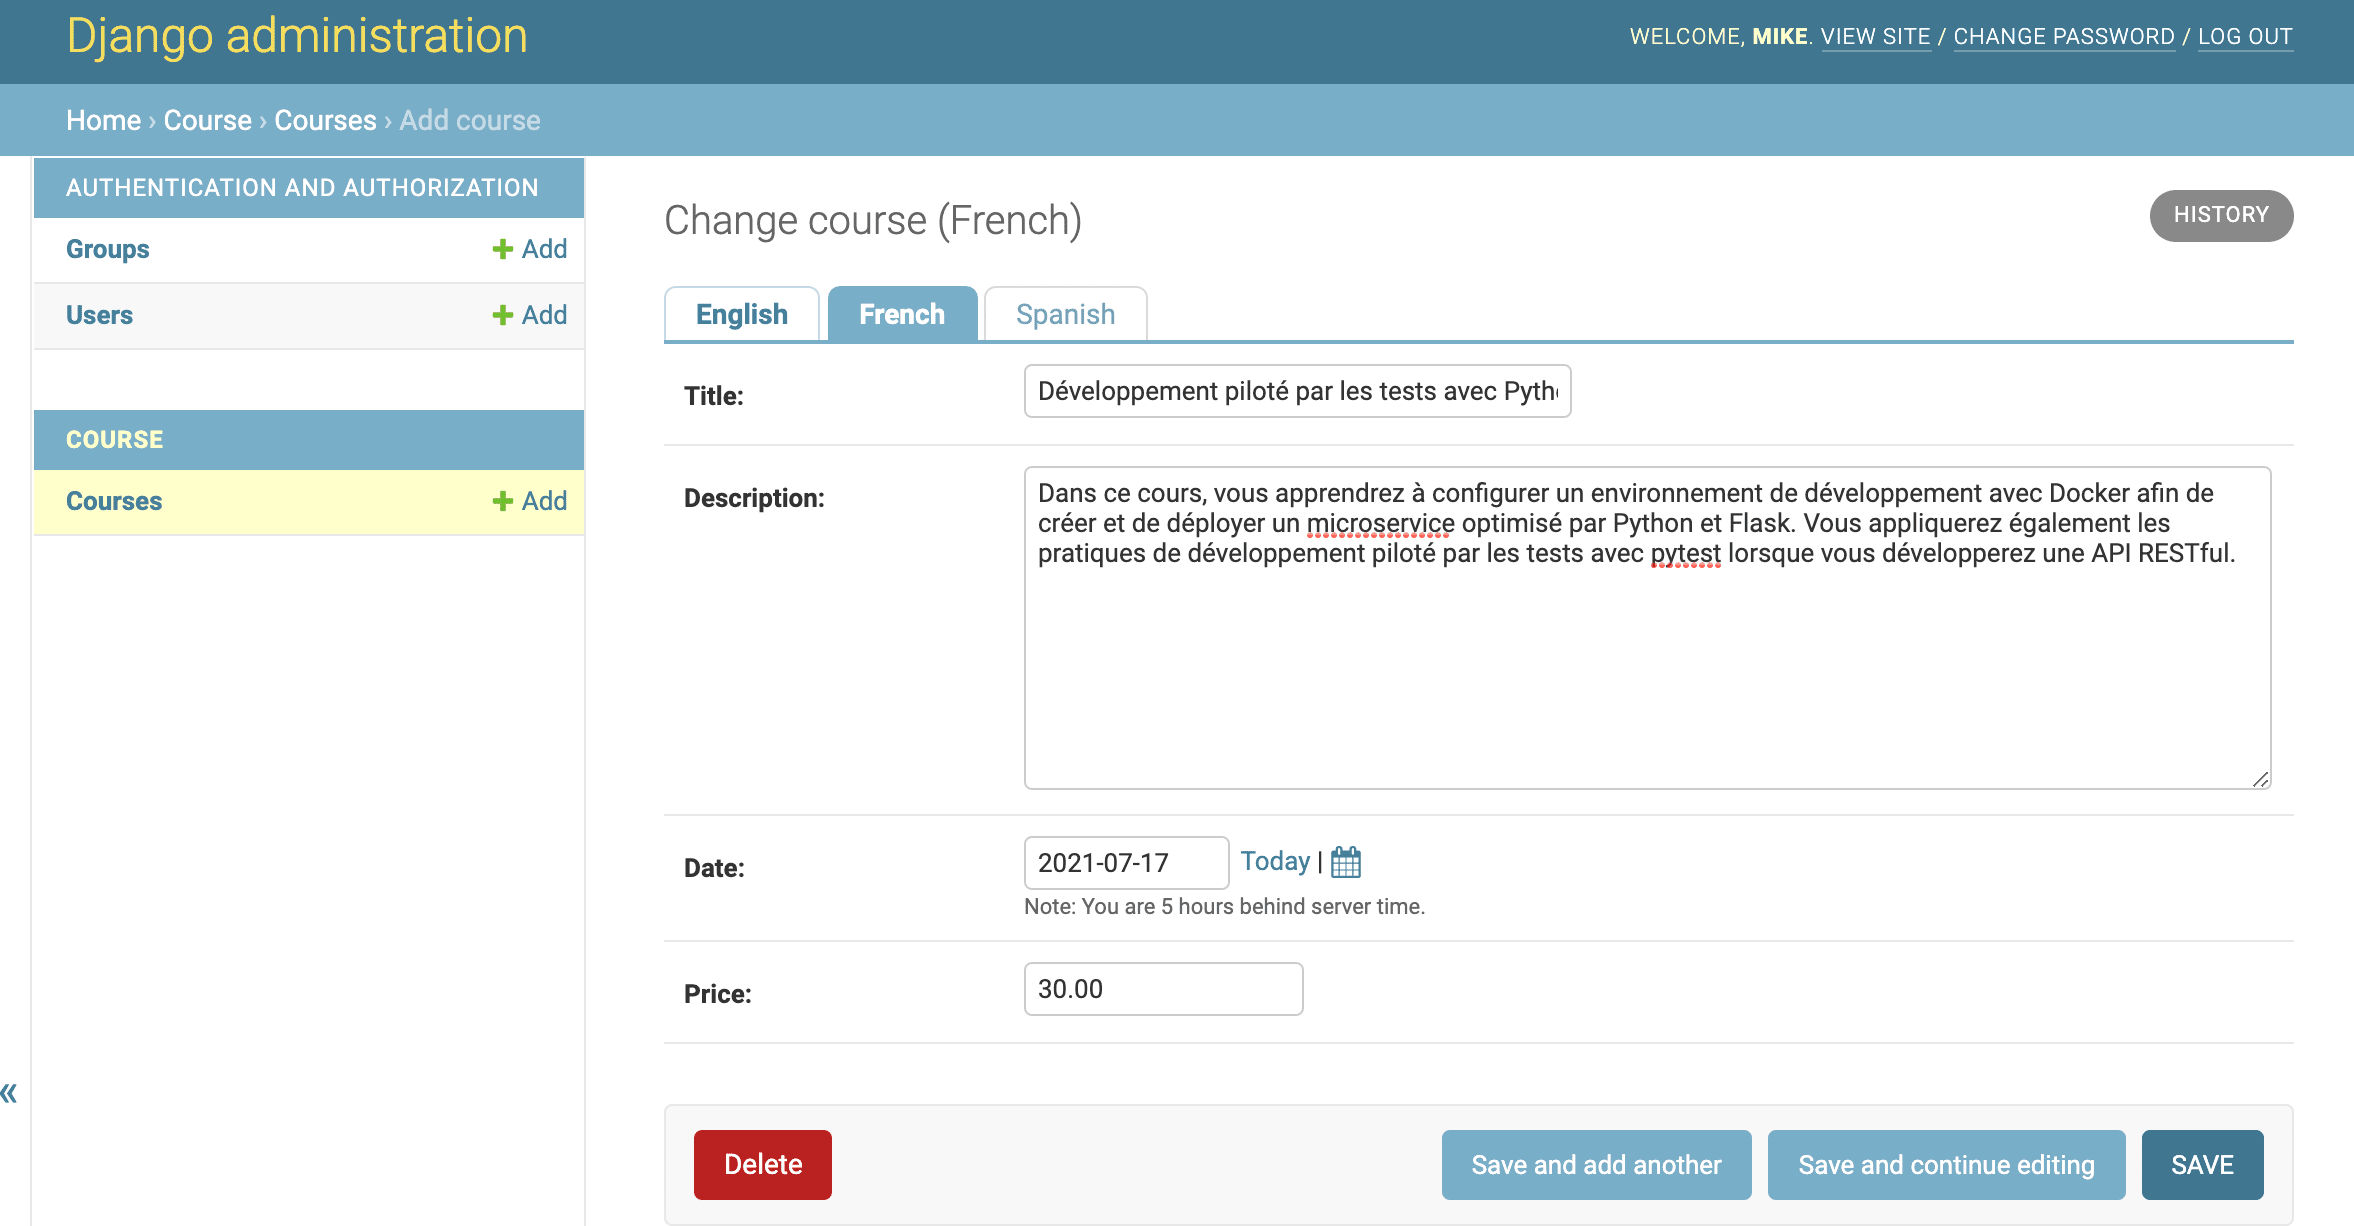
Note that we barely scratched the surface on what django-parler can achieve for us. Please refer to the docs to learn more.
Allowing Users to Switch Languages
In this section, we'll show how to allow users the ability to switch between languages from our homepage.
Update the index.html file like so:
{% load i18n %}

<!DOCTYPE html>
<html lang="en">
  <head>
    <meta charset="UTF-8" />
    <meta http-equiv="X-UA-Compatible" content="IE=edge" />
    <meta name="viewport" content="width=device-width, initial-scale=1.0" />
    <link
      href="https://cdn.jsdelivr.net/npm/[email protected]/dist/css/bootstrap.min.css"
      rel="stylesheet"
      integrity="sha384-EVSTQN3/azprG1Anm3QDgpJLIm9Nao0Yz1ztcQTwFspd3yD65VohhpuuCOmLASjC"
      crossorigin="anonymous"
    />
    <title>TestDriven.io</title>
      <style>
        h1, h3 {
          color: #266150;
        }
        li {
          display: inline;
          text-decoration: none;
          padding: 5px;
        }
        a {
          text-decoration: none;
          color: #DDAF94;
        }
        a:hover {
          color: #4F4846;
        }
        .active {
          background-color: #266150;
          padding: 5px;
          text-align: right;
          border-radius: 7px;
        }
      </style>
  </head>
  <body>
    <div class="container">
      <h1>{% trans "TestDriven.io Courses" %}</h1>

      {% get_current_language as CURRENT_LANGUAGE %}
      {% get_available_languages as AVAILABLE_LANGUAGES %}
      {% get_language_info_list for AVAILABLE_LANGUAGES as languages %}
      <div class="languages">
        <p>{% trans "Language" %}:</p>
        <ul class="languages">
          {% for language in languages %}
            <li>
              <a href="/{{ language.code }}/"
                {% if language.code == CURRENT_LANGUAGE %} class="active"{% endif %}>
                {{ language.name_local }}
              </a>
            </li>
          {% endfor %}
        </ul>
      </div>

      {% for course in courses %}
        <div class="card p-4">
          <h3>
            {{ course.title }}
            <em style="font-size: small">{{ course.date }}</em>
          </h3>
          <p>{{ course.description }}</p>
          <strong>Price: $ {{ course.price }}</strong>
        </div>
        <hr />
      {% empty %}
        <p>Database is empty</p>
      {% endfor %}

    </div>
  </body>
</html>
What's happening here?
We:
- Loaded the internationalization tags using
{% load i18n %}. - Retrieved the current language using the
{% get_current_language %}tag. - Also obtained the available languages defined in the
LANGUAGESsetting via the{% get_available_languages %}template tag. - Then used the
{% get_language_info_list %}tag to enable the language attributes. - Built an HTML list to display all available languages and added an active class attribute to the currently active language to highlight the active language.
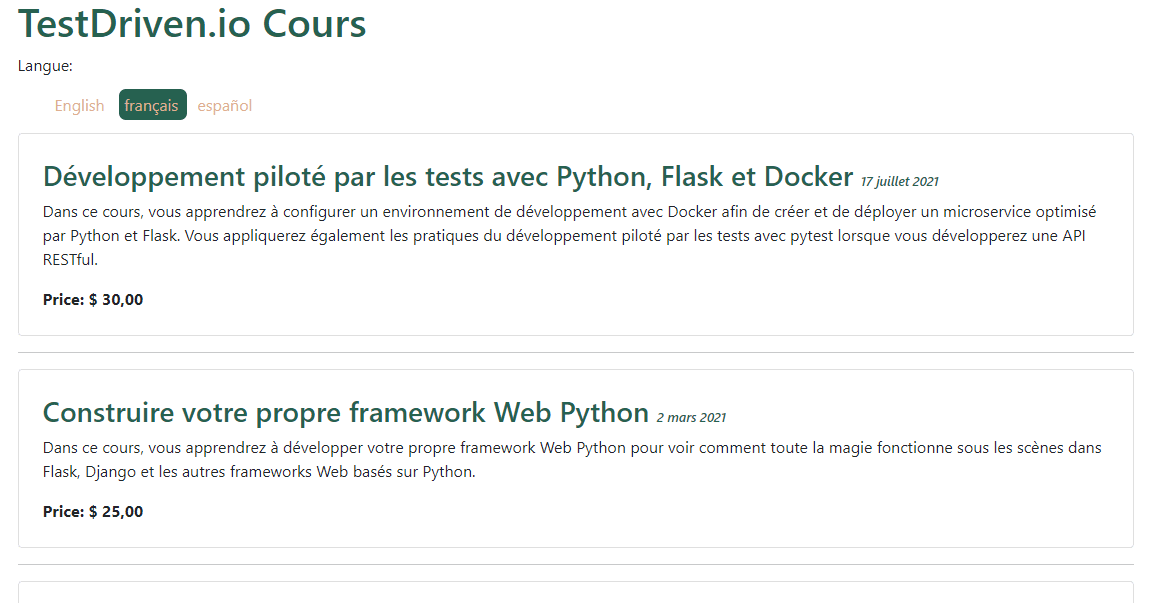
Navigate to http://127.0.0.1:8000/ in your browser to see the changes. Switch between the multiple languages and also note how the URL prefix changes for each language.
Add Locale-Support
Remember how we set USE_L10N to True? With this, Django will try to use a locale-specific format whenever it outputs a value in a template. Therefore, dates, times, and numbers will be in different formats based on the user's locale.
Navigate back to http://127.0.0.1:8000/ in your browser to see the changes and you will notice that the date format changes. Decimal numbers in the English version of your site, are displayed with a dot separator for decimal places, while in the Spanish and French versions, they are displayed using a comma. This is due to the differences in locale formats between each of the languages.
Conclusion
In this tutorial, you learned about internationalization and localization and how to configure a Django project for internationalization via Django's internationalization framework. We also used Rosetta to make updating and compiling message files easy and django-parler to translate our models.
Grab the complete code from the django-lang repo on GitHub.
 Samuel Torimiro