 Michael Herman
This tutorial shows how to add Stripe to a Flask application for accepting one-time payments.
Need to handle subscription payments? Check out Flask Stripe Subscriptions.
Contents
Stripe Payment Strategies
Stripe currently has three strategies for accepting one-time payments:
- Charges API (legacy)
- Stripe Checkout (the focus of this tutorial)
- Payment Intents API (often coupled with Stripe Elements)
Which strategy should you use?
- Use Stripe Checkout if you want to get up and running fast. If you've used the old modal version of Checkout and are looking for a similar approach, then this is the way to go. It provides a number of powerful features out-of-the-box, supports multiple languages, and can even be used for recurring payments. Most importantly, Checkout manages the entire payment process for you, so you can begin accepting payments without even having to add a single form!
- Use the Payment Intents API (along with Elements) if you want to customize the payment experience for your end users.
What about the Charges API?
- While you still can use the Charges API, if you're new to Stripe do not use it since it does not support the latest banking regulations (like SCA). You will see a high rate of declines if used. For more, review the Charges vs. Payment Intents APIs page from the official Stripe docs.
- Still using the Charges API? If most of your customers are based in the US or Canada you don't need to migrate just yet. Review the Checkout migration guide guide for more info.
Initial Setup
The first step is to set up a basic Python environment and install Flask.
Create a new project folder, create and activate a virtual environment, and install Flask:
$ mkdir flask-stripe-checkout && cd flask-stripe-checkout
$ python3.12 -m venv env
$ source env/bin/activate
(env)$ pip install flask
Feel free to swap out virtualenv and Pip for uv, Poetry, or Pipenv. For more, review Modern Python Environments.
Next, create a file called app.py, and add the code for a basic "Hello World" app:
# app.py

from flask import Flask, jsonify

app = Flask(__name__)


@app.route("/hello")
def hello_world():
    return jsonify("hello, world!")


if __name__ == "__main__":
    app.run()
Fire up the server:
(env)$ FLASK_DEBUG=True python app.py
You should see "hello, world!" in your browser at http://127.0.0.1:5000/hello.
Add Stripe
Time for Stripe. Start by installing it:
(env)$ pip install stripe
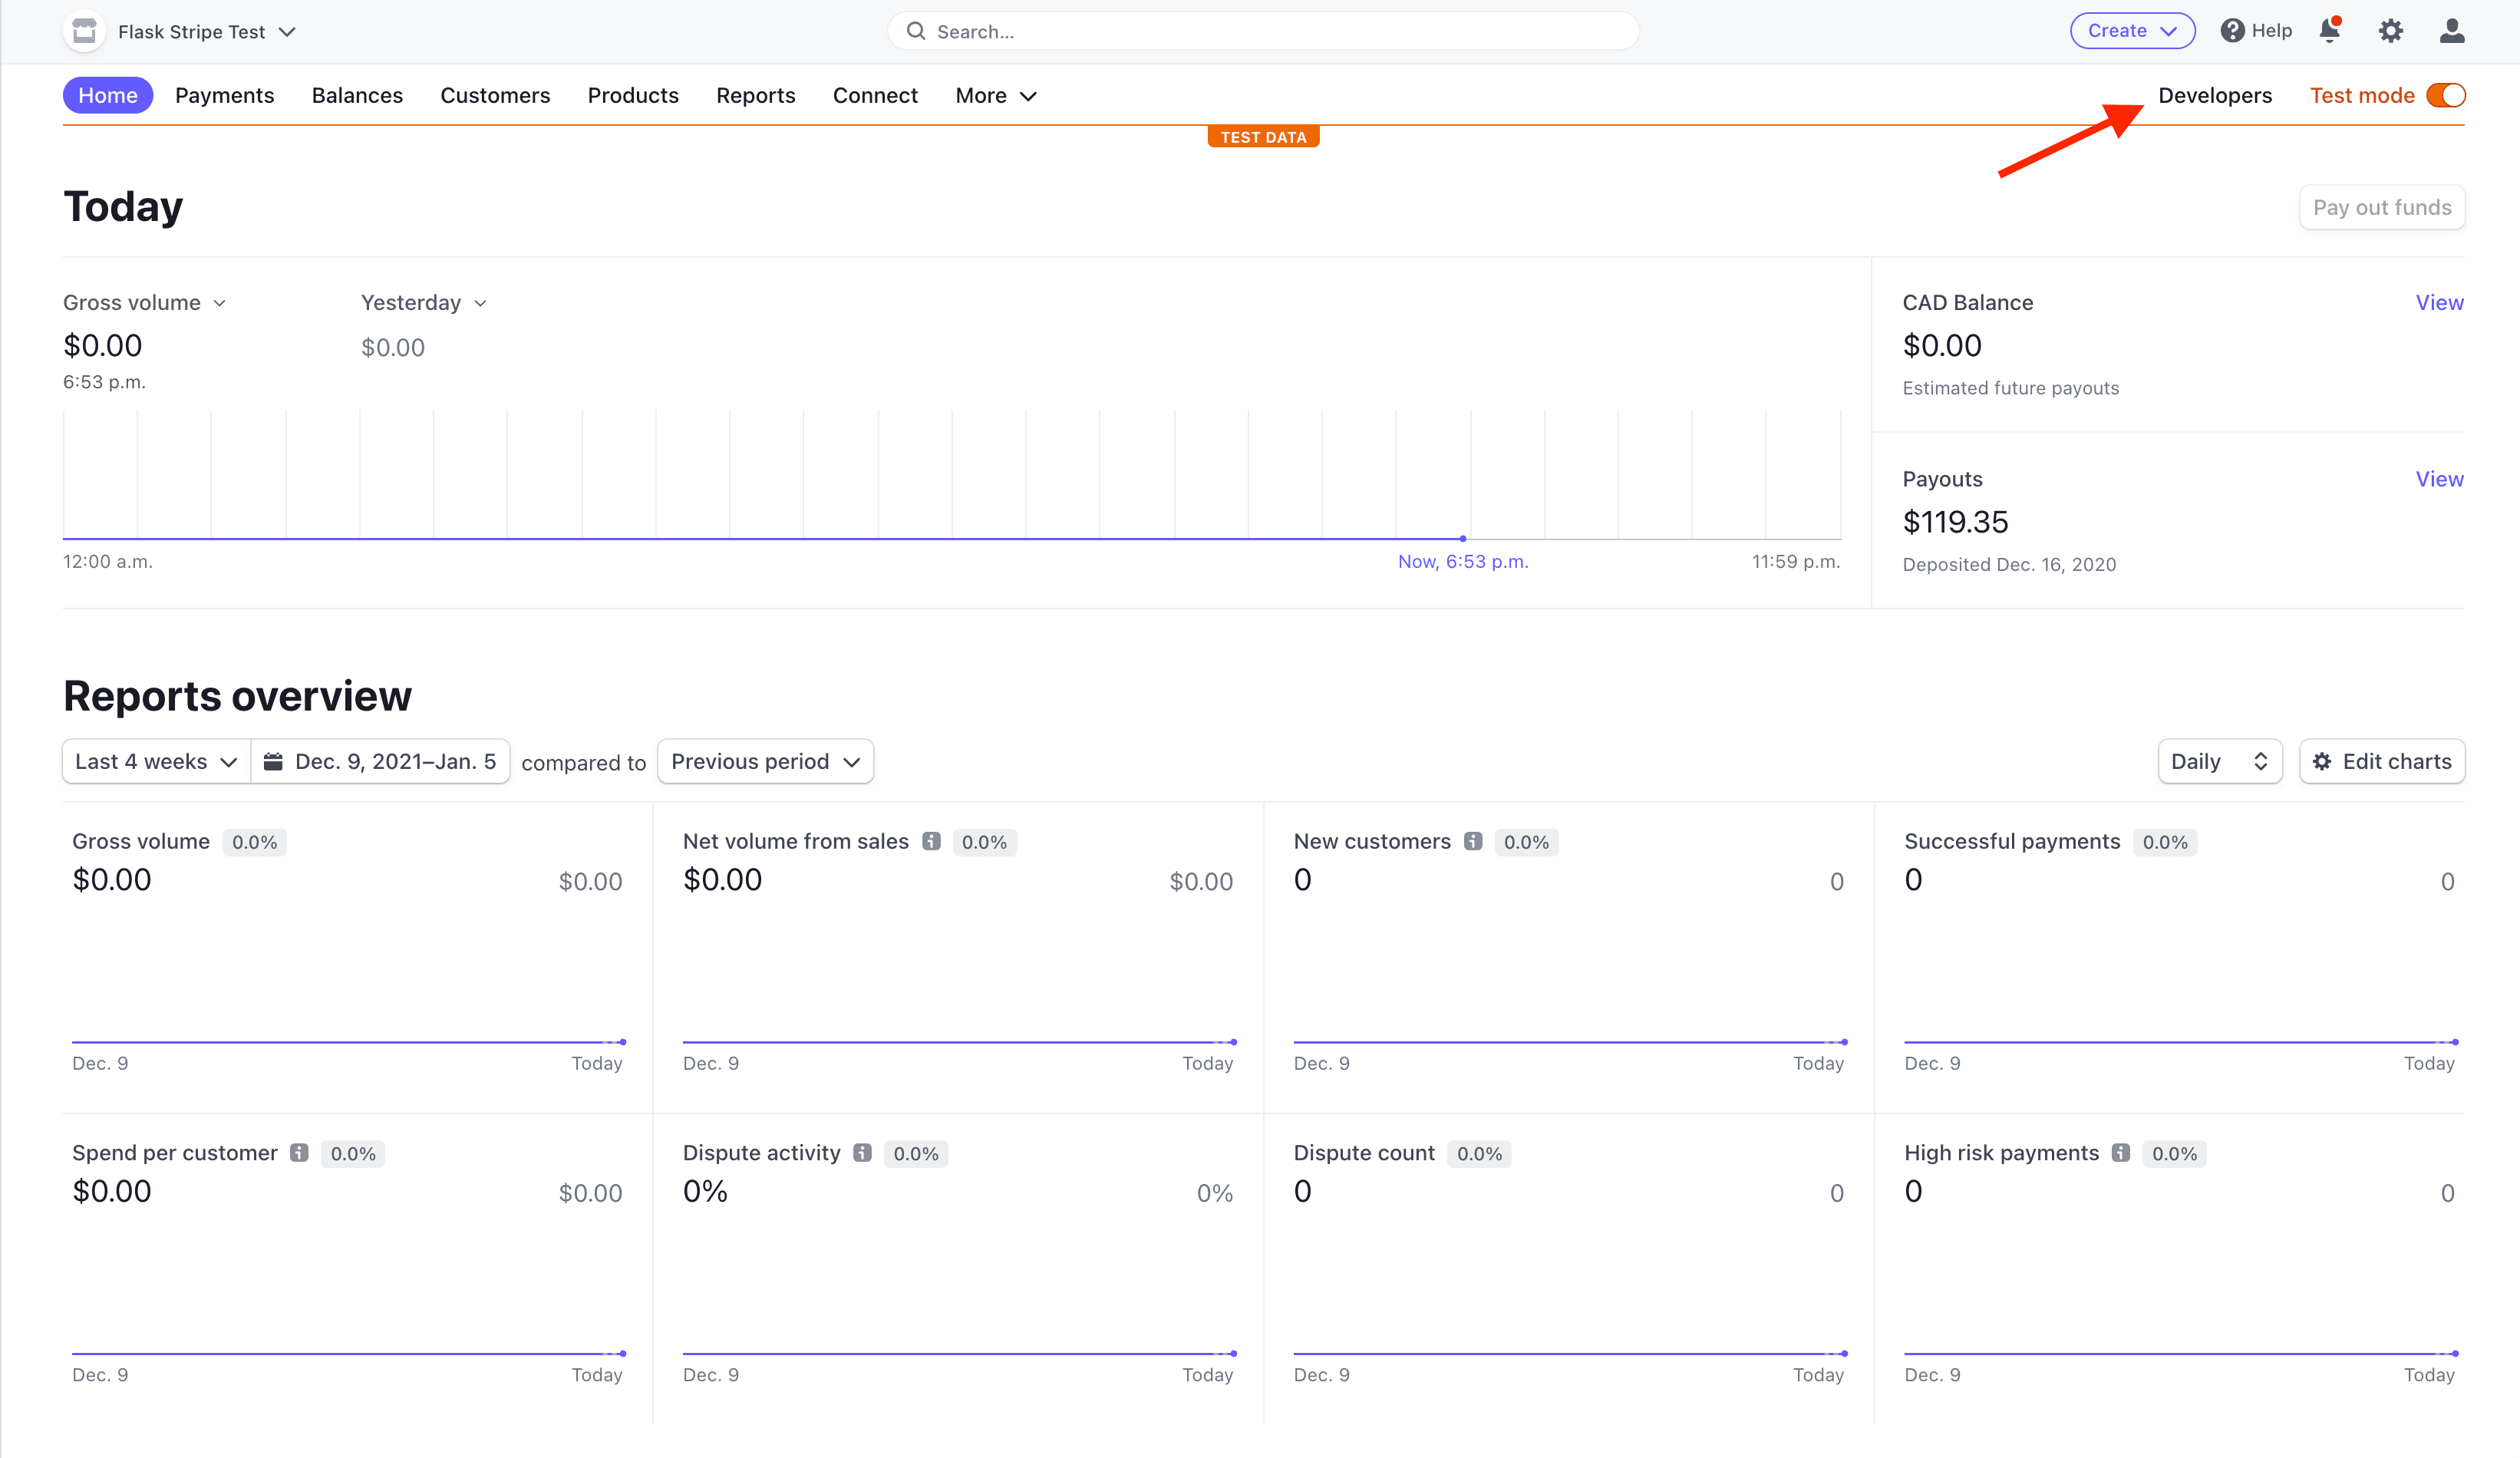
Next, register for a new Stripe account (if you don't already have one) and navigate to the dashboard. Click on "Developers":
Then on the top navigation bar click on "API keys":
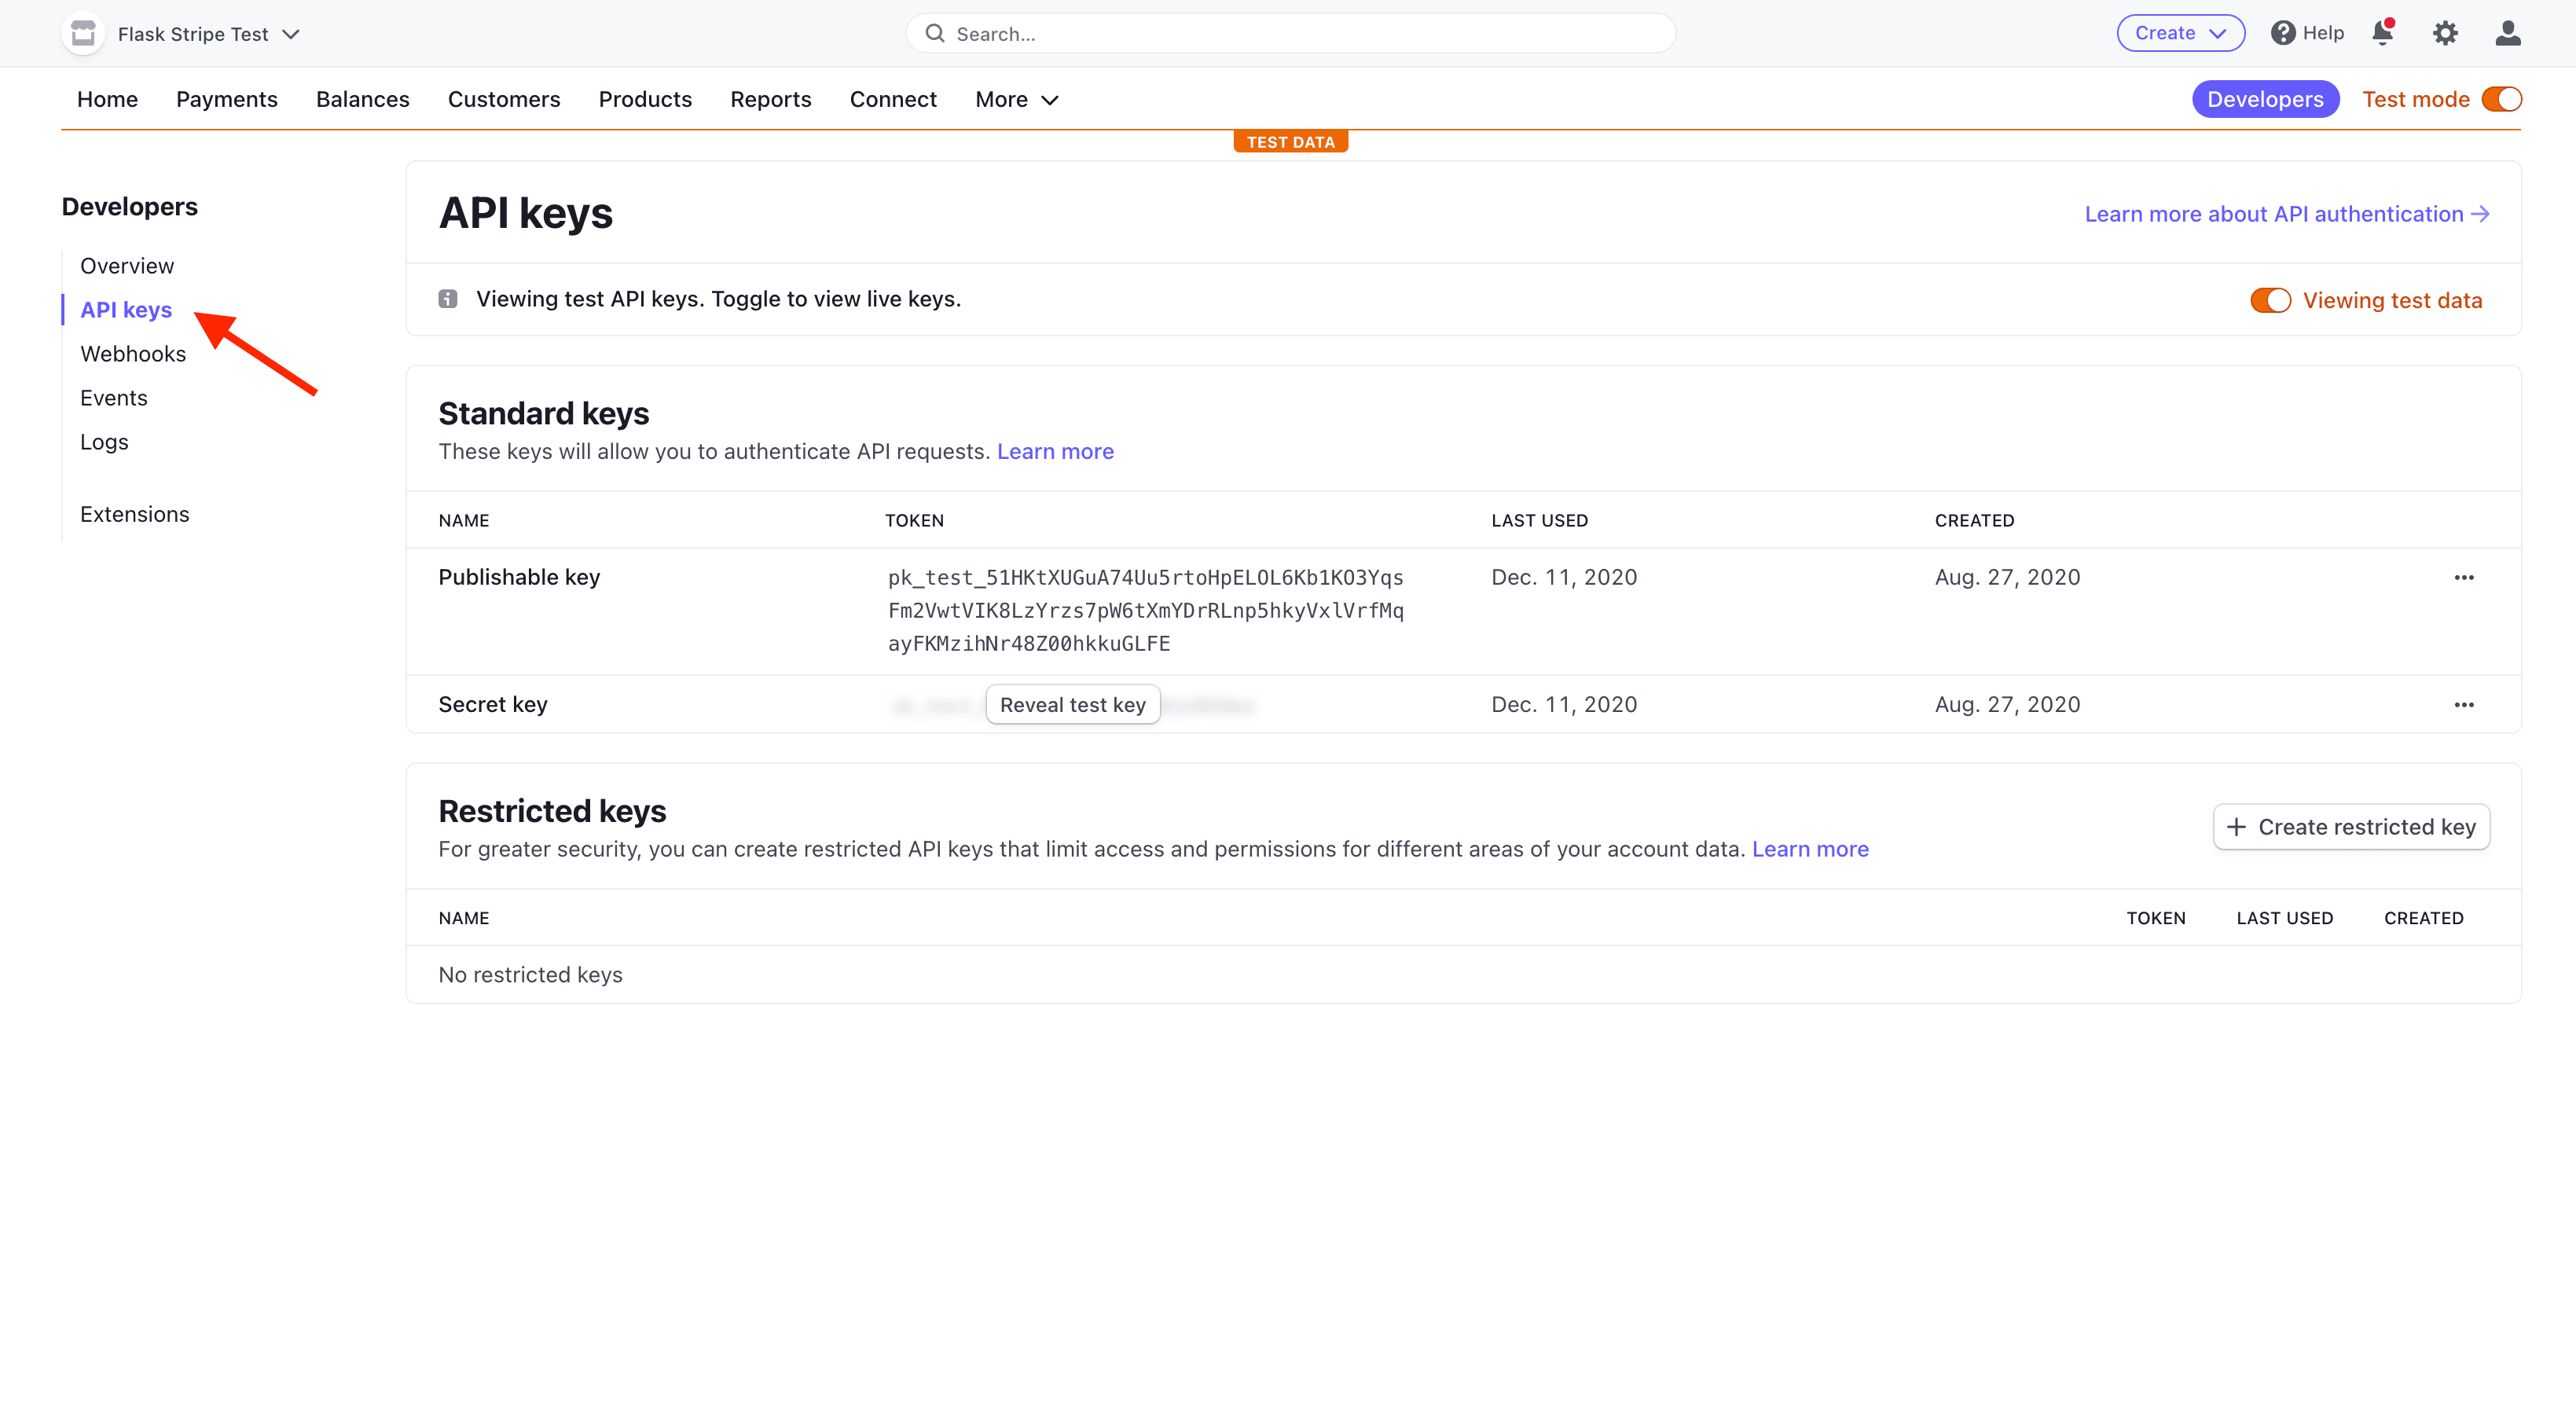
Each Stripe account has four API keys: two keys for testing and two for production. Each pair has a "secret key" and a "publishable key". Do not reveal the secret key to anyone; the publishable key will be embedded in the JavaScript on the page that anyone can see.
Currently the toggle for "Viewing test data" in the upper right indicates that we're using the test keys now. That's what we want.
Store your test API keys as environment variables like so:
(env)$ export STRIPE_PUBLISHABLE_KEY=<YOUR_STRIPE_PUBLISHABLE_KEY>
(env)$ export STRIPE_SECRET_KEY=<YOUR_STRIPE_SECRET_KEY>
Next, add the Stripe keys to your app:
# app.py

import os

import stripe
from flask import Flask, jsonify

app = Flask(__name__)

stripe_keys = {
    "secret_key": os.environ["STRIPE_SECRET_KEY"],
    "publishable_key": os.environ["STRIPE_PUBLISHABLE_KEY"],
}

stripe.api_key = stripe_keys["secret_key"]


@app.route("/hello")
def hello_world():
    return jsonify("hello, world!")


if __name__ == "__main__":
    app.run()
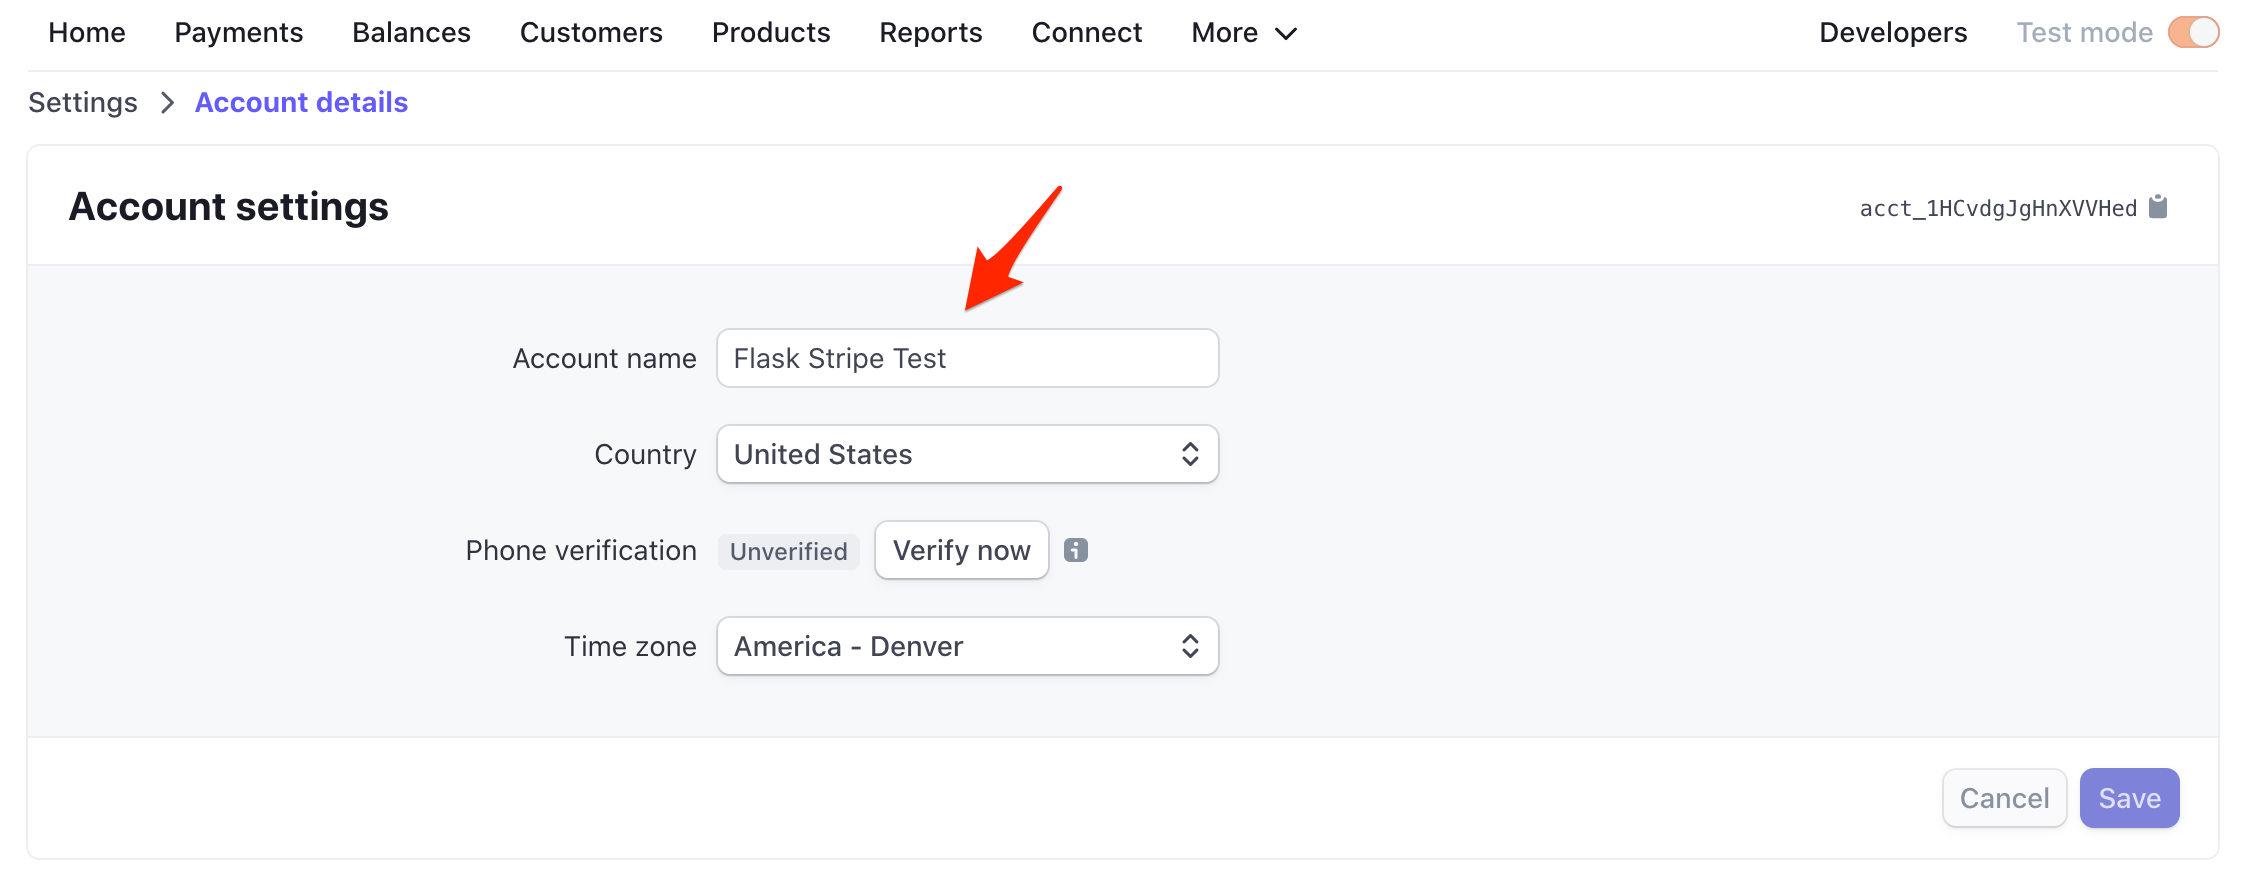
Finally, you'll need to specify an "Account name" within your "Account settings" at https://dashboard.stripe.com/settings/account:
Create a Product
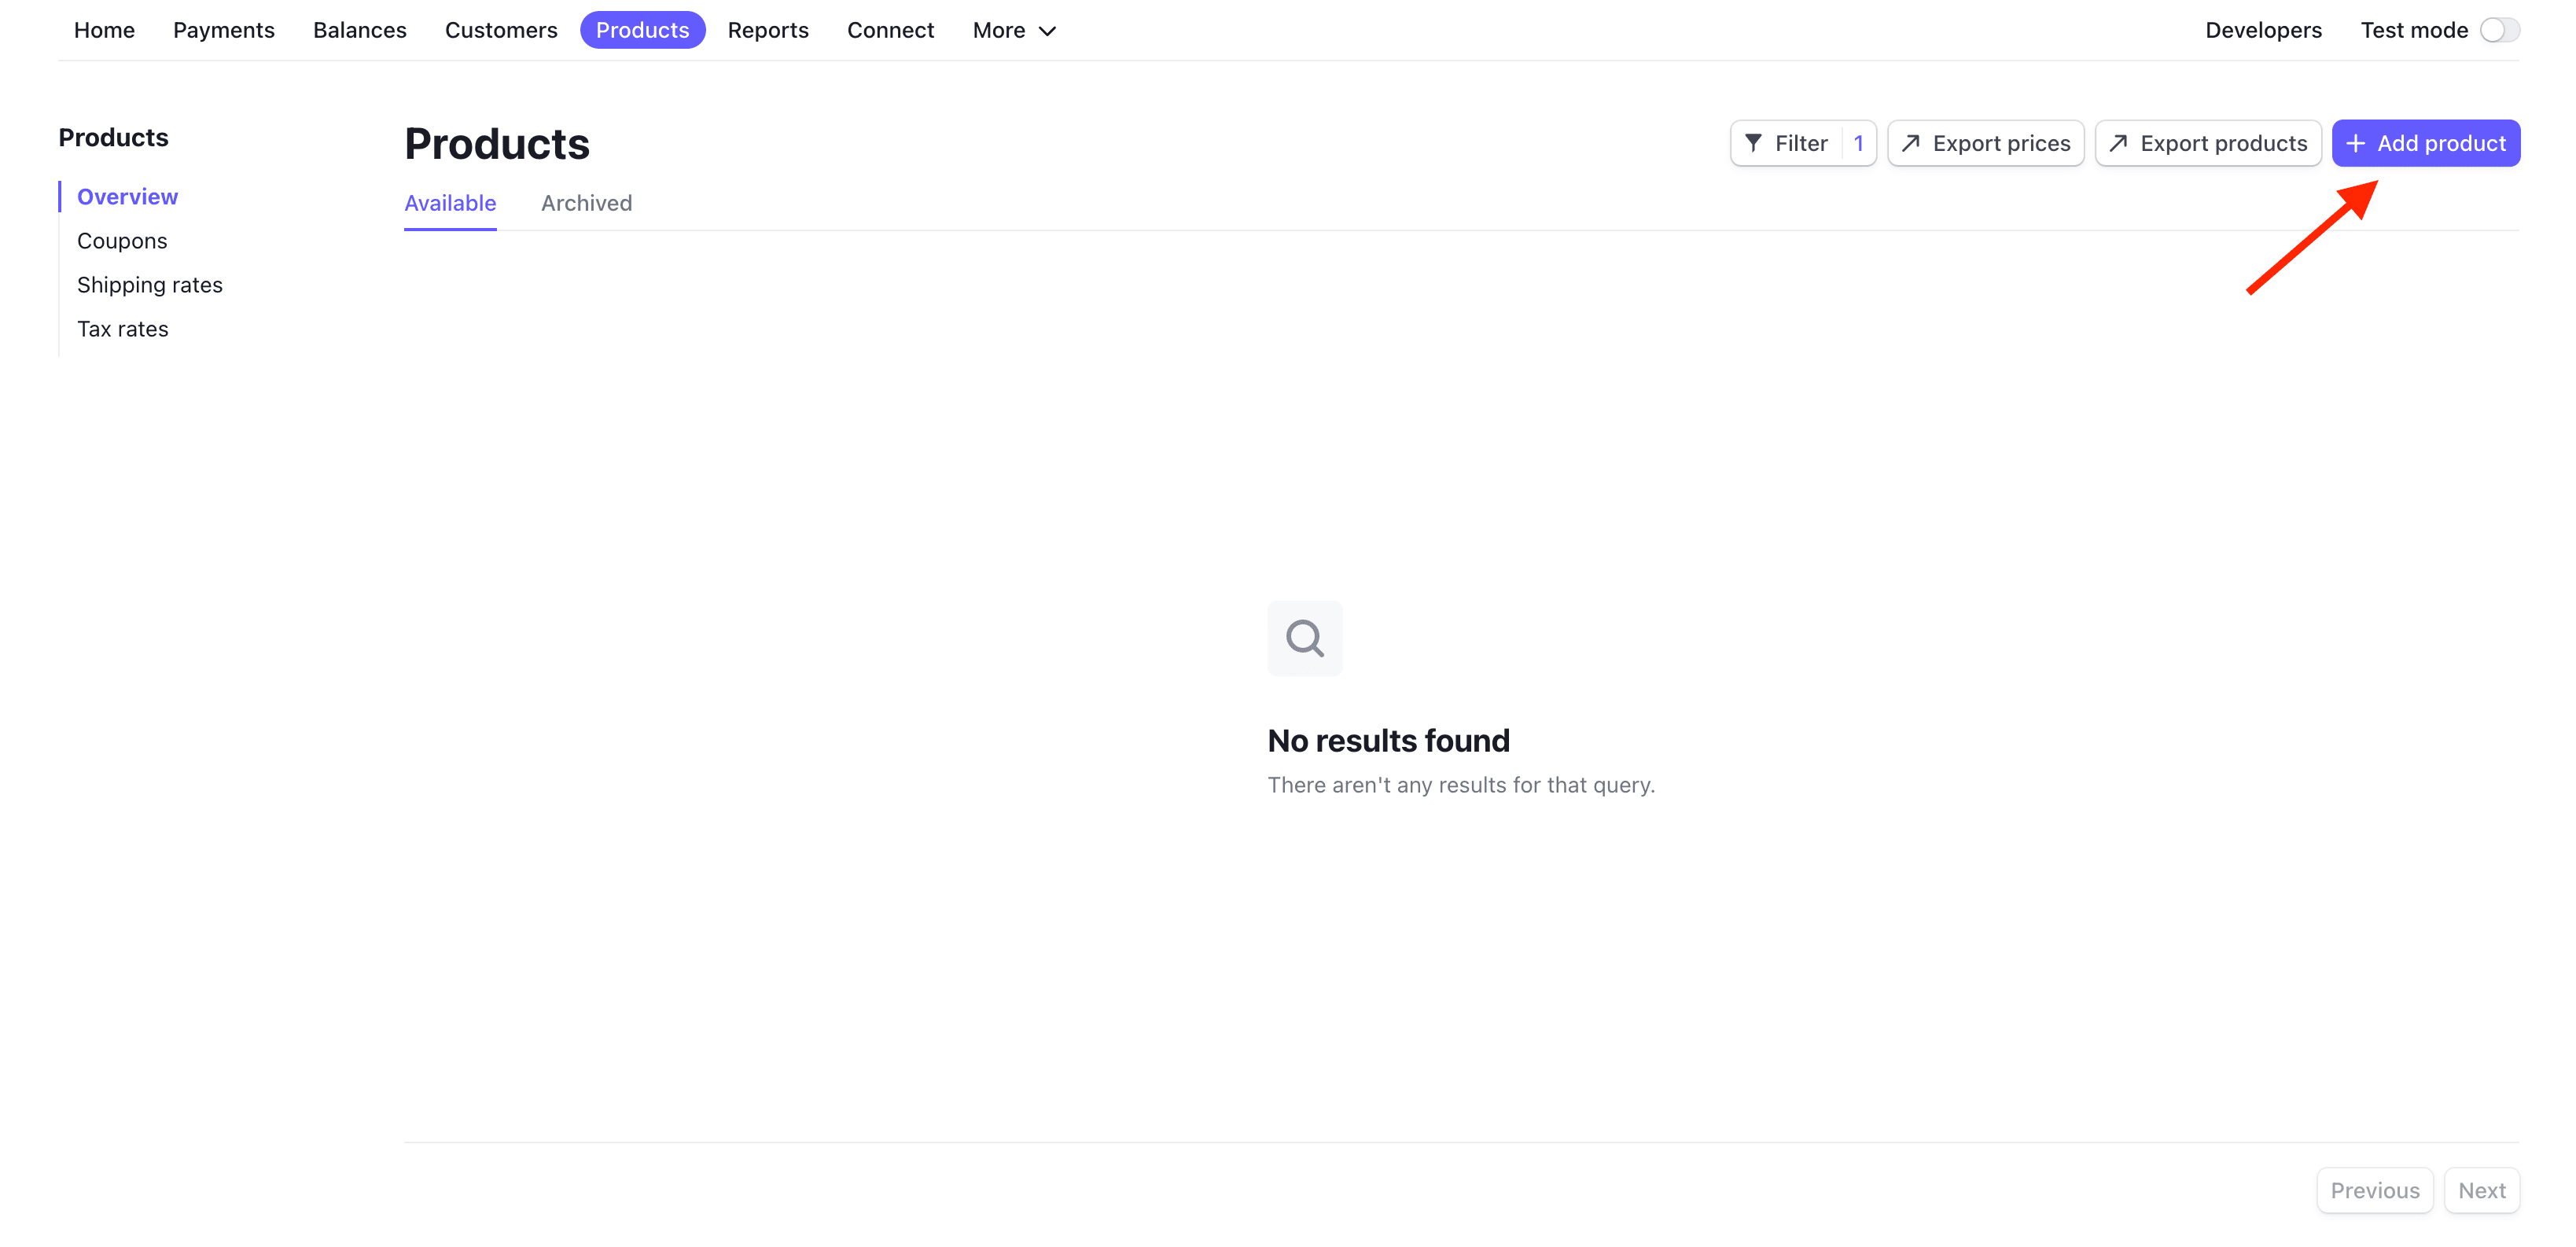
Next, we need to create a product to sell.
Click "Product Catalog" on the left side bar and then "Add product":
Add a product name, enter a price, and select "One-off":
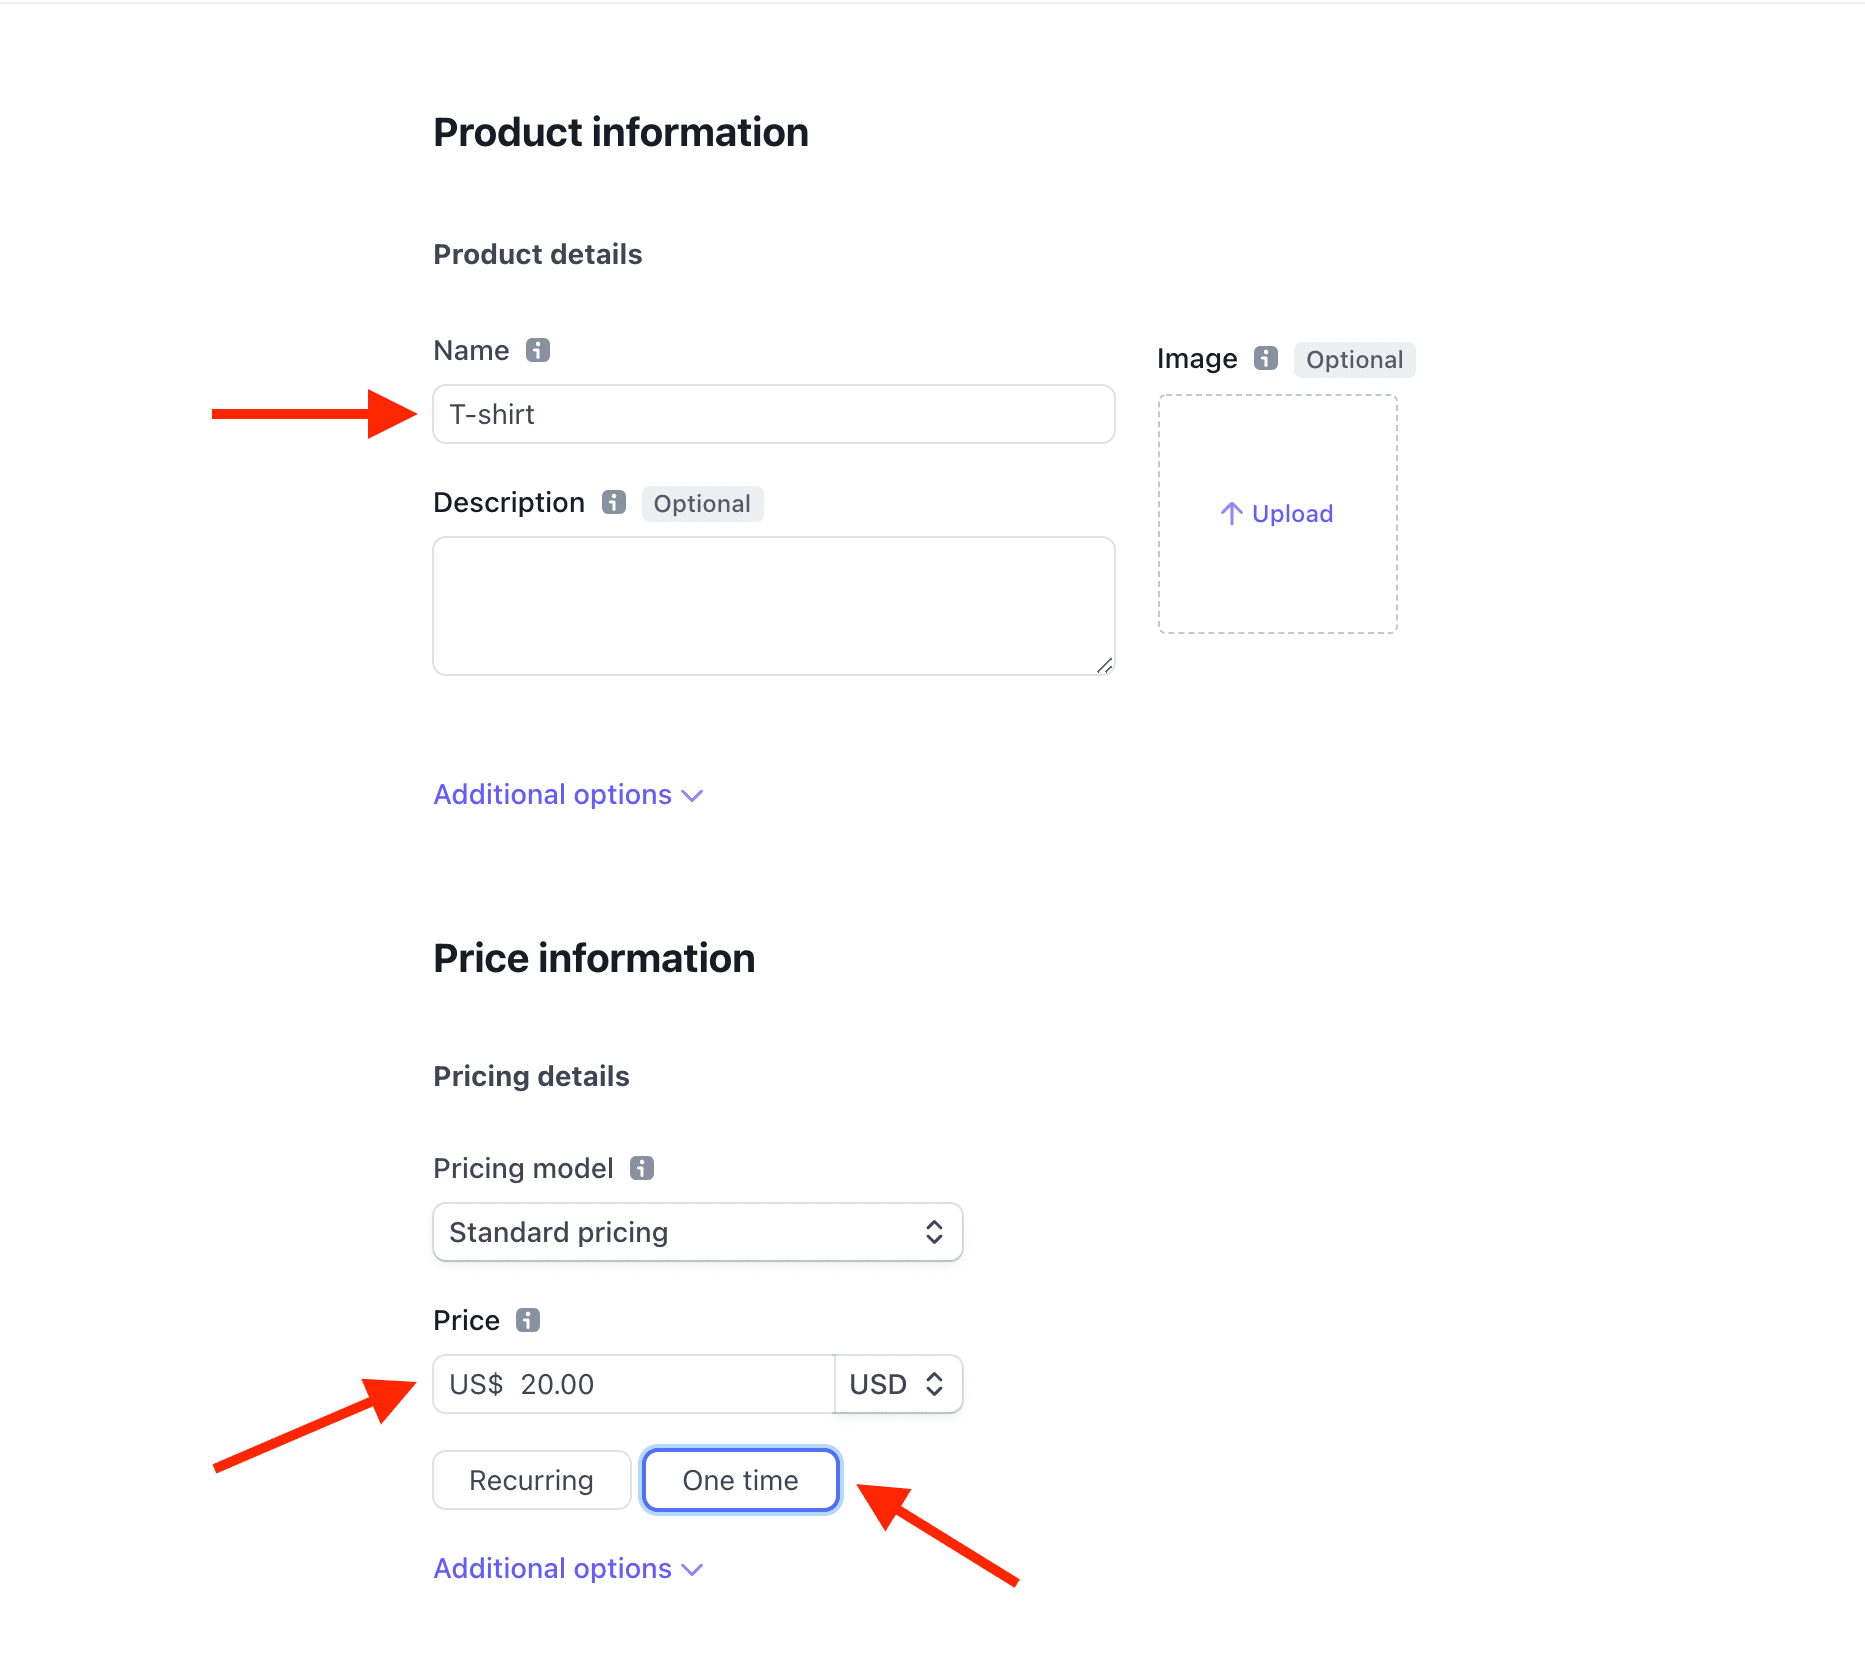
Click "Save product".
With the API keys in place and a product setup, we can now start adding Stripe Checkout to process payments.
Workflow
After the user clicks the purchase button we need to do the following:
-
Get Publishable Key
- Send an AJAX request from the client to the server requesting the publishable key
- Respond with the key
- Use the key to create a new instance of Stripe.js
-
Create Checkout Session
- Send another AJAX request to the server requesting a new Checkout Session ID
- Generate a new Checkout Session and send back the ID
- Redirect to the checkout page for the user to finish their purchase
-
Redirect the User Appropriately
- Redirect to a success page after a successful payment
- Redirect to a cancellation page after a cancelled payment
-
Confirm Payment with Stripe Webhooks
- Set up the webhook endpoint
- Test the endpoint using the Stripe CLI
- Register the endpoint with Stripe
Get Publishable Key
JavaScript Static File
Let's start by creating a new static file to hold all of our JavaScript.
Add a new folder called "static", and then add a new file to that folder called main.js:
// static/main.js

console.log("Sanity check!");
Next, add a new route to app.py that serves up an index.html template:
# app.py

@app.route("/")
def index():
    return render_template("index.html")
Make sure to import render_template as well:
from flask import Flask, jsonify, render_template
For the template, first add a new folder called "templates", and then add a base template called base.html, which includes the script tag for serving up the main.js static file:
<!-- templates/base.html -->

<!DOCTYPE html>
<html>
  <head>
    <meta charset="utf-8">
    <meta name="viewport" content="width=device-width, initial-scale=1">
    <title>Flask + Stripe Checkout</title>
    <link rel="stylesheet" href="https://cdn.jsdelivr.net/npm/[email protected]/css/bulma.min.css">
    <script src="{{ url_for('static', filename='main.js') }}"></script>
    <script defer src="https://use.fontawesome.com/releases/v5.14.0/js/all.js"></script>
  </head>
  <body>
    {% block content %}{% endblock %}
  </body>
</html>
Next, add a payment button to a new template called index.html:
<!-- templates/index.html -->

{% extends "base.html" %}

{% block content %}
  <section class="section">
    <div class="container">
      <button class="button is-primary" id="submitBtn">Purchase!</button>
    </div>
  </section>
{% endblock %}
Run the development server again:
(env)$ FLASK_DEBUG=True python app.py
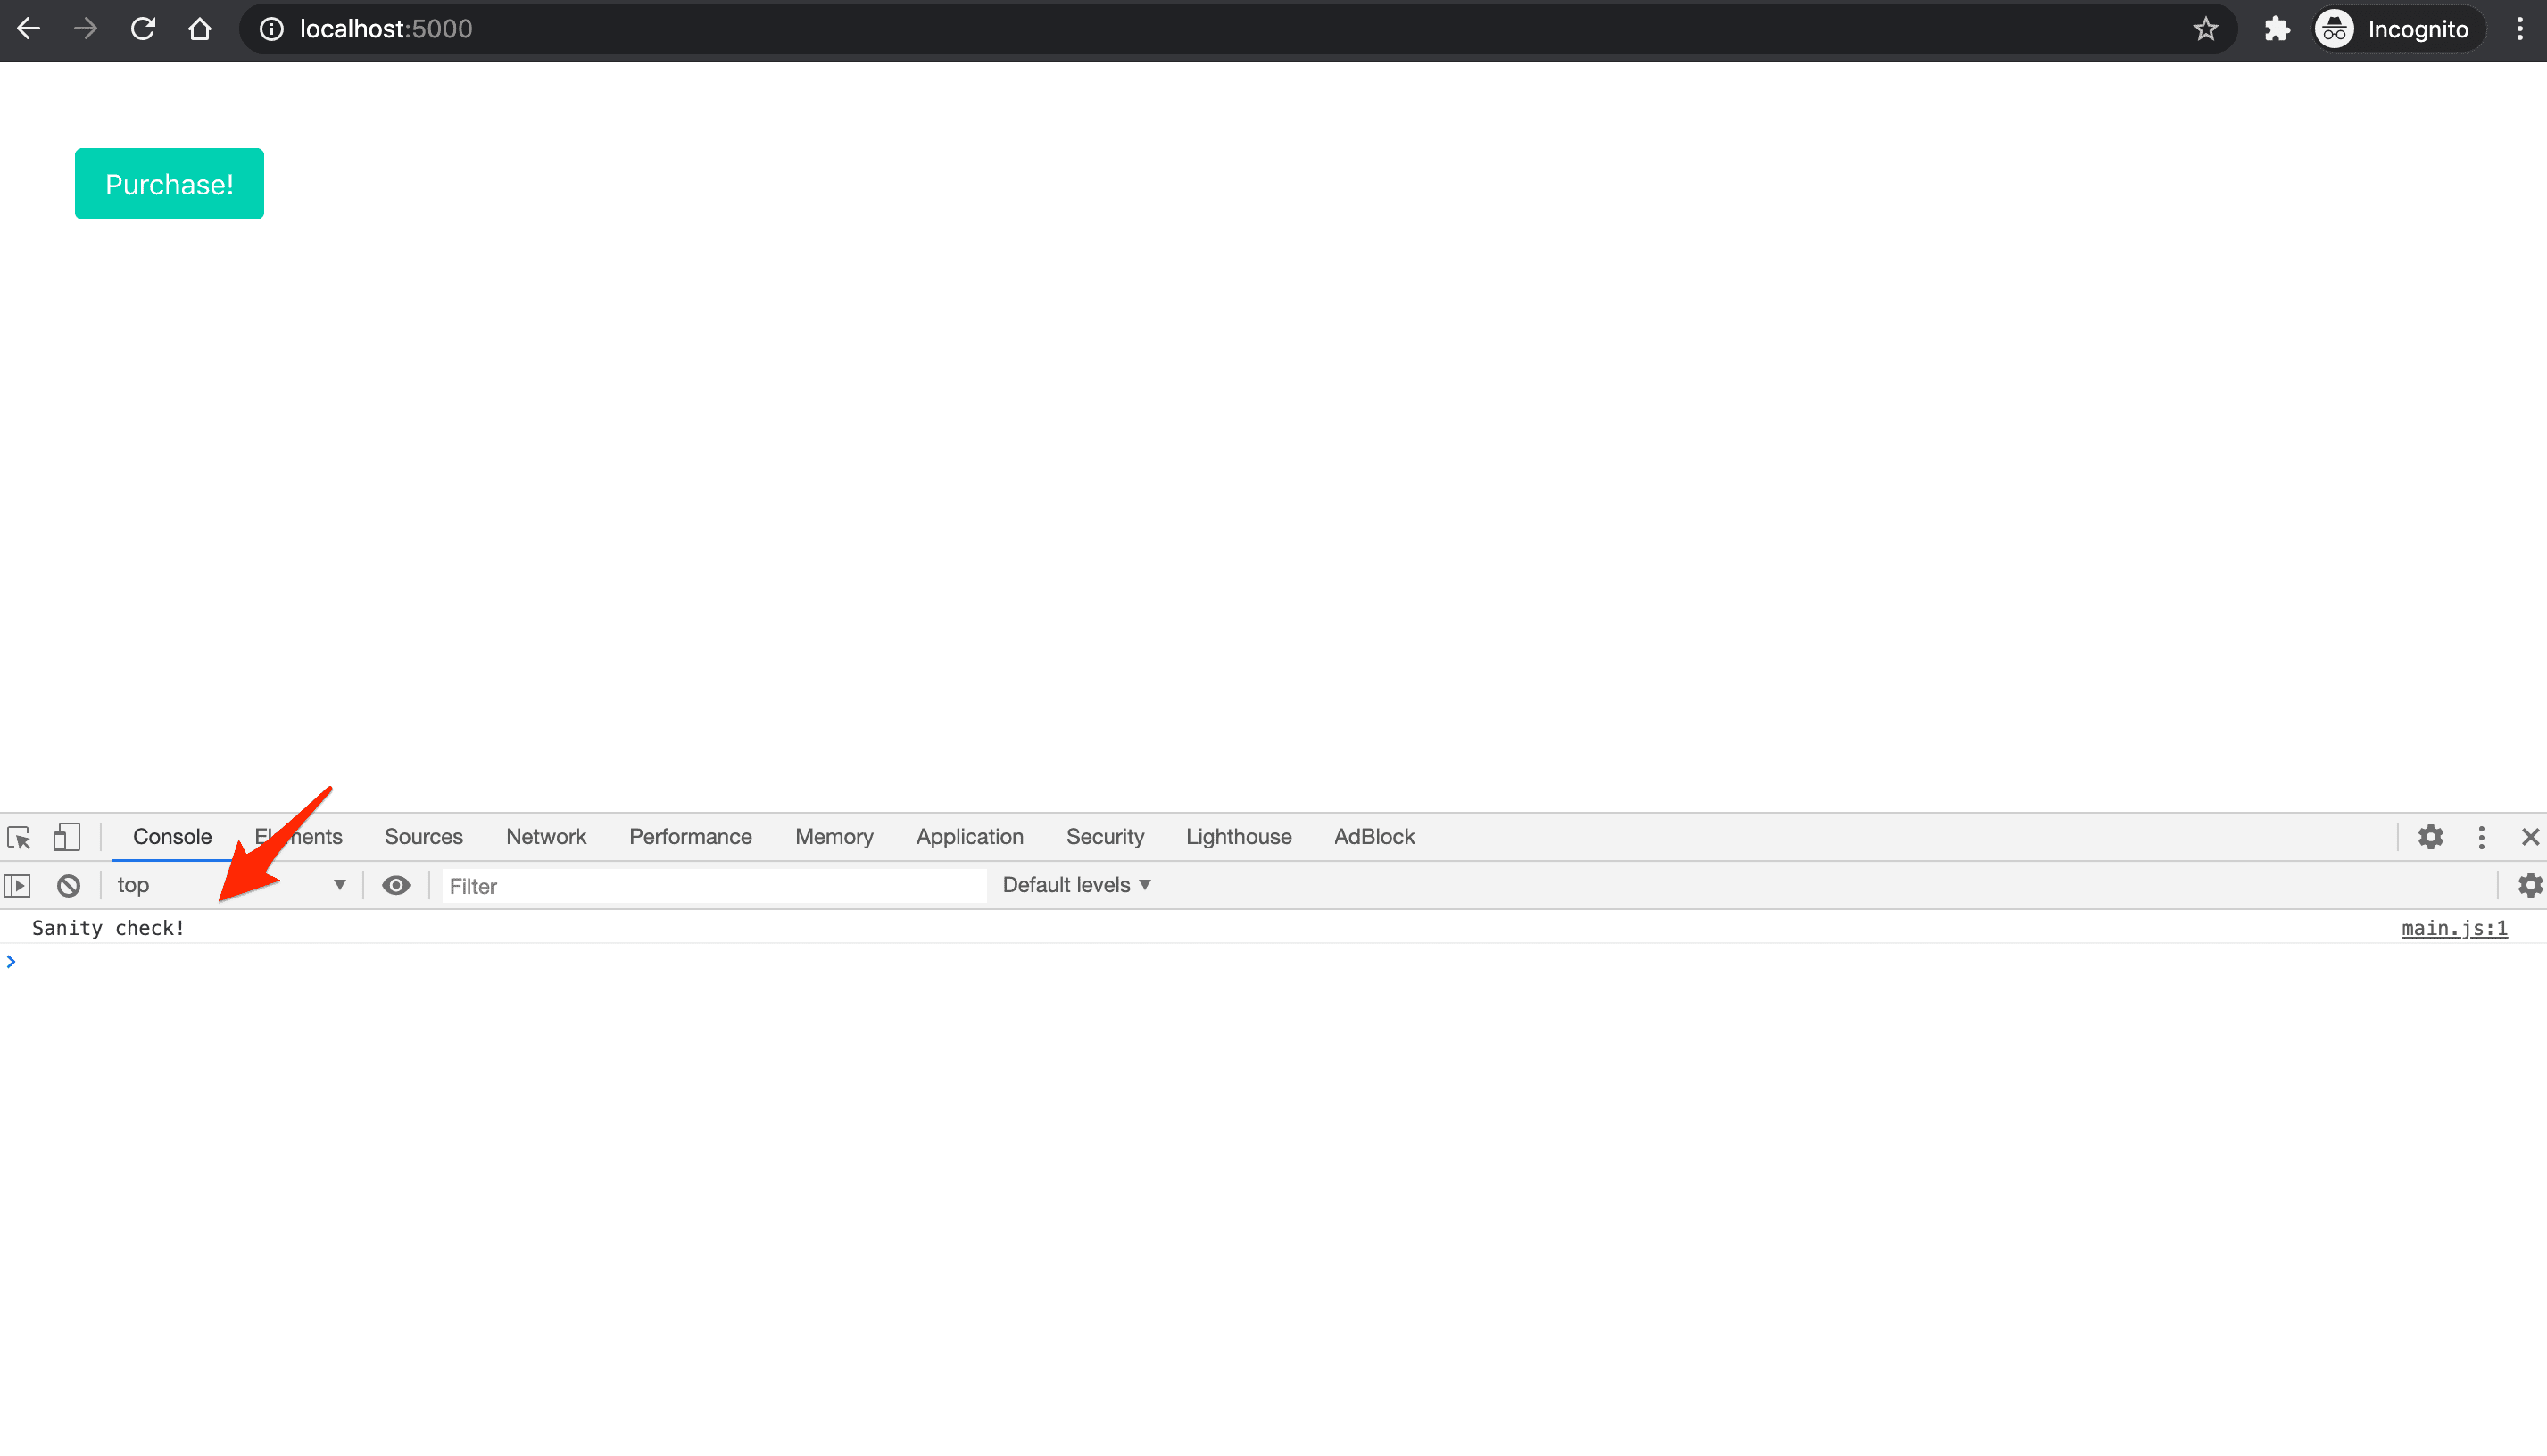
Navigate to http://127.0.0.1:5000, and open up the JavaScript console. You should see the sanity check:
Route
Next, add a new route to app.py to handle the AJAX request:
# app.py

@app.route("/config")
def get_publishable_key():
    stripe_config = {"publicKey": stripe_keys["publishable_key"]}
    return jsonify(stripe_config)
AJAX Request
Next, use the Fetch API to make an AJAX request to the new /config endpoint in static/main.js:
// static/main.js

console.log("Sanity check!");

// new
// Get Stripe publishable key
fetch("/config")
.then((result) => { return result.json(); })
.then((data) => {
  // Initialize Stripe.js
  const stripe = Stripe(data.publicKey);
});
The response from a fetch request is a ReadableStream. result.json() returns a promise, which we resolved to a JavaScript object -- i.e., data. We then used dot-notation to access the publicKey in order to obtain the publishable key.
Include Stripe.js in templates/base.html like so:
<!-- templates/base.html -->

<!DOCTYPE html>
<html>
  <head>
    <meta charset="utf-8">
    <meta name="viewport" content="width=device-width, initial-scale=1">
    <title>Flask + Stripe Checkout</title>
    <link rel="stylesheet" href="https://cdn.jsdelivr.net/npm/[email protected]/css/bulma.min.css">
    <script src="https://js.stripe.com/v3/"></script>  <!-- new -->
    <script src="{{ url_for('static', filename='main.js') }}"></script>
    <script defer src="https://use.fontawesome.com/releases/v5.14.0/js/all.js"></script>
  </head>
  <body>
    {% block content %}{% endblock %}
  </body>
</html>
Now, after the page load, a call will be made to /config, which will respond with the Stripe publishable key. We'll then use this key to create a new instance of Stripe.js.
Workflow:
-
Get Publishable KeySend an AJAX request from the client to the server requesting the publishable keyRespond with the keyUse the key to create a new instance of Stripe.js
-
Create Checkout Session
- Send another AJAX request to the server requesting a new Checkout Session ID
- Generate a new Checkout Session and send back the ID
- Redirect to the checkout page for the user to finish their purchase
-
Redirect the User Appropriately
- Redirect to a success page after a successful payment
- Redirect to a cancellation page after a cancelled payment
-
Confirm Payment with Stripe Webhooks
- Set up the webhook endpoint
- Test the endpoint using the Stripe CLI
- Register the endpoint with Stripe
Create Checkout Session
Moving on, we need to attach an event handler to the button's click event which will send another AJAX request to the server to generate a new Checkout Session ID.
Route
First, add the new route:
# app.py

@app.route("/create-checkout-session")
def create_checkout_session():
    domain_url = "http://127.0.0.1:5000/"
    stripe.api_key = stripe_keys["secret_key"]

    try:
        # Create new Checkout Session for the order
        checkout_session = stripe.checkout.Session.create(
            success_url=domain_url + "success?session_id={CHECKOUT_SESSION_ID}",
            cancel_url=domain_url + "cancelled",
            payment_method_types=["card"],
            mode="payment",
            line_items=[
                {
                    "price_data": {
                        "currency": "usd",
                        "product_data": {
                            "name": "T-shirt",
                        },
                        "unit_amount": 2000,  # Amount in cents
                    },
                    "quantity": 1,
                }
            ]
        )
        return jsonify({"sessionId": checkout_session["id"]})
    except Exception as e:
        return jsonify(error=str(e)), 403
Here, we-
- Defined a
domain_url(for the redirects) - Assigned the Stripe secret key to
stripe.api_key(so it will be sent automatically when we make a request to create a new Checkout Session) - Created the Checkout Session
- Sent the ID back in the response
Take note of the success_url and cancel_url, which use the domain_url. The user will be redirected back to those URLs in the event of a successful payment or cancellation, respectively. We'll set the /success and /cancelled routes up shortly.
AJAX Request
Add the event handler and subsequent AJAX request to static/main.js:
// static/main.js

console.log("Sanity check!");

// Get Stripe publishable key
fetch("/config")
.then((result) => { return result.json(); })
.then((data) => {
  // Initialize Stripe.js
  const stripe = Stripe(data.publicKey);

  // new
  // Event handler
  document.querySelector("#submitBtn").addEventListener("click", () => {
    // Get Checkout Session ID
    fetch("/create-checkout-session")
    .then((result) => { return result.json(); })
    .then((data) => {
      console.log(data);
      // Redirect to Stripe Checkout
      return stripe.redirectToCheckout({sessionId: data.sessionId})
    })
    .then((res) => {
      console.log(res);
    });
  });
});
Here, after resolving the result.json() promise, we called the redirectToCheckout method with the Checkout Session ID from the resolved promise.
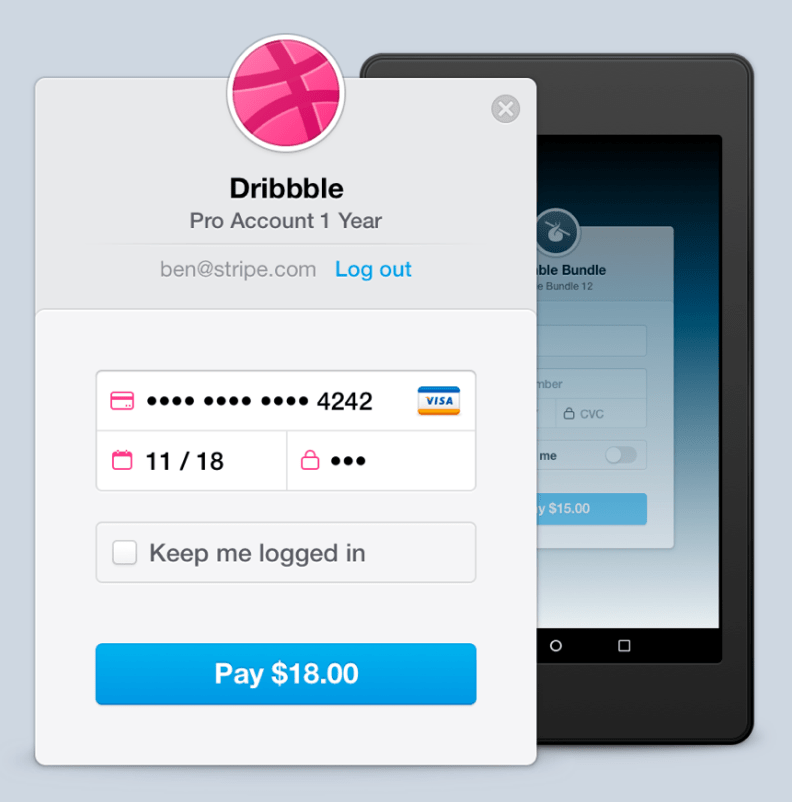
Navigate to http://127.0.0.1:5000. On button click, you should be redirected to an instance of Stripe Checkout (a Stripe-hosted page to securely collect payment information) with the T-shirt product information:
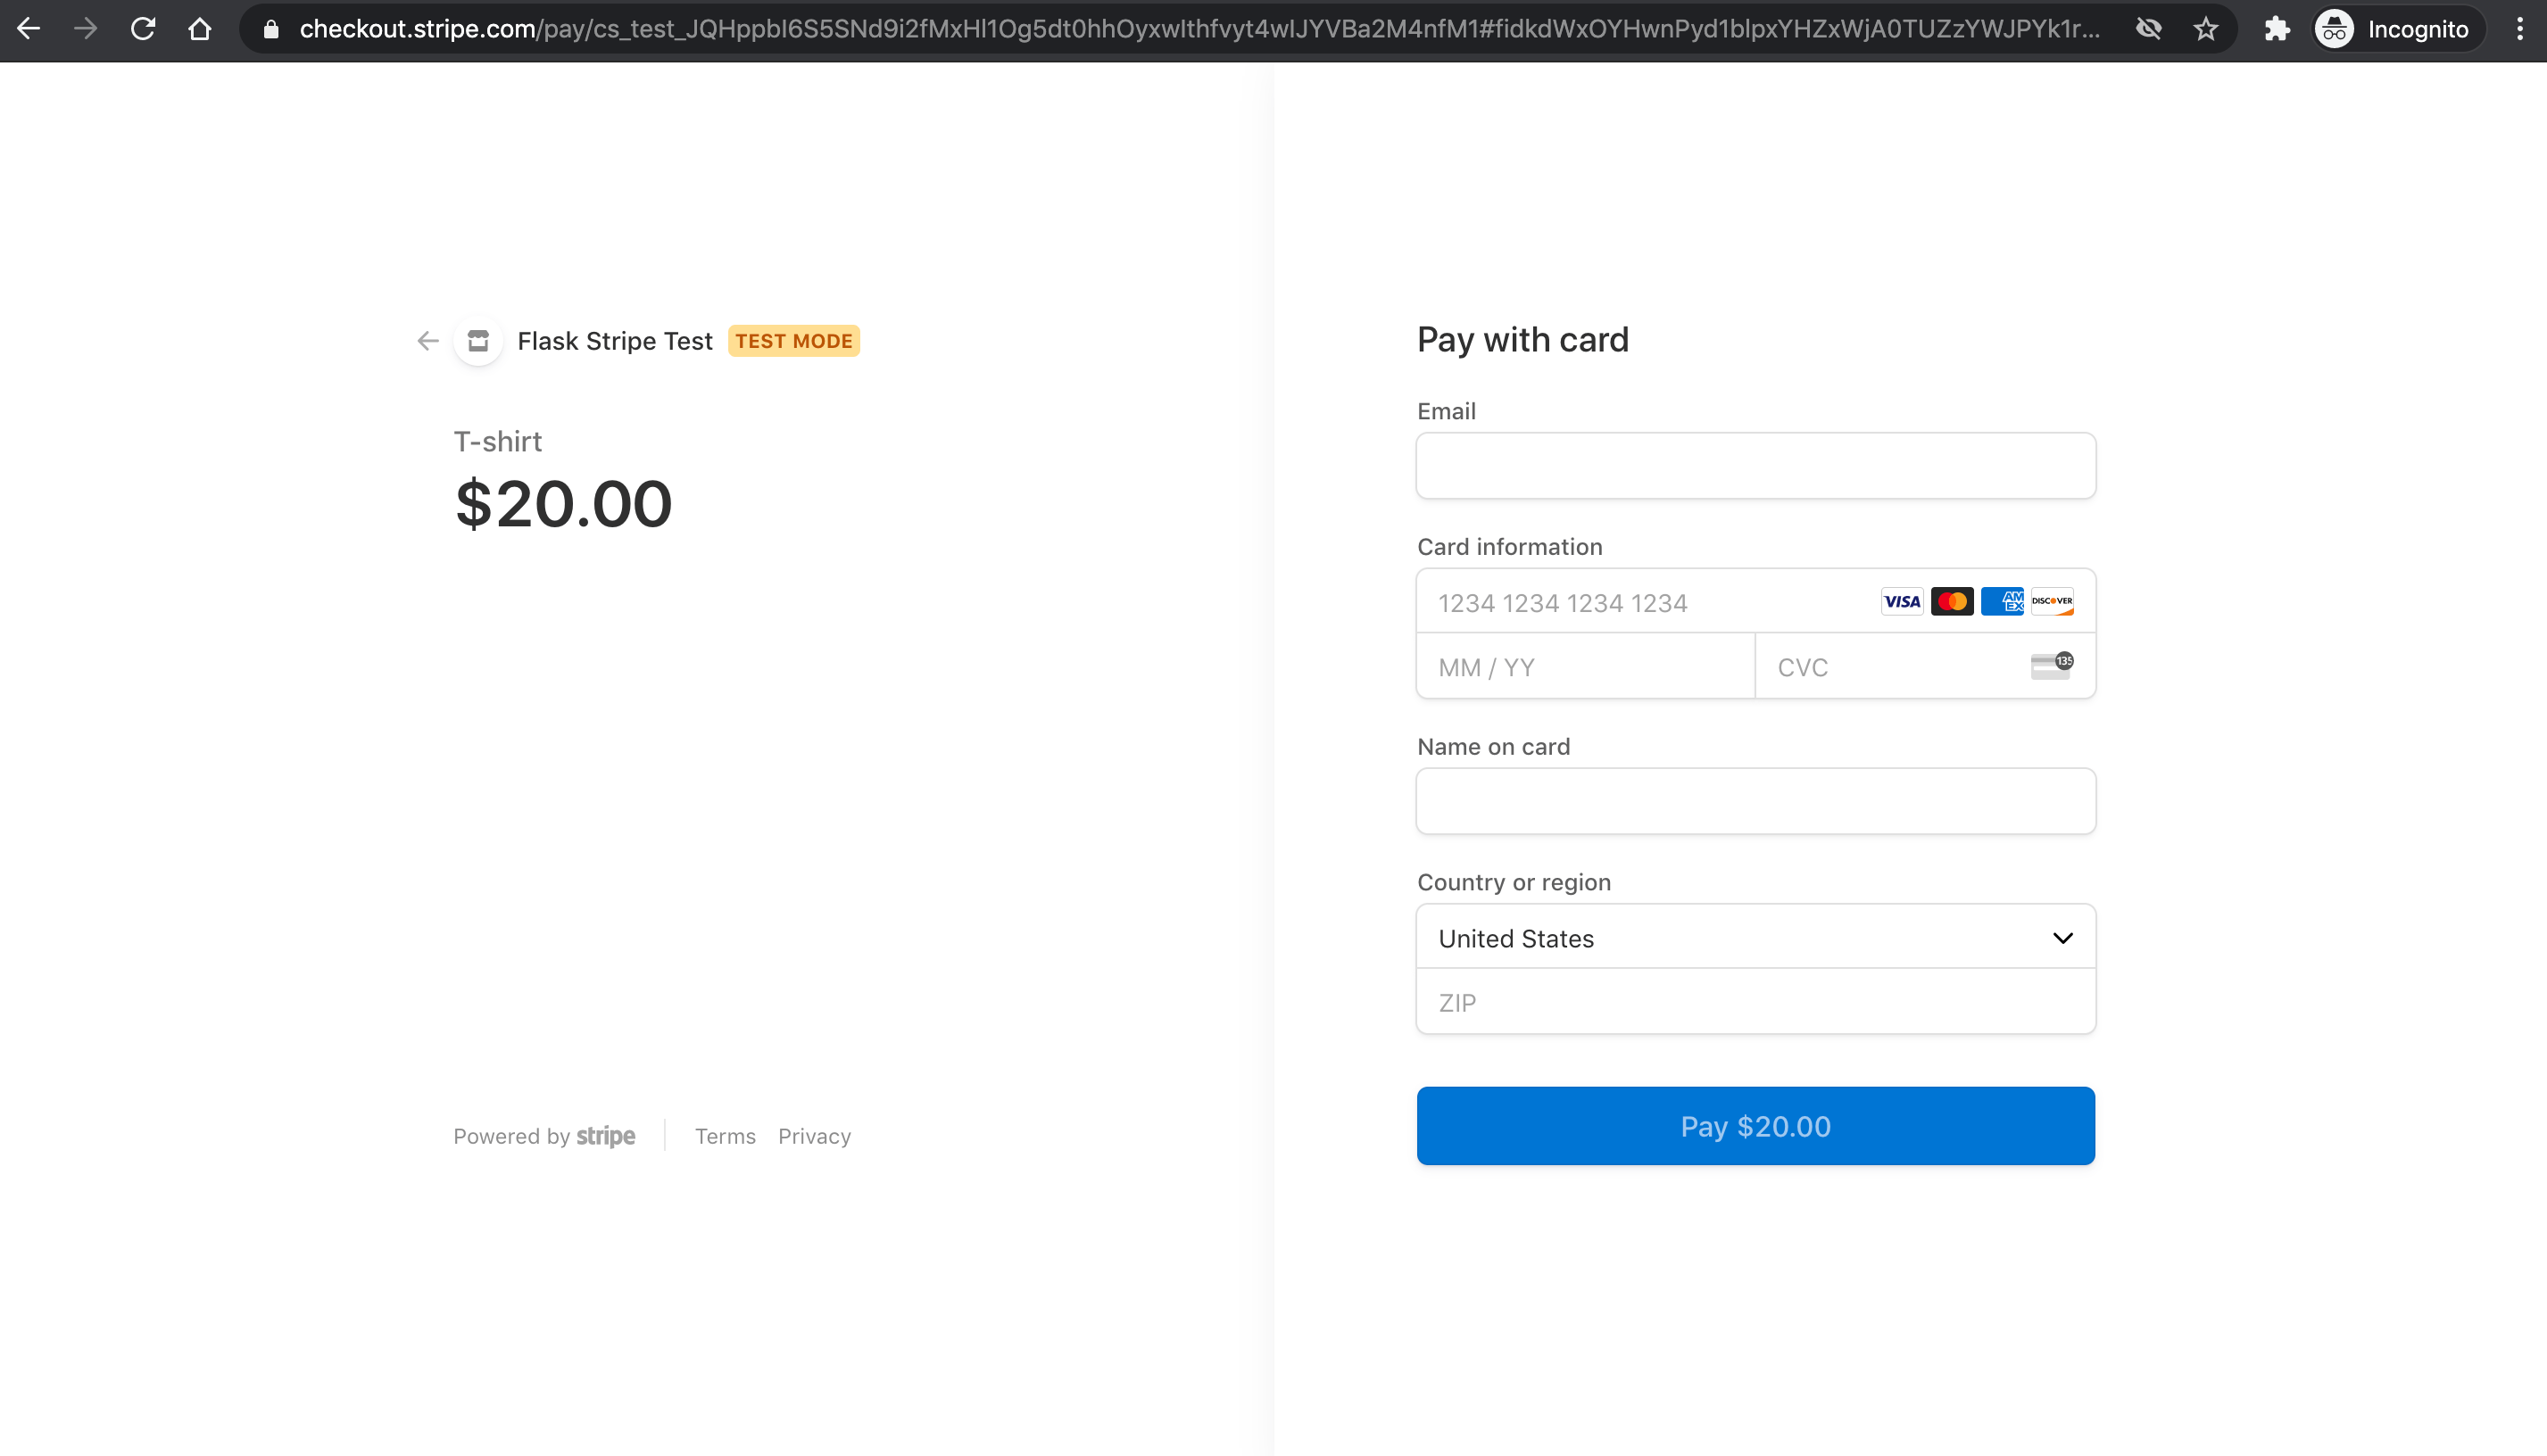
We can test the form by using one of the several test card numbers that Stripe provides. Let's use 4242 4242 4242 4242.
- Email: a valid email
- Card number:
4242 4242 4242 4242 - Expiration: any date in the future
- CVC: any three numbers
- Name: anything
- Postal code: any five numbers
If all goes well, the payment should be processed, but the redirect will fail since we have not set up the /success URL yet.
Workflow:
-
Get Publishable KeySend an AJAX request from the client to the server requesting the publishable keyRespond with the keyUse the key to create a new instance of Stripe.js
-
Create Checkout SessionSend another AJAX request to the server requesting a new Checkout Session IDGenerate a new Checkout Session and send back the IDRedirect to the checkout page for the user to finish their purchase
-
Redirect the User Appropriately
- Redirect to a success page after a successful payment
- Redirect to a cancellation page after a cancelled payment
-
Confirm Payment with Stripe Webhooks
- Set up the webhook endpoint
- Test the endpoint using the Stripe CLI
- Register the endpoint with Stripe
Redirect the User Appropriately
Finally, let's wire up the templates and routes for handling the success and cancellation redirects.
Success template:
<!-- templates/success.html -->

{% extends "base.html" %}

{% block content %}
  <section class="section">
    <div class="container">
      <p>Your payment succeeded.</p>
    </div>
  </section>
{% endblock %}
Cancelled template:
<!-- templates/cancelled.html -->

{% extends "base.html" %}

{% block content %}
  <section class="section">
    <div class="container">
      <p>Your payment was cancelled.</p>
    </div>
  </section>
{% endblock %}
Routes:
# app.py

@app.route("/success")
def success():
    return render_template("success.html")


@app.route("/cancelled")
def cancelled():
    return render_template("cancelled.html")
Back at http://127.0.0.1:5000, click on the payment button and use the credit card number 4242 4242 4242 4242 again along with the rest of the dummy credit card info. Submit the payment. You should be redirected back to http://127.0.0.1:5000/success.
To confirm a charge was actually made, click "Transactions" back on the Stripe dashboard:
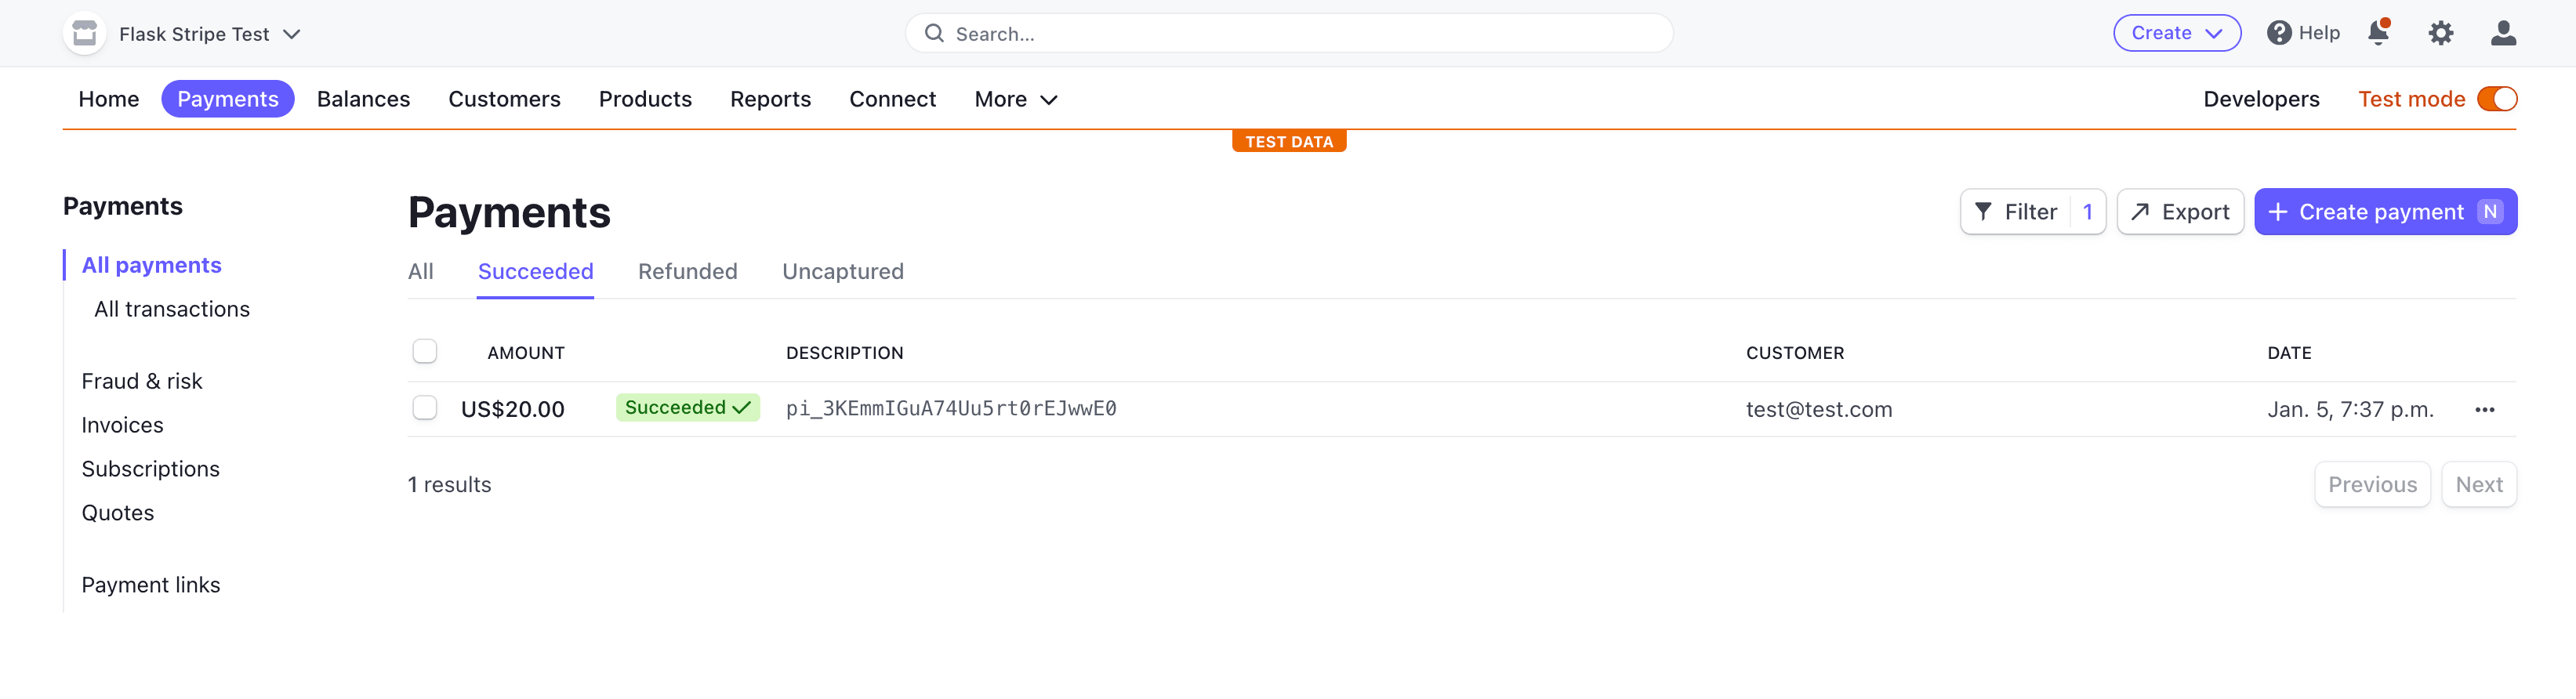
To review, we used the secret key to create a unique Checkout Session ID on the server. This ID was then used to create a Checkout instance, which the end user gets redirected to after clicking the payment button. After the charge occurred, they are then redirected back to the success page.
Be sure to test out a cancelled payment as well.
Workflow:
-
Get Publishable KeySend an AJAX request from the client to the server requesting the publishable keyRespond with the keyUse the key to create a new instance of Stripe.js
-
Create Checkout SessionSend another AJAX request to the server requesting a new Checkout Session IDGenerate a new Checkout Session and send back the IDRedirect to the checkout page for the user to finish their purchase
-
Redirect the User AppropriatelyRedirect to a success page after a successful paymentRedirect to a cancellation page after a cancelled payment
-
Confirm Payment with Stripe Webhooks
- Set up the webhook endpoint
- Test the endpoint using the Stripe CLI
- Register the endpoint with Stripe
Confirm Payment with Stripe Webhooks
Our app works well at this point, but we still can't programmatically confirm payments and perhaps run some code if a payment was successful. We already redirect the user to the success page after they check out, but we can't rely on that page alone since payment confirmation happens asynchronously.
There are two types of events in Stripe and programming in general: Synchronous events, which have an immediate effect and results (e.g., creating a customer), and asynchronous events, which don't have an immediate result (e.g., confirming payments). Because payment confirmation is done asynchronously, the user might get redirected to the success page before their payment is confirmed and before we receive their funds.
One of the easiest ways to get notified when the payment goes through is to use a callback or so-called Stripe webhook. We'll need to create a simple endpoint in our application, which Stripe will call whenever an event occurs (e.g., when a user buys a T-shirt). By using webhooks, we can be absolutely sure the payment went through successfully.
In order to use webhooks, we need to:
- Set up the webhook endpoint
- Test the endpoint using the Stripe CLI
- Register the endpoint with Stripe
This section was written by Nik Tomazic.
Endpoint
Create a new route called stripe_webhook which prints a message every time a payment goes through successfully:
# app.py

@app.route("/webhook", methods=["POST"])
def stripe_webhook():
    payload = request.get_data(as_text=True)
    sig_header = request.headers.get("Stripe-Signature")

    try:
        event = stripe.Webhook.construct_event(
            payload, sig_header, stripe_keys["endpoint_secret"]
        )

    except ValueError as e:
        # Invalid payload
        return "Invalid payload", 400
    except stripe.error.SignatureVerificationError as e:
        # Invalid signature
        return "Invalid signature", 400

    # Handle the checkout.session.completed event
    if event["type"] == "checkout.session.completed":
        print("Payment was successful.")
        # TODO: run some custom code here

    return "Success", 200
stripe_webhook now serves as our webhook endpoint. Here, we're only looking for checkout.session.completed events which are called whenever a checkout is successful, but you can use the same pattern for other Stripe events.
Make sure to add the request import to the top:
from flask import Flask, jsonify, render_template, request
Testing the webhook
We'll use the Stripe CLI to test the webhook.
Once downloaded and installed, run the following command in a new terminal window to log in to your Stripe account:
$ stripe login
This command should generate a pairing code:
Your pairing code is: peach-loves-classy-cozy
This pairing code verifies your authentication with Stripe.
Press Enter to open the browser (^C to quit)
By pressing Enter, the CLI will open your default web browser and ask for permission to access your account information. Go ahead and allow access. Back in your terminal, you should see something similar to:
> Done! The Stripe CLI is configured for Flask Stripe Test with account id acct_<ACCOUNT_ID>

Please note: this key will expire after 90 days, at which point you'll need to re-authenticate.
Next, we can start listening to Stripe events and forward them to our endpoint using the following command:
$ stripe listen --forward-to 127.0.0.1:5000/webhook
This will also generate a webhook signing secret:
> Ready! Your webhook signing secret is whsec_xxxxxxxxxxxxxxxxxxxxxxxxxxxxxx (^C to quit)
In order to initialize the endpoint, save the secret as another environment variable like so:
(env)$ export STRIPE_ENDPOINT_SECRET=<YOUR_STRIPE_ENDPOINT_SECRET>
Next, add it in the stripe_keys dictionary like so:
# app.py

stripe_keys = {
    "secret_key": os.environ["STRIPE_SECRET_KEY"],
    "publishable_key": os.environ["STRIPE_PUBLISHABLE_KEY"],
    "endpoint_secret": os.environ["STRIPE_ENDPOINT_SECRET"], # new
}
Stripe will now forward events to our endpoint. To test, run another test payment through with 4242 4242 4242 4242. In your terminal, you should see the Payment was successful. message.
Once done, stop the stripe listen --forward-to 127.0.0.1:5000/webhook process.
If you'd like to identify the user making the purchase, you can use the client_reference_id to attach some sort of user identifier to the Stripe session.
For example:
@app.route("/create-checkout-session")
def create_checkout_session():
    domain_url = "http://127.0.0.1:5000/"
    stripe.api_key = stripe_keys["secret_key"]

    try:
        checkout_session = stripe.checkout.Session.create(
            # new
            client_reference_id=current_user.id if current_user.is_authenticated else None,
            success_url=domain_url + "success?session_id={CHECKOUT_SESSION_ID}",
            cancel_url=domain_url + "cancelled",
            payment_method_types=["card"],
            mode="payment",
            line_items=[
                {
                    "price_data": {
                        "currency": "usd",
                        "product_data": {
                            "name": "T-shirt",
                        },
                        "unit_amount": 2000,
                    },
                    "quantity": 1,
                }
            ]
        )
        return jsonify({"sessionId": checkout_session["id"]})
    except Exception as e:
        return jsonify(error=str(e)), 403
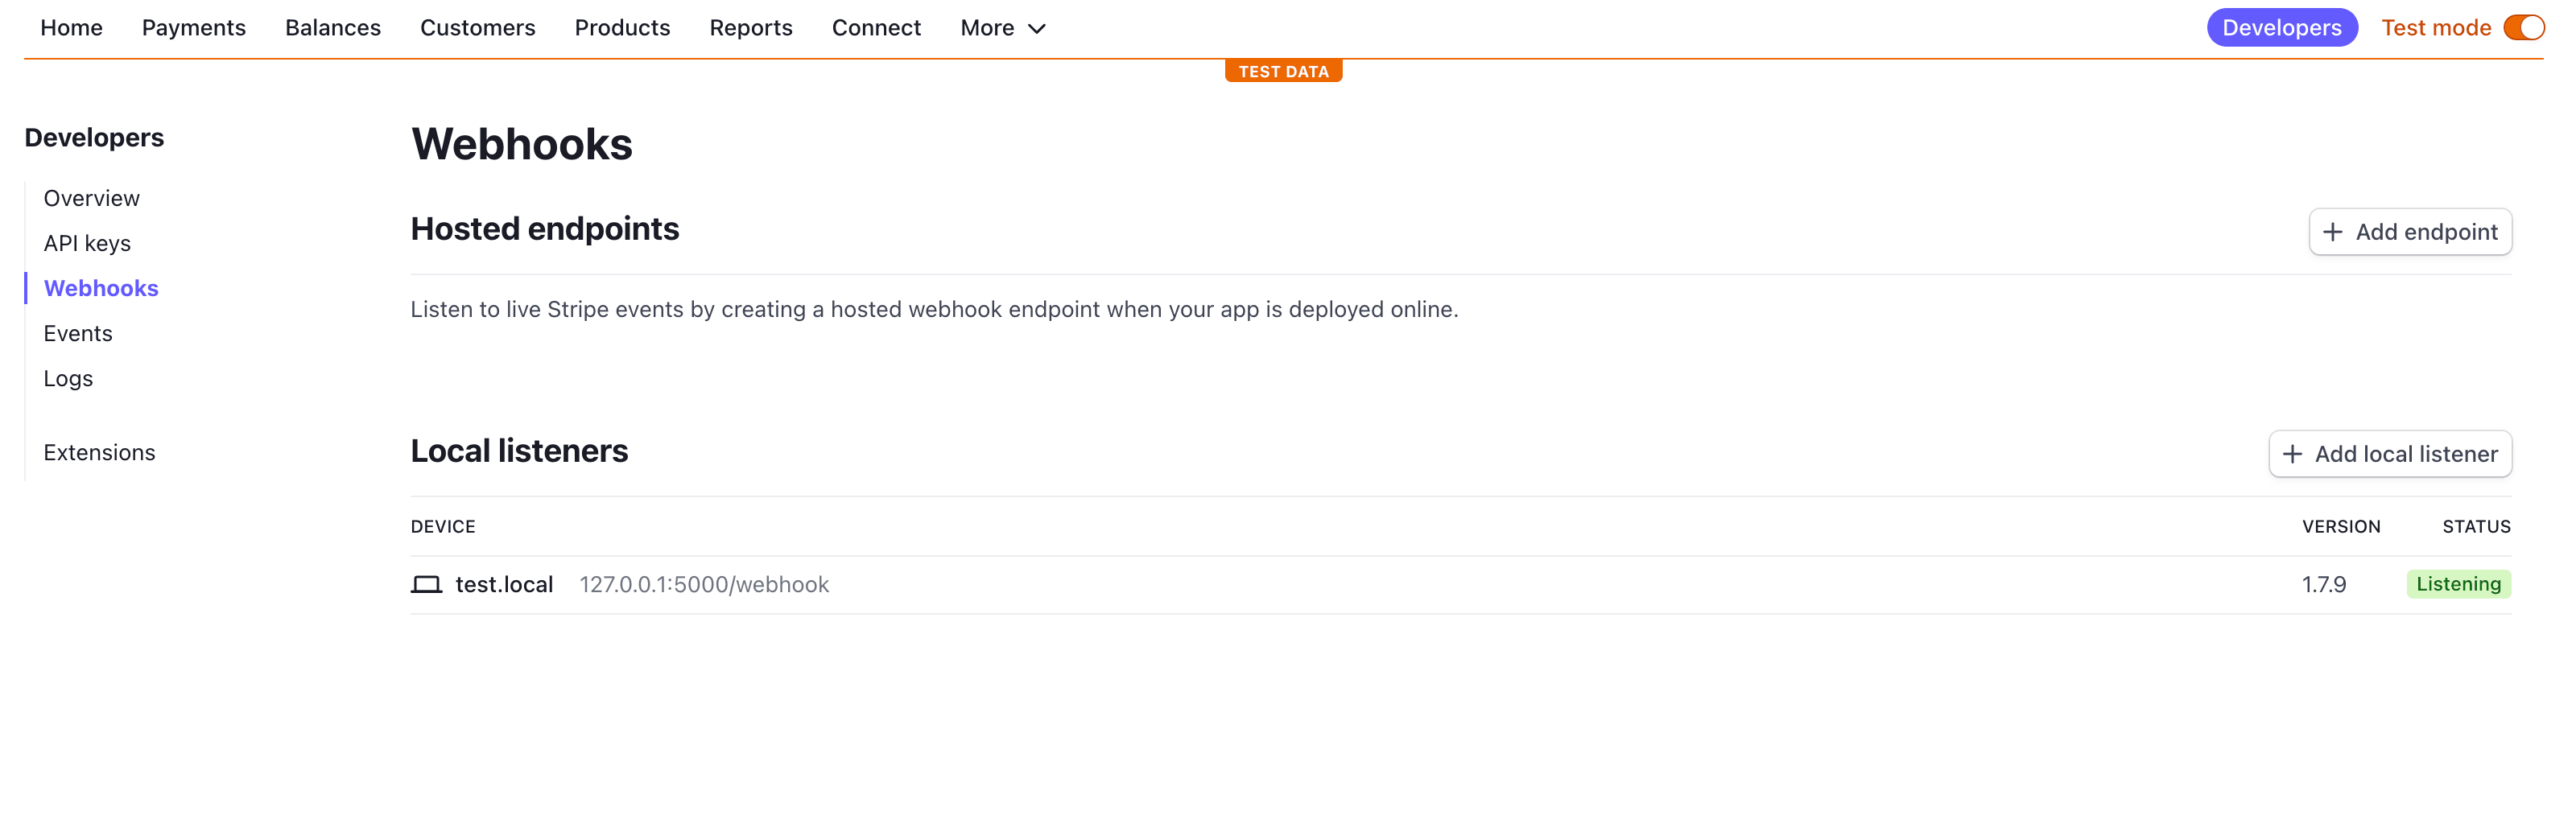
Register the endpoint
Finally, after deploying your app, you can register the endpoint in the Stripe dashboard, under Developers > Webhooks. This will generate a webhook signing secret for use in your production app.
For example:
Workflow:
-
Get Publishable KeySend an AJAX request from the client to the server requesting the publishable keyRespond with the keyUse the key to create a new instance of Stripe.js
-
Create Checkout SessionSend another AJAX request to the server requesting a new Checkout Session IDGenerate a new Checkout Session and send back the IDRedirect to the checkout page for the user to finish their purchase
-
Redirect the User AppropriatelyRedirect to a success page after a successful paymentRedirect to a cancellation page after a cancelled payment
-
Confirm Payment with Stripe WebhooksSet up the webhook endpointTest the endpoint using the Stripe CLIRegister the endpoint with Stripe
Next Steps
In production, you'll need to have HTTPS so your connection is secure. You'll probably want to store the domain_url as an environment variable as well. Finally, it's a good idea to confirm that the correct product and price are being used in the /create-checkout-session route before creating a Checkout Session. To do this, you can:
- Add each of your products to a database.
- Then, when you dynamically create the product page, store the product database ID and price in data attributes within the purchase button.
- Update the
/create-checkout-sessionroute to only allow POST requests. - Update the JavaScript event listener to grab the product info from the data attributes and send them along with the AJAX POST request to the
/create-checkout-sessionroute. - Parse the JSON payload in the route handler and confirm that the product exists and that the price is correct before creating a Checkout Session.
Cheers!
--
Grab the code from the flask-stripe-checkout repo on GitHub.