 Michael Herman
WhiteNoise drastically simplifies static file management since it enables your Flask app to serve up its own static files. Couple it with a CDN like CloudFront or Cloudflare, and it's a convenient solution -- i.e., a good balance between simplicity and performance -- for handling static files on a Platform as a Service (PaaS) like Heroku or PythonAnywhere.
This tutorial details how to manage static files with Flask and WhiteNoise. We'll also configure Amazon CloudFront to get the best possible performance.
It's worth noting that this tutorial does not cover how to handle user-uploaded media files. Feel free to set this up as well as you work your way through the tutorial. Refer to the Storing Django Static and Media Files on Amazon S3 tutorial for more info.
Contents
WhiteNoise
Assuming you have a Flask project set up that uses the Application Factory function pattern, import and configure WhiteNoise:
import os

from flask import Flask, jsonify
from whitenoise import WhiteNoise


def create_app(script_info=None):

    app = Flask(__name__, static_folder="staticfiles")

    WHITENOISE_MAX_AGE = 31536000 if not app.config["DEBUG"] else 0

    # configure WhiteNoise
    app.wsgi_app = WhiteNoise(
        app.wsgi_app,
        root=os.path.join(os.path.dirname(__file__), "staticfiles"),
        prefix="assets/",
        max_age=WHITENOISE_MAX_AGE,
    )

    @app.route("/")
    def hello_world():
        return jsonify(hello="world")

    return app
Configuration:
rootis the absolute path to the directory of static files.prefixis the prefix string for all static URLs. In other words, based on the above configuration, a main.css static file will be available athttp://localhost:5000/assets/main.css.max_ageis the length of time in seconds that browsers and proxies should cache the static files.
Review the Configuration attributes section, from the official WhiteNoise documentation, for more info on optional arguments.
Add a "static" directory in the project root and, for testing purpose, download a copy of boostrap.css and add it to that newly created directory. Add a "staticfiles" directory to the project root as well.
Your project structure should now look something like this:
├── app.py
├── static
│   └── bootstrap.css
└── staticfiles
Next, add the following script -- called compress.py -- to your project root that compresses the files from the "static" directory and then copies them over to the "staticfiles" directory:
import os
import gzip


INPUT_PATH = os.path.join(os.path.dirname(__file__), "static")
OUTPUT_PATH = os.path.join(os.path.dirname(__file__), "staticfiles")
SKIP_COMPRESS_EXTENSIONS = [
    # Images
    ".jpg",
    ".jpeg",
    ".png",
    ".gif",
    ".webp",
    # Compressed files
    ".zip",
    ".gz",
    ".tgz",
    ".bz2",
    ".tbz",
    ".xz",
    ".br",
    # Flash
    ".swf",
    ".flv",
    # Fonts
    ".woff",
    ".woff2",
]


def remove_files(path):
    print(f"Removing files from {path}")
    for filename in os.listdir(path):
        file_path = os.path.join(path, filename)
        try:
            if os.path.isfile(file_path):
                os.unlink(file_path)
        except Exception as e:
            print(e)


def main():
    # remove all files from "staticfiles"
    remove_files(OUTPUT_PATH)

    for dirpath, dirs, files in os.walk(INPUT_PATH):
        for filename in files:
            input_file = os.path.join(dirpath, filename)
            with open(input_file, "rb") as f:
                data = f.read()
            # compress if file extension is not part of SKIP_COMPRESS_EXTENSIONS
            name, ext = os.path.splitext(filename)
            if ext not in SKIP_COMPRESS_EXTENSIONS:
                # save compressed file to the "staticfiles" directory
                compressed_output_file = os.path.join(OUTPUT_PATH, f"{filename}.gz")
                print(f"\nCompressing {filename}")
                print(f"Saving {filename}.gz")
                output = gzip.open(compressed_output_file, "wb")
                try:
                    output.write(data)
                finally:
                    output.close()
            else:
                print(f"\nSkipping compression of {filename}")
            # save original file to the "staticfiles" directory
            output_file = os.path.join(OUTPUT_PATH, filename)
            print(f"Saving {filename}")
            with open(output_file, "wb") as f:
                f.write(data)


if __name__ == "__main__":
    main()
This script:
- Removes any existing files in the "staticfiles" directory
- Iterates through the files in the "static" directory and compresses then saves the compressed version to the "staticfiles" directory along with the original, uncompressed version
By having both the compressed and uncompressed versions available, WhiteNoise will serve up the compressed version when a client specifically asks for it. You'll see an example of this shortly.
To test, first install WhiteNoise, if you haven't already done so:
$ pip install whitenoise
Next, add a dummy PNG file to the "static" directory, to ensure that it gets skipped in the compress script, and then run the script:
$ touch static/test.png
$ python compress.py
You should see:
Removing files from staticfiles

Compressing bootstrap.css
Saving bootstrap.css.gz
Saving bootstrap.css

Skipping compression of test.png
Saving test.png
The "staticfiles" directory should now be populated:
├── app.py
├── compress.py
├── static
│   ├── bootstrap.css
│   └── test.png
└── staticfiles
    ├── bootstrap.css
    ├── bootstrap.css.gz
    └── test.png
To verify that this worked, install then run Gunicorn:
$ pip install gunicorn
$ gunicorn "app:create_app()" -b 127.0.0.1:5000
Now, to test out WhiteNoise's gzip functionality with cURL, run:
$ curl -I -H "Accept-Encoding: gzip" http://localhost:5000/assets/bootstrap.css
You should see the following response:
HTTP/1.1 200 OK
Server: gunicorn
Date: Mon, 13 Feb 2023 18:21:35 GMT
Connection: close
Content-Type: text/css; charset="utf-8"
Cache-Control: max-age=31536000, public
Access-Control-Allow-Origin: *
Vary: Accept-Encoding
Last-Modified: Mon, 13 Feb 2023 18:13:44 GMT
ETag: "63ead238-305f6"
Content-Length: 25881
Content-Encoding: gzip
Take note of Content-Encoding: gzip. This indicates that the gzipped version of the file was served.
CloudFront
Although it's not required, using a Content Delivery Network (CDN) is highly recommended since it will store cached versions of your static files on multiple geographic edge locations. Your visitors will then be served your static content from the location closest to them, which will improve the web server's overall response time. CloudFront, in particular, provides a number of additional features as well like protection against DDoS attacks and access control permissions, to name a few.
To set up, log in to the AWS Console and navigate to the CloudFront dashboard. Click "Create Distribution". Add your domain (without http or https) in the "Origin domain" field and leave the remaining defaults. Then, click "Create Distribution".
If you don't have a domain name configured, feel free to test this setup locally with ngrok. With your Gunicorn server up and running on port 5000, download (if necessary) then start ngrok:
$ ngrok http 5000Once started, you should see a public URL that you can use with CloudFront.
Want to see a demo of this in action? Check out the video below.
It generally takes about 15 minutes for CloudFront to fully configure your distribution. You can test it out before it's been fully distributed out to all edge locations while the creation status is still "In Progress", though. It still may take a few minutes before you can begin testing.
To test, grab the URL associated with the CloudFront distribution and run:
$ curl -I -H "Accept-Encoding: gzip" https://dxquy3iqeuay6.cloudfront.net/assets/bootstrap.css
You should see something similar to:
HTTP/2 200
content-type: text/css; charset="utf-8"
content-length: 25881
access-control-allow-origin: *
cache-control: max-age=31536000, public
content-encoding: gzip
date: Tue, 23 Feb 2021 15:39:01 GMT
etag: "6035739d-305f6"
last-modified: Tue, 23 Feb 2021 15:29:01 GMT
server: gunicorn/20.0.4
vary: Accept-Encoding
x-cache: Miss from cloudfront
via: 1.1 5f09c808a81a33267d5cc58d93ce6353.cloudfront.net (CloudFront)
x-amz-cf-pop: DFW53-C1
x-amz-cf-id: _aLbrgkskBos4G1tjMFR34__rgmmBSkxaCNGiSdMBmxauX4f4CFO1Q==
You can now use the provided CloudFront domain in the Flask app to handle static file requests:
import os
from urllib.parse import urljoin

from flask import Flask, jsonify, render_template
from whitenoise import WhiteNoise


def create_app(script_info=None):

    app = Flask(__name__, static_folder="staticfiles")

    WHITENOISE_MAX_AGE = 31536000 if not app.config["DEBUG"] else 0
    CDN = "https://dxquy3iqeuay6.cloudfront.net"

    app.config["STATIC_URL"] = CDN if not app.config["DEBUG"] else ""

    # configure WhiteNoise
    app.wsgi_app = WhiteNoise(
        app.wsgi_app,
        root=os.path.join(os.path.dirname(__file__), "staticfiles"),
        prefix="assets/",
        max_age=WHITENOISE_MAX_AGE,
    )

    @app.template_global()
    def static_url(prefix, filename):
        return urljoin(app.config["STATIC_URL"], f"{prefix}/{filename}")

    @app.route("/")
    def hello_world():
        return jsonify(hello="world")

    return app
The static_url should be used instead of url_for in your templates.
Sanity Check
Let's configure a template to test this out.
Add a new handler:
import os
from urllib.parse import urljoin

from flask import Flask, jsonify, render_template
from whitenoise import WhiteNoise


def create_app(script_info=None):

    app = Flask(__name__, static_folder="staticfiles")

    WHITENOISE_MAX_AGE = 31536000 if not app.config["DEBUG"] else 0
    CDN = "https://dxquy3iqeuay6.cloudfront.net"

    app.config["STATIC_URL"] = CDN if not app.config["DEBUG"] else ""

    # configure WhiteNoise
    app.wsgi_app = WhiteNoise(
        app.wsgi_app,
        root=os.path.join(os.path.dirname(__file__), "staticfiles"),
        prefix="assets/",
        max_age=WHITENOISE_MAX_AGE,
    )

    @app.template_global()
    def static_url(prefix, filename):
        return urljoin(app.config["STATIC_URL"], f"{prefix}/{filename}")

    @app.route("/")
    def hello_world():
        return jsonify(hello="world")

    @app.route("/hi")
    def index():
        return render_template("index.html")

    return app
Create a new directory called "templates" in the project root and add an index.html file to that directory:
<!DOCTYPE html>
<html lang="en">
<head>
  <meta charset="UTF-8">
  <meta name="viewport" content="width=device-width, initial-scale=1.0">
  <meta http-equiv="X-UA-Compatible" content="ie=edge">
  <link rel="stylesheet" href="{{ static_url('assets', filename='bootstrap.css') }}">
  <title>Hello, world!</title>
</head>
<body>
  <div class="container" style="padding-top:100px">
    <h1>Hello, world!</h1>
  </div>
</body>
</html>
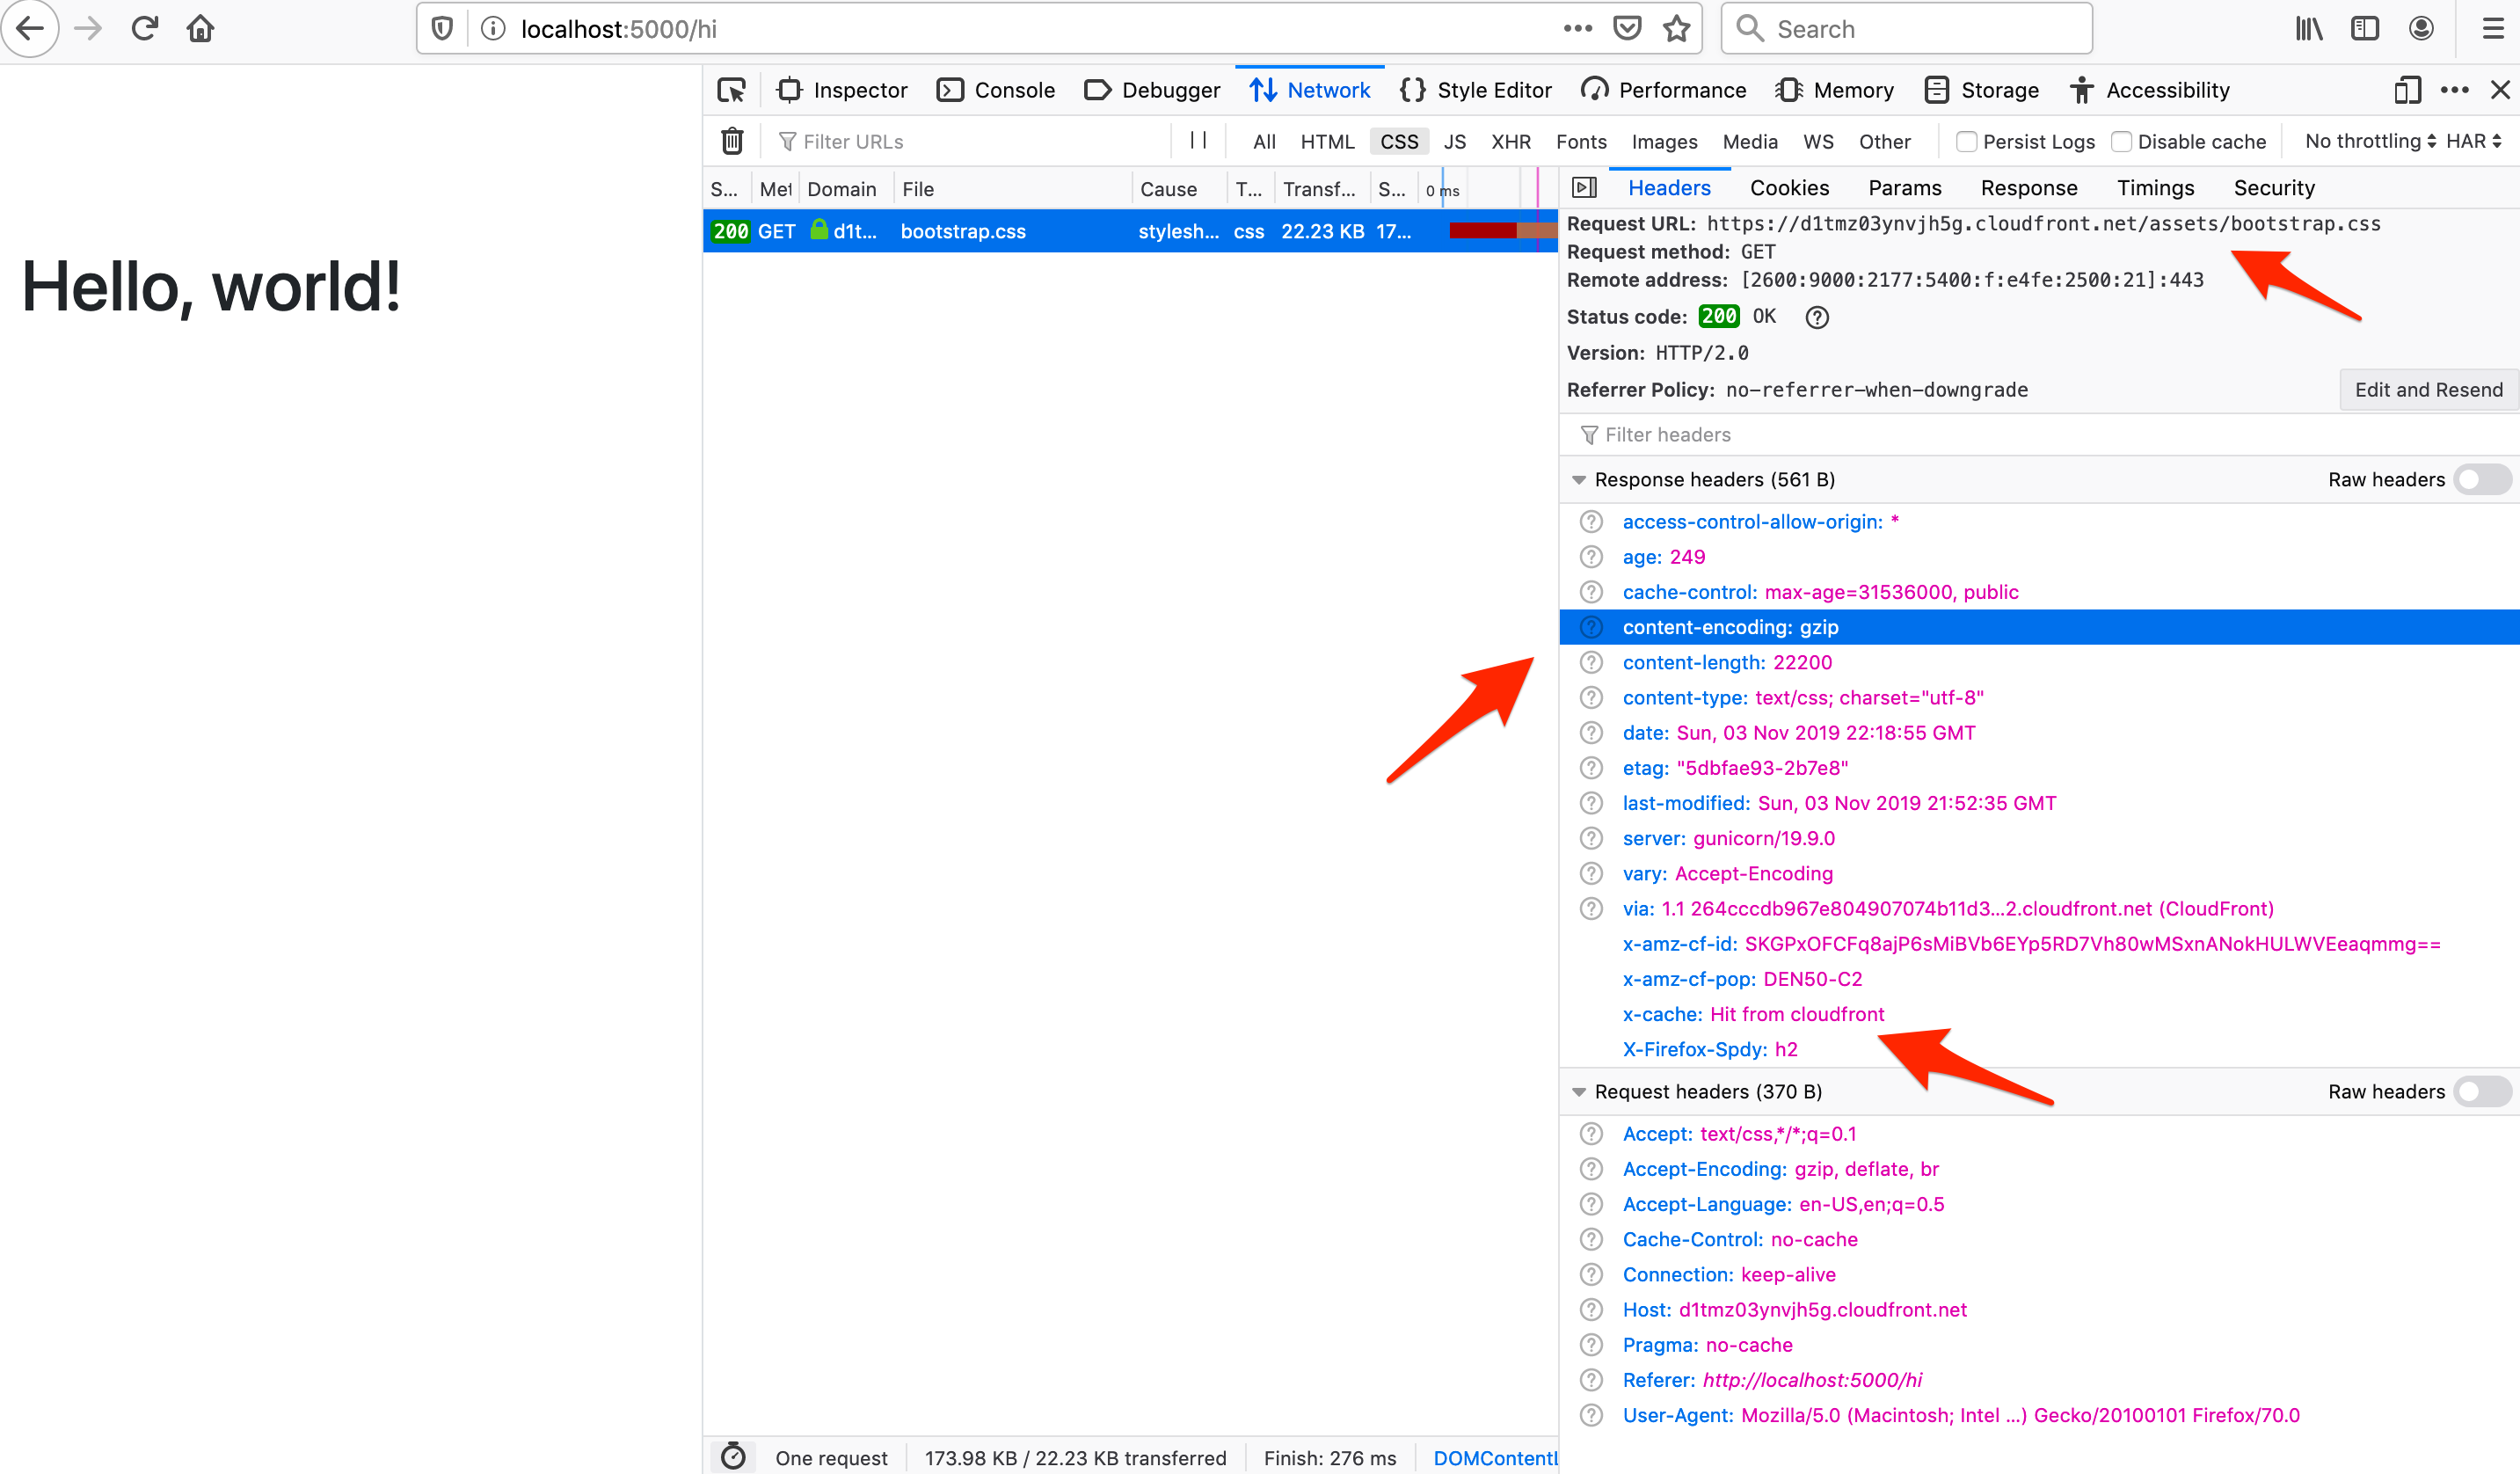
Restart the Gunicorn server and then test it out at http://localhost:5000/hi.
Within your browser's dev tools, the
- bootstrap.css file should have been loaded from CloudFront:
https://dxquy3iqeuay6.cloudfront.net/assets/bootstrap.css - gzipped version of the file should have been served:
content-encoding: gzip - file should also have been served from the cache of the edge location:
x-cache: Hit from cloudfront
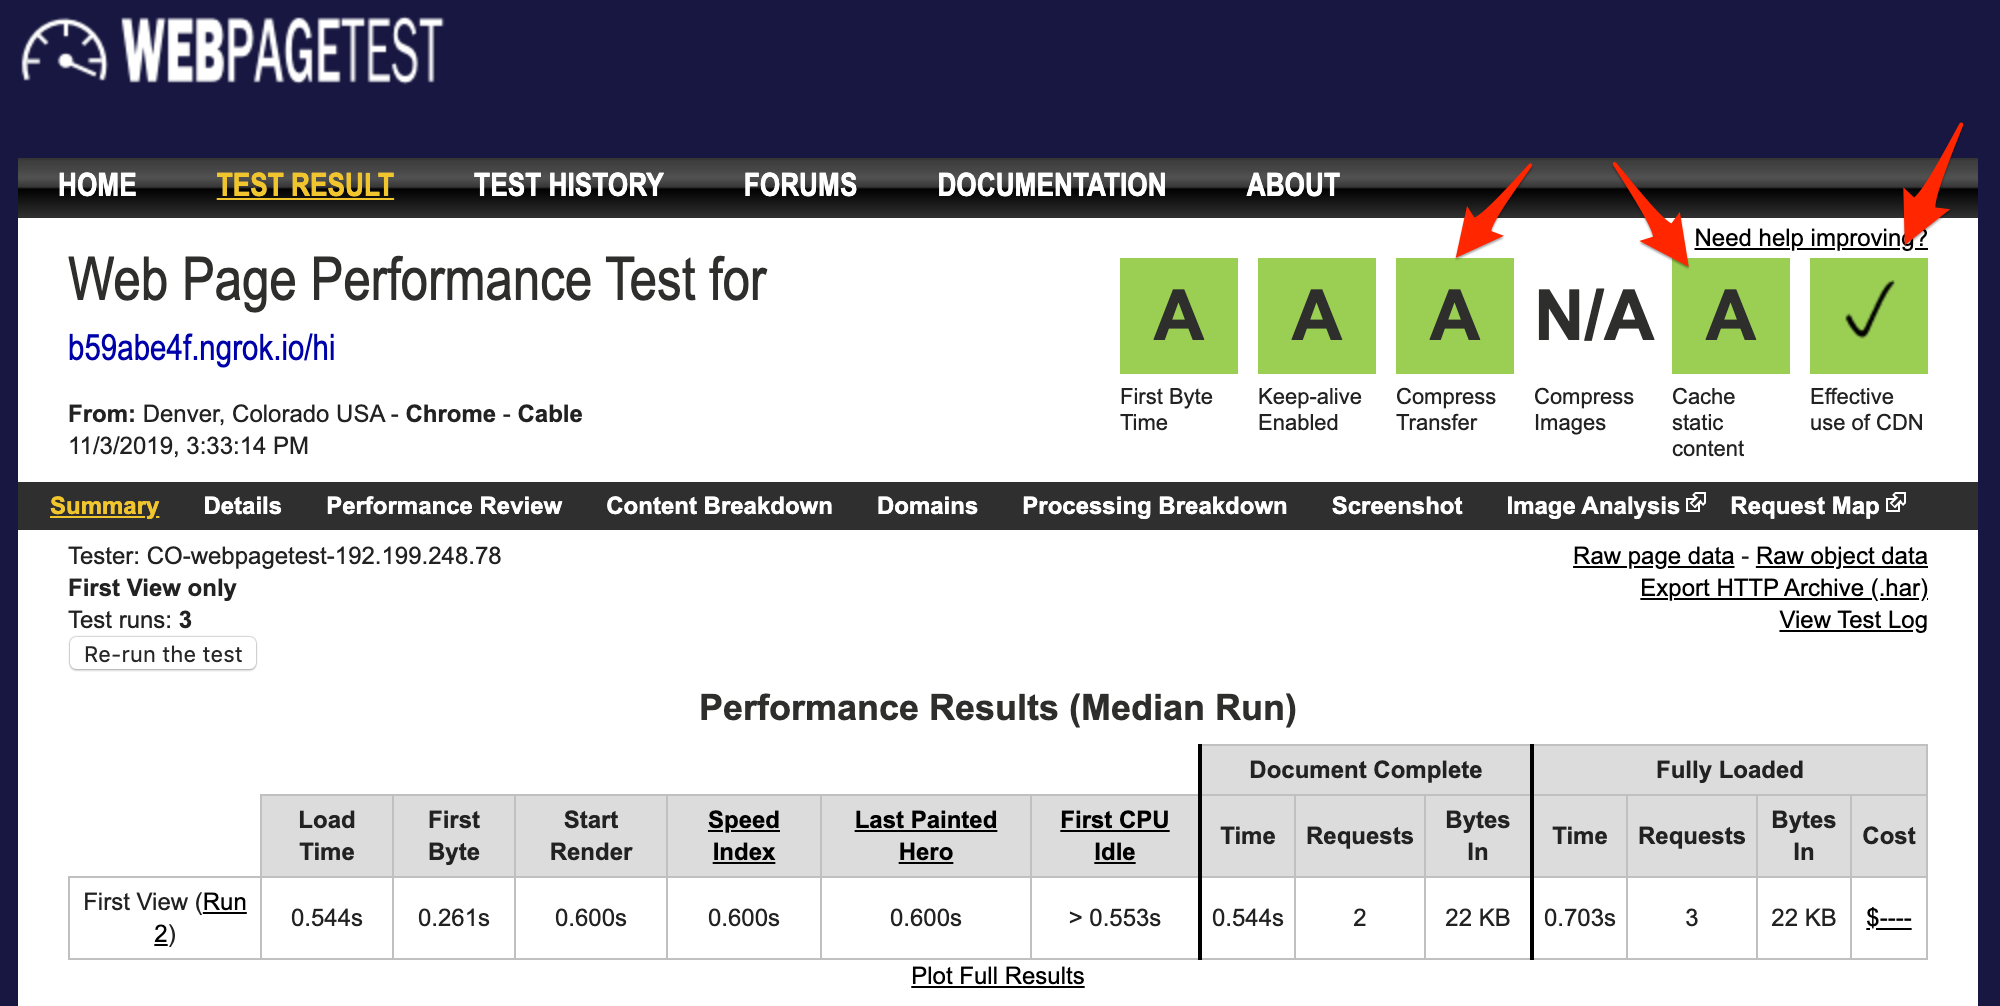
Try running a WebPageTest to ensure static files are being compressed and cached correctly:
Demo video: