 Amal Shaji
Machine learning is a hot topic at present. With technology companies moving in the direction of artificial intelligence and machine learning to cash in early, the field has grown tremendously large. Many of these companies create their own machine learning solutions and sell them to others using a subscription-based model.
Since the majority of machine learning models are developed in Python, the web frameworks that serve them up are usually Python-based as well. For a long time, Flask, a micro-framework, was the goto framework. But that's changing. A new framework, designed to compensate for almost everything Flask lacks is becoming more and more popular. It's called FastAPI.
FastAPI is faster than Flask because it brings asynchronous function handlers to the table:
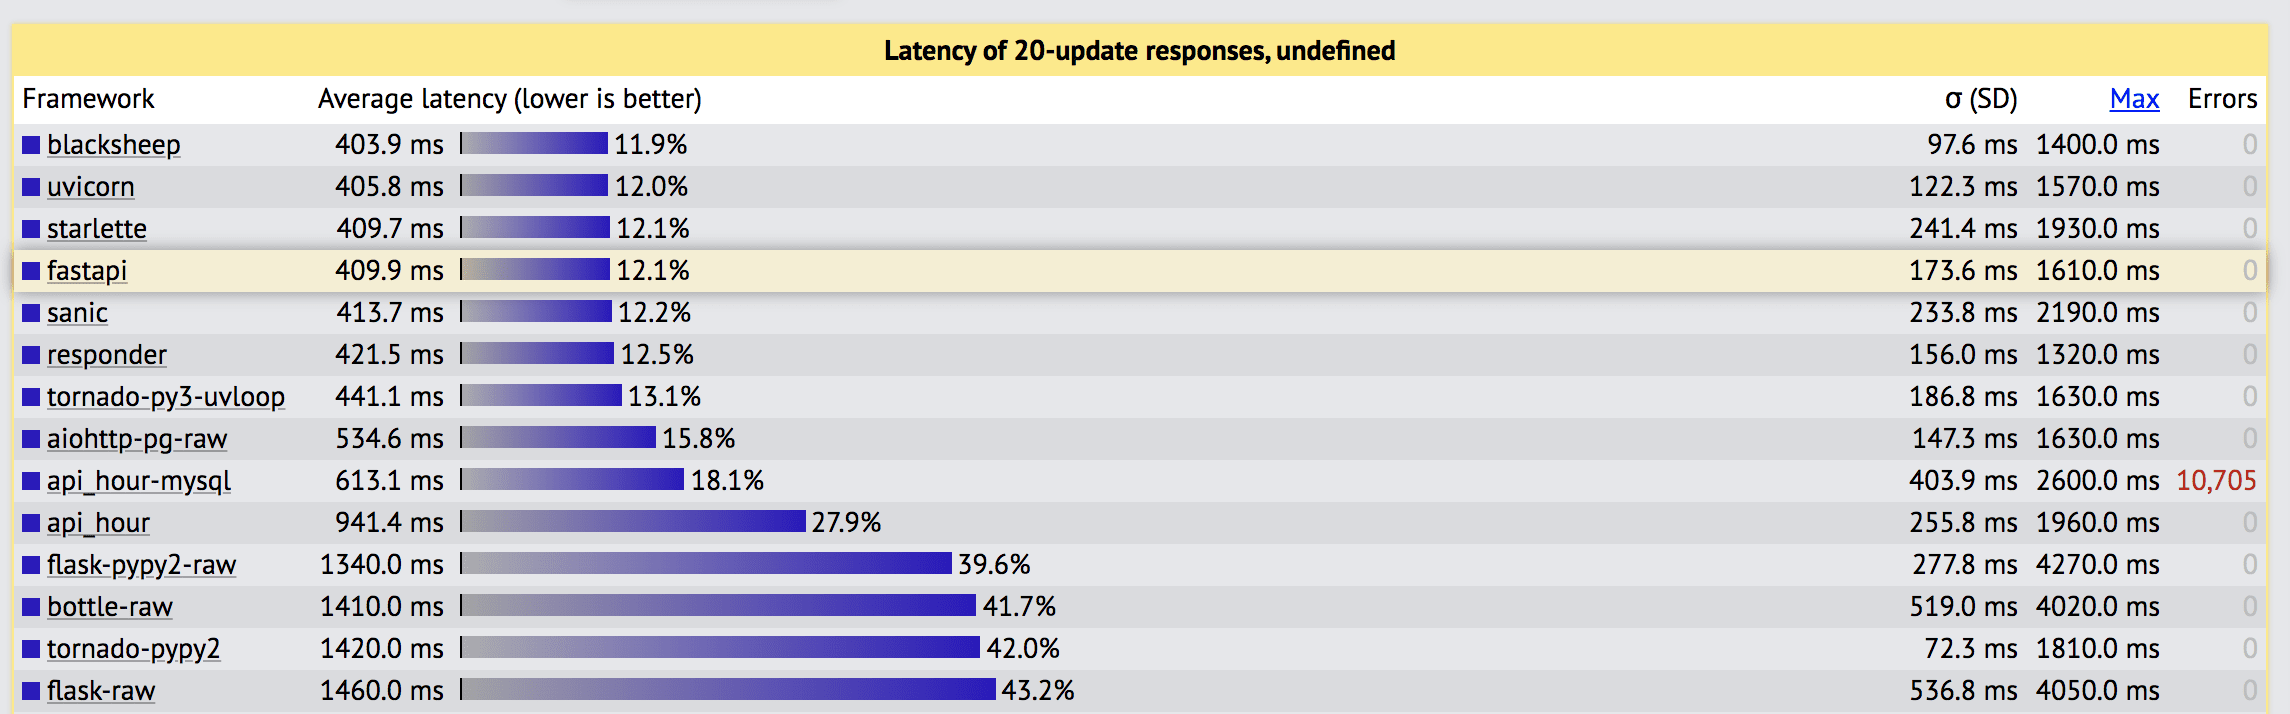
Source: TechEmpower Web Framework Benchmarks
As you can see from the figure above, FastAPI is almost 3x faster than Flask.
The third position is held by Starlette, which FastAPI is built on.
FastAPI supports data validation via pydantic and automatic API documentation as well.
Review the Features guide from the official docs for more info. It's also encouraged to review Alternatives, Inspiration, and Comparisons, which details how FastAPI compares to other web frameworks and technologies, for context.
Streamlit, meanwhile, is an application framework that makes it easy for data scientists and machine learning engineers to create powerful user interfaces that interact with machine learning models.
Although Streamlit can be used in production, it's best for rapid prototyping. By serving up the model with FastAPI, you can quickly move to a production-ready UI with Dash or React, after the prototype is approved.
With that, we're going to build a style transfer application based on the Perceptual Losses for Real-Time Style Transfer and Super-Resolution paper and Justin Johnson's pre-trained models. We'll use FastAPI as the backend to serve our predictions, Streamlit for the user interface, and OpenCV to do the actual prediction. Docker will be used as well.
One powerful Feature of OpenCV's Deep Neural Networks (DNN) module is that it can load trained models from Torch, TensorFlow, and Caffe, effectively saving us the trouble of installing those dependencies.
Contents
Objectives
By the end of this tutorial, you will be able to:
- Develop an asynchronous API with Python and FastAPI
- Serve up a machine learning model with FastAPI
- Develop a UI with Streamlit
- Containerize FastAPI and Streamlit with Docker
- Leverage asyncio to execute code in the background outside the request/response flow
Project Setup
Create a project folder called "style-transfer":
$ mkdir style-transfer
$ cd style-transfer
Then, create two new folders with "style-transfer":
$ mkdir frontend
$ mkdir backend
Add __init__.py files to each folder.
FastAPI Backend
Add a new file to "backend" called main.py:
# backend/main.py

import uuid

import cv2
import uvicorn
from fastapi import File
from fastapi import FastAPI
from fastapi import UploadFile
import numpy as np
from PIL import Image

import config
import inference


app = FastAPI()


@app.get("/")
def read_root():
    return {"message": "Welcome from the API"}


@app.post("/{style}")
def get_image(style: str, file: UploadFile = File(...)):
    image = np.array(Image.open(file.file))
    model = config.STYLES[style]
    output, resized = inference.inference(model, image)
    name = f"/storage/{str(uuid.uuid4())}.jpg"
    cv2.imwrite(name, output)
    return {"name": name}


if __name__ == "__main__":
    uvicorn.run("main:app", host="0.0.0.0", port=8080)
This is our server. FastAPI creates two endpoints, one dummy ("/") and one for serving our prediction ("/{style}"). The serving endpoint takes in a name as a URL parameter. We're using nine different trained models to perform style transfer, so the path parameter will tell us which model to choose. The image is accepted as a file over a POST request and sent to the inference function. Once the inference is complete, the file is stored on the local filesystem and the path is sent as a response.
Next, add the following config to a new file called backend/config.py:
# backend/config.py

MODEL_PATH = "./models/"

STYLES = {
    "candy": "candy",
    "composition 6": "composition_vii",
    "feathers": "feathers",
    "la_muse": "la_muse",
    "mosaic": "mosaic",
    "starry night": "starry_night",
    "the scream": "the_scream",
    "the wave": "the_wave",
    "udnie": "udnie",
}
When introduced, style transfer was a game-changer. The only disadvantage was that the image had to be trained to obtain a style for it. This means, to get a styled image, you need to run through the original images multiple times before getting a better result. In 2016, the Perceptual Losses for Real-Time Style Transfer and Super-Resolution paper introduced fast-style transfer, which means you can style any image in a single pass. We're going to use the same technique with the trained models provided by the author.
Now, we need to download the models. Add a script to the project root called download_models.sh:
BASE_URL="https://cs.stanford.edu/people/jcjohns/fast-neural-style/models/"

mkdir -p backend/models/
cd backend/models/
curl -O "$BASE_URL/instance_norm/candy.t7"
curl -O "$BASE_URL/instance_norm/la_muse.t7"
curl -O "$BASE_URL/instance_norm/mosaic.t7"
curl -O "$BASE_URL/instance_norm/feathers.t7"
curl -O "$BASE_URL/instance_norm/the_scream.t7"
curl -O "$BASE_URL/instance_norm/udnie.t7"
curl -O "$BASE_URL/eccv16/the_wave.t7"
curl -O "$BASE_URL/eccv16/starry_night.t7"
curl -O "$BASE_URL/eccv16/la_muse.t7"
curl -O "$BASE_URL/eccv16/composition_vii.t7"
Download:
$ sh download_models.sh
Add the inference function to backend/inference.py:
# backend/inference.py

import config
import cv2


def inference(model, image):
    model_name = f"{config.MODEL_PATH}{model}.t7"
    model = cv2.dnn.readNetFromTorch(model_name)

    height, width = int(image.shape[0]), int(image.shape[1])
    new_width = int((640 / height) * width)
    resized_image = cv2.resize(image, (new_width, 640), interpolation=cv2.INTER_AREA)

    # Create our blob from the image
    # Then perform a forward pass run of the network
    # The Mean values for the ImageNet training set are R=103.93, G=116.77, B=123.68

    inp_blob = cv2.dnn.blobFromImage(
        resized_image,
        1.0,
        (new_width, 640),
        (103.93, 116.77, 123.68),
        swapRB=False,
        crop=False,
    )

    model.setInput(inp_blob)
    output = model.forward()

    # Reshape the output Tensor,
    # add back the mean substruction,
    # re-order the channels
    output = output.reshape(3, output.shape[2], output.shape[3])
    output[0] += 103.93
    output[1] += 116.77
    output[2] += 123.68

    output = output.transpose(1, 2, 0)
    return output, resized_image
Here, we loaded the Torch model, performed resizing, and converted it into the blob format required. Then we passed the pre-processed image into the network/model and obtained the output. The post-processed image and resized image are returned as output.
Lastly, add the dependencies to a requirements file:
# backend/requirements.txt

fastapi
numpy
opencv-python
pillow
python-multipart
uvicorn
That's it for the backend. Let's configure Docker and then test it out.
Docker Setup
First, add a Dockerfile to the "backend" folder:
# backend/Dockerfile

FROM python:3.10.1-slim

WORKDIR /app

RUN apt-get update
RUN apt-get install \
    'ffmpeg'\
    'libsm6'\
    'libxext6'  -y

COPY requirements.txt .
RUN pip install -r requirements.txt

COPY . .

EXPOSE 8080

CMD ["python", "main.py"]
'ffmpeg', 'libsm6', and 'libxext6' are required for OpenCV.
From the "backend" folder in your terminal, build the image:
$ docker build -t backend .
Run the container:
$ docker run -p 8080:8080 backend

INFO:     Started server process [1]
INFO:     Waiting for application startup.
INFO:     Application startup complete.
INFO:     Uvicorn running on http://0.0.0.0:8080 (Press CTRL+C to quit)
In your browser, navigate to http://localhost:8080/. You should see:
{
  "message": "Welcome from the API"
}
Kill the container once done.
Streamlit Frontend
For the UI, add a main.py file to the "frontend" folder:
# frontend/main.py
import requests
import streamlit as st
from PIL import Image
STYLES = {
"candy": "candy",
"composition 6": "composition_vii",
"feathers": "feathers",
"la_muse": "la_muse",
"mosaic": "mosaic",
"starry night": "starry_night",
"the scream": "the_scream",
"the wave": "the_wave",
"udnie": "udnie",
}
# https://discuss.streamlit.io/t/version-0-64-0-deprecation-warning-for-st-file-uploader-decoding/4465
st.set_option("deprecation.showfileUploaderEncoding", False)
# defines an h1 header
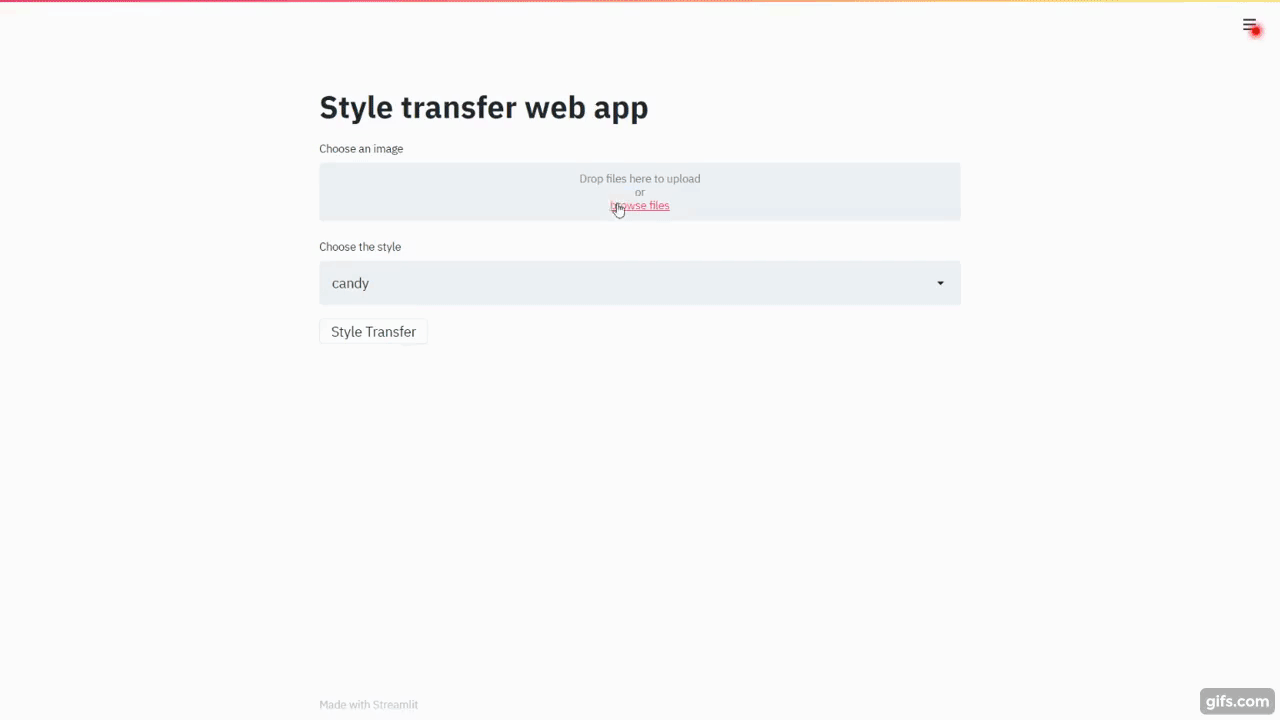
st.title("Style transfer web app")
# displays a file uploader widget
image = st.file_uploader("Choose an image")
# displays the select widget for the styles
style = st.selectbox("Choose the style", [i for i in STYLES.keys()])
# displays a button
if st.button("Style Transfer"):
if image is not None and style is not None:
files = {"file": image.getvalue()}
res = requests.post(f"http://backend:8080/{style}", files=files)
img_path = res.json()
image = Image.open(img_path.get("name"))
st.image(image, width=500)
Take note of the code comments above. Put simply, we created an upload image widget along with a select dropdown displaying each of the styles from the STYLES dict. We also added a button that, when pressed, sends the image to the backend as a POST request payload to http://backend:8080/{style}. Upon receiving the image path in the response from the backend, the image is opened and displayed.
Refer to Streamlit's Get started guide and the API reference for help with displaying text and data as well as adding basic interactivity with widgets.
Add the Streamlit dependency to a requirements.txt file:
# frontend/requirements.txt

streamlit==1.2.0
Docker Compose
Next, let's Dockerize the frontend and wire both containers together with Docker Compose.
frontend/Dockerfile:
# frontend/Dockerfile

FROM python:3.10.1-slim

WORKDIR /app

COPY requirements.txt .
RUN pip install -r requirements.txt

COPY . .

EXPOSE 8501

CMD ["streamlit", "run", "main.py"]
docker-compose.yml:
version: '3'

services:
  frontend:
    build: frontend
    ports:
      - 8501:8501
    depends_on:
      - backend
    volumes:
        - ./storage:/storage
  backend:
    build: backend
    ports:
      - 8080:8080
    volumes:
      - ./storage:/storage
The most important thing here is that we mapped the storage of the host machine to the storage of each container. This is important for sharing the path and also to persist data when spinning down the containers.
Thus, both the backend and frontend can access images from the same shared volume:
# backend
name = f"/storage/{str(uuid.uuid4())}.jpg"
cv2.imwrite(name, output)
return {"name": name}

# frontend
img_path = res.json()
image = Image.open(img_path.get("name"))
To test, from the project root, build the images and spin up both containers:
$ docker-compose up -d --build
Navigate to http://localhost:8501:
Async Model Serving
Now that you have seen how to use FastAPI, Streamlit, and OpenCV to perform a style transfer, let's do a little experiment.
One of the most powerful features of FastAPI is that it supports asynchronous functions. So, let's leverage an async function to convert the input image into multiple styles. We'll process the first style synchronously, and then send back the response as the remaining models are processed in the background.
Add the following functions to backend/main.py:
# backend/main.py

async def generate_remaining_models(models, image, name: str):
    executor = ProcessPoolExecutor()
    event_loop = asyncio.get_event_loop()
    await event_loop.run_in_executor(
        executor, partial(process_image, models, image, name)
    )


def process_image(models, image, name: str):
    for model in models:
        output, resized = inference.inference(models[model], image)
        name = name.split(".")[0]
        name = f"{name.split('_')[0]}_{models[model]}.jpg"
        cv2.imwrite(name, output)
The generate_remaining_models function generates each of the remaining styles using asyncio.
Check out the Speeding Up Python with Concurrency, Parallelism, and asyncio article for more info on asyncio.
Add the following imports:
import asyncio

from concurrent.futures import ProcessPoolExecutor

from functools import partial
Update the get_image function so that it creates the asynchronous tasks before sending the response back:
# backend/main.py

@app.post("/{style}")
async def get_image(style: str, file: UploadFile = File(...)):
    image = np.array(Image.open(file.file))
    model = config.STYLES[style]
    start = time.time()
    output, resized = inference.inference(model, image)
    name = f"/storage/{str(uuid.uuid4())}.jpg"
    cv2.imwrite(name, output)
    models = config.STYLES.copy()
    del models[style]
    asyncio.create_task(generate_remaining_models(models, image, name))
    return {"name": name, "time": time.time() - start}
Once the first prediction is made, we'll delete the style from a copy of the original styles. Then the remaining styles are passed to generate_remaining_models.
Add the import:
import time
Next, update the block of the following if statement in frontend/main.py:
# frontend/main.py

if st.button("Style Transfer"):
    if image is not None and style is not None:
        files = {"file": image.getvalue()}
        res = requests.post(f"http://backend:8080/{style}", files=files)
        img_path = res.json()
        image = Image.open(img_path.get("name"))
        st.image(image)

        displayed_styles = [style]
        displayed = 1
        total = len(STYLES)

        st.write("Generating other models...")

        while displayed < total:
            for style in STYLES:
                if style not in displayed_styles:
                    try:
                        path = f"{img_path.get('name').split('.')[0]}_{STYLES[style]}.jpg"
                        image = Image.open(path)
                        st.image(image, width=500)
                        time.sleep(1)
                        displayed += 1
                        displayed_styles.append(style)
                    except:
                        pass
Add the import to the top:
import time
So, after displaying the first style, we continue to check for the remaining styles, displaying each until all nine are on the page.
Update the containers and test:
$ docker-compose up -d --build
Now, the remaining styles will be displayed asynchronously without blocking the initial response.
Conclusion
FastAPI is a modern, async alternative to Flask. It has a lot of features that Flask lacks and is faster than Flask since it leverages Starlette and supports asynchronous function handlers. FastAPI has a lot of additional features like data validation, automatic API documentation, background tasks as well as a powerful dependency injection system. Plus, since you'll most likely be taking advantage of Python type hints (so you can leverage data validation), you'll be able to move faster in development due to editor autocompletion and automatic error checks.
You can find the final code in the style-transfer repo on GitHub.