 Abdulazeez Abdulazeez Adeshina
In this tutorial, you'll learn how to develop an asynchronous API with FastAPI and MongoDB. We'll be using the Motor package to interact with MongoDB asynchronously.
Contents
Objectives
By the end of this tutorial, you'll be able to:
- Develop a RESTful API with Python and FastAPI
- Interact with MongoDB asynchronously
- Run MongoDB in the cloud with MongoDB Atlas
- Deploy a FastAPI app to Heroku
Initial Setup
Start by creating a new folder to hold your project called "fastapi-mongo":
$ mkdir fastapi-mongo
$ cd fastapi-mongo
Next, create and activate a virtual environment:
$ python3.9 -m venv venv
$ source venv/bin/activate
$ export PYTHONPATH=$PWD
Feel free to swap out virtualenv and Pip for uv, Poetry, or Pipenv. For more, review Modern Python Environments.
Next, create the following files and folders:
├── app
│   ├── __init__.py
│   ├── main.py
│   └── server
│       ├── app.py
│       ├── database.py
│       ├── models
│       └── routes
└── requirements.txt
Add the following dependencies to your requirements.txt file:
fastapi==0.73.0
uvicorn==0.17.4
Install them:
(venv)$ pip install -r requirements.txt
In the app/main.py file, define an entry point for running the application:
import uvicorn

if __name__ == "__main__":
    uvicorn.run("server.app:app", host="0.0.0.0", port=8000, reload=True)
Here, we instructed the file to run a Uvicorn server on port 8000 and reload on every file change.
Before starting the server via the entry point file, create a base route in app/server/app.py:
from fastapi import FastAPI

app = FastAPI()


@app.get("/", tags=["Root"])
async def read_root():
    return {"message": "Welcome to this fantastic app!"}
Tags are identifiers used to group routes. Routes with the same tags are grouped into a section on the API documentation.
Run the entry point file from your console:
(venv)$ python app/main.py
Navigate to http://localhost:8000 in your browser. You should see:
{
  "message": "Welcome to this fantastic app!"
}
You can also view the interactive API documentation at http://localhost:8000/docs:
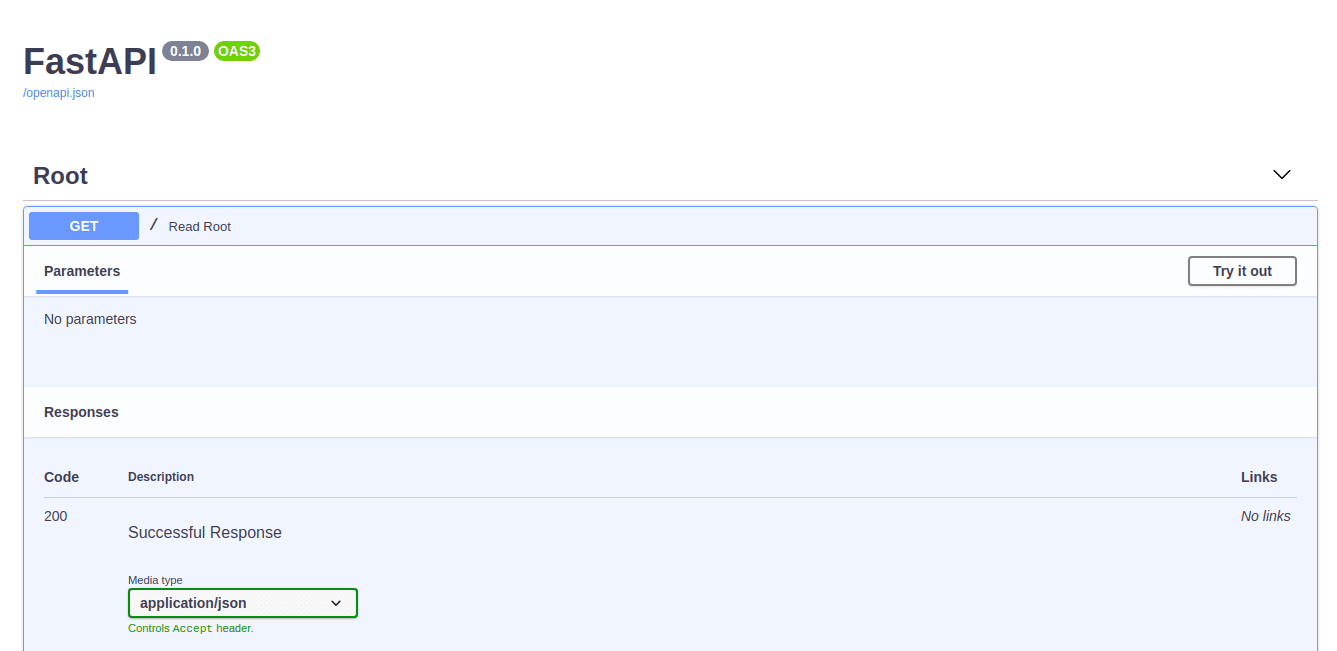
Routes
We'll be building a simple app for storing student data with the following CRUD routes:

Before we dive into writing the routes, let's first define the relevant schema and configure MongoDB.
Schema
Let's define the Schema for which our data will be based on, which will represent how data is stored in the MongoDB database.
Pydantic Schema's are used for validating data along with serializing (JSON -> Python) and de-serializing (Python -> JSON). It does not serve as a Mongo schema validator, in other words.
In the "app/server/models" folder, create a new file called student.py:
from typing import Optional

from pydantic import BaseModel, EmailStr, Field


class StudentSchema(BaseModel):
    fullname: str = Field(...)
    email: EmailStr = Field(...)
    course_of_study: str = Field(...)
    year: int = Field(..., gt=0, lt=9)
    gpa: float = Field(..., le=4.0)

    class Config:
        schema_extra = {
            "example": {
                "fullname": "John Doe",
                "email": "[email protected]",
                "course_of_study": "Water resources engineering",
                "year": 2,
                "gpa": "3.0",
            }
        }


class UpdateStudentModel(BaseModel):
    fullname: Optional[str]
    email: Optional[EmailStr]
    course_of_study: Optional[str]
    year: Optional[int]
    gpa: Optional[float]

    class Config:
        schema_extra = {
            "example": {
                "fullname": "John Doe",
                "email": "[email protected]",
                "course_of_study": "Water resources and environmental engineering",
                "year": 4,
                "gpa": "4.0",
            }
        }


def ResponseModel(data, message):
    return {
        "data": [data],
        "code": 200,
        "message": message,
    }


def ErrorResponseModel(error, code, message):
    return {"error": error, "code": code, "message": message}
In the code above, we defined a Pydantic Schema called StudentSchema that represents how the student data will be stored in your MongoDB database.
In Pydantic, the ellipsis, ..., indicates that a Field is required. It could be replaced with None or a default value. In StudentSchema, each field has an ellipsis, since each field is important and the program shouldn't proceed without having the values set.
In the gpa and year field in the StudentSchema, we added the validators gt, lt, and le:
gtandltin theyearfield ensures that the value passed is greater than 0 and less than 9. As a result, values such as 0, 10, 11, will result in errors.levalidator in thegpafield ensures that the value passed is less than or equal to 4.0.
This schema will help users send HTTP requests with the proper shape to the API -- i.e., the type of data to send and how to send it.
FastAPI uses Pyantic Schemas to automatically document data models in conjunction with Json Schema. Swagger UI then renders the data from the generated data models. You can read more about how FastAPI generates API documentation here.
Since we used EmailStr, we need to install email-validator.
Add it to the requirements file:
pydantic[email]
Install:
(venv)$ pip install -r requirements.txt
With the schema in place, let's set up MongoDB before writing the routes for the API.
MongoDB
In this section, we'll wire up MongoDB and configure our application to communicate with it.
According to Wikipedia, MongoDB is a cross-platform document-oriented database program. Classified as a NoSQL database program, MongoDB uses JSON-like documents with optional schemas.
MongoDB Setup
If you don't have MongoDB installed on your machine, refer to the Installation guide from the docs. Once installed, continue with the guide to run the mongod daemon process. Once done, you can verify that MongoDB is up and running, by connecting to the instance via the mongo shell command:
$ mongo
For reference, this tutorial uses MongoDB Community Edition v5.0.6.
$ mongo --version

MongoDB shell version v5.0.6

Build Info: {
    "version": "5.0.6",
    "gitVersion": "212a8dbb47f07427dae194a9c75baec1d81d9259",
    "modules": [],
    "allocator": "system",
    "environment": {
        "distarch": "x86_64",
        "target_arch": "x86_64"
    }
}
Motor Setup
Next, we'll configure Motor, an asynchronous MongoDB driver, to interact with the database.
Start by adding the dependency to the requirements file:
motor==2.5.1
Install:
(venv)$ pip install -r requirements.txt
Back in the app, add the database connection info to app/server/database.py:
import motor.motor_asyncio

MONGO_DETAILS = "mongodb://localhost:27017"

client = motor.motor_asyncio.AsyncIOMotorClient(MONGO_DETAILS)

database = client.students

student_collection = database.get_collection("students_collection")
In the code above, we imported Motor, defined the connection details, and created a client via AsyncIOMotorClient.
We then referenced a database called students and a collection (akin to a table in a relational database) called students_collection. Since these are just references and not actual I/O, neither requires an await expression. When the first I/O operation is made, both the database and collection will be created if they don't already exist.
Next, create a quick helper function for parsing the results from a database query into a Python dict.
Add this to the database.py file as well:
import motor.motor_asyncio

MONGO_DETAILS = "mongodb://localhost:27017"

client = motor.motor_asyncio.AsyncIOMotorClient(MONGO_DETAILS)

database = client.students

student_collection = database.get_collection("students_collection")


# helpers


def student_helper(student) -> dict:
    return {
        "id": str(student["_id"]),
        "fullname": student["fullname"],
        "email": student["email"],
        "course_of_study": student["course_of_study"],
        "year": student["year"],
        "GPA": student["gpa"],
    }
Next, let's write the CRUD database operations.
Database CRUD Operations
Start by importing the ObjectId method from the bson package at the top of the database.py file:
from bson.objectid import ObjectId
bson comes installed as a dependency of motor.
Next, add each of the following functions for the CRUD operations:
# Retrieve all students present in the database
async def retrieve_students():
    students = []
    async for student in student_collection.find():
        students.append(student_helper(student))
    return students


# Add a new student into to the database
async def add_student(student_data: dict) -> dict:
    student = await student_collection.insert_one(student_data)
    new_student = await student_collection.find_one({"_id": student.inserted_id})
    return student_helper(new_student)


# Retrieve a student with a matching ID
async def retrieve_student(id: str) -> dict:
    student = await student_collection.find_one({"_id": ObjectId(id)})
    if student:
        return student_helper(student)


# Update a student with a matching ID
async def update_student(id: str, data: dict):
    # Return false if an empty request body is sent.
    if len(data) < 1:
        return False
    student = await student_collection.find_one({"_id": ObjectId(id)})
    if student:
        updated_student = await student_collection.update_one(
            {"_id": ObjectId(id)}, {"$set": data}
        )
        if updated_student:
            return True
        return False


# Delete a student from the database
async def delete_student(id: str):
    student = await student_collection.find_one({"_id": ObjectId(id)})
    if student:
        await student_collection.delete_one({"_id": ObjectId(id)})
        return True
In the code above, we defined the asynchronous operations to create, read, update, and delete student data in the database via motor.
In the update and delete operations, the student is searched for in the database to decide whether to carry out the operation or not. The return values guide how to send responses to the user which we'll be working on in the next section.
CRUD Routes
In this section, we'll add the routes to complement the database operations in the database file.
In the "routes" folder, create a new file called student.py and add the following content to it:
from fastapi import APIRouter, Body
from fastapi.encoders import jsonable_encoder

from app.server.database import (
    add_student,
    delete_student,
    retrieve_student,
    retrieve_students,
    update_student,
)
from app.server.models.student import (
    ErrorResponseModel,
    ResponseModel,
    StudentSchema,
    UpdateStudentModel,
)

router = APIRouter()
We'll be using the JSON Compatible Encoder from FastAPI to convert our models into a format that's JSON compatible.
Next, wire up the student route in app/server/app.py:
from fastapi import FastAPI

from app.server.routes.student import router as StudentRouter

app = FastAPI()

app.include_router(StudentRouter, tags=["Student"], prefix="/student")


@app.get("/", tags=["Root"])
async def read_root():
    return {"message": "Welcome to this fantastic app!"}
Create
Back in the routes file, add the following handler for creating a new student:
@router.post("/", response_description="Student data added into the database")
async def add_student_data(student: StudentSchema = Body(...)):
    student = jsonable_encoder(student)
    new_student = await add_student(student)
    return ResponseModel(new_student, "Student added successfully.")
So, the route expects a payload that matches the format of StudentSchema. Example:
{
    "fullname": "John Doe",
    "email": "[email protected]",
    "course_of_study": "Water resources engineering",
    "year": 2,
    "gpa": "3.0",
}
Fire up the Uvicorn server:
(venv)$ python app/main.py
And refresh the interactive API documentation page at http://localhost:8000/docs to view the new route:
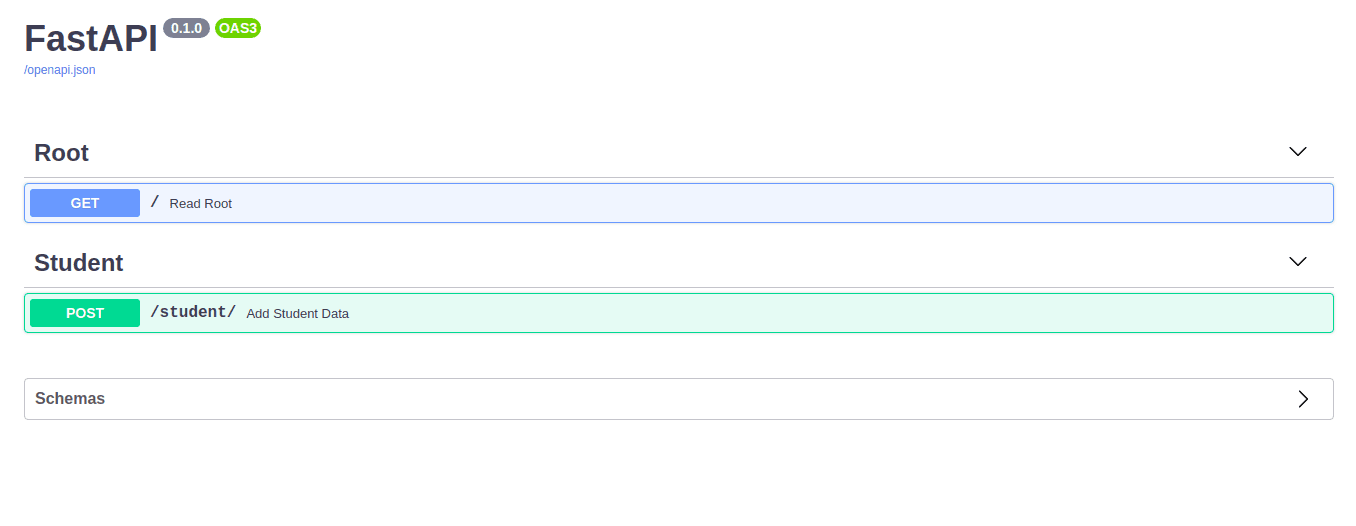
Test it out as well:
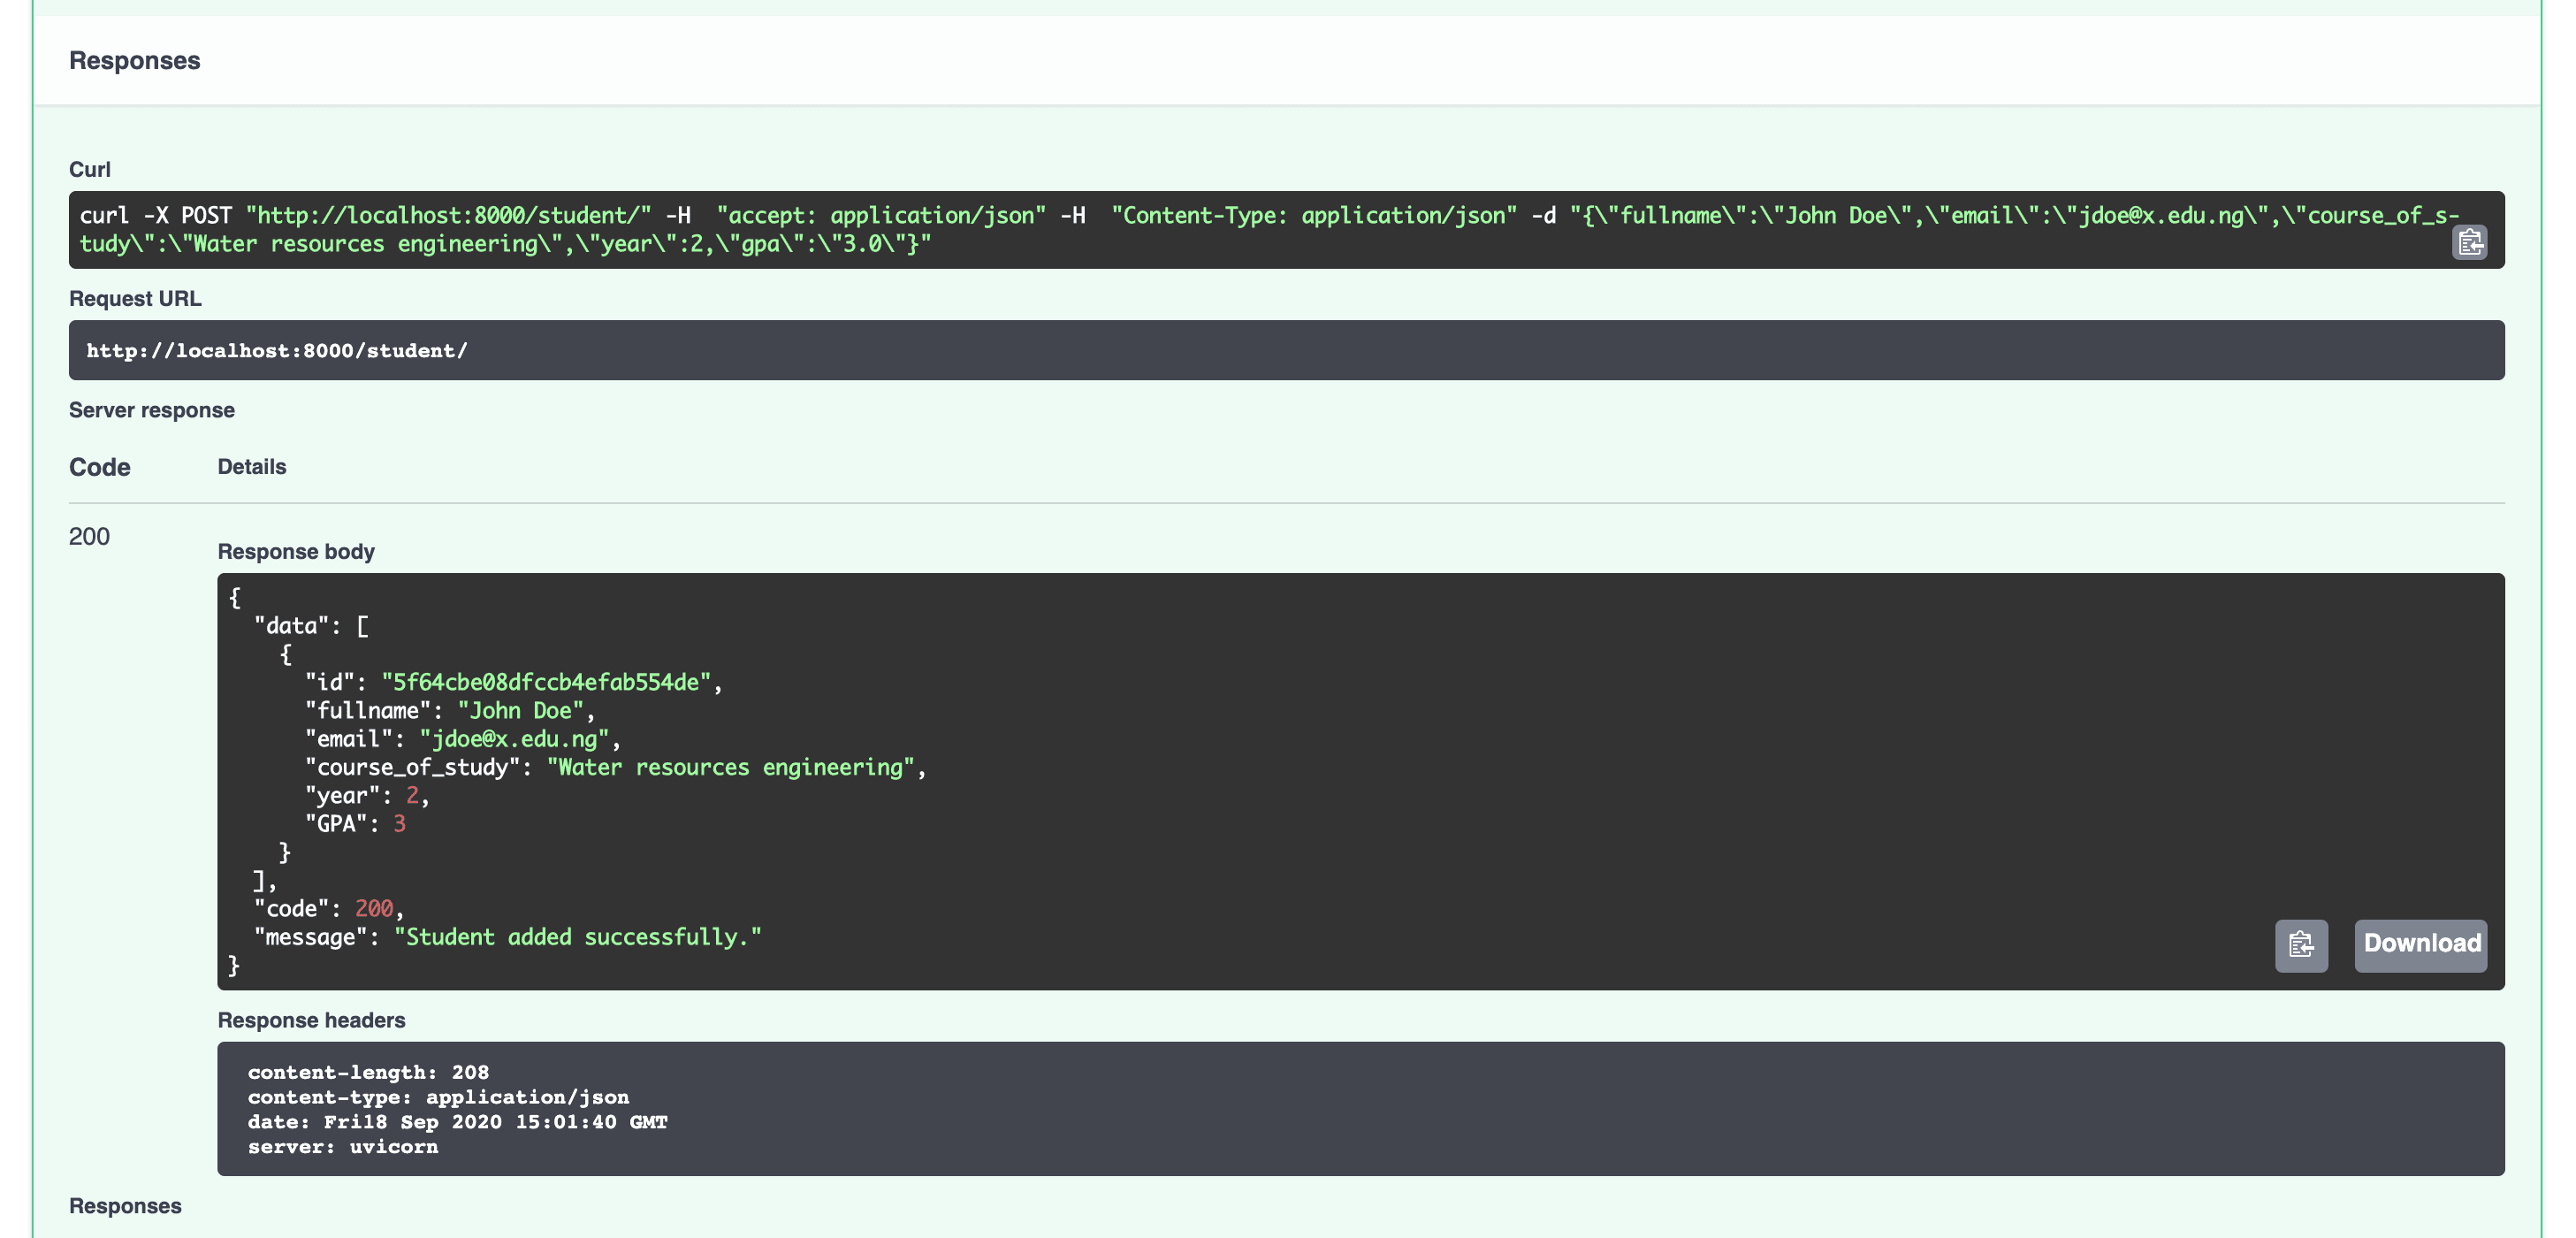
So, when a request is sent to the endpoint, it stores a JSON-encoded request body in the variable student before calling the add_student database method and storing the response in the new_student variable. The response from the database is then returned via the ResponseModel.
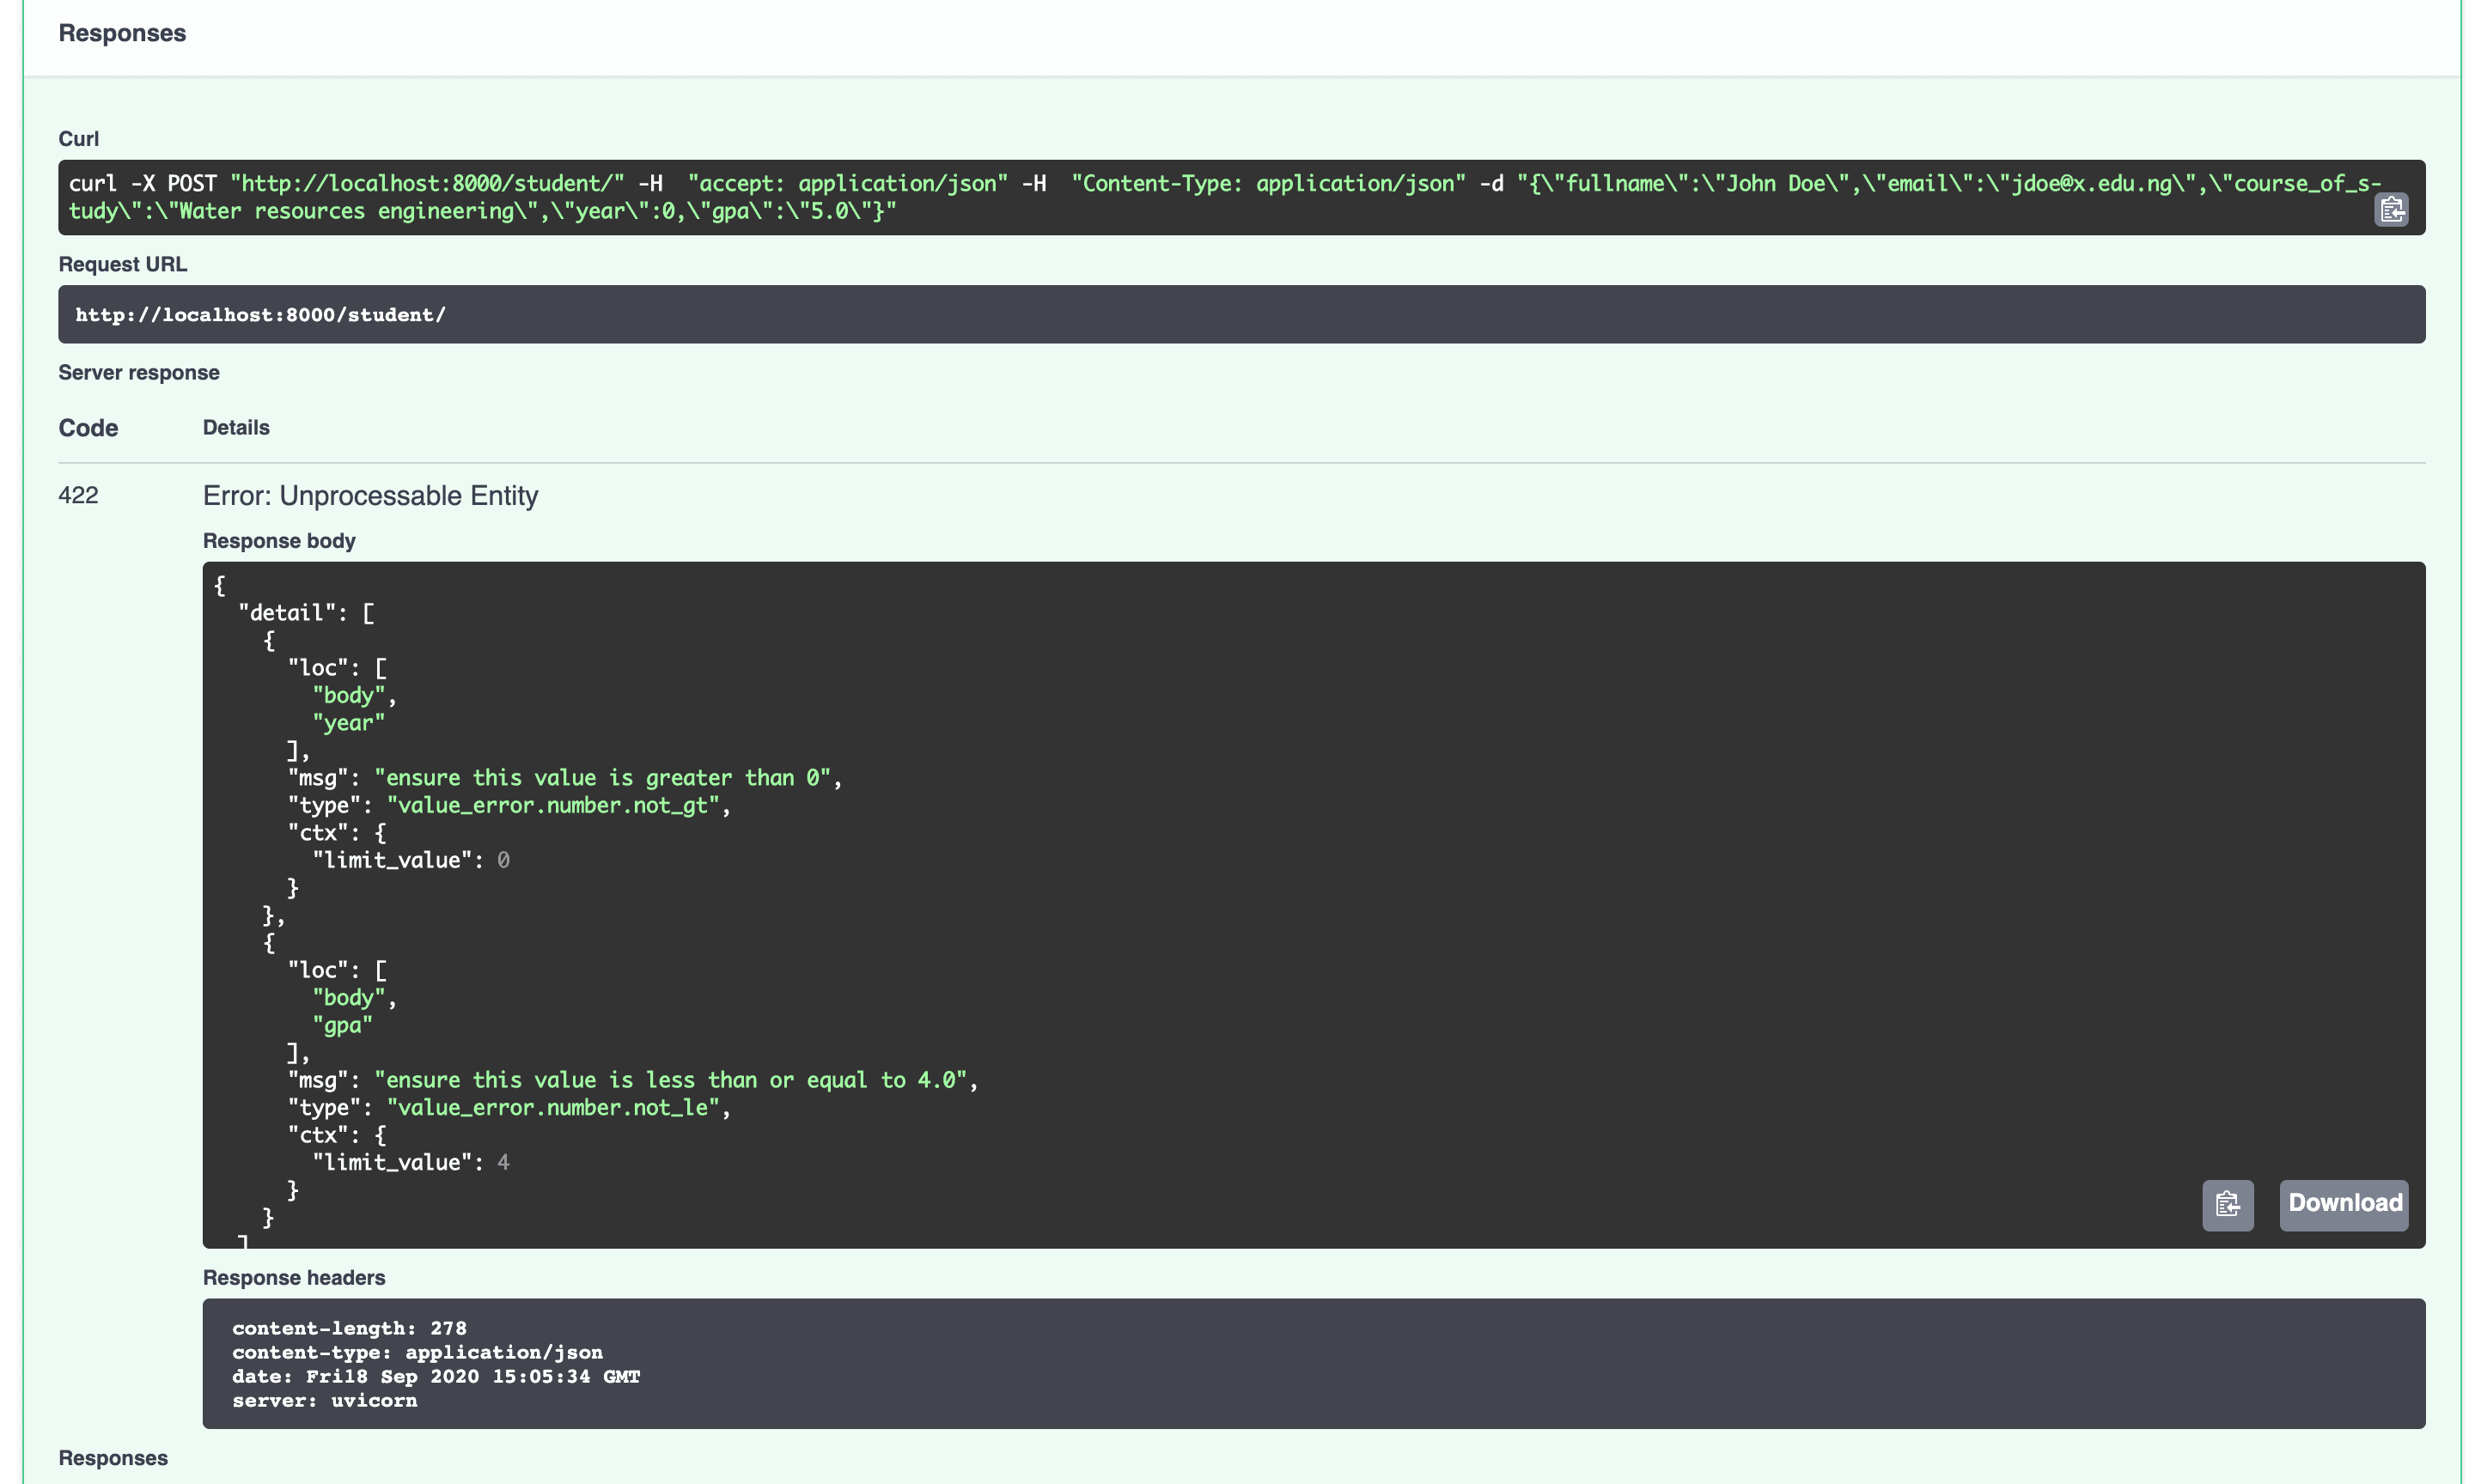
Test out the validators as well:
- Year must be greater than 0 and less than 10
- GPA must be less than or equal to 4.0
Read
Moving right along, add the following routes to retrieve all students and a single student:
@router.get("/", response_description="Students retrieved")
async def get_students():
students = await retrieve_students()
if students:
return ResponseModel(students, "Students data retrieved successfully")
return ResponseModel(students, "Empty list returned")
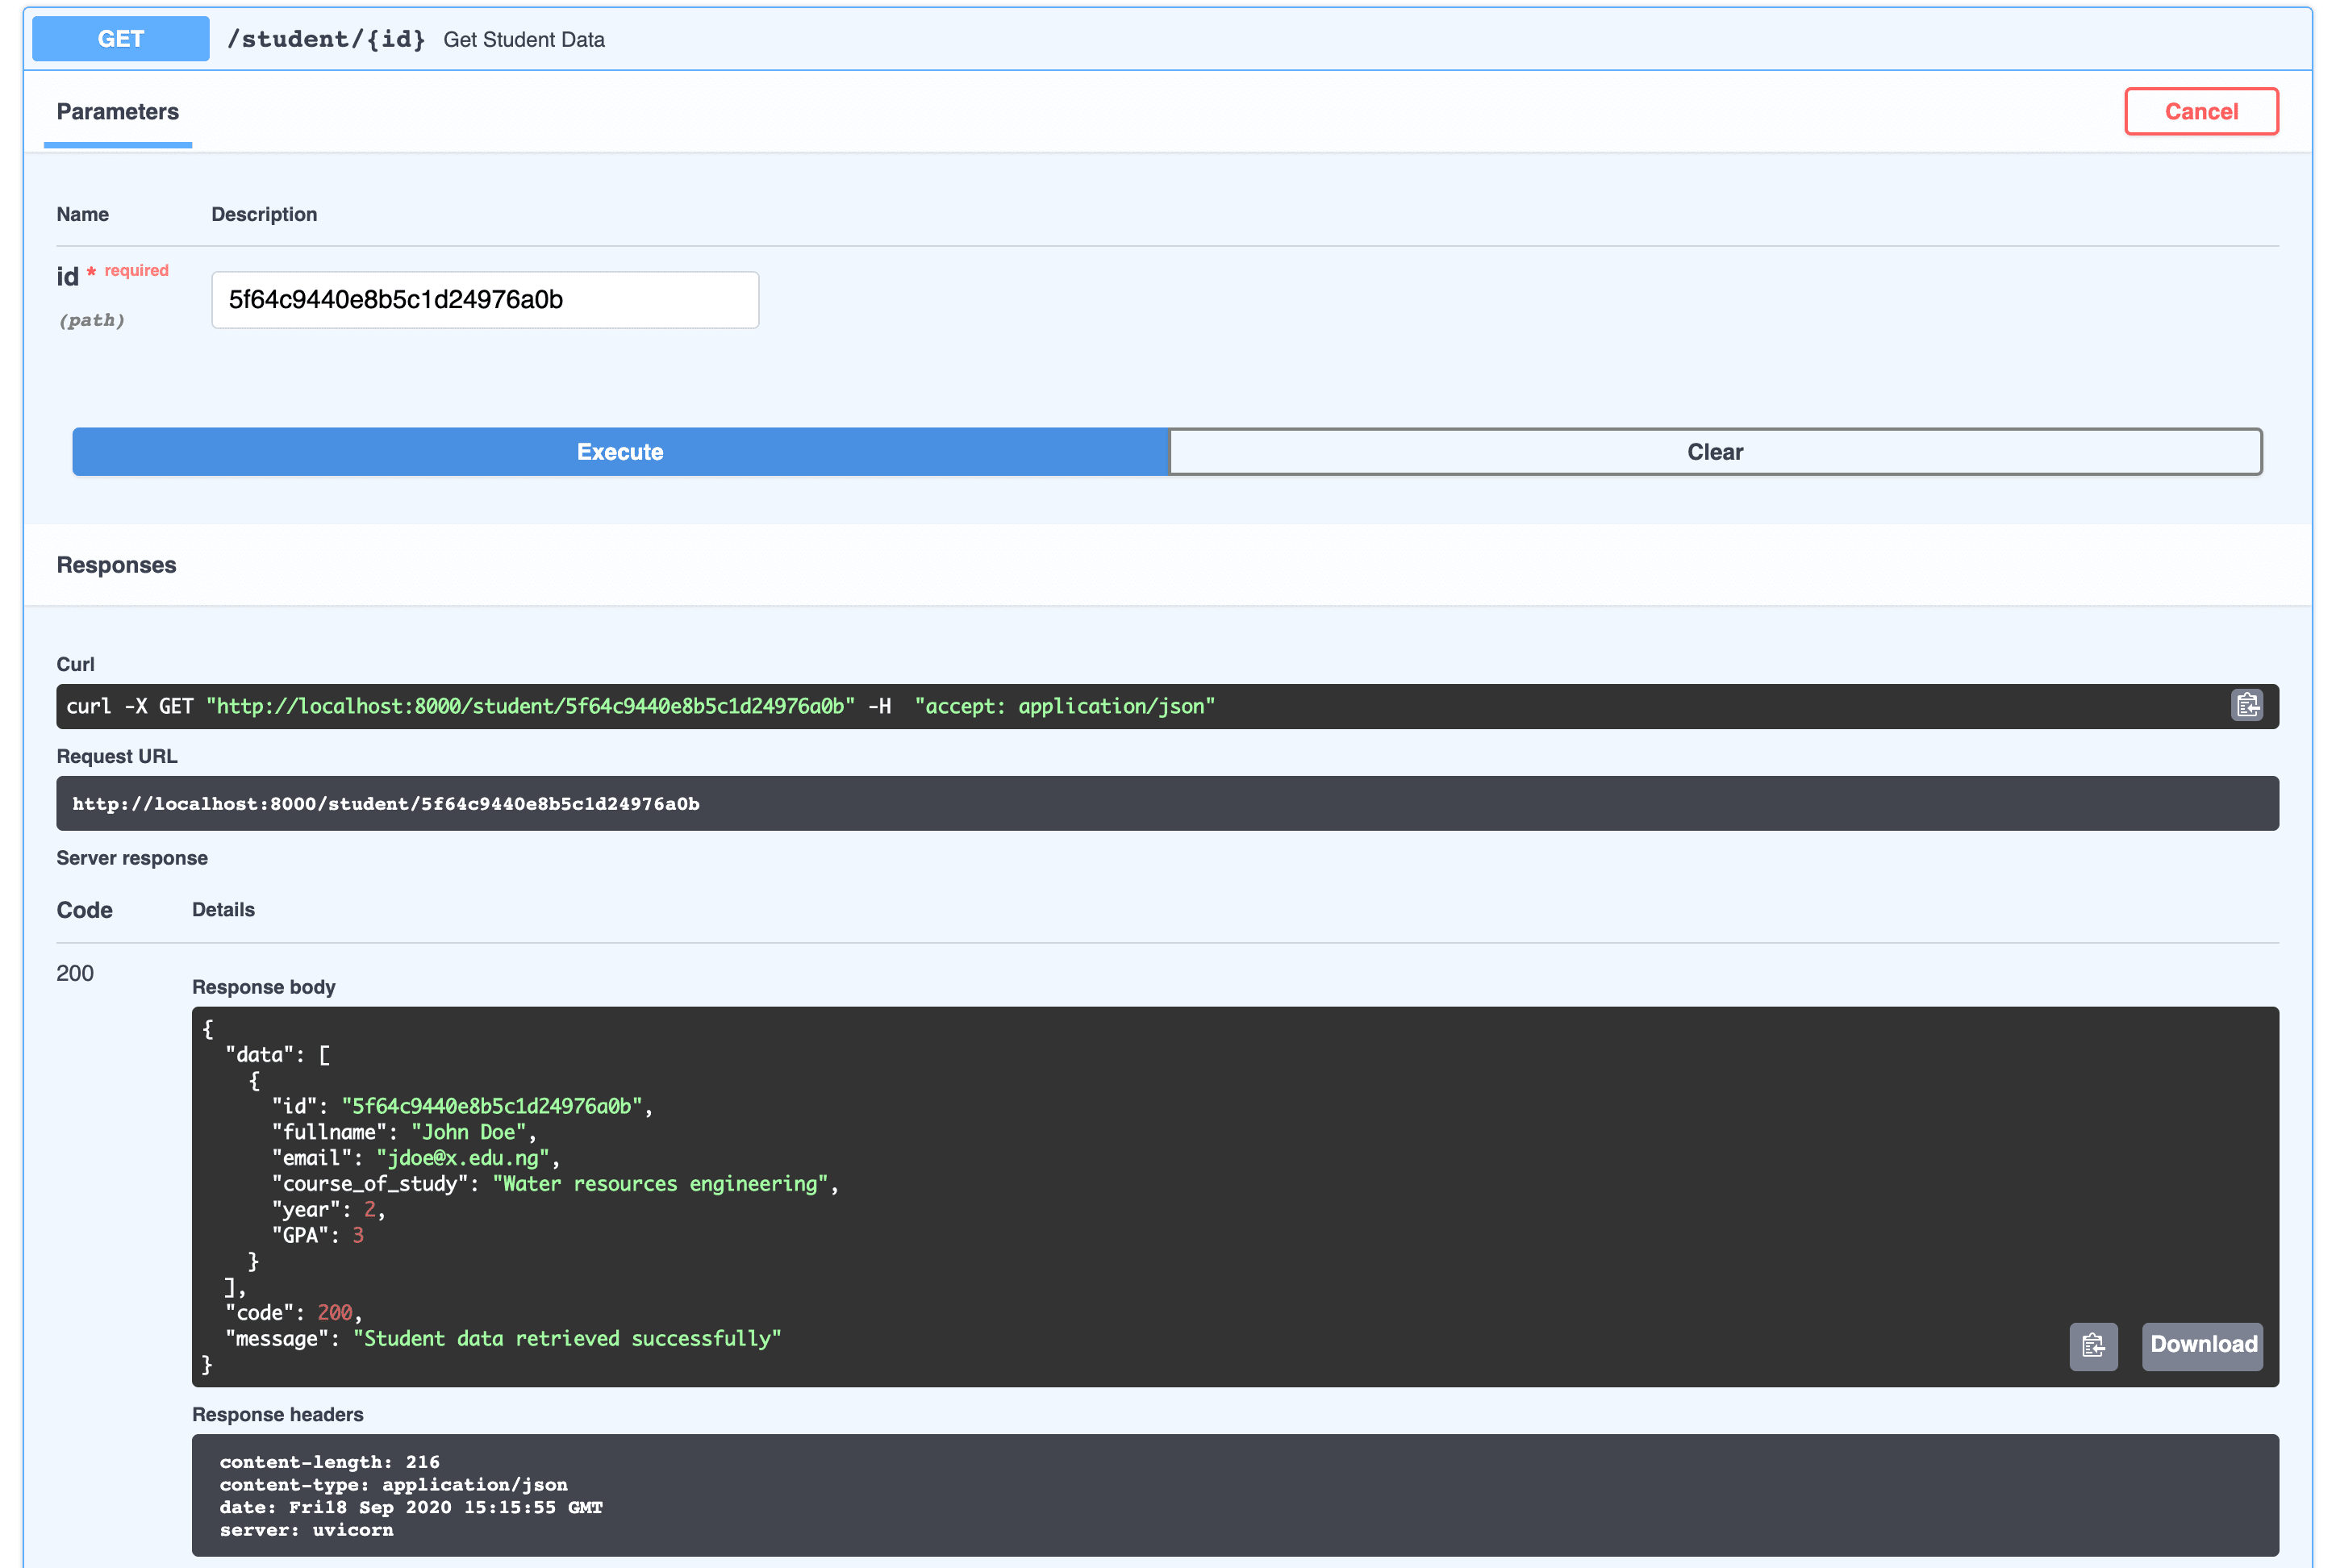
@router.get("/{id}", response_description="Student data retrieved")
async def get_student_data(id):
student = await retrieve_student(id)
if student:
return ResponseModel(student, "Student data retrieved successfully")
return ErrorResponseModel("An error occurred.", 404, "Student doesn't exist.")
What happens if you don't pass in a valid ObjectId -- e.g.,
1-- for the ID to the retrieve a single student route? How can you better handle this in the application?
When the delete operation is implemented, you'll have an opportunity to test the response for an empty database.
Update
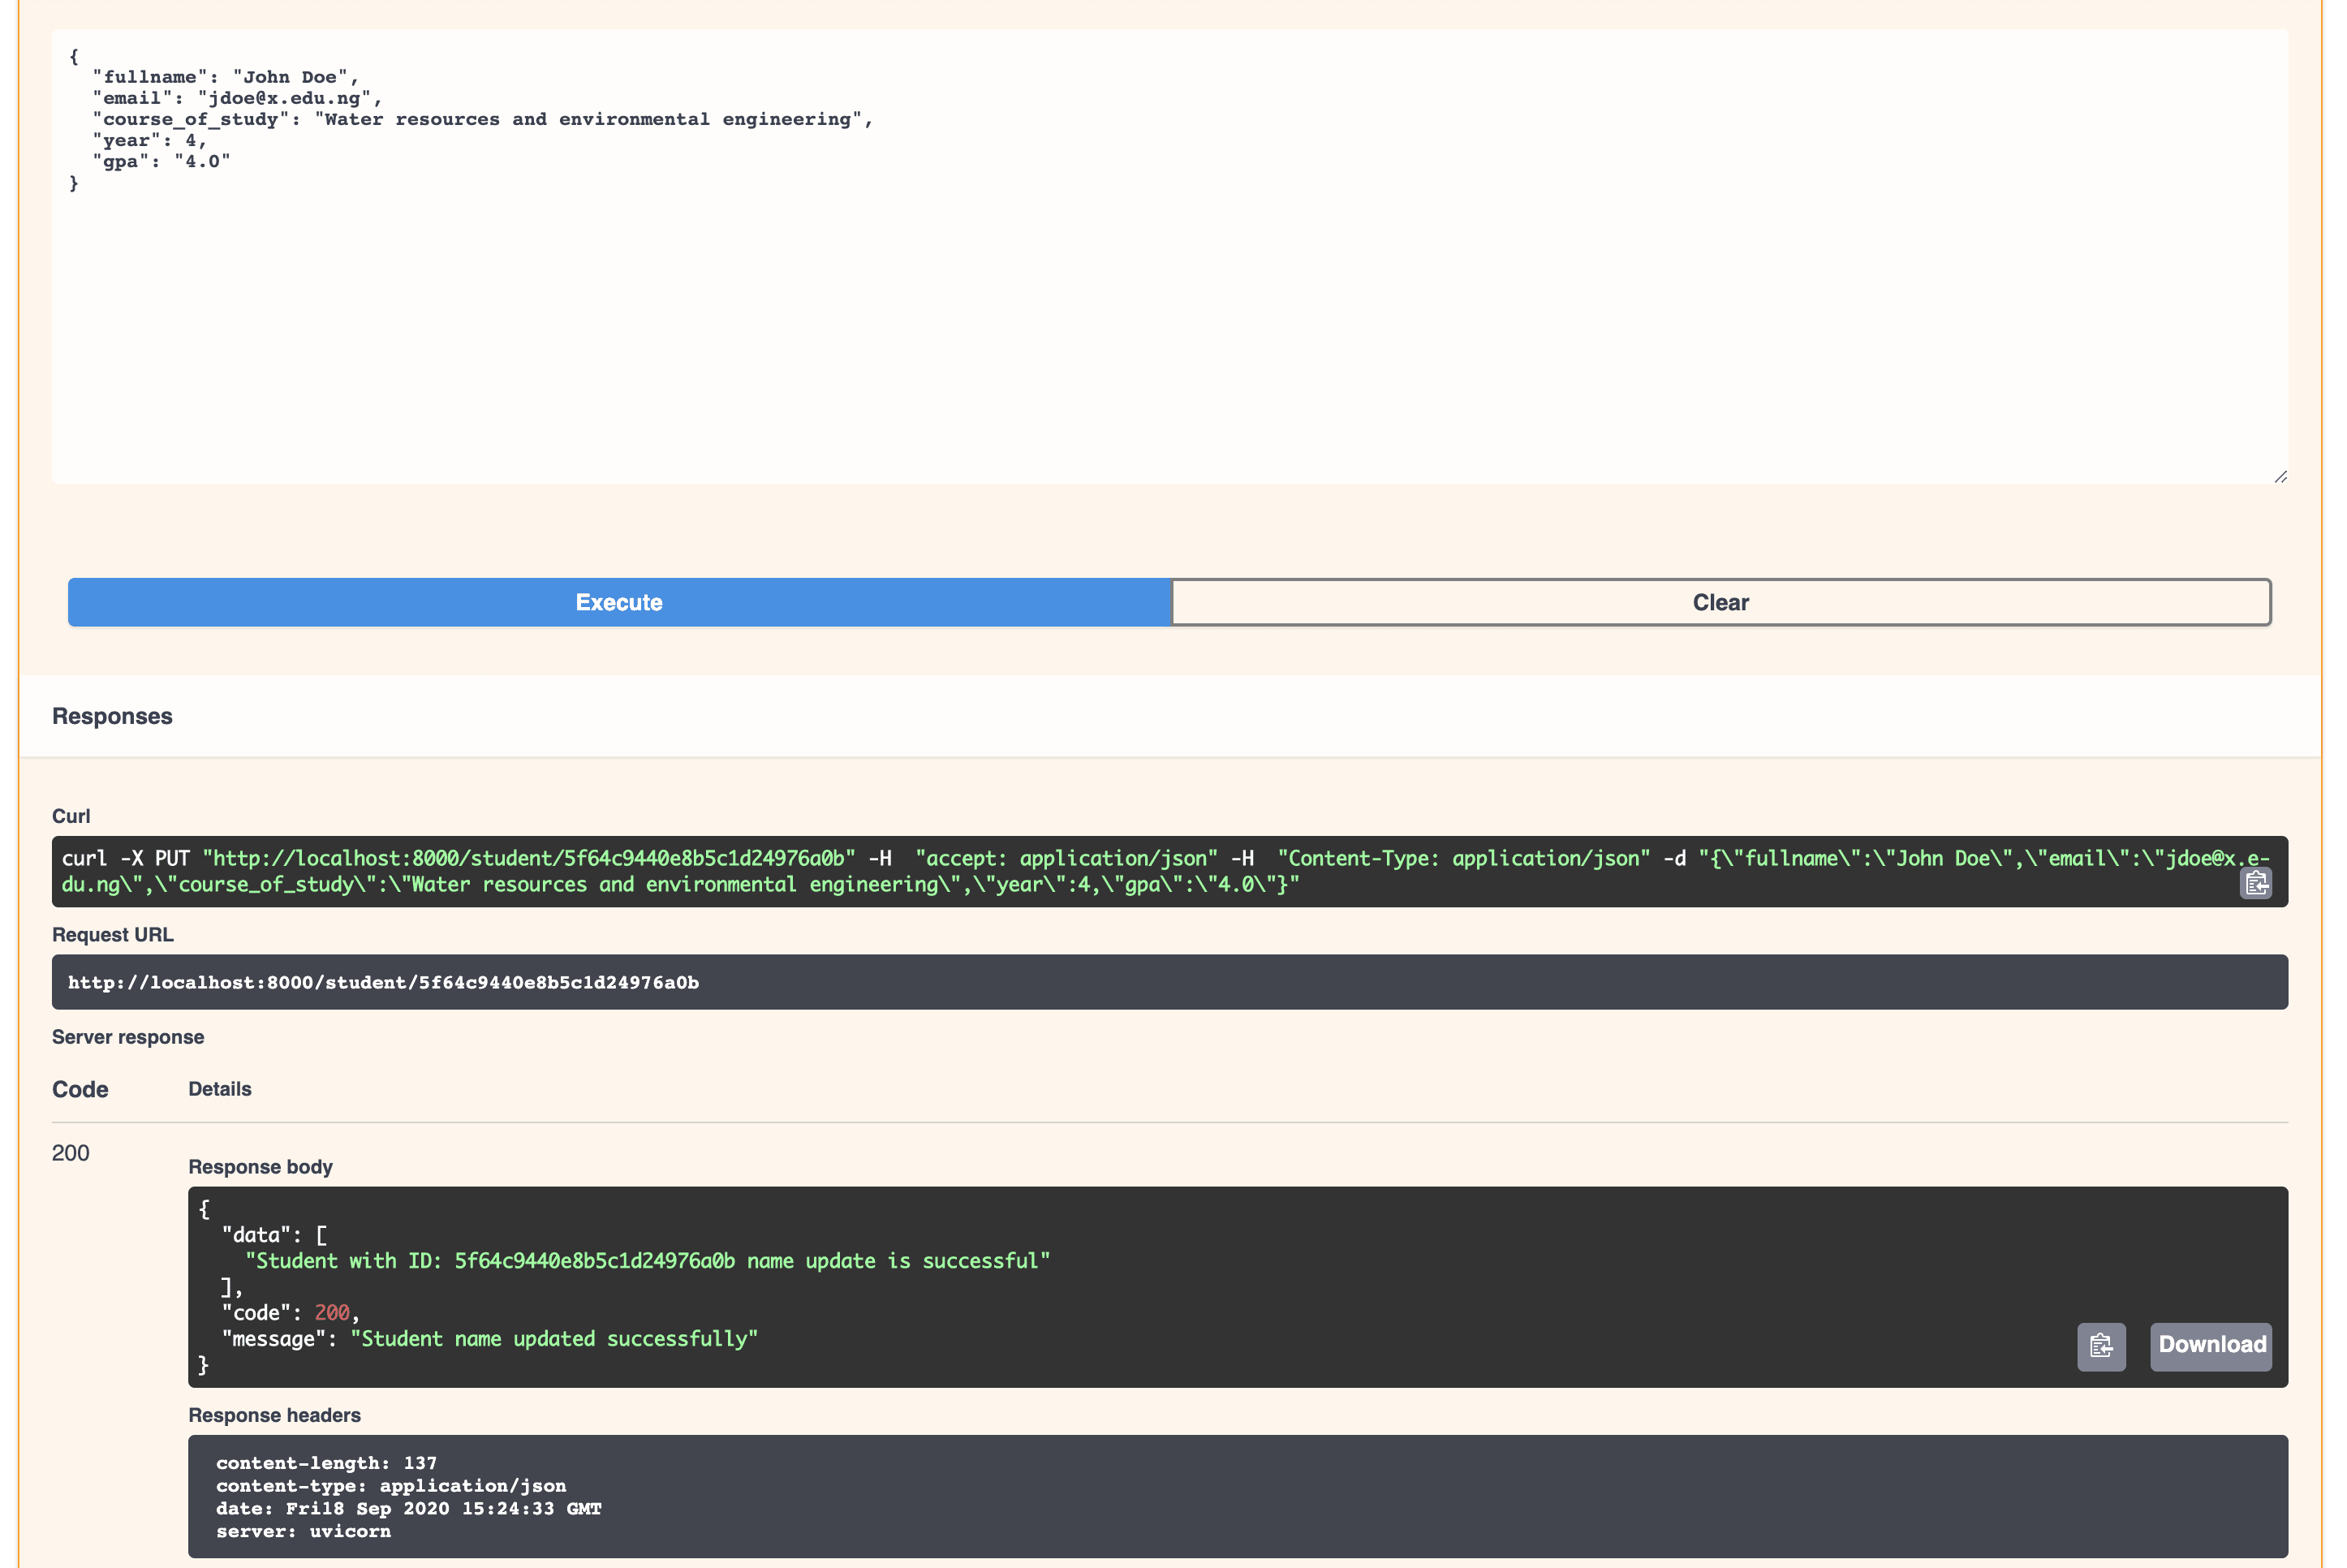
Next, write the individual route for updating the student data:
@router.put("/{id}")
async def update_student_data(id: str, req: UpdateStudentModel = Body(...)):
    req = {k: v for k, v in req.dict().items() if v is not None}
    updated_student = await update_student(id, req)
    if updated_student:
        return ResponseModel(
            "Student with ID: {} name update is successful".format(id),
            "Student name updated successfully",
        )
    return ErrorResponseModel(
        "An error occurred",
        404,
        "There was an error updating the student data.",
    )
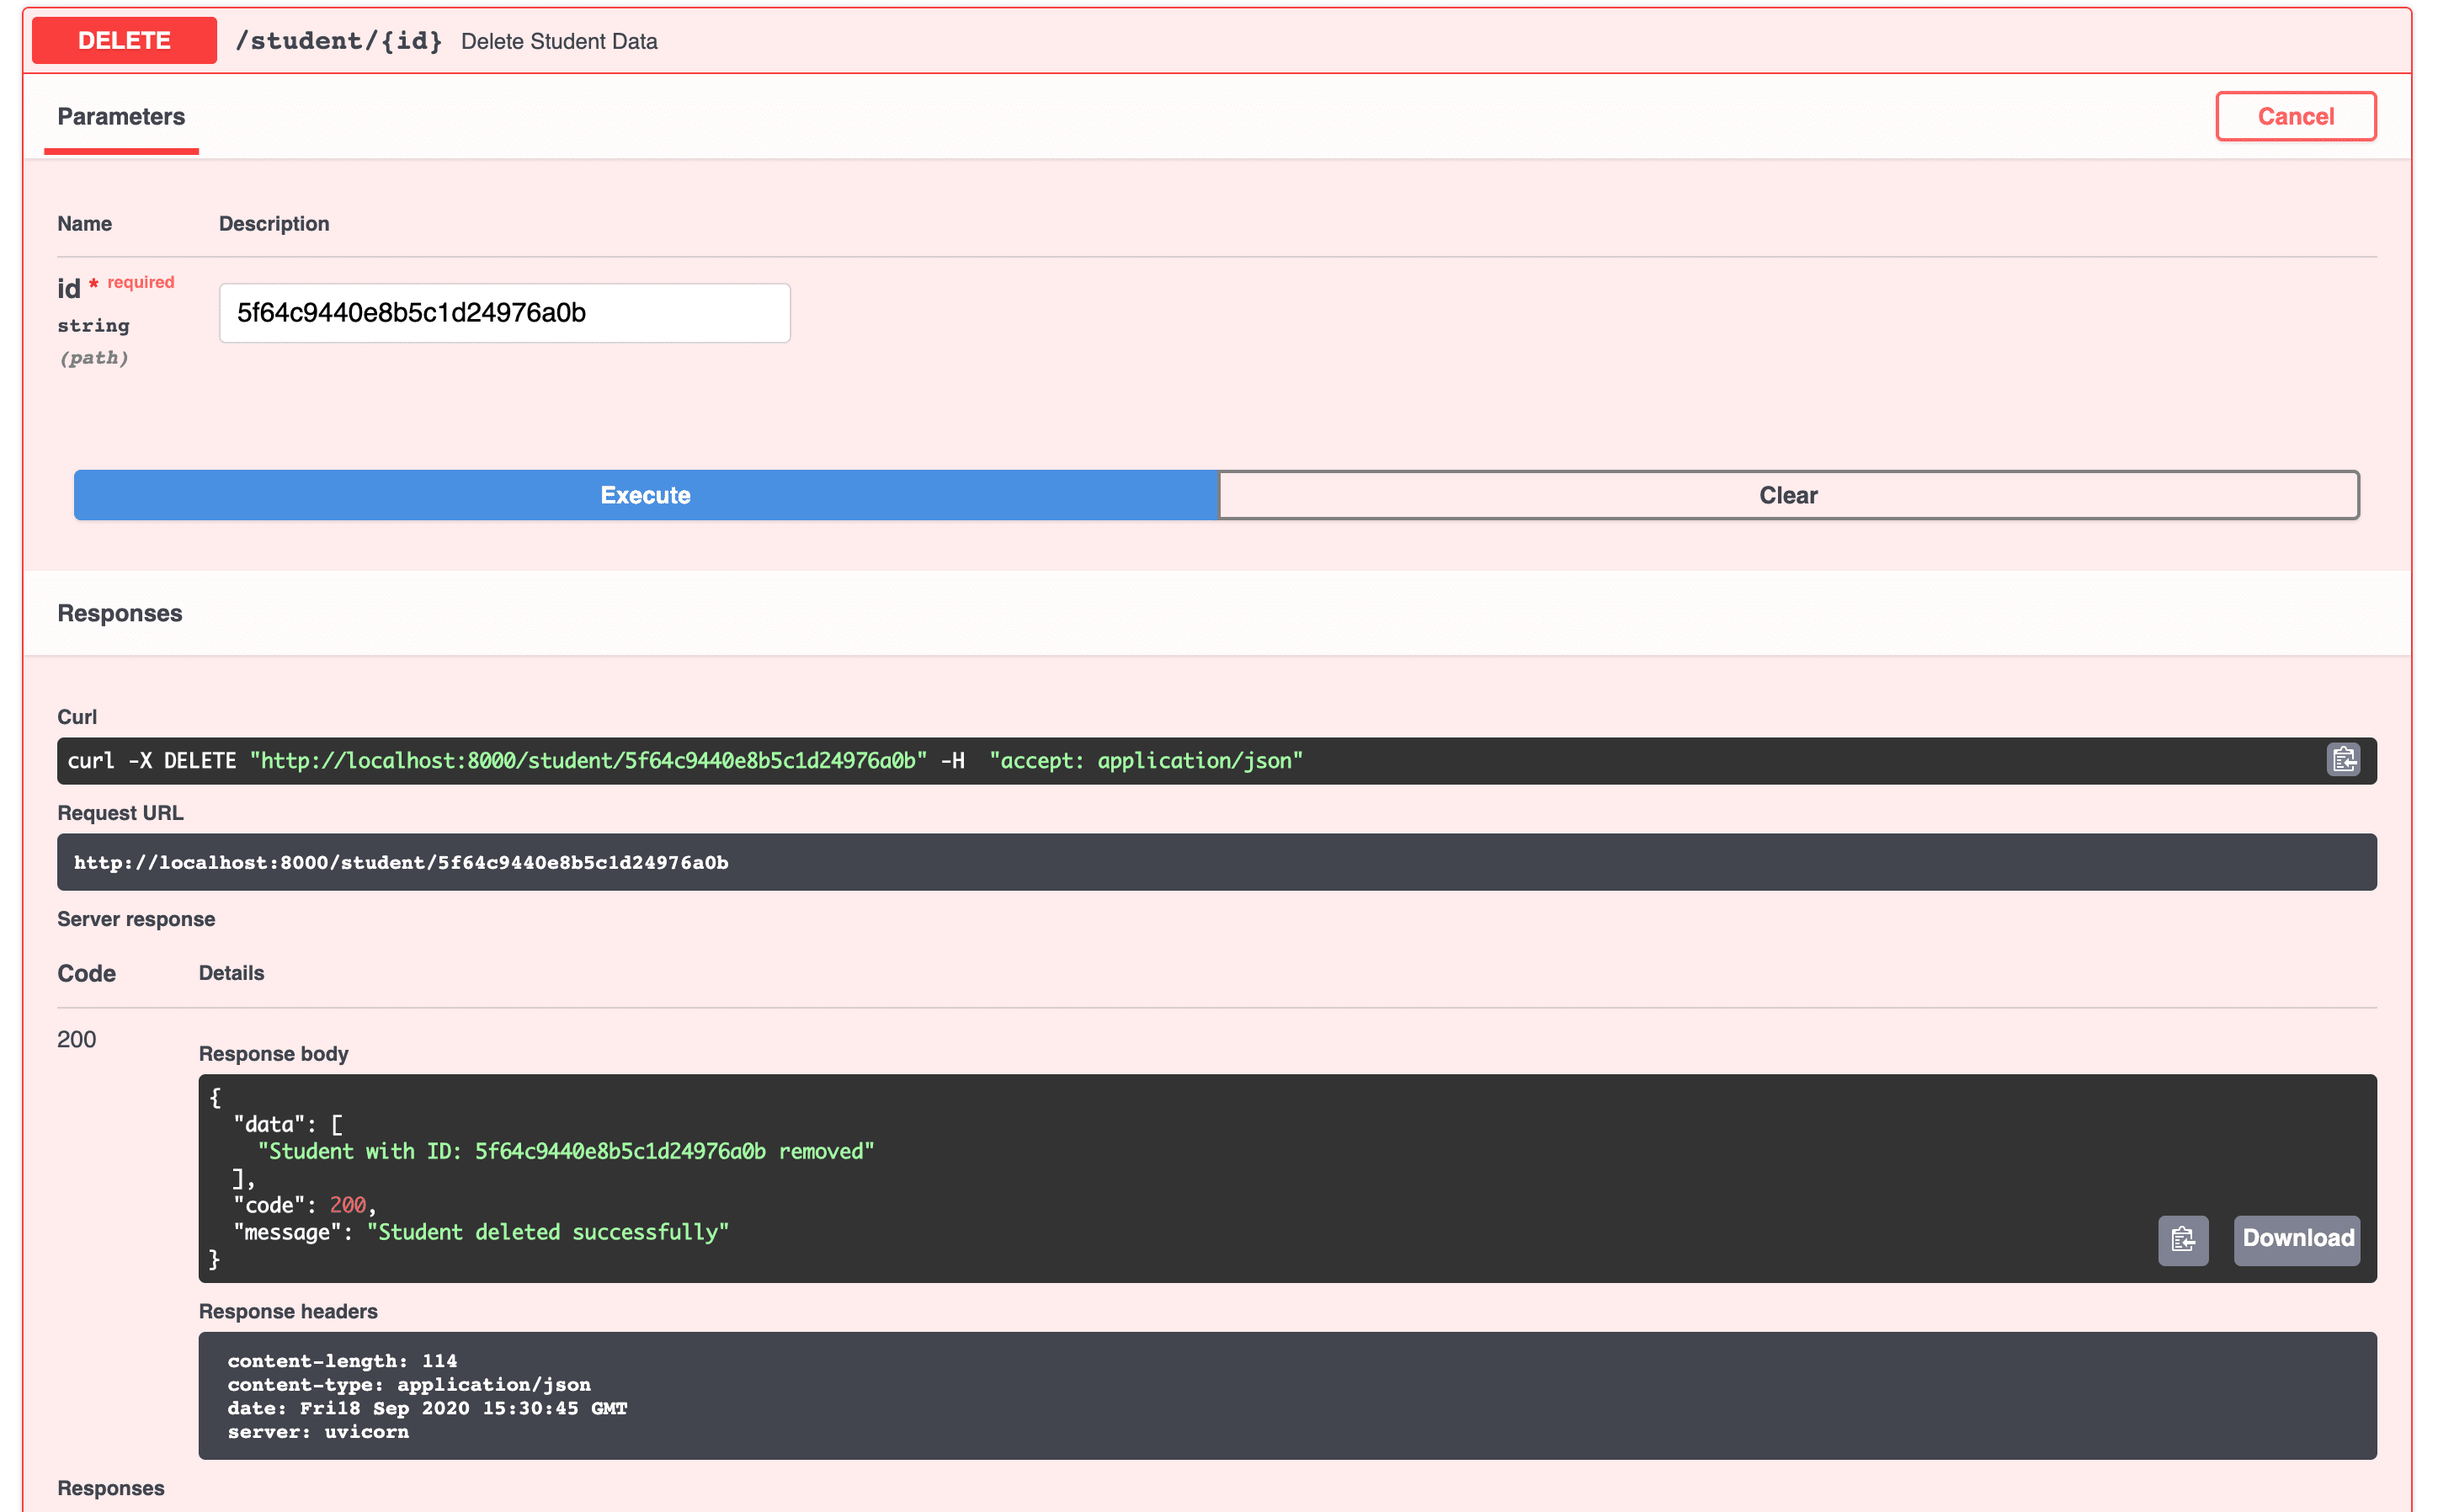
Delete
Finally, add the delete route:
@router.delete("/{id}", response_description="Student data deleted from the database")
async def delete_student_data(id: str):
    deleted_student = await delete_student(id)
    if deleted_student:
        return ResponseModel(
            "Student with ID: {} removed".format(id), "Student deleted successfully"
        )
    return ErrorResponseModel(
        "An error occurred", 404, "Student with id {0} doesn't exist".format(id)
    )
Retrieve the ID of the user you created earlier and test the delete route:
Remove any remaining students and test out the read routes again, ensuring the responses are appropriate for an empty database.
Deployment
In this section, we'll deploy the app to Heroku and configure a cloud database for MongoDB.
MongoDB Atlas
Before deploying, we need to set up MongoDB Atlas, a cloud database service for MongoDB to host our database.
Follow the Getting Started guide where you'll create an account, deploy a free tier cluster, set up a user, and whitelist an IP address.
For testing purposes, use
0.0.0.0/0for the whitelisted IP to allow access from anywhere. For a production app you'll want to restrict access to a static IP.
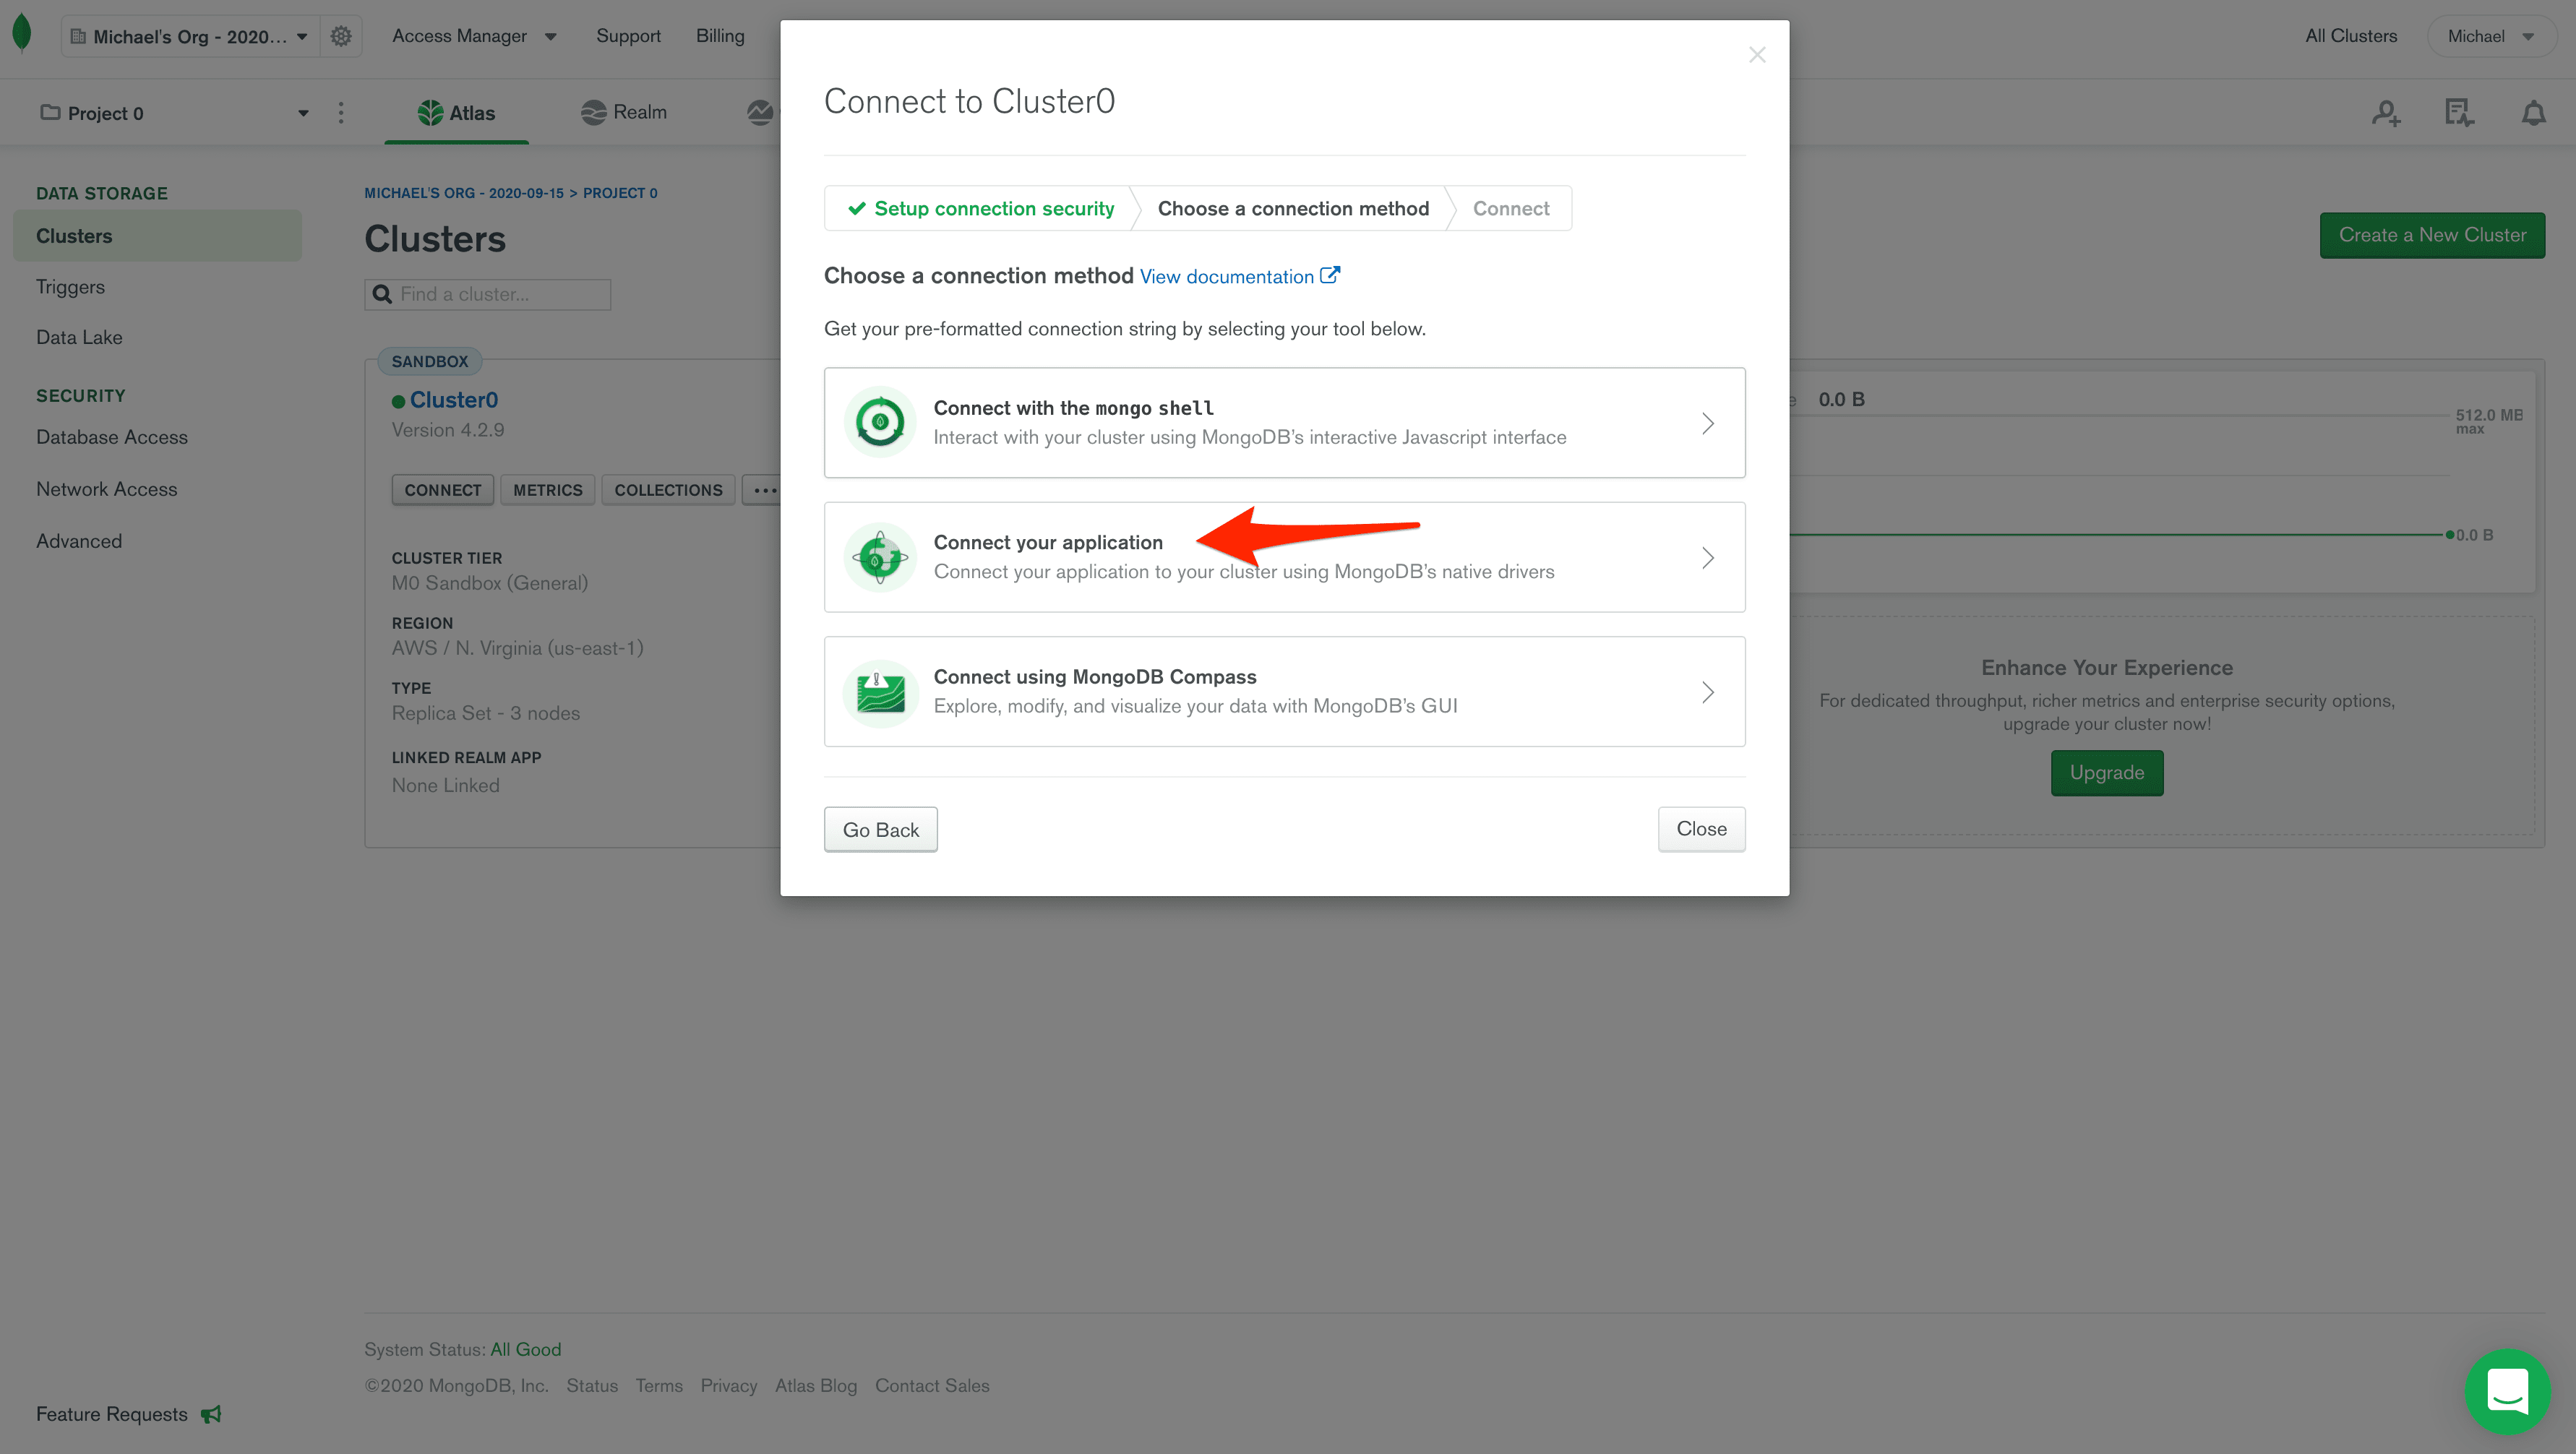
Once done, grab the database connection information from your cluster by clicking the "Connect" button:
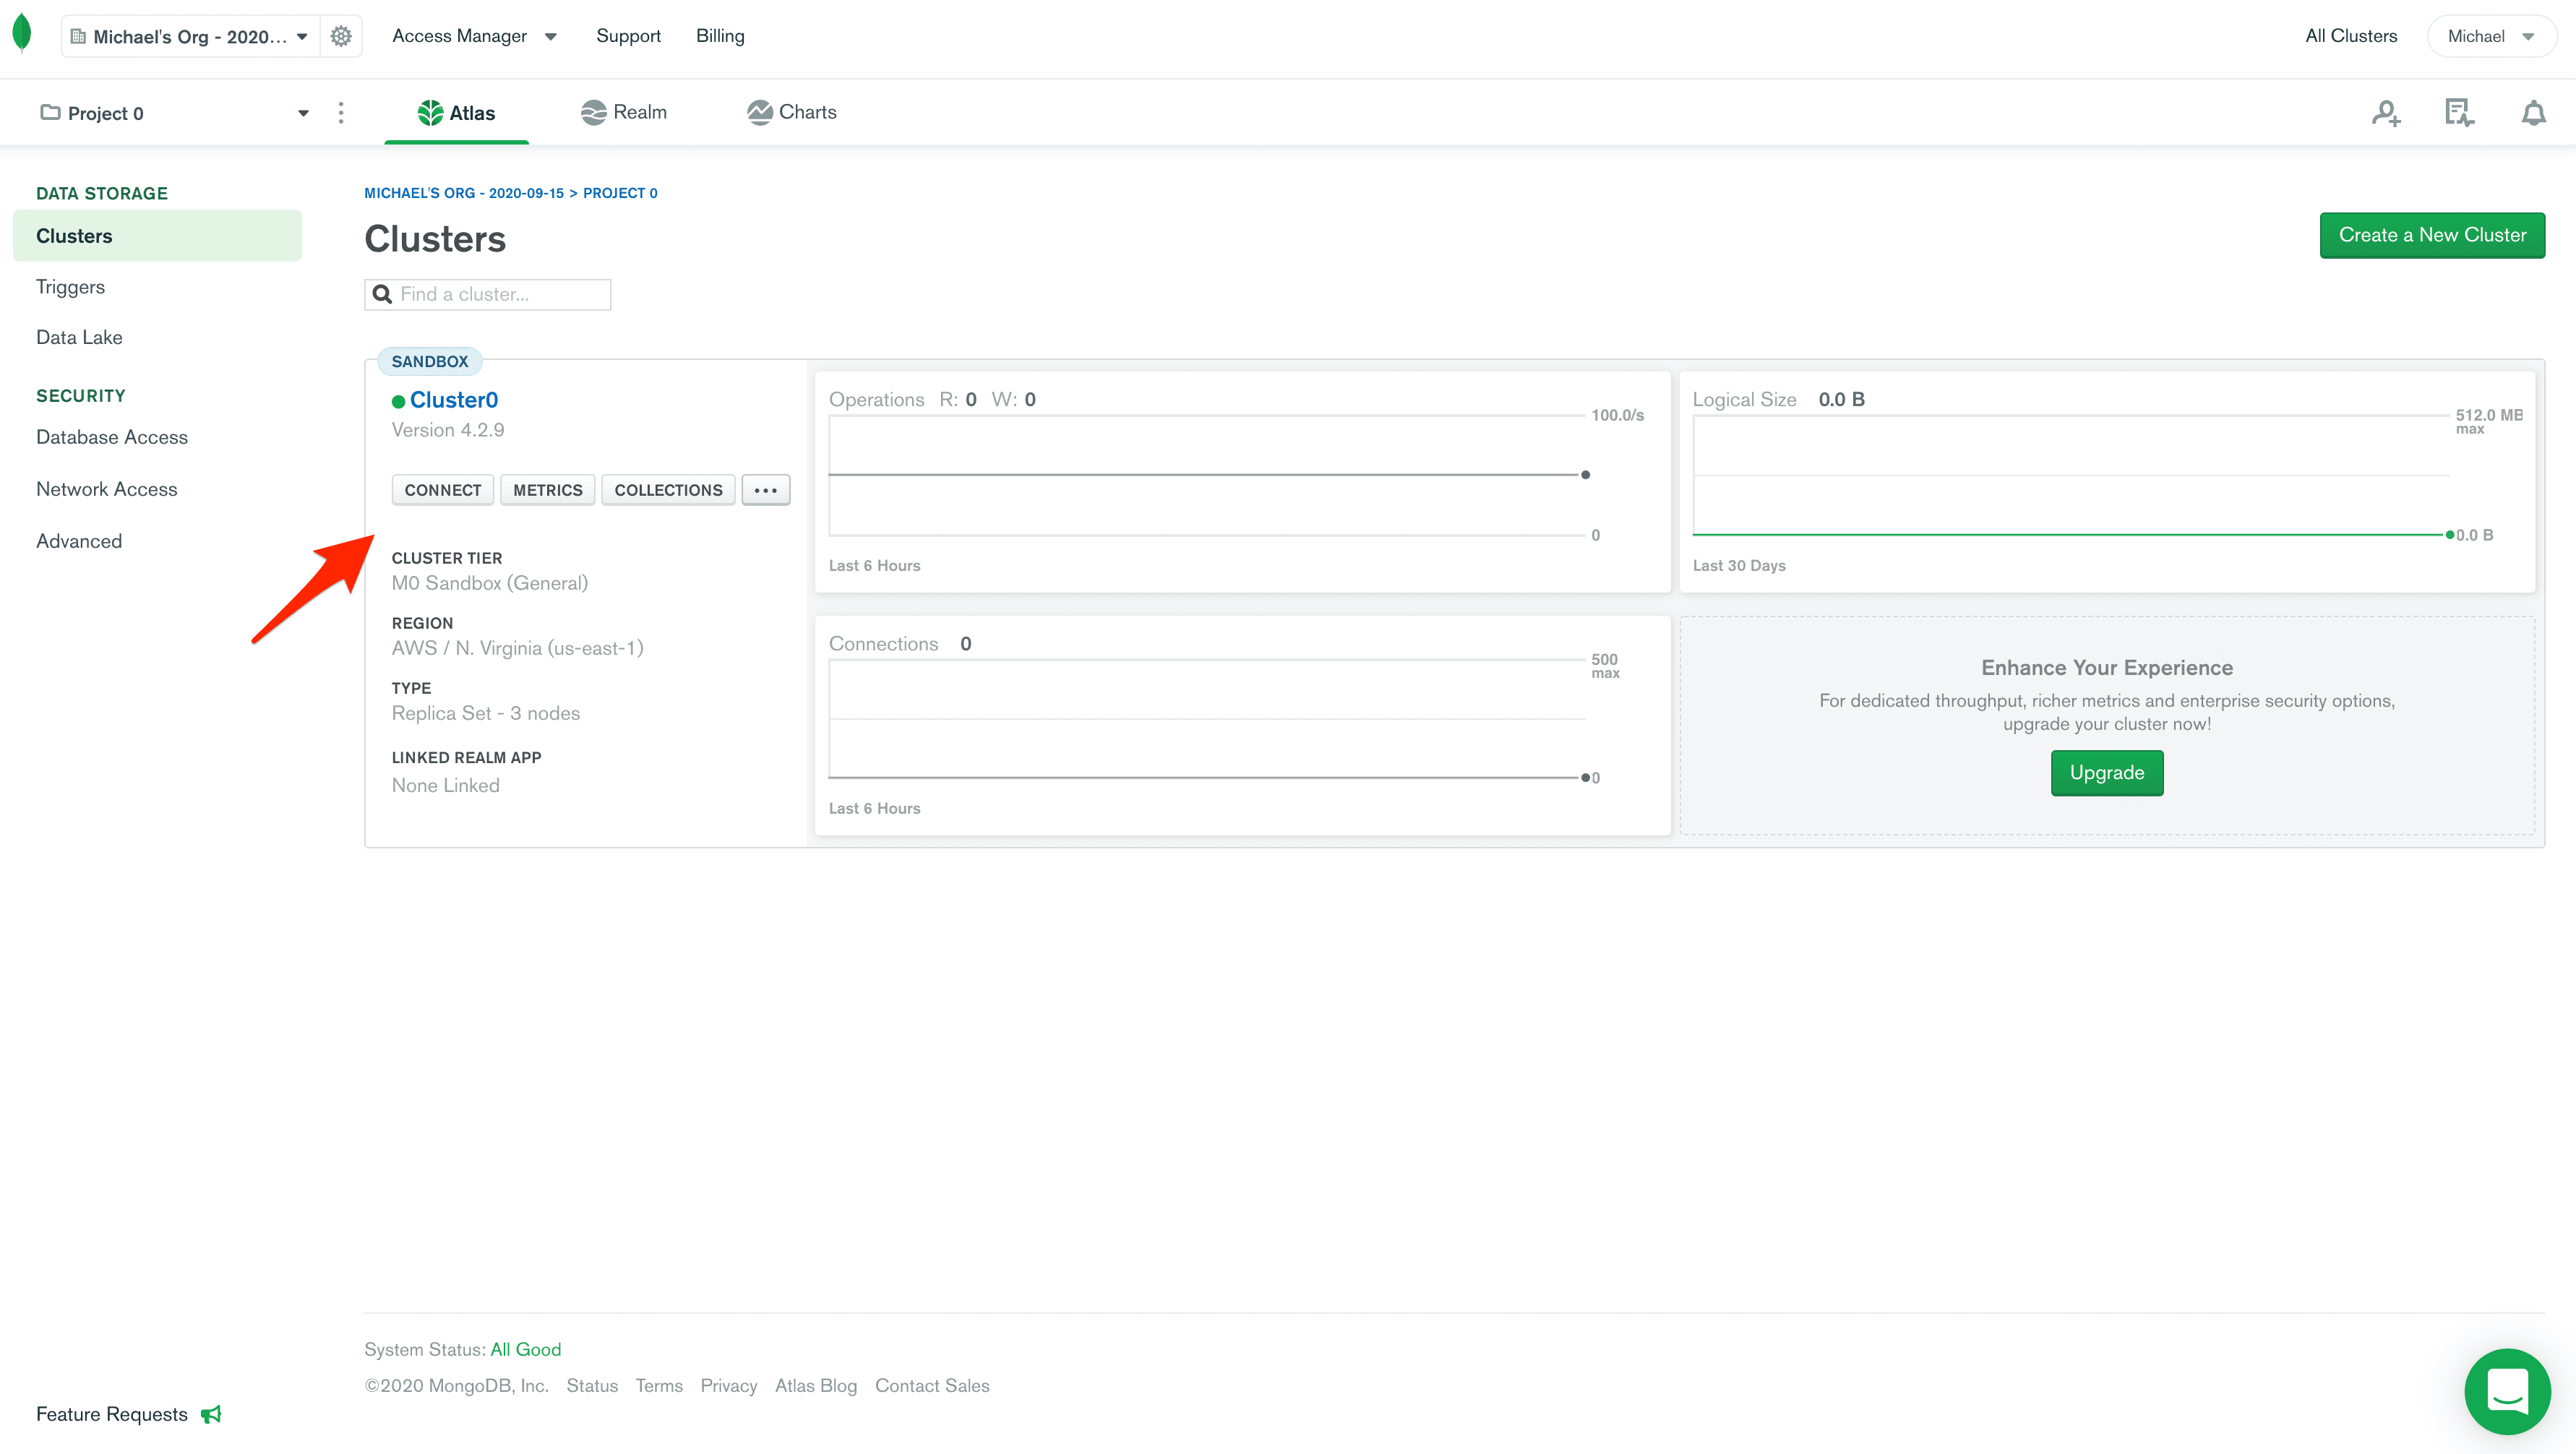
Click on the second option, "Connect to your application":
Copy the connection URL, making sure to update the password. Set the default database to "students" as well. It will look similar to:
mongodb+srv://foobar:foobar@cluster0.0reol.mongodb.net/students?retryWrites=true&w=majority
Instead of hard coding this value in our app, we'll define it has an environment variable. Create a new file called .env in the project root and the connection info to it:
MONGO_DETAILS=your_connection_url
Make sure to replace
your_connection_urlwith the copied URL.
Next, to simplify the management of environment variables in our app, let's install the Python Decouple package. Add it to your requirements file like so:
python-decouple==3.6
Install:
(venv)$ pip install -r requirements.txt
In the app/server/database.py file, import the library:
from decouple import config
The imported config method scans through the root directory for a .env file and reads the content passed to it. So, in our case, it will read the MONGO_DETAILS variable.
Next, change the MONGO_DETAILS variable to:
MONGO_DETAILS = config("MONGO_DETAILS") # read environment variable
Testing Locally
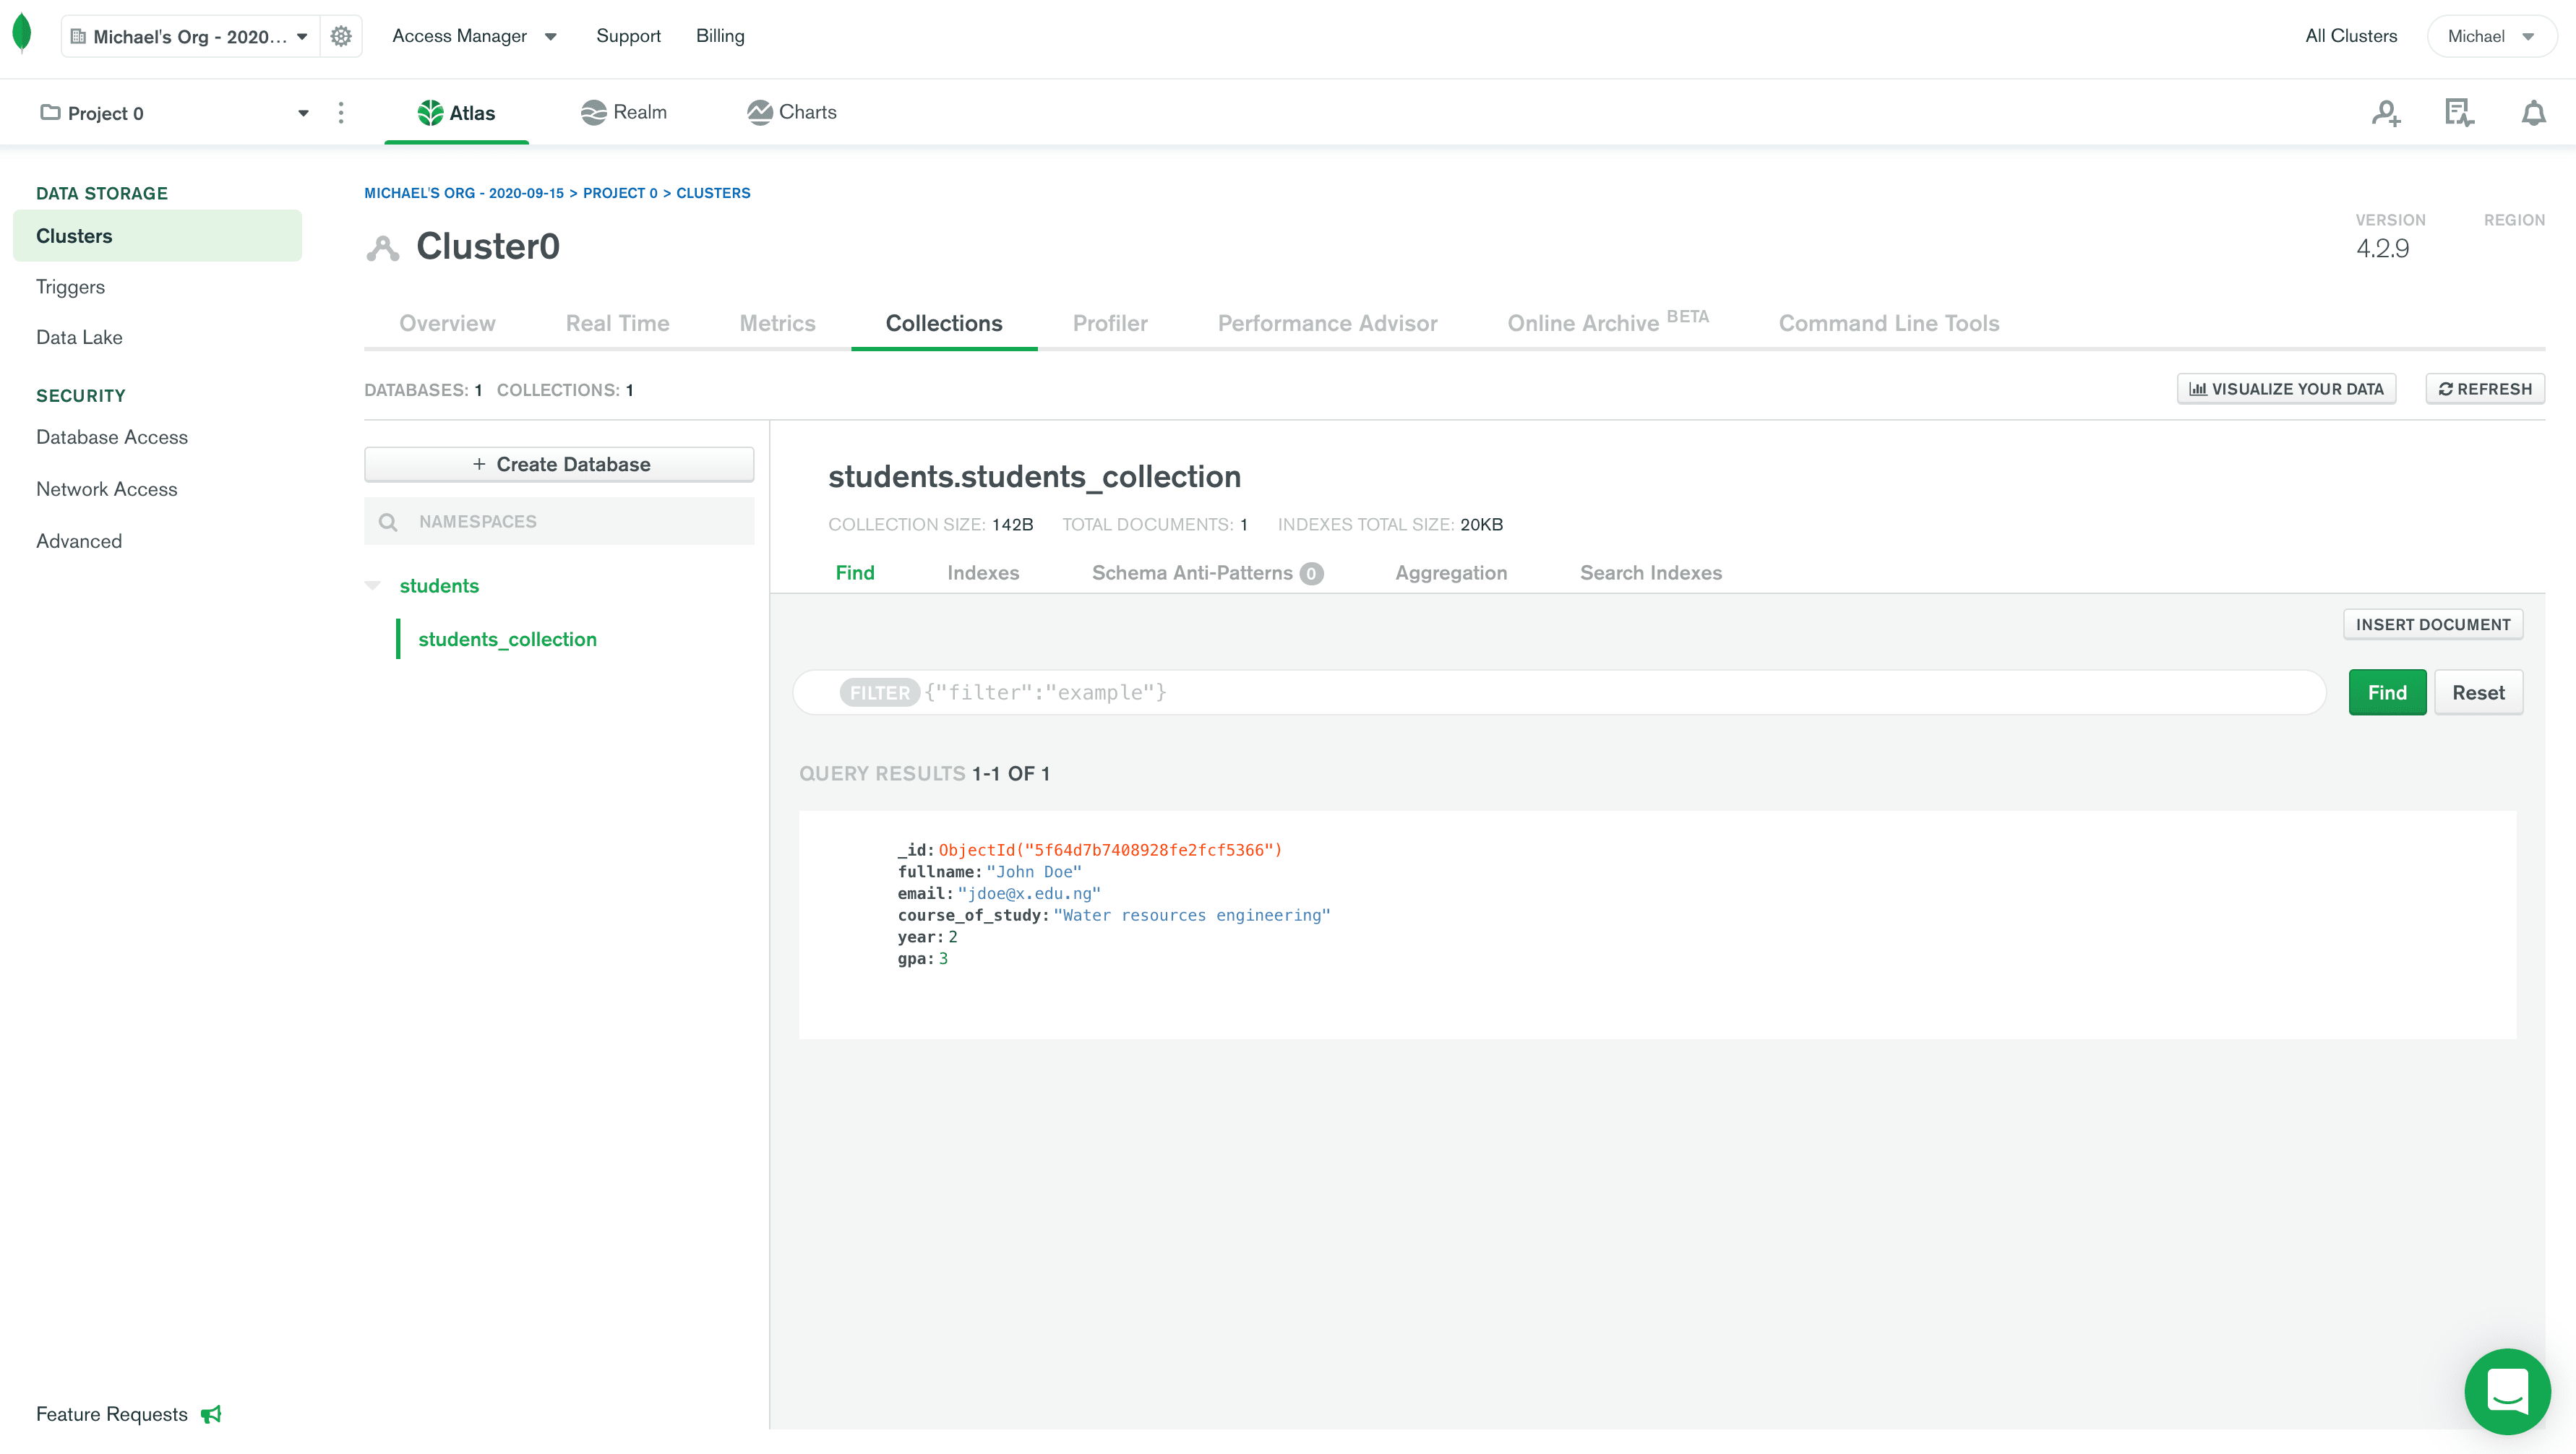
Before deploying, let's test the app locally with the cloud database to ensure that the connection is properly configured. Restart your Uvicorn server and test each route from the interactive documentation at http://localhost:8000/docs.
You should be able to see the data on the Atlas dashboard:
Deploying to Heroku
Finally, let's deploy the app to Heroku.
Heroku is a cloud Platform as a Service (PaaS) used for deploying and scaling applications.
If necessary, sign up for a Heroku account and install the Heroku CLI.
Before proceeding, create a .gitignore file in the project to prevent checking in the "venv" folder and .env file to git:
(venv)$ touch .gitignore
Add the following:
.env
venv/
__pycache__
Next, add a Procfile to your project's root:
web: uvicorn app.server.app:app --host 0.0.0.0 --port=$PORT
Notes:
- A Procfile is a text file, placed at the root of your project, that guides Heroku on how to run your application. Since we're serving a web app, we defined the process type of
webalong with the command to serve up Uvicorn. - Heroku dynamically exposes a port for your app to run at the time of deployment, which is exposed via the
$PORTenvironment variable.
Your project should now have the following files and folders:
├── .env
├── .gitignore
├── Procfile
├── app
│   ├── __init__.py
│   ├── main.py
│   └── server
│       ├── app.py
│       ├── database.py
│       ├── models
│       │   └── student.py
│       └── routes
│           └── student.py
└── requirements.txt
In your project's root, initialize a new git repository:
(venv)$ git init
(venv)$ git add .
(venv)$ git commit -m "My fastapi and mongo application"
Now, we can create a new app on Heroku:
(venv)$ heroku create
Along with creating a new app, this command creates a remote git repository on Heroku for us to push our application to for deployment. It then sets this as a remote on the local repository automatically for us.
You can verify that the remote is set by running
git remote -v.
Take note of your application's URL.
Since we didn't add the .env file to git, we need to set the environment variable within the Heroku environment:
(venv)$ heroku config:set MONGO_DETAILS="your_mongo_connection_url"
Again, make sure to replace
your_connection_urlwith the real connection URL.
Push your code up to Heroku and ensure that at least one instance of the application is running:
(venv)$ git push heroku master
(venv)$ heroku ps:scale web=1
Run heroku open to open your app in your default browser.
You have successfully deployed your application to Heroku. Test it out.
Conclusion
In this tutorial, you learned how to create a CRUD app with FastAPI and MongoDB and deploy it to Heroku. Perform a quick self-check by reviewing the objectives at the beginning of the tutorial. You can find the code used in this tutorial on GitHub.
Looking for more?
- Set up unit and integration tests with pytest.
- Add additional routes.
- Create a GitHub repo for your application and configure CI/CD with GitHub Actions.
- Configure a static IP on Heroku with Fixie Socks and restrict access to the MongoDB Atlas database.
- Review the Building a CRUD App with FastAPI, MongoDB, and Beanie tutorial to see how you can leverage Beanie ODM, which provides an additional abstraction layer over Motor, making it much easier to interact with collections inside a Mongo database.
Check out the Test-Driven Development with FastAPI and Docker course to learn more about testing and setting up CI/CD for a FastAPI app.
Cheers!