 Michael Herman
Assume that you're a data scientist. Following a typical machine learning workflow, you'll define the problem statement along with objectives based on business needs. You'll then start finding and cleaning data followed by analyzing the collected data and building and training your model. Once trained, you'll evaluate the results. This process of finding and cleansing data, training the model, and evaluating the results will continue until you're satisfied with the results. You'll then refactor the code and package it up in a module, along with its dependencies, in preparation for testing and deployment.
What happens next? Do you hand the model off to another team to test and deploy the model? Or do you have to handle this yourself? Either way, it's important to understand what happens when a model gets deployed. You may have to deploy the model yourself one day. Or maybe you have a side project that you'd just like to stand up in production and make available to end users.
In this tutorial, we'll look at how to deploy a machine learning model, for predicting stock prices, into production on Heroku as a RESTful API using FastAPI.
Contents
Objectives
By the end of this tutorial, you will be able to:
- Develop a RESTful API with Python and FastAPI
- Build a basic machine learning model to predict stock prices
- Deploy a FastAPI app to Heroku
- Use the Heroku Container Registry for deploying Docker to Heroku
FastAPI
FastAPI is a modern, high-performance, batteries-included Python web framework that's perfect for building RESTful APIs. It can handle both synchronous and asynchronous requests and has built-in support for data validation, JSON serialization, authentication and authorization, and OpenAPI.
Highlights:
- Heavily inspired by Flask, it has a lightweight microframework feel with support for Flask-like route decorators.
- It takes advantage of Python type hints for parameter declaration which enables data validation (via pydantic) and OpenAPI/Swagger documentation.
- Built on top of Starlette, it supports the development of asynchronous APIs.
- It's fast. Since async is much more efficient than the traditional synchronous threading model, it can compete with Node and Go with regards to performance.
Review the Features guide from the official docs for more info. It's also encouraged to review Alternatives, Inspiration, and Comparisons, which details how FastAPI compares to other web frameworks and technologies, for context.
Project Setup
Create a project folder called "fastapi-ml":
$ mkdir fastapi-ml
$ cd fastapi-ml
Then, create and activate a new virtual environment:
$ python3.11 -m venv env
$ source env/bin/activate
(env)$
Add a two new files: requirements.txt and main.py.
Unlike Django or Flask, FastAPI does not have a built-in development server. So, we'll use Uvicorn, an ASGI server, to serve up FastAPI.
New to ASGI? Read through the excellent Introduction to ASGI: Emergence of an Async Python Web Ecosystem article.
Add FastAPI and Uvicorn to the requirements file:
fastapi==0.95.2
uvicorn==0.22.0
Install the dependencies:
(env)$ pip install -r requirements.txt
Then, within main.py, create a new instance of FastAPI and set up a quick test route:
from fastapi import FastAPI


app = FastAPI()


@app.get("/ping")
def pong():
    return {"ping": "pong!"}
Start the app:
(env)$ uvicorn main:app --reload --workers 1 --host 0.0.0.0 --port 8008
So, we defined the following settings for Uvicorn:
--reloadenables auto-reload so the server will restart after changes are made to the code base.--workers 1provides a single worker process.--host 0.0.0.0defines the address to host the server on.--port 8008defines the port to host the server on.
main:app tells Uvicorn where it can find the FastAPI ASGI application -- i.e., "within the the 'main.py' file, you'll find the ASGI app, app = FastAPI().
Navigate to http://localhost:8008/ping. You should see:
{
  "ping": "pong!"
}
ML Model
The model that we'll deploy uses Prophet to predict stock market prices.
Add the following functions to train the model and generate a prediction to a new file called model.py:
import datetime
from pathlib import Path
import joblib
import pandas as pd
import yfinance as yf
from prophet import Prophet
BASE_DIR = Path(__file__).resolve(strict=True).parent
TODAY = datetime.date.today()
def train(ticker="MSFT"):
# data = yf.download("^GSPC", "2008-01-01", TODAY.strftime("%Y-%m-%d"))
data = yf.download(ticker, "2020-01-01", TODAY.strftime("%Y-%m-%d"))
data.head()
data["Adj Close"].plot(title=f"{ticker} Stock Adjusted Closing Price")
df_forecast = data.copy()
df_forecast.reset_index(inplace=True)
df_forecast["ds"] = df_forecast["Date"]
df_forecast["y"] = df_forecast["Adj Close"]
df_forecast = df_forecast[["ds", "y"]]
df_forecast
model = Prophet()
model.fit(df_forecast)
joblib.dump(model, Path(BASE_DIR).joinpath(f"{ticker}.joblib"))
def predict(ticker="MSFT", days=7):
model_file = Path(BASE_DIR).joinpath(f"{ticker}.joblib")
if not model_file.exists():
return False
model = joblib.load(model_file)
future = TODAY + datetime.timedelta(days=days)
dates = pd.date_range(start="2020-01-01", end=future.strftime("%m/%d/%Y"),)
df = pd.DataFrame({"ds": dates})
forecast = model.predict(df)
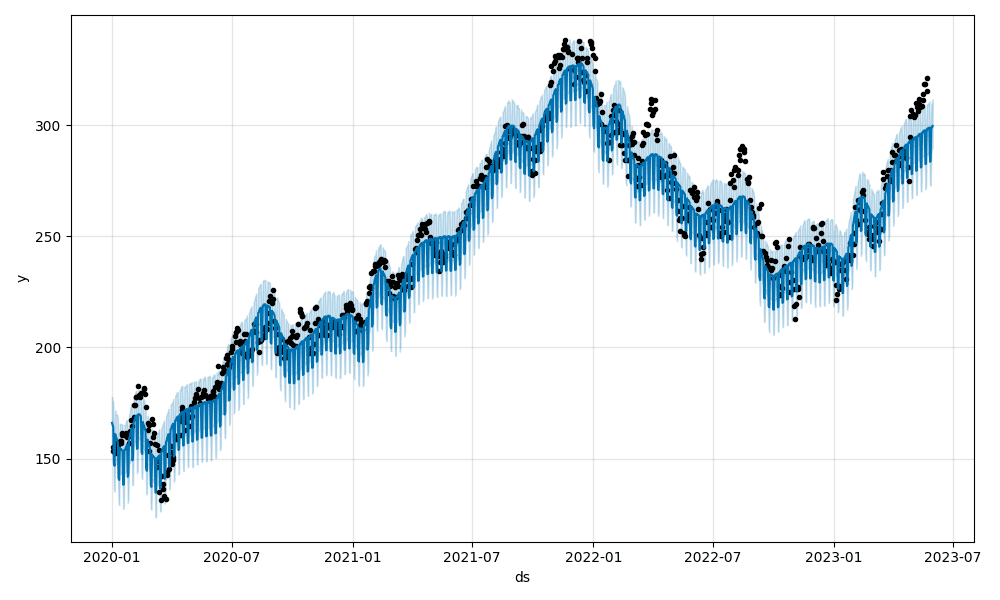
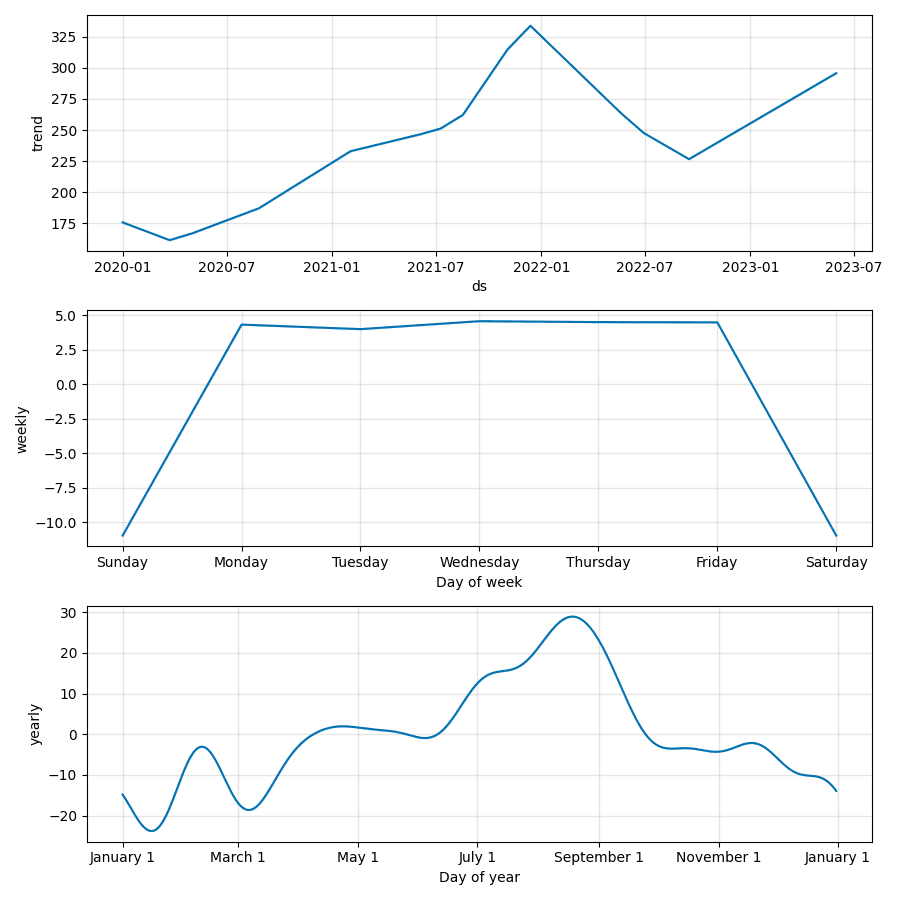
model.plot(forecast).savefig(f"{ticker}_plot.png")
model.plot_components(forecast).savefig(f"{ticker}_plot_components.png")
return forecast.tail(days).to_dict("records")
def convert(prediction_list):
output = {}
for data in prediction_list:
date = data["ds"].strftime("%m/%d/%Y")
output[date] = data["trend"]
return output
Here, we defined three functions:
traindownloads historical stock data with yfinance, creates a new Prophet model, fits the model to the stock data, and then serializes and saves the model as a Joblib file.predictloads and deserializes the saved model, generates a new forecast, creates images of the forecast plot and forecast components, and returns the days included in the forecast as a list of dicts.converttakes the list of dicts frompredictand outputs a dict of dates and forecasted values (e.g.,{"07/02/2020": 200}).
This model was developed by Andrew Clark.
Update the requirements file:
# pystan must be installed before prophet
# you may need to pip install it on it's own
# before installing the remaining requirements
# pip install pystan==3.7.0

pystan==3.7.0

fastapi==0.95.2
uvicorn==0.22.0

prophet==1.1.3
joblib==1.2.0
pandas==2.0.1
plotly==5.14.1
yfinance==0.2.18
Install the new dependencies:
(env)$ pip install -r requirements.txt
If you have problems installing the dependencies on your machine, you may want to use Docker instead. For instructions on how to run the application with Docker, review the README on the fastapi-ml repo on GitHub.
To test, open a new Python shell and run the following commands:
(env)$ python

>>> from model import train, predict, convert
>>> train()
>>> prediction_list = predict()
>>> convert(prediction_list)
You should see something similar to:
{
    '05/25/2023': 294.0682561271952,
    '05/26/2023': 294.3370516687231,
    '05/27/2023': 294.60584721025106,
    '05/28/2023': 294.87464275177894,
    '05/29/2023': 295.1434382933069,
    '05/30/2023': 295.4122338348348,
    '05/31/2023': 295.6810293763628
}
This is the predicted prices for the next seven days for Microsoft Corporation (MSFT). Take note of the saved MSFT.joblib model along with the two images:
Go ahead and train a few more models to work with. For example:
>>> train("GOOG")
>>> train("AAPL")
>>> train("^GSPC")
Exit the shell.
With that, let's wire up our API.
Routes
Add a /predict endpoint by updating main.py like so:
from fastapi import FastAPI, HTTPException
from pydantic import BaseModel

from model import convert, predict

app = FastAPI()


# pydantic models


class StockIn(BaseModel):
    ticker: str


class StockOut(StockIn):
    forecast: dict


# routes


@app.get("/ping")
async def pong():
    return {"ping": "pong!"}


@app.post("/predict", response_model=StockOut, status_code=200)
def get_prediction(payload: StockIn):
    ticker = payload.ticker

    prediction_list = predict(ticker)

    if not prediction_list:
        raise HTTPException(status_code=400, detail="Model not found.")

    response_object = {"ticker": ticker, "forecast": convert(prediction_list)}
    return response_object
So, in the new get_prediction view function, we passed in a ticker to our model's predict function and then used the convert function to create the output for the response object. We also took advantage of a pydantic schema to covert the JSON payload to a StockIn object schema. This provides automatic type validation. The response object uses the StockOut schema object to convert the Python dict -- {"ticker": ticker, "forecast": convert(prediction_list)} -- to JSON, which, again, is validated.
For the web app, let's just output the forecast in JSON. Comment out the following lines in predict:
# model.plot(forecast).savefig(f"{ticker}_plot.png")
# model.plot_components(forecast).savefig(f"{ticker}_plot_components.png")
Full function:
def predict(ticker="MSFT", days=7):
    model_file = Path(BASE_DIR).joinpath(f"{ticker}.joblib")
    if not model_file.exists():
        return False

    model = joblib.load(model_file)

    future = TODAY + datetime.timedelta(days=days)

    dates = pd.date_range(start="2020-01-01", end=future.strftime("%m/%d/%Y"),)
    df = pd.DataFrame({"ds": dates})

    forecast = model.predict(df)

    # model.plot(forecast).savefig(f"{ticker}_plot.png")
    # model.plot_components(forecast).savefig(f"{ticker}_plot_components.png")

    return forecast.tail(days).to_dict("records")
Run the app:
(env)$ uvicorn main:app --reload --workers 1 --host 0.0.0.0 --port 8008
Then, in a new terminal window, use curl to test the endpoint:
$ curl \
  --header "Content-Type: application/json" \
  --request POST \
  --data '{"ticker":"MSFT"}' \
  http://localhost:8008/predict
You should see something like:
{
    "ticker":"MSFT",
    "forecast":{
        "05/25/2023":294.0682561271952,
        "05/26/2023":294.3370516687231,
        "05/27/2023":294.60584721025106,
        "05/28/2023":294.87464275177894,
        "05/29/2023":295.1434382933069,
        "05/30/2023":295.4122338348348,
        "05/31/2023":295.6810293763628
    }
}
What happens if the ticker model doesn't exist?
$ curl \
  --header "Content-Type: application/json" \
  --request POST \
  --data '{"ticker":"NONE"}' \
  http://localhost:8008/predict

{
  "detail": "Model not found."
}
Heroku Deployment
Heroku is a Platform as a Service (PaaS) that provides hosting for web applications. They offer abstracted environments where you don't have to manage the underlying infrastructure, making it easy to manage, deploy, and scale web applications. With just a few clicks you can have your app up and running, ready to receive traffic.
Sign up for a Heroku account (if you don’t already have one), and then install the Heroku CLI (if you haven't already done so).
Next, log in to your Heroku account via the CLI:
$ heroku login
You'll be prompted to press any key to open your web browser to complete login.
Create a new app on Heroku:
$ heroku create
You should see something similar to:
Creating app... done, ⬢ pure-shore-23100
https://pure-shore-23100.herokuapp.com/ | https://git.heroku.com/pure-shore-23100.git
Next, we'll use Heroku's Container Registry to deploy the application with Docker. Put simply, with the Container Registry, you can deploy pre-built Docker images to Heroku.
Why Docker? We want to minimize the differences between the production and development environments. This is especially important with this project, since it relies on a number of data science dependencies that have very specific system requirements.
Log in to the Heroku Container Registry, to indicate to Heroku that we want to use the Container Runtime:
$ heroku container:login
Add a Dockerfile file to the project root:
FROM python:3.11

WORKDIR /app

RUN apt-get -y update  && apt-get install -y \
  python3-dev \
  apt-utils \
  python-dev \
  build-essential \
&& rm -rf /var/lib/apt/lists/*

RUN pip install --upgrade setuptools
RUN pip install \
    cython==0.29.35 \
    numpy==1.24.3 \
    pandas==2.0.1 \
    pystan==3.7.0

COPY requirements.txt .
RUN pip install -r requirements.txt

COPY . .

CMD gunicorn -w 3 -k uvicorn.workers.UvicornWorker main:app --bind 0.0.0.0:$PORT
Here, after pulling the Python 3.11 base image, we installed the appropriate dependencies, copied over the app, and ran Gunicorn, a production-grade WSGI application server, to manage Uvicorn with three worker processes. This config takes advantage of both concurrency (via Uvicorn) and parallelism (via Gunicorn workers).
Add Gunicorn to the requirements.txt file:
# pystan must be installed before prophet
# you may need to pip install it on it's own
# before installing the remaining requirements
# pip install pystan==3.7.0

pystan==3.7.0

fastapi==0.95.2
gunicorn==20.1.0
uvicorn==0.22.0

prophet==1.1.3
joblib==1.2.0
pandas==2.0.1
plotly==5.14.1
yfinance==0.2.18
Add a .dockerignore file as well:
__pycache__
env
Build the Docker image and tag it with the following format:
registry.heroku.com/<app>/<process-type>
Make sure to replace <app> with the name of the Heroku app that you just created and <process-type> with web since this will be for a web process.
For example:
$ docker build -t registry.heroku.com/pure-shore-23100/web .
It will take several minutes to install Prophet. Be patient. You should see it hang here for some time:
Running setup.py install for prophet: started
Once done, you can run the image like so:
$ docker run --name fastapi-ml -e PORT=8008 -p 8008:8008 -d registry.heroku.com/pure-shore-23100/web:latest
Ensure http://localhost:8008/ping works as expected. Once done, stop and remove the container:
$ docker stop fastapi-ml
$ docker rm fastapi-ml
Push the image to the registry:
$ docker push registry.heroku.com/pure-shore-23100/web
Release the image:
$ heroku container:release -a pure-shore-23100 web
This will run the container. You should now be able to view your app. Make sure to test the /predict endpoint:
$ curl \
  --header "Content-Type: application/json" \
  --request POST \
  --data '{"ticker":"MSFT"}' \
  https://<YOUR_HEROKU_APP_NAME>.herokuapp.com/predict
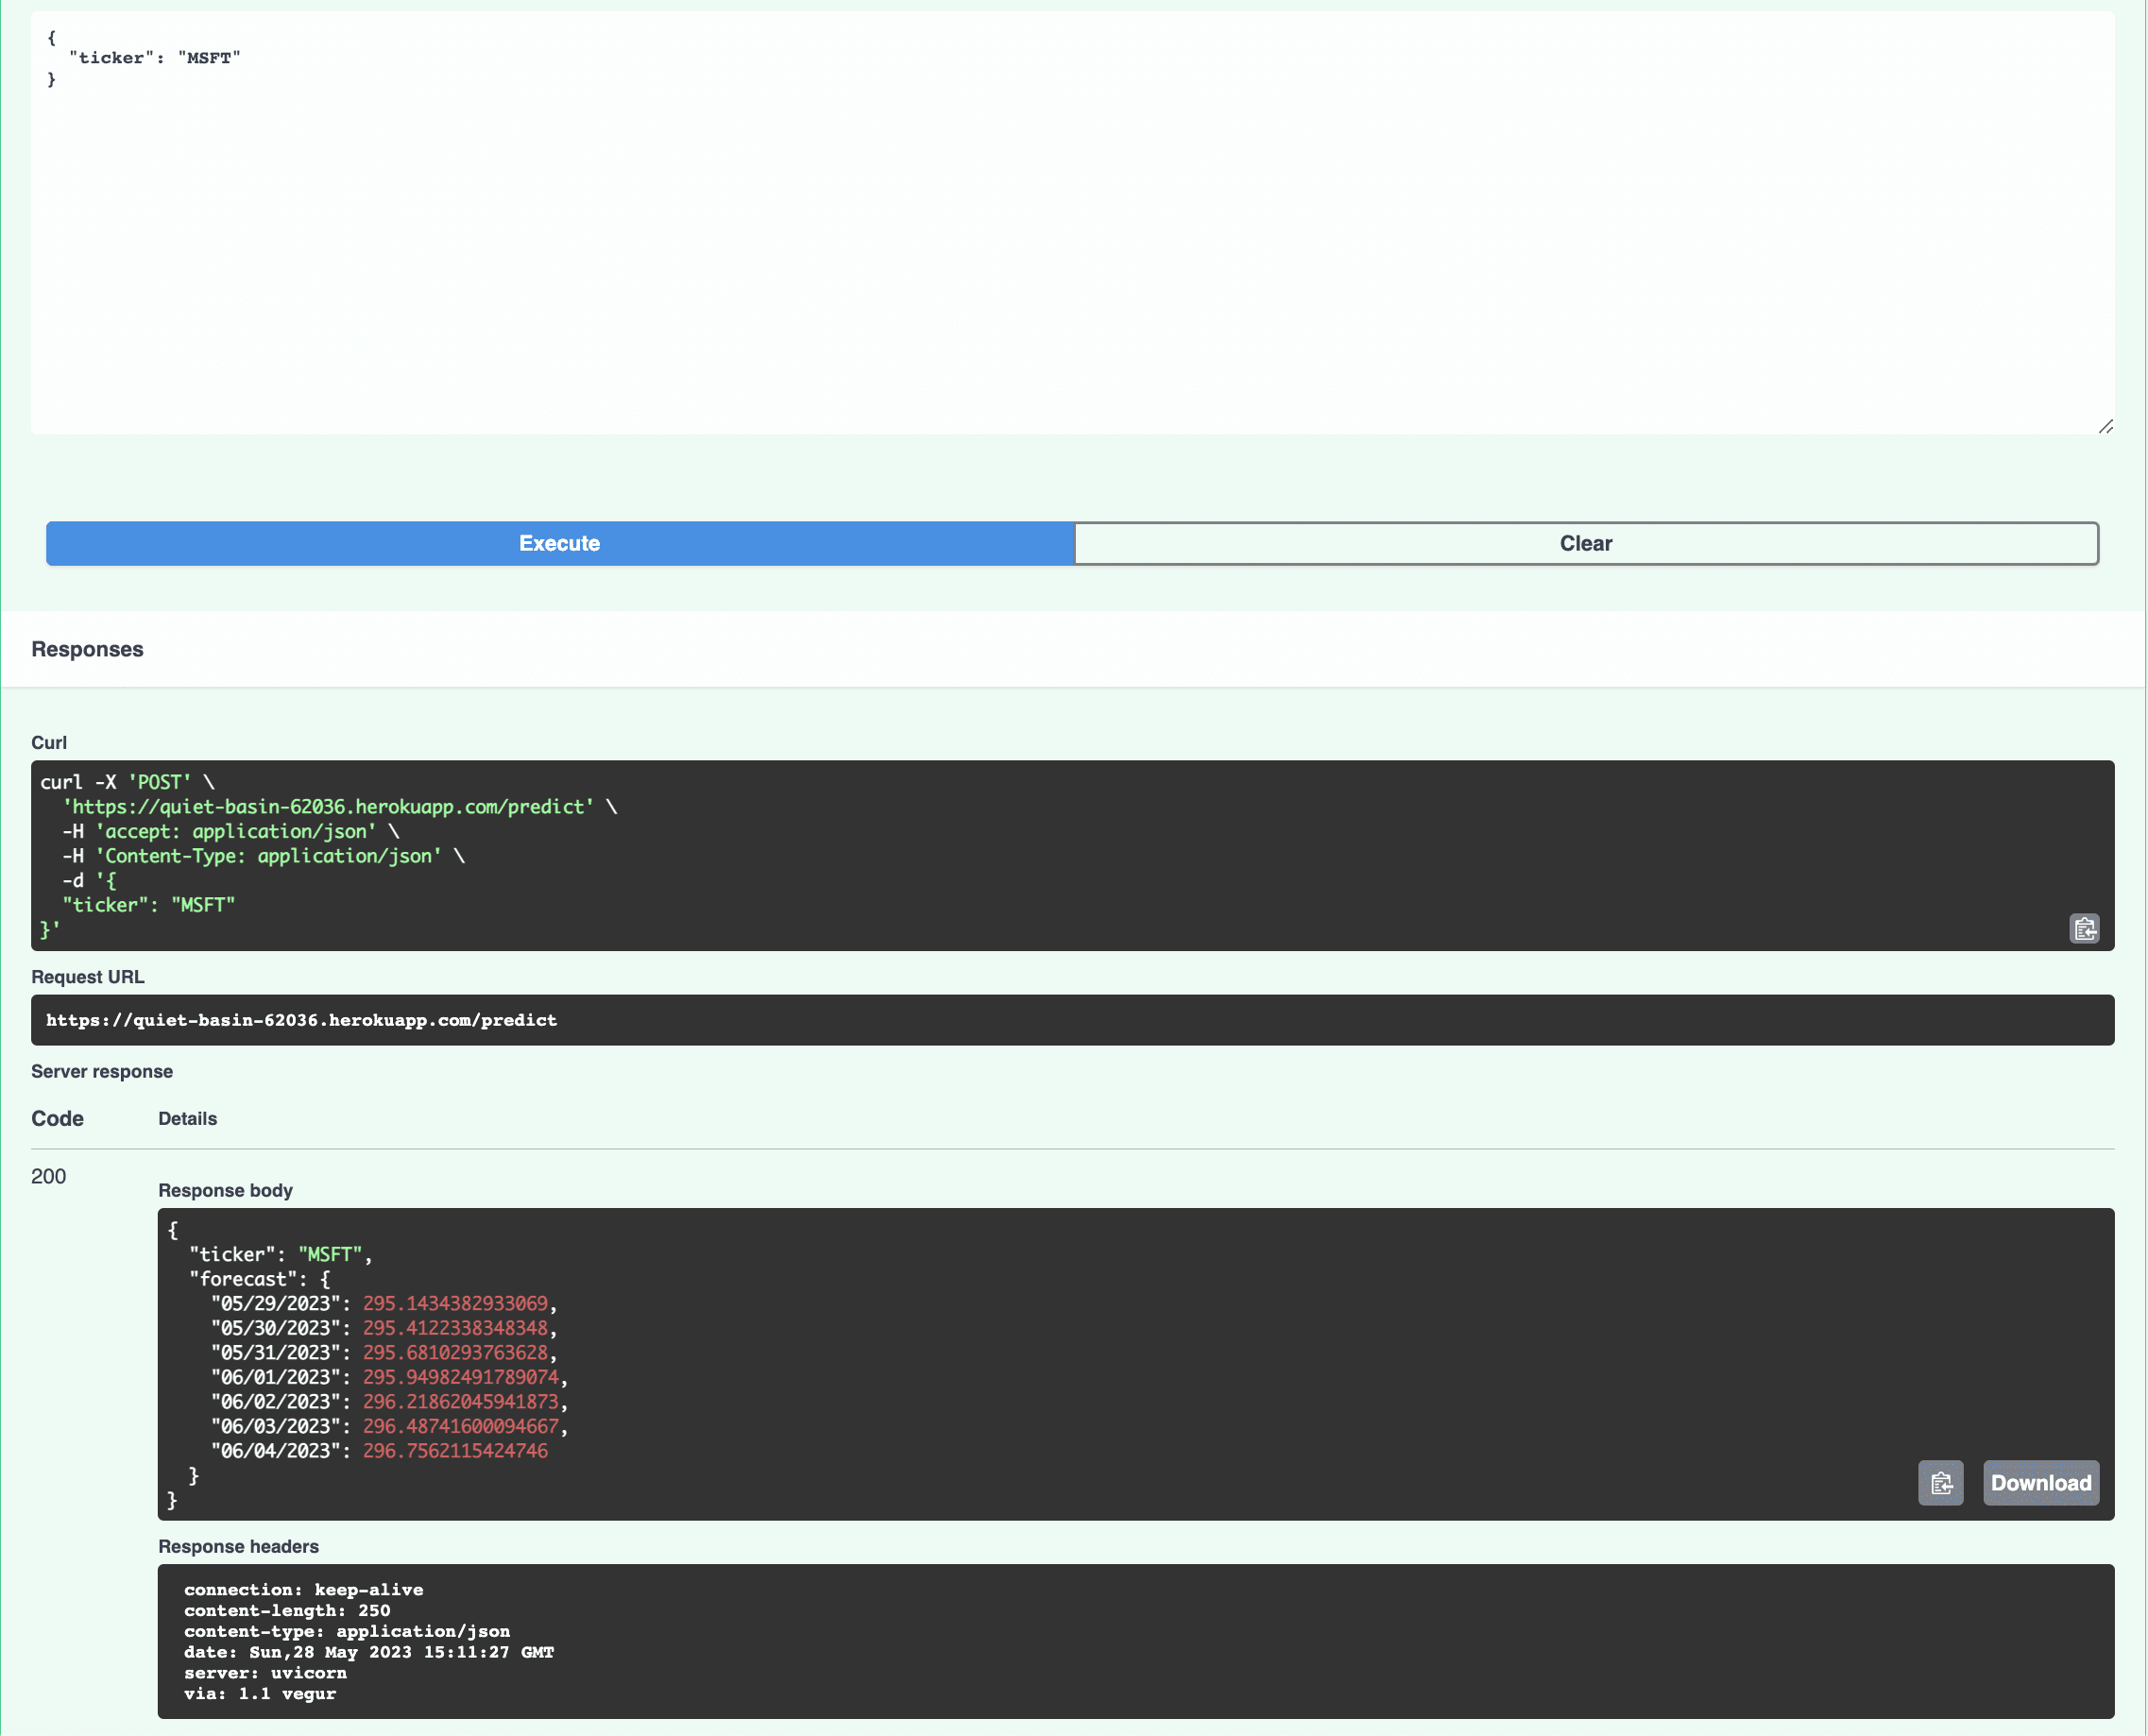
Finally, check out the interactive API documentation that FastAPI automatically generates at https://<YOUR_HEROKU_APP_NAME>.herokuapp.com/docs:
Conclusion
This tutorial looked at how to deploy a machine learning model, for predicting stock prices, into production on Heroku as a RESTful API using FastAPI.
What's next?
- Set up a database to save prediction results
- Create a production Dockerfile that uses multistage Docker builds to reduce the size of the production image
- Add logging and monitoring
- Convert your view functions and the model prediction function into asynchronous functions
- Run the prediction as a background task to prevent blocking
- Add tests
- Store trained models to AWS S3, outside of Heroku
Check out the following resources for help with the above pieces:
- Developing and Testing an Asynchronous API with FastAPI and Pytest
- Test-Driven Development with FastAPI and Docker
If you're deploying a non-trivial model, I recommend adding model versioning and support for counterfactual analysis along with model monitoring (model and feature drift, bias detection). Check out the Monitaur platform for help in these areas.
You can find the code in the fastapi-ml repo.