In this tutorial, you'll learn how to secure a FastAPI app by enabling authentication using JSON Web Tokens (JWTs). We'll be using PyJWT to sign, encode, and decode JWT tokens.
Contents
Authentication in FastAPI
Authentication is the process of verifying users before granting them access to secured resources. When a user is authenticated, the user is allowed to access secure resources not open to the public.
We'll be looking at authenticating a FastAPI app with Bearer (or Token-based) authentication, which involves generating security tokens called bearer tokens. The bearer tokens in this case will be JWTs.
Authentication in FastAPI can also be handled by OAuth.
Initial Setup
Start by creating a new folder to hold your project called "fastapi-jwt":
$ mkdir fastapi-jwt && cd fastapi-jwt
Next, create and activate a virtual environment:
$ python3.12 -m venv venv
$ source venv/bin/activate

(venv)$ export PYTHONPATH=$PWD
Feel free to swap out virtualenv and Pip for uv, Poetry, or Pipenv. For more, review Modern Python Environments.
Install FastAPI and Uvicorn:
(venv)$ pip install fastapi==0.111.0 uvicorn==0.29.0
Next, create the following files and folders:
fastapi-jwt
├── app
│   ├── __init__.py
│   ├── api.py
│   ├── auth
│   │   └── __init__.py
│   └── model.py
└── main.py
The following command will create the project structure:
(venv)$ mkdir app && \
        mkdir app/auth && \
        touch app/__init__.py app/api.py && \
        touch app/auth/__init__.py app/model.py main.py
In the main.py file, define an entry point for running the application:
# main.py

import uvicorn

if __name__ == "__main__":
    uvicorn.run("app.api:app", host="0.0.0.0", port=8081, reload=True)
Here, we instructed the file to run a Uvicorn server on port 8081 and reload on every file change.
Before starting the server via the entry point file, create a base route in app/api.py:
# app/api.py

from fastapi import FastAPI

app = FastAPI()

@app.get("/", tags=["root"])
async def read_root() -> dict:
    return {"message": "Welcome to your blog!"}
Run the entry point file from your terminal:
(venv)$ python main.py
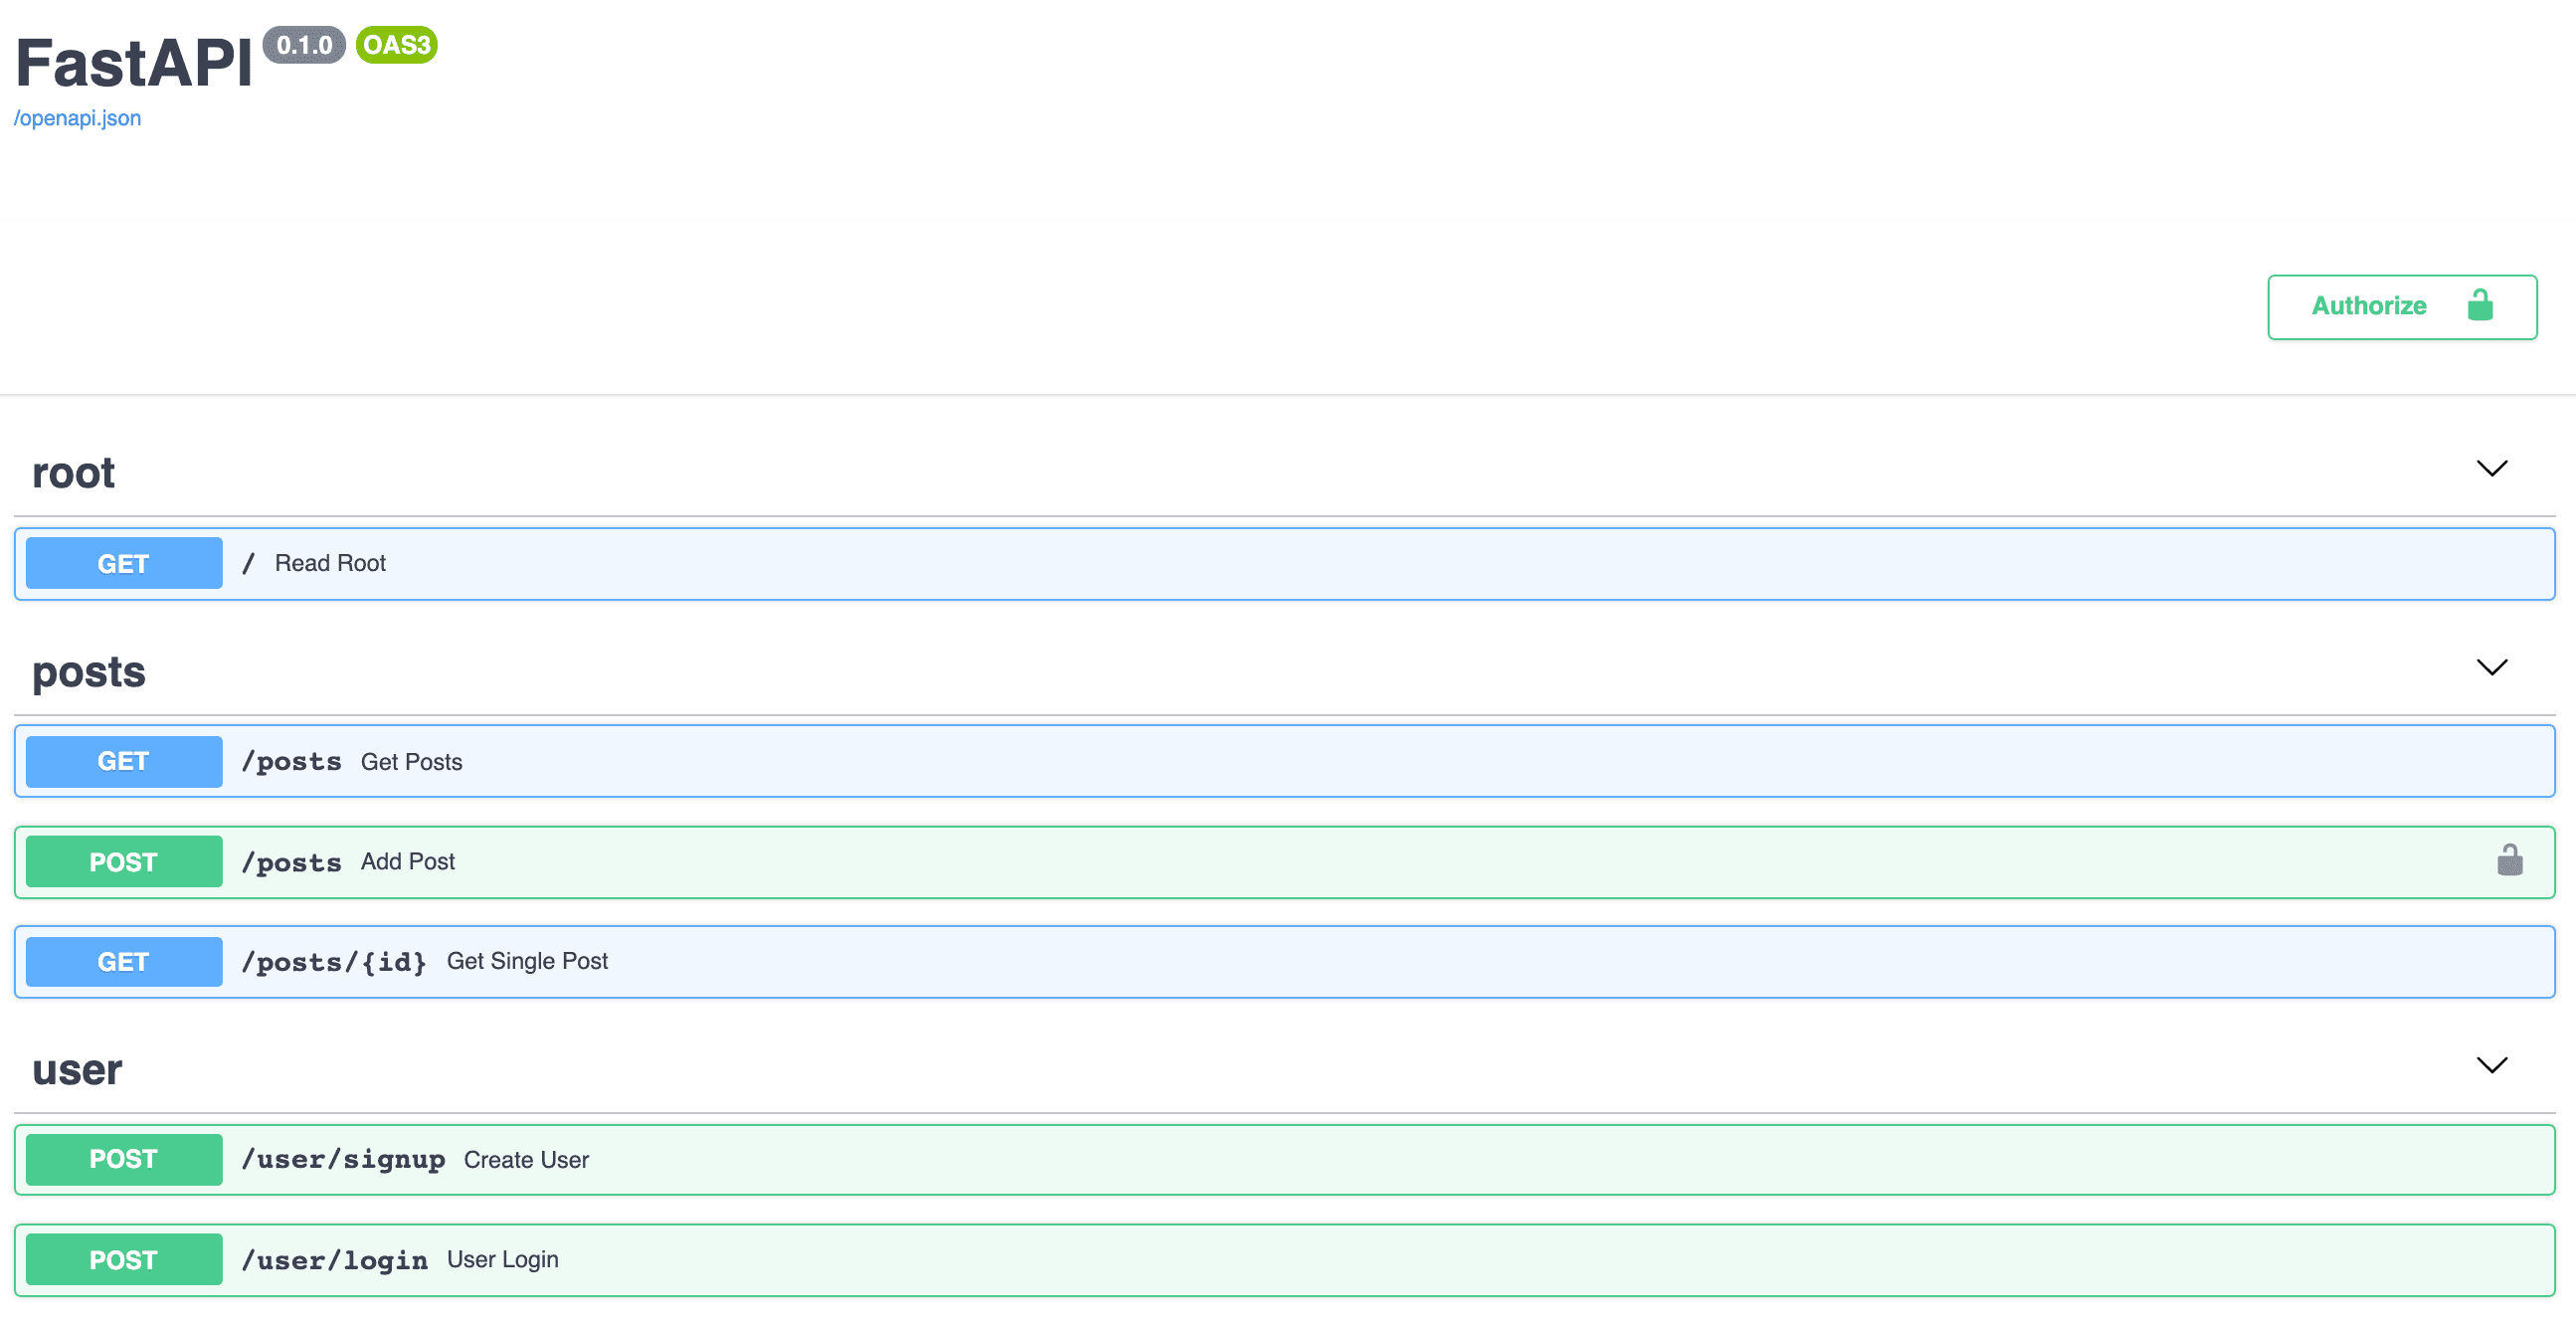
Navigate to http://localhost:8081 in your browser. You should see:
{
    "message": "Welcome to your blog!"
}
What Are We Building?
For the remainder of this tutorial, you'll be building a secured mini-blog CRUD app for creating and reading blog posts. By the end, you will have:

Models
Before we proceed, let's define a pydantic model for the posts.
In model.py, add:
# app/model.py

from pydantic import BaseModel, Field, EmailStr


class PostSchema(BaseModel):
    id: int = Field(default=None)
    title: str = Field(...)
    content: str = Field(...)

    class Config:
        json_schema_extra = {
            "example": {
                "title": "Securing FastAPI applications with JWT.",
                "content": "In this tutorial, you'll learn how to secure your application by enabling authentication using JWT. We'll be using PyJWT to sign, encode and decode JWT tokens...."
            }
        }
Routes
GET Route
Start by importing the PostSchema then adding a list of dummy posts and an empty user list variable in app/api.py:
# app/api.py

from app.model import PostSchema

posts = [
    {
        "id": 1,
        "title": "Pancake",
        "content": "Lorem Ipsum ..."
    }
]

users = []
Then, add the route handlers for getting all posts and an individual post by ID:
# app/api.py

@app.get("/posts", tags=["posts"])
async def get_posts() -> dict:
    return { "data": posts }


@app.get("/posts/{id}", tags=["posts"])
async def get_single_post(id: int) -> dict:
    if id > len(posts):
        return {
            "error": "No such post with the supplied ID."
        }

    for post in posts:
        if post["id"] == id:
            return {
                "data": post
            }
app/api.py should now look like this:
# app/api.py

from fastapi import FastAPI

from app.model import PostSchema


posts = [
    {
        "id": 1,
        "title": "Pancake",
        "content": "Lorem Ipsum ..."
    }
]

users = []

app = FastAPI()


@app.get("/", tags=["root"])
async def read_root() -> dict:
    return {"message": "Welcome to your blog!"}


@app.get("/posts", tags=["posts"])
async def get_posts() -> dict:
    return { "data": posts }


@app.get("/posts/{id}", tags=["posts"])
async def get_single_post(id: int) -> dict:
    if id > len(posts):
        return {
            "error": "No such post with the supplied ID."
        }

    for post in posts:
        if post["id"] == id:
            return {
                "data": post
            }
Manually test the routes at http://localhost:8081/posts and http://localhost:8081/posts/1
POST Route
Just below the GET routes, add the following handler for creating a new post:
# app/api.py

@app.post("/posts", tags=["posts"])
async def add_post(post: PostSchema) -> dict:
    post.id = len(posts) + 1
    posts.append(post.dict())
    return {
        "data": "post added."
    }
With the backend running, test the POST route via the interactive docs at http://localhost:8081/docs.
You can also test with curl:
$ curl -X POST http://localhost:8081/posts \
    -d  '{ "id": 2, "title": "Lorem Ipsum tres", "content": "content goes here"}' \
    -H 'Content-Type: application/json'
You should see:
{
    "data": [
        "post added."
    ]
}
JWT Authentication
In this section, we'll create a JWT token handler and a class to handle bearer tokens.
Before beginning, install PyJWT, for encoding and decoding JWTs. We'll also be using python-decouple for reading environment variables:
(venv)$ pip install PyJWT==2.8.0 python-decouple==3.8
JWT Handler
The JWT handler will be responsible for signing, encoding, decoding, and returning JWT tokens. In the "auth" folder, create a file called auth_handler.py:
# app/auth/auth_handler.py

import time
from typing import Dict

import jwt
from decouple import config


JWT_SECRET = config("secret")
JWT_ALGORITHM = config("algorithm")


def token_response(token: str):
    return {
        "access_token": token
    }
In the code block above, we imported the time, typing, jwt, and decouple modules. The time module is responsible for setting an expiry for the tokens. Every JWT has an expiry date and/or time where it becomes invalid. The jwt module is responsible for encoding and decoding generated token strings. Lastly, the token_response function is a helper function for returning generated tokens.
JSON Web Tokens are encoded into strings from a dictionary payload.
JWT Secret and Algorithm
Next, create an environment file called .env in the base directory:
secret=please_please_update_me_please
algorithm=HS256
The secret in the environment file should be substituted with something stronger and should not be disclosed. For example:
>>> import os
>>> import binascii
>>> binascii.hexlify(os.urandom(24))
b'deff1952d59f883ece260e8683fed21ab0ad9a53323eca4f'
The secret key is used for encoding and decoding JWT strings.
The algorithm value on the other hand is the type of algorithm used in the encoding process.
Sign and Decode JWT
Back in auth_handler.py, add the function for signing the JWT string:
# app/auth/auth_handler.py

def sign_jwt(user_id: str) -> Dict[str, str]:
    payload = {
        "user_id": user_id,
        "expires": time.time() + 600
    }
    token = jwt.encode(payload, JWT_SECRET, algorithm=JWT_ALGORITHM)

    return token_response(token)
In the sign_jwt function, we defined the payload, a dictionary containing the user_id passed into the function, and an expiry time of ten minutes from when it is generated. Next, we created a token string comprising of the payload, the secret, and the algorithm type and then returned it.
Next, add the decode_jwt function:
# app/auth/auth_handler.py

def decode_jwt(token: str) -> dict:
    try:
        decoded_token = jwt.decode(token, JWT_SECRET, algorithms=[JWT_ALGORITHM])
        return decoded_token if decoded_token["expires"] >= time.time() else None
    except:
        return {}
The decode_jwt function takes the token and decodes it with the aid of the jwt module and then stores it in a decoded_token variable. Next, we returned decoded_token if the expiry time is valid, otherwise, we returned None.
A JWT is not encrypted. It's base64 encoded and signed. So anyone can decode the token and use its data. But only the server can verify it's authenticity using the
JWT_SECRET.
User Registration and Login
Moving along, let's wire up the routes, schemas, and helpers for handling user registration and login.
In model.py, add the user schema:
# app/model.py

class UserSchema(BaseModel):
    fullname: str = Field(...)
    email: EmailStr = Field(...)
    password: str = Field(...)

    class Config:
        json_schema_extra = {
            "example": {
                "fullname": "Abdulazeez Abdulazeez Adeshina",
                "email": "[email protected]",
                "password": "weakpassword"
            }
        }

class UserLoginSchema(BaseModel):
    email: EmailStr = Field(...)
    password: str = Field(...)

    class Config:
        json_schema_extra = {
            "example": {
                "email": "[email protected]",
                "password": "weakpassword"
            }
        }
Next, update the imports in app/api.py:
# app/api.py

from fastapi import FastAPI, Body

from app.auth.auth_handler import sign_jwt
from app.model import PostSchema, UserSchema, UserLoginSchema
Add the the user registration route:
# app/api.py

@app.post("/user/signup", tags=["user"])
async def create_user(user: UserSchema = Body(...)):
    users.append(user) # replace with db call, making sure to hash the password first
    return sign_jwt(user.email)
Since we're using an email validator, EmailStr, install email-validator:
(venv)$ pip install "pydantic[email]"
Run the server:
(venv)$ python main.py
Test it via the interactive documentation at http://localhost:8081/docs.

In a production environment, make sure to hash your password using bcrypt or passlib before saving the user to the database.
Next, define a helper function to check if a user exists:
# app/api.py

def check_user(data: UserLoginSchema):
    for user in users:
        if user.email == data.email and user.password == data.password:
            return True
    return False
The above function checks to see if a user exists before creating a JWT with a user's email.
Next, define the login route:
# app/api.py

@app.post("/user/login", tags=["user"])
async def user_login(user: UserLoginSchema = Body(...)):
    if check_user(user):
        return sign_jwt(user.email)
    return {
        "error": "Wrong login details!"
    }
Test the login route by first creating a user and then logging in:

Since users are stored in memory, you'll have to create a new user each time the application reloads to test out logging in.
Securing Routes
With the authentication in place, let's secure the create route.
JWT Bearer
Now we need to verify the protected route, by checking whether the request is authorized or not. This is done by scanning the request for the JWT in the Authorization header. FastAPI provides the basic validation via the HTTPBearer class. We can use this class to extract and parse the token. Then, we'll verify it using the decode_jwt function defined in app/auth/auth_handler.py.
Create a new file in the "auth" folder called auth_bearer.py:
# app/auth/auth_bearer.py

from fastapi import Request, HTTPException
from fastapi.security import HTTPBearer, HTTPAuthorizationCredentials

from .auth_handler import decode_jwt


class JWTBearer(HTTPBearer):
    def __init__(self, auto_error: bool = True):
        super(JWTBearer, self).__init__(auto_error=auto_error)

    async def __call__(self, request: Request):
        credentials: HTTPAuthorizationCredentials = await super(JWTBearer, self).__call__(request)
        if credentials:
            if not credentials.scheme == "Bearer":
                raise HTTPException(status_code=403, detail="Invalid authentication scheme.")
            if not self.verify_jwt(credentials.credentials):
                raise HTTPException(status_code=403, detail="Invalid token or expired token.")
            return credentials.credentials
        else:
            raise HTTPException(status_code=403, detail="Invalid authorization code.")

    def verify_jwt(self, jwtoken: str) -> bool:
        isTokenValid: bool = False

        try:
            payload = decode_jwt(jwtoken)
        except:
            payload = None
        if payload:
            isTokenValid = True

        return isTokenValid
So, the JWTBearer class is a subclass of FastAPI's HTTPBearer class that will be used to persist authentication on our routes.
Init
In the __init__ method, we enabled automatic error reporting by setting the boolean auto_error to True.
Call
In the __call__ method, we defined a variable called credentials of type HTTPAuthorizationCredentials, which is created when the JWTBearer class is invoked. We then proceeded to check if the credentials passed in during the course of invoking the class are valid:
- If the credential scheme isn't a bearer scheme, we raised an exception for an invalid token scheme.
- If a bearer token was passed, we verified that the JWT is valid.
- If no credentials were received, we raised an invalid authorization error.
Verify
The verify_jwt method verifies whether a token is valid. The method takes a jwtoken string which it then passes to the decode_jwt function and returns a boolean value based on the outcome from decode_jwt.
Dependency Injection
To secure the routes, we'll leverage dependency injection via FastAPI's Depends.
Start by updating the imports by adding the JWTBearer class as well as Depends:
# app/api.py

from fastapi import FastAPI, Body, Depends

from app.auth.auth_bearer import JWTBearer
from app.auth.auth_handler import sign_jwt
from app.model import PostSchema, UserSchema, UserLoginSchema
In the add_post route, add the dependencies argument to the @app property like so:
# app/api.py

@app.post("/posts", dependencies=[Depends(JWTBearer())], tags=["posts"])
async def add_post(post: PostSchema) -> dict:
    post.id = len(posts) + 1
    posts.append(post.dict())
    return {
        "data": "post added."
    }
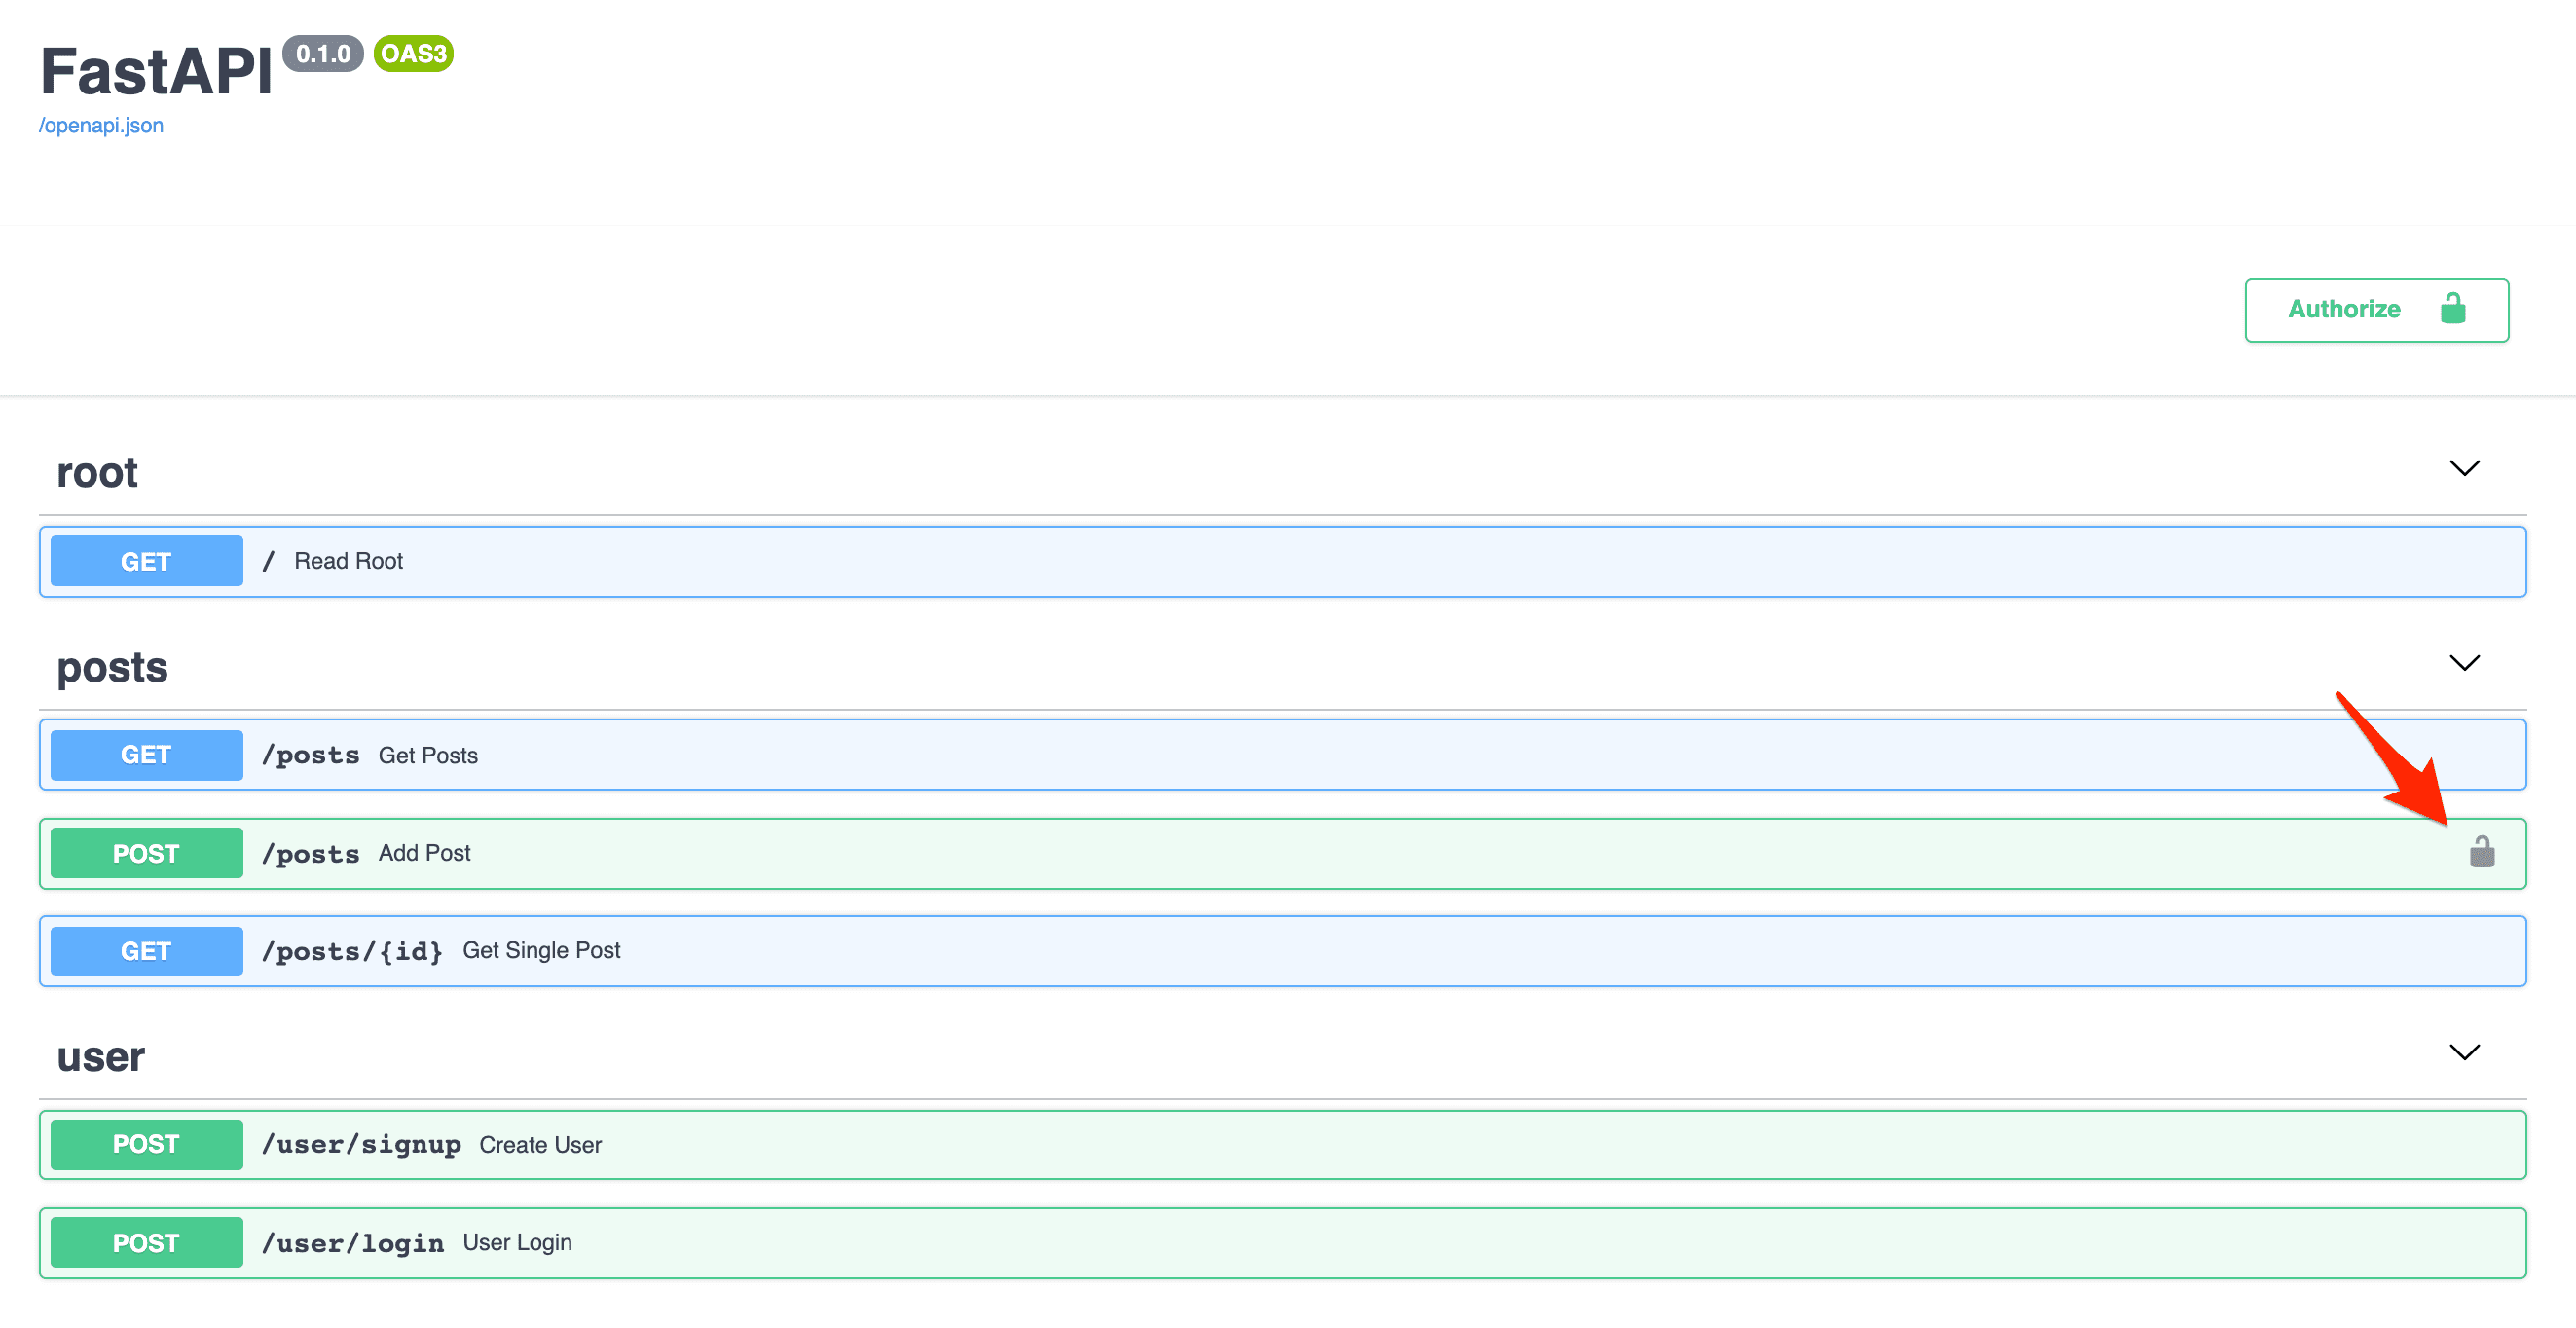
Refresh the interactive docs page:

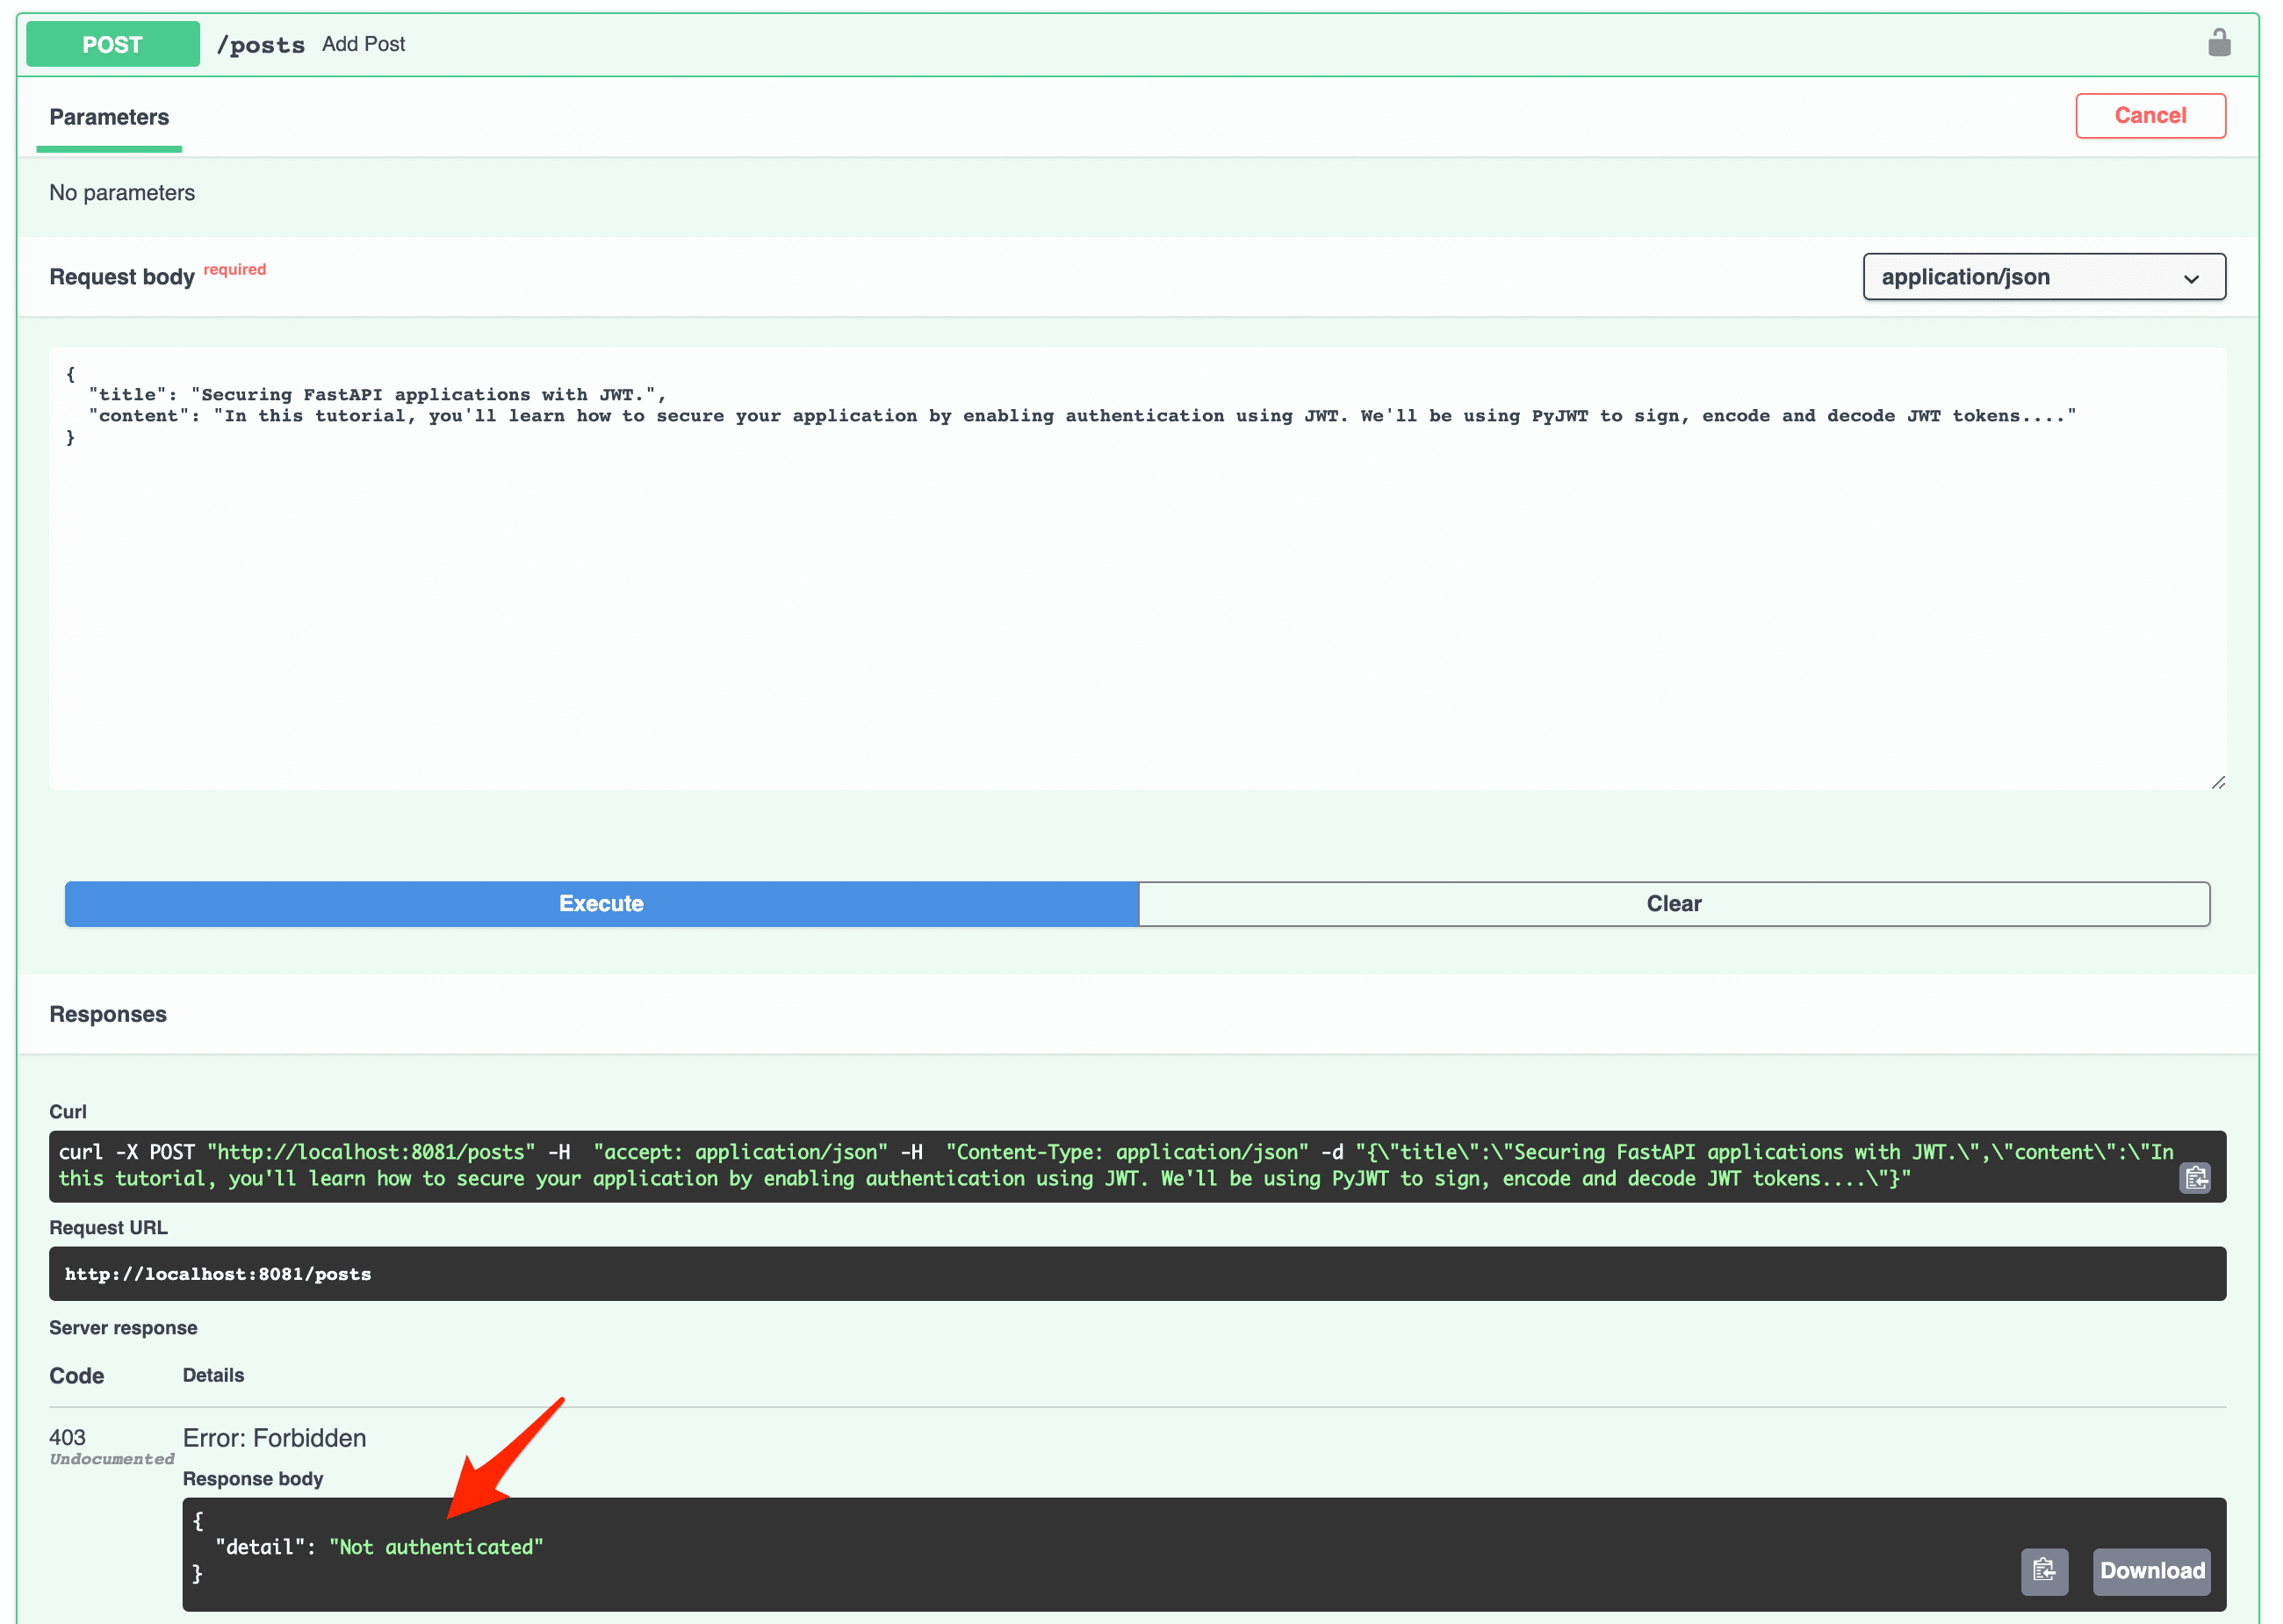
Test the authentication by trying to visit a protected route without passing in a token:

Create a new user and copy the generated access token:

After copying it, click on the authorize button in the top right corner and paste the token:

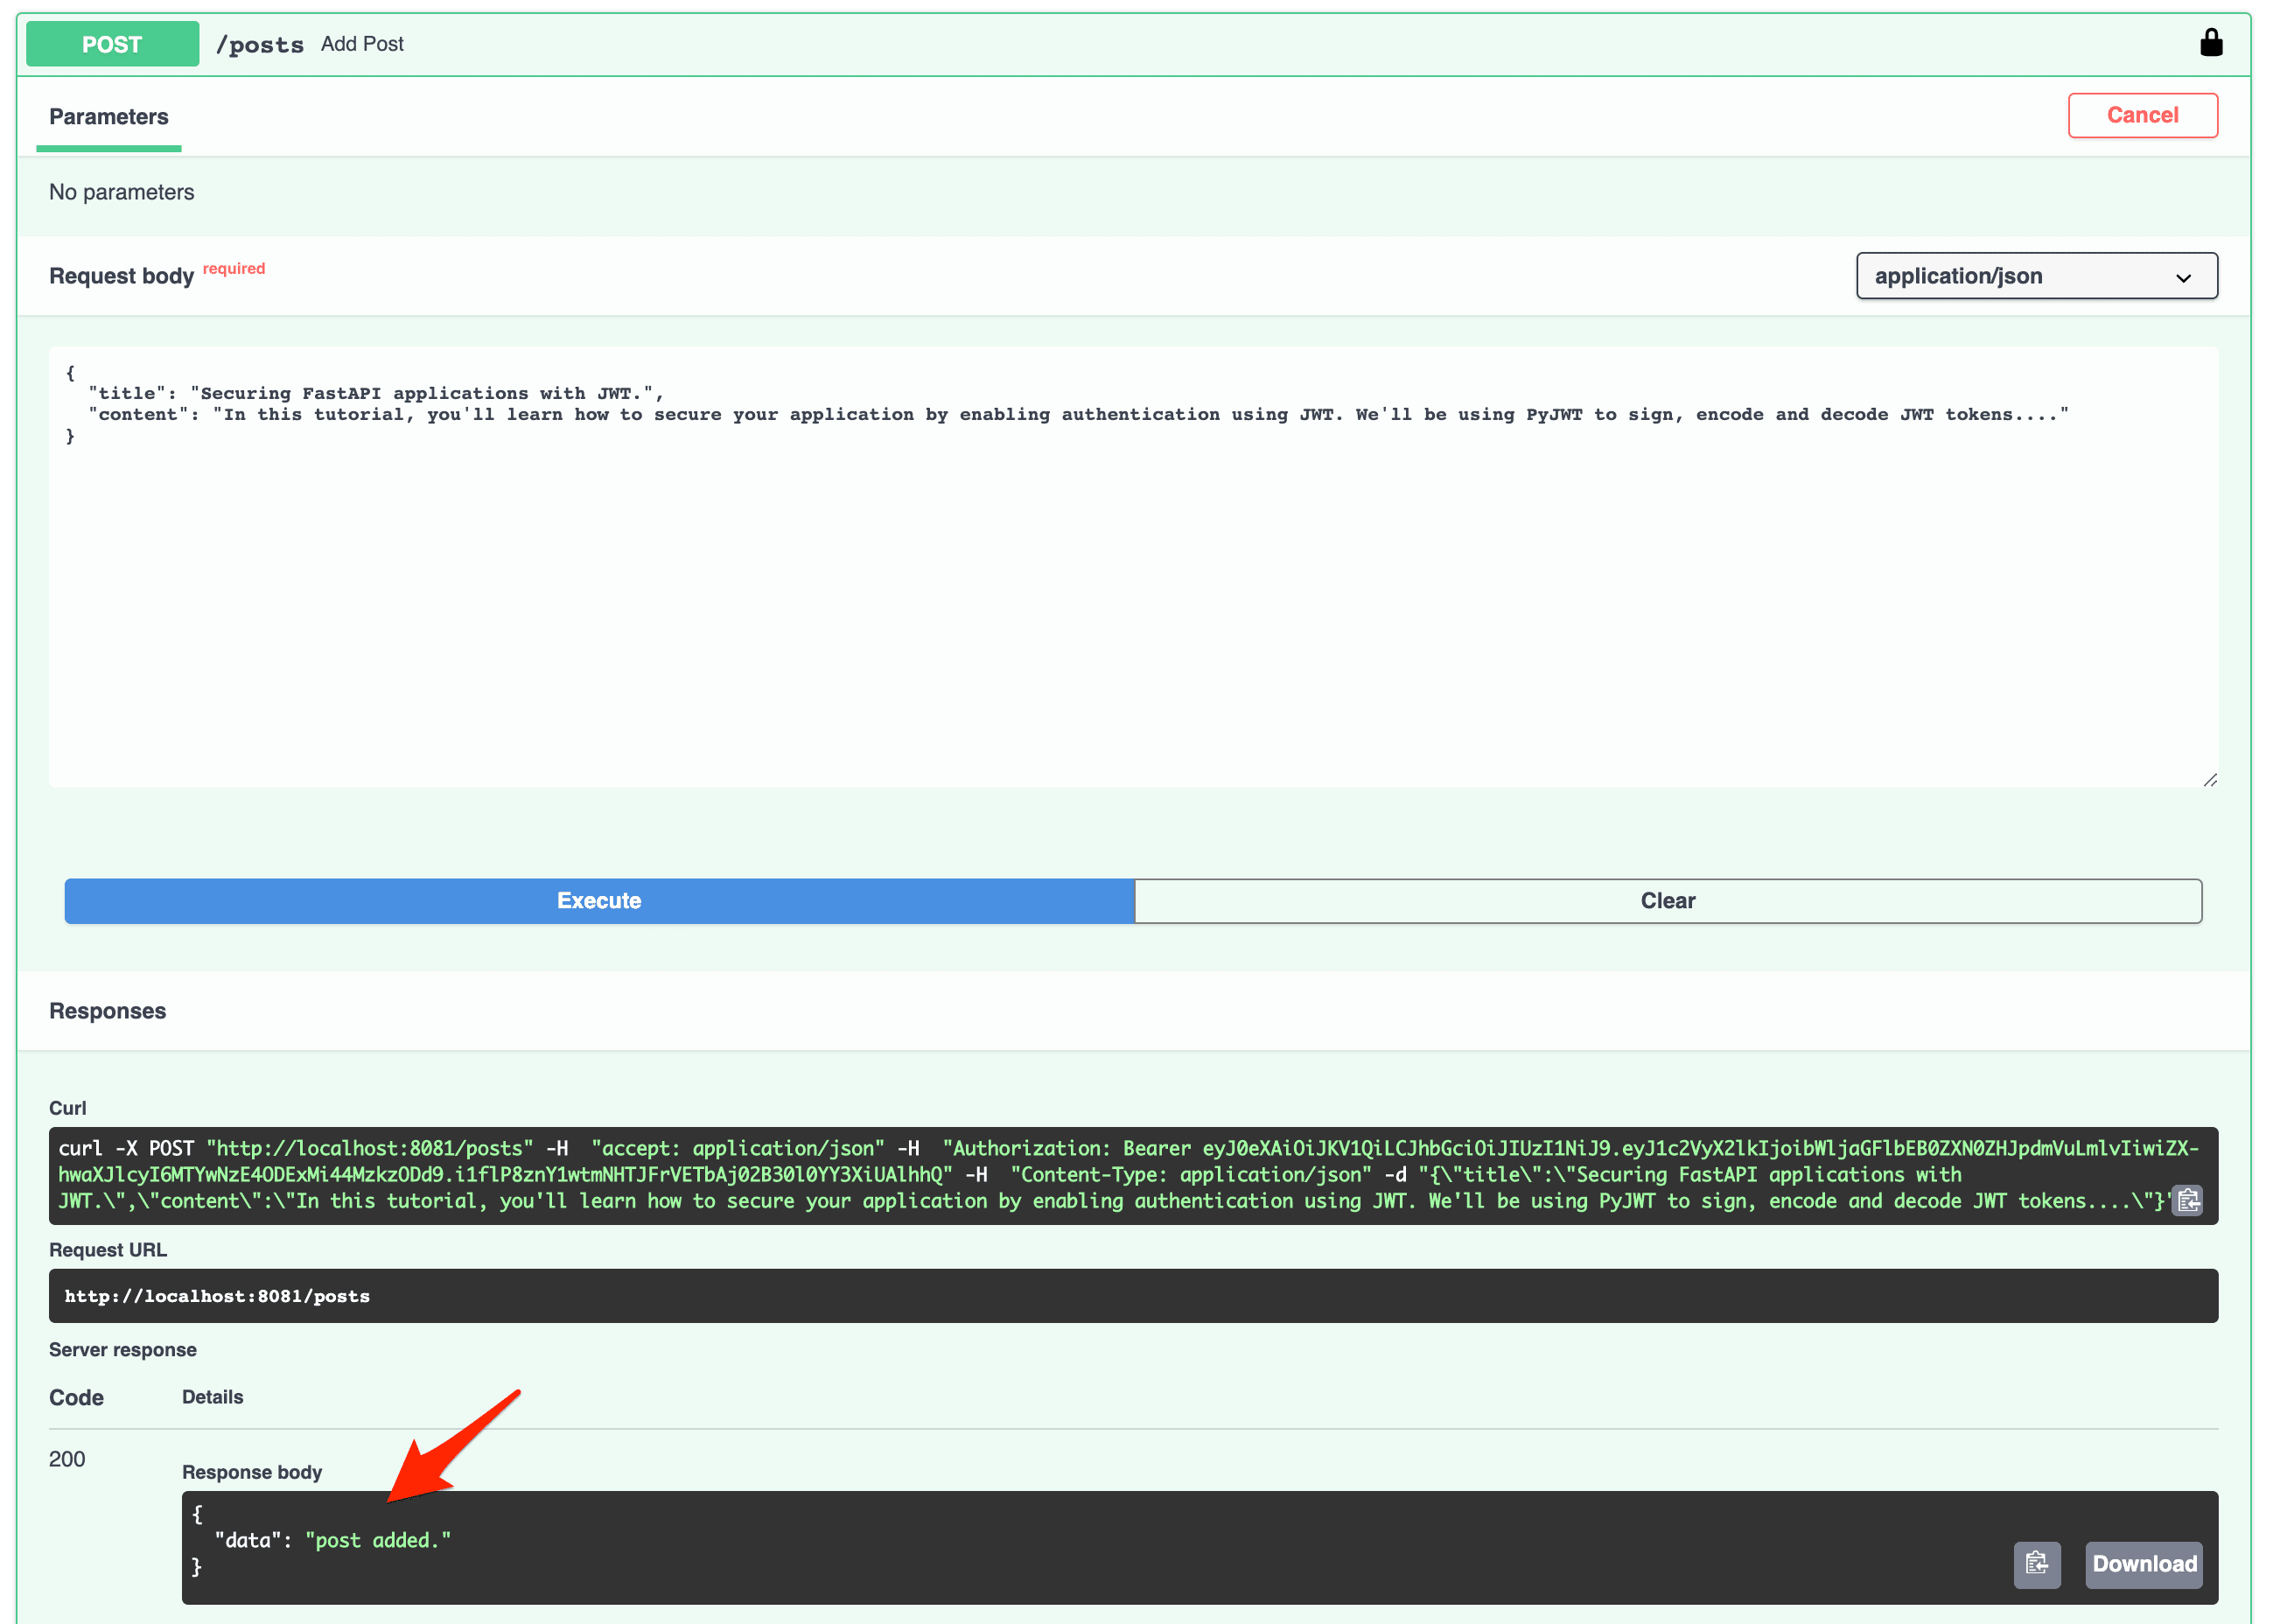
You should now be able to use the protected route:

Conclusion
This tutorial covered the process of securing a FastAPI application with JSON Web Tokens. You can find the source code in the fastapi-jwt repository. Thanks for reading.
Looking for some challenges?
- Hash the passwords before saving them using bcrypt or passlib.
- Move the users and posts from temporary storage to a database like MongoDB or Postgres. You can follow the steps in Building a CRUD App with FastAPI and MongoDB to set up a MongoDB database and deploy to Heroku.
- Add refresh tokens to automatically issue new JWTs when they expire. Don't know where to start? Check out this explanation by the author of Flask-JWT.
- Add routes for updating and deleting posts.
 Abdulazeez Abdulazeez Adeshina