 Špela Giacomelli
Docker is a tool that developers use to simplify developing and shipping applications.
Per Stack Overflow's 2021 Developer Survey, it's one of the most popular development tools.
This article will take you through the basics of Docker, focusing specifically on:
- The core Docker concepts and components
- What a Dockerfile looks like and what its most common instructions do
- What images and containers are, how they're created, and how to manage them
This article can be read-only. However, if you want to follow along, I provided a basic HelloWorld application that you can use to try out all the commands on your own. Feel free to clone it down and run the commands as you move through this article.
While container and image commands are independent of your application's language, Dockerfiles generally have language specific constructs in them. That said, despite the provided example being Python-based, you'll easily be able to tailor your newly-gained knowledge to other languages.
Contents
Objectives
By the end of this article, you should be able to:
- Explain what Docker is and how it works
- Describe and differentiate between the following concepts and components: Docker Engine, Docker Desktop, Dockerfile, Docker image, and Docker container
- Follow more complicated tutorials that use Docker
Containers and Virtual Machines
Before jumping into Docker, it's important to understand the difference between containers and virtual machines.
Containers and virtual machines are similar in that they allow multiple apps to run on the same server with various software requirements -- e.g., different Python versions, different libraries, etc. Their main difference is in the operating system. While containers uses the host's operating system, each virtual machine has its own guest operating system on top of the host's operating system.
In a now almost famous image, you can see how Docker compares to virtual machines:
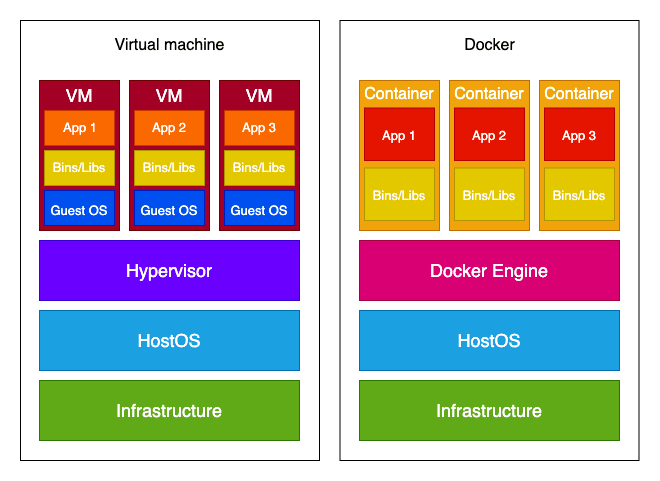
So, if you have an application that needs to run on different operating systems, a virtual machine is the way to go. But if that's not a requirement, Docker has multiple advantages over a virtual machine:
- Lighter-weight
- Faster to build
- Can be easily ported across different platforms
- Less resource intensive
- Scaling up and duplicating is easier
All those advantages are due to Docker containers not needing their own operating system.
Docker
Docker Engine
When people refer to Docker, they're typically referring to Docker Engine.
Docker Engine is the underlying open source containerization technology for building, managing, and running containerized applications. It's a client-server application with the following components:
- Docker daemon (called dockerd) is a service that runs in the background that listens for Docker Engine API requests and manages Docker objects like images and containers.
- Docker Engine API is a RESTful API that's used to interact with Docker daemon.
- Docker client (called docker) is the command line interface used for interacting with Docker daemon. So, when you use a command like
docker build, you're using Docker client, which in turn leverages Docker Engine API to communicate with Docker daemon.
Docker Desktop
These days, when you try to install Docker, you'll come across Docker Desktop. While Docker Engine is included with Docker Desktop, it's important to understand that Docker Desktop is not the same as Docker Engine. Docker Desktop is an integrated development environment for Docker containers. It makes it much easier to get your operating system configured for working with Docker.
If you haven't already, go ahead and install Docker Desktop:
Docker Concepts
At the heart of Docker, there are three core concepts:
- Dockerfile - a text file that serves as a blueprint for your container. In it, you define a list of instructions that Docker uses to build an image.
- Image - a read-only embodiment of the Dockerfile. It's built out of layers -- each layer corresponds to a single line of instructions from a Dockerfile.
- Container - running a Docker image produces a container, which is a controlled environment for your application. If we draw parallels with object-oriented programming, a container is an instance of a Docker image.
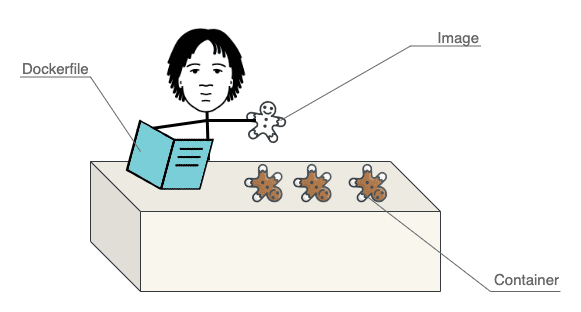
A Dockerfile is used to create a Docker image, which is then used to create (multiple) Docker containers.
We'll look into all three core concepts in detail in the next few sections.
It's highly recommended to read through Docker overview before moving on.
Dockerfile
Again, a Dockerfile is a text file that contains instructions for Docker on how to build an image. By default, a Dockerfile has no extension, but you can add one if you need more than one -- e.g., Dockerfile.prod.
Here's an example of a very simple Dockerfile:
FROM python:3.10-slim-buster

WORKDIR /usr/src/app

ENV PYTHONDONTWRITEBYTECODE 1
ENV PYTHONUNBUFFERED 1

RUN pip install --upgrade pip
COPY ./requirements.txt .
RUN pip install -r requirements.txt

COPY . .

CMD uvicorn main:app --reload --host 0.0.0.0 --port 8000
This example is as simple as can be, so you can easily understand it. It does not adhere to best practices, but you should try to follow them in your Dockerfiles.
A Dockerfile is essentially a list of commands in the following form: INSTRUCTION arguments. The majority of the most widely used commands can be seen in the above Dockerfile. Let's look at each of them in detail...
FROM
All Dockerfiles include a parent/base image on which the new image will be built. You use the FROM instruction to define the parent image:
FROM python:3.10-slim-buster
A valid Dockerfile always includes a FROM instruction.
Although parent and base image terms are sometimes used interchangeably, there's a difference between them. A parent image has its own parent image. Meanwhile, a base image has no parent; it starts with
FROM scratch.Alpine image is a base image and Python:alpine is a parent image (whose parent (base) image is actually the alpine image).
It's possible to create a base image on your own, but the probability of you needing your own image is small.
You can find parent images on Docker Hub, which is Docker's library/registry for Docker images. You can think of it as GitHub for Docker images. You'll probably want to use either official images or verified images from trusted sources since they're more likely to adhere to Docker best practices and contain the latest security fixes.
In the example above, we used the official Python parent image, specifically python:3.10-slim-buster.
Notes about python:3.10-slim-buster:
- The number tells you which version of the technology the image uses (e.g., the
python:3.11.0a5image uses Python version 3.11.0a5 whilenode:18.9.0uses Node version 18.9.0). You'll probably want to avoid any versions withrcin it (e.g.,python:3.11.0rc2) since rc means release candidate. - Names like buster, bullseye, or alpine tell you which OS images were used for this image (buster and bullseye refer to Debian releases while alpine is a lightweight Linux distribution). Additionally, there are tags such as
slimandslim-busterthat use lighter versions of the full image.
Review Use Small Docker Base Images for best practices on which base image to use.
RUN
The RUN instruction executes any commands in a new layer on top of the current image and commits the result.
Examples:
RUN mkdir /home/app/web

RUN python manage.py collectstatic --noinput
ENV
You use the ENV instruction to set an environment variable. This variable will be available in all subsequent instructions.
Examples:
ENV TZ=UTC

ENV HOME=/home/app
CMD and ENTRYPOINT
Some Docker instructions are so similar it can be hard to understand why both commands are needed. One of those "couples" are CMD and ENTRYPOINT.
First, for the similarities:
CMDandENTRYPOINTboth specify a command / an executable that will be executed when running a container. UnlikeRUN, which executes the command right away (the result is used in the image layer), theCMD/ENTRYPOINTcommand in the build-up specifies the command that will be used only when the container starts.- You can have only one
CMD/ENTRYPOINTinstruction in a Dockerfile, but it can point to a more complicated executable file.
There's actually only one difference between those instructions:
CMDcan easily be overridden from Docker CLI.
You should use CMD if you want the flexibility to run different executables depending on your needs when starting the container. If you want to clearly communicate that command is not meant to be overridden and prevent accidentally changing it, use ENTRYPOINT.
You'll probably use one or the other. If you don't use one, the container will be stopped immediately since there's no reason for it to exist (the exception being if you're also using Docker Compose).
You may also use both CMD and ENTRYPOINT in the same Dockerfile, in which case CMD serves as the default argument for the ENTRYPOINT.
You can have only one CMD instruction in a Dockerfile, but it can point to a more complicated executable file. If you have more than one CMD, only the last CMD will take effect. The same goes for the ENTRYPOINT instruction.
Example of CMD instruction usage:
CMD gunicorn core.wsgi:application --bind 0.0.0.0:$PORT
There's a big chance you'll see the ENTRYPOINT argument as an executable file since commands that should be executed are often more than a one-liner.
Example of ENTRYPOINT as executable file usage:
ENTRYPOINT ["./entrypoint.sh"]
And this is what the entrypoint.sh file might look like:
#!/bin/sh

python manage.py migrate
python manage.py collectstatic --noinput
It's important to understand the difference between
CMDandENTRYPOINT. For more, check out Understand the Difference Between ENTRYPOINT and CMD as well as the official docs.
ADD and COPY
Another pair similar to one another is ADD and COPY.
Both instructions copy new files or directories from the
ADD <src> <dest>
COPY <src> <dest>
Additionally, ADD can copy from remote file URLs (for example, it allows adding a git repository to an image directly) and directly from a compressed archive (ADD will automatically unpack the contents to the given location).
You should prefer COPY over ADD unless you specifically need one of the two additional features of ADD -- i.e., downloading example files or unpacking a compressed file
Examples of ADD and COPY instruction usage:
# copy local files on the host to the destination
COPY /source/path  /destination/path
COPY ./requirements.txt .

# download external file and copy to the destination
ADD http://external.file/url  /destination/path
ADD --keep-git-dir=true https://github.com/moby/buildkit.git#v0.10.1 /buildkit

# copy and extract local compresses files
ADD source.file.tar.gz /destination/path
Image
An image might be the most confusing concept of the three. You create a Dockerfile and then use a container, but an image lies between those two.
So, an image is a read-only embodiment of a Dockerfile that's used to create a Docker container. It consists of layers -- each line in a Dockerfile makes one layer. You can't change an image directly; you change it by changing the Dockerfile. You don't directly use an image either; you use a container created from an image.
The most important image-related tasks are:
- building images from Dockerfiles
- listing all the built images
- removing images
Since 2017, Docker switched from shorter commands (i.e.,
docker <command>) to a more descriptive format (i.e.,docker <top-level command> <command>). Despite Docker users being encouraged to use the new version, even the official tutorial uses the shorter version. As of now, the old version still works, and I have not been able to find any proof of the old commands getting deprecated. What's more, people (and even the documentation) started referring to it as a 'shorthand'.The advantage of using the new version is that you'll better understand which of the three concepts the command is dealing with. The commands are also easier to find in the docs. The advantage of the old version is that it's shorter, and the documentation is more comprehensive.
I'll be using the descriptive form of commands in this article. At the end of the article, you can find all the commands with their shorthand version.
Here, you can find all the new-form commands that deal with images.
Building
To build an image from a Dockerfile, you use the docker image build command. This command requires one argument: either a path or URL of the context.
This image will use the current directory as a context:
$ docker image build .
There are a number of options you can provide.
For example, -f is used to specify a specific Dockerfile when you have multiple Dockerfiles (e.g., Dockerfile.prod) or when the Dockerfile isn't in the current directory (e.g., docker image build . -f docker/Dockerfile.prod).
Probably the most important is the -t tag that is used to name/tag an image.
When you build an image, it gets assigned an ID. Contrary to what you might expect, the IDs are not unique. If you want to be able to easily reference your image, you should name/tag it. With -t, you can assign a name and a tag to it.
Here's an example of creating three images: one without the usage of -t, one with a name assigned, and one with a name and a tag assigned.
$ docker image build .
$ docker image build . -t hello_world
$ docker image build . -t hello_world:67d19c27b60bd782c9d3600ae914604a94bddfd4

$ docker image ls
REPOSITORY           TAG       IMAGE ID       CREATED          SIZE
REPOSITORY    TAG                                        IMAGE ID       CREATED          SIZE
hello_world   67d19c27b60bd782c9d3600ae914604a94bddfd4   e03784993f22   25 minutes ago   181MB
hello_world   latest                                     e03784993f22   26 minutes ago   181MB
<none>        <none>                                     7a615d108866   29 minutes ago   181MB
Notes:
- For the image that was built without a name or tag, you can only reference it via its image ID. Not only is it difficult to remember, but, again, it might not be unique (which is the case above). You should avoid this.
- For the image that only has a name (
-t hello_world), the tag is automatically set tolatest. You should avoid this as well. For more, review Version Docker Images.
Listing
The docker image ls command lists all built images.
Example:
$ docker image ls

REPOSITORY      TAG       IMAGE ID       CREATED         SIZE
hello_world     latest    c50405e84d39   9 minutes ago   245MB
<none>          <none>    2700a62cd8f1   42 hours ago    245MB
alpine/git      latest    692618a0d74d   2 weeks ago     43.4MB
todo_app        test      999740882932   3 weeks ago     1.03GB
Removing
There are two use cases for removing images:
- You want to remove one or more selected images
- You want to remove all the unused images (you don't care which images specifically)
For the first case, you use docker image rm; for the second, you use docker image prune.
Remove
docker image rm removes and untags the selected image(s). It requires one argument: The reference to the image(s) you want to remove. You can reference it by name or short/long ID.
If you think back to the explanation of image tagging... there can be multiple images with a different name but the same ID. If you try to remove the image by image ID and multiple images with that ID exist, you'll get an image is referenced in multiple repositories error. In that case, you'll have to remove it by referencing it by name. If you wish to remove all images with the same ID, you can use the -f flag.
Example of unsuccessful and successful image removal:
$ docker image ls

REPOSITORY   TAG       IMAGE ID       CREATED          SIZE
test1        latest    4659ba97837b   41 seconds ago   245MB
test2        latest    4659ba97837b   41 seconds ago   245MB
test         latest    4659ba97837b   41 seconds ago   245MB


$ docker rmi 4659ba97837b

Error response from daemon: conflict: unable to delete 4659ba97837b (must be forced) - image is referenced in multiple repositories


$ docker rmi test2
Untagged: test2:latest


$ docker image ls

REPOSITORY   TAG       IMAGE ID       CREATED         SIZE
test1        latest    4659ba97837b   4 minutes ago   245MB
test         latest    4659ba97837b   4 minutes ago   245MB
Prune
docker image prune removes dangling images. Since prune is a command that can be used for cleaning containers, images, volumes, and networks, this command doesn't have a shorter version. If you use the -a flag, all unused images are removed (i.e., docker image prune -a).
A dangling image is an image that is not tagged and is not referenced by any container.
An unused image is an image that isn't associated with at least one container.
Example:
$ docker image prune

WARNING! This will remove all dangling images.
Are you sure you want to continue? [y/N]

Deleted Images:
deleted: sha256:c9a6625eb29593463ea43aab4053090427bf29cc59bc97917b3298fda6a94e8a
deleted: sha256:284f940f39c3ef5be09440e23fdefdb00df0791344db5c340a9d11979a98039e
deleted: sha256:1934187bf17ccf4e754842a4ceeacf5c14aaa63ba7a04c0c520f53946426c902
There are a few additional commands, but you'll probably not use them very much; you can see all image-related commands in the official docs.
Container
The third concept you need to understand is a container, which is a controlled environment for your application. An image becomes a container when it's run on Docker Engine. It's the end goal: You use Docker so you can have a container for your application.
The main operations you can do with a container are
- running a container
- listing all the containers
- stopping a container
- removing a container
You can see all the commands related to a container in the official docs.
Running
You can either create a new container of an image and run it, or you can start an existing container that was previously stopped.
Run
The docker container run command actually combines two other commands, docker container create and docker container start.
So, the following essentially gives you the same result:
$ docker container run my_image

# the same as:

$ docker container create my_image
88ce9c60aeabbb970012b5f8dbae6f34581fa61ec20bd6d87c6831fbb5999263
$ docker container start 88ce9c60aeabbb970012b5f8dbae6f34581fa61ec20bd6d87c6831fbb5999263
You need to provide one argument: The image you want to use for the container.
When you run the run command, Docker creates a writable container layer over the specified image and then starts it using the specified command (CMD/ENTRYPOINT in the Dockerfile).
The changes made in the writable layer do not persist after you delete the container, unless you store it. Docker has two options for storing data.
Since you can override a number of the defaults, there are many options. You can see all of them in the official docs. The most important option is --publish/-p, which is used to publish ports to the outside world. Although it is technically possible to run a container without a port, it's not very useful since the service(s) running inside the container wouldn't be accessible outside the container. You can use --publish/-p for both the create and run commands:
Here's an example of how that looks like:
$ docker container run -p 8000:8000 my_image
You can read more on port publishing in the official docs.
You can run your container in detached mode by using --detach/-d, which lets you keep using the terminal.
If you run a container in detached mode, Docker will just return the container ID:
$ docker container run -p 8000:8000 -d my_image

0eb20b715f42bc5a053dc7878b3312c761058a25fc1efaffb7920b3b4e48df03
Your container gets a unique, quirky name by default, but you can assign your own name:
$ docker container run -p 8000:8000 --name my_great_container my_image
Start
To start a stopped or just created container, you use the docker container start command. Since with this command, you're starting an existing container, you have to specify the container instead of an image (as with docker container run).
Another difference from docker container run is that docker container start by default runs the container in the detached mode. You can attach it using --attach/-a (reverse from docker container run -d).
Example:
$ docker container start -a reverent_sammet
Listing
You can list all running containers with docker container ls.
Example:
$ docker container ls

CONTAINER ID   IMAGE          COMMAND                  CREATED         STATUS         PORTS                    NAMES
0f21395ec96c   9973e9c65229   "/bin/sh -c 'gunicor…"   6 minutes ago   Up 6 minutes   0.0.0.0:80->8000/tcp     shopping
73bd69d041ae   my_image       "/bin/sh -c 'uvicorn…"   2 hours ago     Up 2 hours     0.0.0.0:8000->8000/tcp   my_great_container
If you want to also see the stopped containers, you can add the -a flag:
$ docker container ls -a

CONTAINER ID   IMAGE          COMMAND                  CREATED              STATUS                     PORTS                    NAMES
0f21395ec96c   9973e9c65229   "/bin/sh -c 'gunicor…"   About a minute ago   Up About a minute          0.0.0.0:80->8000/tcp     shopping
73bd69d041ae   my_image       "/bin/sh -c 'uvicorn…"   2 hours ago          Up 2 hours                 0.0.0.0:8000->8000/tcp   my_great_container
0eb20b715f42   my_image       "/bin/sh -c 'uvicorn…"   2 hours ago          Exited (137) 2 hours ago                            agitated_gagarin
489a02b8cfac   my_image       "/bin/sh -c 'uvicorn…"   2 hours ago          Created                                             vigorous_poincare
Let's take a look at the output for:
CONTAINER ID   IMAGE          COMMAND                  CREATED         STATUS         PORTS                    NAMES
73bd69d041ae   my_image       "/bin/sh -c 'uvicorn…"   2 hours ago     Up 2 hours     0.0.0.0:8000->8000/tcp   my_great_container
CONTAINER ID(73bd69d041ae) and itsNAMES(my_great_container) are both unique, so you can use them to access the container.IMAGE(my_image) tells you which image was used to run the container.CREATEDis pretty self-explanatory: when the container was created (2 hours ago).- We already discussed the need for specifying a command for starting a container...
COMMANDtells you which command was used ("/bin/sh -c 'uvicorn…"). STATUSis useful when you don't know why your container isn't working (Up 2 hoursmeans your container is running,ExitedorCreatedmeans it's not)
Some of the information is truncated. If you want the untruncated version, add
--no-trunc.
Stopping
To stop a container, use docker container stop. The name or ID of the stopped container is then returned.
Example:
$ docker container stop my_great_container
my_great_container

$ docker container stop 73bd69d041ae
73bd69d041ae
A container can be started again with
docker container start.
Removing
Similar to images, to remove a container, you can either:
- remove one or more selected containers via docker container rm.
- remove all stopped containers via docker container prune
Example of docker container rm:
$ docker container rm festive_euclid
festive_euclid
Example of docker container prune:
$ docker container prune

WARNING! This will remove all stopped containers.
Are you sure you want to continue? [y/N] y
Deleted Containers:
0f21395ec96c28b443bad8aac40197fe0468d24e0eed49e5f56011de1c81b589
80c693693f3d99999925eae5f4bbfc03236cde670db509797d83f50e732fcf31
0eb20b715f42bc5a053dc7878b3312c761058a25fc1efaffb7920b3b4e48df03
1273cf44c551f8ab9302e6d090e3c4e135ca6f7e1ab3d90a62bcbf5e83ba9342
Commands
We went through quite a few commands in this article. To help you navigate through what you read, I prepared a table with all the commands we came across. The table includes the descriptive command as well as the shorthand alias.
| Command | Alias | Usage |
|---|---|---|
| docker image build | docker build | Build an image from a Dockerfile |
| docker image ls | docker images | List images |
| docker image rm | docker rmi | Remove selected images |
| docker image prune | N/A | Remove unused images |
| docker container run | docker run | Create the container and start it |
| docker container start | docker start | Start an existing container |
| docker container ls | docker ps | List all containers |
| docker container stop | docker stop | Stop a container |
| docker container rm | docker rm | Remove a container |
| docker container prune | N/A | Remove all stopped containers |
Conclusion
To summarize, the most essential concepts in Docker are Dockerfile, image, and container.
Using a Dockerfile as a blueprint, you build an image. Images can then be used to build other images and can be found on Docker Hub. Running an image produces a controlled environment for your application, called a container.
The aim of this article was to explain to you the basics of Docker. If you want to read some more hands-on tutorials, you can check our extensive list of articles related to Docker. If you're a Python developer, be sure to check out Docker Best Practices for Python Developers.
What's next?
Docker is a complex system. This article just scratched the surface. There are still plenty of concepts, features, and tools that you'll need to learn as you use Docker. Here are a few that you'll probably encounter sooner rather than later:
- Like git, Docker has an ignore file called .dockerignore where you can define which files and folders you don't want to add to the image (due to security, size, etc.).
- As I mentioned in the article, the data from the container's writable layers don't persist if the container is removed. You can use volumes or bind mounts to store files on the host machine.
- If your application needs multiple containers (for example, if your Django app uses Postgres), you can use Docker Compose to simplify their lifecycle.