 Nik Tomazic
In this tutorial, we'll build a Django app that takes website screenshots using Playwright. We'll start by capturing screenshots directly in the view and then move the work to a background task using Celery. Finally, we'll explain how to run browser automation at scale using Browser Use's browser infrastructure.
Requirements:
- Python v3.12 or newer
- Docker (with Compose) installed
Contents
Project Introduction
To make the tutorial easier to follow, I've prepared a dockerized Django project. The project includes three services: web for Django, celery for background tasks, and redis for the task queue and results.
Interested in building the starter project yourself? Check out the Django Celery guide.
Right now, the project lets you submit a website URL, choose between a full-page or viewport screenshot, and store the request in the database. No screenshots are taken yet.
First, clone the base branch of the django-website-screenshots repo:
$ git clone https://github.com/duplxey/django-website-screenshots.git \
    --single-branch --branch base && cd django-website-screenshots
Build and start the services:
$ docker compose up --build -d
Then apply the database migrations:
$ docker compose exec web python manage.py migrate
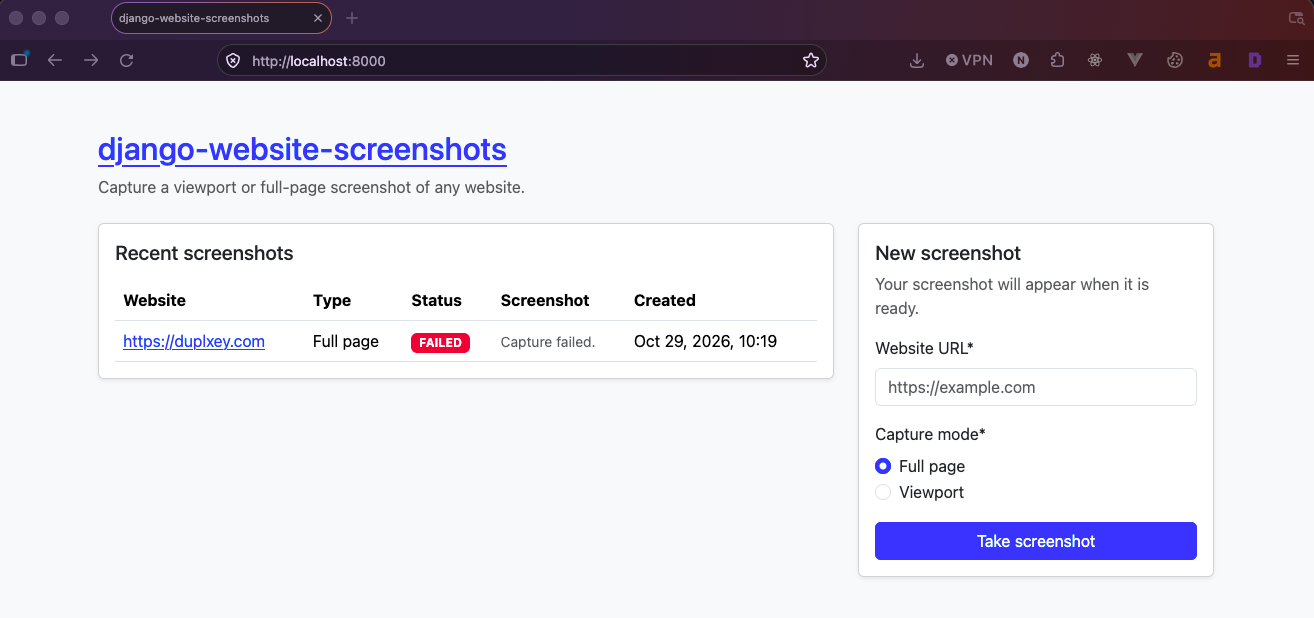
Open your favorite web browser and navigate to http://localhost:8000. Test whether the screenshot request saves successfully by filling out the form. After you submit, the request should appear in the table with status FAILED, because screenshot functionality isn't implemented yet.
Install Playwright
To take screenshots, we'll use a package called Playwright.
Playwright is a browser automation library that lets you control Chromium, Firefox, and WebKit from Python. You can use it to navigate websites, fill out forms, click buttons, take screenshots, or do automated testing.
First, add it to requirements.txt:
playwright==1.64.1
We now have to make two changes in our Dockerfile.
First, define the PLAYWRIGHT_BROWSERS_PATH environment variable, which tells Playwright where to install and find browsers:
# Dockerfile

ENV PYTHONDONTWRITEBYTECODE=1 \
    PYTHONUNBUFFERED=1 \
    PLAYWRIGHT_BROWSERS_PATH=/ms-playwright
Then install Chromium and its system dependencies right after pip install:
# Dockerfile

RUN pip install --no-cache-dir -r requirements.txt
RUN python -m playwright install --with-deps chromium  # new
Rebuild the image and recreate the web and worker containers:
$ docker compose up --build -d
We're now ready to take our first screenshot.
Capture a Screenshot
To capture a screenshot using Playwright, we'll have to do the following:
- Start a Playwright-controlled headless Chromium instance.
- Configure the browser, such as setting the
widthand theheight. - Navigate to the desired page and call
screenshot(). - Close the browser instance.
Create a new file called utils.py in the screenshots app with the following contents:
# screenshots/utils.py

from urllib.parse import urlsplit
from playwright.sync_api import sync_playwright


def take_screenshot(url, full_page=True):
    if urlsplit(url).scheme not in {"http", "https"}:
        raise ValueError("Only HTTP and HTTPS URLs are supported.")

    with sync_playwright() as playwright:
        browser = playwright.chromium.launch()
        try:
            page = browser.new_page(viewport={"width": 1280, "height": 800})
            page.set_default_timeout(30_000)
            response = page.goto(url, wait_until="load")
            if response is not None and response.status >= 400:
                raise ValueError(f"Website returned HTTP {response.status}.")
            image = page.screenshot(full_page=full_page, type="png")
        finally:
            browser.close()

    return image
The helper function returns PNG bytes for either the 1280x800 viewport or the full scrollable page. It also checks for any errors and propagates them to the caller.
Moving along, let's utilize the helper in index_view():
# screenshots/views.py

@require_http_methods(["GET", "POST"])
def index_view(request):
    form = ScreenshotForm(request.POST if request.method == "POST" else None)

    # If a form is submitted, take the screenshot, and then redirect
    if request.method == "POST" and form.is_valid():
        screenshot = form.save()
        is_full_page = screenshot.type == TYPE_FULL_PAGE
        try:
            image = take_screenshot(screenshot.url, is_full_page)
            screenshot.file.save(
                f"{uuid4()}.png",
                ContentFile(image),
                save=False,
            )
            screenshot.status = STATUS_SUCCESS
            screenshot.save()
        except Exception:
            Screenshot.objects.filter(pk=screenshot.pk).update(
                status=STATUS_FAILED,
                updated_at=timezone.now(),
            )
        return redirect("index")

    # Otherwise, fetch the table data and display the template
    table = ScreenshotTable(Screenshot.objects.all())
    RequestConfig(request, paginate={"per_page": 10}).configure(table)
    return render(
        request,
        "screenshots/index.html",
        {
            "form": form,
            "table": table,
        },
    )
Don't forget about the imports at the top of the file:
# screenshots/views.py

from uuid import uuid4
from django.core.files.base import ContentFile
from django.utils import timezone
from .models import STATUS_FAILED, STATUS_SUCCESS, TYPE_FULL_PAGE
from .utils import take_screenshot
The view calls the helper, saves the PNG through the model's image field, and marks the capture as SUCCESS or FAILED. Test it by navigating to http://localhost:8000 and taking a screenshot of a random site.
Taking a screenshot inside the view blocks the worker handling the request until the capture finishes. The user has to wait for a response, and that worker can't handle another request in the meantime. In the next section, we'll move the capture to a background task.
Using Background Tasks
Create a file called tasks.py in the screenshots app with the following contents:
# screenshots/tasks.py

from uuid import uuid4

from celery import shared_task
from django.core.files.base import ContentFile
from django.utils import timezone

from .models import STATUS_FAILED, STATUS_SUCCESS, Screenshot
from .utils import take_screenshot


@shared_task
def capture_screenshot_task(screenshot_id, url, full_page=True):
    screenshot = Screenshot.objects.get(pk=screenshot_id)

    try:
        image = take_screenshot(url, full_page=full_page)
        screenshot.file.save(
            f"{uuid4()}.png",
            ContentFile(image),
            save=False,
        )
        screenshot.status = STATUS_SUCCESS
        screenshot.save()
    except Exception:
        Screenshot.objects.filter(pk=screenshot_id).update(
            status=STATUS_FAILED,
            updated_at=timezone.now(),
        )
        raise

    return screenshot.file.name
The file defines and registers a new Celery task using the @shared_task decorator. The task calls the same take_screenshot() helper and handles the image and status updates. We re-raise exceptions, so Celery also records failures.
Next, trigger the task from index_view():
# screenshots/views.py

logger = logging.getLogger(__name__)


@require_http_methods(["GET", "POST"])
def index_view(request):
    form = ScreenshotForm(request.POST if request.method == "POST" else None)

    if request.method == "POST" and form.is_valid():
        screenshot = form.save()
        try:
            capture_screenshot_task.delay(
                screenshot.pk,
                screenshot.url,
                full_page=screenshot.type == TYPE_FULL_PAGE,
            )
        except OperationalError:
            Screenshot.objects.filter(pk=screenshot.pk).update(
                status=STATUS_FAILED, updated_at=timezone.now(),
            )
            logger.exception("Could not queue screenshot %s", screenshot.pk)
            messages.error(
                request, "Could not start the capture. Please try again.",
            )
        return redirect("index")

    # ...
And add the imports at the top of the file:
import logging
from django.contrib import messages
from kombu.exceptions import OperationalError
from .tasks import capture_screenshot_task
Calling .delay() queues the capture through Redis, allowing Django to redirect without waiting for it. If queuing fails, we mark the screenshot as failed and show an error.
Restart the worker to load the task:
$ docker compose restart celery
Submit another URL, then refresh after a few seconds to see the result. The capture now runs in the background without blocking the Django thread.
Polling for Status
The capture now runs in the background, but we still have to refresh the page to see the result. To update the table automatically, we'll use polling. Our JavaScript code will periodically check the status of each pending screenshot and update its row when the capture finishes.
First, add a status_view() to screenshots/views.py:
# screenshots/views.py

from django.http import JsonResponse
from django.shortcuts import get_object_or_404


@require_http_methods(["GET"])
def status_view(request, pk):
    screenshot = get_object_or_404(Screenshot, pk=pk)
    return JsonResponse(
        {
            "status": screenshot.status,
            "label": screenshot.get_status_display(),
            "file_url": screenshot.file.url if screenshot.file else None,
        }
    )
The view fetches the screenshot by its primary key and returns its status, display label, and image URL as JSON. If the screenshot doesn't exist, it returns a 404 response.
Next, register the view by adding it to urls.py:
# screenshots/urls.py

path("screenshots/<int:pk>/status/", views.status_view, name="status"),
Our JavaScript code needs to know which rows are pending and where to check their status. To provide this information, add row_attrs to ScreenshotTable.Meta in screenshots/tables.py, keeping the existing options:
# screenshots/tables.py

class ScreenshotTable(tables.Table):
    # ...

    class Meta:
        # ...

        row_attrs = {
            "data-state": lambda record: record.status,
            "data-status-url": lambda record: reverse(
                "status", args=[record.pk],
            ),
        }
And add the import:
# screenshots/tables.py

from django.urls import reverse
Each table row now includes two HTML attributes: data-state for the screenshot's current status and data-status-url for its status endpoint.
Moving along, create a status.js file in screenshots/static/screenshots folder:
screenshots/
└── static/
    └── screenshots/
        └── status.js
Then put the following contents inside:
// screenshots/static/screenshots/status.js

async function updateScreenshot(row) {
    try {
        const response = await fetch(row.dataset.statusUrl, {
            cache: "no-store",
        });
        if (!response.ok) {
            throw new Error("Could not check screenshot status");
        }

        const data = await response.json();
        const badge = row.querySelector("[data-status]");
        const placeholder = row.querySelector("[data-file-placeholder]");
        row.dataset.state = data.status;
        badge.textContent = data.label;
        badge.classList.remove(
            "text-bg-warning", "text-bg-success", "text-bg-danger",
        );
        badge.classList.add({
            PE: "text-bg-warning",
            SU: "text-bg-success",
            FA: "text-bg-danger",
        }[data.status]);

        if (data.status === "SU" && data.file_url) {
            const link = row.querySelector("[data-file-link]");
            link.href = data.file_url;
            link.hidden = false;
            placeholder.hidden = true;
            return;
        }

        if (data.status === "FA") {
            placeholder.textContent = "Capture failed.";
            return;
        }

        placeholder.textContent = "Capturing...";
    } catch (error) {
        const placeholder = row.querySelector("[data-file-placeholder]");
        placeholder.textContent = "Reconnecting...";
    }

    setTimeout(() => updateScreenshot(row), 2000);
}

document.querySelectorAll('tr[data-state="PE"]').forEach((row) => {
    setTimeout(() => updateScreenshot(row), 1000);
});
The script finds all pending rows and checks their status after one second. It uses the template's existing data-* attributes to update the status badge and show the image link or a failure message.
If a capture is still pending, the script waits two seconds before checking again. Failed status requests display "Reconnecting..." and are retried as well. Polling stops once the image link is available, or the capture has failed.
Finally, load the script just before </body> in screenshots/templates/screenshots/index.html. The template already loads the static tag, so we only need to add:
<!-- screenshots/templates/screenshots/index.html -->

<!DOCTYPE html>
<html lang="en">
<head>
    <!-- ... -->
</head>
<body>
    <!-- ... -->
    <script src="{% static 'screenshots/status.js' %}" defer></script>
</body>
</html>
Test it by navigating to http://localhost:8000 and submitting another URL. The status and image link should now update without refreshing the page. To test a failed capture locally, try a broken URL.
Optional: Browser Automation at Scale
Running Chromium inside a Celery worker works well for smaller projects, but concurrent browsers can quickly exhaust the worker's memory. At higher volumes, you'll also face bot detection, CAPTCHAs, and blocked requests.
Browser Use's browser infrastructure lets you run your existing Playwright scripts against managed Chromium browsers. It includes stealth protections and residential proxies to help reduce blocking. Pricing is $0.02 per browser-hour plus $5/GB of residential proxy traffic, with no subscription.
Currently, Browser Use offers $1 in free credits for eligible signups.
Let's update our app to use it.
Create a new API key and add it to the environment variables in docker-compose.yaml:
# docker-compose.yaml

services:
  web:
    # ...
    environment:
      # ...
      - BROWSER_USE_API_KEY=<your-api-key>

  celery:
    # ...
    environment:
      # ...
      - BROWSER_USE_API_KEY=<your-api-key>
Don't forget to replace
<your-api-key>with the actual key.
Then read it in settings.py:
# core/settings.py

BROWSER_USE_API_KEY = os.environ["BROWSER_USE_API_KEY"]
Next, update screenshots/utils.py to use a direct CDP connection instead of launching Chromium locally:
# screenshots/utils.py

from django.conf import settings

# ...


def take_screenshot(url, full_page=True):
    # ...

    with sync_playwright() as playwright:
        browser = playwright.chromium.connect_over_cdp(
            "wss://connect.browser-use.com"
            f"?apiKey={settings.BROWSER_USE_API_KEY}"
            "&proxyCountryCode=us"
        )
        # ...
Keep the rest of the helper unchanged, including the finally block that calls browser.close().
Recreate the containers to apply the environment changes:
$ docker compose up -d --force-recreate web celery
Voilà, the project now uses remote browser infrastructure instead of running Chromium instances in the Celery workers. Give it a try by submitting a new URL.
Conclusion
In this article, we built a Django screenshot app with Playwright, moved captures into Celery background tasks, and added automatic status updates. We also connected the same task to Browser Use to run the browser remotely.
The final source code is available on GitHub.