 Nik Tomazic
In this tutorial, we'll look at how to deploy a Django app to Sevalla.
Contents
Objectives
By the end of this tutorial, you should be able to:
- Explain what Sevalla is and how it works.
- Deploy a Django application to Sevalla.
- Spin up a PostgreSQL instance on Sevalla and connect to it.
- Serve static files directly from Django using WhiteNoise.
- Set up Sevalla Persistent Storage to persist media files.
What is Sevalla?
Sevalla is an intuitive Platform as a Service (PaaS) solution that enables you to deploy your apps in no time. It offers seamless hosting for applications, SQL and NoSQL databases, static sites, and S3-compatible object storage.
The platform is backed by Kinsta and has been around since mid-2024. Despite being relatively new, Sevalla is robust and provides the same feature set as you'd expect from other long-established solutions.
Sevalla is extremely easy to use thanks to its slick user interface. Moreover, it is highly flexible, as it provides three build options: Nixpacks, Buildpacks, and custom Dockerfiles. When using Sevalla, you only pay for the resources that you use.
At the time of writing, Sevalla offers $50 free credits to all newly registered users.
Why Sevalla?
- Extremely easy to use
- Supports Nixpacks, Buildpacks, and custom Dockerfiles
- Automatic SSL and DDoS protection (via CloudFlare)
- Great customer support
Project Setup
In this tutorial, we'll be deploying a simple image hosting application called django-images.
Check your understanding by deploying your own Django application as you follow along with the tutorial.
First, grab the code from the repository on GitHub.
$ git clone [email protected]:duplxey/django-images.git
$ cd django-images
Create a new virtual environment and activate it:
$ python3 -m venv venv && source venv/bin/activate
Install the requirements and migrate the database:
(venv)$ pip install -r requirements.txt
(venv)$ python manage.py migrate
Run the server:
(venv)$ python manage.py runserver
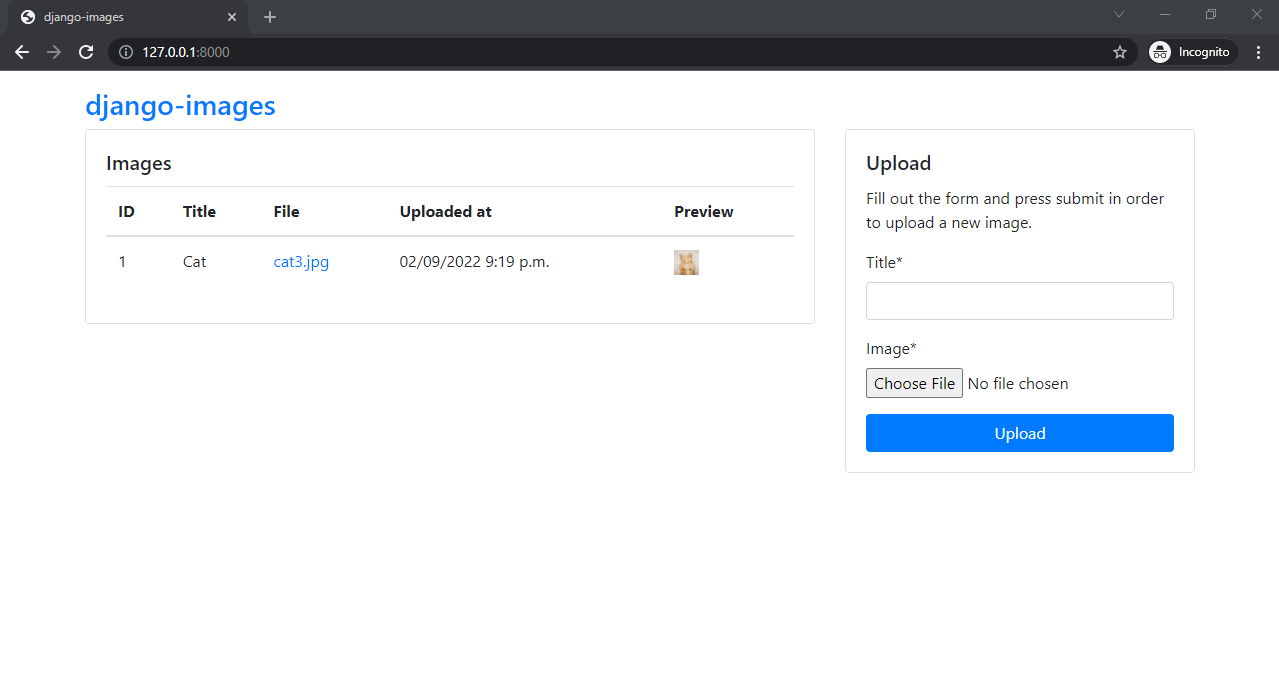
Open your favorite web browser and navigate to http://localhost:8000. Make sure everything works correctly by using the form on the right to upload an image. After you upload an image, you should see it displayed in the table:
Configure Django Project
In this section, we'll prepare our Django project for deployment to Sevalla.
Environmental Variables
Instead of storing sensitive information in the source code, we'll utilize environmental variables. The easiest way to manage environmental variables is via a third-party package called python-dotenv. This package enables you to load variables from a dotenv file.
Start by adding the following to your requirements.txt:
python-dotenv==1.1.1
Next, initialize the environment at the top of core/settings.py like so:
# core/settings.py

from pathlib import Path

from dotenv import load_dotenv

# Build paths inside the project like this: BASE_DIR / 'subdir'.
BASE_DIR = Path(__file__).resolve().parent.parent

load_dotenv(BASE_DIR / '.env')
Load SECRET_KEY, DEBUG, ALLOWED_HOSTS, and CSRF_TRUSTED_ORIGINS from the environment:
# core/settings.py

# SECURITY WARNING: keep the secret key used in production secret!
SECRET_KEY = os.getenv('SECRET_KEY')

# SECURITY WARNING: don't run with debug turned on in production!
DEBUG = os.getenv('DEBUG', '0').lower() in ['true', 't', '1']

ALLOWED_HOSTS = os.getenv('ALLOWED_HOSTS').split(' ')

CSRF_TRUSTED_ORIGINS = os.getenv('CSRF_TRUSTED_ORIGINS').split(' ')
Don't forget about the import at the top of the file:
import os
For local development you can now use a .env file like this one:
# .env

DEBUG=1
SECRET_KEY=complexsecret123
ALLOWED_HOSTS=localhost 127.0.0.1
CSRF_TRUSTED_ORIGINS=http://localhost:8000 http://127.0.0.1:8000
Ensure to add this file to .gitignore so you don't accidentally commit it to your VCS.
Database
Moving along, let's take care of the database.
By default, Django uses SQLite, which is fine for testing but not for production. We'll switch to PostgreSQL since it's more reliable and better suited for real-world use.
First, add the following line to your requirements.txt:
psycopg2-binary==2.9.10
To configure the database, there are two options, you can either:
- Set environmental variables for the database name, username, password, and so on.
- Use a Twelve-Factor inspired database URL that includes all the parameters.
Sevalla automatically sets both, so it's up to you to decide which one you want to use. Nevertheless, I suggest using the database URL as it is the standard for most hosting solutions.
To parse the database URL add dj-database-url to your requirements.txt:
dj-database-url==3.0.1
Next, configure DATABASES in core/settings.py like so:
# core/settings.py

import dj_database_url

DATABASES = {
    'default': dj_database_url.config(
        default=os.getenv('DB_URL', 'sqlite:///db.sqlite3'),
        conn_max_age=600,
        conn_health_checks=True,
    ),
}
This will automatically parse the DB_URL variable and configure the database.
Gunicorn
As the web server, we'll use Gunicorn -- a production-ready Python WSGI server for UNIX.
Add it to your requirements.txt:
gunicorn==23.0.0
Build Script
As mentioned in the introduction, Sevalla supports three build options: Nixpacks, Buildpacks, and Dockerfiles. We'll use Nixpacks since they're the default option.
Create a nixpacks.toml file in the project root with the following contents:
# nixpacks.toml

[start]
cmd = "python manage.py migrate && gunicorn core.wsgi:application --bind 0.0.0.0:$PORT"
This file configures the start command, which runs after the container has been built. It migrates the database and starts the Gunicorn web server.
For more information regarding Nixpacks configuration, check out the official docs.
Before moving to the next step, push all the changes to your remote repository.
Deploy
In this section, we'll set up a PostgreSQL database, deploy the Django app, take care of static/media files, and the superuser creation.
The following steps require you to have a Sevalla account. If you don't have one yet, go ahead and sign up for free!
Database
Sevalla currently supports three types of databases: PostgreSQL, MySQL, and MariaDB. We'll use PostgreSQL, as we have already configured our Django project for it.
To create a database, navigate to your Sevalla dashboard, select "Databases" in the sidebar, and then click "Create a database". Enter the following details:
- Engine: PostgreSQL
- PostgreSQL version: 17
- Database name: Leave as it is
- Database user: Leave as it is
- Database password: Leave as it is
- Name: Custom name
- Location: Location closest to you
- Resources: Plan that suits your needs
The platform will take roughly two minutes to provision your database. Once the database is ready, its status will change to "Ready".
By default, the database is only accessible to your other Sevalla resources, such as your web services and workers. If you wish to enable external access, you need to enable "Public access".
Web Service
Moving on, let's take care of the web service.
Select "Applications" in the sidebar and create an app with the following details:
- Source: Git repository
- Repository: Pick your repository
- Branch: Pick your branch
- Automatic deployment on commit: Do not check
- Name: Custom name
- Location: Location closest to you
- Resources: Plan that suits your needs
Then, click the "Create" button. We do not want to deploy just yet, because we haven't connected the application to the database or set up the environmental variables.
To link the database to the app, click "Add connection" under "Connected services".
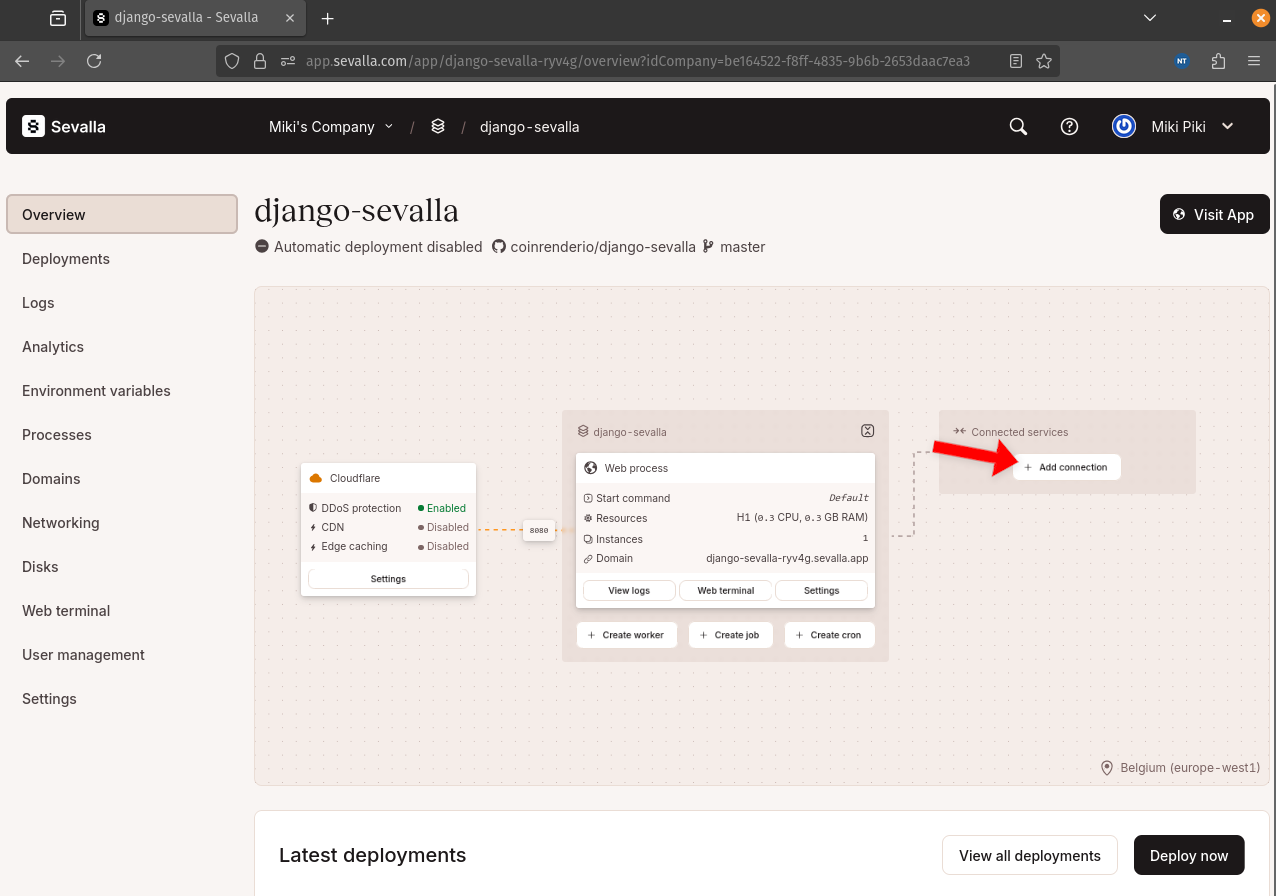
After the connection has been created, Sevalla should automatically pass the database connection parameters along with the database URL to your application.
Next, select "Environmental variables" in the sidebar, and add the following four:
+----------------------+--------------------------------------------------------------+
| Key                  | Value                                                        |
+----------------------+--------------------------------------------------------------+
| SECRET_KEY           | complexsecret123                                             |
+----------------------+--------------------------------------------------------------+
| DEBUG                | 1                                                            |
+----------------------+--------------------------------------------------------------+
| ALLOWED_HOSTS        | localhost 127.0.0.1 .sevalla.app                             |
+----------------------+--------------------------------------------------------------+
| CSRF_TRUSTED_ORIGINS | http://localhost:8000 http://127.0.0.1 https://*.sevalla.app |
+----------------------+--------------------------------------------------------------+
Ensure they're accessible during both build time and runtime.
Great, the app is now ready for deployment!
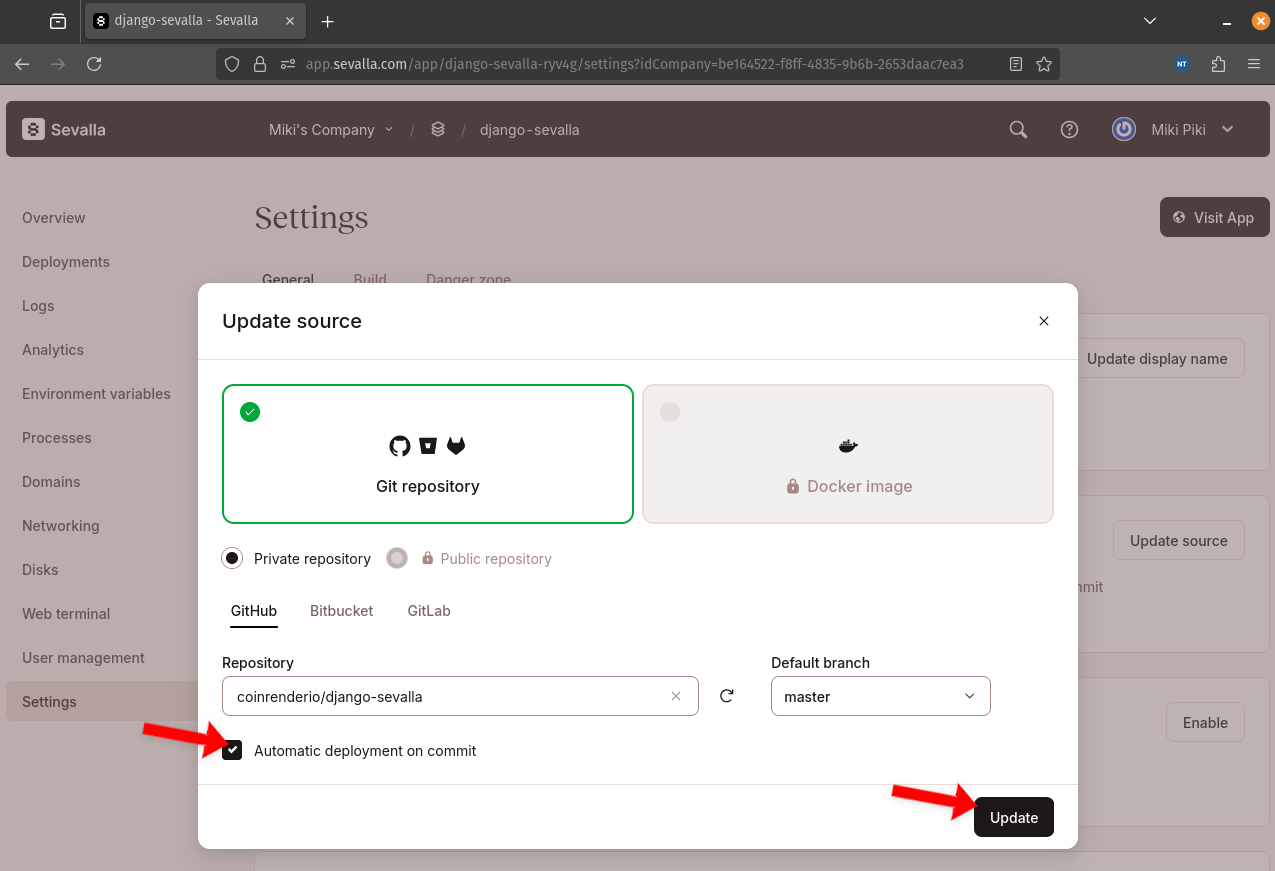
To enable automatic deployments on commit, open the sidebar, select "Settings", then "Source > Update source", and tick "Automatic deployment on commit".
Then push an empty commit to the remote to deploy your app. Alternatively, you can select "Deployments" in the sidebar and trigger a manual deployment. Once the deployment is complete, visit your app by clicking "Visit App".
Static Files
To serve static files in production we can use a package called WhiteNoise. WhiteNoise allows us to make our app a self-contained unit that can be deployed anywhere without relying on Nginx, Apache, or any other external service.
First, add the following to your requirements.txt:
whitenoise==6.9.0
Then add the WhiteNoiseMiddleware right after the SecurityMiddleware:
# core/settings.py

MIDDLEWARE = [
    'django.middleware.security.SecurityMiddleware',
    'whitenoise.middleware.WhiteNoiseMiddleware',
    # ...
]
Configure the STORAGES setting like so:
# core/settings.py

STORAGES = {
    'default': {
        'BACKEND': 'django.core.files.storage.FileSystemStorage',
    },
    'staticfiles': {
        'BACKEND': 'whitenoise.storage.CompressedManifestStaticFilesStorage',
    },
}
Lastly, ensure the static files are automatically collected by modifying nixpacks.toml:
# nixpacks.toml

[phases.build]
cmds = ["python manage.py collectstatic --noinput"]

[start]
cmd = "python manage.py migrate && gunicorn core.wsgi:application --bind 0.0.0.0:$PORT"
Voila! The static files are now automatically collected and served.
Media Files
Sevalla (as well as many other platforms) works using an ephemeral filesystem. This means that the filesystem doesn't persist between application restarts or deployments. This is problematic, especially if your app's purpose is to persist user-uploaded files.
To enable persistent storage on Sevalla, you can either use:
- Application Storage: connects your application's pod to persistent storage
- Object Storage: powered by CloudFlare R2, compatible with S3 API
For production, you should opt for the second approach as it allows you to serve media files independently of your application. That means that there is no risk of your web server running any malicious user-uploaded files or code.
Nevertheless, we'll demonstrate the first approach as it is easier to configure.
If you're curious about the second approach, check out Storing Django Static and Media Files on Amazon S3. The same approach will work for Sevalla as Sevalla's Object Storage is S3-compatible.
To set up persistent storage via application storage, select "Disks" in the sidebar, and create a new disk with the following details:
- Process: Web process
- Mount path: /app/mediafiles
- Size: Plan that suits your needs
Redeploy your app, and you're done. Your files will now persist between deployments.
Django Admin Access
In this last section, we'll create a custom Django command that creates a superuser. We'll first define the command and then add it to nixpacks.toml to run it after deployment.
Create the following directory structure within the images app:
└-- images
    └-- management
        |-- __init__.py
        └-- commands
            |-- __init__.py
            └-- createsu.py
Then put the following contents in createsu.py:
# images/management/commands/createsu.py

from django.contrib.auth.models import User
from django.core.management.base import BaseCommand


class Command(BaseCommand):
    help = 'Creates a superuser.'

    def handle(self, *args, **options):
        if not User.objects.filter(username='admin').exists():
            User.objects.create_superuser(
                username='admin',
                password='complexpassword123'
            )
        print('Superuser has been created.')
Lastly, add the command to nixpacks.toml start phase like so:
# nixpacks.toml

[phases.build]
cmds = ["python manage.py collectstatic --noinput"]

[start]
cmd = "python manage.py migrate && python manage.py createsu && gunicorn core.wsgi:application --bind 0.0.0.0:$PORT"
Push the code to the remote repository and wait for the redeployment to complete. You should then be able to log into the admin panel using the just-created superuser account.
Conclusion
In this tutorial, we've successfully deployed a Django app to Sevalla. We've set up a PostgreSQL database, created a web service, configured static and media files, and handled the creation of the superuser. You should now be able to deploy your own Django apps to Sevalla.
The final source code is available on GitHub.
What's Next?
- Look into Sevalla Object Storage for handling your static and media files. To configure Django you can follow the Storing Django Static and Media Files on Amazon S3 article.
- Move superuser credentials to environmental variables and turn off the
DEBUGmode. - Check out Sevalla docs to learn what else the platform is capable of.