 Nik Tomazic
This tutorial explains how to implement a multi-tenant web app in Django using the django-tenants and django-tenant-users packages, helping to answer:
- How to build a multi-tenant web app with Django?
- How to support multiple tenants in a Django project?
The described solution is perfect for mid-sized to large Software-as-a-Service (SaaS) projects.
Contents
Objectives
By the end of this tutorial, you'll be able to:
- Explain different multi-tenancy architecture strategies
- Transform a single-tenant Django project into a multi-tenant one
- Set up and configure django-tenants and django-tenant-users package
- Manage tenants and tenant users (provision tenants, delete tenants, assign users, etc.)
- Work with multi-tenant Django projects
Multi-tenant Approaches
Multi-tenant applications are designed to be used by multiple customers. Each customer is called a tenant and usually represents a group of users, such as an organization.
Generally speaking, there are three ways of approaching multi-tenancy:
- Isolated approach: each tenant has its own database and own app instances
- Semi-isolated approach: database and app instances are shared across tenants; limitations are put in place on the database level -- e.g., through database schemas
- Shared approach: database and app instances are shared across tenants; there are no limitations on the database level; tenancy is achieved via foreign keys
Isolated Approach
The isolated approach makes sense if you need high isolation between tenants and don't plan to onboard many of them. For most projects, this approach is overkill, as it is pretty challenging to provision and de-provision tenants. On top of that, the cost of cloud resources is typically higher compared to the alternatives.
If you choose this approach, there won't be any need to modify your Django code. Instead, most of the work will be offloaded to your infrastructure setup. Every time you onboard a tenant, you'll need to spin up a new database and app instance. Most isolated setups use virtualization or containerization.
Shared Approach
The shared approach is appropriate for smaller projects. Still, it can introduce a significant amount of complexity, requiring foreign keys on every model. You also need to ensure that you do not inadvertently leak other tenants' data.
With each model that can be owned by a tenant, you'll have to do something like this:
class Project(models.Model):
    name = models.CharField(max_length=255)
    description = models.TextField(blank=True, null=True)

    # an extra field that determines to which tenant the model instance belongs
    tenant = models.ForeignKey(to="tenants.Tenant", on_delete=models.CASCADE)
Optimally, you'll want to create an abstract model for this, e.g., TenantOwnableModel, and override model manager's get_queryset() to filter automatically based on the tenant.
For this approach, you can leverage the django-multitenant package. Alternatively, if you want to implement the tenant functionallity on your own and just avoid leaking other tenants' data there's django-scopes.
Semi-isolated Approach
Most of the time, your best bet is to adopt a semi-isolated approach, which is exactly what we do in this tutorial. This approach strikes a balance between the isolated and shared approaches. Django doesn't natively support it, but you can use packages like django-tenants and django-tenant-users to make it work.
Let's first explain how these two packages work and then move on to a hands-on tutorial.
What is django-tenants?
django-tenants is an easy-to-use package that enables Django projects to support multiple tenants. It allows you to transform any single-tenant project into a multi-tenant one without changing much code. At its core, it leverages PostgreSQL schemas.
PostgreSQL schemas are logical containers that hold database objects such as tables, views, functions, and indexes. Hierarchically, schemas are below databases, meaning a database can contain multiple schemas.
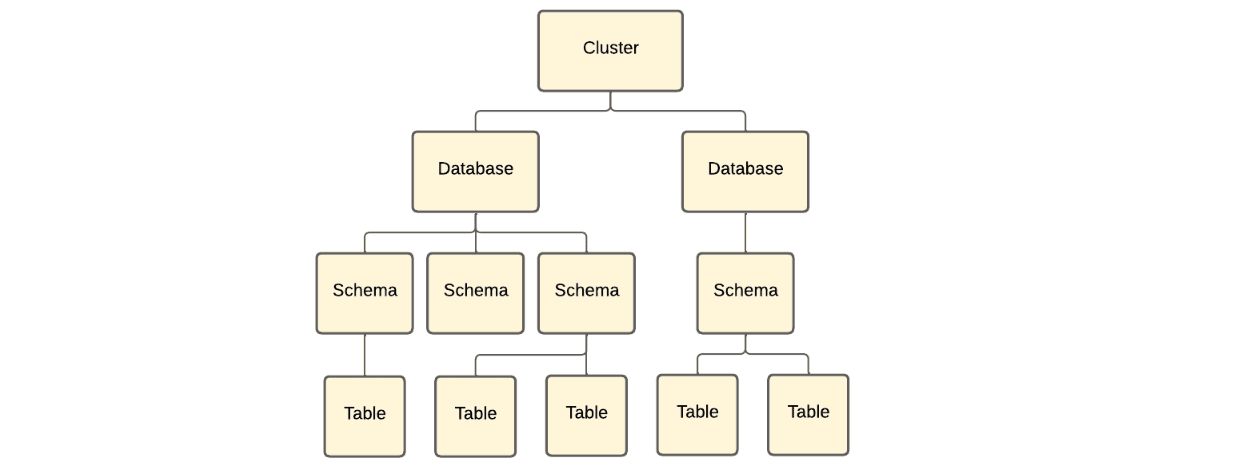
In django-tenants, each tenant is assigned its schema and a domain name (typically a subdomain). For example, demo1.duplxey.com points to schema demo1, demo2.duplxey.com points to demo2, and so on.
As the requests come in, TenantMainMiddleware checks the domain name, matches it against the tenant, and injects the tenant into the request. It also switches the active PostgreSQL schema, meaning that only the requested tenant data is returned.
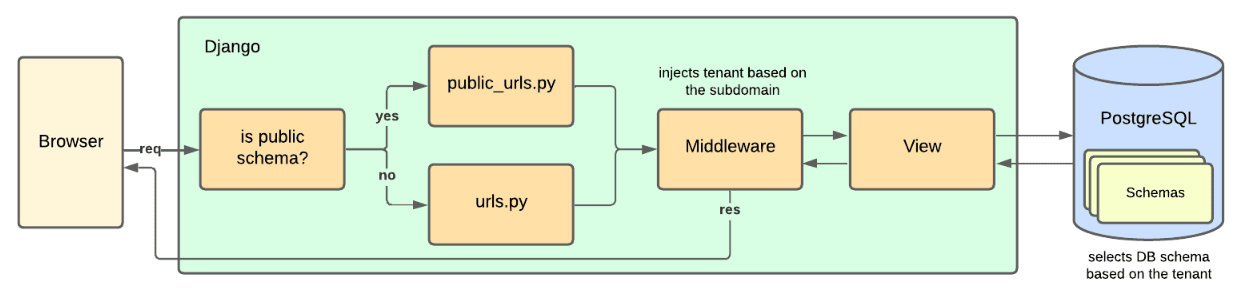
Additionally, the package provides a public schema that can be utilized for cross-tenant applications and data, such as localization, authentication, and billing systems.
What is django-tenant-users?
django-tenant-users is a package that builds on top of django-tenants. It provides multi-tenant Django projects with:
- Tenant user management
- Global authentication with tenant-specific permissions
- Distinct schema permissions
Combining both packages allows you to set up a production-ready multi-tenant project.
Project Introduction
In this tutorial, we'll be working on a project management web app similar to Jira. Each tenant will be able to create and manage their projects, as well as add tasks to them. Additionally, the web app will support a public (shared) blog for marketing purposes.
To save you some time, I've put together a sample project that we'll use as a starting point. Currently, it only supports a single tenant; however, by the end of this tutorial, we'll transform it into a multi-tenant project.
Start by cloning the base branch of the django-multi-tenant repo:
$ git clone https://github.com/duplxey/django-multi-tenant.git \
    --single-branch --branch base && cd django-multi-tenant
Next, create a new virtual environment and activate it:
$ python3 -m venv venv && source venv/bin/activate
Install the requirements:
(venv)$ pip install -r requirements.txt
Before moving onwards, please take a few minutes to briefly review the source code.
Next, use locally installed PostgreSQL or spin it up using Docker:
$ docker run --name sprinty-postgres -p 5432:5432 \
    -e POSTGRES_USER=sprinty -e POSTGRES_PASSWORD=complexpassword123 \
    -e POSTGRES_DB=sprinty -d postgres
Migrate the database:
(venv)$ python manage.py migrate
Lastly, start the development server:
(venv)$ python manage.py runserver
Your web app should be accessible at http://localhost:8000/api/. You'll notice three API routes: /api/blog/, /api/projects/, and /api/tasks/. Each of them supports basic CRUD operations.
django-tenants
In this section, we'll install and configure django-tenants.
Custom App
Before installing django-tenants, create a new Django app called tenants:
(venv)$ python manage.py startapp tenants
This app will hold our custom user and tenant-related models, which we'll create later.
Next, register it in core/settings.py:
# core/settings.py

INSTALLED_APPS = [
    # ...
    "blog.apps.BlogConfig",
    "tasks.apps.TasksConfig",
    "tenants.apps.TenantsConfig",  # new
]
Installation
Start by installing django-tenants via pip:
(venv)$ pip install django-tenants==3.7.0
Add django-tenants to the top of INSTALLED_APPS:
# core/settings.py

INSTALLED_APPS = [
    "django_tenants",  # new, must be first
    "django.contrib.admin",
    "django.contrib.auth",
    # ...
]
If you don't add the package to the top, you might run into problems later on. For example, Django admin site coloring won't work as expected.
Next, add TenantMainMiddleware to the top of the MIDDLEWARE list:
# core/settings.py

MIDDLEWARE = [
    "django_tenants.middleware.main.TenantMainMiddleware",  # new, must be first
    "django.middleware.security.SecurityMiddleware",
    "django.contrib.sessions.middleware.SessionMiddleware",
    # ...
]
This middleware ensures that the proper database schema is selected based on the request host. Additionally, it injects the tenant instance into the request, so you can access it directly in your views.
Switch the database engine and set the DATABASE_ROUTERS setting:
# core/settings.py

DATABASES = {
    "default": {
        "ENGINE": "django_tenants.postgresql_backend",  # changed
        "NAME": "sprinty",
        "USER": "sprinty",
        "PASSWORD": "complexpassword123",
        "HOST": "localhost",
        "PORT": "5432",
    }
}

# new
DATABASE_ROUTERS = [
    "django_tenants.routers.TenantSyncRouter",
]
Later, when we split our INSTALLED_APPS into TENANT_APPS and SHARED_APPS, this router will ensure that the public and tenant-only apps are synced correctly to the database.
Lastly, define BASE_DOMAIN and PUBLIC_SCHEMA_NAME setting:
# core/settings.py

BASE_DOMAIN = "localhost"
PUBLIC_SCHEMA_NAME = "public"
Notes:
BASE_DOMAINis a custom setting, which we'll use to populate the DB.PUBLIC_SCHEMA_NAMEdefines the name of the public/shared PostgreSQL schema.
User, Tenant, and Domain
Moving along, let's define custom tenant-related models:
# tenants/models.py

from django.contrib.auth.models import AbstractUser
from django.db import models
from django_tenants.models import TenantMixin, DomainMixin

from core.models import TimeStampedModel


class User(AbstractUser):
    pass


class Tenant(TenantMixin, TimeStampedModel):
    name = models.CharField(max_length=100)


class Domain(DomainMixin, TimeStampedModel):
    pass
Notes:
Useris a custom user model that inherits from Django's AbstractUser. Defining a custom user is not mandatory. Still, it is a good idea since most multi-tenant Django projects require user model modifications.Tenantmust inherit from TenantMixin, which provides tenant management methods.Domainmust inherit from DomainMixin. This model will be in a1:1relationship to your tenant model. It'll provide tenants with their domain names.
Register them in tenants/admin.py like so:
# tenants/admin.py

from django.contrib import admin
from django_tenants.admin import TenantAdminMixin

from tenants.models import Tenant, Domain, User


class TenantAdmin(TenantAdminMixin, admin.ModelAdmin):
    list_display = ["schema_name", "name", "created_at", "updated_at"]


class DomainAdmin(admin.ModelAdmin):
    list_display = ["domain", "tenant", "is_primary", "created_at", "updated_at"]


class UserAdmin(admin.ModelAdmin):
    list_display = ["id", "email", "is_active"]
    list_display_links = ["id", "email"]
    search_fields = ["email"]
    fieldsets = [
        (
            None,
            {
                "fields": [
                    "email",
                    "password",
                ],
            },
        ),
        (
            "Administrative",
            {
                "fields": [
                    "tenants",
                    "last_login",
                    "is_active",
                    "is_verified",
                ],
            },
        ),
    ]


admin.site.register(Tenant, TenantAdmin)
admin.site.register(Domain, DomainAdmin)
admin.site.register(User, UserAdmin)
Lastly, provide the paths to the just-created models in core/settings.py:
# core/settings.py

AUTH_USER_MODEL = "tenants.User"
TENANT_MODEL = "tenants.Tenant"
TENANT_DOMAIN_MODEL = "tenants.Domain"
Shared and Tenant Apps
django-tenants provides two app-related settings:
SHARED_APPSis a list of apps shared across all tenants. Their SQL tables are created in thepublicschema.TENANT_APPSis a list of apps isolated per tenant. Their SQL tables are created in each tenant’s schema (e.g.demo1,demo2).
Let's split the INSTALLED_APPS accordingly:
# core/settings.py

SHARED_APPS = [
    "django_tenants",
    "django.contrib.admin",
    "django.contrib.auth",
    "django.contrib.contenttypes",
    "django.contrib.sessions",
    "django.contrib.messages",
    "django.contrib.staticfiles",
    "rest_framework",
    "django_filters",
    "tenants.apps.TenantsConfig",
    "blog.apps.BlogConfig",
]

TENANT_APPS = [
    "tasks.apps.TasksConfig",
]

INSTALLED_APPS = list(SHARED_APPS) + [
    app for app in TENANT_APPS if app not in SHARED_APPS
]
With the configuration above, we're specifying that all apps except tasks should be synced to the public schema. This means that the blog data will be shared across tenants, while tasks will remain isolated within each tenant.
Public and Tenant URLs
Currently, we're using the same urls.py file for both public and tenant schemas.
This isn't good because the tasks app is no longer registered on the public schema, meaning that we'll run into errors when hitting, for example, http://localhost:8000/api/tasks/.
# core/urls.py

# ...
from blog.views import ArticleViewSet
from core.views import index_view
from tasks.views import ProjectViewSet, TaskViewSet

router = DefaultRouter()
router.register("blog", ArticleViewSet)
router.register("projects", ProjectViewSet)
router.register("tasks", TaskViewSet)  # <- this line will fail, because
                                       #    `tasks` DB tables aren't created
                                       #    on the `public` schema
# ...
To fix this, we can separate public URLs from tenant URLs.
Create a file named urls_public.py within the core app:
# core/urls_public.py

"""
URLs for the 'public' schema.
"""

from django.contrib import admin
from django.urls import include, path
from rest_framework.routers import DefaultRouter

from blog.views import ArticleViewSet
from core.views import index_view

router = DefaultRouter()
router.register("blog", ArticleViewSet)

urlpatterns = [
    path("", index_view, name="index"),
    path("api/", include(router.urls)),
    path("admin/", admin.site.urls),
]
Then register the public URL config, right below ROOT_URLCONF:
# core/settings.py

ROOT_URLCONF = "core.urls"
PUBLIC_SCHEMA_URLCONF = "core.urls_public"
Provision Tenants
There are multiple ways to provision tenants:
- Using the django-tenants management commands.
- Using Django shell and running custom code.
- Via a custom populate_db.py command.
If you need to create one tenant, the first two options are usually the best approach. However, since we want to create multiple tenants, we'll create a populate command.
Let's create three tenants: public (a public one), demo1, and demo2.
First, create the following directory structure within your tenants app:
tenants/
├── data/
│   └── tenants.json
├── management/
│   ├── __init__.py
│   └── commands/
│       ├── __init__.py
│       └── populate_db.py
└── ...
Put the following contents in tenants.json:
// tenants/data/tenants.json

[
  {
    "id": 1,
    "name": "Public Tenant",
    "schema_name": "public",
    "subdomain": "",
    "owner": {
      "username": "admin@localhost",
      "email": "admin@localhost",
      "password": "password"
    }
  },
  {
    "id": 2,
    "name": "Demo1 Tenant",
    "schema_name": "demo1",
    "subdomain": "demo1",
    "owner": {
      "username": "[email protected]",
      "email": "[email protected]",
      "password": "password"
    }
  },
  {
    "id": 3,
    "name": "Demo2 Tenant",
    "schema_name": "demo2",
    "subdomain": "demo2",
    "owner": {
      "username": "[email protected]",
      "email": "[email protected]",
      "password": "password"
    }
  }
]
Then, add the following to populate_db.py:
# tenants/management/commands/populate_db.py

import json

from psycopg2 import connect, sql
from django.core.management import BaseCommand, call_command

from core import settings
from tenants.models import Tenant, Domain, User


class Command(BaseCommand):
    help = "Creates a public tenant and two demo tenants"
    tenants_data_file = "tenants/data/tenants.json"

    def __init__(self, stdout=None, stderr=None, no_color=False, force_color=False):
        super().__init__(stdout, stderr, no_color, force_color)

        # Load the tenant data from JSON
        self.tenants_data = []
        with open(self.tenants_data_file, "r") as file:
            self.tenants_data = json.load(file)

    def handle(self, *args, **kwargs):
        self.drop_and_recreate_db()

        call_command("migrate")
        self.create_tenants()

        self.stdout.write(
            self.style.SUCCESS("Yay, database has been populated successfully.")
        )

    def drop_and_recreate_db(self):
        db = settings.DATABASES["default"]
        db_name = db["NAME"]

        # Create a connection to the database
        conn = connect(
            dbname="postgres",
            user=db["USER"],
            password=db["PASSWORD"],
            host=db["HOST"],
            port=db["PORT"],
        )
        conn.autocommit = True
        cur = conn.cursor()

        # Terminate all connections to the database except the current one
        cur.execute(
            """
            SELECT pg_terminate_backend(pid)
            FROM pg_stat_activity
            WHERE datname = %s
              AND pid <> pg_backend_pid();
            """,
            [db_name],
        )

        # Drop the database if it exists and create a new one
        cur.execute(
            sql.SQL("DROP DATABASE IF EXISTS {}").format(sql.Identifier(db_name))
        )
        cur.execute(
            sql.SQL("CREATE DATABASE {}").format(sql.Identifier(db_name))
        )

        cur.close()
        conn.close()

    def create_tenants(self):
        for tenant_data in self.tenants_data:
            # Create the tenant
            tenant = Tenant(
                id=tenant_data["id"],
                name=tenant_data["name"],
                schema_name=tenant_data["schema_name"],
            )
            tenant.save()

            # Build the full domain name
            domain_str = settings.BASE_DOMAIN
            if tenant_data["subdomain"]:
                domain_str = f"{tenant_data['subdomain']}.{settings.BASE_DOMAIN}"

            # Create the domain
            domain = Domain(
                domain=domain_str,
                is_primary=tenant_data["schema_name"] == settings.PUBLIC_SCHEMA_NAME,
                tenant=tenant,
            )
            domain.save()

            # Create the tenant owner
            tenant_owner = User.objects.create_superuser(
                username=tenant_data["owner"]["username"],
                email=tenant_data["owner"]["email"],
                password=tenant_data["owner"]["password"],
            )
Notes:
- This command first loads the tenants.json data.
- It then drops, recreates, and migrates the database.
- After that, it creates a
Tenantand aDomaininstance for each of the tenants. - Finally, it creates a "tenant owner" for each tenant.
Lastly, make migrations and populate the database:
(venv)$ python manage.py makemigrations
(venv)$ python manage.py populate_db
Whew, we've successfully installed and configured django-tenants.
Usage
We created three tenants, each at their subdomain:
publicat localhost:8000demo1at demo1.localhost:8000demo2at demo2.localhost:8000
Additionally, each tenant comes with a superuser account.
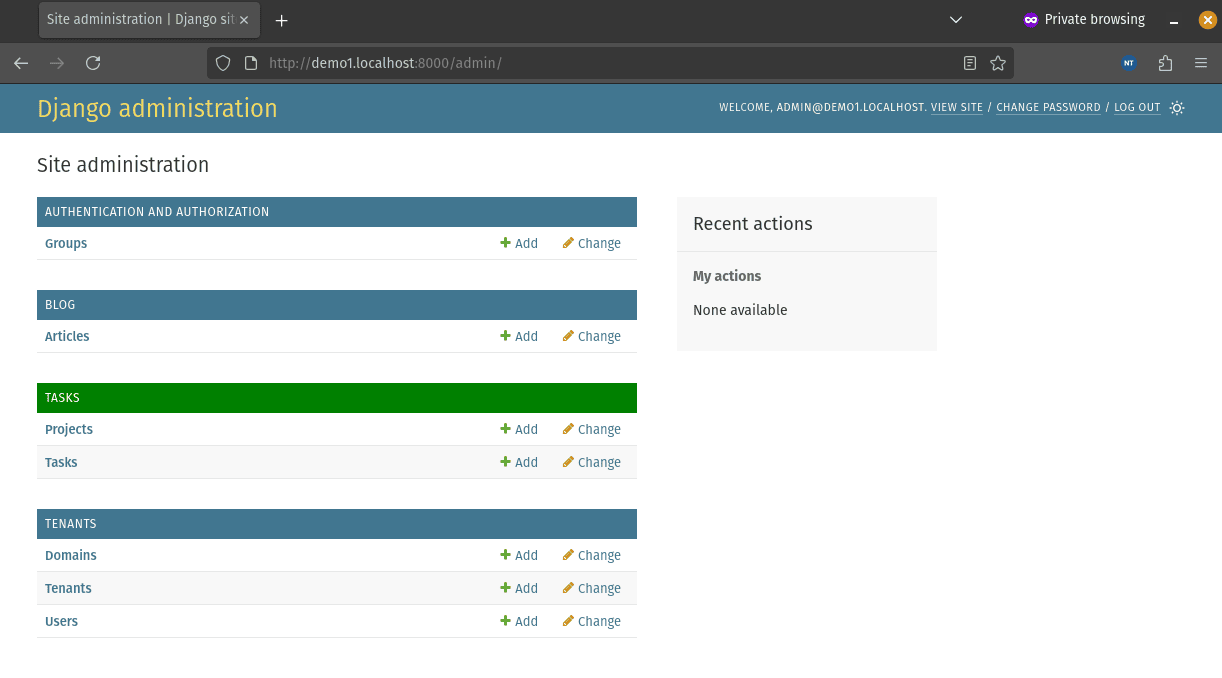
Go ahead and log into http://demo1.localhost:8000/admin using the following credentials:
user: admin@demo1.localhost
pass: password
To log into other tenants, modify the URL and username accordingly.
You'll notice that the Django apps are now colored. Blue is used for the public/shared apps, while green is used for tenant-only apps.
Create a few articles, a project or two, and add a few tasks.
If you hit the following URLs, you'll notice that the articles are shared across tenants:
- http://localhost:8000/api/blog/
- http://demo1.localhost:8000/api/blog/
- http://demo2.localhost:8000/api/blog/
On the contrary, the projects and tasks are isolated on the tenant level:
Since we defined a PUBLIC_SCHEMA_URLCONF the following URL should result in a 404:
django-tenant-users
As mentioned before, django-tenants doesn't provide user management. There's no way to add or remove users from tenants, restrict tenant access, or manage tenant permissions.
In this section, we'll install django-tenant-users to solve those issues.
Installation
Start by installing it via pip:
(venv)$ pip install django-tenant-users==2.1.1
Next, modify your SHARED_APPS and TENANT_APPS like so:
# core/settings.py

SHARED_APPS = [
    "django_tenants",
    "django.contrib.admin",
    "django.contrib.auth",
    "django.contrib.contenttypes",
    "django.contrib.sessions",
    "django.contrib.messages",
    "django.contrib.staticfiles",
    "rest_framework",
    "django_filters",
    "tenants.apps.TenantsConfig",
    "blog.apps.BlogConfig",
    "tenant_users.permissions",  # new
    "tenant_users.tenants",  # new
]

TENANT_APPS = [
    "django.contrib.auth",  # new
    "django.contrib.contenttypes",  # new
    "tenant_users.permissions",  # new
    "tasks.apps.TasksConfig",
]
Note that
tenant_users.permissionshas to be added to both shared and tenant apps, as permissions are handled on the schema level.
Next, add the TenantAccessMiddleware right after the AuthenticationMiddleware:
# core/settings.py

MIDDLEWARE = [
    # ...
    "django.contrib.auth.middleware.AuthenticationMiddleware",
    "tenant_users.tenants.middleware.TenantAccessMiddleware",  # must be right here
    # ...
]
This middleware ensures that the authenticated user has access to the tenant specified in the request. If the user doesn't have access to the tenant, a 404 error is raised.
Lastly, set the following two settings in core/settings.py:
# core/settings.py

TENANT_USERS_DOMAIN = BASE_DOMAIN

AUTHENTICATION_BACKENDS = [
    "tenant_users.permissions.backend.UserBackend",
]
Notes:
TENANT_USERS_DOMAINdefines from which domain the users should be provisioned. This should match the domain of the public tenant.AUTHENTICATION_BACKENDSsets a custom authentication backend that works well with tenant-level groups and permissions.
User, Tenant, and Domain
Moving along, we have to slightly modify the User and Tenant models:
# tenants/models.py

class User(UserProfile):
    pass


class Tenant(TenantBase, TimeStampedModel):
    name = models.CharField(max_length=100)

# ...
Notes:
User- instead of inheriting fromAbstractUserwe have to inherit fromUserProfile.Tenant- instead of using theTenantMixin, we have to useTenantBase.
Don't forget about the import:
from tenant_users.tenants.models import TenantBase, UserProfile
Since we've swapped out the default Django user model, we have to recreate the migrations. Delete the tenants/migrations folder and then run makemigrations:
(venv)$ rm -rf tenants/migrations/0001_initial.py
(venv)$ python manage.py makemigrations
Provision Tenants
Lastly, we have to slightly modify the populate_db command to align with the new models:
# tenants/management/commands/populate_db.py

import json

from psycopg2 import connect, sql
from django.core.management import BaseCommand, call_command
from tenant_users.tenants.tasks import provision_tenant
from tenant_users.tenants.utils import create_public_tenant

from core import settings
from tenants.models import User


class Command(BaseCommand):
    help = "Creates a public tenant and two demo tenants"
    tenants_data_file = "tenants/data/tenants.json"

    root_user = None
    public_tenant = None

    def __init__(self, stdout=None, stderr=None, no_color=False, force_color=False):
        super().__init__(stdout, stderr, no_color, force_color)

        # Load the tenant data from the JSON file
        self.tenants_data = []
        with open(self.tenants_data_file, "r") as file:
            self.tenants_data = json.load(file)

    def handle(self, *args, **kwargs):
        self.drop_and_recreate_db()
        call_command("migrate_schemas", "--shared", "--noinput")
        self.stdout.write(
            self.style.SUCCESS("Database recreated & migrated successfully.")
        )

        self.create_public_tenant()
        self.create_private_tenants()

        self.stdout.write(
            self.style.SUCCESS("Yay, database has been populated successfully.")
        )

    def drop_and_recreate_db(self):
        db = settings.DATABASES["default"]
        db_name = db["NAME"]

        # Create a connection to the database
        conn = connect(
            dbname="postgres",
            user=db["USER"],
            password=db["PASSWORD"],
            host=db["HOST"],
            port=db["PORT"],
        )
        conn.autocommit = True
        cur = conn.cursor()

        # Terminate all connections to the database except the current one
        cur.execute(
            """
            SELECT pg_terminate_backend(pid)
            FROM pg_stat_activity
            WHERE datname = %s
              AND pid <> pg_backend_pid();
            """,
            [db_name],
        )

        # Drop the database if it exists and create a new one
        cur.execute(sql.SQL("DROP DATABASE IF EXISTS {}").format(sql.Identifier(db_name)))
        cur.execute(sql.SQL("CREATE DATABASE {}").format(sql.Identifier(db_name)))

        cur.close()
        conn.close()

    def create_public_tenant(self):
        self.stdout.write(f"Creating the public tenant...")
        public_tenant_data = self.tenants_data[0]

        # Create the public tenant and the root user
        public_tenant, public_tenant_domain, root_user = create_public_tenant(
            domain_url=settings.BASE_DOMAIN,
            tenant_extra_data={"slug": public_tenant_data["subdomain"]},
            owner_email=public_tenant_data["owner"]["email"],
            is_superuser=True,
            is_staff=True,
            **{
                "password": public_tenant_data["owner"]["password"],
                "is_verified": True,
            },
        )
        self.public_tenant = public_tenant
        self.root_user = root_user

        self.stdout.write(
            self.style.SUCCESS(
                f"Public tenant ('{public_tenant.schema_name}') has been successfully created."
            )
        )

    def create_private_tenants(self):
        private_tenant_data = self.tenants_data[1:]

        for tenant_data in private_tenant_data:
            self.stdout.write(f"Creating tenant {tenant_data['schema_name']}...")

            # Create the tenant owner
            tenant_owner = User.objects.create_user(
                email=tenant_data["owner"]["email"],
                password=tenant_data["owner"]["password"],
            )
            tenant_owner.is_verified = True
            tenant_owner.save()

            # Create the tenant
            tenant, domain = provision_tenant(
                tenant_name=tenant_data["name"],
                tenant_slug=tenant_data["subdomain"],
                schema_name=tenant_data["schema_name"],
                owner=tenant_owner,
                is_superuser=True,
                is_staff=True,
            )

            # Add the root user to the tenant
            tenant.add_user(
                self.root_user,
                is_superuser=True,
                is_staff=True,
            )

            self.stdout.write(
                self.style.SUCCESS(
                    f"Tenant '{tenant.schema_name}' has been successfully created."
                )
            )
Notes:
- The command recreates and migrates the database the same as before.
- Instead of creating tenants using the
ObjectManagerdirectly we're now using specialized commands, e.g.create_public_tenant()andprovision_tenant(). - When creating tenants we have to provide the tenant
owner. - To add users to the tenants we're using the
add_user()method.
Lastly, run the command:
(venv)$ python manage.py populate_db
Django Admin Fixes
At the time of writing, there are a few problems when using Django admin to manage tenants and users. Specifically:
- Deleting
TenantandUserinstances raises an exception UserAdmindoes not hash the password correctly (it saves it in plain text)UserTenantPermissionsdoesn't automatically reflect the changes when adding or removing a user from a tenant
If you do not plan to manage tenants and users through Django admin, feel free to skip this section. However, I still think you should at least fix number two.
Tenant and User Deletion
By default, django-tenants prevents you from deleting tenants and users. This helps avoid mistakes. However, it can be frustrating when you actually need to delete a tenant or a user.
To bypass the restriction, add the following delete_model() methods to admin.py classes:
# tenants/admin.py

class TenantAdmin(TenantAdminMixin, admin.ModelAdmin):
    # ...

    def delete_model(self, request, obj):
        # Force delete the tenant
        obj.delete(force_drop=True)


class UserAdmin(admin.ModelAdmin):
    # ...

    def delete_model(self, request, obj):
        # Cancel the delete if the user owns any tenant
        if obj.id in Tenant.objects.values_list("owner_id", flat=True):
            raise ValidationError("You cannot delete a user that is a tenant owner.")

        # Cancel the delete if the user still belongs to any tenant
        if obj.tenants.count() > 0:
            raise ValidationError("Cannot delete a tenant owner.")

        # Otherwise, delete the user
        obj.delete(force_drop=True)
Don't forget about the import:
from django.core.exceptions import ValidationError
You should now be able to delete tenants and users via Django admin.
User Password Hashing
Since we're using a custom user model and a custom admin, the password hashing no longer works. Every time you create or update a user, the password gets stored in plain text.
Let's reenable hashing and enforce password strength validation.
Create forms.py in the tenants app with the following UserAdminForm:
# tenants/forms.py

from django import forms
from django.contrib.auth import password_validation
from django.contrib.auth.hashers import make_password
from tenants.models import User


class UserAdminForm(forms.ModelForm):
    class Meta:
        model = User
        fields = "__all__"

    def clean_password(self):
        password = self.cleaned_data.get("password")

        # Run the password validators
        try:
            password_validation.validate_password(password=password, user=self.instance)
        except forms.ValidationError as e:
            raise forms.ValidationError(e.messages)

        # Hash the password only if it isn't hashed yet
        if password and not password.startswith("pbkdf2_"):
            return make_password(password)

        return password
Next, set UserAdmin's form:
# tenants/admin.py

class UserAdmin(admin.ModelAdmin):
    form = UserAdminForm
    # ...
Don't forget about the import:
from tenants.forms import UserAdminForm
The user password should now be automatically hashed on save.
Automatic Tenant Permissions
Finally, let's ensure UserTenantPermissions are automatically created or removed every time a user is assigned or removed from a tenant using Django admin.
I'm referring to the tenants field in particular:
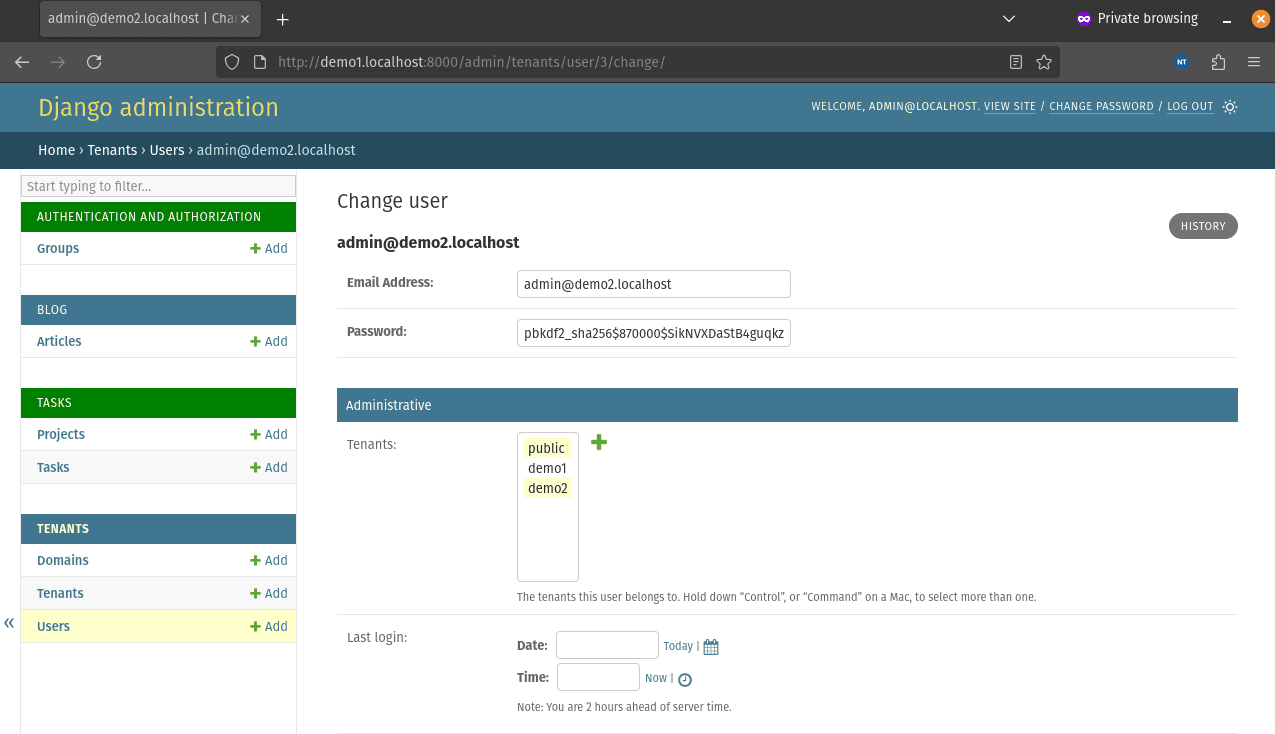
Create signals.py in the tenants app like so:
# tenants/signals.py

from django.db.models.signals import m2m_changed
from django.dispatch import receiver
from django_tenants.utils import schema_context
from tenant_users.permissions.models import UserTenantPermissions

from tenants.models import User


@receiver(m2m_changed, sender=User.tenants.through)
def on_tenant_user_tenants_changed(
    sender, instance, action, reverse, model, pk_set, **kwargs
):
    # Automatically create 'UserTenantPermissions' when user is added to a tenant
    if action == "post_add":
        for tenant_id in pk_set:
            tenant = model.objects.get(pk=tenant_id)
            with schema_context(tenant.schema_name):
                UserTenantPermissions.objects.get_or_create(profile=instance)

    # Automatically delete 'UserTenantPermissions' when user is removed from a tenant
    if action == "post_remove":
        for tenant_id in pk_set:
            tenant = model.objects.get(pk=tenant_id)
            with schema_context(tenant.schema_name):
                UserTenantPermissions.objects.filter(profile=instance).delete()
Lastly, import the signals in apps.py like so:
# tenants/apps.py

from django.apps import AppConfig

class TenantsConfig(AppConfig):
    default_auto_field = "django.db.models.BigAutoField"
    name = "tenants"

    def ready(self):
        from tenants import signals
The tenants field changes should now be reflected in the database.
Conclusion
In this tutorial, we've looked at different approaches to multi-tenancy. The recommended approach for most Django projects is the semi-isolated approach, which can be achieved using the django-tenants and django-tenant-users package.
The source code is available on GitHub.
If you have any questions or problems, feel free to hit me up.