In this tutorial, we'll integrate Django with Coinbase Commerce to accept different crypto payments. We'll look at two different approaches: Coinbase Charges and Coinbase Checkout.
Contents
What is Coinbase Commerce?
Coinbase Commerce is an enterprise digital payment service offered by Coinbase, which allows merchants to accept crypto payments in different digital currencies. At the time of writing, they support Bitcoin, Bitcoin Cash, DAI, Ethereum, Litecoin, Dogecoin, and USD Coin. Coinbase Commerce is easy to integrate into your web application and removes the hassle of dealing with crypto payments.
Coinbase and Coinbase Commerce are not the same thing. Coinbase is a crypto exchange and a wallet manager, while Coinbase Commerce is a digital payment service provider for merchants.
The Coinbase Commerce API provides two different ways of accepting crypto payments: Coinbase Charges and Coinbase Checkout.
Advantages of Coinbase Charges:
- highly customizable
- ability to programmatically attach metadata
Advantages of Coinbase Checkout:
- works out of the box
- dashboard product management
- embedded checkout
For most applications, we recommend the Charges API since it can be customized. This outweighs the simplicity that the Checkout API offers. If you're selling a fixed product and customization doesn't play a big role, feel free to use the Checkout API.
Project Setup
In this tutorial, we'll show how to get both approaches, Coinbase Charges and Coinbase Checkout, up and running. We'll start with the same project setup for each. Once set up, feel free to follow one or both approaches.
Django Project Setup
Start by creating a new directory and setting up a new Django project:
$ mkdir django-coinbase && cd django-coinbase
$ python3.9 -m venv env
$ source env/bin/activate

(env)$ pip install django==3.2.8
(env)$ django-admin startproject core .
After that, create a new app called payments:
(env)$ python manage.py startapp payments
Register the app in core/settings.py under INSTALLED_APPS:
# core/settings.py

INSTALLED_APPS = [
    'django.contrib.admin',
    'django.contrib.auth',
    'django.contrib.contenttypes',
    'django.contrib.sessions',
    'django.contrib.messages',
    'django.contrib.staticfiles',
    'payments.apps.PaymentsConfig', # new
]
Add a simple functional view called home_view to payments/views.py:
# payments/views.py

from django.shortcuts import render

def home_view(request):
    return render(request, 'home.html', {})
Create a urls.py file inside the payments app:
# payments/urls.py

from django.urls import path

from . import views

urlpatterns = [
    path('', views.home_view, name='payments-home'),
]
Update the project-level URLs file with the payments app:
# core/urls.py

from django.contrib import admin
from django.urls import path, include

urlpatterns = [
    path('', include('payments.urls')), # new
    path('admin/', admin.site.urls),
]
Create a dedicated "templates" folder and a file for the homepage:
(env)$ mkdir templates
(env)$ touch templates/home.html
Then, add the following HTML to templates/home.html:
<!-- templates/home.html -->

<!DOCTYPE html>
<html lang="en">
  <head>
    <meta charset="utf-8">
    <meta name="viewport" content="width=device-width, initial-scale=1">
    <title>Django + Coinbase</title>
    <link rel="stylesheet" href="https://cdn.jsdelivr.net/npm/[email protected]/dist/css/bootstrap.min.css" crossorigin="anonymous">
    <script src="https://cdn.jsdelivr.net/npm/[email protected]/dist/js/bootstrap.min.js" crossorigin="anonymous"></script>
  </head>
  <body>
    <div class="container mt-5">
      <a class="btn btn-primary" href="#">Purchase</a>
    </div>
  </body>
</html>
Make sure to update the settings.py file so Django knows to look for a "templates" folder:
# core/settings.py

TEMPLATES = [
    {
        'BACKEND': 'django.template.backends.django.DjangoTemplates',
        'DIRS': ['templates'], # new
        ...
Finally run migrate to sync the database and runserver to start Django's local web server:
(env)$ python manage.py migrate
(env)$ python manage.py runserver
That's it! Open http://localhost:8000/ in your favorite browser. You should see the homepage:

Add Coinbase Commerce
Next, install coinbase-commerce:
(env)$ pip install coinbase-commerce==1.0.1
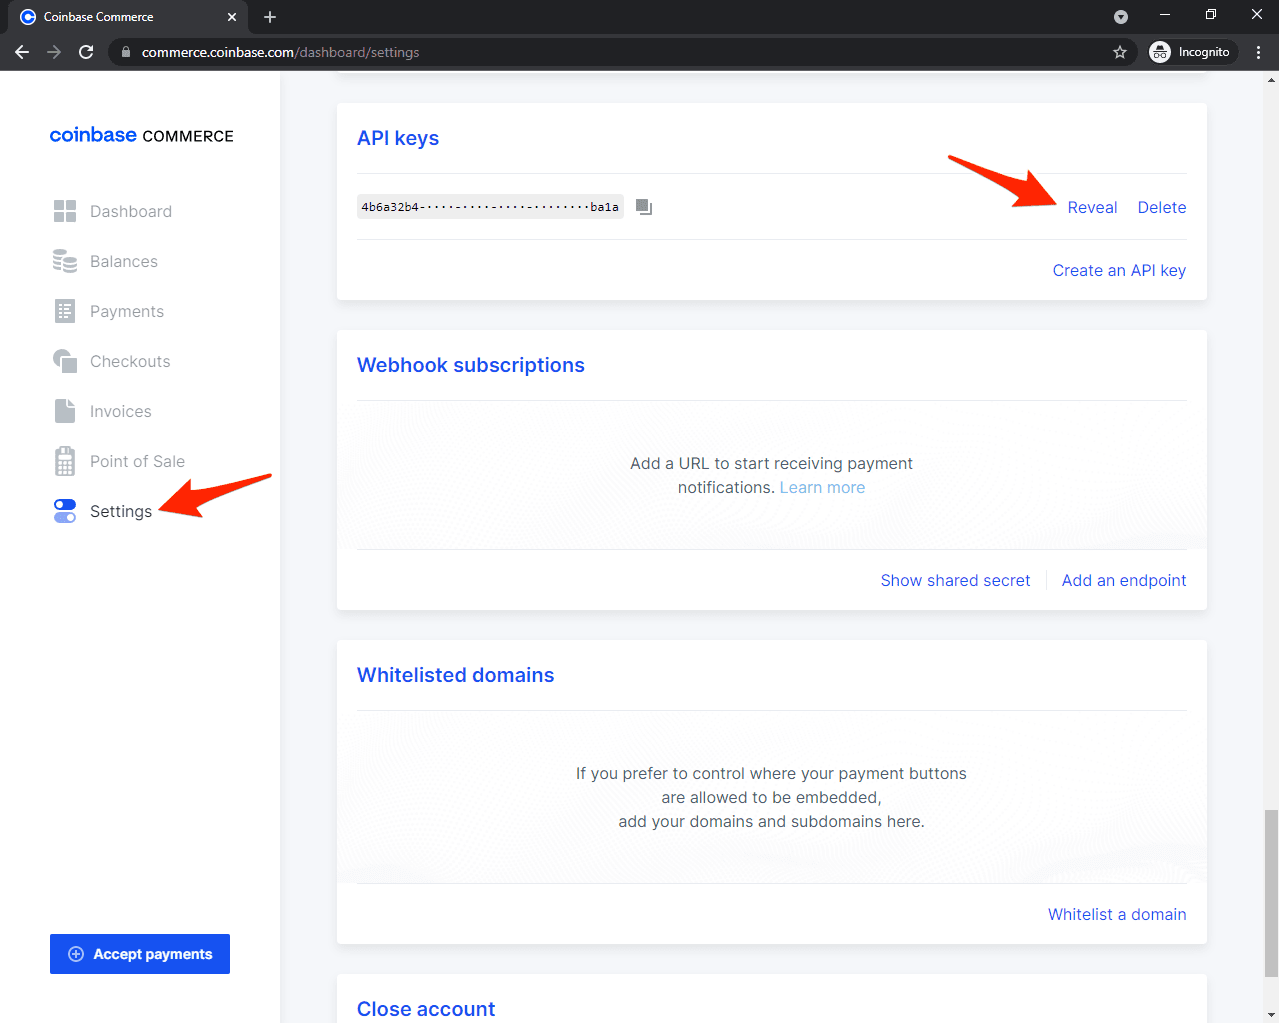
In order to work with the Coinbase Commerce API, you'll need to create an account (if you haven't already). After you've created an account, log in and navigate to your settings. Scroll down to the "API keys" section, click "Create an API key" and then "Reveal". Copy the API key to your clipboard.
Then add the key to the settings.py file:
# core/settings.py

COINBASE_COMMERCE_API_KEY = '<your coinbase api key here>'
Before moving to the next step, let's test if we can retrieve data from the API. Enter the Python shell using the following command:
(env)$ python manage.py shell
Import the following:
>>> from core import settings
>>> from coinbase_commerce.client import Client
Initialize a new client and list the charges:
>>> client = Client(api_key=settings.COINBASE_COMMERCE_API_KEY)
>>> for charge in client.charge.list_paging_iter():
...     print("{!r}".format(charge))
If everything works, client.charge.list_paging_iter() should be an empty list. As long as you don't see the following error you can assume all is well:
coinbase_commerce.error.AuthenticationError: Request id 10780b77-1021-4b09-b53b-a590ea044380: No such API key.
Useful pages for working with the Coinbase API:
With that, decide which approach you'd like to take, Coinbase Charges or Coinbase Checkout.
Coinbase Charges
This part of the tutorial shows how to accept payments using the Coinbase Charges API.
Coinbase Charges is the most customizable approach for collecting crypto payments. With this approach, you have full control over the charges.
Workflow:
- Use a client to connect to the Coinbase Commerce API
- Create a charge (from JSON)
- Fetch the newly created charge and pass it to the template
- Redirect the user to the Coinbase Commerce hosted site
- (Optional) Verify the charge using webhooks
Create a Charge
To request a cryptocurrency payment, you create a charge. Since cryptocurrency payments are push payments, a charge will expire after a waiting period if no payment has been detected. Charges are identified by a unique 8 character code.
Update home_view to create a charge:
# payments/views.py

from coinbase_commerce.client import Client
from django.shortcuts import render

from core import settings


def home_view(request):
    client = Client(api_key=settings.COINBASE_COMMERCE_API_KEY)
    domain_url = 'http://localhost:8000/'
    product = {
        'name': 'Coffee',
        'description': 'A really good local coffee.',
        'local_price': {
            'amount': '5.00',
            'currency': 'USD'
        },
        'pricing_type': 'fixed_price',
        'redirect_url': domain_url + 'success/',
        'cancel_url': domain_url + 'cancel/',
    }
    charge = client.charge.create(**product)

    return render(request, 'home.html', {
        'charge': charge,
    })
We first initialized the client by passing COINBASE_COMMERCE_API_KEY to it. Then, we created a JSON object which represents our product (we provided the name, description, etc.). We also passed redirect_url and cancel_url to the charge, which we'll implement here shortly. We then unpacked the JSON object and used the client to create a charge. Finally, we passed it to the home template as context.
We can now access charge information in templates/home.html. Update the template like so:
<!-- templates/home.html -->

<!DOCTYPE html>
<html lang="en">
  <head>
    <meta charset="utf-8">
    <meta name="viewport" content="width=device-width, initial-scale=1">
    <title>Django + Coinbase Charge</title>
    <link rel="stylesheet" href="https://cdn.jsdelivr.net/npm/[email protected]/dist/css/bootstrap.min.css" crossorigin="anonymous">
    <script src="https://cdn.jsdelivr.net/npm/[email protected]/dist/js/bootstrap.min.js" crossorigin="anonymous"></script>
  </head>
  <body>
    <div class="container mt-5">
      <div class="card w-25">
        <div class="card-body">
          <h5 class="card-title">{{ charge.name }}</h5>
          <p class="card-text">
            <span>{{ charge.description }}</span>
            <br>
            <span>${{ charge.pricing.local.amount }} {{ charge.pricing.local.currency }}</span>
          </p>
          <div>
            <a class="btn btn-primary w-100" href="{{ charge.hosted_url }}">Purchase</a>
          </div>
        </div>
      </div>
    </div>
  </body>
</html>
Refer to the Charge API documentation for all the charge-related info that you can display on the template.
Run the development server:
(env)$ python manage.py runserver
http://localhost:8000/ should now look like this:
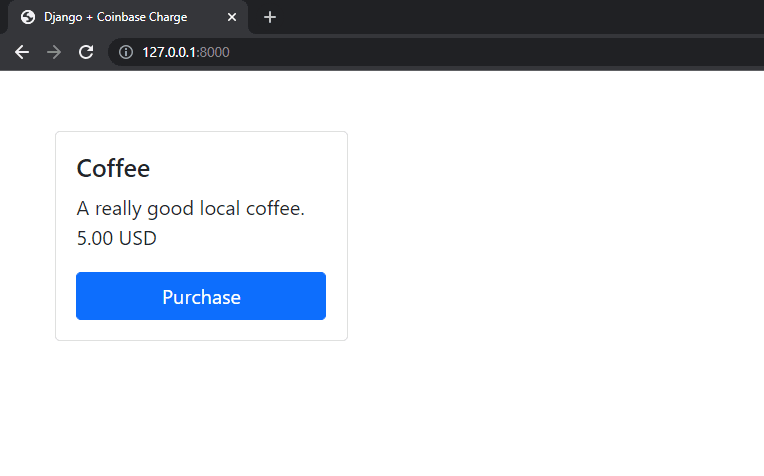
Don't test it out yet. We'll do that shortly.
Create the Redirect Views
Let's implement the views for redirect_url and cancel_url that we passed to the charge.
Create two new views inside payments/views.py:
# payments/views.py

def success_view(request):
    return render(request, 'success.html', {})


def cancel_view(request):
    return render(request, 'cancel.html', {})
Register the new views inside payments/urls.py:
# payments/urls.py

from django.urls import path

from . import views

urlpatterns = [
    path('', views.home_view, name='payments-home'),
    path('success/', views.success_view, name='payments-success'), # new
    path('cancel/', views.cancel_view, name='payments-cancel'), # new
]
And templates/success.html:
<!-- templates/success.html -->

<!DOCTYPE html>
<html lang="en">
  <head>
    <meta charset="utf-8">
    <meta name="viewport" content="width=device-width, initial-scale=1">
    <title>Django + Coinbase Charge</title>
    <link rel="stylesheet" href="https://cdn.jsdelivr.net/npm/[email protected]/dist/css/bootstrap.min.css" crossorigin="anonymous">
    <script src="https://cdn.jsdelivr.net/npm/[email protected]/dist/js/bootstrap.min.js" crossorigin="anonymous"></script>
  </head>
  <body>
    <div class="container mt-5">
      <p>Your payment has been successful.</p>
    </div>
  </body>
</html>
And templates/cancel.html:
<!-- templates/cancel.html -->

<!DOCTYPE html>
<html lang="en">
  <head>
    <meta charset="utf-8">
    <meta name="viewport" content="width=device-width, initial-scale=1">
    <title>Django + Coinbase Charge</title>
    <link rel="stylesheet" href="https://cdn.jsdelivr.net/npm/[email protected]/dist/css/bootstrap.min.css" crossorigin="anonymous">
    <script src="https://cdn.jsdelivr.net/npm/[email protected]/dist/js/bootstrap.min.js" crossorigin="anonymous"></script>
  </head>
  <body>
    <div class="container mt-5">
      <p>Your payment has been cancelled.</p>
    </div>
  </body>
</html>
Now, after the payment is confirmed, the user will be redirected to redirect_url. In the event that they cancel the payment (or the charge times out), they will be redirected to cancel_url.
Testing
Unfortunately, Coinbase Commerce doesn't support sandbox accounts for testing, which means that you'll need to use real crypto to test your application.
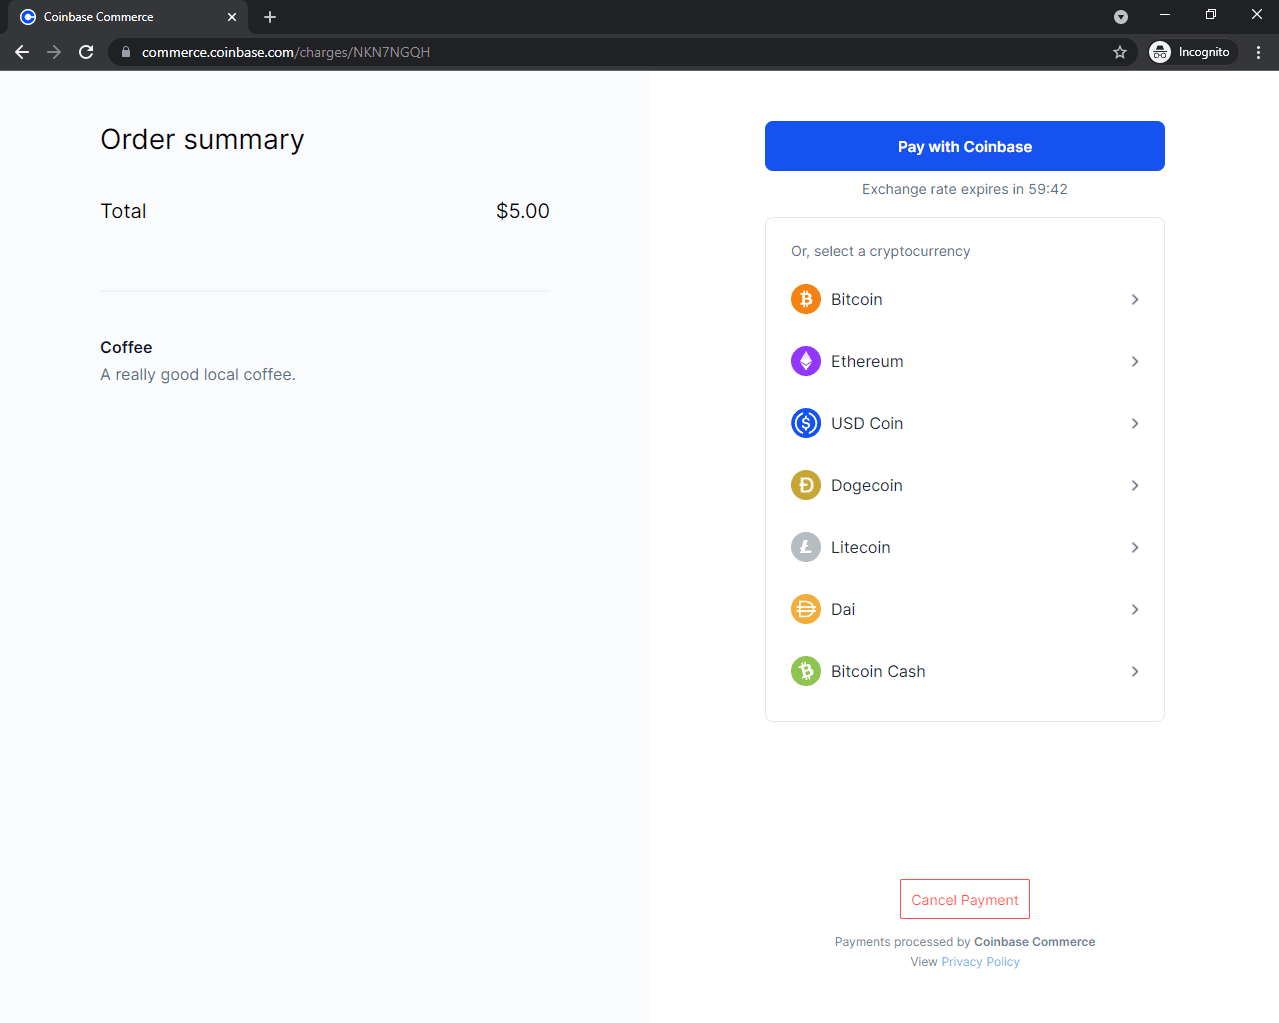
Run the server, navigate to http://localhost:8000/, and click on the "Purchase" button. You'll be redirected to the Coinbase Commerce hosted site:
When you select a cryptocurrency with which you'd like to pay, a wallet address (and a QR code) will be shown:
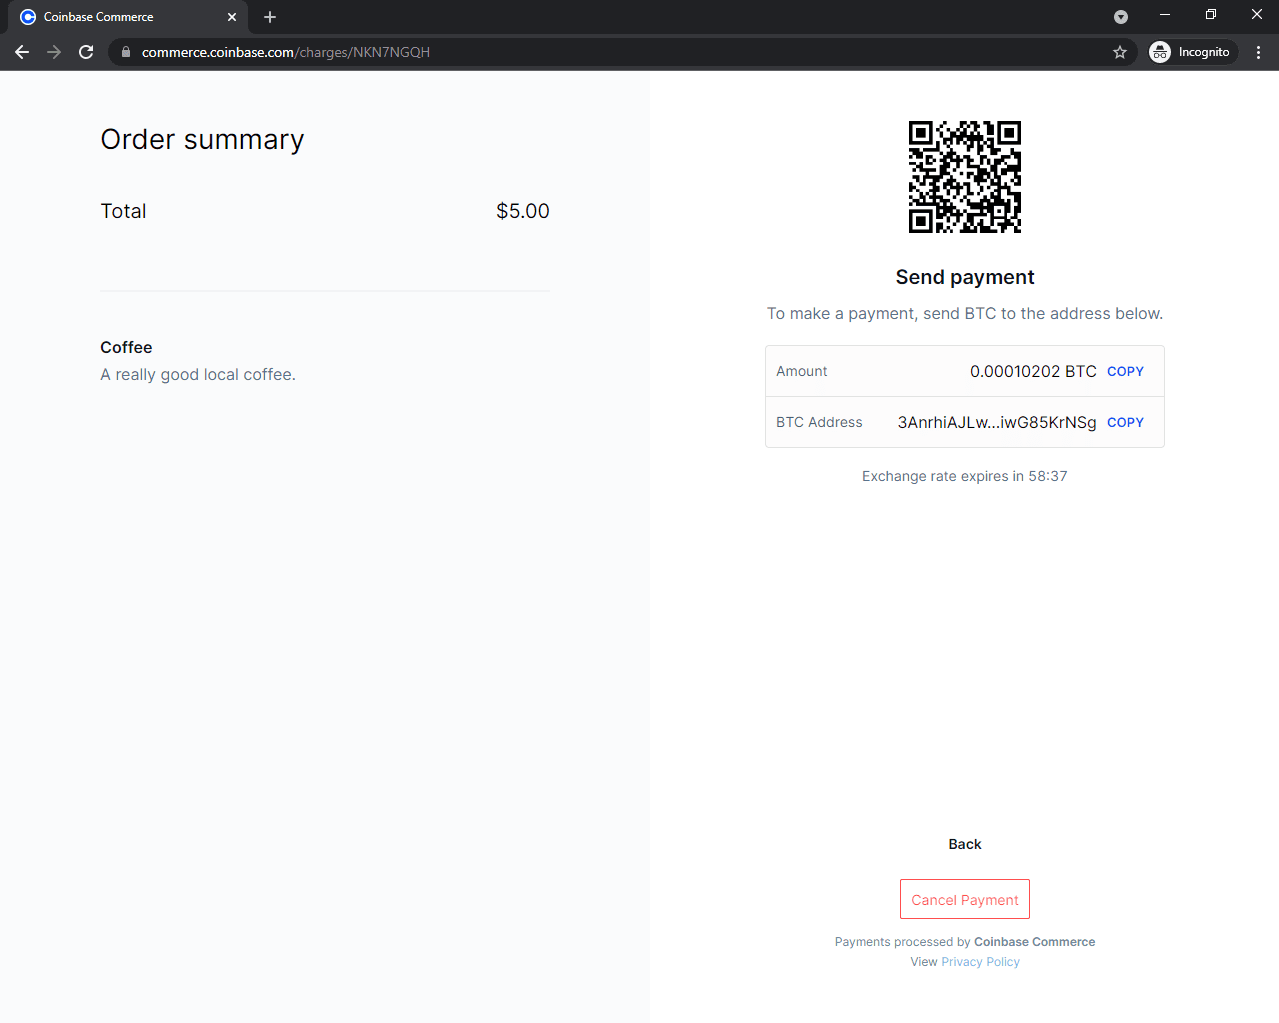
You then have 60 minutes to transfer the crypto before the charge times out.
After you send the crypto, it will take a few minutes (depending on which cryptocurrency you use) for miners to confirm your transaction. After the transaction gets the required number of confirmations (based on the cryptocurrency), you'll be redirected to the URL associated with redirect_url.
The payments will appear in the Commerce Dashboard under "Payments":
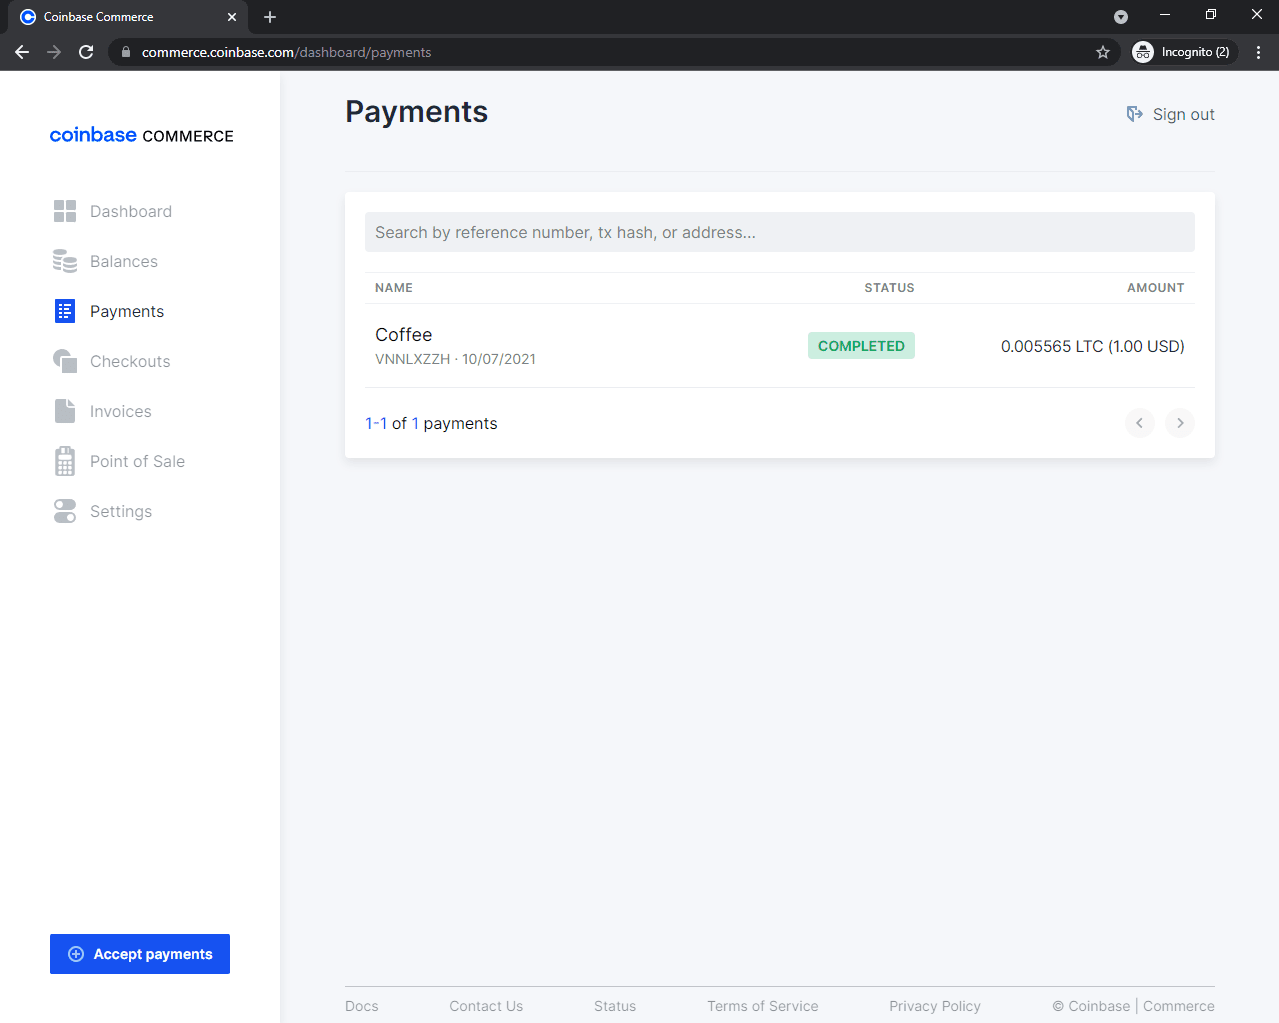
Skip down to the "Confirm Payments with Webhooks" section to learn about payment confirmation.
Coinbase Checkout
This part of the tutorial shows how to accept payments using the Coinbase Checkout API. If you decided to go with Coinbase Charges, feel free to skip this section and move down to the "Confirm Payments with Webhooks" section.
Coinbase Checkout is the easiest way to collect crypto payments with Coinbase Commerce. With this approach, charges will automatically be generated for you. This approach is appropriate when working with fixed products.
Workflow:
- Use a client to connect to the Coinbase Commerce API
- Fetch a checkout from Coinbase Commerce API and pass it to the template
- (Optional) Add the required HTML code to the template if dealing with embedded checkouts
- Redirect the user to Coinbase Commerce hosted site OR use an embedded checkout
- (Optional) Verify the charge using webhooks
Create a Checkout
There are two ways of creating a checkout:
- Programmatically via the coinbase-commerce library
- Manually within the Coinbase Commerce dashboard
For simplicity, we'll use the Commerce Dashboard.
Navigate to "Checkouts" and click "Create Checkout":
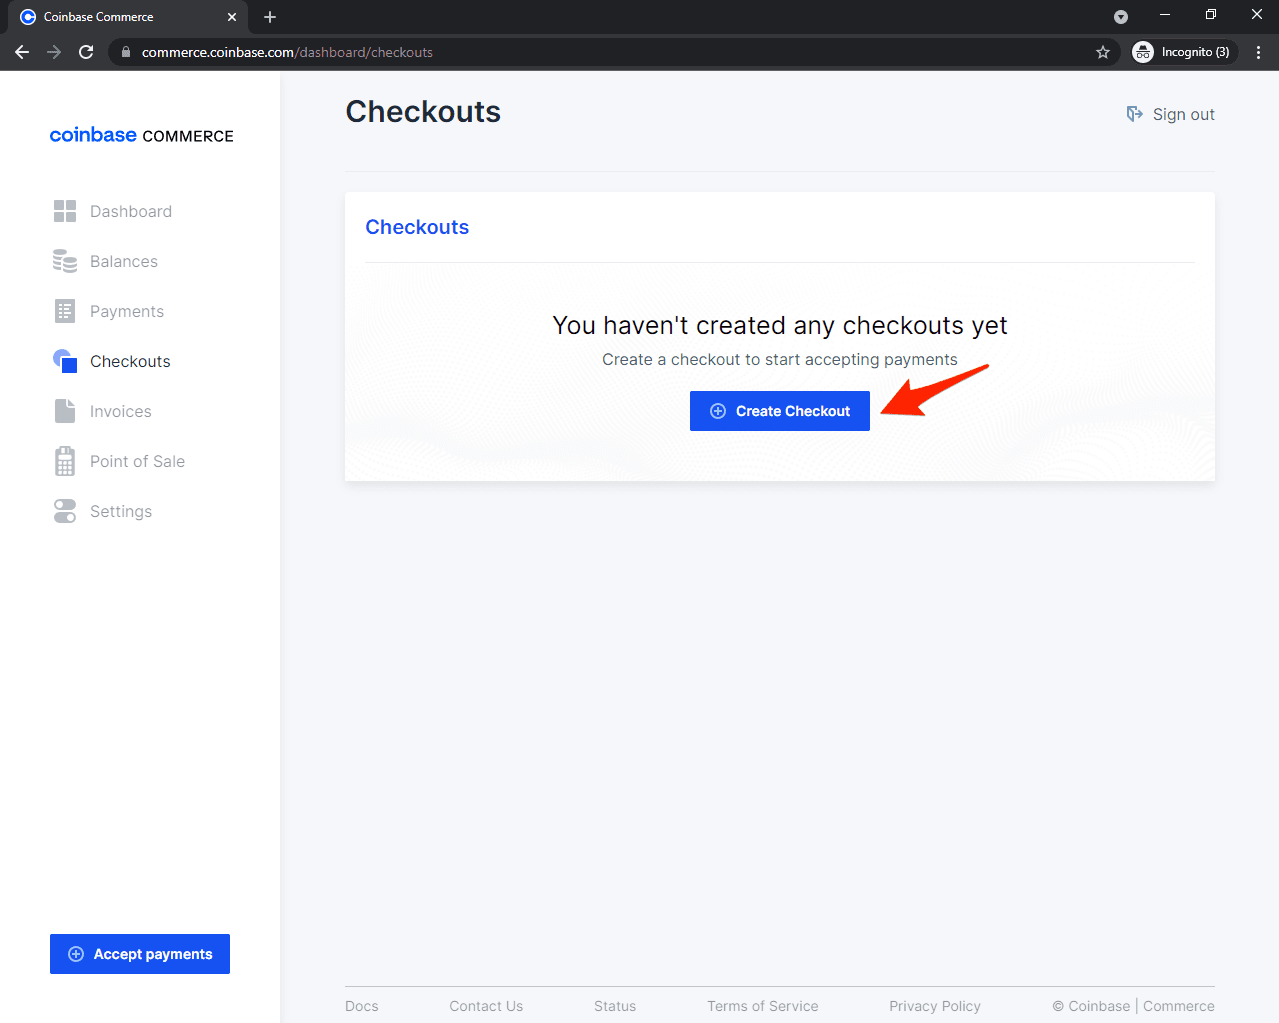
Click "Sell a Product". Enter the product name, description, and price. Click "Next". Under "Customer information", select "Don't collect any information". Then, click "Done.
Coinbase Commerce generated all the necessary HTML code that you need to add to your home template. You can see this under the "Embed" tab. To make the web application more modular and reusable, we'll fetch the checkout info in the home_view instead of hard coding it in the template. To do so, we first need to obtain the checkout ID by copying the hosted page URL:
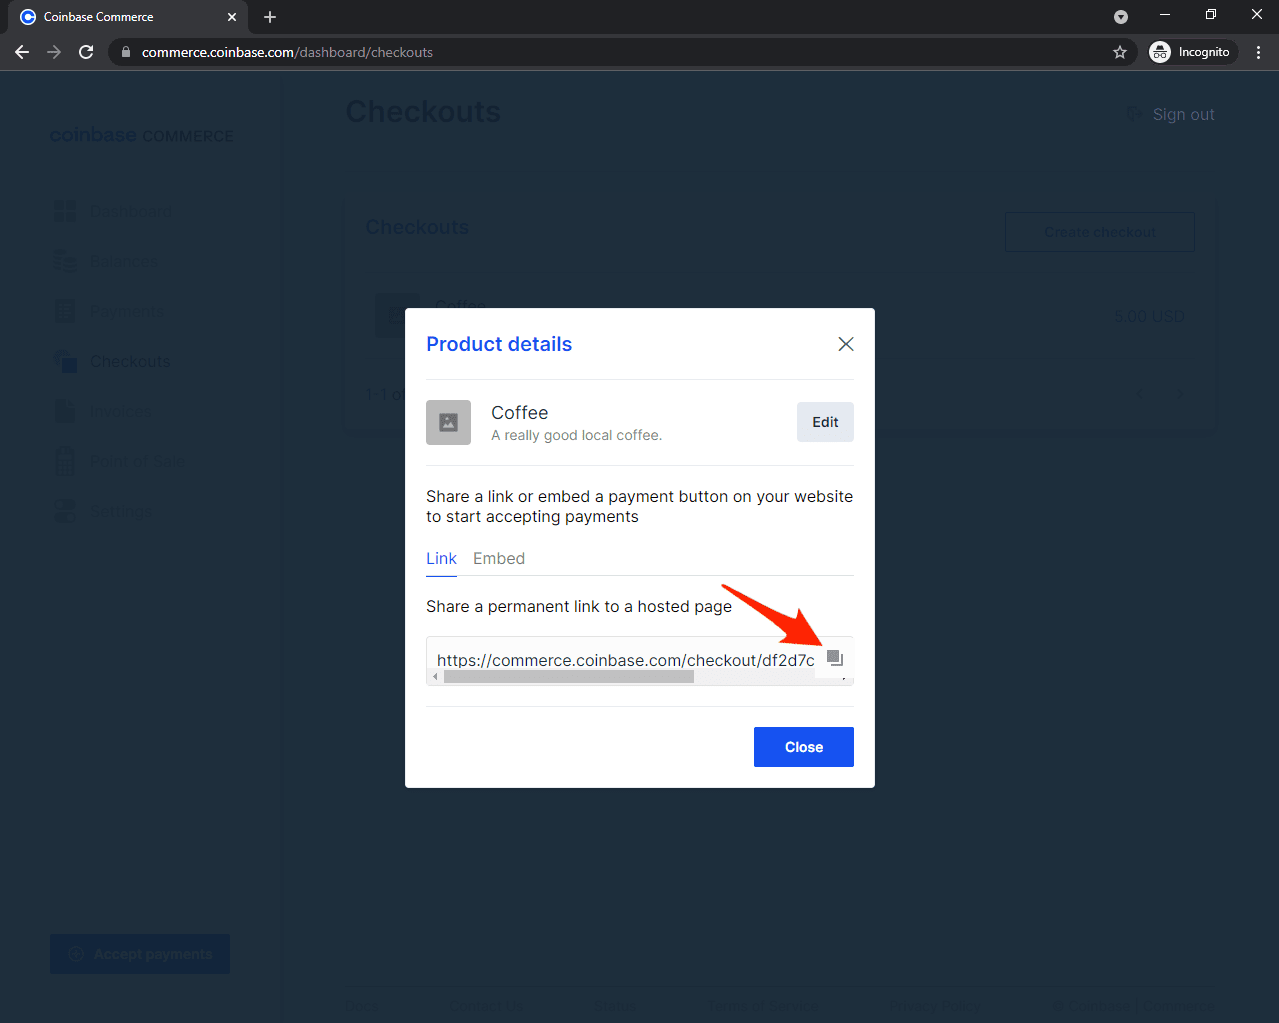
The permanent link should look something like this:
https://commerce.coinbase.com/checkout/df2d7c68-145e-4537-86fa-1cac705eb748
We're only interested in the last segment of the URL, which represents the checkout ID:
df2d7c68-145e-4537-86fa-1cac705eb748
Save this inside the core/settings.py file like so:
# core/settings.py

COINBASE_CHECKOUT_ID = '<your checkout id>'
Update payments/views.py:
# payments/views.py

from coinbase_commerce.client import Client
from django.shortcuts import render

from core import settings


def home_view(request):
    client = Client(api_key=settings.COINBASE_COMMERCE_API_KEY)
    checkout = client.checkout.retrieve(settings.COINBASE_CHECKOUT_ID)
    checkout_link = f'https://commerce.coinbase.com/checkout/{checkout.id}'

    return render(request, 'home.html', {
        'checkout': checkout,
        'checkout_link': checkout_link,
    })
This code fetches the checkout and passes it to the template.
Finally, we need to modify the home template to use the checkout. You can either use a:
- Hosted page - the user gets redirected to a Coinbase Checkout website
- Embedded page - everything happens on your website
For educational purposes, we'll use both approaches.
Update templates/home.html:
<!-- templates/home.html -->

<!DOCTYPE html>
<html lang="en">
  <head>
    <meta charset="utf-8">
    <meta name="viewport" content="width=device-width, initial-scale=1">
    <title>Django + Coinbase Checkout</title>
    <link rel="stylesheet" href="https://cdn.jsdelivr.net/npm/[email protected]/dist/css/bootstrap.min.css" crossorigin="anonymous">
    <script src="https://cdn.jsdelivr.net/npm/[email protected]/dist/js/bootstrap.min.js" crossorigin="anonymous"></script>
  </head>
  <body>
    <div class="container mt-5">
      <div class="card w-25">
        <!-- Coinbase checkout details -->
        <div class="card-body">
          <h5 class="card-title">{{ checkout.name }}</h5>
          <p class="card-text">
            {{ checkout.description }}<br>
            {{ checkout.local_price.amount }} {{ checkout.local_price.currency }}
          </p>
          <div>
            <!-- Coinbase hosted approach (script not required) -->
            <a class="btn btn-primary w-100" href="{{ checkout_link }}">Purchase (hosted)</a>
            <!-- Coinbase embedded approach (script required) -->
            <div class="mt-2">
              <a class="btn btn-primary buy-with-crypto w-100" href="{{ checkout_link }}">Purchase (embedded)</a>
              <script src="https://commerce.coinbase.com/v1/checkout.js?version=201807"></script>
            </div>
          </div>
        </div>
      </div>
    </div>
  </body>
</html>
Run the server and navigate to http://localhost:8000/:
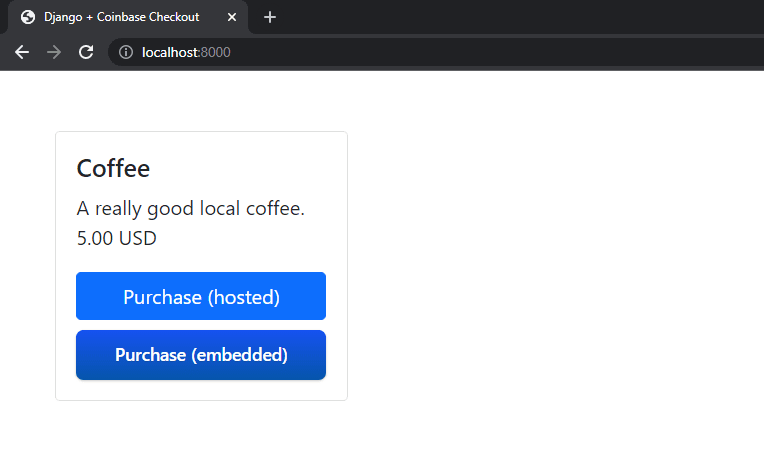
The application is completely functional at this point. Don't test anything just yet though. We'll do that in the next section.
Testing
Unfortunately, Coinbase Commerce doesn't support sandbox accounts for testing, which means that you'll need to use real crypto to test your application.
With the server running, navigate to http://localhost:8000/. You can test using the Coinbase hosted site or the embedded checkout. Your choice.
When you select a cryptocurrency with which you'd like to pay, a wallet address (and a QR code) will be shown:

You then have 60 minutes to transfer the crypto before the charge times out.
After you send the crypto, it will take a few minutes (depending on which cryptocurrency you use) for miners to confirm your transaction. After the transaction gets the required number of confirmations (based on the cryptocurrency), you'll be presented with a "Payment complete" message.
The payments will appear in the Commerce Dashboard under "Payments":

Confirm Payments with Webhooks
Our app works well at this point, but we can't programmatically confirm payments yet. We just redirect the user to the success page after they check out, but we can't rely on that page alone since payment confirmation happens asynchronously.
You often deal with two different types of events when programming: Synchronous events, which have an immediate effect and results (e.g., creating a charge), and asynchronous events, which don't have an immediate result (e.g., confirming payments). Because payment confirmation is done asynchronously, the user might get redirected to the success page before their payment is confirmed and before we receive their funds.
To get notified when the payment goes through, you need to create a webhook. We'll need to create a simple endpoint in our application, which Coinbase Commerce will call whenever an event occurs (i.e., when a charge is confirmed). By using webhooks, we can be sure the payment went through successfully.
In order to use webhooks, we need to:
- Set up the webhook endpoint in the application
- Register the endpoint in the Coinbase Commerce Dashboard
Configure the Endpoint
Create a coinbase_webhook view in payments/views.py:
# payments/views.py

@csrf_exempt
@require_http_methods(['POST'])
def coinbase_webhook(request):
    logger = logging.getLogger(__name__)

    request_data = request.body.decode('utf-8')
    request_sig = request.headers.get('X-CC-Webhook-Signature', None)
    webhook_secret = settings.COINBASE_COMMERCE_WEBHOOK_SHARED_SECRET

    try:
        event = Webhook.construct_event(request_data, request_sig, webhook_secret)

        # List of all Coinbase webhook events:
        # https://commerce.coinbase.com/docs/api/#webhooks

        if event['type'] == 'charge:confirmed':
            logger.info('Payment confirmed.')
            # TODO: run some custom code here

    except (SignatureVerificationError, WebhookInvalidPayload) as e:
        return HttpResponse(e, status=400)

    logger.info(f'Received event: id={event.id}, type={event.type}')
    return HttpResponse('ok', status=200)
This block of code validates the signature and the payload of the request and then generates an event out of it. You can now check the event type and perform different actions based on the type.
Update the imports:
import logging

from coinbase_commerce.client import Client
from coinbase_commerce.error import SignatureVerificationError, WebhookInvalidPayload
from coinbase_commerce.webhook import Webhook
from django.http import HttpResponse
from django.shortcuts import render
from django.views.decorators.csrf import csrf_exempt
from django.views.decorators.http import require_http_methods

from core import settings
Ignore the error that
COINBASE_COMMERCE_WEBHOOK_SHARED_SECRETdoesn't exist yet. We'll add it in the next step.
Register the URL in payments/urls.py:
# payments/urls.py

from django.urls import path

from . import views

urlpatterns = [
    path('', views.home_view, name='payments-home'),
    path('success/', views.success_view, name='payments-success'),   # only for the Coinbase charges approach
    path('cancel/', views.cancel_view, name='payments-cancel'),      # only for the Coinbase charges approach
    path('webhook/', views.coinbase_webhook),  # new
]
The coinbase_webhook view now serves as our webhook endpoint to which Coinbase Commerce will send events to when they occur.
If you followed the Coinbase Checkout approach, don't include the
success/orcancel/URLs.
Identify the User
To identify the user in your webhook, you need to pass some metadata when creating the charge or when starting the checkout session. You'll then be able to fetch this metadata inside your webhook.
The manner in which you pass metadata is different depending on which approach you used:
- Charges API - you'll have to attach metadata to the product
- Checkout API - you'll have to pass metadata as an HTML attribute
Identify the User with the Charges API
To identify the user with the Charges API start by adding the following to the product dict inside home_view:
# payments/views.py

product = {
    ...
    'metadata': {
        'customer_id': request.user.id if request.user.is_authenticated else None,
        'customer_username': request.user.username if request.user.is_authenticated else None,
    },
    ...
}
This block of code attaches the user ID and username from the authenticated user.
You can now access the metadata inside the coinbase_webhook view like so:
# payments/views.py

@csrf_exempt
@require_http_methods(['POST'])
def coinbase_webhook(request):
    logger = logging.getLogger(__name__)

    request_data = request.body.decode('utf-8')
    request_sig = request.headers.get('X-CC-Webhook-Signature', None)
    webhook_secret = settings.COINBASE_COMMERCE_WEBHOOK_SHARED_SECRET

    try:
        event = Webhook.construct_event(request_data, request_sig, webhook_secret)

        # List of all Coinbase webhook events:
        # https://commerce.coinbase.com/docs/api/#webhooks

        if event['type'] == 'charge:confirmed':
            logger.info('Payment confirmed.')
            customer_id = event['data']['metadata']['customer_id'] # new
            customer_username = event['data']['metadata']['customer_username'] # new
            # TODO: run some custom code here
            # you can also use 'customer_id' or 'customer_username'
            # to fetch an actual Django user

    except (SignatureVerificationError, WebhookInvalidPayload) as e:
        return HttpResponse(e, status=400)

    logger.info(f'Received event: id={event.id}, type={event.type}')
    return HttpResponse('ok', status=200)
Identify the User with the Checkout API
To identify the user with the Checkout API we need to add the metadata as a data-custom data attribute to the anchors in templates/home.html:
For example:
<div>
  <!-- Coinbase hosted approach (script not required) -->
  <a
    class="btn btn-primary w-100"
    {% if user.is_authenticated %}data-custom="{{ user.pk }}"{% endif %}
    href="{{ checkout_link }}"
  >Purchase (hosted)</a>
  <!-- Coinbase embedded approach (script required) -->
  <div class="mt-2">
    <a
      class="btn btn-primary buy-with-crypto w-100"
      {% if user.is_authenticated %}data-custom="{{ user.pk }}"{% endif %}
      href="{{ checkout_link }}"
    >Purchase (embedded)</a>
    <script src="https://commerce.coinbase.com/v1/checkout.js?version=201807"></script>
  </div>
</div>
You can then retrieve the metadata inside the coinbase_webhook view like so:
# payments/views.py

@csrf_exempt
@require_http_methods(['POST'])
def coinbase_webhook(request):
    import logging

    request_data = request.body.decode('utf-8')
    request_sig = request.headers.get('X-CC-Webhook-Signature', None)
    webhook_secret = settings.COINBASE_COMMERCE_WEBHOOK_SHARED_SECRET

    try:
        event = Webhook.construct_event(request_data, request_sig, webhook_secret)

        # List of all Coinbase webhook events:
        # https://commerce.coinbase.com/docs/api/#webhooks

        if event['type'] == 'charge:confirmed':
            logger.info('Payment confirmed.')
            customer_id = event['data']['metadata']['custom'] # new
            # TODO: run some custom code here
            # you can also use 'customer_id'
            # to fetch an actual Django user

    except (SignatureVerificationError, WebhookInvalidPayload) as e:
        return HttpResponse(e, status=400)

    logger.info(f'Received event: id={event.id}, type={event.type}')
    return HttpResponse('ok', status=200)
Keep in mind that the webhook receives
data-customas plain text. Be sure to parse it to an integer before using it to fetch the user from the database.
Register the Endpoint
Navigate to https://commerce.coinbase.com/dashboard/settings, scroll down to "Webhook subscriptions" and click on "Add an endpoint":
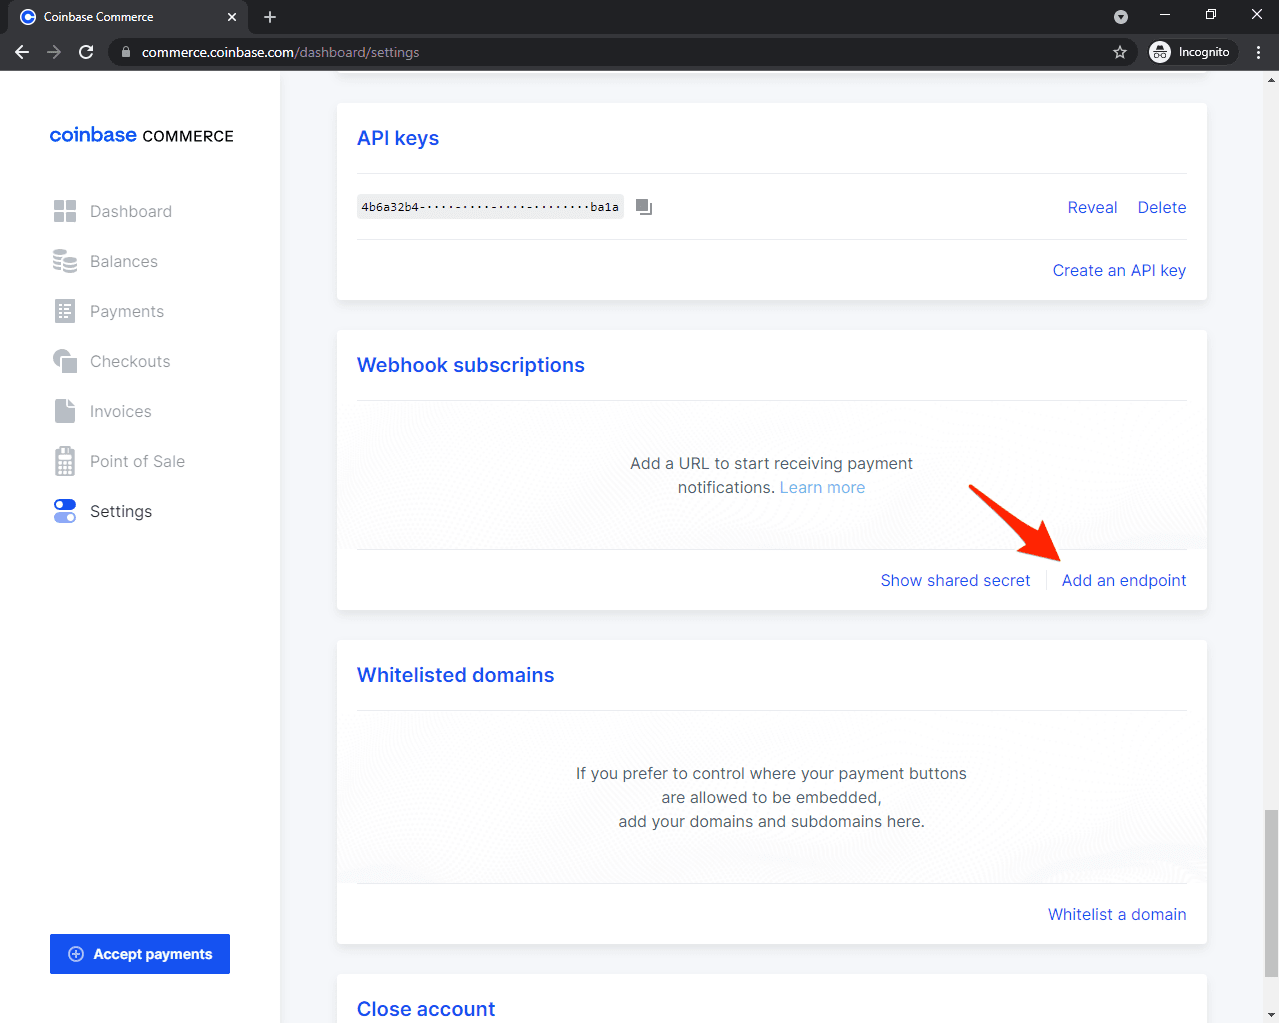
Enter your endpoint URL and press "Save".
The URL needs to start with HTTPS, which means that you need to deploy your app before you can test it.
Next, click on "Show shared secret" and copy the secret:
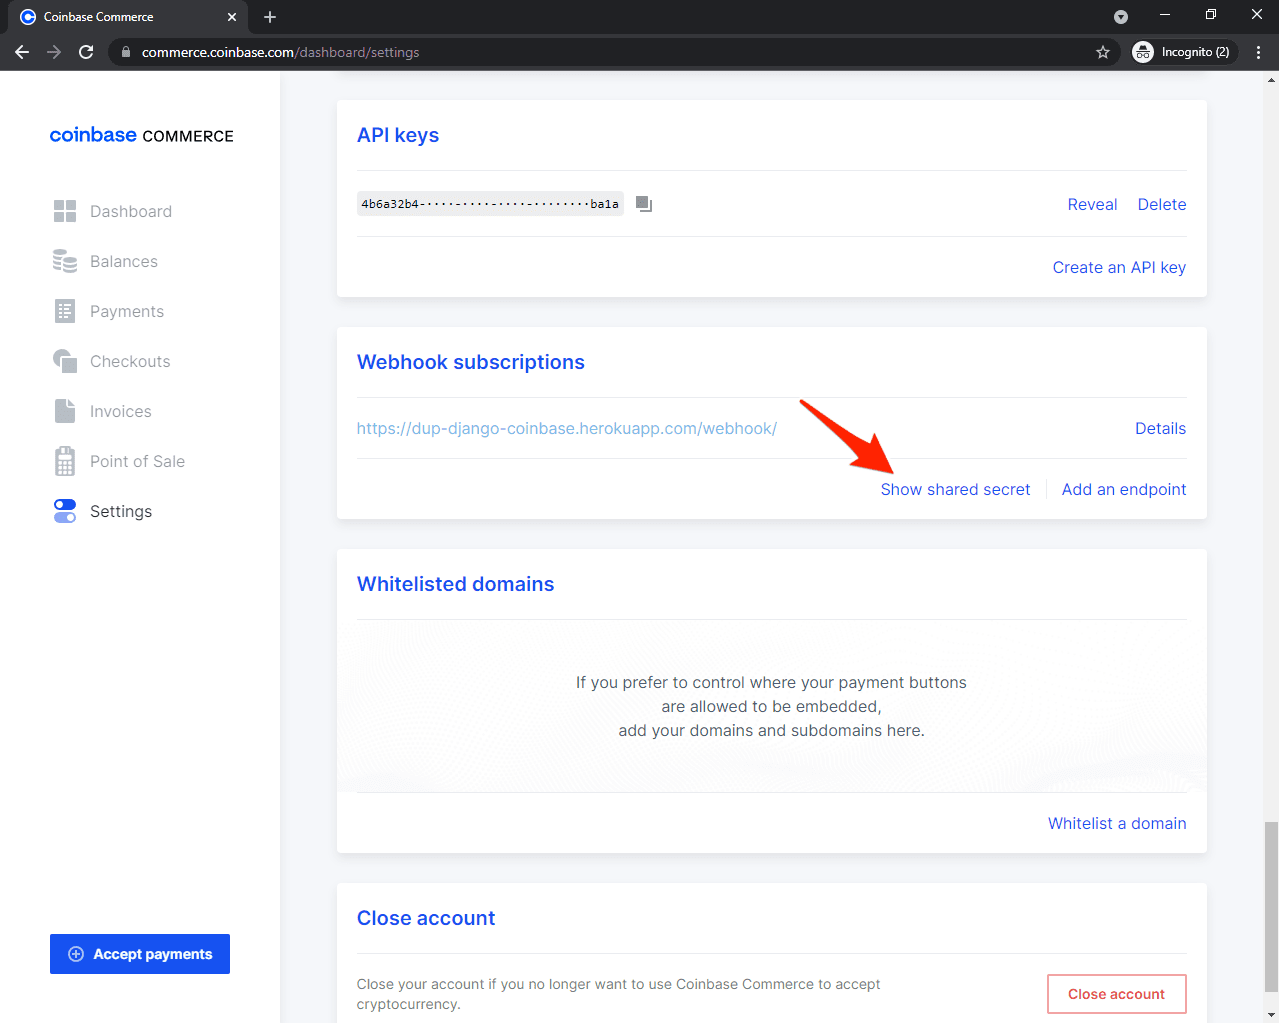
Add the shared secret to the settings.py file like so:
# core/settings.py

COINBASE_COMMERCE_WEBHOOK_SHARED_SECRET = '<your coinbase webhook secret here>'
Test the Endpoint
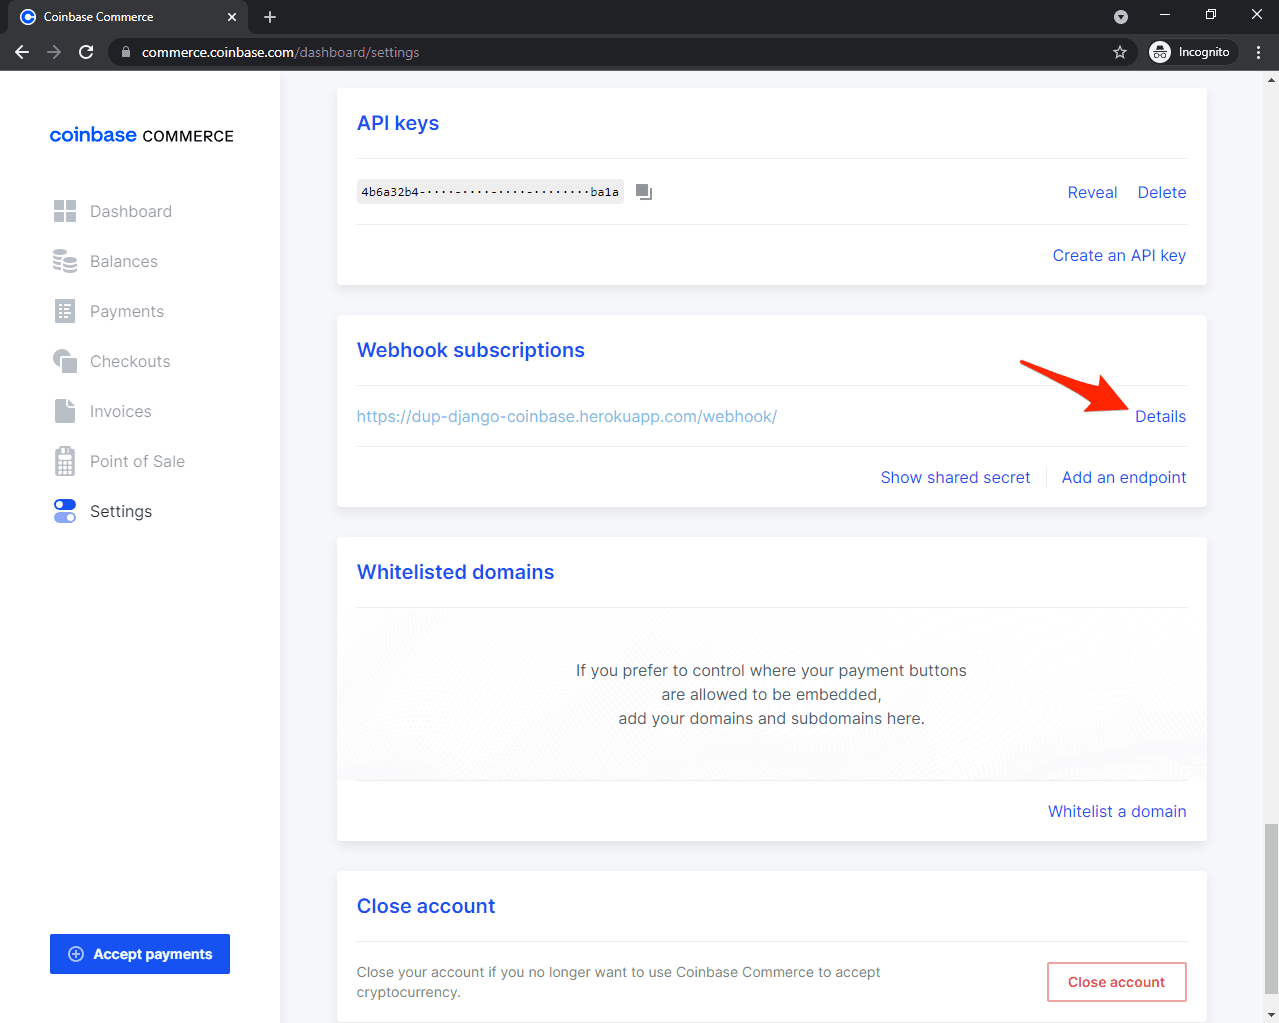
With your application deployed, you can send a test webhook request from the Commerce Dashboard. Navigate to "Webhook subscriptions" and click on "Details" under the webhook endpoint:
Then click "Send Test":
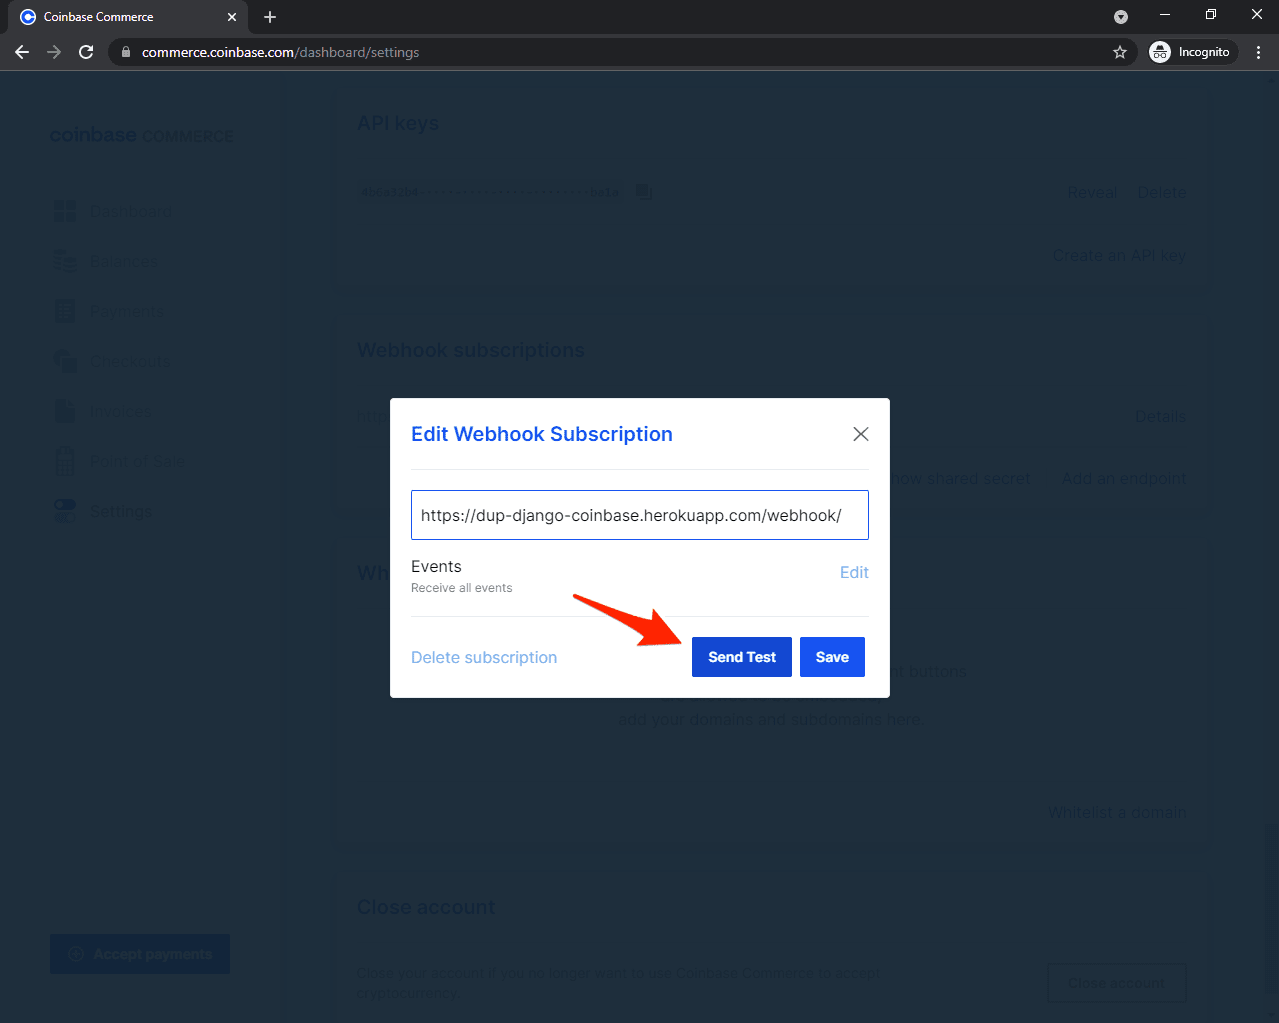
Finally, select the "charge:confirmed" and click on "Send Test" again. You should see the "Payment has been successful." log message.
Conclusion
In this tutorial, you learned how to accept crypto payments with Coinbase Commerce. You should now be able to integrate it with Django and verify payments via a webhook.
You can find the code in the following repos on GitHub:
 Nik Tomazic