 Nik Tomazic
Cloudflare R2 is a globally distributed, S3-compatible object storage service. It allows you to easily store your Django static and media files. Best of all, it has zero egress fees and a generous free tier -- which includes 10 GB of storage, 1 million write operations per month, and 10 million read operations per month.
Requirements:
- Django v5 or newer
- Python v3.12 or newer
- Free Cloudflare account
Prefer to use S3? Check out Storing Django Static and Media Files on Amazon S3.
Contents
Project Setup
To make the tutorial easier to follow, I've prepared a simple Django image-hosting project. All the project does is let you upload cute images of cats.
Feel free to skip this section and follow along with your own project.
First, clone the base branch of the django-r2 repo:
$ git clone https://github.com/duplxey/django-r2.git \
    --single-branch --branch base && cd django-r2
Create a new virtual environment and activate it:
$ python3 -m venv venv && source venv/bin/activate
Install the requirements and migrate the database:
(venv)$ pip install -r requirements.txt
(venv)$ python manage.py migrate
Run the server:
(venv)$ python manage.py runserver
Open your favorite web browser and navigate to http://localhost:8000. Make sure everything works correctly by using the form on the right to upload an image. After you upload an image you should see it displayed in the table:
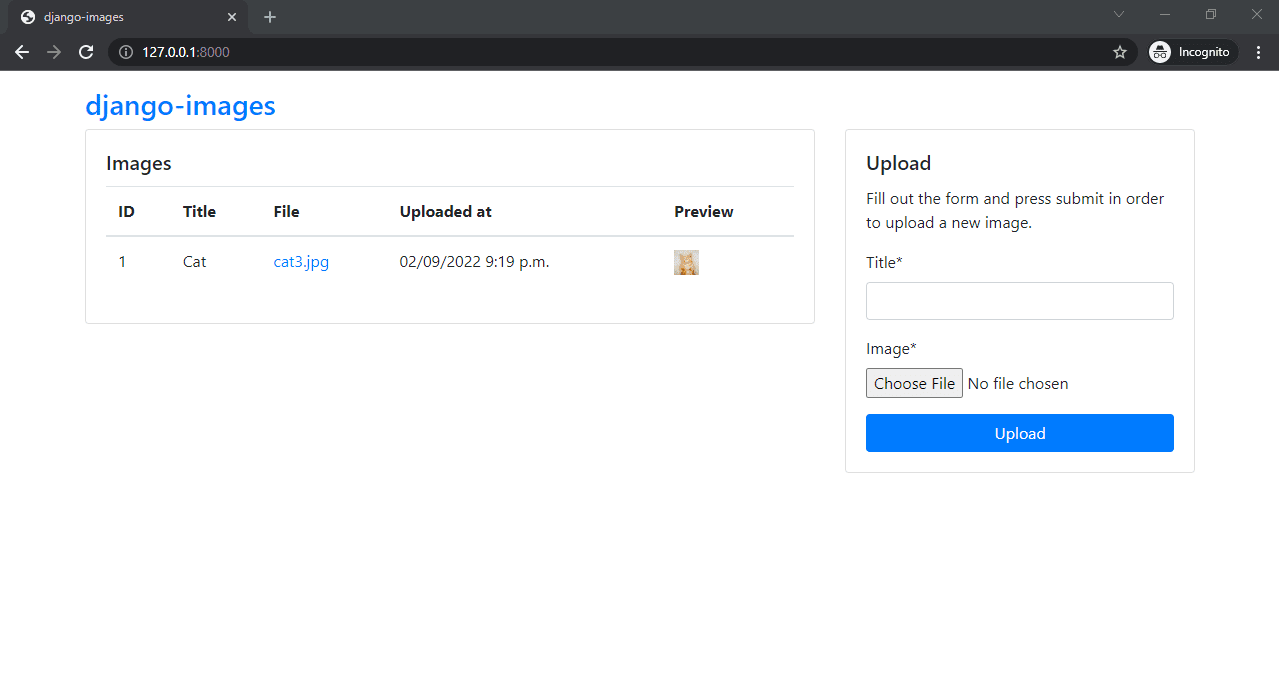
At the moment, both public and private images are accessible by everyone. After migrating to Cloudflare R2 we'll enable signed URLs.
Cloudflare Bucket
To follow along, you'll need a free Cloudflare account. Note, that you'll also need to add a valid credit card to use the R2 service. Free tier has a generous limit, but ensure to review the pricing page.
For Django projects, you typically want to create two buckets:
- A public bucket (objects accessible by everyone, for static and public media files)
- A private bucket (objects accessible via signed URLs, for private media files)
Let's create them, starting with the public bucket.
Public Bucket
First, navigate to the Cloudflare dashboard.
Select "Storage & databases > R2 Object Storage > Overview" in the sidebar. Then click "Create bucket" at the top right of the screen:
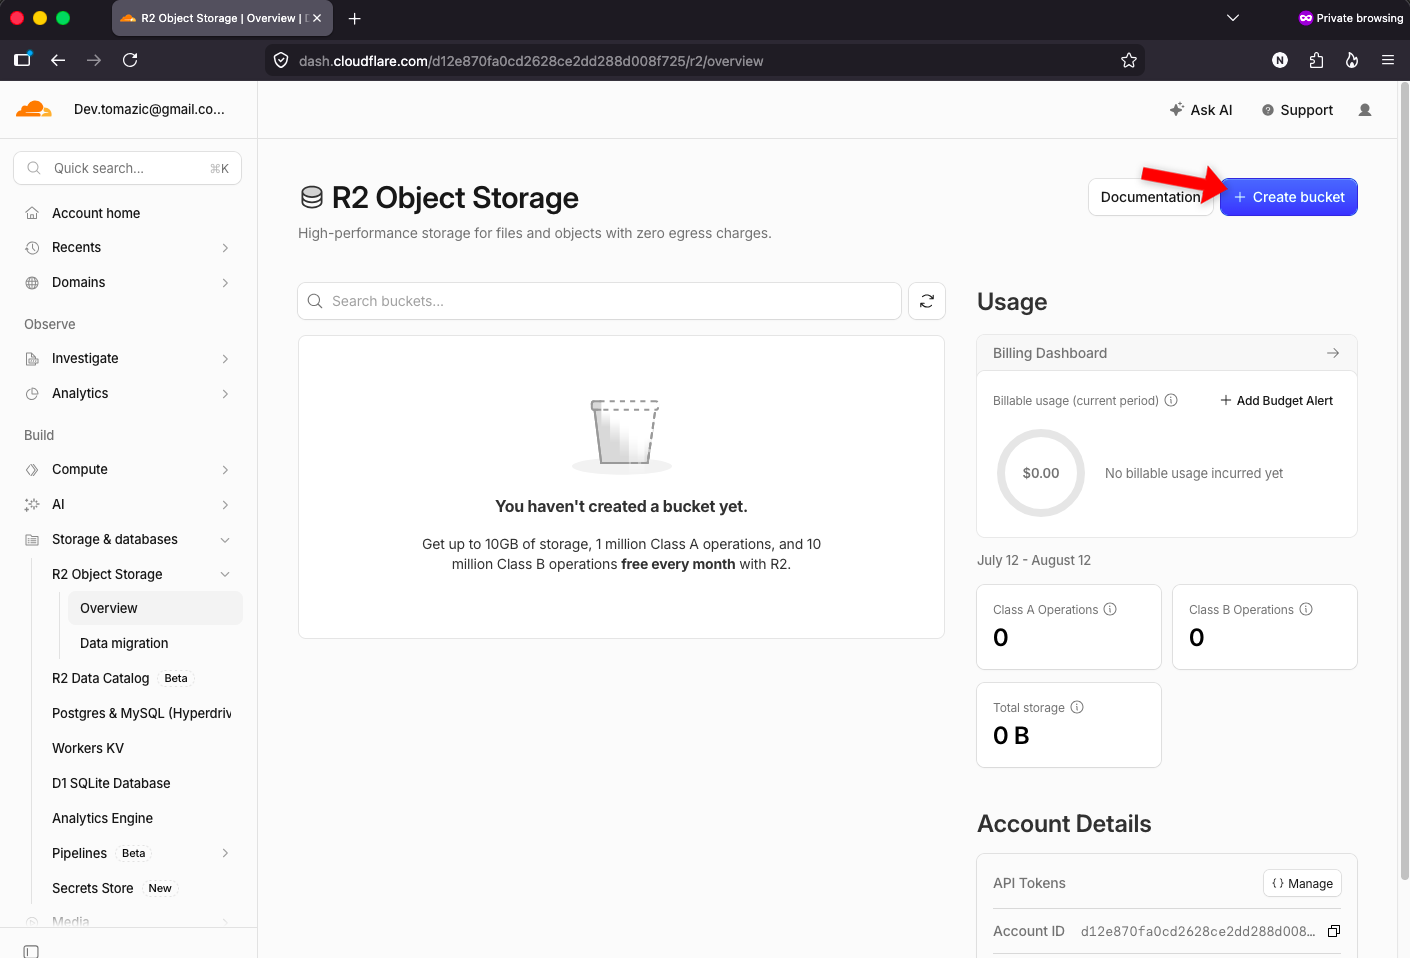
Create a bucket using the following details:
- Bucket name: django-r2-public (or a custom name)
- Location: Location closest to your users
- Default Storage Class: Standard
Once created, make it public by navigating to the bucket "Settings > General" and enabling "Public Development URL":
Note, that the public development URL is only appropriate for development. In production, ensure to conenct a custom domain to your bucket. You can do that by clicking "Custom Domains > Add".
Finally, take note of the public development URL's domain:
domain: pub-0d0e0c3a66abcc9ad3bdd1f145d3c32.r2.dev
Private Bucket
To create a private bucket, follow the exact same steps, but do not enable the public development URL.
I'll name my private bucket: django-r2-private.
Cloudflare API Token
To connect to R2, we need to create a Cloudflare R2 API key.
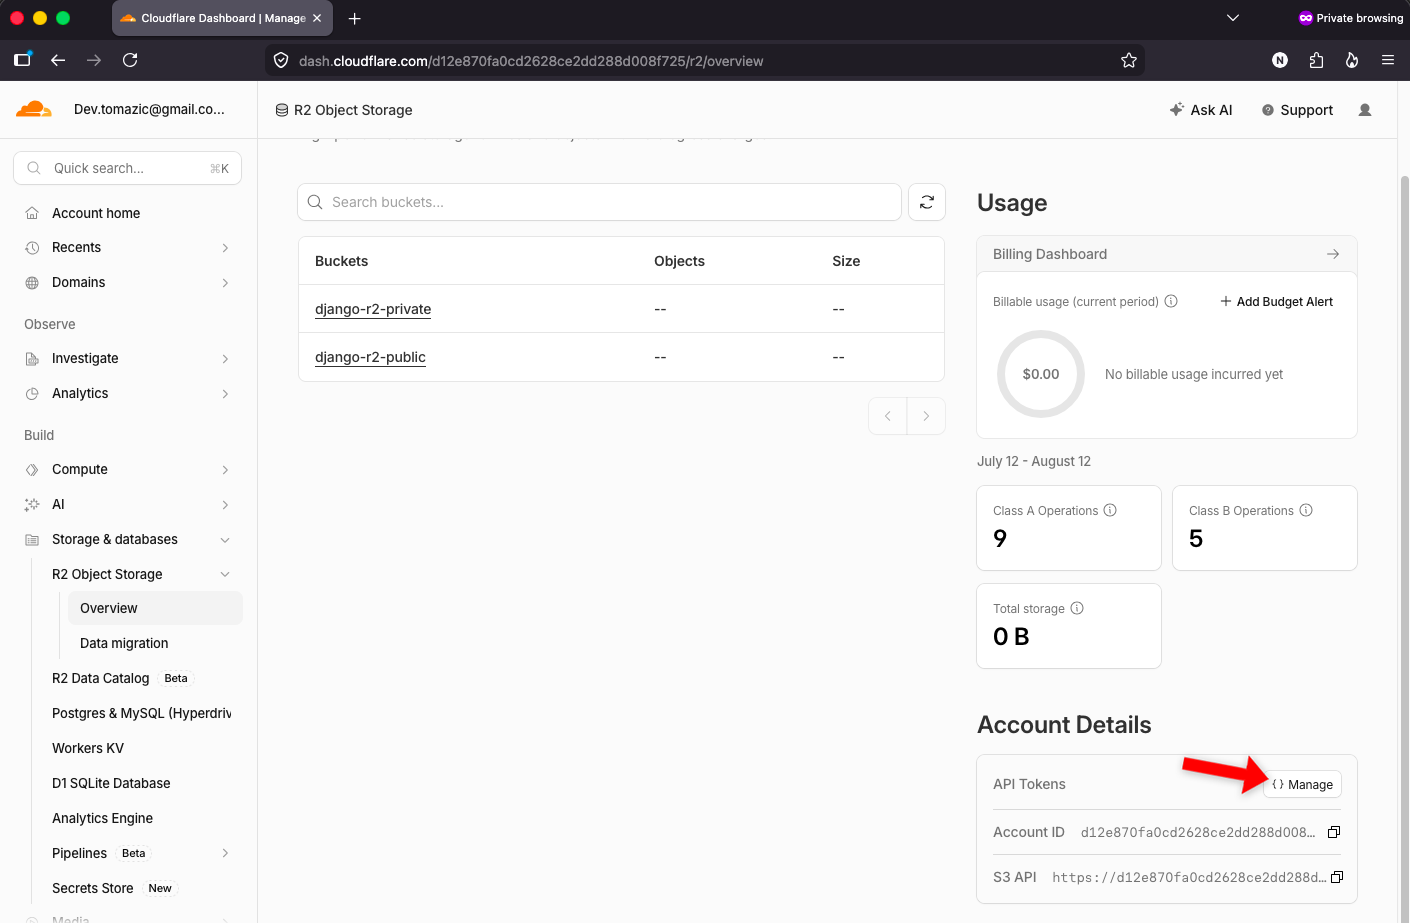
Navigate to the R2 dashboard, scroll all the way down to "Account Details", and click "Manage" in the "API Tokens" section.
Next, create an "Account API token" with the following details:
- Token Name: django-r2-token
- Permissions: Object Read & Write
- Specify Bucket(s): django-r2-public, django-r2-private
- Time To Live: Forever
- IP Address Filtering: Leave blank
Once created, take note of the access key ID, secret access key, and the endpoint:
access: 6e340f71a69a40f4139f0dc420847eff
secret: dfa349238396f587bb69d2d8d1c72332b28173784eccc914195af3559de776e6
endpoint: https://d12b8e0aa0cd262333dd2882208ff25.r2.cloudflarestorage.com
The Cloudflare setup is now done.
Django Storages
Moving along, let's set up Django to work with Cloudflare R2.
To do that, we'll use the django-storages package, which provides a collection of storage backends. While it doesn't natively support Cloudflare R2, we can use its AWS S3 adapter, since R2 is S3-compatible.
Install it via pip along with the boto3 dependency:
(venv)$ pip install django-storages boto3
Static Files
To handle static files, first create a new file called storages.py:
# images/storages.py

from django.conf import settings
from django.core.files.storage import storages
from storages.backends.s3boto3 import S3Boto3Storage


class StaticStorage(S3Boto3Storage):
    bucket_name = getattr(settings, "AWS_S3_PUBLIC_BUCKET_NAME", None)
    custom_domain = getattr(settings, "AWS_S3_PUBLIC_CUSTOM_DOMAIN", None)
    location = getattr(settings, "STATIC_LOCATION", None)
    signature_version = None
    querystring_auth = False
    file_overwrite = True


def static_storage():
    return storages["staticfiles"]
In this file, we created a new storage inheriting from S3Boto3Storage and a static_storage() function, which can be used as a model FileField.storage value.
Then configure settings.py like so:
# core/settings.py

# Static & media files (django-storages)
# https://django-storages.readthedocs.io/en/latest/

USE_CF_R2 = True

STATIC_LOCATION = "static"

if USE_CF_R2:
    # Cloudflare R2 configuration
    AWS_S3_REGION_NAME = "auto"
    AWS_S3_ACCESS_KEY_ID = "<cf_r2_access_key_id>"
    AWS_S3_SECRET_ACCESS_KEY = "<cf_r2_secret_access_key>"
    AWS_S3_ENDPOINT_URL = "<cf_r2_endpoint_url>"
    AWS_S3_OBJECT_PARAMETERS = {"CacheControl": "max-age=86400"}

    # Bucket configuration
    AWS_S3_PUBLIC_BUCKET_NAME = "django-r2-public"
    AWS_S3_PRIVATE_BUCKET_NAME = "django-r2-private"
    AWS_S3_PUBLIC_CUSTOM_DOMAIN = "<cf_r2_public_development_url>"

    # Storage locations
    STATIC_URL = f"https://{AWS_S3_PUBLIC_CUSTOM_DOMAIN}/{STATIC_LOCATION}/"

    STORAGES = {
        "staticfiles": {
            "BACKEND": "images.storages.StaticStorage",
        },
    }
else:
    # Local disk configuration
    STATIC_URL = "/static/"
    STATIC_ROOT = BASE_DIR / "staticfiles"
    MEDIA_URL = "/media/"
    MEDIA_ROOT = BASE_DIR / "mediafiles"

    STORAGES = {
        "default": {
            "BACKEND": "django.core.files.storage.FileSystemStorage",
        },
        "private": {
            "BACKEND": "django.core.files.storage.FileSystemStorage",
        },
        "staticfiles": {
            "BACKEND": "django.contrib.staticfiles.storage.StaticFilesStorage",
        },
    }
Don't forget to replace the credentials placeholders with the values from previous sections.
Media Files
Similar story for media files, first define a public and a private storage in storages.py:
# images/storages.py

# ...

class PublicMediaStorage(S3Boto3Storage):
    bucket_name = getattr(settings, "AWS_S3_PUBLIC_BUCKET_NAME", None)
    custom_domain = getattr(settings, "AWS_S3_PUBLIC_CUSTOM_DOMAIN", None)
    location = getattr(settings, "PUBLIC_MEDIA_LOCATION", None)
    signature_version = None
    querystring_auth = False
    file_overwrite = False


class PrivateMediaStorage(S3Boto3Storage):
    bucket_name = getattr(settings, "AWS_S3_PRIVATE_BUCKET_NAME", None)
    location = getattr(settings, "PRIVATE_MEDIA_LOCATION", None)
    signature_version = "s3v4"
    querystring_auth = True
    file_overwrite = False


def public_storage():
    return storages["default"]


def private_storage():
    return storages["private"]
Next, add the missing mediafiles configuration in settings.py:
# core/settings.py

# Static & media files (django-storages)
# https://django-storages.readthedocs.io/en/latest/

USE_CF_R2 = True

STATIC_LOCATION = "static"
PUBLIC_MEDIA_LOCATION = "media"  # new
PRIVATE_MEDIA_LOCATION = "private"  # new

if USE_CF_R2:
    # Cloudflare R2 configuration
    AWS_S3_REGION_NAME = "auto"
    AWS_S3_ACCESS_KEY_ID = "<cf_r2_access_key_id>"
    AWS_S3_SECRET_ACCESS_KEY = "<cf_r2_secret_access_key>"
    AWS_S3_ENDPOINT_URL = "<cf_r2_endpoint_url>"
    AWS_S3_OBJECT_PARAMETERS = {"CacheControl": "max-age=86400"}

    # Bucket configuration
    AWS_S3_PUBLIC_BUCKET_NAME = "django-r2-public"
    AWS_S3_PRIVATE_BUCKET_NAME = "django-r2-private"
    AWS_S3_PUBLIC_CUSTOM_DOMAIN = "<cf_r2_custom_domain>"

    # Storage locations
    STATIC_URL = f"https://{AWS_S3_PUBLIC_CUSTOM_DOMAIN}/{STATIC_LOCATION}/"
    MEDIA_URL = f"https://{AWS_S3_PUBLIC_CUSTOM_DOMAIN}/{PUBLIC_MEDIA_LOCATION}/"  # new

    STORAGES = {
        "default": {
            "BACKEND": "images.storages.PublicMediaStorage",
        },
        "private": {
            "BACKEND": "images.storages.PrivateMediaStorage",  # new
        },
        "staticfiles": {
            "BACKEND": "images.storages.StaticStorage",  # new
        },
    }
else:
    # Local disk configuration
    STATIC_URL = "/static/"
    STATIC_ROOT = BASE_DIR / "staticfiles"
    MEDIA_URL = "/media/"
    MEDIA_ROOT = BASE_DIR / "mediafiles"

    STORAGES = {
        "default": {
            "BACKEND": "django.core.files.storage.FileSystemStorage",
        },
        "private": {
            "BACKEND": "django.core.files.storage.FileSystemStorage",
        },
        "staticfiles": {
            "BACKEND": "django.contrib.staticfiles.storage.StaticFilesStorage",
        },
    }
Finally, change the model's ImageField.storage accordingly:
# images/models.py

class PublicImage(models.Model):
    file = models.ImageField(upload_to="images/", storage=public_storage)
    # ...


class PrivateImage(models.Model):
    file = models.ImageField(upload_to="images/", storage=private_storage)
    # ...
Don't forget about the import:
from images.storages import public_storage, private_storage
Also, add the following at the bottom of core/urls.py if you wish to serve static and media files when USE_CF_R2 is disabled:
# core/urls.py

if not settings.USE_CF_R2:
    urlpatterns += static(settings.MEDIA_URL, document_root=settings.MEDIA_ROOT)
    urlpatterns += static(settings.STATIC_URL, document_root=settings.STATIC_ROOT)
Testing
Ensure everything works by first collecting the static files:
(venv)$ python manage.py collectstatic --noinput

# 0 static files copied, 141 unmodified.
Next, open your favorite web browser, navigate to http://localhost:8000 and upload a public and a private image.
By checking the image sources, you'll notice that the public images use the public development URL we've set up, and the private images require a signature to be viewed:
# public (200)
https://pub-0d0...r2.dev/media/images/cute-cat.png

# private (with signature works - 200)
https://d12...r2.cloudflarestorage.com/django-r2-private/private/images/cat.png
    ?X-Amz-Algorithm=AWS4-HMAC-SHA256
    &X-Amz-Credential=00f...
    &X-Amz-Date=20260712T055541Z
    &X-Amz-Expires=3600
    &X-Amz-SignedHeaders=host
    &X-Amz-Signature=3ad...

# private (with no signature fails - 403)
https://d12...r2.cloudflarestorage.com/django-r2-private/private/images/cat.png
Wrapping Up
In this article, you've learned how to store your Django static and media files on Cloudflare R2. You now know how to use the django-storages package and how to handle public and private buckets.
While I love Cloudflare R2, it lacks some of the functionality of AWS S3, most importantly:
- No version control system
- No object-level access controls, only bucket-level
- Weak analytics & no smart tiering
The final source code is available on GitHub.